1
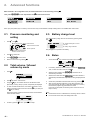
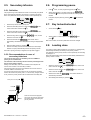
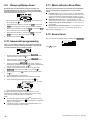
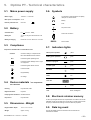
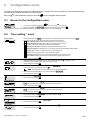
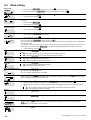
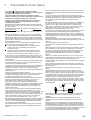
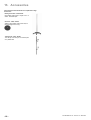
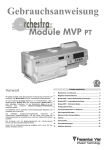
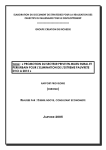
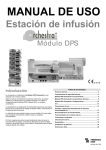
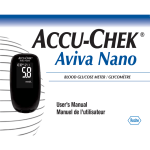
OPERATOR’S GUIDE 237,0$37 Volumetric Infusion Pump Introduction Great care has been taken in the design and manufacture of the Optima PT, a volumetric infusion device. The configuration flexibility of the Optima PT provides overall improvement in the working conditions of medical teams, thus increasing patient safety. The use of this material requires great care. The user must be able to handle the instrument properly and must know how to fully operate. Please read the operator’s guide carefully before putting the device into use. Table of contents 1. Operations for use.......................................................................2 2. Advanced functions ....................................................................4 3. Optima PT - Internal safety features...........................................7 4. Optima PT - Performances........................................................10 5. Optima PT - Technical characteristics .....................................11 6. Configuration menu ..................................................................13 7. Precautions to be taken ............................................................15 8. Maintenance recommendations ...............................................16 9. RS 232 connection ....................................................................17 10. Nurse call connection ...............................................................17 11. Drip sensor ................................................................................17 12. Function with the internal battery ............................................17 13. Accessories ...............................................................................18 14. Disposable .................................................................................19 15. Conditions of guarantee ...........................................................20 16. Useful addresses.......................................................................24 1. Operations for use 1.1. Installation of the Optima PT 1.2.3. Switching on and installation of the infusion set Special attention must be paid to the stability of the Optima PT. The Optima PT can be used on mains or battery . Note: connect device to mains as often as possible to recharge batteries. 1. Connect the power supply cord to the pump and to the mains source. The mains power indicator lights up . 2. Quick check : see protocol page 9. This test is recommended or mandatory (in case of in-forced law): it allows a complete alarms & safety features check. It is recommended before use or when the device has not been used for a long time. Open the pump door by lifting the door handle. The pump automatically switches on when connected to mains (if configurated). If not, press . Auto-test checks functionality of the pump. Make sure that all LED & buzzers are activated. Warning may be displayed at that time. Please refer to the warning section. Check the type of set displayed is the one you are using. 1. Lift pump clamp upward and insert tube as indicated in the drawing. 3 2 1 1.2. Tubing set installation 1. 2. Choose from the range of infusion sets proposed on page 18, the one that best suits the protocol you are using. The infusion set must be in normal temperature conditions: +18°/+30°C. Prepare the solution container (bag/bottle) with its associated infusion line according to the standard infusion procedures. Important: the solution container must be in normal temperature conditions: +18°/+30°C. 2. Insert the tube into left set guide so that the tube is held, in straight position, on the pumping membrane. 3. Insert the tube into air detector by forming a loop. 4. Close the door by pushing the door handle. 1.2.4. Drip sensor 1.2.1. Purge of the set used with a bag 1. Introduce the spike right down into the bag (roller clamp open – air inlet closed). 2. Press the bag in order to remove the air, and fill the drip chamber up to 1/2 of its capacity. 3. Hang the bag upside down, and let the liquid flow into the set. 4. Once the set is completely primed, close the roller clamp and check absence of air bubble. 1. Connect the drop detector plug of to the connection socket on the back of the pump. 2. Connect the drop detector to the drip chamber. Important: control the right positioning of the drip chamber and check there are no drops on the drip chamber walls. Place the container outside the pump 1.2.2. Purge of the set used with a bottle 1. 2. Introduce the spike right down into the bottle (roller clamp open, air inlet closed) Close the roller clamp. 3. Hang the bottle upside down then press the drip chamber in order to fill it till ~ 1/2 of its capacity. 4. Open the roller clamp. 5. Open the air inlet, and let the liquid flow into the set. The container should be placed 20 to 80 cm above the pump Form a short loop between the door and the air detector Ô Í To patient 6. Once the set is primed, close the roller clamp and check absence of air bubble. -2- The set should be positionned in the pump so that it remains loose outside the pump NU OPTIMA PT IS - 1273 rev 0 – 03/12/02 1.4. Information during infusion 1.3. Infusion setting Alarm status (red) Prealarm status (orange) 1.3.1. Setting with Volume / Time / Rate Volume to infuse Infusion duration Drug name (optional) *OXFR FRVVH Infused volume (total I. Vol.) PO Æ Æ Æ flow rate Flow rate (ml/h) Infusion mode type Mains power operation Battery power operation Ì P POO K Volume/time (*) Flow rate Time Drug name (optional) POK Ê Drop indicator (speed related to flow rate if drop sensor connected) In-progress flow indicator 1. Select the volume to infuse with shift to next item with , then confirm and . Caution : the volume set must be the closest possible to the actual volume of the container. All added or removed volumes must be taken into account, including the volumes of fluids contained in the set and lost during priming which must be removed from the volume to infuse (~ 25 ml). 2. 3. . , then confirm and shift to next Select the flow rate with Total volume is displayed when the same drug has been infused and the same infusion mode has been used. Partial volume is displayed when different drugs have been infused or when different modes have been used. , then confirm and Select the infusion duration with shift to next item with (*) In alternance with infused volume : total volume (Total IV) or partial volume (Partial IV). . The infusion duration is automatically calculated and item with readjusted according to displayed flow rate. 1.5. Hold of infusion Press . An audible alarm triggers after 2 minutes. . 4. Check the infused volume. Erase it if desired with 5. Open the roller clamp. Check there is no free flow nor air remaining inside the infusion line. 6. Connect set to IV Infusion site according to good clinical practices. 7. Press 1.6. Change of container 1. Press Note: 2. Close roller clamp. 3. Disconnect set from the old container. 4. Connect set to new container according to good clinical practices. 5. Check fluid level in drip chamber (around half of its capacity) Prime the line if some air remains inside. 6. Program new infusion parameters : flow rate, volume, … 7. Open roller clamp. 8. Start infusion. to start infusion. When the optional drip sensor is used, the volume to infuse can be set at zero. The infusion therefore automatically stops when drops are no longer detected, thus enabling to fully empty the container. When using secondary mode, this setting is stored as primary mode. 1.3.2. Setting with flow rate only to hold infusion. This setting mode is available only if the drop detector is used. POK 1. Select the flow rate with 2. Open the roller clamp. Check there is no free flow nor air remaining inside the infusion line. 3. 4. . Connect set to IV Infusion site according to good clinical practices. Press to start infusion. 1.7. Change of set 1. Press 2. Close roller clamp. to hold infusion. 3. Disconnect set from container. 4. Disconnect set from IV device according to usual clinical practices. 5. Open the door and remove set from pump. 6. Select and prepare new set as indicated above. 7. Program and start infusion as indicated above. 1.8. Turning off the Optima PT Press NU OPTIMA PT IS - 1273 rev 0 – 03/12/02 , then for more than 2 seconds. -3- 2. Advanced functions When activated in the configuration menu, all advanced functions can be reached by pressing Then, press to reach required item and to enter desired screen. /RDGLQJ GRV GRVHH 5DPS XS 'RZ 'RZQQ 3U 3UHHVVX VVXUUH 7R 7RWWDO YROXPH %ROX %ROXVV 6HFRQGDU 6HFRQGDU\\ 6HTXHQWLDO %DWDXWRQRP\ 6RXQG OHYHO . %R %ROOXV 6H 6HFFRQG RQGDDU\ 3DXVH .H\V ORFNHG Note: Upon pump status (stop or infusion), some functions may not be available. Example: loading dose is not available after infusion start. 2.1. Pressure monitoring and setting 2.3. Battery charge level The present battery charge level can be reached by pressing either or 1. Press 3 3 , then : . Ë Line disconnection / Drop in pressure alarm Å Pressure alarm threshold 21 K POK K P P+ J 21 Å Infusion pressure Å Average battery life at current flow rate Å battery charge indication É Dynamic Pressure System See paragraph 9 for operation with battery. to select item. 2.4. Bolus Pressure increase control 2. Press 3. Press 4. Return to main screen by pressing to select value. 1. . 2.2. Total volume / Infused volume by mode 1. Press : 3UHVVX HVVXUUH 7RWDO YRO ROXXPH %DWDXWRQRP\ 2. Press to select “Total Volume”. 3. Using the key, the infused volumes of the different modes (Secondary, Primary, Ramp up / down, Sequential) are displayed. 4. To clear the total infused volume, the infusion should be on hold. Switch to the total volume screen and use the the 3 5, 7R 7RWWDO ,,99 P POO 2. . PPO P PLLQ Q POK PO If necessary, select the volume of bolus to infuse with . Then, confirm and shift to next item with . 3. Select the bolus duration with automatically calculated. . The bolus rate is 4. . The bolus duration is Select the flow rate bolus with automatically calculated and readjusted according to displayed flow rate. 5. Check bolus parameters and start bolus infusion by pressing 6. After the bolus has been delivered, a short beep is emitted. The pump automatically resumes its initial status (stand-by or infusion) and the bolus programming parameters are stored. If the bolus is interrupted, the remaining bolus volume to infuse is kept in memory. key to clear (use P O 93 WRW WRWDDO LQ Confirm by pressing -4- key and enter the bolus function with . key to restore). When total volume is cleared, all infused volumes of the different modes are also cleared. 5. Access with the Notes: Infused bolus volume is subtracted from remaining volume to infuse. For a bolus at infusion start, use loading dose mode. P O K . Then, press to escape. NU OPTIMA PT IS - 1273 rev 0 – 03/12/02 2.5. Secondary infusion 2.6. Programming pause 2.5.1. Definition This programming mode enables the infusion of a secondary line placed above, automatically followed by the infusion of a primary line placed below. The parameters of the primary infusion must be previously set. P POO K K 6( 6(&& 1. Press 2. Select pause duration in minutes and hours with Confirm with emitted. 3. $QWL $QWLEELRWLF LFVV PO PPO POKK 1. Place the drip sensor on the primary line. 2. Select the secondary volume to infuse with confirm and shift to next item with 3. 4. . After the pause has ended, an auditing signal is If required, stop the pause by pressing infusion. to restart the 1. Access with the key. 2. Select locked or unlocked position with . Then, . Then, confirm . press Select the flow rate with . The infusion time is automatically calculated and readjusted according to displayed flow rate. 6. Start secondary infusion by pressing 7. After the secondary infusion has been delivered, a short beep is emitted. The pump automatically resumes the primary infusion. . Note that if opening the clamp is forgotten, the drip alarm triggers. 2.5.2. Recommendations in case of secondary infusions . 2.8. Loading dose This infusion mode enables the delivery of a volume (e.g. loading dose) automatically followed by the delivery of the primary infusion. The parameters of the primary infusion must be previously set according to paragraph 1.3. Note that infused loading dose volume is automatically subtracted from primary volume to infuse. PPO P PLLQ The container of the secondary solution must be placed higher than the one of the primary solution. Setting of the secondary volume to be infused must be equal to the volume of the solution in the secondary container. One must then take into account the variables such as over volume in container, addition of medicines, etc. If a volume lower than the real volume is set, the remaining secondary solution will infuse at the primary rate. If, on the contrary, a higher volume is set, part of the primary solution will be infused at the secondary rate. Î and Note: when locked, the infusion parameters cannot be changed. The use of the drop sensor is mandatory. The use of MS80 as primary set is recommended. Primary , or . 5. Gravity set or secondary set . . Then, . Select the drug name (optional) with and shift to next item with key. 2.7. Key locked/unlocked Select the secondary infusion duration with confirm and shift to next item with twice, or reach programming pause with PO 1. Select the volume to infuse with shift to next item with 2. PO POK . Then, confirm and . . Then, confirm and Select the infusion duration with shift to next item with . . The infusion duration is 3. Select the flow rate with automatically calculated. 4. Start loading dose delivery by pressing . Î Drop sensor Î ÍMS 80 Note: the set must be equipped with a one way valve to prevent the secondary solution from filling the primary container. NU OPTIMA PT IS - 1273 rev 0 – 03/12/02 -5- 2.9. Ramp up/Ramp down 2.11. Micro Infusion Flow Rate By setting ramp up and ramp down durations, the pump will automatically increase the flow rate to reach in ten intermediate steps the plateau flow rate and, at the end of the infusion plateau, decrease the flow rate down to zero. When the micro infusion flow rate is activated (see Configuration menu), a decimal digit is displayed both for flow rate and for volume. K POK K K PO K K 1. Select the volume to infuse with shift to next item with 2. . , in hours with Select ramp-up duration in minutes with . , in hours with Select ramp-down duration in minutes with Start infusion by pressing Bolus Flow rate range : from 0.1 ml/h to 300 ml/h, 0.1 ml/h increment from 0.1 to 100 ml/h, 1 ml/h increment above 100 ml/h. Volume limit range for primary infusion : 0.1 ml to 1000 ml, 0.1 ml increment. Volume limit for secondary infusion : 0.1 ml to 1000 ml, 0.1 ml increment from 0.1 to 100 ml; 1 ml increment, above 100 ml. Note: volume is displayed at ± 0.1 ml. . . Then, confirm and shift to next item with 5. , in hours with Select total infusion duration in minutes with Then, confirm and shift to next item with 4. Flow rate range : from 0.1 ml/h to 100 ml/h, 0.1 ml/h increment. In order to insure a high flow rate accuracy, the lower limit is set at 0.5 ml/h (see Precaution to be taken before use page 15). For a setting as of 0.1 ml/h, contact our After-Sales Service Department. . Then, confirm and . The sustaining flow rate is then automatically calculated. 3. . 2.12. Sound level . The sound level can be adjusted with the selection keys . 2.10. Sequential programming From 1 up to 20 infusion sequences can be defined in volume to infuse and rate of infusion. Pause periods (Stop) or KVO periods could also be defined in the sequence program: 1. Select the volume of the first sequence with . Then, . Select the duration of the first sequence with confirm and shift to next item with 3. to confirm. PO W PO POK KK KK KK confirm and shift to next item with 2. Press . Then . Select the flow rate with . The infusion duration is automatically calculated and readjusted according to displayed flow 4. . rate. Confirm and shift to next item with Activate or de-activate beep at the end of the sequence with 5. Select next sequence with 6. 7. . with Set new sequence(s) in the same way. End last sequence by selecting “end” as last volume to infuse. 8. Check programming sequences and confirm with . Then, confirm and shift to next item with . , and shift to next volume to infuse key. Number of pending sequence / out of total number of sequence Ë 7RWD RWDOO ,9 PPO PPOO K K PO POKK 9. Start sequential infusion by pressing . Changes in the sequence program will become active only if the sequences are re-started or have not already been reached. A beep sound could be activated at each end of a sequence. Notes : To modify the ongoing sequence, press , change the ongoing sequence parameters and press key to validate. The sequential program is not modified. If sequence program is modified during sequential infusion, only forthcoming sequences will be modified. -6- NU OPTIMA PT IS - 1273 rev 0 – 03/12/02 3. Optima PT - Internal safety features Optima PT has a continuous inspection system which functions as soon as the pump is in use. Any internal failure or anomaly detected will be immediately displayed. Nevertheless, the qualified personnel in your establishment or our After-Sales Department should always be notified of any abnormal function where no specific cause can be found. 3.1. Optima PT – Alarms, pre-alarms and warnings All alarms are displayed with a flashing red light at the left of the front panel and are indicated with an audible signal. The audible signal can be switched off for 2 minutes by pressing . All pre-alarms are displayed with an orange light flashing on the left side of the front panel. All alarms are displayed with a red light flashing on the left side of the front panel. The right LCD display provides explanations about alarms, pre-alarms and warnings : Message on LCD display Meaning Door open alarm. Infusion stops. 'RRU RSHQ Causes Door is open. Actions to do Close the door. Check tube positioning. ,QVHUW VHW $LU LQ OLQH P POO K K Set insertion alarm. Infusion can not be started. Set mis-positioned. Check set insertion. Air Alarm. Infusion stops. The volume of air in line is above limit. Remove air bubble in line by priming set according to facility protocol. Set is not properly inserted in air detector. Check set positioning in air detector. End of infusion pre-alarm. Infusion continues. 5 minutes or 5% volume before volume limit is reached. Check if remaining volume in container is in accordance with remaining volume to infuse. If needed, prepare container for a new infusion sequence. End of infusion alarm. Infusion continues in KVO mode. Volume limit is reached. If needed, set a new infusion sequence. In case of use with drip sensor only : Empty container. Check container. Roller clamp closed. Check roller clamp. Drip sensor is not properly positioned. Check air-inlet cap (if bottle is used). * OXF OXFRRVH P POO POK * OXF OXFRRVH PPO 'ULS VHQVRU PPO K K . 92 Flow control alarm Infusion stops. Check drip sensor positioning. Drip sensor has been placed onto the secondary line. Check fluid level in drip chamber. Drip chamber over filled. Check set. Check the fluid temperature. &KHFN VHW In case of use with drip sensor only : Over-flow. Open the door and check set positioning. Mispositioning of infusion set. Check drip sensor positioning. Set positioning Infusion stops. RFFOXVLRQ Downstream occlusion alarm. Infusion stops. NU OPTIMA PT IS - 1273 rev 0 – 03/12/02 Downstream pressure in line Check infusion line. exceeds pressure threshold Check if pressure threshold is set in programmed. relation to flow rate. -7- Message on LCD display Meaning Actions to do Upstream pressure in line is too low. Empty bag. Roller clamp closed. Air inlet cap is closed (if bottle is used). Occlusion pre alarm. Infusion continues. In-line pressure has reached Check the infusion line. 50 mmHg below pressure threshold. Set proper pressure threshold. Pressure drop warning. Infusion continues. Pressure in line is dropping. Check downstream luer lock connection. Pressure increase warning. Infusion continues. Pressure in line is increasing. Check downstream line. Upstream occlusion alarm. Infusion stops. RFFOXVLRQ Causes Check container. Check roller clamp. Check container height. Check air inlet cap (if bottle is used). orange (on front panel) PP+ P+JJ 3 21 3 2 )) 3 21 PP+ P+JJ 3 21 Check if pressure threshold is in accordance with flow rate. Low battery pre-alarm. Infusion continues. The prealarm is activated at least 30 min before the battery alarm when the battery is properly charged. Battery life is low. Connect Optima PT to the mains. Discharged battery alarm. Infusion stops. Pump will automatically switch off after 5 minutes. Battery charge is over. Connect Optima PT to the mains. Motor rotation alarm. Infusion stops Control signal failure. Technical alarm. Infusion stops. Pump can not start. Technical failure. (LED display) 3UHYHQWLYH Occlusion It is time to conduct the preventive maintenance. Maintenance date has been to continue normal operation. Press reached or total running time Contact Service Department to plan is over. pump servicing in the coming months. The set is in the pump for long time and needs to be removed to control pump functions. The pump has been switched on and off with a set installed for more than 24 hours. Remove the set from air detector and install it again. The pump retains the infusion parameters for more than 6 hours. This is independent of the total infused volume that can be permanently stored. Select "No" to reset infusion parameters. The pump has been out of mains power for a long time. Set date and time and charge the battery. orange (on front panel) K (U, (U; (U (LED display) (U PDLQWHQDQFH SDVVHG SDVVHG +UV SDVVHG 5HPRYH DQG LQVHUW VHW IRU DXWRWHVW 3URJUDP LQWHUUXSWHG Occlusion FRQWLQXH " <HV 1R The pump has been turned off while the volume to infuse has not been reached. You can decide to resume the infusion from the point when the pump was turned off or to reset the infusion parameters. Set date and time. to resume the device to normal Press operation. Note error code and contact the qualified technicians in your establishment or our After-Sales Department. If this warning persists, contact the qualified technicians of your establishment or our after-sales service. Select "Yes" to resume the infusion. 3URFHHG WR EDWWHU\ FKDUJH -8- NU OPTIMA PT IS - 1273 rev 0 – 03/12/02 3.2. Quick check This test is recommended or mandatory (in case of in-force law). It allows a complete alarm and safety features check of the Optima PT (no patient connected). Serial number (ID/N): ............................. Date: ..... / ..... / ..... Department: ........................ Name: ............................. Results YES NO YES NO Install set (filled with fluid) without positioning the tube in the air sensor : - close the door and check message : DLU LQ OLQH YES NO 4. Insert the tube in the air sensor. The air alarm message disappears. YES NO 5. Set infusion parameters – 500 ml/h (no patient connected). - start infusion. 6. Clamp the upstream line with the roller clamp: - check upstream occlusion alarm (less than 15 seconds). YES NO 7. Open roller clamp. 8. Start infusion (500 ml/h) and clamp the downstream line: - check occlusion alarm (less than 15 seconds). YES NO 9. Unclamp the downstream line. Open the door: - check that there is no more than 3 drip falling in the drip chamber. YES NO 1. Switch the pump ON, pressing the - check buzzer and LEDs test. 2. Open the pump door : - check message: GRRU 3. key, without tube: RSHQHG Quick check is OK if answers are “yes” for all items. NU OPTIMA PT IS - 1273 rev 0 – 03/12/02 -9- 4. Optima PT - Performances 4.1. Flow rate available from keyboard selection 4.8. Change set interval From 1 to 1000 ml/h, 1 ml/h increment. We recommend to change the set after 72 hours of use or 7 liters. We recommend to change the set after 24 hours and/or 2.5 liters for very tight flow rate accuracy (check local protocols). In micro infusion mode: from 0.1 to 100 ml/h, 0.1 ml/h increment. 4.2. Volume limit and volume infused 4.9. Volume / Time and rate setting From 1 to 9999 ml, 1 ml increment, displayed at ± 1 ml. The device operates at the displayed rate. The time entered is readjusted according to the formulae: In micro infusion mode: from 0.1 to 1000 ml, 0.1 ml increment. Time = 4.3. Time limit From 0h01’ to 96h00’, 1’ increment, displayed at ± 1’. 4.4. Pressure limit threshold From 100 to 900 mmHg, 50 mmHg increment. ± 75 mmHg, or ± 15%. 4.5. Dynamic Pressure System (DPS) 4.10. Response time & bolus release after occlusion alarm according to infusion flow rate for VS tube Flow rate Threshold value mmHg Response time h/min/sec Bolus ml 1 ml/h 100 < 12’ < 0.1 300 < 30’ < 0.15 750 < 1h15’ < 0.25 100 < 12’’ < 0.15 300 < 45’’ < 0.15 750 < 2’30’’ < 0.25 100 < 6’’ < 0.15 300 < 20’’ < 0.15 750 < 45’’ < 0.25 Pressure increase Anticipates an occlusion during infusion, recommended for low flow rates when quick occlusion detection is required. 25 ml/h Pressure drop A pressure drop indication may be a warning of infusion line disconnection. Can be used to prevent disconnection when a significant pressure is present in the infusion line. 4.6. Air detection Default setting: 250 µl, detected as a single bubble or cumulated volume air over a period of 15 minutes, from bubble sizes above 50 µl. Resolution of sensor : ~ 10 µl. Volume to infuse Rate displayed 100 ml/h To reduce bolus and occlusion detection delay at low flow rates we recommend you to select the appropriate threshold value according to your needs and the above table. These values can be adjusted in ward setting menu (refer to “Ward setting menu” paragraph, page 14). 4.11. Programmed Bolus Infusion 4.7. Average flow rate accuracy Volume infused accuracy : deducted from tube accuracy versus volume/time programmed, or ± 0.1 ml. VS sets PVC type or VS sets PVC free type or MCM 400 Flow rate accuracy ± 5% first 24 hours. ± 10% (*) between 24 and 72 hours. Fresenius Infudrop Air PD, Codan PVC (Pressure), Braun Intrafix, BD Ohmeda R 87 P: Flow rate accuracy ± 10% (**) over period of 24 hours. These values are given for an intermediate flow rate of 100 ml/h and when the tube type is selected on the device (see technical manual). (*) A better accuracy, over a long period of time, can be obtained by regularly shifting the tube segment in contact with pumping system every 24 hours. (**) Tested on one batch. Contact tube’s manufacturer for batch dispersion. 4.12. Ramp up/down mode Flow rate accuracy : following average flow rate accuracy with recommended set. 4.13. Sequential mode Flow rate accuracy per sequence: following average flow rate accuracy with recommended set. 4.14. KVO Rate Activated when the volume to infuse is reached. 3 ml/h for 30 minutes for flow rate selection above 3ml/h, set flow rate for 30 minutes for flow rate below 3 ml/h. - 10 - NU OPTIMA PT IS - 1273 rev 0 – 03/12/02 5. Optima PT - Technical characteristics 5.1. Mains power supply Mains supply 5.6. Symbols 100-240 V ~ / 50-60 Hz The operator's guide should be completely read prior to use the device Maxi. power consumption 50 VA Battery Internal protective fuse 630 mAT Fuse 5.2. Battery Drip sensor inlet Characteristics 6V Battery life 4 h min for any flow rate lower than 125 ml/h Battery recharging Device off: 5 hours / Device on: 16 hours 2.7/3 Ah - NiMH Nurse call connection RS232 RS 232 outlet 5.3. Compliance 5.7. Indicators lights Compliance with EN 60 601-1 and EN 60 601-2-24. CE 0459 IP31 Class I Mains power operation yellow Battery power operation green Protection against leakage current: Type CF equipment Infusion in progress green Protection against electric shocks Confirm signal green Pre-alarm orange Alarm red CE 0459 marking in compliance with EEC 93/42 Medical Device directive Protection against splashing fluid Functional earth Equipotentiality dc voltage Flow rate 5.4. Device materials : all components green are Latex free Housing Polycarbonate, ABS Keyboard & labels Polyester Pumping track membrane EPDM Elastomer Drip sensor Polycarbonate 5.5. Dimensions - Weight Height / Width / Depth 13.5 x 17.5 x 14.5 cm Weight approx. 2.9 Kg NU OPTIMA PT IS - 1273 rev 0 – 03/12/02 Drop Green LCD Black, backlighted 5.8. Electronic retainer memory In case of prolonged switched off, all parameters of the device are stored indefinitely except for the date which is lost after 3 months storage. When the pump is switched ON, settings of the new date are proposed. 5.9. Data log event The last 764 dated events are stored and can be read with the maintenance software. - 11 - 5.10. Curves Trumpet curves demonstrate the evolution of the minimum and maximum variance of the PUMP / SET combination versus flow rate. The test protocol used to obtain these results is described in the EN 60 601-2-24. For further information, please refer to this publication. Use these curves to determine the accuracy depending upon your infusion protocol / drug / dilution. Sequential and Ramp up / down curves are given for a typical representative programming protocol parameters: Sequential: 40 ml/h for 10 ml, 100 ml/h for 30 ml, 5 ml/h for 1.5 ml, 40 ml/h for 6 ml. Ramp up / down: Ramp up time setting: 15 minutes, Ramp down time setting: 15 minutes, Stabilised flow rate: 115 ml/h, Total volume to be infused: 70 ml. These graphs are therefore representative of VS PVC type sets during trials and serve as an indication only of the pump’s overall performance. Please contact our after-sales department for other curves. Trumpet curves for 2, 5, 11, 19, 31 minutes observation windows 25 ml / hour: % variance from nominal flowrate 1 ml / hour: Accuracy upper limit (+5%) % variance from nominal flowrate max Accuracy upper limit (+5%) Accuracy lower limit (-5%) 100 ml / hour: max min Accuracy lower limit (-5%) % variance from nominal flowrate 5.10.1. Accuracy upper limit (+5%) max min Accuracy lower limit (-5%) min Observation windows (min) Observation windows (min) 5.10.2. Observation windows (min) Flow rate / time curves: start-up and instantaneous flow rate (in ml/h, measured every 30”) versus time (in second). 25 ml / hour: 100 ml / hour: Flow rate (ml/h) Flow rate (ml/h) Flow rate (ml/h) 1 ml / hour: time (minutes) 5.10.3. time (minutes) Curves for micro infusion mode Trumpet curves at 0.5 ml / hour: Instantaneous flow rate at 0,5 ml / hour: 1.4 1.2 40 20 Flow rate (ml/hr) % variance from nominal flowrate 60 max Accuracy upper limit (+5%) 0 Accuracy lower limit (-5%) -20 min 1.0 0.8 0.6 0.4 -40 0.2 0 -60 2 5 5.10.4. 11 19 Observation windows (min) 0 31 1000 2000 3000 4000 time (second) 5000 6000 7000 Flow rate / time curves: sequential mode, ramp up / ramp down mode 40 ml/h for 10 ml, 100 ml/h for 30 ml, 5 ml/h for 1.5 ml, 40 ml/h for 6 ml 120 Ramp up : 15’, Ramp down : 15’, Stabilised flow rate : 115 ml/h, Total vol. : 70 ml. 140 measured flow rate Set flow rate 100 measured flow rate Set flow rate 120 100 Flow rate (ml/hr) 80 Flow rate (ml/hr) time (minutes) 60 40 20 80 60 40 20 0 0 - 12 - 500 1000 1500 2000 2500 time (seconds) 3000 3500 4000 0 0 500 1000 1500 2000 time (second) 2500 3000 NU OPTIMA PT IS - 1273 rev 0 – 03/12/02 6. Configuration menu Fresenius Vial recommends the presence of its qualified personnel or a member of the Technical Department of your establishment to help you implement the configuration procedures you wish to choose. Note: press to cancel modification at any time - Press OFF to leave configuration mode at any time. 6.1. Access to the configuration menu 8VHU VHWWLQ WLQJJ :DUG VHWWLQJ 0DLQWHQDQFH 1. To access configuration menu, press key. Then, keep key pressed. , and enter in required item by pressing 2. Select required item with Note: Maintenance setting is accessible by Bio Medical Technicians. Please refer to the Technical Manual. . 6.2. “User setting “ menu Infusion modes 1. Select required item with and activate with a tick or de-activate required item by pressing All infusion modes with a tick will be proposed when switching the pump on. . g Micro-infusion mode: display of one decimal from 0,5 ml/h to 99,9 ml/h. Setting with flow rate only: infusion with no volume limit and no time limit (end of infusion when empty container is detected by drop detector). Ramp-up / Ramp down: progressive increase and decrease of flow rate. Sequential infusion: programming of 1 to 20 infusion sequences automatically linked together. Loading dose: infusion of a loading dose prior to primary infusion. Bolus: infusion of a bolus before or during a primary infusion. 6(& Secondary infusion: infusion of a secondary line followed by the primary infusion. Lock function: enables the locking of key board after the infusion has been set. KVO (Keep vein open) PO K P LQ .92 PPOO Pressure setting Confirm setting by pressing 1. 2. Select KVO rate from 0 (no KVO) to 20 ml/h. Then, shift to next item with Select silence alarm duration during KVO from 2 to 30 minutes. 3. Confirm setting by pressing 1. PP+J 3 PP+J Drug display selection 21 2)) Primary drug list *O *OXXFRVH *O *OXXFRVH *OXFRVH Secondary drug list *O *OXXFRVH *O *OXXFRVH *OXFRVH Time setting Language )U )UDDQFDL QFDLVV (Q (QJJOLV OLVKK 'HXWVFK LCD contrast /&' FR FRQQWU WUDDVW . 2. increment 1 ml/h. . Select pressure threshold from 100 to 900 mmHg with . This threshold will be proposed when . switching the pump on. Shift to next item with PP+J recall of the last pressure threshold when the pump is switched on. 2. Select pressure drop threshold from 100 to 500 mmHg with 3. Confirm setting by pressing 1. Select by pressing 2. Confirm setting by pressing 1. Select required drug name with 2. Confirm setting by pressing 1. Select required drug name with 2. Confirm setting by pressing 1. Select value by pressing 2. Confirm setting by pressing 1. Select desired language by pressing 2. Confirm setting by pressing 1. Increase contrast by pressing or decrease contrast by pressing 2. Confirm setting by pressing . . whether you wish the drug name to be displayed. . . Then, activate with a tick or de-activate required drug name by pressing . All drug names with a tick will be proposed in primary drug list. . . Then, activate with a tick or de-activate required drug name by pressing . All drug names with a tick will be proposed in secondary drug list. NU OPTIMA PT IS - 1273 rev 0 – 03/12/02 . . Then, shift to next item with . . . . . . - 13 - 6.3. Ward setting Ward setting :DUG VHWWLQJ &RG &RGHH Ward name 5HD HD&&DUGL DUGLRR User code &RG &RGHH Bolus reduction during occlusion release 21 2) 2))) Maximum rate 1. Enter code with 2. Select required item with 1. Select desired letter with 2. Confirm setting by pressing = 250 µl/15min 50 µl and enter the required item by pressing . Shift to next letter with Volume screen 21 2) 2))) Infused volume stored at power off 21 2) 2))) Keep interrupted program for K K Infusion modes transition Pre-Alarm 9RO PLQ 21 Buzzers . . 1. Enter code with 2. Confirm setting by pressing 1. Select by pressing 2. Confirm setting by pressing 1. Select by pressing the maximum flow rate you wish to allow during infusion setting (valid for all infusion modes except bolus and loading dose). . whether you wish to activate bolus reduction after release of an occlusion. . 2. Confirm setting by pressing . st 1 parameter: cumulated air volume over a period of 15 minutes after which the air bubble alarm will trigger: select value from 30 to 1000 µl with . Shift to next item with . Note: a continuous air bubble greater or equal to the cumulated programmed volume will trigger an alarm independent from the time period. nd 2 parameter: minimum air bubble size you wish to take into account within the cumulated air volume over 18 minutes. 1. 21 2) 2))) . . Select value from 10 to 200 µl with Fixed initial parameters (pre-set code is 200). The user code is settable from 0000 to 9999. If user code is set at 0, the user setting menu is then accessible without code entry. POKU Air bubble size , and confirm by pressing Confirm setting by pressing . If 1 is selected, all detectable bubbles will be taken into account. . Select by pressing whether you wish to fix infusion parameters (rate, volume, drug name…) for all infusion modes : 21 : when switching the pump on, the same parameters are always proposed. 2)) : when switching the pump on, the last set parameters are proposed. Select by pressing whether you wish to display the volume screen : 21 : display of the volume screen during infusion. 2)) : display of the infusion setting during infusion. Select by pressing whether you wish the last infused volume to be recalled when switching the pump on : 21 : recall of the last volume (enabling cumulating). 2)) : total volume infused is pre-set at 0. Select by pressing the time you wish the last infusion parameters to be recalled when switching the pump OFF then ON. From 0 h 15 to 24 h 00. If 0 h 00 is selected, parameters are not recalled. Select required item with . Activate with a tick or de-activate required item by pressing beeps to be triggered after advanced infusion mode. whether you wish 3 Select required item with , adjust value by pressing , Confirm setting by pressing . 1. Remaining infusion time which triggers an end of infusion pre-alarm : from 5 to 30 minutes. 1. Remaining volume to infuse (in % of total volume to infuse) which triggers an end of infusion pre-alarm from 0 to 15%. 21 : end of infusion pre-alarm is always activated when the first above condition is reached. 2)) : end of infusion pre-alarm not activated. Select by pressing the type of buzzer type 1 or type 2. Select by pressing the activation of automatic switch ON at door opening (when connected to mains). Automatic ON 21 2) 2))) Screen with Mode key 3DX 3DXVVH %DWWHU\ OLIH Serial link speed %DXGV Select by pressing the items which can be reached from the Mode key in the menu : Pause, Battery life. allows you to shift from an item to another. Select by pressing the serial link speed. %DXGV %DXG XGVV %DXG XGVV - 14 - NU OPTIMA PT IS - 1273 rev 0 – 03/12/02 7. Precautions to be taken The symbol , visible inside door label of the device, recommends this Operator's Guide should be completely read in accordance with the EN 60 601-1 Standard. Fresenius Vial will not be liable for any damages or claims, medical or otherwise, of any nature whatsoever, whether direct or consequential, caused by improper use of this device. In order to insure that all the safety features of the device are activated, the pump should be switched ON prior to being connected to the patient. Special attention must be paid to the stability of the device. Use the device in horizontal position, on a table, or with the incorporated clamp for using on a pole. Fresenius Vial recommends not to place the pump higher than 1,3 metre above patient. Container must be placed on a range of 50 cm above the pump ± 30 cm. During all manipulations on the pump or on the set (set installation, door opening, set removal), make sure the line is closed near to the injection device with a clamp or a stopcock. If they are not available, we recommend a back check valve to be assembled on the injection device in order to avoid any pressure variations which may occur due to the compliance of the line. Recommendations to improve performances and safety when the pump is commonly used at low flow rates (≤ 20 ml/h) : Limit the range of available flow rates in accordance with the maximum flow rate to be used with your protocol (see configuration menu); The time to detect a downstream occlusion being conversely proportional to the flow rate, it is recommended to lower the pressure limit in order to gain in time to detect an occlusion. For the infusion of very short half life drugs at flow rate below 5 ml/h, we recommend the use of syringe pumps which usually offer better performances of instant flow rates. Check instant flow rate curves and trumpet curves. We recommend you partially or completely recharge the battery when you receive the device or in the case of prolonged storage so as to prevent all risks of premature discharge. To preserve the environment, remove the battery from the device prior to destruction or at the end of the device life and as during normal maintenance replacement, return it to a competent recycling organisation. Proceed in the same way for the device itself (electronic boards, plastics…). Avoid short circuit and excessive temperature. Anaesthetic substances: the device must not be used in the presence of inflammable anaesthetic agents due to the risk of explosion. It should always be used away from all risk areas. The device is designed to infuse any medical substance that can be injected in normal conditions of temperature: +18°/+30°C. The physiological effects of medicine can be influenced by the characteristics of the device and the associated disposable (constitution material is commonly listed on the set packaging). Check that they are compatible with prescriptions, the characteristics of trumpet curves and occlusion alarm setting times in relation to the programmed flow rate. When using the pump with protocols including refrigerated solution, check normal temperature of the solution container (+18°/+30°C) before the installation of the infusion set into the pumping system. This medical device complies with IEC 60 601-2-24 for environmental range of use (+ 5°C to + 40°C, 20% to 90% relative humidity) but due to the range limitation condition of the solution to be infused, we recommend a normal use condition from + 18°C to + 30°C. Use only disposable proposed in this Operator’s Guide in accordance with local standard operating procedures and good clinical practices. Using non recommended disposable could lead to serious hazards such as free flow or pump degradation. After the disposable is primed, check the integrity of the connected disposable to patient (no leak, no air, especially after the air bubble sensor). NU OPTIMA PT IS - 1273 rev 0 – 03/12/02 Fuses should be replaced by equivalent parts. This should be done by a qualified technician. Refer to the part list of the technical manual for full specification. The pump may only be connected to the mains with the power cord supplied by the manufacturer. Check that the mains voltage corresponds with the value indicated on the label placed underneath the device. Do not exceed the permitted voltage on the different external connections. The settings parameters which have been modified but not validated by the users, or the ones which are proposed after the pump has been switched on may trigger an alarm after a while. The default values which are then proposed by the pump may vary according to ongoing status (Start-up, Stop, Infusion). In any case, check the setting parameters are in accordance with the one you wish. This device can be disturbed by a strong electromagnetic fields, external electrical influences and electrostatic discharges above the limits stipulated by EN 60 601-1-2 and EN 60 601-2-24 (e.g.: mobile phones, surgical equipment leads close to the pump). It can also be disturbed by environmental pressure or pressure variations, mechanical shocks, heat ignition sources, etc. Standard precautions should be taken to prevent contamination or injuries while discarding the associate waste disposables (e.g. extension sets, etc.). High inline depression may create free flow. Only use luer lock connection to prevent disconnection due to infusion pressure. Make sure that all connection tubes and other infusion devices, that may be connected to this pump, will resist to a pressure up to 2000 HPa. Do not use in conjunction with positive pressure infusion devices, that could generate backpressure higher than 1500 HPa, susceptible to damage infusion disposables and the device (e.g. contrast fluid devices). While in use, negative pressure variation may occur in the line, by the relative height from the device to the injection site or by combination with pumping devices such as blood pump, alternative clamp, etc. Pressure variation may generate flow rates fluctuation mainly noticeable at low flow rates. When the reservoir is placed higher than the injection site, please pay attention to manipulate the set only when it is clamped or disconnected from patient side. Make sure that infusion line does not hinder moving parts of other devices. Fresenius Vial recommends the use of one way valves or positive pressure infusion devices for multi-line infusions. If there is no one way valve on a gravity infusion line during a multi-line infusion, this will make it impossible to detect occlusions on the patient side, and could result in accumulation of the drug being infused in the gravity line, which could later be infused in an uncontrolled manner when the occlusion is released. Place the connection between the gravity line and the pumpdriver line as near to the start of the set as possible in order to minimise the dead space and consequently the impact of any change in flow rate on the gravity line. Solution container One way valve Infusion pump All computer systems connected to the RS 232 link on the base must meet the safety features, as in the IEC 950 standard for computer interfaces. Fresenius Vial will not be responsible whatsoever for use of any interface communication between the Optima pump and computer systems. Opening the pump or the battery cover must only be carried out by the qualified personnel in your establishment, and taking all the necessary technical precautions. Non-respect of these procedures is dangerous to the personnel and may damage the pump. We recommend you follow the maintenance procedures defined in the Technical Manual. To obtain a copy of the Technical Manual, please contact our After-Sales Department specifying the identification number of the device. - 15 - 8. Maintenance recommendations 8.1. Cleaning and disinfection 8.3. Servicing The device forms part of the patient’s immediate environment. It is advisable to clean and disinfect the device’s external surfaces on a daily basis in order to protect patient and staff. To ensure normal performance of the device, it is recommended to replace the internal battery every 3 years. This should be done by a qualified technician. Disconnect the device from its mains supply before starting to clean. The qualified technicians in your establishment or our After-Sales Department should be informed if the device is dropped or if any Do not place in an AUTOCLAVE nor IMMERSE the device. Do not let malfunction occurs. In this case the instrument must not be used. For fluids enter the device’s casing. further information please contact our After-Sales Department. If the device is placed in a high contamination risk unit, it is advisable If the device has to be returned to our After-Sales Department, proceed to to leave it in the room during aerial disinfection, after having its cleaning and disinfection. Then, pack it very carefully, if possible in its disinfected it with a moist cloth. original packaging, before shipping. Use a cloth soaked in DETERGENT-DISINFECTANT, previously Fresenius Vial is not liable for loss or damage to the device during diluted with water if required, to destroy micro-organisms. Avoid transport to our After-Sales Department. abrasive scrubbing which could scratch the casing. Do not rinse or wipe surfaces. Do not use: TRICHLOROETHYLENE-DICHLOROETHYLENE AMMONIA - AMMONIUM CHLORIDE - CHLORINE and AROMATIC HYDROCARBON - ETHYLENE DICHLORIDE-METHYLENE CHLORIDE - CETONE. These aggressive agents could damage the plastic parts and cause device malfunction. Take care also with ALCOHOL BASED SPRAYS (20% - 40% alcohol). They lead to tarnishing of and small cracks in the plastic, and do not provide the necessary cleaning prior to disinfection. Using disinfecting applies by SPRAYS may be done, in accordance with the manufacturer recommendation, from a distance of 30 cm of the device, avoid the accumulation of the product in fluid form. Please contact the appropriate service, handling suitable cleaning and disinfection products, in your establishment for further details. 8.4. Regular inspections In order to insure that the device is functioning optimally, regular inspections of the device are recommended every 12 months. A regular control check consists of various inspection operations listed in the Technical manual. These control checks must be performed by an experienced technician. There are not covered by any contract or agreement provided by Fresenius Vial and are under the responsibility of the User. Note: failure to comply with these maintenance procedures can damage the device and lead to a functional failure. 8.2. Storage The device should be stored in a dry, cool place. In case of prolonged storage, the battery should be disconnected. This should be done by a qualified technician. Permissive relative humidity: from 20% to 90%, no condensation. Storage temperature: -10°C + 60°C. - 16 - NU OPTIMA PT IS - 1273 rev 0 – 03/12/02 9. RS 232 connection RS232 The installation as well as the use of the infusion pump via a RS 232 interface must be in compliance with the installation protocol described in the Technical Manual of the device. For further information, please contact our After-Sales Department. 12. Function with the internal battery The device contains an internal battery which automatically takes over when the mains supply is disconnected and ensures normal function with no loss of the programmed data. Operation from the battery is visualised by the battery indicator 10. Nurse call connection The nurse call connection, situated on the back of the pump, enables the connection of the device to a nurse call. For further information, please contact our After-Sales Department. . 12.1. Recharging the battery To recharge battery, just connect the pump to a mains power supply. . Recharging of the battery is visualised by the mains indicator 12.2. Recommendations The battery should be replaced every 3 years or according your local servicing recommendations. 11. Drip sensor 1. Connect the drop detector plug of to the connection socket on the back of the pump. 2. Connect the drop detector to the drip chamber. The loading charge indicator may be affected (lower battery life) if the battery is out of order or too old. Important: control the right positioning of the drip chamber and check there are no drops on the drip chamber walls. NU OPTIMA PT IS - 1273 rev 0 – 03/12/02 - 17 - 13. Accessories Fresenius Vial recommends the use of Optima PT range accessories. Rolling stand 180 - Cat # 073070 High stability rolling stand - Height 1.80 m - 5 rollers - Burnished pole. Cast iron - Cat # 073074 Added to high stability rolling stand 180, for live loads higher than 16 kg. Transrail 120 - Cat # 073071 Two clamps which firmly fix a burnished pole on 2 parallel rails. - 18 - NU OPTIMA PT IS - 1273 rev 0 – 03/12/02 14. Disposable 14.1. VS range 14.2. Other PVC giving sets In order to use the Optima PT pump in best conditions and cover most applications, we have developed a complete range of sterile disposables: the VS series. Fresenius Vial recommends the use of the following sets : Due to the quality and diversity of this range, you are offered a selection of high performance administration sets. Designation VS 10 - Infusion set with 15 µ filter - L ~ 240 cm MCM400 infusion set (Fresenius MCM) VS XX sets (Fresenius Vial) Fresenius Infudrop Air PD Codan PVC (Pressure) Braun Intrafix BD Ohmeda R 87 P The choice of the set to be used with the pump should be selected in the Configuration menu : Maintenance / Configuration / SAV2 Set selection. VS 20 - Infusion set with 100 µ filter and male or female luer lock L ~ 250 cm MCM400 infusion set and VS XX set ranges are made of bio-compatible plastic materials Single use, with 5 year shelf life. MCM400 & VS XX infusion sets with different filter sizes. VS 30 - Infusion set with injection site (Latex free) and 15 µ filter L ~ 250 cm Note : the staff of the hospital should check the compatibility of the fluid or drug to deliver with the components listed on the pouch: materials, filter size, special recommendations. VS 31 - Infusion set for infusion, with 15 µ filter and needle-free access for intermittent injection - L ~ 240 cm VS 33 - Infusion set with 15 µ filter and 3-way stopcock for injection of medicines - L ~ 250 cm All Fresenius Vial sets are designed and controlled by Fresenius Vial in order to guarantee the performances and the safety features of our pump. The manufacturing is done by Fresenius Vial (CE0459) or by its qualified subcontractors (CE0123, CE0318) for and on behalf of Fresenius Vial in exclusive distribution. The CE certificates are available on request. VS 50 - Infusion set with 200 µ filter for transfusion - L ~ 240 cm VS 60 - Infusion set with 15 µ filter for infusion of drugs non compatible with PVC - L ~ 250 cm VS 70 - Infusion set with 15 µ filter and 0.22 µ antibacterial filter for infusion of drugs non compatible with PVC (Taxol) - L ~ 250 cm OP VS - Opaque infusion set for infusion of light sensible drugs, with 15 µ filter - L ~ 265 cm All sets are designed and controlled by Fresenius Vial in order to guarantee the performances and the safety features of our pump. The manufacturing is done by Fresenius Vial (CE0459) or by its qualified subcontractors (CE0123, CE0318) for and on behalf of Fresenius Vial in exclusive distribution. The CE certificates are available on request. Notes: These sterile infusion sets are packed in an individual peeling pouch by carton of 100 units. These sets are single use. Fresenius Vial is not responsible for the use of Optima PT pump with non-recommended sets. NU OPTIMA PT IS - 1273 rev 0 – 03/12/02 - 19 - 15. Conditions of guarantee Fresenius Vial guarantee that this product is free from defects in materials and workmanship (excluding batteries and accessories) for a period of one year from the date of invoice. If you comply to benefit from the materials and workmanship guarantee from our After-Sales Service or an agent authorised by Fresenius Vial, the following conditions must be respected: The device must have been used according to the instructions in this Operator’s Guide. The device must not have been damaged when in storage, at the time of repair, or show signs of improper handling. The device must not have been altered or repaired by non-qualified personnel. The serial number (ID/N°) must not have been altered, changed, or erased. In case of non-respect of these conditions, Fresenius Vial will prepare an estimate for repair covering the parts and labour required. Where return and repair of a device is necessary, please contact Fresenius Vial Customer or After-Sales Department. - 20 - NU OPTIMA PT IS - 1273 rev 0 – 03/12/02 Notes NU OPTIMA PT IS - 1273 rev 0 – 03/12/02 - 21 - Notes - 22 - NU OPTIMA PT IS - 1273 rev 0 – 03/12/02 Notes NU OPTIMA PT IS - 1273 rev 0 – 03/12/02 - 23 - 16. Useful addresses All requests for information or documentation (technical files, tubing sets catalogue or brochures) must be sent to: CUSTOMER SERVICE - AFTER-SALES SERVICE: Fresenius Vial Le Grand Chemin F-38590 BREZINS (France) Tel: +33 (0)4 76 67 10 10 Fax: +33 (0)4 76 67 11 34 E-mail: [email protected] Consult our Web site www.fresenius-vial.fr This document may contain inaccuracies or typographical errors. Modifications may thus be made and will be included in later editions. As standards and equipment change from time to time, the features shown and described in this document must be confirmed by our departments. This document may not be reproduced in whole or in part without the written consent of Fresenius Vial. Fresenius Vial - Le Grand Chemin - F-38590 BREZINS (FRANCE)