1
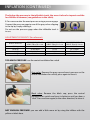
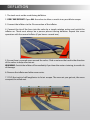
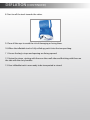
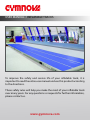
User manual / inflatable tracks
To improve the safety and service life of your inflatable track, it is
important to read the entire user manual and use this product according
to the directions.
These safety rules will help you make the most of your inflatable track
over many years. For any questions or requests for further information,
please contact us.
www.gymnova.com
Safety instructions
- The inflatable track must be installed by authorized or competent persons only.
- Always check that the surface is clean, dry and uniform. If outdoors, always lay a tarpaulin
under the inflatable track and check there is nothing that can puncture the track surface.
- To move the inflatable track, use the handles on the sides. Never drag the inflatable track
on the ground.
- Use of the inflatable track must always be properly supervised.
- Ensure that the inflatable track is always cleaned, dry and properly stored.
- Do not use the inflatable track wearing hard-soled shoes or shoes with heels. The track
should be used barefoot or with suitable flexible shoes.
- If you use a pressure gage during inflation, remember to remove it before the track is used.
- Place the safety mat at the end of the track.
Pack contents:
FOR 10 cm & 15 cm TRACKS
• 1 compact inflator with yellow hose (for 10 cm track) and black hose (for 15 cm track)
• 1 pressure gage Tightening wrench + repair kit
• 1 transport bag
FOR 20 cm TRACKS
• 2 compact inflators, each with black hose
• 1 yellow hose
• 1 pressure gage
• Tightening wrench + repair kit
• Transport bag
Inflation
It is important that someone stays by the inflator during the inflation time ready to switch it
off as soon as the maximum pressure is reached and so avoid risk of damage.
1. Unfasten the external and internal straps of the transport bag.
2. Unroll the inflatable track and remove the transport bag.
3. Unfold the track (take note of how it is folded so that it can be folded the same way
for storage).
4. Connect the inflator(s): connect the hose (yellow or black depending on the model) to
the OUT connection on the inflator.
OUT connection
5. Connect the inflators to the valves.
For 15 cm and 20 cm tracks: Open the valve by
unscrewing the external black cap. Attach the hose
to the black valve by turning the ring clockwise.
Repeat the same operation with the second inflator
(if you have a second one).
For 10 cm tracks: Connect the tip of the hose into
the gray valve by a simple rotation action (the valve
will open automatically) and switch the inflator on.
The valve will close automatically when you remove
the hose. This prevents any air escaping. Press the
center of the valve if it does not close automatically.
The track inflates within a few minutes, depending on its size, specific requirements
and level of users.
7. Reseal the valve with the external cap.
Inflation (continued)
The higher the pressure in the inflatable track, the more it absorbs impacts and the
less flexible it becomes (see guidelines in the table).
8. You can ascertain the exact pressure using a pressure gage.
Connect the pressure gage to one of the gray valves clipping
in the tip by simply rotating it.
Do not use the pressure gage when the inflatable track is
in use.
Adjustment of rigidity (for reference):
Body weight
15-30 kg
30-60 kg
60-90 kg
> 90 kg
Pressure inflatable track 10 cm
60-80 Mbar
70-l00 Mbar
l00-l40 Mbar
150 Mbar
Pressure inflatable track 15 cm
50-70
60-90
80-110
120
Pressure inflatable track 20 cm
40-50 Mbar
50-70 Mbar
70-80 Mbar
90 Mbar
Too much pressure: use the central ventilation fan switch
Gray valve: Remove the gray cap and exert pressure on the
central ventilation fan switch; press again to close it.
Black valve: Remove the black cap, press the central
ventilation fan switch and turn it clockwise until you hear a
"click". Press and turn again (in the other direction) to close it.
Not enough pressure: you can add a little more air by using the inflator with the
yellow or black hose.
Deflation
1. The track must not be used during deflation.
2. Very important: Open ALL the valves to allow as much air as possible to escape.
3. Connect the inflators to the IN connection of the inflator.
4. Connect the tip of the hose into the valve by a simple rotation action and switch the
inflator on. There must always be a person present during deflation. Repeat the same
operation with the second inflator (if you have a second one).
5. Ensure there is enough space around the valves. Slide a mat over the track in the direction
of the valves to help evacuate air.
Warning: Switch the inflator off immediately if you hear the motor straining, to avoid risk
of damage.
6. Remove the inflator and other accessories.
7. FOLD the track in half lengthwise to let air escape. The more air you get out, the more
compact the rolled mat.
Deflation (continued)
8. Start to roll the track towards the valves.
9. Close all the caps to avoid the risk of damaging or losing them.
10. When the inflatable track is fully rolled up, pack it into the transport bag.
11. Ensure the bag's straps and opening are facing upward.
12. Fasten the straps, starting with those on the small sides and finishing with those on
the side with the carry handles.
13. Your inflatable track is now ready to be transported or stored.
repair
Repair kit contents:
Fast-bonding glue, 1 piece of gray canvas, 1 piece of
blue PVC, 1 Key for valve repair.
The surface of the inflatable track is manufactured from PVC and canvas. If used
inappropriately it may become damaged. For example, small holes caused by grit on the
floor can easily be repaired.
By making correct use of the above repair kit, not requiring any professional skills, you
can repair small leaks easily and with long-lasting effectiveness. The key can be used for
replacing a gray valve or for re-tightening.
Recommended use:
1. Identify the point of puncture on the inflatable track by spraying soapy water over the
PVC surface and then mark the point with a pen.
2. Mark the area over which you want to apply the glue using adhesive tape.
Ensure that the surface is perfectly clean and that the marked bonding area is the same
shape as the canvas patch.
3. Remove grease from the surface to be glued.
4. Apply the glue to the canvas patch. You can use a small brush.
5. Apply the glue to the inflatable track over the marked area.
6. Once the glue is dry (after 10-15 minutes), remove the adhesive tape.
7. Place the patch on the area and press hard.
8. Press hard in one direction to obtain good adherence and remove any air between the
two materials.
9. You can use the inflatable track again after four hours drying at ambient temperature.
GYMNOVA - CS 30056 - 45 rue Gaston de Flotte - 13375 Marseille Cedex 12
Tel. +33 (0)4 91 87 51 20 - Fax +33 (0)4 91 93 86 89 - [email protected]
www.gymnova.com