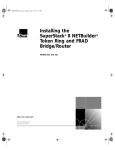
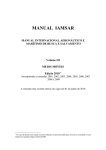
1
NMIN-0803-MINI
DSP56F803 Controller Board
User Manual
Warranty
New Micros, Inc. warrants its products against defects in materials and workmanship for a period of 90 days. If you
discover a defect, New Micros, Inc. will, at its option, repair, replace, or refund the purchase price. Simply call our
sales department for an RMA number, write it on the label and return the product with a description of the problem. We
will return your product, or its replacement, using the same shipping method used to ship the product to New Micros,
Inc. (for instance, if you ship your product via overnight express, we will do the same). This warranty does not apply if
the product has been modified or damaged by accident, abuse, or misuse.
Copyrights and Trademarks
Copyright © 2002 by New Micros, Inc. All rights reserved. NMIN-0803-Mini, IsoMax™ and Virtually Parallel
Machine Architecture™ are trademarks of New Micros, Inc. Windows is a registered trademark of Microsoft
Corporation. 1-wire is a registered trademark of Dallas Semiconductor. Other brand and product names are trademarks
or registered trademarks of their respective holders.
Disclaimer of Liability
New Micros, Inc. is not responsible for special, incidental, or consequential damages resulting from any breach of
warranty, or under any legal theory, including lost profits, downtime, goodwill, damage to or replacement of equipment
or property, and any costs of recovering, reprogramming, or reproducing any data stored in or used with New Micros,
Inc. products.
Internet Access
Web site: http://www.newmicros.com
This manual: http://www.newmicros.com/store/product_manual/nmin-0803-mini.pdf
Email technical questions: [email protected]
Email sales questions: [email protected]
Also see “Manufacturer” information near the end of this manual.
Internet NMIN-0803-Mini Discussion List
We maintain the NMIN-0803-Mini discussion list on our web site. Members can have all questions and answers
forwarded to them. It’s a way to discuss NMIN-0803-Mini issues.
To subscribe to the NMIN-0803-Mini list, visit the Discussion section of the New Micros, Inc. website.
http://www.newmicros.com/discussion/
This manual is valid with the following software and firmware versions
IsoMax V0.5 or newer.
or
(c) 2000-2001 Motorola Inc. S-Record loader. Version 1.3
If you have any questions about what you need to upgrade your product, please contact New Micros, Inc.
NMIN-0803-Mini User Manual
2
Table of Contents
1
GETTING STARTED ........................................................................................................................ 5
1.1
1.2
1.3
INSTRUCTIONS FOR ISOMAX USERS .................................................................................................. 7
INSTRUCTIONS FOR USERS WITH SMALL C AND A JTAG CABLE .................................................... 11
INSTRUCTIONS FOR USERS WITH SMALL C WITHOUT A JTAG CABLE ............................................ 11
2
QUICK TOUR .................................................................................................................................. 11
3
CIRCUIT DESCRIPTION............................................................................................................... 13
3.1
3.2
3.3
3.4
3.5
RS-232 LEVELS TRANSLATION....................................................................................................... 13
CAN BUS LEVELS TRANSLATION .................................................................................................. 13
LED’S ............................................................................................................................................. 13
RESET ........................................................................................................................................... 14
POWER SUPPLY.......................................................................................................................... 14
4
TROUBLE SHOOTING .................................................................................................................. 15
5
ONLINE RESOURCES ................................................................................................................... 16
5.1
5.2
5.3
5.4
6
NMIN-0803-MINI WEBSITE ............................................................................................................ 16
MAXFORTH™ GLOSSARY REFERENCE PAGE ............................................................................... 16
MOTOROLA DSP56F803 USERS MANUAL ...................................................................................... 16
MOTOROLA DSP56F800 PROCESSOR REFERENCE MANUAL .......................................................... 16
CONNECTORS ................................................................................................................................ 16
6.1
6.2
6.3
6.4
6.5
6.6
6.7
6.8
6.9
J1 PWM, QUAD ENCODER & INTERRUPTS ..................................................................................... 17
J2 CAN BUS SPEED CONTROL ....................................................................................................... 18
J4 RS232 DIS/ENABLE ................................................................................................................... 18
J5 POWER & GROUND .................................................................................................................... 18
J3 CAN BUS .................................................................................................................................. 18
J6 JTAG CONNECTOR ..................................................................................................................... 18
J7 RS232 ........................................................................................................................................ 19
J8 ADC........................................................................................................................................... 19
J9 SHARED I/O & LCD CONNECTION ............................................................................................. 19
7
MANUFACTURER.......................................................................................................................... 20
8
MECHANICAL ................................................................................................................................ 20
9
ELECTRICAL .................................................................................................................................. 20
10
EMBEDDED SOFTWARE DEVELOPMENT.............................................................................. 22
10.1
OVERVIEW ................................................................................................................................. 22
10.2
ISOMAX ..................................................................................................................................... 22
10.3
COMPILER & ASSEMBLER .......................................................................................................... 22
10.3.1 With JTAG ............................................................................................................................ 23
10.3.2 With Serial Bootloader ......................................................................................................... 23
11
PC COMMUNICATION ................................................................................................................. 27
11.1
11.2
11.3
12
NMITERM .................................................................................................................................. 27
MAXTERM ................................................................................................................................. 28
HYPERTERMINAL ....................................................................................................................... 29
REFERENCE.................................................................................................................................... 30
NMIN-0803-Mini User Manual
3
12.1
12.2
DECIMAL / OCTAL / HEX / ASCII CHART .................................................................................. 30
SIMPLE ASCII CHART................................................................................................................ 32
13
GLOSSARY ...................................................................................................................................... 33
14
ARTICLES AND SUGGESTED READING ................................................................................. 34
15
MECHANICAL DRAWING ............................................ ERROR! BOOKMARK NOT DEFINED.
16
SCHEMATIC ……………………………………………………………………………………….35
Table Of Figures
FIGURE 1 – NMIN-0803-MINI ........................................................................................................................ 5
FIGURE 2 – POWER AND SERIAL CONNECTIONS .............................................................................................. 6
FIGURE 3 – THE SERIAL CABLE ...................................................................................................................... 7
FIGURE 4 – THE POWER CABLE ...................................................................................................................... 7
FIGURE 5 – THE LEDS .................................................................................................................................... 8
FIGURE 6 – RED LED OFF ............................................................................................................................... 9
FIGURE 7 – RED LED ON ................................................................................................................................ 9
FIGURE 8 – GREEN LED OFF ......................................................................................................................... 10
FIGURE 9 – GREEN LED ON .......................................................................................................................... 10
FIGURE 10 – BOARD FEATURES .................................................................................................................... 12
FIGURE 11 – CONNECTOR J1 ......................................................................................................................... 17
FIGURE 12 – CONNECTORS J2, J3, J4, J5 AND J6 .......................................................................................... 18
FIGURE 13 – CONNECTORS J7, J8 AND J9 ..................................................................................................... 19
FIGURE 14 – EMBEDDED SOFTWARE DEVELOPMENT OVERVIEW.................................................................. 22
FIGURE 15 – SOFTWARE DEVELOPMENT USING ISOMAX .............................................................................. 22
FIGURE 16 – SOFTWARE DEVELOPMENT USING JTAG.................................................................................. 23
FIGURE 17 – SOFTWARE DEVELOPMENT USING SERIAL BOOTLOADER ......................................................... 23
Tables
TABLE 1 - CONNECTORS ............................................................................................................................... 12
TABLE 2 - ABSOLUTE MAXIMUM RATINGS ................................................................................................... 20
TABLE 3 - RECOMMENDED OPERATING CONDITIONS.................................................................................... 21
TABLE 4 - DC ELECTRICAL CHARACTERISTICS ............................................................................................ 21
NMIN-0803-Mini User Manual
4
1 GETTING STARTED
Thank you for buying the NMIN-0803-Mini. We hope you will find the NMIN-0803Mini to be the incredibly useful small controller board we intended it to be, and easy to
use as possible. If you are new to the NMIN-0803-Mini, we know you will be in a hurry
to see it working. That’s okay. We understand.
Figure 1 – NMIN-0803-Mini
Let’s skip the features and get right to the operation. Once we’ve got communications,
then we can make some lights blink and know for sure that we’re in business. Let’s make
this “Mini board” talk to us!
We’ll need PC running a terminal program. Then we’ll need a serial cable to connect
from the PC to the NMIN-0803-Mini (which, hopefully, you’ve already gotten from us).
Then we need power, such as from a 6VDC wall transformer (which, hopefully, you’ve
NMIN-0803-Mini User Manual
5
already gotten from us. If we have those connections correct, we will be able to talk to
the NMIN-0803-Mini interactively.
The wall transformer can supply the power to the NMIN-0803-Mini board, but do not
connect it to the board yet. The board can be seen in the figure below, showing the
connections of VIN and GND. Connect the serial cable between the J7 connector and the
PC. The J7 upper row pinout can also be seen in the figure.
Figure 2 – Power and Serial Connections
Once you have your serial cable and connectors, and wall transformer and connectors
ready, follow these steps.
Start with the PC. Install (if not already installed) and run the terminal communications
program - MaxTerm or NMITerm or HyperTerminal. Set the program for the desired
communications channel (COM1, COM2, etc.), and set the communications parameters
to 9600, 8N1. Operate the program to get past the opening setups and to the terminal
screen, so it is ready to communicate. (If necessary, visit the section on PC
Communication if you have trouble understanding how to accomplish any of this.)
Hook the computer end of the serial cable (usually a DB-9 connector, but may be a DB25, or other, on older PC’s) to the PC’s communication channel selected in the terminal
program. A simple serial cable can be made with Digikey part CFP09T-ND (a female D
sub 9), CSC10T-ND (a 10 pin female connector), and a short length of 10 circuit ribbon
cable.
NMIN-0803-Mini User Manual
6
Figure 3 – The Serial Cable
Plug the wall transformer into the wall, but do not plug it into the board yet.
Figure 4 – The Power Cable
1.1 Instructions for IsoMax Users
Now, while watching the LED’s plug in the wall transformer connector to the power pins
on the NMIN-0803-Mini board. Be very careful not to plug it in reverse polarity here,
even though the regulator, LM2937 has the reverse voltage protection.
Both the Red and Green LED’s should come on. If the LED’s do not light, unplug the
power to the NMIN-0803-Mini quickly.
NMIN-0803-Mini User Manual
7
Figure 5 – The LEDs
If the LED glows, then check the screen on the computer. When the power is applied,
before any user program installed, the PC terminal program should show,
“IsoMax™V0.5”
(or whatever the version currently is, see upgrade policy later at the end of this chapter),
or “© 2000-2001 Motorola Inc. S-Record loader. Version 1.3” .
If the LED’s don’t light, and the screen doesn’t show the message, unplug the power to
the NMIN-0803-Mini. Check the power connections, particularly for polarity. (This is the
most dangerous error to your board.) If the LED’s come on but there is no
communication, check the terminal program. Check the serial connections, particularly
for a reversal or rotation. Try once more. If you have no success, see the trouble shooting
section of this manual and then contact technical support for help, before going further.
Do not leave power on the board for more than a few seconds if it does not appear to be
operational.
Normally at this point you will see the prompt on the computer screen “IsoMax™ V0.5”,
or “© 2000-2001 Motorola Inc. S-Record loader. Version 1.3”. Odds are you’re there.
Congratulations! Now let’s do something interactive with the NMIN-0803-Mini.
To start with IsoMax programming, in the terminal program on the PC, type in, “WORDS”
(all in “caps” as the language is case sensitive), and then hit “Enter”. A stream of words
in the language should now scroll up the screen. Good, we’re making progress. You are
now talking interactively with the language in the NMIN-0803-Mini.
Now let’s blink the LED’s. Port lines control the LED’s. Type:
REDLED OFF
NMIN-0803-Mini User Manual
8
Figure 6 – Red LED off
To turn it back on type:
REDLED ON
Figure 7 – Red LED on
Now let’s use the Green LED. Type:
GRNLED OFF
NMIN-0803-Mini User Manual
9
Figure 8 – Green LED off
To turn it back on type:
GRNLED ON
Figure 9 – Green LED on
Now you should have a good feeling because you can tell your NMIN-0803-Mini is
working. It’s time for an overview of what your NMIN-0803-Mini has for features.
First though, a few comments on IsoMax™ revision level. The first port of IsoMax™ to
the NMIN-0803-Mini occurred on May 27, 2002. We called this version V0.1, but it
never shipped. While the core language was functional as it then was, we really wanted to
add many I/O support words. We added a small number of words to identify the port
lines and turn them on and off and shipped the first public release on June 3, 2002. This
version was V0.2. Currently we are shipping V0.5 . As we approach a more complete
NMIN-0803-Mini User Manual
10
version, eventually we will release V1.0. We want all our original customers to have the
benefit of the extensions we add to the language. Any NMIN-0803-Mini purchased prior
to V1.0 release can be returned to the factory (at customer’s expense for shipping) and we
will upgrade the V0.x release to V1.0 without charge.
1.2 Instructions for Users with Small C and a JTAG Cable
A Small C program will have been flashed to the 803-Mini by NMI prior to shipping.
When you connect the power to the board, you should observe the red LED and the green
LED are both ‘on’. After 10 seconds, the green LED flashing, and the red LED is stayed
steady ‘on’ – this proves that the board is working. This test program is listing on section
10.4 page 23.
1.3 Instructions for Users with Small C without a JTAG Cable
The 803-Mini will contain the Serial Bootloader, and this will have been used by NMI to
flash the test program, as detailed in the above section. To ensure correct operation of the
board, connect the Serial Cable to your PC (and the 803-Mini) and run the desired
communications program with the following settings – 115200 baud, 8 bits, no parity, 1
stop bit, Xon/Xoff flow control. When you connect the power to the board, a message
will be displayed via the communications program on your PC saying that the Serial
Bootloader has started. Note: there will be a 10 seconds delay, and then the test program
will run. You should then observe the red LED ‘on’ and the green LED flashing – this
proves that the board is working
2 QUICK TOUR
Start by comparing your board to the diagram below. Most of the important features on
the top board are labeled.
NMIN-0803-Mini User Manual
11
Figure 10 – Board Features
The features most important to you will be the connectors. The following list gives a brief
description of each connector and the signals involved.
Table 1 - Connectors
J1
J2
J3
J4
J5
J6
J7
J8
J9
PWM’s, Quad encoder, and interrupts
CAN BUS Speed control
CAN BUS Network Port
unavailable
V + & Ground
JTAG connector
RS-232 Serial Port
A/D
Shared I/O’s & LCD connection
The table above explains the type of connection that can be made to each of the
connectors. As it can be seen from the table there os no connector assigned for J4. The
power reset and ground can be used externally for various applications.
All the connectors are dual or triple row male headers. Connection can be made with
female headers with crimped wire inserts, or IDC headers with soldered or cabled wires.
Signals were put on separate connectors where possible, such as with the RS-232, the
Can Bus, and PWM connectors. The male headers allow insertion of individually handNMIN-0803-Mini User Manual
12
crimped wires in connectors where signals are combined. For instance, R/C Servo motor
headers often come in this size connection with a 3x1 header. These can plug directly
onto the board side by side on the PWM connector.
The large chip at the center of the board is the CPU (DSP56F803).
The two LED’s, Red and Green, are along the bottom of the CPU, and are dedicated to
user control.
On the back of the board the components are the voltage regulators. If the total current
draw were smaller, we could make a smaller supply, but to be sure every user could get
enough power to run at full speed, these larger parts were necessary.
A few smaller chips are also on the board, the RS-232 transceiver and the LED driver,
and a handful of resistors and capacitors.
3 CIRCUIT DESCRIPTION
The processor chip contains the vast majority of the circuitry. The remaining support
circuitry is described here. The power for the system can be handled several different
way, but as the board comes, power will normally be supplied from the VIN pin on
board.
3.1
RS-232 Levels Translation
The MAX3221 converts the 3.3V supply to the voltages necessary to drive the RS-232
interface. Since a typical RS-232 line requires 10 mA of outputs at 10V or more, the
MAX3221 uses about 30 mA from the 3.3V supply. A shutdown is provided, controlled
by TD1.
http://pdfserv.maxim-ic.com/arpdf/MAX3221-MAX3243.pdf
3.2
CAN BUS Levels Translation
A TJA1050 buffers the CAN BUS signal.
http://my.semiconductors.com/acrobat/datasheets/TJA1050_3.pdf
3.3
LED’s
A 74HC04 drives the on-board LED’s. Each LED has a current limiting resistor to the
+3.3V supply.
http://www.fairchildsemi.com/ds/74/74AC05.pdf
NMIN-0803-Mini User Manual
13
3.4
RESET
A S80728HN Low Voltage Detector asserts reset when the voltage is below operating
levels. This prevents brown out runaway, and a power-on-reset function.
http://www.seiko-instruments.de/documents/ic_documents/power_e/s807_e.pdf
3.5
POWER SUPPLY
A LM2937 reduces the VIN DC to a regulated 5V. In early versions a 7805C was used.
The LM2937 was rated a bit less for current (500 mA Max), but had reverse voltage
protection and a low drop out which was more favorable. A drops the 5V to the 3.3V
needed for the processor. At full current, 180 mA, these two regulators will get hot. They
can provide current to external circuits if care is taken to keep them cool. Each are rated
at 1A but will have to have heat sinking added to run there.
http://www.national.com/ds/LM/LM2937.pdf
http://www.national.com/ds/LM/LM3940.pdf
NMIN-0803-Mini User Manual
14
4 TROUBLE SHOOTING
There are no user serviceable parts on the NMIN-0803-Mini. If connections are made
correctly, operation should follow, or there are serious problems on the board. As always,
the first thing to check in case of trouble is checking power and ground are present.
Measuring these with a voltmeter can save hours of head scratching from overlooking the
obvious. After power and ground, signal connections should be checked next. If the serial
cable comes loose, on either end, using your PC to debug your program just won’t help.
Also, if your terminal program has locked up, you can experience some very “quiet”
results. Don’t overlook these sources of frustrating delays when looking for a problem.
They are easy to check, and will make a monkey of you more times than not, if you
ignore them.
One of the great advantages of having an interactive language embedded in a processor,
is if communications can be established, then program tools can be built to test
operations. If the RS-232 channel is not in use in your application, or if it can be
optionally assigned to debugging, talking to the board through the language will provide
a wealth of debugging information.
The LED’s can be wonderful windows to show operation. This takes some planning in
design of the program. A clever user will make good use of these little light. Even if the
RS-232 channel is in use in your application and not available for debugging, don’t
overlook the LED’s as a way to follow program execution looking for problems.
The NMIN-0803-Mini is designed so no soldering to the board should be required, and
the practice of soldering to the board is not recommended. Instead, all signals are brought
to connectors.
So, the best trouble shooting technique would be to unplug the NMIN-0803-Mini and try
to operate it separately with a known good serial cable on power supply.
If the original connections have been tested to assure no out-of-range voltages are
present, a second NMIN-0803-Mini can then be programmed and plugged into the circuit
in question. But don’t be too anxious to take this step. If the first NMIN-0803-Mini
should be burned out, you really want to be sure you know what caused it, before
sacrificing another one in the same circuit.
Finally, for advanced users, the JTAG connection can give trace, single step and memory
examination information with the use of special debugging hardware. This level of access
is beyond the expected average user of the NMIN-0803-Mini and will not be addressed in
this manual.
NMIN-0803-Mini User Manual
15
5 Online Resources
5.1 NMIN-0803-Mini Forum & Technical Support
http://www.newmicros.com/discussion/
5.2 NMIN-0803-Mini Manual
http://www.newmicros.com/store/product_manual/nmin-0803-mini.pdf
5.3 Small C & Assembler website
http://home.attbi.com/~petegray/
5.4
MaxFORTH™ Glossary Reference Page
http://www.ee.ualberta.ca/~rchapman/MFwebsite/V50/Alphabetical/Brief/index.html
This has explanations for the definitions for the procedural language "under" the
IsoMax(TM) Finite State Machine language.
5.5
Motorola DSP56F803 Users Manual
http://e-www.motorola.com/brdata/PDFDB/docs/DSP56F801-7UM.pdf
5.6
Motorola DSP56F800 Processor Reference Manual
http://e-www.motorola.com/brdata/PDFDB/docs/DSP56800FM.pdf
6 CONNECTORS
The NMIN-0803-Mini has 8 connectors. J1, J2, J3, J5, J6, J7, J8, J9 are below:
J1 PWM, Quad Encoder & Interrupts PWM, V+, GND, Quad, Faults, ISx, IRQx
J2 CAN BUS Speed Control Jumper
High/Low
J3 CAN BUS Network Port
CANL, CANH, GND
J4 unavailable
J5 Reset, +5V, V+, & Ground
Reset & GND, +5V & GND, V+ & GND
J6 JTAG connector
Jtag interface
J7 RS-232 Serial Port
TXD, RXD, GND
J8 A/D
A/D0 – A/D7
J9 Shared I/O & LCD connection
PA0-PA7, PE4-PE6, TD2
NMIN-0803-Mini User Manual
16
Figure 11 – Connector J1
6.1
36
33
30
27
24
21
18
15
12
9
6
3
J1 PWM, Quad Encoder & Interrupts
GND
35 V+
34 PWMA0
GND
32 V+
31 PWMA1
GND
29 V+
28 PWMA2
GND
26 V+
25 PWMA3
GND
23 V+
22 PWMA4
GND
20 V+
19 PWMA5
IRQB
17 ISA2
16 HOME0
IRQA
14 ISA1
13 INDEX0
PE2
11 ISA0
10 PHASEB0
PE3
8 FAULT2
7 PHASEA0
GND
5 FAULT1
4 GND
+3.3V
2 FAULT0
1 +5V
NMIN-0803-Mini User Manual
17
Figure 12 – Connectors J2, J3, J4, J5 and J6
Connectors in above “top view, J1-to-left” picture and on page below,
have same oriented (pin 1 upper left).
6.2
J2 CAN BUS speed control
1 2
Jumper J2 can be used to switch between high-speed mode or silence mode CAN BUS
operation based on TD2 output low or high respectively. Also to use the control speed,
Pin 1 & 2 must connect together. By default, J2 is not connected and the control pin S is
normally pulled low. This enabled the High Speed mode operation.
6.3
J4 unavailable
6.4 J5 Power, Reset & Ground
GND 1 2 RESET
GND 3 4 +5V
GND 5 6 V+
6.5 J3 CAN BUS Connector
1 CANL
2 CANH
3 GND
6.6 J6 JTAG connector
N.C.
+3V
RESET’
13
11
9
14
12
10
TRST
DE
TMS
N.C.
7
8
N.C.
TCK
5
6
GND
TD0
3
4
GND
TD1
1
2
GND
NMIN-0803-Mini User Manual
18
Figure 13 – Connectors J7, J8 and J9
Connectors in above “top view, J1-to-left” picture and on page below,
have same oriented (pin 1 lower right).
6.7 J7 RS232 Connector
GND TO 8 RXD TXD
9
7
5
3
10
8
6
4
N.C. TO 7 TO 4 TO 6
6.8 J8 ADC
VREF 1 2
ANA7 3 4
ANA5 5 6
ANA3 7 8
ANA1 9 10
N.C.
1
2
N.C.
VSSA
ANA6
ANA4
ANA2
ANA0
6.9 J9 Shared I/Os & LCD connection
E2/TD2 16 15 NC
D7/PA7 14 13 D6/PA6
D5/PA5 12 11 D4/PA4
D3/PA3 10
9 D2/PA2
D1/PA1 8
7 D0/PA0
E1/PE4 6
5 RW/PE5
RS/PE6 4
3 Vo
+5V 2
1 GND
NMIN-0803-Mini User Manual
19
7 MANUFACTURER
New Micros, Inc.
1601 Chalk Hill Rd.
Dallas, TX 75212
Tel: (214) 339-2204
Fax: (214) 339-1585
Web site: http://www.newmicros.com
This manual: http://www.newmicros.com/store/product_manual/nmin-0803-mini.pdf
Email technical questions: [email protected]
Email sales questions: [email protected]
8 MECHANICAL
Board size is 1.7” x 2.1”
Mechanical Drawing on page 34
9 ELECTRICAL
The total draw for the NMIN-0803-Mini under maximum speed is approximately 180
mA.
Sleeping or slowing the processor can substantially reduce current consumption.
Each digital pin is capable of sinking 4 mA, and sourcing –4 mA.
Each PWM pins can sink 16mA, and source -10mA.
Each LED draws approx. 12 mA when lit.
Table 2 - Absolute Maximum Ratings
Characteristic
Supply voltage
All other input voltages, excluding Analog inputs
Analog Inputs ANAx, VREF
Current drain per pin excluding VDD, VSS, PWM outputs,
TCS, VPP, VDDA, VSSA
Symbol
VDD
VIN
VIN
I
Min
VSS – 0.3
VSS – 0.3
VSS – 0.3
—
NMIN-0803-Mini User Manual
Max
VSS + 4.0
VSS + 5.5V
VDDA + 0.3V
10
Unit
V
V
V
mA
20
Current drain per pin for PWM outputs
Junction temperature
Storage temperature range
I
TJ
TSTG
—
—
-55
20
150
150
mA
°C
°C
Table 3 - Recommended Operating Conditions
Characteristic
Supply voltage
Ambient operating temperature
Symbol
VDD
TA
Min
3.0
-40
Max
3.6
85
Unit
V
°C
Table 4 - DC Electrical Characteristics
Operating Conditions: VSS = VSSA = 0 V, VDD = VDDA = 3.0–3.6 V, TA = –40° to +85°C, CL ≤ 50 pF, fop = 80
MHz
Characteristic
Symbol
Min
Typ
Max
Unit
Input high voltage
VIH
2.0
—
5.5
V
Input low voltage
VIL
-0.3
—
0.8
V
Input current low (pullups/pulldowns disabled)
IIL
-1
—
1
µA
Input current high (pullups/pulldowns disabled)
IIH
-1
—
1
µA
Typical pullup or pulldown resistance
RPU, RPD
—
30
—
KΩ
Input/output tri-state current
low IOZL
-10
—
10
µA
Input/output tri-state current
low IOZH
-10
—
10
µA
Output High Voltage (at IOH)
VOH
VDD – 0.7
—
—
V
Output Low Voltage (at IOL)
VOL
—
—
0.4
V
Output High Current
IOH
—
—
-4
mA
Output Low Current
IOL
—
—
4
mA
Input capacitance
CIN
—
8
—
pF
Output capacitance
COUT
—
12
—
pF
PWM pin output source current 1
IOHP
—
—
-10
mA
PWM pin output sink current 2
IOLP
—
—
16
mA
Total supply current
IDDT 3
Run 4
—
126
162
mA
Wait 5
—
72
98
mA
Stop
—
60
84
mA
Low Voltage Interrupt 6
VEI
2.4
2.7
2.9
V
Power on Reset 7
VPOR
—
1.7
2.0
V
1. PWM pin output source current measured with 50% duty cycle.
2. PWM pin output sink current measured with 50% duty cycle.
3. IDDT = IDD + IDDA (Total supply current for VDD + VDDA)
4. Run (operating) IDD measured using 8MHz clock source. All inputs 0.2V from rail; outputs unloaded. All ports
configured as inputs; measured with all modules enabled.
5. Wait IDD measured using external square wave clock source (fosc = 8 MHz) into XTAL; all inputs 0.2V from rail;
no DC loads; less than 50 pF on all outputs. CL = 20 pF on EXTAL; all ports configured as inputs; EXTAL capacitance
linearly affects wait IDD; measured with PLL enabled.
6. Low voltage interrupt monitors the VDDA supply. When VDDA drops below VEI value, an interrupt is generated.
For correct operation, set VDDA=VDD. Functionality of the device is guaranteed under transient conditions when
VDDA>VEI.
7. Power-on reset occurs whenever the internally regulated 2.5V digital supply drops below VPOR. While power is
ramping up, this signal remains active for as long as the internal 2.5V supply is below 1.5V no matter how long the
ramp up rate is. The internally regulated voltage is typically 100 mV less than VDD during ramp up until 2.5V is
reached, at which time it self regulates.
NMIN-0803-Mini User Manual
21
10 Embedded Software Development
10.1 Overview
Figure 14 – Embedded Software Development Overview
This diagram shows all of the components available for embedded software development.
Note that not all of the components will be used, depending upon the scheme adopted by
the developer. These schemes – and the required components – are detailed below.
10.2 IsoMax
Figure 15 – Software Development using IsoMax
In this configuration, the PC user runs a program which communicates with IsoMax via
the RS-232 cable. This allows interactive software development and testing. Details of
IsoMax can be found on NMI’s website.
10.3 Compiler & Assembler
Using this method, software is developed on the PC and transferred to the NMIN-0803Mini using either the RS-232 (serial) cable or a JTAG cable. Note that the diagrams,
below, show the components required for each scheme. Additional components are
optional.
NMIN-0803-Mini User Manual
22
10.3.1 With JTAG
Figure 16 – Software Development using JTAG
In this configuration, an editor is used to write a program on the PC, which is then
compiled, assembled, and transferred to the 803-Mini via the JTAG cable using a Flash
Utility on the PC. The RS-232 cable and communications program (not shown) are
optional.
The JTAG cable plugs into the PC’s parallel port, and J6 on the 803-Mini board.
However, the Windows Operating System does not allow a ‘normal’ user program – like
the Flash Utility - to directly control the computer’s hardware (i.e. the parallel port), so a
utility must be used which permits this, such as UserPort.
10.3.2 With Serial Bootloader
Figure 17 – Software Development using Serial Bootloader
In this configuration, an editor is used to write a program on the PC, which is then
compiled, assembled, and transferred to the 803-Mini via the RS-232 cable using the
Communications Program on the PC and the Serial Bootloader software on the 803-Mini.
The JTAG cable and Flash Utility (not shown) are optional.
NMIN-0803-Mini User Manual
23
10.4 Blinking Green Led Test Program
/*----------------------------------------------------blinkgrn.c
GPIO example program for the NMIN-0803-MINI (see http://www.newmicros.com)
Modified from ledsmini.c by Peter F Gray ([email protected]) 6Feb03
--------------------------------------------------------*/
#include "scdefs.h"
/* GPIO registers */
#define PEPUR 0x0FF0
#define PEDR 0x0FF1
#define PEDDR 0x0FF2
#define PEPER 0x0FF3
#define PEIAR 0x0FF4
#define PEIENR 0x0FF5
#define PEIPOLR 0x0FF6
#define PEIPR 0x0FF7
#define PEIESR 0x0FF8
/* SCI registers */
#define SCI0BR 0x0F00
#define SCI0CR 0x0F01
#define SCI0SR 0x0F02
#define SCI0DR 0x0F03
/* I/O routines for SCI (i.e. PC hyperterm or minicom communication) */
inscichar (a,b)
int *a;
unsigned char *b;
{
int status;
do status = *SCI0SR; while ((status&0x3000)!=0x3000);
*b = *a;
}
outsci (a,b)
int *a;
unsigned char *b;
NMIN-0803-Mini User Manual
24
{
unsigned int status;
while (*b) {
do status = *SCI0SR; while ((status&0xC000)!=0xC000);
*a = *b;
*b++;
}
do status = *SCI0SR; while ((status&0xC000)!=0xC000);
}
outscichar (a,b)
int *a;
unsigned char *b;
{
int status;
do status = *SCI0SR; while ((status&0xC000)!=0xC000);
*a = *b;
do status = *SCI0SR; while ((status&0xC000)!=0xC000);
}
delay()
{
unsigned int i, j;
for(i = 0; i < 3; i++)
for(j = 0; j < 0xFFFF; j++);
}
/* main program */
main ()
{
char c;
int val;
*SCI0BR = 22;
*SCI0CR = 12;
/* set up SCI 115,200 & 8N1 */
/* and display instructions... */
outsci (SCI0DR,"\n To download a new program, simply reset or recycle the NMIN0803-Mini power.");
outsci (SCI0DR,"\n You have 10 seconds before the blinkgrn test program is
restarted...");
*PEIAR = 0;
*PEIENR = 0;
*PEIPOLR = 0;
*PEIESR = 0;
/* set up GPIO */
NMIN-0803-Mini User Manual
25
*PEPER = 0x00F3;
*PEDDR = 0x000C;
*PEPUR = 0x00FF;
val = 0x0008 | 0x0004;
*PEDR = val;
/* set both 'on' */
while (1)
{
/* loop forever */
val |= 0x0008;
/* PE3 high, */
*PEDR = val;
/* Green Led On */
delay();
val &= 0x00F7;
/* PE3 low, */
*PEDR = val;
/* Green Led Off */
delay();
}
}
NMIN-0803-Mini User Manual
26
11 PC Communication
A variety of programs are available which allow a PC to communicate directly with the
NMIN-0803-Mini. These programs are sometimes referred to as ‘Communications
Programs’, ‘Comms programs’ or ‘Terminal Programs’ (because some emulate Computer
Terminals). These programs run on the PC and are used in conjunction with an RS-232
cable, also known as a Serial Cable. One end of this cable plugs into the PC’s COM port,
and the other end is for the 803-Mini’s RS-232 connector, J7.
Note: The settings given in the following sections are IsoMax and JTAG users only –
Serial Bootloader users should refer to the relevant sections in this manual for the
required settings.
11.1 NMITerm
Provided Windows terminal program from New Micros, Inc. Usually provided in a ZIP.
Un ZIP in a subdirectory, such as C:\NMITerm. To install the program: click, or double
click, the SETUP.EXE program icon. Once the program is installed, click on START,
PROGRAMS, NMITerm, NMITerm icon to start
NMITerm.LNK
NMITerm is a simple Windows-based communications package designed for program
development on serial port based embedded controllers. It runs under Windows
95/98/200, NT, and XP.
NMITerm provides:
1.
2.
3.
4.
5.
6.
7.
8.
Support for COM1 through COM16.
Baud rates from 110 through 256000.
Control over RTS and DTR lines.
Capture files, which record all terminal activity to disk.
Scroll-back buffer, editable and savable as a file.
On-line Programmer's Editor.
File downloader.
Programmable function keys.
Quick start commands:
1. Baud: default 9600
2. DTR On/Off : ALT+T
3. Download: ALT+D
For further information click on HELP TOPICS under HELP menu.
This program can be downloaded from:
http://www.newmicros.com/download/NMITerm.zip
NMIN-0803-Mini User Manual
27
11.2 MaxTerm
Provided DOS terminal program from New Micros, Inc. Usually provided in a ZIP. Un
ZIP in a subdirectory, such as C:\MAXTERM. To start the program: click, or double
click, the program icon.
Maxterm.ico
MaxTerm is a simple DOS-based communications package designed for program
development on serial port based embedded controllers. It can run under stand-alone
DOS or in a DOS session under Windows.
MaxTerm provides:
1.
2.
3.
4.
5.
6.
7.
8.
9.
Support for COM1 & COM2.
Baud rates from 300 through 38400.
Control over RTS and DTR lines.
Capture files, which record all terminal activity to disk.
32K scroll-back buffer, editable and savable as a file.
On-line Interactive Programmer's Editor (OPIE).
File downloader.
Programmable function keys.
Received character monitor, which displays all data in HEX.
Quick start commands:
4.
5.
6.
7.
8.
Set comport: ALT+1 or ALT+2 It does not support com3 & 4.
Baud: default 9600
DTR On/Off : ALT+T
Download: ALT+D
PACING: ALT+P (IsoMax default decimal 10)
For further information use the Help screen (ALT-H) or the program documentation.
MAXTERM Help
alt-B Change baud rate
alt-C Open (or close) capture file
alt-D Download a file (all text)
alt-E Edit a file (Split screen)
alt-F Edit function keys
alt-H Help
alt-I Program Information
alt-K Toggle redefinition catcher
alt-L Open scrollback log
alt-1 (2 3 4) Select Com port
f1-f10 Programmable function keys
alt-M
alt-O
alt-P
alt-R
alt-S
alt-T
alt-U
alt-W
alt-X
alt-Z
f12
Character monitor mode
Toggle sounds
Change line pace char
Toggle RTS
Unsplit the screen
Toggle DTR
Change colors
Wipe the screen
Exit
Download a file (no fat)
Re-enter OPIE
NMIN-0803-Mini User Manual
28
Status line mode indicators: r = rts, d = dtr, L = log file, S = sounds,
K = redefinition, P = line pacing active
11.3 HyperTerminal
Usually provided in Programs/Accessories/Communications/HyperTerminal. If not
present, it can be loaded from the Windows installation disk. Use “Add/Remove
Software” feature in Settings/Control Panel, choose Windows Setup, choose
Communications, click on Hyperterm, then Okay and Okay. Follow any instructions to
add additional features to windows.
Hypertrm.exe
C:\Program Files\Accessories\HyperTerminal
Run HyperTerminal, select an icon that pleases you and give the new connection a name,
such as Mini803. Now in the “Connect To” dialog box, in the bottom “Connect Using”
line, select the communications port you wish to use, with Direct Com1, Direct Com2,
Direct Com3, Direct Com4 as appropriate, then Okay. In the COMx Dialog box which
follows set up the port as follows: Bits per second: 9600 , Data bits: 8, Parity: None,
Flow Control: None, then Okay.
The ATN signal must be unconnected when using this program. There is no option to
remotely set and reset the board using the DTR line with this program.
NMIN-0803-Mini User Manual
29
12 REFERENCE
12.1 Decimal / Octal / Hex / ASCII Chart
DEC
0
1
2
3
4
5
6
7
8
9
10
11
12
13
14
15
16
17
18
19
20
21
22
23
24
25
26
27
28
29
30
31
OCT
0
1
2
3
4
5
6
7
10
11
12
13
14
15
16
17
20
21
22
23
24
25
26
27
30
31
32
33
34
35
36
37
HEX
0
1
2
3
4
5
6
7
8
9
a
b
c
d
e
f
10
11
12
13
14
15
16
17
17
19
1a
1b
1c
1d
1e
1f
Character
NUL
SOH
STX
ETX
EOT
ENQ
ACK
BEL
BS
HT
LF
VT
FF
CR
SO
SI
DLE
DC1
DC2
DC3
DC4
NAK
SYN
ETB
CAN
EM
SUB
ESC
FS
GS
RS
US
DEC
32
33
34
35
36
37
38
39
40
41
OCT
40
41
42
43
44
45
46
47
50
51
HEX
20
21
22
23
24
25
26
27
28
29
Character
SP
!
"
#
$
%
&
`
(
)
Control Action
Null character
Start of heading, = console interrupt
Start of text
End of text
End of transmission, not the same as ETB
Enquiry, goes with ACK; old HP flow control
Acknowledge, clears ENQ logon hand
Bell, rings the bell...
Backspace, works on HP terminals/computers
Horizontal tab, move to next tab stop
Line Feed
Vertical tab
Form Feed, page eject
Carriage Return
Shift Out, alternate character set
Shift In, resume defaultn character set
Data link escape
XON, with XOFF to pause listings; ":okay to send".
Device control 2, block-mode flow control
XOFF, with XON is TERM=18 flow control
Device control 4
Negative acknowledge
Synchronous idle
End transmission block, not the same as EOT
Cancel line, MPE echoes !!!
End of medium, Control-Y interrupt
Substitute
Escape, next character is not echoed
File separator
Group separator
Record separator, block-mode terminator
Unit separator
Description
Space
Exclamation mark
Quotation mark
Cross hatch (number sign)
Dollar sign
Percent sign
Ampersand
Closing single quote (apostrophe)
Opening parentheses
Closing parentheses
NMIN-0803-Mini User Manual
30
42
43
44
45
46
47
48
49
50
51
52
53
54
55
56
57
58
59
60
61
62
63
64
65
66
67
68
69
70
71
72
73
74
75
76
77
78
79
80
81
82
83
84
85
86
87
88
89
90
91
92
93
94
52
53
54
55
56
57
60
61
62
63
64
65
66
67
70
71
72
73
74
75
76
77
100
101
102
103
104
105
106
107
110
111
112
113
114
115
116
117
120
121
122
123
124
125
126
127
130
131
132
133
134
135
136
2a
2b
2c
2d
2e
2f
30
31
32
33
34
35
36
37
38
39
3a
3b
3c
3d
3e
3f
40
41
42
43
44
45
46
47
48
49
4a
4b
4c
4d
4e
4f
50
51
52
53
54
55
56
57
58
59
5a
5b
5c
5d
5e
*
+
,
.
/
0
1
2
3
4
5
6
7
8
9
:
;
<
=
>
?
@
A
B
C
D
E
F
G
H
I
J
K
L
M
N
O
P
Q
R
S
T
U
V
W
X
Y
Z
[
\
]
^
Asterisk (star, multiply)
Plus
Comma
Hyphen, dash, minus
Period
Slant (forward slash, divide)
Zero
One
Two
Three
Four
Five
Six
Seven
Eight
Nine
Colon
Semicolon
Less than sign
Equals sign
Greater than sign
Question mark
At-sign
Uppercase A
Uppercase B
Uppercase C
Uppercase D
Uppercase E
Uppercase F
Uppercase G
Uppercase H
Uppercase I
Uppercase J
Uppercase K
Uppercase L
Uppercase M
Uppercase N
Uppercase O
Uppercase P
Uppercase Q
Uppercase R
Uppercase S
Uppercase T
Uppercase U
Uppercase V
Uppercase W
Uppercase X
Uppercase Y
Uppercase Z
Opening square bracket
Reverse slant (Backslash)
Closing square bracket
Caret (Circumflex)
NMIN-0803-Mini User Manual
31
95
96
97
98
99
100
101
102
103
104
105
106
107
108
109
110
111
112
113
114
115
116
117
118
119
120
121
122
123
124
125
126
127
137
140
141
142
143
144
145
146
147
150
151
152
153
154
155
156
157
160
161
162
163
164
165
166
167
170
171
172
173
174
175
176
177
5f
60
61
62
63
64
65
66
67
68
69
6a
6b
6c
6d
6e
6f
70
71
72
73
74
75
76
77
78
79
7a
7b
7c
7d
7e
7f
_
`
a
b
c
d
e
f
g
h
i
j
k
l
m
n
o
p
q
r
s
t
u
v
w
x
y
z
{
|
}
~
DEL
Underscore
Opening single quote
Lowercase a
Lowercase b
Lowercase c
Lowercase d
Lowercase e
Lowercase f
Lowercase g
Lowercase h
Lowercase i
Lowercase j
Lowercase k
Lowercase l
Lowercase m
Lowercase n
Lowercase o
Lowercase p
Lowercase q
Lowercase r
Lowercase s
Lowercase t
Lowercase u
Lowercase v
Lowercase w
Lowercase x
Lowercase y
Lowercase z
Opening curly brace
Vertical line
Closing curly brace
Tilde (approximate)
Delete (rubout), cross-hatch box
12.2 Simple ASCII Chart
0
1
2
3
4
5
6
7
0
NUL
DLE
SP
0
@
P
`
p
1
SOH
DC1
!
1
A
Q
a
q
2
STX
DC2
"
2
B
R
b
r
3
ETX
DC3
#
3
C
S
c
s
4
EOT
DC4
$
4
D
T
d
t
5
ENQ
NAK
%
5
E
U
e
u
6
ACK
SYN
&
6
F
V
f
v
7
BEL
ETB
'
7
G
W
g
w
8
BS
CAN
(
8
H
X
h
x
NMIN-0803-Mini User Manual
9
HT
EM
)
9
I
Y
I
y
A
LF
SUB
*
:
J
Z
j
z
B
VT
ESC
+
;
K
[
k
{
C
FF
FS
,
<
L
\
l
|
D
CR
GS
=
M
]
m
}
32
E
SO
RS
.
>
N
^
n
~
F
SI
US
/
?
O
_’
o
DEL
13 GLOSSARY
.1” double and triple row connectors
24-pin socket
74AH04
9600 8N1
A/D
adapter
ASCII
CAN BUS
Caps
carrier board
computing and control function
communications channel
communications settings
COM1
COM2
COM3
COM4
controller
controller interface board
dedicated computer
deeply embedded
double male right angle connector
double sided sticky tape
embedded
embedded tasks
female
hand-crimped wires
headers
high-density connectors
High-Level-Language
HyperTerminal
IDC headers and ribbon cable
interactive
IsoMax™
NMIN-0803-Mini
language
Levels Translation
LED
LM3940
LM2937
Low Voltage Detector
male
NMIN-0803-Mini User Manual
33
mobile robot
Multitasking
PCB board
PWM
PWM connectors
Power Supply
Programming environment
prototyping
RS-232
R/C Servo motor
real time applications.
real time control
registers
RESET
Resistor
S80728HN
SCI
SPI
serial cable
“stamp-type” controller
stand-alone computer board
TJA1050
terminal program
upgrade an existing application.
Virtually Parallel Machine Architecture™ (VPMA)
wall transformer
14 Articles and Suggested Reading
Mealy, G. H. State machine pioneer, wrote “A Method for Synthesizing Sequential
Circuits,” Bell System Tech. J. vol 34, pp. 1045 –1079, September 1955
Moore, E. F. State machine pioneer, wrote “Gedanken-experiments on Sequential
Machines,” pp 129 – 153, Automata Studies, Annals of Mathematical Studies, no. 34,
Princeton University Press, Princeton, N. J., 1956
NMIN-0803-Mini User Manual
34