1
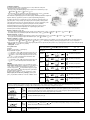
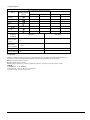
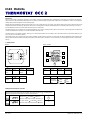
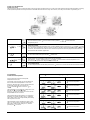
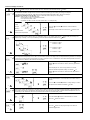
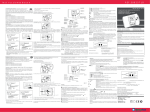
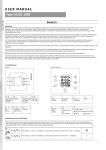
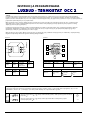
INSTRUKCJA PROGRAMOWANIA
LUXBUD - TERMOSTAT OCC 2
1. Wstęp
Programowalny regulator temperatury OCC2 służy do załączania obwodu grzejnego o zadanych porach, w poszczególne dni tygodnia. Modyfikacji
programu można dokonać poprzez zmianę czterech, wstępnie zaprogramowanych zdarzeń. To nowatorskie rozwiązanie pozwala na zaprogramowanie
regulatora, niemal z “dziecinną łatwością“. Procesor regulatora został tak zaprogramowany, aby poprzez duży wyświetlacz i za pomocą symboli graficznych,
poprowadzić użytkownika przez proces programowania.
OCC2 został wyposażony w funkcję adaptacyjną, która automatycznie zmienia czas załączenia ogrzewania w taki sposób, aby o nastawionej przez
użytkownika porze, została osiągnięta zadana temperatura. Po trzech dniach funkcja adaptacyjna zostaje zapisana w pamięci regulatora. Funkcję
adaptacyjną można wyłączyć (patrz pkt 5).
Podstawową zaletą programowalnego regulatora temperatury OCC2 jest możliwość zaprogramowania czasu i temperatury dla każdego zdarzenia
indywidualnie. Dzięki takiemu rozwiązaniu można znacznie zredukować koszty energii, nie tracąc przy tym (dzięki funkcji adaptacyjnej) jednej z
najważniejszych zalet przy ogrzewaniu jaką jest “komfort cieplny“.
OCC2 występuje w dwóch typach: OCC2-1991 (wyposażony w czujnik podłogowy) oraz OCC2-1999 (wyposażony we wbudowany czujnik powietrzny).
Regulator i czujnik należy zamontować zgodnie z instrukcją obsługi LUXBUD.
Symbole
G
A
F
B
E
C
BR929A09
Przyciski
H
I
M
D
R
N
J
L
K
A:
B:
Regulacja
zegara
Włącz /
Wyłącz
C:
Powrót do
ustawień
fabrycznych
D:
H:
I:
J:
Regulacja
w dół
Funkcja zegara
Tryb ręczny
Czas i temperatura
K:
Określenie dnia
tygodnia
E:
F:
G:
L:
M:
N:
Akceptacja
Regulacja
w górę
Wyświetlacz
Ogrzewanie
włączone
%
Odczyt czasu
pracy
Symbole czterech zdarzeń
Pobudka
Wyjście
Powrót
Noc
2. Załączenie regulatora
Po pierwszym załączeniu regulatora na wyświetlaczu pojawią się pulsujące symbole: zegara ( ) i dni. Każdy dzień ma przypisaną cyfrę od 1 do 7
(poniedziałek-1, wtorek-2, itd. ...). Pamiętając o tym należy ustawić aktualny czas i odpowiedni dzień tygodnia.
☞
Za pomocą przycisków (
przycisku ( ).
☞
Za pomocą przycisków ( ) i (
naciśnięcie przycisku ( ).
)i(
) należy ustawić aktualną godzinę i zaakceptować poprzez naciśnięcie
) należy ustawić odpowiedni dzień i zaakceptować poprzez
1-7
3. Obsługa regulatora
W regulatorze OCC2 dzień został podzielony na cztery zdarzenia. Fabrycznie
zaprogramowany na pracę 5(4)-2(2) tzn:
- Przez pięć dni (poniedziałek-piątek) pracuje w trybie cztero-zdarzeniowym, czyli:
( ) pobudka, ( ) wyjście, ( ) powrót, ( )noc.
- Przez dwa dni (sobota, niedziela) w trybie dwu-zdarzeniowym, czyli: ( ) pobudka
i ( ) noc. Ustawienia fabryczne można zmienić (patrz pkt 4).
Dla ułatwienia modyfikacji programów w instrukcji firmy LUXBUD przewidziano miejsce na
wpisanie własnego tygodniowego harmonogramu użytkownika (patrz pkt 6.).
Regulator wyposażony jest w przycisk “R“ (reset). Naciśnięcie i przytrzymanie tego
przycisku przez ok. trzy sekundy spowoduje wyzerowanie godziny i dnia tygodnia,
natomiast programy powrócą do ustawień fabrycznych. Ponowne ustawienie godz. i
dnia patrz pkt 2. W celu zmiany programów patrz pkt 4 instrukcji LUXBUD.
Przed przystąpieniem do programowania należy zastanowić się, który z trzech
wariantów podziału tygodnia najbardziej nam odpowiada (programowanie
wariantów patrz instrukcja LUXBUD pkt 5):
Wariant 1. 5(4)-2(2) -12345 / 67
- Przez pięć dni (poniedziałek-piątek) pracuje w trybie cztero-zdarzeniowym, czyli: ( ) pobudka, ( ) wyjście, ( ) powrót, ( )noc.
- Przez dwa dni (sobota, niedziela) w trybie dwu-zdarzeniowym, czyli: ( ) pobudka i ( )noc.
Wariant 2. 6(4)-1(2) -123456 / 7
- Przez sześć dni (poniedziałek-sobota) pracuje w trybie cztero-zdarzeniowym, czyli: ( ) pobudka, ( ) wyjście, ( ) powrót, ( )noc.
- Przez jeden dzień (niedziela) w trybie dwu-zdarzeniowym, czyli: ( ) pobudka i ( ) noc.
Wariant 3. 7(4)-0(0) - 1234567
- Przez siedem dni (poniedziałek-niedziela) pracuje w trybie cztero-zdarzeniowym z tym wyjątkiem, że w tym trybie, każdy dzień można zaprogramowa_
indywidualnie, czyli: ( ) pobudka, ( ) wyjście, ( ) powrót, ( )noc - dla każdego dnia tygodnia mogą występować różne czasy i temperatura.
Ważne jest także, aby zastanowić się jaki rodzaj zegara będzie dla nas odpowiedni i jakiej skali chcemy używać (programowanie zegara i skali patrz pkt 5):
- rodzaj zegara - 12-sto lub 24-ro godzinny,
- rodzaj skali - ˚C lub ˚F.
4. Programowanie
Przykład.
Wybrany został wariant “1“ (patrz pkt 3).
Od poniedziałku do piątku:
- ( ) pobudka, o godz. 6:00 temperatura wzrosła do 27˚C.
- ( ) wyjście, o godz. 8:00 temperatura zmalała do 20˚C.
- ( ) powrót, o godz. 16:00 temperatura wzrosła do 27˚C.
- ( ) noc, o godz. 22:30 temperatura zmalała do 20˚C.
Natomiast od soboty do niedzieli:
- ( ) pobudka, o godz. 8:00 temperatura wzrosła do 27˚C.
- ( ) noc, o godz. 23:00 temperatura zmalała do 20˚C.
UWAGA:
Temperaturę można ustawiać co 0,5˚, w zależności od “rodzaju skali (˚C lub ˚F)“ (wybór: patrz pkt 5.), w przedziale od
+5˚ do +40˚. Po ustawieniu temperatury na poziomie +5˚ i
naciśnięciu przycisku ( ) na wyświetlaczu pojawi się napis
“OFF“. Takie ustawienie spowoduje wyłączenie ogrzewania
w programowanym zdarzeniu.
Godzinę można ustawiać co 15 min, w zależności od “rodzaju zegara (12-sto lub 24-ro godzinny)“ (wybór: patrz
pkt 5.), w przedziale od 0:00 do 11:45 lub od 0:00 do 23:45.
Naciśnij i przytrzymaj przycisk ( ) przez 3 sekundy. Przyciskami (
eniaj, a przyciskiem ( ) zatwierdzaj dokonane zmiany.
Dni 1 do 5
)i(
) zmi-
Ustaw
Pobudka
☞
☞
: Godzinę i temperaturę
Wyjście
☞
☞
: Godzinę i temperaturę
Powrót
☞
☞
: Godzinę i temperaturę
Noc
☞
☞
: Godzinę i temperaturę
Dni 6 i 7
☞
Pobudka
☞
Noc
☞
: Godzinę i temperaturę
☞
: Godzinę i temperaturę
Tymczasowa zmiana ustawień
Podczas normalnej pracy regulatora w trybie cztero-zdarzeniowym, może zaistnieć potrzeba, chwilowego przestawienia temperatury z ekonomicznej
na komfortową np. przedłużające się przyjęcie lub z komfortowej na ekonomiczną np. niezaplanowane wyjście.
Tryb komfortowy /
ekonomiczny
☞
Anulowanie trybu
komfortowego /
ekonomicznego
Nacisnąć przycisk ( ). Przyciskami ( ) i ( ) należy zwiększyć lub zmniejszyć temperaturę. Nastawiona
wartość temperatury będzie pulsować przez 5 sekund. Po tym czasie regulator powróci do wyświetlania
godziny. Nastawiona wartość będzie obowiązywała do rozpoczęcia następnego zaprogramowanego zdarzenia. Regulator będzie pracował wg zaprogramowanych ustawień.
Nacisnąć dwukrotnie przycisk (
).
☞
Program wakacyjny
Zaprogramowany cykl pracy możemy zastąpić innym ustawieniem, np. na czas urlopu.
Tryb ręczny:
☞
Anulowanie trybu
ręcznego
☞
Nacisnąć przycisk ( ). Przyciskami ( ) i ( ) należy ustawić temperaturę. Od tego momentu regulator
będzie utrzymywać nastawioną temperaturę.
Nacisnąć przycisk (
).
5. Ustawienia dodatkowe
Naciśnij i przytrzymaj przyciski ( ) i ( ) przez 3 sekundy. Przyciskiem ( ) przejdż do odpowiedniego menu.
Przyciskiem ( ) wejdż do wybranego menu.
Menu
Odczyt zużycia energii
Z regulatora można odczytać procentowy czas pracy ogrzewania z ostatnich 2, 30 lub 365 dni
(ze wzoru: 1dzień = czas pracy / 100 x moc urządzenia (kW) x cena za 1kWh x 24h), co pozwala kontrolować zużycie energii np.:
Odczyt:
30% z ostatnich 365 dni pracy
Moc urządzenia: 1,2 kW
Cena 1kWh:
0,35 zł.
Odczyt:
30/100 x 1,2 x 0,35 x 24 = 3,024zł/dzień
☞
}
2 dni
30 dni
365 dni
Wersja oprogramowania
☞
Bieżąca temperatura czujnika
☞
Wybór Wariantu podziału tygodnia
Po wejściu w to menu na przemian pulsują cyfry: 12345 / 67 (“wariant-1“ patrz pkt 3). Wybieramy odpowiedni dla nas wariant
poprzez naciśnięcie przycisku ( ). Zmiany zatwierdzamy przyciskiem ( ).
}
☞
☞
5
2
6
1
7
dni
dni
dni
dzień
dni
opis zdarzeń patrz pkt 3.
Wybór rodzaju skali i zegara
W tym menu można dokonić zmian rodzaju skali i zegara (patrz UWAGA pkt 4)
☞
☞
☞
☞
}
Przyciskami ( ) i ( ) należy wybrać odpowiedni rodzaj skali i
zegara. Akceptujemy poprzez naciśnięcie przycisku ( ) .
Funkcja adaptacyjna
Opisaną funkcję adaptacyjną (patrz pkt 1) można wyłączyć lub włączyć. W przypadku wyłączenia regulator załączy się o
zaprogramowanej godzinie.
☞
☞
przez
przez
przez
przez
przez
Przyciskami ( ) i ( ) zwiększamy lub zmniejszamy temperaturę
“MIN“. Akceptujemy poprzez naciśnięcie przycisku ( ).
☞
☞
zdarzenia
zdarzenia
zdarzenia
zdarzenia
zdarzenia
Przyciskami ( ) i ( ) zwiększamy lub zmniejszamy
temperaturę “MAX“. Akceptujemy poprzez naciśnięcie przycisku
( ). Na wyświetlaczu pojawi się napis “LoLi“. W celu
kontynuacji należy nacisnąć przycisk ( ).
☞
☞
5(4)-2(2) - 4
2
6(4)-1(2) - 4
2
7(4)-0(0) - 4
Ograniczenie zakresu regulacji temperatury MIN/MAX
Zakres regulacji temperatury można ograniczyć aby wykluczyć możliwość ustawienia za niskiej lub za wysokiej temperatury. Niektóre
podłogi drewniane nie mogą być nagrzewane powyżej 27˚C. W przypadku wykorzystania ogrzewania podłogowego w celu uzyskania
komfortu ciepłej podłogi możemy nie chcieć, aby temperatura podłogi spadła poniżej 22˚C.
☞
☞
Kolejne odczyty zmienia się przyciskami ( ) i ( ) . Wyjście z
menu poprzez naciśnięcie przycisku ( ). W tym menu nie
można wprowadzać żadnych zmian.
}
Przyciskiem (
) ustawiamy “OFF“ lub “ON“.
Akceptujemy poprzez naciśnięcie przycisku (
).
☞
Aby opuścić “ustawienia dodatkowe“ i przejść do normalnej
pracy, należy nacisnąć przycisk ( )
☞
Ustawienia fabryczne
Czas i temperatura dla każdego zdarzenia
Dni 1-5
Godzina
Symbol graficzny
zdarzenia
Pobudka
Wyjście
Powrót
Noc
Fabrycznie
Użytkownik
Temperatura
Fabrycznie
06:00
27˚C
08:00
20˚C
16:00
27˚C
22:30
20˚C
08:00
27˚C
23:00
20˚C
Użytkownik
Dni 6-7
Pobudka
Noc
Fabrycznie
Ustawienia
dodatkowe
Wariant podziału
tygodnia
5:2
Ograniczenie
zakresu MIN/MAX
+5/+55˚C
Rodzaj skali i zegara
24 h/˚C
Funkcja adaptacyjna
ON
Użytkownik
7. Kody błędów
Regulator został tak zaprogramowany aby pomóc użytkownikowi podczas wystąpienia ewentualnych nieprawidłowości w
jego działaniu. Zawsze w razie jakichkolwiek wątpliwości mogą Państwo skontaktować się z firmą LUXBUD.
E0: Błąd wewnętrzny. Wymienić regulator.
E1: Błąd czujnika. Wymienić regulator.
E2: Błąd czujnika. Sprawdzić czy czujnik jest prawidłowo podłączony do regulatora. Jeżeli tak, wymienić czujnik.
LUXBUD
ul. Krasińskiego 8 · 01-601 Warszawa
Tel. (22) 839 90 22; 839 82 30; 817 03 32 · Fax 839 86 52
www.luxbud.com.pl www.termostaty.com.pl
USER MANUAL
THERMOSTAT OCC 2
Introduction
The OCC 2 thermostat is capable of switching on your heating system at pre determined times on different days of the week. It is possible to set 4 periods
called events each day with different temperatures. From factory a default schedule is programmed suitable for most installations. Unless you change these
settings the thermostat will operate to this default program.
Working with lower temperatures during times that the room is unoccupied will lower your energy costs without reducing the comfort. The thermostat has an
adaptive function that automatically changes the start time of a heating period so that the desired temperature is reached at the time that you set. After 3
days the adaptive function has learned when the heating must be switched on.
The thermostat type OCC2-1991H1 has an external temperature sensor that is normally placed in the floor construction. In this configuration the thermostat
controls the temperature of the floor and not the temperature within the room.
The thermostat has a pin button marked R, allowing you to reset the thermostat to factory settings. These are listed at the end of this manual with space for
you to record your own weekly schedule.
The heating system can be switched off on the built-in interrupter. The Microprocessor taking care of the time will still be supplied with power whereby time
and day will be maintained. When the heating is required and the thermostat is switched on, it will continue the 4-event programme based on present time
and day.
1. Getting started
Display symbols
G
A
F
B
E
C
BR929A09
Buttons
H
I
M
D
R
N
J
L
K
A:
B:
C:
D:
H:
I:
J:
Pin button
adjust of
clock
On/off
Reset to
factory
setting
Adjustment
down
Clock
function
Manual
mode
Time and
temperature
E:
F:
G:
L:
M:
N:
OK accept
Adjustment
up
Display
Heating on
4-event symbol
%
Monitoring
Wake
of switch-on
Night
time
K:
Day number
Out
Home
Setting the thermostat into operation
First time power is connected the clock and day will be flashing and must be set. If you need to
adjust the time of the thermostat at a later date, insert a pin into the hole
for setting of time
and day. Adjustment must be made for summer and winter time.
☞
Press the UP ( ) or DOWN ( ) buttons to
select the correct time and press OK button (
☞
Then press the UP ( ) or DOWN ( ) button to
select the correct day and press OK ( ) button.
Type: OCC2
).
1-7
Lagernummer: 57669 01/03 - (BJ)
2. Daily use of the thermostat
4-event clock mode
The day has been split into 4 events describing a typical day. When the thermostat is in 4-event mode it will automatically adjust the temperature according
to the required temperature to the required time. As standard the thermostat has 5 days with 4 events, and 2 days with 2 events. Programming see 3.
4-event clock mode:
The clock function symbol (
Programming see 3.
Comfort mode:
☞
5 secs.
Manual mode:
5 secs.
☞
) will be indicated.
Temporary override
To temporarily override the temperature in the 4-event schedule program, press the UP ( ) or DOWN ( ) button
once, to show the temperature, and press again to increase or decrease the temperature. The display will flash for
5 seconds, and will then revert to the time. The override will operate until the next programmed event when the
unit will resume the automatic programme.
Cancel comfort mode
To cancel the override state, press the OK (
☞
☞
) and one of the 4-event symbols (
) button twice.
Permanent override:
During holidays, the scheduled 4-event program can be overridden.
Press the OK ( ) button, and then the UP ( ) or DOWN ( ) button until the override temperature is set.
The unit will now operate to this temperature permanently.
Cancel manual mode
To cancel the permanent override state press the OK (
3. Programming
4-event time and temperature
For each event, the start time and required
temperature must be set.
Press OK (
) button once, and the unit will resume automatic function.
) button for 3 secs. to begin programming
Day 1 - 5
For example, in the morning you wish the heating to
start at 07:00 and the temperature to rise to 25˚C.
Press OK ( ) button for 3 seconds and the start time
is displayed. Change this to 07:00 with the
UP ( ) or DOWN ( ) button. Press OK ( ) to
confirm.
The temperature is now displayed. Change this to 25˚C
with the UP ( ) or DOWN ( ) button.
Press OK ( ) button to confirm. This action can now
be repeated for the second event.
☞
☞
: Time and temperature
☞
☞
: Time and temperature
☞
☞
: Time and temperature
These settings will be valid with days 1-5 showing on
the display. To program the days 6 and 7, repeat the
above. Days 6 and 7 are usually Saturday and Sunday,
and only have two events.
☞
☞
: Time and temperature
☞
☞
: Time and temperature
☞
☞
: Time and temperature
The temperature can be set within the range of +5 to
+40˚C. It is also possible to select the heating OFF at
that event by reducing the setting to 5˚C, and then
pressing the ( ) once more.
Day 6 - 7
4. Advanced settings and read-out
☞
✚
☞
Press both UP ( ) and DOWN ( ) buttons together for 3 seconds. INFO is displayed.
Press UP( ) button until you reach the desired sub menu. Select the sub menu with the OK (
Monitoring of energy consumption
The thermostat calculates average time it has been switched on allowing you to monitor your energy consumption.
In the thermostat you can read out:. Total switch-on time in percentage in the latest 2 days, 30 days or 365 days.
Calculation of operational costs per day: (switch-on time:100) x kW x kWh-price x 24 h per day
Example: Read-out: 30 % in the latest 365 days
Size of heating system: 1,2 kW (ask the installer)
Cost of power: 0,2 EUR / kWh
Calculation: (30:100) x 1,2 kW x 0,2 EUR / kWh x 24 h = 1,7 EUR per day
}
2 days
30 days
365 days
Software version
☞
Actual sensor temperature
☞
}
☞
☞
) button to show the different
No changes can be made here. Use the OK (
) button to end.
5-2: 4 events in 5 days +
2 events in 2 days.
6-1: 4 events in 6 days +
2 events in 1 day
7-0: 4 events in 7 days
☞
Maximum allowed temperature setting. Use the UP ( ) or
DOWN ( ) button to increase or reduce, and OK ( ) button to
accept.
☞
Next is displayed LoLi. Press OK (
☞
Minimum allowed temperature setting. Use the UP ( ) or
DOWN ( ) button to increase or reduce and OK ( ) button to
accept.
) button to continue.
Time and temperature scale selection
☞
☞
☞
}
You can select either ˚C or ˚F scale, and 12 or 24 hour clock as
follows:
Press UP (
) or DOWN (
) button to change settings. Confirm
the required scale with the OK button (
) button.
Adaptive function:
This function enables the thermostat to calculate when it needs to switch ON so that the required temperature is reached at the set
time. With a start time of 07:00 therefore, the thermostat may switch ON as early as 06:00 so that the desired temperature of 25˚C is
achieved by 07:00. Without this function set, the thermostat will start to heat at the time you set.
☞
☞
) or DOWN (
Max and min allowed temperature range
The temperature setting range of +5˚ to 40˚ C can be limited to prevent a too high or too low temperature being selected. For example,
a wood floor covering should not be allowed to exceed a maximum of 27˚C. Low limitation is used where the temperature of the floor
is required never to fall below the minimum set temperature.
☞
☞
Press UP (
readouts.
4-event sequence
The present event sequence flashes: Days 1-5, followed by days 6-7. To change, press the UP ( ) button until you have days 1-6
and then day 7 flashing, or all 7 days are flashing. Select the required sequence with the OK ( ) button.
☞
☞
) button.
}
Press the DOWN (
Press OK (
) button to switch between on and off.
) button to confirm.
☞
Press OK ( ) button to end programming and to return to
scheduled programme.
☞
5. Reset to factory setting
Press the pin button for 3 secs. and the thermostat returns to factory settings. Time
and day is also reset and must be set according to “Setting the thermostat into
operation”.
Factory settings
4-event time and temperature
Day 1-5
Time
Temperature
06:00
25˚C
08:00
20˚C
16:00
27˚C
22:30
20˚C
08:00
27˚C
23:00
20˚C
Day 6-7
4-event sequence
5:2
Hi-Low temp.
55˚C / 5˚C
Scale
24 H / ˚C
Adaptive control
ON
6. Failure codes
E0 = Internal failure, replace thermostat
E1 = Built-in sensor short-circuit or disconnected, replace thermostat
E2 = External sensor short-circuit or disconnected
OJ ELEKTRONIK A/S
Stenager 13B · DK-6400 Sønderborg
Tel. +45 73 12 13 14 · Fax +45 73 12 13 13
www.oj.dk