1
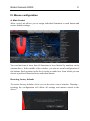
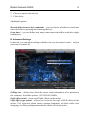
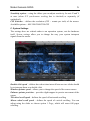
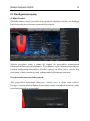
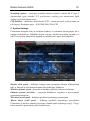
Natec Genesis GX55
1
EN – NATEC GENESIS GX55 – USER MANUAL
I. Introduction
Natec Genesis GX55 is a wired gaming mouse with 9 fully customizable
buttons, high precision optical engine and comfortable design.
II. Features
-
High-end optical engines, positioning precision
Adjustable resolution up to 3200DPI
Different LED indicator colors, which depend on resolution
Two modes of LED lightning: full lightened and breathing.
9 fully programmable keys – more than 40 setting to choose for each
Adjustable polling rate: 125/250/500/1000 Hz.
Advanced profiles management
Ergonomic design.
III. Driver description
A. System
-
Compatible with Windows XP/Vista/7 operation system
USB (1.1/2.0) port
CD-ROM drive
30 MB of hard disk space
B. Windows XP/Vista/7 installation guide
1. Insert the Genesis GX55 gaming mouse USB plug into the computer USB
port
2. Insert the Genesis GX55 driver CD into the CD-ROM drive
3. When the screen shows install the program, click next
4. Select the install path, then click next
5. Installing
6. When the screen shows installation finished, click finish
7. Restart the computer.
Natec Genesis GX55
2
IV. Mouse configuration
A. Main Control
Main control tab allows you to assign individual functions to each button and
restore default settings.
You can bind one of more than 40 functions to keys labeled by numbers on the
schema above. In the middle of the window, you can see actual configuration of
the buttons. Each position on the list is in fact a combo box, from which you can
choose a preferred function for an individual button.
Restoring factory defaults
To restore factory defaults, click reset on the main control window. Warning –
resetting the configuration will delete all settings and macros stored in the
driver!
Natec Genesis GX55
3
Defining Macros
In brief speaking, a macro is a series of actions that you can bind to the
keyboard. More precisely, macro is a recorded sequence of key presses, releases
and time delays between them. Output delays can be recorded or predefined by
user.
To define a macro, you have to choose from available function list assign
macro, and then macro manager.
Adding a macro:
1. Click new
2. Choose name for your macro
3. Click start record
4. Press desired sequence of keys
5. Press stop record
Now you can assign your macro to the key by selecting it from group assign
macro on the list related to the programmed key.
Deleting macros:
1. Open macro manager
Natec Genesis GX55
4
2. Choose a macro from the list
3. Click delete
Additional options:
Record delays between key commands – you can choose whether to record time
intervals between pressing and releasing the keys
Loop times – you can define how many times macro should be used after single
button press.
B. Advanced Settings
In this tab, you can adjust settings related to the way the mouse works – such as
precision or sensitivity.
Polling rate – defines how often the mouse sends information of its position to
the computer. Available options: 125/250/500/1000Hz
Light effect switch – turns on/off light effects on the mouse
Light effect type options – allows you to choose the type of LED effects of the
mouse. Full lightened option causes constant luminance of diode while color
changing; breathing setting means that the diode will slowly pulse.
Natec Genesis GX55
5
Sensitivity options – using the sliders you can adjust sensitivity for axis X and Y
at once (when X/Y synchronous working box is checked) or separately (if
unchecked).
CPI Switcher – defines the resolution (CPI – counts per inch) of the mouse.
Available options – 400/1200/2000/3200 CPI
C. System Settings
The settings here are related rather to an operation system, not the hardware
itself. System settings allow you to change the way your system interprets
signals from the mouse.
Double click speed – defines how short time interval between two clicks should
be to interpret them as a double click
Windows pointer speed – allows you to change the speed of the screen cursor
Enhance pointer precision – provides slight support in precise movement of the
cursor
Tilt wheel scroll speed – defines the speed of horizontal scrolling
Mouse wheel scroll speed – defines the speed of vertical scrolling. You can
adjust using the slider or choose option 1 Page, which will cause full pages
scrolling.
Natec Genesis GX55
6
D. Profile management
Natec Genesis GX55 allows you to create different profiles of settings and
assign them to individual games or applications. Up to five profiles can be
stored in the driver – other have to be saved to your hard disk. Switching
between profiles is possible by the driver interface, mouse buttons with assigned
profile-related functions or automatically – by launching an application linked to
the profile.
Creating a profile
1. Click create profile on the driver interface
2. Type the name for the profile
3. In the path to executable box insert path to the executable file (.exe) of the
application you want to be assigned to the profile
Editing a profile
1. Click edit profile on the driver interface
2. Edit the name and path to assigned application accordingly to your needs
Saving a profile
1. Click save profile on the driver interface
2. Choose the folder you want to save profile to and name for the file
Loading a profile
1. Click load profile on the driver interface
2. Choose the file with the profile you need
Natec Genesis GX55
V. General
Non-authorized repairs or taking the device to pieces make the warranty
void and may cause the product damage.
Do not use the product in low and high temperatures and in the dusty
atmosphere.
Do not connect / disconnect the product to / from a computer when it is on.
The safe product, conforming to the EU requirements.
The product is made in accordance with RoHS European standard. The
standard was issued in order to decrease the amount of the electronic and
electrical waste emitted into the atmosphere.
The WEEE symbol (the crossed-out wheeled bin) using indicates that this
product in not home waste. You protect the environment when you recycle
hazardous waste appropriately. In order to get detailed information about
recycling this product please contact your retailer or a local authority.
7
Natec Genesis GX55
8
PL – NATEC GENESIS GX55 – INSTRUKCJA OBSŁUGI
I. Wstęp
Natec Genesis GX55 jest przewodową myszą dla graczy wyposażoną w 9 w
pełni programowalnych przycisków, precyzyjny układ optyczny oraz wygodny
profil.
II. Cechy
- Najwyższej jakości układ optyczny, precyzja pozycjonowania
- Konfigurowalna rozdzielczość do 3200DPI
- Zróżnicowane kolory wskaźnika LED, zmienne w zależności od
rozdzielczości
- Dwa tryby podświetlenia LED: w pełni podświetlony i pulsujący
- 9 w pełni programowalnych przycisków – ponad 40 ustawień do wyboru dla
każdego
- Konfigurowalna częstotliwość pracy: 125/250/500/1000 Hz.
- Zaawansowane zarządzanie profilami
- Ergonomiczny design.
III. Opis sterownika
A. System
-
Kompatybilny z systemami Windows XP/Vista/7
Port USB (1.1/2.0)
Napęd CD-ROM
30 MB wolnej przestrzeni na dysku
B. Instrukcja instalacji w systemach Windows XP/Vista/7
1.
2.
3.
4.
5.
6.
7.
Umieść wtyczkę USB myszy Genesis GX55 w porcie USB komputera.
Umieść płytę CD ze sterownikiem Genesis GX55 w napędzie CD-ROM.
Gdy na ekranie wyświetli się Zainstaluj program, kliknij Dalej.
Wybierz docelową ścieżkę instalacji, następnie kliknij Dalej.
Instalacja.
Gdy na ekranie wyświetli się Instalacja zakończona, kliknij Zakończ.
Uruchom ponownie komputer.
Natec Genesis GX55
9
IV. Konfiguracja myszy
A. Main Control
Zakładka Main control pozwala na przypisanie odrębnych funkcji do każdego
przycisku oraz przywrócenie ustawień fabrycznych.
Możesz przypisać jedną z ponad 40 funkcji do przycisków oznaczonych
numerami na powyższym schemacie. W środkowej części okna można zobaczyć
bieżącą konfigurację przycisków. Każda z pozycji na liście jest w istocie listą
rozwijaną, z której można wybrać żądaną funkcję dla danego klawisza.
Przywracanie ustawień fabrycznych
Aby przywrócić ustawienia fabryczne, wciśnij reset w oknie main control.
Uwaga – resetowanie konfiguracji spowoduje utratę wszystkich ustawień i makr
przechowywanych w sterowniku!
Natec Genesis GX55
10
Definiowanie Makr
Mówiąc ogólnie, makro to seria akcji, którą można przypisać do klawiatury.
Dokładniej, makro jest zarejestrowaną sekwencją naciśnięć i zwolnień
przycisków oraz odstępów czasowych między nimi. Odstępy wyjściowe mogą
być identyczne z nagranymi, bądź zdefiniowane przez użytkownika.
Aby zdefiniować makro, należy z dostępnej listy funkcji wybrać assign macro, a
następnie macro manager.
Dodawanie makra:
1. Kliknij new
2. Wybierz nazwę dla twojego makra
3. Kliknij start record
4. Wciśnij żądaną sekwencję klawiszy
5. Kliknij stop record
Teraz możesz przypisać makro do przycisku, wybierając jego nazwę z grupy
assign macro na liście związanej z programowanym przyciskiem.
Usuwanie makra:
1. Otwórz macro manager
Natec Genesis GX55
11
2. Wybierz makro z listy
3. Kliknij delete
Opcje dodatkowe:
Record delays between key commands – możesz wybrać, czy rejestrować
odstępny czasu pomiędzy wciskaniem a zwalnianiem klawiszy
Loop times – definiuje, ile razy makro ma zostać wykonane przy jednym
przyciśnięciu przycisku
B. Advanced Settings
W tej zakładce znajdują się ustawienia związane ze sposobem działania myszy –
takie jak precyzja bądź czułość.
Polling rate – definiuje, jak często mysz wysyła informacje o pozycji do
komputera. Dostępne opcje: 125/250/500/1000Hz
Light effect switch – włącza/wyłącza efekty świetlne myszy
Light effect type options – pozwala na wybranie rodzaju efektu diody LED
myszy. Opcja Full lightened powoduje stałe natężenie światła diody podczas
zmiany koloru; opcja breathing oznacza, że dioda będzie powoli pulsować.
Natec Genesis GX55
12
Sensitivity options – używając suwaków możesz ustawić czułość dla X oraz Y
jednocześnie (gdy okienko X/Y synchronous working jest zaznaczone) bądź
osobno (jeśli jest odznaczone).
CPI Switcher – definiuje rozdzielczość (CPI – counts per inch, czyli pomiary na
cal) myszy. Dostępne opcje – 400/1200/2000/3200 CPI
C. System Settings
Ustawienia dostępne tutaj są związane bardziej z systemem operacyjnym, niż z
samym urządzeniem. Zakładka System settings umożliwia zmianę sposobu, w
jaki Twój system interpretuje sygnały wysyłane przez mysz do komputera.
Double click speed – definiuje odstęp czasu pomiędzy dwoma kliknięciami,
taki, w którym są one interpretowane jako podwójne kliknięcie
Windows pointer speed – pozwala na zmianę szybkości kursora na ekranie
Enhance pointer precision – zapewnia dodatkowe wsparcie w precyzyjnym
poruszaniu kursorem
Tilt wheel scroll speed – definiuje prędkość poziomego przewijania
Mouse wheel scroll speed – definiuje prędkość pionowego przewijania.
Ustawienie to możesz zmienić używając suwaka bądź wybierając opcję 1 Page,
która umożliwi przewijanie tylko całych stron.
Natec Genesis GX55
13
D. Zarządzanie profilami
Natec Genesis GX55 pozwala na stworzenie różnych profili ustawień oraz
przypisanie ich do odrębnych gier lub aplikacji. Do pięciu profili może być
przechowywane w sterowniku – reszta musi zostać zapisana na dysk twardy.
Przełączanie pomiędzy profilami jest możliwe przez interfejs sterownika,
przyciski myszy, do których przypisano funkcje związane z profilami, bądź
automatycznie – poprzez uruchomienie aplikacji związanej z profilem.
Tworzenie profilu
1. Kliknij create profile w oknie sterownika
2. Wprowadź nazwę dla profilu
3. W polu path to executable box insert umieść ścieżkę do pliku
wykonywalnego (.exe) aplikacji, którą chcesz przypisać do profilu
Edycja profilu
1. Kliknij edit profile w oknie sterownika
2. Zmień nazwę profilu i ścieżkę do przypisanej aplikacji zgodnie z
potrzebą.
Zapisywanie profilu
1. Kliknij save profile w oknie sterownika
2. Wybierz folder, w którym chcesz zapisać profil oraz nazwę dla pliku z
profilem
Wczytywanie profilu
1. Kliknij load profile w oknie sterownika
2. Wybierz potrzebny plik z profilem
Natec Genesis GX55
V. Uwagi ogólne
Nie używaj produktu w gorącym, zimnym, zakurzonym bądź
zawilgoconym otoczeniu.
Upuszczenie, bądź uderzenie klawiatury może spowodować uszkodzenie
urządzenia, podrapanie obudowy, bądź inną usterkę produktu.
Nieautoryzowane próby rozkręcania urządzenia powodują utratę
gwarancji i mogą spowodować uszkodzenie produktu.
Produkt bezpieczny, zgodny z wymaganiami UE.
Produkt wyprodukowany zgodnie z europejską normą RoHS. Jej celem
jest zmniejszenie ilości substancji niebezpiecznych, przenikających do
środowiska z odpadów elektrycznych i elektronicznych.
Użycie symbolu WEEE (przekreślony kosz) oznacza, że niniejszy produkt
nie może być traktowany jako odpad domowy. Zapewniając prawidłową
utylizację pomagasz chronić środowisko naturalne. W celu uzyskania
szczegółowych informacji dotyczących recyklingu niniejszego produktu
należy skontaktować się z punktem sprzedaży detalicznej, w którym
dokonano zakupu lub organem władzy lokalnej.
14