1
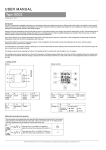
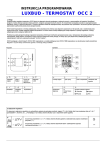
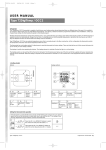
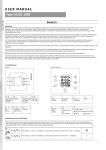
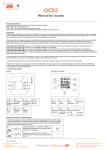
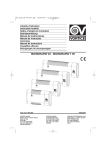
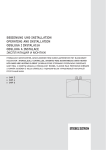
Type OCD2 Introduction The thermostat is capable of switching on your heating system at pre determined times on different days of the week. It is possible to set 4 periods called events each day with different temperatures. From factory a default schedule is programmed suitable for most installations. Unless you change these settings the thermostat will operate to this default program. Working with lower temperatures during times that the room is unoccupied will lower your energy costs without reducing the comfort. The thermostat has an adaptive function that automatically changes the start time of a heating period so that the desired temperature is reached at the time that you set. After 3 days the adaptive function has learned when the heating must be switched on. The thermostat has a built-in temperature sensor and an externally temperature sensor. In this configuration the thermostat controls the temperature within the room and use the externally temperature sensor as limit sensor avoiding too high or too low temperatures in the floor construction. The thermostat has a pin button marked R, allowing you to reset the thermostat to factory settings. These are listed at the end of this manual with space for you to record your own weekly schedule. The display is backlit when operating the buttons. The heating element is switched off when the light is on in the display. The heating system can be switched off on the built-in interrupter. The Microprocessor taking care of the time will still be supplied with power whereby time and day will be maintained. When the heating is required and the thermostat is switched on, it will continue the 4-event programme based on present time and day. 1. Getting started Display symbols Buttons G A F B E C BR929A09 Lagernummer: 57667 09/03 - (BJ) U SER M AN U AL H I M D R N J L K A: B: C: D: H: I: J: Pin button adjust of clock On/off Reset to factory setting Adjustment down Clock function Manual mode Time and temperature E: F: G: L: M: N: OK accept Adjustment up Display Heating on 4-event symbol % Monitoring Wake of switch-on Night time Setting the thermostat into operation First time power is connected the clock and day will be flashing and must be set. If you need to adjust the time of the thermostat at a later date, insert a pin into the hole for setting of time and day. Adjustment must be made for summer and winter time. ☞ Press the UP ( ) or DOWN ( ) buttons to select the correct time and press OK button ( ☞ Then press the UP ( ) or DOWN ( ) button to select the correct day and press OK ( ) button. Type: OCD2 ). 1-7 K: Day number Out Home 2. Daily use of the thermostat 4-event clock mode The day has been split into 4 events describing a typical day. When the thermostat is in 4-event mode it will automatically adjust the temperature according to the required temperature to the required time. As standard the thermostat has 5 days with 4 events, and 2 days with 2 events. Programming see 3. 4-event clock mode: The clock function symbol ( Programming see 3. Comfort mode: ☞ 5 secs. ) will be indicated. Temporary override To temporarily override the temperature in the 4-event schedule program, press the UP ( ) or DOWN ( ) button once, to show the temperature, and press again to increase or decrease the temperature. The display will flash for 5 seconds, and will then revert to the time. The override will operate until the next programmed event when the unit will resume the automatic programme. Cancel comfort mode To cancel the override state, press the OK ( ) button twice. ☞ Manual mode: ☞ ) and one of the 4-event symbols ( 5 secs. ☞ Permanent override: During holidays, the scheduled 4-event program can be overridden. Press the OK ( ) button, and then the UP ( ) or DOWN ( ) button until the override temperature is set. The unit will now operate to this temperature permanently. Cancel manual mode To cancel the permanent override state press the OK ( ) button once, and the unit will resume automatic function. 3. Programming 4-event time and temperature For each event, the start time and required temperature must be set. Press OK ( ) button for 3 secs. to begin programming Day 1 - 5 For example, in the morning you wish the heating to start at 07:00 and the temperature to rise to 21˚C. Press OK ( ) button for 3 seconds and the start time is displayed. Change this to 07:00 with the UP ( ) or DOWN ( ) button. Press OK ( ) to confirm. The temperature is now displayed. Change this to 21˚C with the UP ( ) or DOWN ( ) button. Press OK ( ) button to confirm. This action can now be repeated for the second event. These settings will be valid with days 1-5 showing on the display. To program the days 6 and 7, repeat the above. Days 6 and 7 are usually Saturday and Sunday, and only have two events. The temperature can be set within the range of +5 to +40˚C. It is also possible to select the heating OFF at that event by reducing the setting to 5˚C, and then pressing the ( ) once more. ☞ ☞ : Time and temperature ☞ ☞ : Time and temperature ☞ ☞ : Time and temperature ☞ ☞ : Time and temperature ☞ ☞ : Time and temperature ☞ ☞ : Time and temperature Day 6 - 7 4. Advanced settings and read-out ☞ ✚ ☞ Press both UP ( ) and DOWN ( ) buttons together for 3 seconds. INFO is displayed. Press UP( ) button until you reach the desired sub menu. Select the sub menu with the OK ( Monitoring of energy consumption The thermostat calculates average time it has been switched on allowing you to monitor your energy consumption. In the thermostat you can read out:. Total switch-on time in percentage in the latest 2 days, 30 days or 365 days. Calculation of operational costs per day: (switch-on time:100) x kW x kWh-price x 24 h per day Example: Read-out: 30 % in the latest 365 days Size of heating system: 1,2 kW (ask the installer) Cost of power: 0,2 EUR / kWh Calculation: (30:100) x 1,2 kW x 0,2 EUR / kWh x 24 h = 1,7 EUR per day } 2 days 30 days 365 days Software version ☞ ) button. Regulation sensor Press UP ( readouts. ) or DOWN ( ) button to show the different No changes can be made here. Use the OK ( ) button to end. Limit sensor (visible if configurated as OCD2) ☞ 4-event sequence The present event sequence flashes: Days 1-5, followed by days 6-7. To change, press the UP ( ) button until you have days 1-6 and then day 7 flashing, or all 7 days are flashing. Select the required sequence with the OK ( ) button. } ☞ ☞ } ☞ ☞ ☞ ☞ ☞ 7-0: 4 events in 7 days OCD2-1999 With 2 sensors; built-in room sensor and incl. floor sensor 3m OCC2-1991 Incl. floor sensor 3m OCC2-1999 With built-in room sensor Max and min allowed temperature range. The temperature setting range of +5˚ to +40˚C can be limited to prevent a too high or too low temperature being selected under manual or comfort mode. For OCD2 with limit sensor the max. and min. temperature range refer to the temperature of the limit sensor. For example: A wood floor covering should not be allowed to exceed a maximum of 27˚C. Low limitation is used where the temperature of the floor is required never to fall below the minimum set temperature. ☞ Maximum allowed temperature setting. Use the UP ( ) or DOWN ( ) button to increase or reduce, and OK ( ) button to accept. ☞ Next is displayed LoLi. Press OK ( ) button to continue. ☞ Minimum allowed temperature setting. Use the UP ( ) or DOWN ( ) button to increase or reduce and OK ( ) button to accept. Time and temperature scale selection ☞ ☞ ☞ ☞ 6-1: 4 events in 6 days + 2 events in 1 day Selection of type Type OCD2-1999 has a built-in temperature sensor and an externally temperature sensor. In this configuration the thermostat controls the temperature within the room and use the externally temperature sensor as limit sensor Type OCD2 can be changed into type OCC2-1991 with an external temperature sensor that normally is placed in the floor construction. In this configuration the thermostat controls the temperature of the floor and not the temperature within the room. OCD2 can also be changed into type OCC2-1999 with a built-in temperature sensor. In this configuration the thermostat controls the temperature of the room, and the external temperature sensor should not be installed. ☞ ☞ 5-2: 4 events in 5 days + 2 events in 2 days. } You can select either ˚C or ˚F scale, and 12 or 24 hour clock as follows: Press UP ( ) or DOWN ( ) button to change settings. Confirm the required scale with the OK button ( ) button. Adaptive function: This function enables the thermostat to calculate when it needs to switch ON so that the required temperature is reached at the set time. With a start time of 07:00 therefore, the thermostat may switch ON as early as 06:00 so that the desired temperature of 25˚C is achieved by 07:00. Without this function set, the thermostat will start to heat at the time you set. ☞ ☞ ☞ } Press the DOWN ( ) button to switch between on and off. Press OK ( ) button to confirm. ☞ Press OK ( ) button to end programming and to return to scheduled programme. ☞ 5. Reset to factory setting Press the pin button for 3 secs. and the thermostat returns to factory settings. Time and day is also reset and must be set according to “Setting the thermostat into operation”. Note that a OCD2 that has been modified to a OCC2 (see 4. Advanced settings and read-out, selection of type) will return to a OCD2. Failure code E2 will be displayed if the external sensor has been removed. Factory settings 4-event time and temperature Day 1-5 Time Temperature 06:00 20˚C 08:00 15˚C 16:00 22˚C 22:30 15˚C 08:00 22˚C 23:00 15˚C Day 6-7 4-event sequence 5:2 Hi-Low temp. 28˚C / 15˚C Scale 24 H / ˚C Adaptive control ON 6. Failure codes E0 = Internal failure, replace thermostat E1 = Built-in sensor short-circuit or disconnected, replace thermostat E2 = External sensor short-circuit or disconnected OJ ELECTRONICS A/S Stenager 13B · DK-6400 Sønderborg Tel. +45 73 12 13 14 · Fax +45 73 12 13 13 www.oj.dk Deutsch Einführung Mit dem Thermostaten kann das Heizsystem zu vorgegebenen Zeiten an verschiedenen Wochentagen eingeschaltet werden. Bis zu 4 verschiedenen Perioden, auch Events genannt, können jeden Tag mit verschiedenen Temperaturen verwendet werden. Ab Werk enthält der Thermostat eine Standardprogrammierung, die für die meisten Heizsysteme geeignet ist. Falls diese Programmierung nicht geändert wird, wird der Thermostat mit dem Standardprogramm laufen. Niedrigere Temperaturen in einem Raum, der momentan nicht benutzt wird, werden die Heizkosten senken ohne den Komfort zu mindern. Der Thermostat beinhaltet eine adaptive Funktion, die automatisch die Startzeit einer Heizperiode ändert, so dass die gewünschte Temperatur zu dem eingegebenen Zeitpunkt erreicht wird. Nach 3 Tagen hat die adaptive Funktion gelernt, wann die Heizung eingeschaltet werden muss. Der Thermostat hat einen eingebauten Temperaturfühler und einen externen Temperaturfühler. In dieser Konfiguration kontrolliert der Thermostat die Temperatur im Raum und der externe Temperaturfühler wird als Begrenzungsfühler verwendet um zu hohe oder zu niedrige Temperaturen in der Bodenkonstruktion zu entgehen. Der Thermostat hat einen Nadelknopf, R, womit der Thermostat auf die Werkseinstellungen zurückgestellt werden kann. Diese Einstellungen werden am Ende dieser Bedienungsanleitung aufgeführt, mit zusätzlichem Raum für die Eingabe des eigenen Wochenprogramms. Bei Betätigung der Knöpfen ist das Display von hinten beleuchtet. Das Heizelement wird abgeschaltet wenn das Display beleuchtet ist. Das Heizungssystem kann über den eingebauten Schalter ausgeschaltet werden. Der Mikroprozessor, der die Zeitangabe steuert, wird mit Spannung versorgt, wobei die Eingaben für Zeit und Tag aufrechterhalten bleiben. Wenn Wärme gewünscht wird, und der Thermostat eingeschaltet wird, wird dieser das 4-Event Programm mit der gegenwärtigen Zeit und dem gegenwärtigen Tag fortsetzen. 1. Inbetriebnahme Display Symbole G A F B E C BR929A09 Knöpfe H I M D R N J L K A: B: Nadelknopf Regelung der Zeit Ein/Aus C: D: H: I: J: UhrenFunktion Manueller Betrieb Zeit und Temperatur L: Heizung eingeschaltet M: % Überwachung der Einschaltzeit 4-Event Symbol Aufwachung Zurückstellung Regelung nach unten auf Werksprogramm E: F: G: OK Akzept Regelung nach oben Display Inbetriebnahme des Thermostaten Wenn der Thermostat zum ersten Mal eingeschaltet wird, blinken die Uhr und der Tag und müssen eingestellt werden. Falls die Zeiteinstellung des Thermostaten auf einen späteren Zeitpunkt verschoben werden muss, muss ein Stift in das Loch gesteckt werden, wonach Zeit und Tag eingestellt werden können. Winter- und Sommerzeit müssen eingestellt werden. ☞ Die Knöpfe ( ) oder ( ) betätigen, um die Zeit einzustellen. Dann den OK-Knopf ( ) betätigen. ☞ Die Knöpfe ( ) oder ( ) betätigen, um den Tag einzustellen. Dann den OK ( ) betätigen. 1-7 K: Tag N: Nacht Ausser Haus Zuhause 2. Täglicher Gebrauch des Thermostaten 4 Event Uhr-Modus Der Tag ist in 4 Events aufgeteilt worden, die einen typischen Tag beschreiben. Wenn der Thermostat im 4 Event Modus läuft, wird die Temperatur automatisch an die gewünschte Temperatur zum gewünschten Zeitpunkt angepasst. Standardmäßig hat der Thermostat 5 Tage mit 4 Events und 2 Tage mit 2 Events. Für Programmierung, siehe Abschnitt 3. 4 Event Uhr-Modus: Das Uhr-Modus Symbol ( ) und ein der 4 Event Symbole ( Für Programmierung, siehe Abschnitt 3. Komfortmodus: ☞ 5 Sek. Manueller Modus: ☞ Zeitweilige Außerachtlassung Um die Temperatur im 4 Event Programm zeitweilig außer Acht zu lassen, den Knopf ( ) oder ( ) einmal drücken um die Temperatur anzuzeigen, und dann wieder drücken, um die Temperatur zu erhöhen oder zu mindern. Die Anzeige wird für 5 Sekunden blinken und dann auf die Zeit wieder zurückgehen. Die Außerachtlassung wird bis zum nächsten programmierten Event aufrechterhalten, wo das System das automatische Programm wieder aufnehmen wird. Komfortmodus aufheben Um die Außerachtlassung zu annullieren, den Knopf ( ☞ 5 Sek. ☞ ) werden angezeigt. ) zweimal betätigen. Permanente Außerachtlassung: An Urlaubstagen kann das 4 Event Programm ausgeschaltet werden. Den OK-Knopf ( ) betätigen und dann den Knopf ( ) oder ( ), bis die neue Temperatur eingestellt ist. Das System wird dann nach dieser Temperatur permanent geregelt. Manueller Modus aufheben Um die permanente Außerachtlassung wieder aufzuheben, den OK-Knopf ( schaltet wieder auf die automatische Funktion über. 3. Programmierung 4 Event Zeit und Temperatur Für jedes Event müssen die Startzeit und die gewünschte Temperatur eingegeben werden. Den OK-Knopf ( ) einmal betätigen. Das System ) für 3 Sekunden betätigen, um die Programmierung zu beginnen für : Tag 1 - 5 Beispiel: Jeden Morgen soll die Heizung um 07:00 eingeschaltet werden und die Temperatur auf 21˚C ansteigen. Den OK-Knopf ( ) für 3 Sekunden betätigen, und die Startzeit wird angezeigt. Die Zeit dann auf 07:00 mit ( ) oder ( )-Knopf ändern. OK ( ) betätigen, um die Eingabe zu bestätigen. ☞ ☞ : Zeit und Temperatur ☞ ☞ : Zeit und Temperatur Die Temperatur wird jetzt angezeigt und muss mit den Knopf ( ) oder ( ) geändert werden. OK ( ) drücken, um die Eingabe zu bestätigen. Dies kann jetzt für Event 2 wiederholt werden. Die Eingaben gelten jetzt für die Tage 1-5. Um die Tage 6 und 7 zu programmieren, den Vorgang oben wiederholden. Diese Tage sind normalerweise Samstag und Sonntag und haben nur 2 Events. ☞ ☞ ☞ ☞ : Zeit und Temperatur ☞ ☞ : Zeit und Temperatur ☞ ☞ : Zeit und Temperatur Die Temperatur kann innerhalb einer Begrenzung von +5˚C bis +40˚C eingestellt werden. Die Heizung kann auch ausgeschaltet werden, indem man bei dem aktuellen Event die Temperatur auf 5˚C setzt und dann den Knopf ( ) noch einmal betätigt. : Zeit und Temperatur Tag 6 - 7 4. Spezielle Einstellungen und Anzeigen ☞ ✚ ☞ Die Knöpfe ( ) und ( ) gemeinsam für 3 Sekunden betätigen. INFO wird angezeigt. Den Knopf ( Untermenü erreicht ist. Mit ( ) das Untermenü wählen. Überwachung des Energieverbrauchs Der Thermostat berechnet die durchschnittliche Einschaltzeit und somit kann der Energieverbrauch überwacht werden. Der Thermostat kann die gesamte Einschaltzeit in % für die letzten 2 Tage, 30 Tage oder 365 Tage anzeigen. Berechnung der Betriebskosten pro Tag: (Einschaltzeit:100) x kW x kWh-Preis x 24 Stunden pro Tag Beispiel: 30% angezeigt für die letzten 365 Tage Größe des Heizungssystems: 1,2 kW (bei Heizungsfachmann nachfragen) Stromkosten: 0,2 EUR / kWh Berechnung (30:100) x 1,2 kW x 0,2 EUR / kWh x 24 Stunden = 1,7 EUR pro Tag 2 Tage 30 Tage 365 Tage Software Version ☞ Regulierungsfühler Begrenzungsfühler (sichtbar wenn konfiguriert als OCD2) ☞ } } ☞ ☞ ☞ ☞ ☞ ☞ Änderungen sind hier nicht möglich. Den OK-Knopf ( ) betätigen, um das Menü zu verlassen. ) betätigen bis Tag 1-6 5-2: 4 Events an 5 Tagen + 2 Events an 2 Tagen 6-1: 4 Events an 6 Tagen + 2 Events an einem Tag. 7-0: 4 Events an 7 Tagen Wahl von Typen (nur sichtbar bei Typ OCD2) Typ OCD2-1999 hat einen eingebauten Temperaturfühler sowie einen externen Temperaturfühler. Bei dieser Konfiguration kontrolliert der Thermostat die Raumtemperatur und der externe Fühler als Begrenzungsfühler angewendet. Typ OCD2 kann geändert werden und als Typ OCC2-1991 mit externem Temperaturfühler, der normalerweise im Bodenkonstruktion plaziert ist, verwendet werden. Bei dieser Konfiguration kontrolliert der Thermostat die Bodentemperatur und nicht die Raumtemperatur. OCD2 kann auch zu Typ OCC2-1999 mit eingebautem Raumfühler geändert werden. Bei dieser Konfiguration kontrolliert der Thermostat die Raumtemperatur, und der externe Fühler soll nicht installiert werden. ☞ OCD2-1999 Mit 2 Fühlern; eingebauter Raumfühler und einschl. Bodenfühler 3 m OCC2-1991 Einschliesslich Bodenfühler 3 m OCC2-1999 Mit eingebautem Raumfühler Max. und min. Temperaturbereich Der Temperaturbereich von +5˚C bis 40˚C kann begrenzt werden, um zu verhindern, dass eine zu hohe oder zu niedrige Temperatur bei Komfort oder manueller Modus gewählt wird. Beispiel: Die Temperatur eines Holzbodens sollte nicht max. 27˚C übersteigen. Eine Begrenzung nach unten wird gebraucht, wenn die Bodentemperatur nie unter die min. eingestellte Temperaur gehen soll. ☞ Max. Temperatureinstellung. Den ( ) oder ( ) benutzen, um zu erhöhen oder verringern. Den OK-Knopf ( ) betätigen, um die Einstellung zu akzeptieren. ☞ LoLi wird dann angezeigt. OK ( weiterzugehen. ☞ Min. Temperatureinstellung. Den Knopf ( ) oder ( ) benutzen, um zu erhöhen oder verringern. Den OK-Knopf ( ) zu akzeptieren. ) drücken, um Wahl der Zeit- und Temperaturskala ☞ ☞ ☞ ☞ } Den Knopf ( ) oder ( ) betätigen, um die verschiedenen Anzeigen zu sehen. 4 Event Sequenz Die aktuelle Event-Sequenz blinkt: Tag 1-5 gefolgt von 6-7. Um diese Angabe zu ändern, den Knopf ( und dann Tag 7, oder alle 7 Tage blinken. Die gewünschte Sequenz mit dem OK-Knopf ( ) wählen. ☞ ☞ ) drücken, bis das gewünschte } Es kann zwischen ˚C und ˚F gewählt werden sowie zwischen 12 oder 24 Stunden Uhr. Den Knopf ( ändern. ) oder ( Den OK-Knopf ( akzeptieren. ) benutzen, um die Angaben zu ) betätigen, um die Einstellung zu Adaptive Funktion: Durch diese Funktion kann der Thermostat berechnen, wann das System eingeschaltet werden muss, um die gewünschte Temperatur zum gewünschten Zeitpunkt zu erreichen. Bei einem Startzeitpunkt von 07:00 kann der Thermostat das System zum Beispiel um 06:00 einschalten, um eine gewünschte Temperatur von 25˚C bei 07:00 zu erreichen. Wenn diese Funktion nicht aktiviert ist, startet der Thermostat das System am gewählten Zeitpunkt. ☞ ☞ ☞ } Den ( ) -Knopf betätigen um zwischen Ein und Aus zu wählen Den OK-Knopf ( ) betätigen, um die Eingabe zu betätigen. ☞ Den OK-Knopf ( ) betätigen, um die Programmierung zu beenden und zum gewählten Programm zurückzukehren. ☞ 5. Zurückstellung auf die Werkseinstellung Den Nadelknopf 3 Sekunden betätigen. Danach kehrt der Thermostat zu den Werkseinstellungen zurück. Zeit und Tag werden auch zurückgestellt und müssen laut dem Abschnitt “Inbetriebnahme” wieder eingegeben werden. Bitte beachten Sie, dass ein OCD2, der in einem OCC2 modifiziert worden ist (siehe Punkt 4. Spezielle Einstellungen und Anzeigen, Wahl von Typen) zu einem OCD2 zurückgeändert wird. Fehlercode E2 wird angezeigt, wenn der externe Fühler entfernt worden ist. Werkseinstellungen 4 Event Zeit und Temperatur Tag1-5 Zeit Temperatur 06:00 20˚C 08:00 15˚C 16:00 22˚C 22:30 15˚C 08:00 22˚C 23:00 15˚C Tag 6-7 4 Event Sequenz 5:2 Hi-Low Temperatur 28˚C /15˚C Skala 24 H / ˚C Adaptive Steuerung EIN 6. Fehlercodes E0 = Interner Fehler. Der Thermostat muss ausgewechselt werden. E1 = Der eingebaute Fühler ist kurzgeschlossen oder ausgeschaltet. Der Thermostat muss ausgewechselt werden. E2 = Der externe Fühler ist kurzgeschlossen oder ausgeschaltet. OJ ELECTRONICS A/S Stenager 13B · DK-6400 Sønderborg Tel. +45 73 12 13 14 · Fax +45 73 12 13 13 www.oj.dk êÛÒÒÍËÈ àÌÒÚÛ͈Ëfl ÔÓ ˝ÍÒÔÎÛ‡Ú‡ˆËË Ç‚Â‰ÂÌË íÂÏÓÒÚ‡Ú ÒÔÓÒÓ·ÂÌ ÛÔ‡‚ÎflÚ¸ LJ¯ÂÈ Ì‡„‚‡ÚÂθÌÓÈ ÒËÒÚÂÏÓÈ, ‚Íβ˜‡fl´  ‚ ÓÔ‰ÂÎÂÌÌÓ ‚ÂÏfl ‚ ‡Á΢Ì˚ ‰ÌË Ì‰ÂÎË. ëÛ˘ÂÒÚ‚ÛÂÚ ‚ÓÁÏÓÊÌÓÒÚ¸ ÛÒÚ‡ÌÓ‚ËÚ¸ 4 ÂÊËχ (ÒÓ·˚ÚËfl) ̇ ͇ʉ˚È ‰Â̸ Ò ‡Á΢ÌÓÈ ÚÂÏÔ‡ÚÛÓÈ. ᇂӉÒÍË ÛÒÚ‡ÌÓ‚ÍË (ÔÓ ÛÏÓΘ‡Ì˲) ÔÓ‰ıÓ‰flÚ ‰Îfl ·Óθ¯ËÌÒÚ‚‡ Ó·˙ÂÍÚÓ‚. ÑÓ ÚÂı ÔÓ, ÔÓ͇ Ç˚ Ì ÓÚÏÂÌËÚ ˝ÚË ÛÒÚ‡ÌÓ‚ÍË, ÚÂÏÓÒÚ‡Ú ·Û‰ÂÚ ‡·ÓÚ‡Ú¸ ÔÓ ÛÏÓΘ‡Ì˲. íÂÏÓÒÚ‡Ú ÔÓÌËʇÂÚ ÚÂÏÔ‡ÚÛÛ ‚Ó ‚ÂÏfl ÓÚÒÛÚÒÚ‚Ëfl β‰ÂÈ ‚ ÔÓÏ¢ÂÌËË, ˜ÂÏ ÛÏÂ̸¯‡ÂÚ ˝Ì„ÓÁ‡Ú‡Ú˚, ÒÓı‡Ìflfl ÔË ˝ÚÓÏ ÍÓÏÙÓÚ. íÂÏÓÒÚ‡Ú ËÏÂÂÚ ‡‰‡ÔÚË‚ÌÛ˛ ÙÛÌÍˆË˛, ÔË ÔÓÏÓ˘Ë ÍÓÚÓÓÈ ‡‚ÚÓχÚ˘ÂÒÍË ÏÂÌflÂÚÒfl ‚ÂÏfl ‚Íβ˜ÂÌËfl ̇„‚‡ÚÂθÌÓÈ ÒËÒÚÂÏ˚ ‰Îfl ÔÓÎÛ˜ÂÌËfl Á‡‰‡ÌÌÓÈ ÚÂÏÔ‡ÚÛ˚ ‚ ÛÒÚ‡ÌÓ‚ÎÂÌÌÓ ‚ÂÏfl. èÓÒΠ3-ı ‰ÌÂÈ ‡·ÓÚ˚ ‡‰‡ÔÚ˂̇fl ÙÛÌ͈Ëfl ÚÓ˜ÌÓ Á̇ÂÚ ‚ÂÏfl ‚Íβ˜ÂÌËfl ̇„‚‡ÚÂθÌÓÈ ÒËÒÚÂÏ˚. íÂÏÓÒÚ‡Ú ËÏÂÂÚ ‚ÒÚÓÂÌÌ˚È Ë ‚˚ÌÓÒÌÓÈ ‰‡Ú˜ËÍË ÚÂÏÔ‡ÚÛ. Ç ‰‡ÌÌÓÈ ÍÓÏÔÎÂÍÚ‡ˆËË ÚÂÏÓÒÚ‡Ú ÍÓÌÚÓÎËÛÂÚ ÚÂÏÔ‡ÚÛÛ ‚ ÔÓÏ¢ÂÌËË, ‡ ‚˚ÌÓÒÌÓÈ ‰‡Ú˜ËÍ ÚÂÏÔ‡ÚÛ˚ ËÒÔÓθÁÛÂÚÒfl ‚ ͇˜ÂÒÚ‚Â ‰‡Ú˜Ë͇ӄ‡Ì˘ËÚÂÎfl, ˜ÚÓ·˚ Ì ‰ÓÔÛÒÚËÚ¸ ‚˚ÒÓÍÛ˛ ËÎË ÌËÁÍÛ˛ ÚÂÏÔ‡ÚÛ˚ ‚ ÍÓÌÒÚÛ͈ËË ÔÓ·. íÂÏÓÒÚ‡Ú ËÏÂÂÚ ÓÚ‚ÂÒÚËÂ Ò Ï‡ÍËÓ‚ÍÓÈ R, ÔÓÁ‚ÓÎfl˛˘Â ÔË Ì‡Ê‡ÚËË ÓÒÚ˚Ï Ô‰ÏÂÚÓÏ ÓÚÏÂÌËÚ¸ LJ¯Ë ÛÒÚ‡ÌÓ‚ÍË Ë ‚ÂÌÛÚ¸Òfl Í Á‡‚Ó‰ÒÍËÏ. ùÚÓ ÔÓ͇Á‡ÌÓ ‚ ÍÓ̈ ËÌÒÚÛ͈ËË, „‰Â ÂÒÚ¸ ÏÂÒÚÓ ‰Îfl Á‡ÔËÒË Ç‡¯Ëı ÒÓ·ÒÚ‚ÂÌÌ˚ı ̉ÂθÌ˚ı ÛÒÚ‡ÌÓ‚ÓÍ. ÑËÒÔÎÂÈ ÔӉ҂˜˂‡ÂÚÒfl ‚Ó ‚ÂÏfl ‡·ÓÚ˚ Ò ÍÌÓÔ͇ÏË. 燄‚‡ÚÂθÌ˚È ˝ÎÂÏÂÌÚ ‚˚Íβ˜ÂÌ, ÍÓ„‰‡ ‰ËÒÔÎÂÈ Ò‚ÂÚËÚÒfl. 燄‚‡ÚÂθ̇fl ÒËÒÚÂχ ÏÓÊÂÚ ·˚Ú¸ ‚˚Íβ˜Â̇ ‚ÒÚÓÂÌÌ˚Ï ÔÂ˚‚‡ÚÂÎÂÏ. åËÍÓÔÓˆÂÒÒÓ ·Û‰ÂÚ ÓÒÛ˘ÂÒÚ‚ÎflÚ¸ ÍÓÌÚÓθ Á‡ ‚ÂÏÂÌÂÏ Ë ·Û‰ÂÚ ÔÓ‰ ÔËÚ‡ÌËÂÏ, ÔÓÒ‰ÒÚ‚ÓÏ ˜Â„Ó ·Û‰ÂÚ ÒÓı‡ÌflÚ¸Òfl ÚÂÍÛ˘Â ‚ÂÏfl Ë ‰Â̸ ̉ÂÎË. äÓ„‰‡ ÔÓÚ·ÛÂÚÒfl ̇„‚, ÚÂÏÓÒÚ‡Ú ‚Íβ˜‡ÂÚÒfl Ë ·Û‰ÂÚ ÛÔ‡‚ÎflÚ¸ 4-Ïfl ÔÓ„‡ÏχÏË ËÒıÓ‰fl ËÁ ÚÂÍÛ˘Â„Ó ‚ÂÏÂÌË Ë ‰Ìfl ̉ÂÎË. 1. 燘‡ÎÓ ÛÒÚ‡ÌÓ‚ÓÍ ëËÏ‚ÓÎ˚ ̇ ‰ËÒÔΠG A F B E C D R BR929A09 äÌÓÔÍË H N I M J L K A: B: à„Óθ˜‡ÚÓ ÓÚ‚ÂÒÚË ‰Îfl ÛÒÚ‡ÌÓ‚ÍË ‚ÂÏÂÌË ÇÍÎ/‚˚ÍÎ E: F: OK ç‡ÒÚÓÈ͇ Á‡ÔÓÏË̇ÌË ۂÂ΢ÂÌË C: D: ÇÓÁ‚‡˘ÂÌË ç‡ÒÚÓÈ͇ Í Á‡‚Ó‰ÒÍËÏ ÛÏÂ̸¯ÂÌË ÛÒÚ‡ÌÓ‚Í‡Ï H: I: J: ó‡Ò˚ ÙÛÌ͈Ëfl êÛ˜ÌÓ ÛÔ‡‚ÎÂÌË ÇÂÏfl Ë ÚÂÏÔ‡ÚÛ‡ K: ÑÂ̸ ̉ÂÎË G: L: M: N: ÑËÒÔÎÂÈ èÓÒÚÛÔÎÂÌË Â ÚÂÔ· % ‚ÂÏÂÌË ‡·ÓÚ˚ ÒËÚÂÏ˚ ëËÏ‚ÓÎ 4-ı ÂÊËÏÓ‚ èÓ·ÛʉÂÌË ÇÌ ‰Óχ çÓ˜¸ ÑÓχ èÓ‰„ÓÚӂ͇ ÚÂÏÓÒÚ‡Ú‡ Í ‡·ÓÚ èË Ô‚ÓÈ ÔÓ‰‡˜Â ÔËÚ‡ÌËfl ̇ ÚÂÏÓÒÚ‡Ú ÌÂÓ·ıÓ‰ËÏÓ ÛÒÚ‡ÌÓ‚ËÚ¸ ‚ÂÏfl Ë ‰Â̸ ̉ÂÎË, ÍÓÚÓ˚ ·Û‰ÛÚ ÏË„‡Ú¸. ÖÒÎË Ç‡Ï ÌÂÓ·ıÓ‰ËÏÓ ÛÒÚ‡ÌÓ‚ËÚ¸ ‚ÂÏfl ̇ ·ÓΠÔÓÁ‰Ì˛˛ ‰‡ÚÛ ‚ÒÚ‡‚¸Ú ÓÒÚ˚È Ô‰ÏÂÚ ‚ ÓÚ‚ÂÒÚË ‰Îfl ÛÒÚ‡ÌÓ‚ÍË ‚ÂÏÂÌË Ë ‰Ìfl ̉ÂÎË. ç‡ÒÚÓÈÍË ‰ÓÎÊÌ˚ ·˚Ú¸ ҉·Ì˚ ‰Îfl ÎÂÚÌÂ„Ó Ë ÁËÏÌÂ„Ó ‚ÂÏÂÌË. ☞ ç‡ÊÏËÚ ÍÌÓÔÍË ì‚Â΢ÂÌË ( ) ËÎË ìÏÂ̸¯ÂÌË ( ̇ÊÏËÚ ÍÌÓÔÍÛ éä ( ) ‰Îfl ÙËÍÒ‡ˆËË ‚ÂÏÂÌË. ☞ á‡ÚÂÏ Ì‡ÊÏËÚ ÍÌÓÔÍÛ ì‚Â΢ÂÌË ( ÍÌÓÔÍÛ éä ( ) ‰Îfl Â„Ó ÙËÍÒ‡ˆËË. ) ‰Îfl ‚˚·Ó‡ Ô‡‚ËθÌÓ„Ó ‚ÂÏÂÌË Ë ) ËÎË ìÏÂ̸¯ÂÌË ( ) ‰Îfl ‚˚·Ó‡ ‰Ìfl ̉ÂÎË Ë Ì‡ÊÏËÚ 1-7 2. èӂ҉̂ÌÓ ËÒÔÓθÁÓ‚‡ÌË ÚÂÏÓÒÚ‡Ú‡ ‚ 4-ı ÔÓ„‡ÏÏÌÓÏ ÂÊËÏ ÑÂ̸ ‡Á‰ÂÎÂÌ Ì‡ 4 ÒÓ·˚ÚËfl, ˜ÚÓ ı‡‡ÍÚÂÌÓ ‰Îfl ÚËÔ˘ÌÓ„Ó ‰Ìfl. äÓ„‰‡ ÚÂÏÓÒÚ‡Ú ‡·ÓÚ‡ÂÚ ‚ 4-ı ÔÓ„‡ÏÏÌÓÏ ÂÊËÏÂ, ÓÌ ‡‚ÚÓχÚ˘ÂÒÍË ÛÒڇ̇‚ÎË‚‡ÂÚ ÌÂÓ·ıÓ‰ËÏÛ˛ ÚÂÏÔ‡ÚÛÛ ‚ Á‡‰‡ÌÌÓ ‚ÂÏfl. íËÔÓ‚‡fl ÛÒÚ‡Ìӂ͇ ÚÂÏÓÒÚ‡Ú‡ ̇ÒÚÓÂ̇ ̇ 4 ÒÓ·˚ÚËfl ‚ Ú˜ÂÌË 5 ‰ÌÂÈ (‡·Ó˜Ë ‰ÌË) Ë Ì‡ 2 ÒÓ·˚ÚËfl ‚ Ú˜ÂÌË 2 ‰ÌÂÈ (‚˚ıÓ‰Ì˚ ‰ÌË). èÓ„‡ÏÏËÓ‚‡ÌË ÒÏ. Ô.3. 4-ı ÔÓ„‡ÏÏÌ˚È ÂÊËÏ: êÂÊËÏ ÍÓÏÙÓÚ‡: ☞ 5 Sek. êÛ˜ÌÓ ÛÔ‡‚ÎÂÌË ☞ 5 Sek. ) ·Û‰ÛÚ ‚˚҂˜˂‡Ú¸Òfl. ÇÂÏÂÌ̇fl ̇ÒÚÓÈ͇ ÑÎfl ̇ÒÚÓÈÍË ÚÂÏÔ‡ÚÛ˚ ‚ 4-ı ÔÓ„‡ÏÏÌÓÏ ÂÊËÏÂ, ̇ÊÏËÚ ӉËÌ ‡Á ÍÌÓÔÍÛ ì‚Â΢ÂÌË ( ) ËÎË ìÏÂ̸¯ÂÌË ( ) ‰Îfl Ë̉Ë͇ˆËË ÚÂÏÔ‡ÚÛ˚, ÔÓÒΠ˜Â„Ó Ì‡ÊËχfl ÒÓÓÚ‚ÂÚÒÚ‚Û˛˘Ë ÍÌÓÔÍË Û‚Â΢¸Ú ËÎË ÛÏÂ̸¯ËÚ ÚÂÏÔ‡ÚÛÛ. ÑËÒÔÎÂÈ ·Û‰ÂÚ ÏË„‡Ú¸ ‚ Ú˜ÂÌË 5 ÒÂÍÛ̉, ‡ Á‡ÚÂÏ ÔÂÂÍβ˜ËÚÒfl ̇ ‚ÂÏfl. чÌÌÓ ËÁÏÂÌÂÌË ·Û‰ÂÚ ‰ÂÈÒÚ‚Ó‚‡Ú¸ ‰Ó ÒÎÂ‰Û˛˘Â„Ó Á‡ÔÓ„‡ÏÏËÓ‚‡ÌÌÓ„Ó ÒÓ·˚ÚËfl, ÍÓ„‰‡ ÚÂÏÓÒÚ‡Ú ‚ÓÁÓ·ÌÓ‚ËÚ ‡·ÓÚÛ ÔÓ ‡‚ÚÓχÚ˘ÂÒÍÓÈ ÔÓ„‡ÏÏÂ. OÚÏeÌa peÊËÏa ÍoÏÙopÚa ÑÎfl oÚÏeÌ˚ ycÚaÌo‚ÎeÌÌo„o peÊËÏa ‰‚aʉ˚ ÌaÊÏËÚe ÍÌoÔÍy OK ( ☞ ☞ ëËÏ‚ÓÎ ÙÛÌ͈ËË ˜‡ÒÓ‚ ( ) Ë Ó‰ËÌ ËÁ 4-ı ÒËÏ‚ÓÎÓ‚ ÒÓ·˚ÚËÈ ( èÓ„‡ÏÏËÓ‚‡ÌË ÒÏ. Ô.3. ). ÑÎËÚÂθ̇fl ̇ÒÚÓÈ͇: ÇÓ ‚ÂÏfl Ô‡Á‰ÌËÍÓ‚ ËÎË Í‡ÌËÍÛÎ 4-ı ÔÓ„‡ÏÏÌ˚È ÂÊËÏ ÏÓÊÂÚ ·˚Ú¸ ÓÚÍβ˜ÂÌ. ç‡ÊÏËÚ ÍÌÓÔÍÛ éä ( ), Á‡ÚÂÏ ÍÌÓÔÍÛ ì‚Â΢ÂÌË ( ) ËÎË ìÏÂ̸¯ÂÌË ( ), ‰Ó ÛÒÚ‡ÌÓ‚ÎÂÌËfl ÌÛÊÌÓÈ ÚÂÏÔ‡ÚÛ˚. íÂÏÓÒÚ‡Ú ·Û‰ÂÚ ÔÓÒÚÓflÌÌÓ ÔÓ‰‰ÂÊË‚‡Ú¸ Á‡‰‡ÌÌÛ˛ ÚÂÏÔ‡ÚÛÛ. éÚÍβ˜ÂÌË ۘÌÓ„Ó ÛÔ‡‚ÎÂÌËfl ÑÎfl ÓÚÍβ˜ÂÌËfl ÒÓÒÚÓflÌËfl ‰ÎËÚÂθÌÓ„Ó ÔÓ‰‰ÂʇÌËfl ÚÂÏÔ‡ÚÛ˚ ̇ÊÏËÚ ӉËÌ ‡Á ÍÌÓÔÍÛ éä ( ÚÂÏÓÒÚ‡Ú ‚ÂÌÂÚÒfl ‚ ‡‚ÚÓχÚ˘ÂÒÍËÈ ÂÊËÏ. 3. èÓ„‡ÏÏËÓ‚‡ÌË 4-ı ‚ÂÏÂÌÌ˚ı ÒÓ·˚ÚËÈ Ë ÚÂÏÔ‡ÚÛ˚ ÑÎfl Í‡Ê‰Ó„Ó ÒÓ·˚ÚËfl ‰ÓÎÊÌ˚ ·˚Ú¸ ÛÒÚ‡ÌÓ‚ÎÂÌ˚ ‚ÂÏfl Á‡ÔÛÒ͇ Ë Ú·ÛÂχfl ÚÂÏÔ‡ÚÛ‡. ä ÔËÏÂÛ, Ç˚ ıÓÚËÚÂ, ˜ÚÓ·˚ ̇„‚ ‚Íβ˜ËÎÒfl ‚ 07:00 ÛÚ‡ Ë ÚÂÏÔ‡ÚÛ‡ ÔÓ‚˚ÒË·Ҹ ‰Ó 21°C. ç‡ÊÏËÚ ÍÌÓÔÍÛ éä ( ÑÌË 1 - 5 ç‡ÊÏËÚ ÍÌÓÔÍÛ éä ( ) ‚ Ú˜ÂÌË 3 ÒÂÍÛ̉ Ë Ì‡ ‰ËÒÔΠ‚˚Ò‚ÂÚËÚÒfl ‚ÂÏfl Á‡ÔÛÒ͇. àÁÏÂÌËÚ ‰‡ÌÌÓ ‚ÂÏfl ̇ 07:00, ËÒÔÓθÁÛfl ÍÌÓÔÍË ì‚Â΢ÂÌË ( ) ËÎË ìÏÂ̸¯ÂÌË ( ) ç‡ÊÏËÚ ÍÌÓÔÍÛ éä ( ) ‰Îfl ÙËÍÒ‡ˆËË ‚ÂÏÂÌË Á‡ÔÛÒ͇. ç‡ ‰ËÒÔΠ‚˚Ò‚ÂÚËÚÒfl ÚÂÏÔ‡ÚÛ‡. ìÒÚ‡ÌÓ‚ËÚ ÚÂÏÔ‡ÚÛÛ 25°C ËÒÔÓθÁÛfl ÍÌÓÔÍË ì‚Â΢ÂÌË ( ) ËÎË ìÏÂ̸¯ÂÌË ( ). ç‡ÊÏËÚ ÍÌÓÔÍÛ ( ) ‰Îfl ÙËÍÒ‡ˆËË ÚÂÏÔ‡ÚÛ˚. чÌÌ˚ ‰ÂÈÒÚ‚Ëfl ÏÓ„ÛÚ ·˚Ú¸ ÔÓ‚ÚÓÂÌ˚ ‰Îfl ÒÎÂ‰Û˛˘Â„Ó ÒÓ·˚ÚËfl. чÌÌ˚ ÛÒÚ‡ÌÓ‚ÍË ·Û‰ÛÚ ‰ÂÈÒÚ‚Ó‚‡Ú¸ ‰Îfl ‰ÌÂÈ 15, Û͇Á‡ÌÌ˚ı ̇ ‰ËÒÔÎÂÂ. ÑÎfl ÔÓ„‡ÏÏËÓ‚‡ÌËfl ÛÒÚ‡ÌÓ‚ÓÍ ‰Îfl ‰ÌÂÈ 6-7 ÔÓ‚ÚÓËÚ ‚˚¯ÂÛ͇Á‡ÌÌ˚ ‰ÂÈÒÚ‚Ëfl. ÑÌË 6 Ë 7 Ó·˚˜ÌÓ ëÛ··ÓÚ‡ Ë ÇÓÒÍÂÒÂÌ¸Â Ë ËÏÂ˛Ú ÚÓθÍÓ ‰‚‡ ÒÓ·˚ÚËfl. íÂÏÔ‡ÚÛ‡ ÏÓÊÂÚ ·˚Ú¸ ÛÒÚ‡ÌÓ‚ÎÂ̇ ‚ ‰Ë‡Ô‡ÁÓÌ ÓÚ +5°C ‰Ó +40°C. í‡ÍÊ ÒÛ˘ÂÒÚ‚ÛÂÚ ‚ÓÁÏÓÊÌÓÒÚ¸ ÓÚÍβ˜ÂÌËfl ̇„‚‡ ‚Ó ‚ÂÏfl ÒÓ·˚ÚËfl, ÛÏÂ̸¯Ë‚ ÛÒÚ‡ÌÓ‚ÍÛ ‰Ó 5°C, Á‡ÚÂÏ Ì‡ÊËχfl ÍÌÓÔÍÛ ( ) ¢ ‡Á. ) ̇ 3 ÒÂÍ. ‰Îfl ̇˜‡Î‡ ÔÓ„‡ÏÏËÓ‚‡ÌËfl ☞ ☞ : BÂÏfl Ë ÚÂÏÔ‡ÚÛ‡ ☞ ☞ : BÂÏfl Ë ÚÂÏÔ‡ÚÛ‡ ☞ ☞ : BÂÏfl Ë ÚÂÏÔ‡ÚÛ‡ ☞ ☞ : BÂÏfl Ë ÚÂÏÔ‡ÚÛ‡ ☞ ☞ : BÂÏfl Ë ÚÂÏÔ‡ÚÛ‡ ☞ ☞ : BÂÏfl Ë ÚÂÏÔ‡ÚÛ‡ ÑÌË 6 - 7 )Ë 4. ì„ÎÛ·ÎÂÌÌ˚ ÛÒÚ‡ÌÓ‚ÍË Ë Ò˜ËÚ˚‚‡ÌË ËÌÙÓχˆËË ☞ ✚ ☞ ç‡ÊÏËÚ ӉÌÓ‚ÂÏÂÌÌÓ ÍÌÓÔÍË ì‚Â΢ÂÌË ( ) Ë ìÏÂ̸¯ÂÌË ( ) ̇ 3 ÒÂÍÛ̉˚. ç‡ ‰ËÒÔΠÔÓfl‚ËÚÒfl ̇‰ÔËÒ¸ INFO. ç‡ÊËχÈÚ ÍÌÓÔÍÛ ì‚Â΢ÂÌË ( ) ‰Ó ÔÓfl‚ÎÂÌË Ê·ÂÏÓ„Ó ÏÂÌ˛. á‡ÙËÍÒËÛÈÚ ‚˚·‡ÌÌÓ ÏÂÌ˛ ÍÌÓÔÍÓÈ éä ( ). åÓÌËÚÓËÌ„ ÔÓÚ·ÎÂÌËfl ˝ÎÂÍÚÓ˝Ì„ËË: íÂÏÓÒÚ‡Ú ‡Ò˜ËÚ˚‚‡ÂÚ Ò‰Ì ‚ÂÏfl, ÍÓ„‰‡ ̇„‚‡ÚÂθ̇fl ÒËÒÚÂχ ·˚· ‚Íβ˜Â̇, ˜ÚÓ ÔÓÁ‚ÓÎflÂÚ Ç‡Ï ‡ÒÒ˜ËÚ‡Ú¸ ˝Ì„ÓÁ‡Ú‡Ú˚. ç‡ ÚÒÏÓÒÚ‡Ú Ç˚ ÒÏÓÊÂÚ ҘËÚ˚‚‡Ú¸: ëÛÏχÌÓ ‚ÂÏfl ‡·ÓÚ˚ ÒËÒÚÂÏ˚ ‚ ÔÓˆÂÌÚ‡ı Á‡ ÔÓÒΉÌË 2 ‰Ìfl, 30 ‰ÌÂÈ ËÎË 365 ‰ÌÂÈ. ê‡Ò˜ÂÚ ÒÚÓËÏÓÒÚË ˝ÎÂÍÚÓ˝Ì„cc ‚ ‰Â̸: (‚ÂÏfl ‡·ÓÚ˚ ÒËÒÚÂÏ˚ ‚ % :100) x ä‚Ú x ˆÂ̇ Á‡ ä‚Ú.˜ x 24 ˜‡Ò‡ ‚ ‰Â̸. èËÏÂ: ë˜ËÚ‡ÌÓ: 30 % Á‡ ÔÓÒΉÌË 365 ‰ÌÂÈ. åÓ˘ÌÓÒÚ¸ ̇„‚‡ÚÂθÌÓÈ ÒËÒÚÂÏ˚: 1,2 ä‚Ú (ÒÔÓÒËÚ ÏÓÌÚ‡ÊÌË͇) ëÚÓËÏÓÒÚ¸ ˝cÂÍÚÓ˝Ì„ËË: 0,2 EUR / ä‚Ú.˜ ê‡Ò˜ÂÚ˚: (30:100) x 1,2 ä‚Ú x 0,2 EUR / ä‚Ú.˜ x 24 ˜ = 1,7 EUR ‚ ‰Â̸ } 2 ‰Ìfl 30 ‰ÌÂÈ 365 ‰ÌÂÈ èÓ„‡ÏÏ̇fl ‚ÂÒËfl ☞ CeÌcop peryÌÌpy˛˘È CeÌcop o„paÌ˘eÌËfl ç‡ÊËχÈÚ ÍÌÓÔÍË ì‚Â΢ÂÌË ( ) ËÎË ìÏÂ̸¯ÂÌË ( ) ‰Îfl ÔÓÒÏÓÚ‡ ‡Á΢ÌÓÈ ËÌÙÓχˆËË. çË͇ÍË ËÁÏÂÌÂÌËfl Á‰ÂÒ¸ ҉·ڸ Ì‚ÓÁÏÓÊÌÓ. àÒÔÓθÁÛÈÚ ÍÌÓÔÍÛ ( ) ‰Îfl ÓÍÓ̘‡ÌËfl ÔÓÒÏÓÚ‡. (BȉÌ˚È ecÎË cÎe‰y˛˘afl ÍoÌÙË„ypaˆËfl OCD2) ☞ èÓÒΉӂ‡ÚÂθÌÓÒÚ¸ 4-ı ÒÓ·˚ÚËÈ åË„‡ÂÚ ÒÛ˘ÂÒÚ‚Û˛˘‡fl ÔÓÒΉӂ‡ÚÂθÌÓÒÚ¸: ÑÌË 1-5, ‰‡Î ÒÎÂ‰Û˛Ú ‰ÌË 6-7. ÑÎfl ‚˚·Ó‡, ̇ÊÏËÚ ÍÌÓÔÍÛ ì‚Â΢ÂÌË ( ) ÔÓ͇ Ì ÔÓfl‚flÚÒfl ‰ÌË 1-6, Á‡ÚÂÏ ÏË„‡ÂÚ ‰Â̸ 7 ËÎË ‚Ò 7 ‰ÌÂÈ ÏË„‡˛Ú. Ç˚·ÂËÚ ÌÛÊÌÛ˛ ÔÓÒΉӂ‡ÚÂθÌÓÒÚ¸ ÔË ÔÓÏÓ˘Ë ÍÌÓÔÍË éä ( ). } ☞ ☞ Ç˚·Ó ÚÂÏÓÒÚ‡Ú‡ íÂÏÓÒÚ‡Ú OCD2-1999 ËÏÂÂÚ ‚ÒÚÓÂÌÌ˚È Ë ‚˚ÌÓÒÌÓÈ ‰‡Ú˜ËÍË ÚÂÏÔ‡ÚÛ. Ç ‰‡ÌÌÓÈ ÍÓÏÔÎÂÍÚ‡ˆËË ÚÂÏÓÒÚ‡Ú ÍÓÌÚÓÎËÛÂÚ ÚÂÏÔ‡ÚÛÛ ‚ ÔÓÏ¢ÂÌËË, ‡ ‚˚ÌÓÒÌÓÈ ‰‡Ú˜ËÍ ËÒÔÓθÁÛÂÚÒfl ‚ ͇˜ÂÒÚ‚Â ‰‡Ú˜Ë͇-Ó„‡Ì˘ËÚÂÎfl. íÂÏÓÒÚ‡Ú OCD2 ÏÓÊÂÚ ·˚Ú¸ Á‡ÏÂÌÂÌ Ì‡ OCC2-1991 Ò ‚˚ÌÓÒÌ˚Ï ‰‡Ú˜ËÍÓÏ ÚÂÏÔ‡ÚÛ˚, ÍÓÚÓ˚È Ó·˚˜ÌÓ ‡ÁÏ¢ÂÌ ‚ ÍÓÌÒÚÛ͈ËË ÔÓ·. Ç ‰‡ÌÌÓÈ ÍÓÏÔÎÂÍÚ‡ˆËË ÚÂÏÓÒÚ‡Ú ÍÓÌÚÓÎËÛÂÚ ÚÂÏÔ‡ÚÛÛ ÔÓ·, ‡ Ì ÚÂÏÔ‡ÚÛÛ ‚ ÔÓÏ¢ÂÌËË. íÂÏÓÒÚ‡Ú OCD2 ÏÓÊÂÚ ·˚Ú¸ Ú‡ÍÊ Á‡ÏÂÌÂÌ Ì‡ OCC2-1999 ÒÓ ‚ÒÚÓÂÌÌ˚Ï ‰‡Ú˜ËÍÓÏ ÚÂÏÔ‡ÚÛ˚. Ç ‰‡ÌÌÓÈ ÍÓÏÔÎÂÍÚ‡ˆËË ÚÂÏÓÒÚ‡Ú ÍÓÌÚÓÎËÛÂÚ ÚÂÏÔ‡ÚÛÛ ‚ ÔÓÏ¢ÂÌËË Ë Ì ÒΉÛÂÚ ÛÒڇ̇‚ÎË‚‡Ú¸ ‚˚ÌÓÒÌÓÈ ‰‡Ú˜ËÍ ÚÂÏÔ‡ÚÛ˚. } ☞ ☞ ☞ ☞ ☞ ☞ OCC2-1999. Ç˚·Ó ¯Í‡Î˚ ‚ÂÏÂÌË Ë ÚÂÏÔ‡ÚÛ˚ ☞ ☞ ☞ ☞ OCC2-1991. ë 2-Ïfl ‰‡Ú˜Ë͇ÏË; ‚ÒÚÓÂÌÌ˚È ÚÂÏÔ‡ÚÛÌ˚È ‰‡Ú˜ËÍ Ë ‰‡Ú˜ËÍ ÚÂÏÔ‡ÚÛ˚ ÔÓ· Ò ‰ÎËÌÓÈ Í‡·ÂÎfl 3 Ï. ë ‰‡Ú˜ËÍÓÏ ÚÂÏÔ‡ÚÛ˚ ÔÓ· Ò ‰ÎËÌÓÈ Í‡·ÂÎfl 3 Ï. ëÓ ‚ÒÚÓÂÌÌ˚Ï ÚÂÏÔ‡ÚÛÌ˚Ï ‰‡Ú˜ËÍÓÏ. ìÒÚ‡Ìӂ͇ χÍÒËχθÌÓ ‰ÓÔÛÒÚËÏÓÈ ÚÂÏÔ‡ÚÛ˚. àÒÔÓθÁÛÈÚ ÍÌÓÔÍË ì‚Â΢ÂÌË ( ) ËÎË ìÏÂ̸¯ÂÌË ( ) ‰Îfl Û‚Â΢ÂÌËfl ËÎË ÛÏÂ̸¯ÂÌËfl Ë ÍÌÓÔÍÛ éä ( ) ‰Îfl ÙËÍÒ‡ˆËË ÚÂÏÔ‡ÚÛ˚. чΠ̇ ‰ËÒÔΠÔÓfl‚ÎflÂÚÒfl LoLi. ç‡ÊÏËÚ ÍÌÓÔÍÛ éä ( ) ‰Îfl ÔÓ‰ÓÎÊÂÌËfl. ìÒÚ‡Ìӂ͇ ÏËÌËχθÌÓ ‰ÓÔÛÒÚËÏÓÈ ÚÂÏÔ‡ÚÛ˚. àÒÔÓθÁÛÈÚ ÍÌÓÔÍË ì‚Â΢ÂÌË ( ) ËÎË ìÏÂ̸¯ÂÌË ( ) ‰Îfl Û‚Â΢ÂÌËfl ËÎË ÛÏÂ̸¯ÂÌËfl Ë ÍÌÓÔÍÛ éä ( ) ‰Îfl ÙËÍÒ‡ˆËË ÚÂÏÔ‡ÚÛ˚. ☞ ☞ OCD2-1999. ÑˇԇÁÓÌ Ï‡ÍÒ. Ë ÏËÌ. ‰ÓÔÛÒÚËÏ˚ı ÚÂÏÔ‡ÚÛ. ìÒڇ̇‚ÎË‚‡ÂÏ˚È ÚÂÏÔ‡ÚÛÌ˚È ‰Ë‡Ô‡ÁÓÌ ÓÚ +5° ‰Ó 40° C ÏÓÊÂÚ ·˚Ú¸ Ó„‡Ì˘ÂÌ ‰Îfl Ô‰ÓÚ‚‡˘ÂÌËfl ÒÎ˯ÍÓÏ ‚˚ÒÓÍÓÈ ËÎË ÒÎ˯ÍÓÏ ÌËÁÍÓÈ ÚÂÏÔ‡ÚÛ ‚˚·ÓÓÏ ÂÊËχ Û˜ÌÓ„Ó ÛÔ‡‚ÎÂÌËfl ËÎË ÂÊËχ ÍÓÏÙÓÚ‡. ÑÎfl ÚÂÏÓÒÚ‡Ú‡ OCD2 Ò ‰‡Ú˜ËÍÓÏ-Ó„‡Ì˘ËÚÂÎÂÏ ‰Ë‡Ô‡ÁÓÌ Ï‡ÍÒ. Ë ÏËÌ. ÚÂÏÔ‡ÚÛ ÓÚÌÓÒËÚÒfl Í ‰‡Ú˜ËÍÛÓ„‡Ì˘ËÚÂβ. ä ÔËÏÂÛ: ÚÂÏÔ‡ÚÛ‡ ÔÓ‚ÂıÌÓÒÚË ‰Â‚flÌÌÓ„Ó ÔÓ· Ì ‰ÓÎÊ̇ Ô‚˚¯‡Ú¸ 27°C. 鄇Ì˘ÂÌË ÏËÌ. ÚÂÏÔ‡ÚÛ˚ ËÒÔÓθÁÛÂÚÒfl ‰Îfl ̉ÓÔÛ˘ÂÌËfl Óı·ʉÂÌËfl ÔÓ· ÌËÊ ÏËÌËχθÌÓÈ ÛÒÚ‡ÌÓ‚ÎÂÌÌÓÈ ÚÂÏÔ‡ÚÛ˚. ☞ ☞ 5-2: 4 ÒÓ·˚ÚËfl ‚ Ú˜ÂÌË 5 ‰ÌÂÈ + 2 ÒÓ·˚ÚËfl ‚ Ú˜ÂÌË 2 ‰ÌÂÈ. 6-1: 4 ÒÓ·˚ÚËfl ‚ Ú˜ÂÌË 6 ‰ÌÂÈ + 2 ÒÓ·˚ÚËfl ‚ Ú˜ÂÌË 1 ‰Ìfl. 7-0: 4 ÒÓ·˚ÚËfl ‚ Ú˜ÂÌË 7 ‰ÌÂÈ. } Ç˚ ÏÓÊÂÚ ‚˚·‡Ú¸ „‡‰ÛËÓ‚ÍÛ ¯Í‡Î˚ ‚ °C ËÎË °F Ë 12 ˜‡ÒÓ‚ÓÈ ËÎË 24 ˜‡ÒÓ‚ÓÈ ÓÚÒ˜ÂÚ ‚ÂÏÂÌË ÒÎÂ‰Û˛˘ËÏ Ó·‡ÁÓÏ: ç‡ÊÏËÚ ÍÌÓÔÍË ì‚Â΢ÂÌË ( ) ËÎË ìÏÂ̸¯ÂÌË ( ) ‰Îfl ËÁÏÂÌÂÌËfl ÛÒÚ‡ÌÓ‚ÓÍ. á‡ÙËÍÒËÛÈÚ ‚˚·‡ÌÌÛ˛ ¯Í‡ÎÛ Ì‡Ê‡ÚËÂÏ ÍÌÓÔÍË éä ( ) . ĉ‡ÔÚ˂̇fl ÙÛÌ͈Ëfl: чÌ̇fl ÙÛÌ͈Ëfl ‰‡ÂÚ ‚ÓÁÏÓÊÌÓÒÚ¸ ÚÂÏÓÒÚ‡ÚÛ ‡ÒÒ˜ËÚ‡Ú¸ ‚ÂÏfl, ÍÓ„‰‡ ÌÂÓ·ıÓ‰ËÏÓ ‚Íβ˜ËÚ¸ ̇„‚ ‰Îfl ‰ÓÒÚËÊÂÌËfl ÌÂÓ·ıÓ‰ËÏÓÈ ÚÂÏÔ‡ÚÛ˚ ‚ Á‡‰‡ÌÌÓ ‚ÂÏfl. í‡ÍËÏ Ó·‡ÁÓÏ, ÂÒÎË Í 07:00 Ç‡Ï ÌÂÓ·ıÓ‰ËÏÓ ËÏÂÚ¸ ÚÂÏÔ‡ÚÛÛ 25°C, ̇„‚ ÏÓÊÂÚ ‚Íβ˜ËÚ¸Òfl ‚ 06:00, ˜ÚÓ·˚ Í 07:00 ÚÂÏÔ‡ÚÛ‡ ·˚· 25°C. ☞ ☞ ☞ } ÅÂÁ ÛÒÚ‡ÌÓ‚ÍË ˝ÚÓÈ ÙÛÌ͈ËË, ÚÂÏÓÒÚ‡Ú ‚Íβ˜ËÚ Ì‡„‚ ‚ ÛÒÚ‡ÌÓ‚ÎeÌÌoe ÇaÏË ‚peÏfl. ç‡ÊÏËÚ ÍÌÓÔÍÛ ìÏÂ̸¯ÂÌË ( ) ‰Îfl ÔÂÂÍβ˜ÂÌËfl ÏÂÊ‰Û ‚ÍÎ. Ë ‚˚ÍÎ. ç‡ÊÏËÚ ÍÌÓÔÍÛ éä ( ) ‰Îfl ÙËÍÒ‡ˆËË. ☞ ç‡ÊÏËÚ ÍÌÓÔÍÛ éä ( ) ‰Îfl ÓÍÓ̘‡ÌËfl ÔÓ„‡ÏÏËÓ‚‡ÌËfl Ë ‚ÓÁ‚‡Ú‡ ‚ ÛÒÚ‡ÌÓ‚ÎÂÌÌ˚ ÔÓ„‡ÏÏ˚. ☞ 5. ÇÓÁ‚‡˘ÂÌËÂ Í Á‡‚Ó‰ÒÍËÏ ÛÒÚ‡ÌÓ‚Í‡Ï ç‡ÊÏËÚ ÍÌÓÔÍÛ R ̇ 3 ÒÂÍ. ‰Îfl ̇˜‡Î‡ ÔÓ„‡ÏÏËÓ‚‡ÌËfl. ÇÂÏfl Ë ‰Â̸ Ú‡ÍÊ ‚ÓÁ‚‡˘‡˛ÚÒfl ‚ ËÒıÓ‰ÌÓ ÒÓÒÚÓflÌËÂ Ë Ëı ÌÂÓ·ıÓ‰ËÏÓ ÔÂÂÛÒÚ‡ÌÓ‚ËÚ¸ Òӄ·ÒÌÓ ‡Á‰ÂÎÛ «èÓ‰„ÓÚӂ͇ ÚÂÏÓÒÚ‡Ú‡ Í ‡·ÓÚ». é·‡ÚËÚ ‚ÌËχÌËÂ, ˜ÚÓ ÚÂÏÓÒÚ‡Ú OCD2 ÏÓÊÂÚ ·˚Ú¸ ÏÓ‰ËÙˈËÓ‚‡Ì ̇ OCC2 (ÒÏ. 4. ìÒӂ¯ÂÌÒÚ‚Ó‚‡ÌÌ˚ ÛÒÚ‡ÌÓ‚ÍË Ë Ò˜ËÚ˚‚‡ÌËÂ, ‚˚·Ó ÚÂÏÓÒÚ‡Ú‡) Ë Ó·‡ÚÌÓ Ì‡ OCD2. äÓ‰ ÌÂËÒÔ‡‚ÌÓÒÚË Ö2 ̇ ‰ËÒÔΠÔÓ͇Á˚‚‡ÂÚ, ˜ÚÓ ‚˚ÌÓÒÌÓÈ ‰‡Ú˜ËÍ ÓÚÍβ˜ÂÌ. ᇂӉÒÍË ÛÒÚ‡ÌÓ‚ÍË ÇÂÏfl 4-ı ÒÓ·˚ÚËÈ Ë ÚÂÏÔ‡ÚÛ‡ ÑÌË 1 - 5 ÇÂÏfl íÂÏÔ‡ÚÛ‡ 06:00 20˚C 08:00 15˚C 16:00 22˚C 22:30 15˚C 08:00 22˚C 23:00 15˚C ÑÌË 6 - 7 èÓÒΉӂ‡ÚÂÎ¸Ì ÓÒÚ¸ 4-ı ÒÓ·˚ÚËÈ Ç˚ÒÓ͇fl-çËÁ͇fl ÚÂÏÔ. 5:2 28˚C / 15˚C ò͇· 24 H / ˚C ĉ‡ÔÚË‚Ì˚È ÍÓÌÚÓθ ÇÍÎ. 6. äÓ‰˚ ÌÂËÒÔ‡‚ÌÓÒÚÂÈ E0 = ÇÌÛÚÂÌÌflfl ÌÂËÒÔ‡‚ÌÓÒÚ¸, Á‡ÏÂÌËÚ ÚÂÏÓÒÚ‡Ú E1 = äÓÓÚÍÓ Á‡Ï˚͇ÌË ËÎË ÓÚÍβ˜ÂÌË ‚ÒÚÓÂÌÌÓ„Ó ‰‡Ú˜Ë͇, Á‡ÏÂÌËÚ ÚÂÏÓÒÚ‡Ú E2 = äÓÓÚÍÓ Á‡Ï˚͇ÌË ËÎË ÓÚÍβ˜ÂÌË ‚˚ÌÓÒÌÓ„Ó ‰‡Ú˜Ë͇ OJ ELECTRONICS A/S Stenager 13B · DK-6400 Sønderborg Tel. +45 73 12 13 14 · Fax +45 73 12 13 13 www.oj.dk Polska 1. Wstęp Programowalny regulator temperatury OCD2 służy do załączania obwodu grzejnego o zadanych porach, w poszczególne dni tygodnia. Modyfikacji programu można dokonać poprzez zmianę czterech, wstępnie zaprogramowanych zdarzeń. To nowatorskie rozwiązanie pozwala na zaprogramowanie regulatora, niemal z “dziecinną łatwością“. Procesor regulatora został tak zaprogramowany, aby poprzez duży wyświetlacz i za pomocą symboli graficznych, poprowadzić użytkownika przez proces programowania. Każdorazowe użycie przycisków powoduje podświetlenie wyświetlacza. Gdy wyświetlacz jest podświetlony element grzejny jest odłączony. OCD2 został wyposażony w funkcję adaptacyjną, która automatycznie zmienia czas załączenia ogrzewania w taki sposób, aby o nastawionej przez użytkownika porze, została osiągnięta zadana temperatura. Po trzech dniach funkcja adaptacyjna zostaje zapisana w pamięci regulatora. Funkcję adaptacyjną można wyłączyć (patrz pkt 5). Regulator wyposażony jest w czujnik powietrzny do kontroli temperatury otoczenia i czujnik podłogowy zabezpieczający przed zbyt wysoką lub zbyt niską temperaturą podłogi. Podstawową zaletą programowalnego regulatora temperatury OCD2 jest możliwość zaprogramowania czasu i temperatury dla każdego zdarzenia indywidualnie. Dzięki takiemu rozwiązaniu można znacznie zredukować koszty energii, nie tracąc przy tym (dzięki funkcji adaptacyjnej) jednej z najważniejszych zalet przy ogrzewaniu jaką jest “komfort cieplny“. Symbole G A F B E C BR929A09 Przyciski H I M D R N J L K A: B: Regulacja zegara Włącz / Wyłącz C: E: F: G: L: M: N: Akceptacja Regulacja w górę Wyświetlacz Ogrzewanie włączone % Odczyt czasu pracy Symbole czterech zdarzeń Pobudka Wyjście Powrót do ustawień fabrycznych D: H: I: J: Regulacja w dół Funkcja zegara Tryb ręczny Czas i temperatura Określenie dnia K: Powrót Noc 2. Załączenie regulatora Po pierwszym załączeniu regulatora na wyświetlaczu pojawią się pulsujące symbole: zegara ( ) i dni. Każdy dzień ma przypisaną cyfrę od 1 do 7 (poniedziałek-1, wtorek-2, itd. ...). Pamiętając o tym należy ustawić aktualny czas i odpowiedni dzień tygodnia. ☞ Za pomocą przycisków ( przycisku ( ). ☞ Za pomocą przycisków ( ) i ( naciśnięcie przycisku ( ). )i( ) należy ustawić aktualną godzinę i zaakceptować poprzez naciśnięcie ) należy ustawić odpowiedni dzień i zaakceptować poprzez 1-7 3. Obsługa regulatora W regulatorze OCD2 dzień został podzielony na cztery zdarzenia. Fabrycznie zaprogramowany na pracę 5(4)-2(2) tzn: - Przez pięć dni (poniedziałek-piątek) pracuje w trybie cztero-zdarzeniowym, czyli: ( ) pobudka, ( ) wyjście, ( ) powrót, ( )noc. - Przez dwa dni (sobota, niedziela) w trybie dwu-zdarzeniowym, czyli: ( ) pobudka i ( ) noc. Ustawienia fabryczne można zmienić (patrz pkt 4). Dla ułatwienia modyfikacji programów w instrukcji przewidziano miejsce na wpisanie własnego tygodniowego harmonogramu użytkownika (patrz pkt 6.). Regulator wyposażony jest w przycisk “R“ (reset). Naciśnięcie i przytrzymanie tego przycisku przez ok. trzy sekundy spowoduje wyzerowanie godziny i dnia tygodnia, natomiast programy powrócą do ustawień fabrycznych. Ponowne ustawienie godz. i dnia patrz pkt 2. W celu zmiany programów patrz pkt 4. Przed przystąpieniem do programowania należy zastanowić się, który z trzech wariantów podziału tygodnia najbardziej nam odpowiada (programowanie wariantów patrz pkt 5): Wariant 1. 5(4)-2(2) -12345 / 67 - Przez pięć dni (poniedziałek-piątek) pracuje w trybie cztero-zdarzeniowym, czyli: ( ) pobudka, ( ) wyjście, ( ) powrót, ( )noc. - Przez dwa dni (sobota, niedziela) w trybie dwu-zdarzeniowym, czyli: ( ) pobudka i ( )noc. Wariant 2. 6(4)-1(2) -123456 / 7 - Przez sześć dni (poniedziałek-sobota) pracuje w trybie cztero-zdarzeniowym, czyli: ( ) pobudka, ( ) wyjście, ( ) powrót, ( )noc. - Przez jeden dzień (niedziela) w trybie dwu-zdarzeniowym, czyli: ( ) pobudka i ( ) noc. Wariant 3. 7(4)-0(2) - 1234567 - Przez siedem dni (poniedziałek-niedziela) pracuje w trybie cztero-zdarzeniowym z tym wyjątkiem, że w tym trybie, każdy dzień można zaprogramować indywidualnie, czyli: ( ) pobudka, ( ) wyjście, ( ) powrót, ( )noc - dla każdego dnia tygodnia mogą występować różne czasy i temperatura. Ważne jest także, aby zastanowić się jaki rodzaj zegara będzie dla nas odpowiedni i jakiej skali chcemy używać (programowanie zegara i skali patrz pkt 5): - rodzaj zegara - 12-sto lub 24-ro godzinny, - rodzaj skali - ˚C lub ˚F. 4. Programowanie Przykład. Wybrany został wariant “1“ (patrz pkt 3). Od poniedziałku do piątku: - ( ) pobudka, o godz. 6:00 temperatura wzrosła do 20˚C. - ( ) wyjście, o godz. 8:00 temperatura zmalała do 15˚C. - ( ) powrót, o godz. 16:00 temperatura wzrosła do 22˚C. - ( ) noc, o godz. 22:30 temperatura zmalała do 15˚C. Natomiast od soboty do niedzieli: - ( ) pobudka, o godz. 8:00 temperatura wzrosła do 22˚C. - ( ) noc, o godz. 23:00 temperatura zmalała do 15˚C. UWAGA: Temperaturę można ustawiać co 0,5˚, w zależności od “rodzaju skali (˚C lub ˚F)“ (wybór: patrz pkt 5.), w przedziale od +5˚ do +40˚. Po ustawieniu temperatury na poziomie +5˚ i naciśnięciu przycisku ( ) na wyświetlaczu pojawi się napis “OFF“. Takie ustawienie spowoduje wyłączenie ogrzewania w programowanym zdarzeniu. Godzinę można ustawiać co 15 min, w zależności od “rodzaju zegara (12-sto lub 24-ro godzinny)“ (wybór: patrz pkt 5.), w przedziale od 0:00 do 11:45 lub od 0:00 do 23:45. Naciśnij i przytrzymaj przycisk ( ) przez 3 sekundy. Przyciskami ( niaj, a przyciskiem ( ) zatwierdzaj dokonane zmiany. Dni 1 do 5 )i( ) zmie- Ustaw Pobudka ☞ ☞ : Godzinę i temperaturę Wyjście ☞ ☞ : Godzinę i temperaturę Powrót ☞ ☞ : Godzinę i temperaturę Noc ☞ ☞ : Godzinę i temperaturę Dni 6 i 7 ☞ Pobudka ☞ Noc ☞ : Godzinę i temperaturę ☞ : Godzinę i temperaturę Tymczasowa zmiana ustawień Podczas normalnej pracy regulatora w trybie cztero-zdarzeniowym, może zaistnieć potrzeba, chwilowego przestawienia temperatury z ekonomicznej na komfortową np. przedłużające się przyjęcie lub z komfortowej na ekonomiczną np. niezaplanowane wyjście. Tryb komfortowy / ekonomiczny ☞ Anulowanie trybu komfortowego / ekonomicznego Nacisnąć przycisk ( ). Przyciskami ( ) i ( ) należy zwiększyć lub zmniejszyć temperaturę. Nastawiona wartość temperatury będzie pulsować przez 5 sekund. Po tym czasie regulator powróci do wyświetlania godziny. Nastawiona wartość będzie obowiązywała do rozpoczęcia następnego zaprogramowanego zdarzenia. Regulator będzie pracował wg zaprogramowanych ustawień. Nacisnąć dwukrotnie przycisk ( ). ☞ Program wakacyjny Zaprogramowany cykl pracy możemy zastąpić innym ustawieniem, np. na czas urlopu. Tryb ręczny: ☞ Anulowanie trybu ręcznego ☞ Nacisnąć przycisk ( ). Przyciskami ( ) i ( ) należy ustawić temperaturę. Od tego momentu regulator będzie utrzymywać nastawioną temperaturę. Nacisnąć przycisk ( ). 5. Ustawienia dodatkowe Naciśnij i przytrzymaj przyciski ( )i( ) przez 3 sekundy. Przyciskiem ( ) przejdż do odpowiedniego menu. Przyciskiem ( ) wejdż do wybranego menu. Menu ☞ Odczyt zużycia energii Z regulatora można odczytać procentowy czas pracy ogrzewania z ostatnich 2, 30 lub 365 dni (ze wzoru: 1dzień = czas pracy / 100 x moc urządzenia (kW) x cena za 1kWh x 24h), co pozwala kontrolować zużycie energii np.: Odczyt: 30% z ostatnich 365 dni pracy Moc urządzenia: 1,2 kW Cena 1kWh: 0,35 zł. Odczyt: 30/100 x 1,2 x 0,35 x 24 = 3,024zł/dzień } 2 dni 30 dni 365 dni Wersja oprogramowania ☞ Czujnik regulcyjny Kolejne odczyty zmienia się przyciskami ( ) i ( ) . Wyjście z menu poprzez naciśnięcie przycisku ( ). W tym menu nie można wprowadzać żadnych zmian. Czujnik ograniczeniowy (widoczne jesli jest nastepujaca konfiguracja OCD2) ☞ Wybór Wariantu podziału tygodnia Po wejściu w to menu na przemian pulsują cyfry: 12345 / 67 (“wariant-1“ patrz pkt 3). Wybieramy odpowiedni dla nas wariant poprzez naciśnięcie przycisku ( ). Zmiany zatwierdzamy przyciskiem ( ). } ☞ ☞ zdarzenia zdarzenia zdarzenia zdarzenia zdarzenia przez przez przez przez przez 5 2 6 1 7 dni dni dni dzień dni opis zdarzeń patrz pkt 3. Regulator OCD2-1999 można stosować zamiennie z regulatorami OCC2-1991 i OCC2-1999 ponieważ ma trzy warianty pomiaru temperatury poprzez czujnik: } ☞ ☞ ☞ 5(4)-2(2) - 4 2 6(4)-1(2) - 4 2 7(4)-0(2) - 4 ☞ - powietrzny i podłogowy, w takim układzie kontroluje temperaturę otoczenia i zabezpiecza przed osiągnięciem zbyt niskiej lub zbyt wysokiej temperatury podłogi. - podłogowy, w takim układzie kontroluje temperaturę podłogi - powietrzny, w takim układzie kontroluje temperaturę otoczenia Ograniczenie zakresu regulacji temperatury MIN/MAX. Ustawienia MIN/MAX w skali temperatury od +5˚C do +40˚C, wykorzystywane są w celu uniknięcia zbyt wysokiej lub zbyt niskiej temperatury podłogi. Niektóre podłogi drewniane nie mogą być nagrzewane powyżej +27˚C. W przypadku wykorzystywania ogrzewania podłogowego w celu uzyskania komfortu ciepłej podłogi możemy nie chcieć, aby temperatura spadła poniżej np. +22˚C. ☞ ☞ Przyciskami ( ) i ( ) zwiększamy lub zmniejszamy temperaturę “MAX“. Akceptujemy poprzez naciśnięcie przycisku ( ). Na wyświetlaczu pojawi się napis “LoLi“. W celu kontynuacji należy nacisnąć przycisk ( ). ☞ ☞ Przyciskami ( ) i ( ) zwiększamy lub zmniejszamy temperaturę “MIN“. Akceptujemy poprzez naciśnięcie przycisku ( ). ☞ Wybór rodzaju skali i zegara W tym menu można dokonać zmiany rodzaju skali i zegara (patrz UWAGA pkt 4) ☞ ☞ ☞ ☞ ☞ } Przyciskami ( ) i ( ) należy wybrać odpowiedni rodzaj skali i zegara. Akceptujemy poprzez naciśnięcie przycisku ( ) . Funkcja adaptacyjna Opisaną funkcję adaptacyjną (patrz pkt 1) można wyłączyć lub włączyć. W przypadku wyłączenia regulator załączy się o zaprogramowanej godzinie. ☞ } ☞ ☞ Przyciskiem ( ) ustawiamy “OFF“ lub “ON“. Akceptujemy poprzez naciśnięcie przycisku ( ). ☞ Aby opuścić “ustawienia dodatkowe“ i przejść do normalnej pracy, należy nacisnąć przycisk ( ) ☞ 6. Powrót do ustawień fabrycznych Regulator wyposażony jest w przycisk “R“ (reset). Naciśnięcie i przytrzymanie tego przycisku przez ok. trzy sekundy spowoduje wyzerowanie godziny i dnia tygodnia, natomiast programy powrócą do ustawień fabrycznych. Ponowne ustawienie godziny i dnia patrz pkt. 2. W celu zmiany programów patrz pkt 4. Ustawienia fabryczne Czas i temperatura dla każdego zdarzenia Dni 1-5 Godzina Symbol graficzny Fabrycznie zdarzenia Użytkownik Temperatura Fabrycznie Pobudka 06:00 20˚C Wyjście 08:00 15˚C Powrót 16:00 22˚C Noc 22:30 15˚C Pobudka 08:00 22˚C Noc 23:00 15˚C Użytkownik Dna 6-7 Fabrycznie Ustawienia dodatkowe Wariant podziału tygodnia 5:2 Ograniczenie zakresu MIN/MAX 15˚C/28˚C Rodzaj skali i zegara 24 h/˚C Funkcja adaptacyjna ON Użytkownik 7. Kody błędów Regulator został tak zaprogramowany aby pomóc użytkownikowi podczas wystąpienia ewentualnych nieprawidłowości w jego działaniu: E0: Błąd wewnętrzny. Wymienić regulator. E1: Błąd czujnika. Wymienić regulator. E2: Błąd czujnika. Sprawdzić czy czujnik jest prawidłowo podłączony do regulatora. Jeżeli tak, wymienić czujnik. OJ ELECTRONICS A/S Stenager 13B · DK-6400 Sønderborg Tel. +45 73 12 13 14 · Fax +45 73 12 13 13 www.oj.dk