1
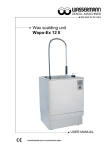
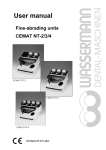
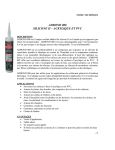
Mixing and dosing unit
SIDOMIX
USER MANUAL
Dear customer,
Thank you for choosing a product from the Wassermann range. Wassermann dental
equipment incorporates the highest standards of quality and the latest technology.
In order to enjoy maximum performance and years of trouble-free operation, please read
this instruction manual carefully before you connect this device and start work, and
operate the device according to the recommended guidelines. The operation safety and
the functionality of this device can only be guaranteed if you follow both the general safety
guidelines and the applying laws to prevent accidents as well as the precautions given in
this instruction manual. We are not liable for any damages which occur due to
inappropriate usage or faulty operation of this device.
Make sure that anyone using this device has read and understood this instruction
manual.
Keep this instruction manual in a safe place where it can be referred to as required
at any time.
Company address:
Wassermann Dental-Maschinen GmbH
Rudorffweg 15-17
D-21031 Hamburg, Germany
Tel. : +49 (0)40 / 730 926 – 0 Fax.: +49 (0)40 / 730 37 24
E-mail: [email protected]
URL: http//www.wassermann-dental.com
.
Erstellt: 20.12.2007 / ms
Version: 1
Auftrag: 172984
Index
1 Features .......................................................................................................................... 4
2 Safety guidelines ............................................................................................................. 4
2.1 Safety symbols used in this manual .......................................................................... 4
2.2 Safety guidelines ....................................................................................................... 5
3 Application ....................................................................................................................... 5
4 Before starting ................................................................................................................. 6
4.1 Transport................................................................................................................... 6
4.2 Installation.................................................................................................................. 6
4.3 Storage...................................................................................................................... 6
5 Start-up / Installation ....................................................................................................... 7
6 Operation ......................................................................................................................... 9
7 Troubleshooting ............................................................................................................. 10
8 Care and maintenance .................................................................................................. 11
8.1 Cleaning................................................................................................................... 11
8.2 Servicing.................................................................................................................. 11
8.3 Warranty ................................................................................................................. 11
8.4 Spare parts.............................................................................................................. 11
8.5 Scope of delivery / Accessories .............................................................................. 12
8.6 Repairs.................................................................................................................... 12
9 Technical data ............................................................................................................... 13
10 EC Conformity Certificate ............................................................................................ 14
1
Features
Mixing and dosing of addition-vulcanazing 1:1 two-component silicones. For even dosage
of both components, both must have similar viscosity.
Advantages:
• Mixing head with separate output openings – mixing of A and B components while
mounting or dismounting the mixing cannula is impossible
• Automatic production of homogene silicone material without any loss or bubbles at the
press of a button
• Saves material and time by filling more than one bowl at the same time with just a single
mixing cannula
• Forced mixing by a disposable mixing cannula, pink with bayonet mount
• Containers with quick couplings mounted directly on the device
• Quick coupling for mounting of 1 kg and 6 kg (optional adapter set ) or 25 kg (optional
pad stand and adapter set with connection hoses required).
• The included 2x2 litre material containers feature a quick coupling and can be used
immediately.
• Food switch available as option
2
2.1
Safety guidelines
Safety symbols used in this manual
Warning!
This is a warning of risk situations and dangers.
Failure to observe this warning could be life-threatening. These warnings must
be observed.
Information!
This symbol draws your attention to specific features that must be observed.
4
2.2
Safety guidelines
Always keep the two silicone components separated – never mix up the
connections! The mixing of components would cause the silicone within the
device to harden, making extensive repairs of the device in the Hamburg plant
necessary.
Drill a ventilation hole using a drill or similar tool at the upper side edge of the 1
litre bottle or 6 kg or 25 kg can. Do not tighten the caps of the 2 litre material
containers, but just fit them loosely to ensure proper ventilation.
After hardening and before further usage, fit a new mixing cannula.
WARNING: Never use with a hardened mixing cannula!
Note that while using bulk containers, the cans must be positioned at a height
higher than the device. Optional pad stands are available on request.
Leave about 2-3 cm minimal filling inside the containers to avoid air to get into
the system and the need for demanding bleeding of the device.
3
Application
Mixing and dosing of addition-vulcanazing 1:1 two component silicones. For even dosage
of both components, both must have similar viscosity.
Only use the device for this type of application.
5
4
4.1
Before starting
Transport
Before transporting the unit, ensure that it has been unplugged from the power socket.
Make sure that it is packed correctly in order to avoid accidental damage.
Be sure to check for any transport damage when unpacking the goods. Note down
any damage if found.
4.2
Installation
Open the box, remove the packing materials, and carefully lift out the device and
accessories. Check the included accessories.
Install the device on a stable, level surface.
Do not install the SIDOMIX outdoors or in places without proper ventilation.
Before start-up, be sure the device reaches room temperature.
Install the device in a place where it will not block the working area and the
functionality (take the dimensions into account).
4.3
Storage
If the unit is to be stored for an extended period, protect it from moisture and dust.
6
5
Start-up / Installation
Connect the power cord.
Remove the closing plugs from the connections and dosage head.
When using 2 litre material containers (included):
Fill the material container with the relevant component.
Warning: Insert the container filled with coloured silicone compound –
component B – into the colour marked entry at the back of the device. Do not
mix up! If you mix up the closings even for a short time, the device must be
disassembled and cleaned.
Very important: Do not tighten the caps of the material containers, but just fit them
loosely to ensure proper ventilation.
When using 1 kg bottles:
Remove the closings of the bottles filled with two component silicone and screw the
above mentioned metal quick closings (accessories) onto the bottles.
Warning: Screw the colour marked quick closings onto the bottles filled with
coloured silicone compound – component B. Do not mix up! If you mix up the
closings even for a short time, the device must be disassembled and cleaned.
Insert the bottles with quick closings into the entry on the back of the device (the
bottles will be upside down).
Very important: Drill a ventilation hole using a drill or similar tool at the upper side
edge of the bottles to ensure proper ventilation.
When using 6 kg bulks:
Remove the closings from the cans filled with two component silicone and screw
the adaptor set onto the cans.
Warning: Screw the colour marked adapter onto the can filled with coloured
silicone compound – component B. Do not mix up! If you mix up the closings
even for a short time, the device must be disassembled and cleaned.
Insert the can with quick closings into the entry on the back of the device (the can
will be upside down).
Very important: Drill a ventilation hole using a drill or similar tool at the upper side
edge of the can to ensure proper ventilation.
7
When using 25 kg bulks:
Note that while using bulk containers, the cans must be positioned at a height
higher than the device. Optional pad stands are available on request.
Remove the closings from the cans filled with two component silicone and screw
connection hoses onto the cans.
Warning: Screw the colour marked connection hose onto the can filled with
coloured silicone compound – Component B - screw on. Do not mix up! If you
mix up the closings even for a short time, the device must be disassembled and
cleaned.
Place the can, e.g. on the optional pad stand, to make sure that it will be placed
higher than the dosage device (can will be upside down) and insert the connection
hoses with quick closings into the entry on the back of the device.
Very important: Drill a ventilation hole using a drill or similar tool at the upper side
edge of the can to ensure proper ventilation.
Replacing bottles/cans:
Remove the quick coupling/bottle adaptor from the device by pulling up the lock. Screw the
quick coupling/bottle adaptor onto the new bottle/can and connect as explained above.
Take special care to never confuse the bottles or connection hoses A+B – not even
for a short time – since the silicone within the connections and pipes hardens
instantly! The cleaning procedure is very demanding and may only be performed by
authorised repair companies.
Note that while using bulk containers, the cans must be positioned at a height higher than
the device. Optional pad stands are available on request.
Never use with a hardened mixing cannula!
8
6
Operation
Switch on the device; the toggle switch lights green.
To clean the pipes and dosage pump, perform the following upon first start-up as
well as when replacing the bottles: Position a container under the mixing head
without the mixing cannula, press the red button and hold it until both components
run evenly and without bubbles from the mixing cannula adaptors.
Mount the mixing cannula by turning it 90° on the mixing cannula adaptor (clean
the adaptor before if necessary). Place the bowl or the model to be used for
doubling the system under the mixing cannula. Press the red button: 1:1 mixed
silicone runs out of the mixing cannula.
We recommend collecting a small amount of the mixture initially output and just
letting the substance output subsequently run into the form. You can fill more forms
without changing the mixing cannula as long as the period between the single
dosage operations lies within the dripping time of the used silicone (about 4 min.).
The dosage machine 1:1 dispenses mixed silicone as long as you press the red
button.
After use, leave the mixing cannula attached to the device and allow the remaining
silicone to vulcanise. This closes the openings of both components sufficiently.
A new mixing cannula must to be fitted after hardening and before further usage.
WARNING: Never use with a hardened mixing cannula!
Very important:
Do not continue operation if one or both containers are empty; otherwise the
pipes will convey air (observe the minimum liquid level of the containers: ~ 2-3
cm!).
9
7
Troubleshooting
Problem
No silicone output.
No silicone output.
No silicone output.
No silicone output.
Silicone output
without 1:1 ratio.
Silicone output
without 1:1 ratio.
Cause
Remedy
Hardened material
Mount a new mixing cannula.
within the old
cannula.
Mixing head clogged. Clean mixing head carefully.
Warning: Silicone components must not get
in contact with each other!
A and B component The device needs to be disassembled and
was mixed up;
cleaned by a qualified technician.
silicone within the
device system has
hardened.
Minimum liquid level Add silicone compound and wait about 20
of the silicone
min. until silicone fills the pipes. Position a
containers was
container under the mixing head without the
reached; system has mixing cannula, press the red button and hold
sucked in air.
it until both components run out even and
without bubbles from the mixing cannula
adaptors. Clean the mixing head and connect
a new mixing cannula if necessary.
Silicone components We recommend using Wassermann doubling
do not have similar
silicones WaSil soft and WaSil.
viscosity.
Gears within the
The device needs to be inspected by a
pump are not evenly qualified technician.
worn.
If the above recommendations do not solve the problem, contact your dental
depot or our service department.
10
8
8.1
Care and maintenance
Cleaning
Disconnect the power plug before starting any maintenance work.
The identification plate must always be kept in easily legible condition and must
not be removed.
Always keep the mixing cannula adaptor and the quick closings clean.
8.2
Servicing
The SIDOMIX does not require any servicing. Just make sure that the device is kept clean.
8.3
Warranty
The warranty period for our equipment is 12 months. If faults occur within the
warranty period, contact your dental depot or get in touch directly with our Service
department.
Your equipment should only be operated in perfect condition. If faults occur which
could harm operators or third parties, the unit should not be used until it has been
fixed.
This warranty does not cover damage caused by improper use, external
mechanical causes, transport damage or interference with the unit by unauthorized
persons.
Wassermann Dental-Maschinen GmbH does not accept any liability when using
silicone compounds produced by other manufacturers. Doubling silicones may vary
in viscosity and abrasiveness of both components; therefore not all commercially
available doubling compounds may be suitable for usage with this dosage device.
8.4
Spare parts
If necessary please contact our service hotline phone:
0049 (0)40 / 730 92 6-0
11
8.5
Scope of delivery / Accessories
Included parts:
Part no.
Material container set with quick coupling, 2x2 litres
172640
Mixing cannula, pink 100 pieces
622022
Accessories:
Part no.
Mixing cannula, pink 100 pieces
622022
Foot switch
174175
Retrofitting set for foot switch
172630
Material container set with quick coupling, 2x2 litres
172640
Pad stand small for WaSil / WaSil soft 2 x 6 kg bulk
172631
Pad stand large for WaSil / WaSil soft 2 x 25 kg bulk
172632
Connection hoses complete, 2 pieces
172633
Adaptor set for WaSil / WaSil soft 2 x 1 kg bulk
172634
Adaptor set for WaSil / WaSil soft 2 x 6 kg bulk
172636
8.6
Repairs
Servicing or repairs to the unit must only be carried out by qualified technicians.
Only original spare parts are to be used. Responsibility for the product is voided
if unauthorised persons alter it or if inappropriate components are installed.
12
9
Technical data
Mixing and dosing unit SIDOMIX, 1:1 – item no. 172984
Dimensions:
Weight:
Voltage*:
Output:
Power consumption:
width: 290 mm, height: 310 mm, depth: 450 mm
11.5 kg
220-240 V / 50/60 Hz – 115 V / 50/60 Hz
260 Watt
1.6 A
*Other voltages upon enquiry.
The noise level of the unit amounts to ≤ 70 dB(A).
The technical data are subject to change without prior notice.
13
10
EC Conformity Certificate
in accordance with 2006/95/EG (low-voltage guidelines) and 2004/108/EG (EMV
guidelines) and 98/37/EG (machinery guidelines)
Manufacturer:
WASSERMANN
Dental-Maschinen GmbH
Rudorffweg 15 - 17
D-21031 Hamburg
Model:
SIDOMIX
Aapplicable
standards:
DIN EN 61010-1:2004
DIN EN 61000-6-3:2005
DIN EN 61000-6-1:2002
DIN 45635-1:1984
DIN EN 60335-1:2007
Product description:
Mixing and dosing
unit, 1:1, for
dental
applications
Item-no. 172984
Hiermit wird bestätigt, dass die oben bezeichnete Maschine den genannten EG-Richtlinien
entspricht. Diese Erklärung wird ungültig, falls die Maschine ohne unsere Zustimmung
verändert wird.
This is to confirm that the above mentioned machine complies with the described EC
rules. This declaration becomes invalid if the machine is modified without our approval.
Cette machine est conforme aux normes en vigueur de la Communité Européene. Cet
avis est nul et non avenant si cette machine est modifiée sans notre accord.
Esta máquina, anteriormente mencionada, cumple con los limites requeridos por el
reglamento EC. Ahora bien, esta declaración quedará invalidada en caso de realizar
modificaciones al aparato sin nuestra aprobación.
Hiermee wordt bevestigd dat bovengenoemde machine voldoet aan de voorgeschreven
EU normen. Deze verklaring verliest geldigheid als er zonder onze uitdrukkelijke
toestemming wijzigen aan de machine worden aangebracht.
Place, date: Hamburg, 20.07.2007
Company stamp:
Signature : ________________________
Wilfried Wassermann
(Managing Director)
14
Notes:
15