1
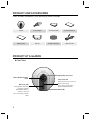
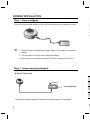
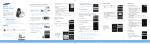
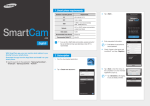
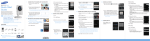
Samsung SmartCam Quick Start Guide SNH-1010N IMPORTANT SAFETY INSTRUCTIONS Ins 1. Read these instructions. The una Suc 2. Keep these instructions. 3. Heed all warnings. 4. Follow all instructions. 5. Do not use this apparatus near water. 6. Clean only with dry cloth. 7. Do not block any ventilation openings, Install in accordance with the manufacturer’s instructions. 8. Do not install near any heat sources such as radiators, heat registers, stoves, or other apparatus (including amplifiers) that produce heat. 9. Do not defeat the safety purpose of the polarized or grounding-type plug. A polarized plug has two blades with one wider than the other. A grounding type plug has two blades and a third grounding prong. The wide blade or the third prong are provided for your safety. If the provided plug does not fit into your outlet, consult an electrician for replacement of the obsolete outlet. 10. Protect the power cord from being walked on or pinched particularly at plugs, convenience receptacles, and the point where they exit from the apparatus. 11. Only use attachments/ accessories specified by the manufacturer. 12. Use only with the cart, stand, tripod, bracket, or table specified by the manufacturer, or sold with the apparatus. When a cart is used, use caution when moving the cart/apparatus combination to avoid injury from tip-over. 13. Unplug this apparatus during lighting storms or when unused for long periods of time. 14. Refer all servicing to qualified service personnel. Servicing is required when the apparatus has been damaged in any way, such as power-supply cord or plug is damaged, liquid has been spilled or objects have fallen into the apparatus, the apparatus has been exposed to rain or moisture, does not operate normally, or has been dropped. SPECIFY SERVICE INSTRUCTIONS AND WARRANTY TERMS This device complies with Part 15 of the FCC Rules. Operation is subject to the following two conditions: (1) this device may not cause harmful interference, and (2) this device must accept any interference received, including interference that may cause undesired operation. FCC NOTE: THE MANUFACTURER IS NOT RESPONSIBLE FOR ANY RADIO OR TV INTERFERENCE CAUSED BY UNAUTHORIZED MODIFICATIONS TO THIS EQUIPMENT. SUCH MODIFICATIONS COULD VOID THE USER'S AUTHORITY TO OPERATE THE EQUIPMENT. W • T • B i • T K • E • N m • T • T s • T i o • M A • M t • A • B a • T • T • W r • T A • T • T s ce s s o The manufacturer is not responsible for any loss or radio/TV interference caused by unauthorized modification of the product. Such modification will void the warranty of the product as well as the user’s right of use. Warning • The product must be assembled and installed by an adult. • Before using, read all instructions on this manual thoroughly and follow operational instructions, warnings on this manual and printed on the product. • To avoid entangled power cord, do not place it around the baby bed or other infant furniture. Keep this product and its power cord out of children’s reach. • Especially, the power cord should be installed carefully while keeping it out of children’s reach. • Never use the product near bath tub, sink, washing machine and in wet basement to avoid moisture. • The product is designed for indoor use. • The product is not designed for medical monitoring, and requires a grown-up’s protective supervision on its use. • To avoid overheating of the product, do not expose the product to direct sunlight; do not install or use near a heat source such as heater, radiator, cooking devices (ex: electric stove or oven) and other warming devices (ex: audio amplifier, TV, etc.). • Make sure to keep ventilated while using the product. Avoid pillar or furniture that may block ventilation, when installing the product. • Make sure to use the power adaptor provided. If used with unidentified adaptor, it may damage the product. The power adaptor must be used with regular household electric supply. • Avoid sharp, pointed objects around the adaptor’s cable, not to damage the cable. • Be warned and never hold the cable’s stripped part when connecting / disconnecting the adaptor to/from the wall outlet. • To avoid entangled cable lines, avoid using cable extension for adaptor’s power cord. • The product’s servicing is allowed only to authorized Samsung Techwin’s service personnel. • When using the product for children’s care, be careful to keep the product out of children’s reach. • The product partially contains component which might cause respiration difficulty. Accessories and small parts of the product should be stored keeping out of children’s reach. • The product is not designed to replace responsibility of human supervision on children. • The product is not equipped with device of immediate notification to adult with accidental/ sudden children‘s move; it requires periodic checks and human supervision. Samsung Techwin cares for the environment at all product manufacturing stages, and is taking measures to provide customers with more environmentally friendly products. The Eco mark represents Samsung Techwin’s devotion to creating environmentally friendly products, and indicates that the product satisfies the EU RoHS Directive. English - 3 ENG g a he Instructions & Warranty PRODUCT AND ACCESSORIES Check for below components when opening the product package. Camera Power Adaptor Quick Start Guide License Information Warranty Card Bracket Double-sided Tape Network Cable PRODUCT AT A GLANCE +Front View High quality camera lens Built-in IR LEDs for night vision Wi-Fi status LED Flashing White: Searching for wireless network Steady White: Wireless network connected Off: Connected via network cable 4 Power status LED Red: Power On, Boot-up in process White: Camera ready Yellow: Privacy mode enabled Magenta: Updating firmware Built-in Mic +Bottom View ENG Holes for wall mount bracket Built-in speaker +Side View WPS Button Used to connect to the Wireless Access Point Privacy button Press once to stop transmitting video/audio Press and hold for 5sec to reset the camera to default settings +Rear View ss DC 5V Power Input Network port Used if WPS is not supported on the Wireless Access Point or if you do not have a Wireless Access Point English - 5 CAMERA INSTALLATION 1 Step 1. Plug-in Adaptor Plug-in the camera power adapter to the wall outlet and connect the camera as shown. 2 3 4 5 6 7 n Make sure to use the provided power adaptor. Otherwise, the product may not operate properly. It will take about 1min for the camera to boot-up completely. When the boot-up is complete, the power LED color will change from red to white. Step 2. Connecting to the Network +Wired Connection <Modem> 1 Internet Service 2 3 1. Connect the network cable to the camera and to the home router as shown above. n 6 1. Connect the network cable to the camera and to the home router as shown above wired connection. ENG n. + Wireless Connection without WPS 2. Register the camera according to Step 3 of Camera Installation. 3. Select the camera according to Step 4 of Camera Installation and click the setup page 4. Click Network Setting - Wireless Network 5. Click Wireless On Button and Select Wireless Network Name 6. Input password of the Wireless Network 7. Click Apply Button <Wireless Network> 1 e 2 3 No. Description 1 Wireless On/ Wireless Off You can select to activate or deactivate the wireless network connection. 2 AP (Access Point) list You will see a list of APs (Access Point) available. Select a desired one from the list of APs (Access Point). 3 AP (Access Point) password If you select a secured AP (Access Point), you must enter the password before you can access the network. For the password, contact your network administrator. e n When the wieless network setting are completed, remove the LAN cable. English - 7 S + Wireless Connection with WPS 1 WPS Button WPS Button Wi-Fi Indicator LED 1: [Camera] --------------------> 2: [Wireless Access Point with WPS] 1. Press the WPS button on the camera and the WiFi status LED will flash rapidly. n 2. Press the WPS button on the Wireless Access Point within 2min. n The W-iFi status LED will become steady white once the camera is connected to the Wireless Access Point. (may take up to 30sec). n 2 3 8 Step 3. Registering the Camera + Creating Samsungsmartcam account 1. Enter www.samsungsmartcam.com on the web browser’s address field. ENG n If you do not have Java installed on your computer, you will be asked to click on the link to download the Java plug-in and install. This process may take up to 10 minutes depending on your internet connection speed. n This product is designed to automatically install JAVA but, in many situations, if it is not installed automatically, visit by www.java.com and follow the onscreen instructions to install the product. 2. Select <Sign Up> to register. After reading the terms of use, check on “Agree”, and click <Next>. 3. Provide requested information, and click <Sign Up>. English - 9 S +Camera Registration 1. Enter the <Serial No.> and click Check. 1 <Bottom Label of the Product> 2. Create a <Private key>. 2 n Private key is required to prevent unauthorized access to the camera. If you lose the private key, you are not able to access the camera. Refer to the <Trouble shooting> section of the manual and make the settings again. 3. Create a <Camera Name>. Camera Name : You can provide the camera name to your preference for identification in the multi-camera network. (ex: Living room, Kitchen...) 10 1 Step 4. Viewing Live Video + Selecting the Camera 1. From the <Camera List>, select the camera by clicking on the active icon (blue). ENG cam-room1 xxxxxxxxx cam-room2 xxxxxxxxx 2. Enter the Private Key and select preferred language. + Live Video 1. Select <Video> <Live> to display the live feed from the selected camera. n English - 11 W < Mid speed network > : Select frame rate based on your network speed. - High speed network: VGA resolution, 20fps - Mid speed network: VGA resolution, 10fps - Low speed network: VGA resolution, 5fps < > : Takes a picture of current live image you are viewing. < > : When enabled, you can hear what’s happening around the camera. < n n > : Enable and disable night vision. Depending on your internet provider, When the camera can’t connect your phone or PC directly, Relay mode show on display screen and the live video viewing may time-out after 1 minute. W Step 5. Notification Setup Camera has ability to send event notifications when motion or audio is detected. See the notification bar below the live view. + <YouTube> Notification When enabled, you can record up to 30 seconds of video to your private YouTube account. 1. Select Enable. 2. Enter your YouTube user ID and password. 3. Select public or private folder to save. By default, it’s set to private folder. 4. Click Apply. 12 W he unt. When enabled, camera will send a picture of the event to your Picasa account. 1. Enter your Picasa user ID and password. 2. Select either public or private folder to save. By default, it’s set to private folder. 3. Click Apply. n YouTube and Picasa must be enabled to receive notifications. + <My Friends> Notification When enabled, camera will send event notifications to listed user IDs. Notifications can be viewed in Smartcam App or Google Talk. - The video/image alarm will be transferred only if you have set the YouTube and Picasa enabled. Otherwise, no alarm will be triggered. - You will have no video displayed if you don’t have any YouTube ID and access a private content. - Even when you access the YouTube site, no video will be played automatically. Be sure to click the Play icon to play a video. If you fail to play the video, log into the YouTube site and install Flash Player and try again. ½ <Google Talk> Notification 1. In the friend’s list, it shows the IDs that camera is registered to and Google Talk friends that receives real-time notification from the camera. 2. When enabled, you can receive real-time event notification through Google Talk messenger and Smartphone push service. 3. To receive instant event notification, add the camera as a friend to your Google Talk messenger account. You have to add the following user ID. (camera serial number@ xmpp.samsungsmartcam.com) (i.e., [email protected]) 4. Once camera is invited, you will receive an instant message to enter the private key for authentication. Enter the private key of the camera you are adding. 5. Once completed, you can see the Google Talk messenger ID in the camera My Friends list. 6. Click Apply. + <Twitter> Notification When enabled, camera will send a notification as a message to your Twitter account. 1. Click “Request URL”. 2. Click on Get Token. 3. Twitter web page will pop-up for authorization. 4. Enter your Twitter user ID and password and click on “Authorize app” to get the Access Token. 5. You will see the pin number generated. Copy the pin numbers and go back to the camera page and paste the pin number in the Access Token section. 6. Click Apply. English - 13 ENG or + <Picasa> Notification + <E-mail> Notification S 1. Please see the below table for the popular email server information. Gmail Yahoo Yahoo Plus smtp.gmail.com smtp.mail.yahoo. com plus.smtp.mail. yahoo. com Port 465 25 465 Use SSL. Use Don’t Use Use User Authentication on on on ID Full email address Only ID without “@yahoo. Only ID without “@yahoo. com” com” Password Email password Email password Email password Sender Full email address Full email address Full email address Server Address 2. If your email provider is not listed, you need to get the email server information from your email provider. 3. Add above information and receiver full email address and then click Add buttion. MOBILE PHONE SETUP Step 1. Download Application With the application, you can perform the real-time monitoring on your smart phone. Download the application from the Play Store and App store, and install it on your smart phone. Visit the Web site and download the application to the smart phone, or click the URL below to start downloading. Application: SmartCam mobile Play Store: http://play.google.com/store App Store: http://www.apple.com/iphone/from-the-appstore/ Search keyword for the application: “Samsung SmartCam”, “Smartcam”, “SAMSUNG TECHWIN”, “TECHWIN”. 14 Step 2. Log In 1. Please run the downloaded application. ENG our 2. When the loading is completed, you will see the login dialog. Provide the user ID and password. (The login information is the same as registered at www.samsungsmartcam.com.) Check the “Remember me” option. Then, your ID and password will be saved. N”, <Android> <iPhone> English - 15 S Step 3. Select Camera 1. From the <Camera List>, select a camera to monitor or for which you want to check the event information. <Android> n <iPhone> You cannot monitor the camera that is inactive. n 2. Select a desired menu item. 16 <Android> <iPhone> the Step 4. Live Video <Android> n ENG 1. If selecting <Live>, you will be prompted to enter the <Private Key>. When done, the video from the camera will be received after few seconds. <iPhone> For more information, please refer to the SmartCam Mobile Guide. Full user manual download link can be found in the samsungsmartcam support page. (www.samsungsmartcam.com) English - 17 MEMO MEMO SALES NETWORK • SAMSUNG TECHWIN CO., LTD. Samsungtechwin R&D Center, 701, Sampyeong-dong, Bundang-gu, Seongnam-si, Gyeonggi-do, Korea, 463-400 TEL: +82-70-7147-8740~60, FAX: +82-31-8018-3745 • SAMSUNG TECHWIN AMERICA Inc. 100 Challenger Rd. Suite 700 Ridgefield Park, NJ 07660 Toll Free : +1-877-213-1222 Direct : +1-201-325-6920 Fax : +1-201-373-0124 www.samsungsv.com • SAMSUNG TECHWIN EUROPE LTD. Samsung House, 1000 Hillswood Drive, Hillswood Business Park Chertsey, Surrey, UNITED KINGDOM KT16 OPS TEL : +44-1932-45-5300 FAX : +44-1932-45-5325 PT01-001112A