1
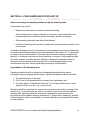
PROTOCOL Bat and Rodent Sampling Methods v. 22 July 2013 Prepared by Jonathan Epstein, EcoHealth Alliance Matthew LeBreton, Global Viral Forecasting Initiative Melinda K Rostal, EcoHealth Alliance and the PREDICT One Health Consortium Objectives: To safely collect biological samples from live and dead wild bats and rodents. (See separate detailed PREDICT protocols bat population sampling, for wild animal capture, personal protective equipment, and data collection). USAID Disclaimer This document was made possible by the generous support of the American people through the United States Agency for International Development (USAID) Emerging Pandemic Threats PREDICT. The contents are the responsibility of the authors and do not necessarily reflect the views of USAID or the United States Government. Suggested Citation Form: PREDICT One Health Consortium 2013. Protocol for Bat and Rodent Sampling Methods. http://www.vetmed.ucdavis.edu/ohi/predict/PREDICT_Publications.cfm#Protocols CONTENTS SECTION 1. SAFETY AND PERSONAL PROTECTIVE EQUIPMENT SECTION 2. DATA COLLECTION SECTION 3. SAMPLE COLLECTION SECTION 4. FIELD SAMPLING STATON SEU-UP SECTION 5. BAT PROCESSING SECTION 6. RODENT PROCESSING SECTION 7. RODENT BLEEDING TECHNIQUES SECTION 8. COLLECTING FECAL SAMPLES SECTION 9. REFERENCES APPENDIX I. BAT DATA SHEET APPENDIX II. RODENT DATA SHEET USAID PREDICT Protocol for Bat and Rodent Sampling Methods 2 SECTION 1. SAFETY & PERSONAL PROTECTIVE EQUIPMENT • All personnel are responsible for knowing the safety guidelines and procedures that are relevant to their tasks. Personnel involved in capturing, handling, or sampling animals, must understand and be able to apply the safety guidelines provided in the PREDICT Guides and Protocols. • The primary investigator and/or sampling team leader are responsible for ensuring that the field team members have had the appropriate safety training for the tasks to be performed. • Each country team should ensure that all activities are in line with relevant IACUC protocols, and SOP’s; and by doing so will ensure that activities are in compliance with the PREDICT Environmental Mitigation and Monitoring Report. • All people handling bats or their blood products must be vaccinated for rabies. • Field personnel must report to their supervisor and follow post-exposure guidelines for any injury from handling bats that may constitute an exposure to rabies. • Each country team should ensure that appropriate PPE is used. (See Minimum PPE Required for Handling Live, Dead or Samples of Rodents and Bats.) Use current biosafety recommendations to decide what level of personal protection is needed to prevent contamination of the field personnel and sampling team, taking into account potential pathogens in the animal population (See PREDICT Safety Guide: Biosafety and PPE Use for details regarding PPE Use.). The purpose of Personal Protective Equipment (PPE) is to: 1. Protect personnel from contamination or exposure to potential infectious agents; and; 2. Prevent the contamination of persons at a site thereby preventing the transmission of potential infectious agents to other sampling locations, animals, and people. Preparation for PPE Use in the Field: PPE is an essential component of any surveillance strategy for zoonotic pathogens. Personal protective measures and gear are covered in detail in the PREDICT Safety Guide: Biosafety and PPE Use. Planning and preparing field sampling kits should includes making careful estimates of the number of sets of PPE that will be required by USAID PREDICT Protocol for Bat and Rodent Sampling Methods 3 all personnel. Field sampling kits must also include supplies for disinfecting personnel on site and containing contaminated PPE for disposal. Minimum PPE Required for Handling Live, Dead or Samples of Rodents and Bats: For bats and rodents the minimum PPE includes eye protection, an n95, p95 or p100 respirator, long clothing, and nitrile or latex gloves. (See the PREDICT Safety Guide: Biosafety and PPE Use for detailed instructions regarding PPE Use). PPE Removal and Decontamination: All non-disposable equipment used should be thoroughly cleaned and properly disinfected immediately after use and field personnel should be mindful that anything in contact with contaminated equipment or PPE must also be considered contaminated. Decontamination = cleaning + disinfection 1. Clean--remove organic material, dirt and grease 2. Disinfect—remove microbial contaminants by selecting an appropriate disinfectant for the potential pathogens Thorough cleaning and disinfection of equipment are essential to protect personnel from pathogen exposure and to prevent the spread of pathogens to other wildlife or domestic animal populations. Used PPE gear must be removed in a manner to avoid contamination of the user or the environment, and disposed of appropriately and in a manner to avoid future contamination of other humans, animals, or the environment. First Aid Preparedness It is recommended that at least two field staff should have basic first aid and CPR training and be familiar with recommended first aid procedures for injuries likely to be encountered in the work tasks in the specific field setting. (Refer to first aid field manuals). First Aid Protocol for a Bite, Scratch or Needlestick 1. The injured person must notify other research staff and work must stop. 2. The bite, scratch or needlestick site should be washed well with soap and water for a full 5 minutes and then betadine (or benzalkonium chloride if available – this is known to kill rabies virus). It is recommended that benzalkonium be kept readily available in a first aid for such purposes. 3. If the injury is from a bat, the post-exposure rabies vaccination should be obtained as soon as possible. It is recommended that the field team carry doses USAID PREDICT Protocol for Bat and Rodent Sampling Methods 4 of rabies vaccine in a cold box on-site if working in a remote location so that a booster dose can be administered immediately following exposure. Otherwise, exposed personnel should report to a medical clinic for administration of the booster doses according to published WHO recommendations. See WHO guidance for post-exposure prophylaxis at: http://www.who.int/rabies/human/postexp/en/ USAID PREDICT Protocol for Bat and Rodent Sampling Methods 5 SECTION 3. SAMPLE DATA COLLECTION Important considerations for sample data collection: • Follow the latest version of the PREDICT Guide: Surveillance Data Collection (Available on Basecamp: PREDICT Training: Guides & Protocols) and complete the PREDICT data sheets as instructed. The PREDICT Rodent Sampling and Small Bat Data Sheets are available in Excel. • For sampling bat populations, see the PREDICT Protocol for Bat Populations sampling. • Sample labels must have unique IDs. If a barcode labeling system is used, these labels should be printed in advance of sampling work. • Data recording sheets should be designed to align with the larger PREDICT surveillance project. PREDICT required and optional data collection requirements are listed in the PREDICT Guide: Surveillance Data Collection. • The entire sampling team should share the same understandings and definitions of terms used in the sheet (e.g. criteria for marking “poor” condition). • The team should share understandings and definitions of how to describe contextual information about the sample collection, including the level of detail and common descriptive terms. • Assign one team member the task of data recording. Successful and consistent data recording is an essential component to disease surveillance. A data spreadsheet should be created well in advance with all required data fields included. The required data fields are listed in the PREDICT Guide: Surveillance Data Collection. The data recording sheet and sample labeling materials must be present during sampling, and updated after each sample taken (i.e., label each sample and record the corresponding data immediately after collecting each sample). As mentioned, it is ideal to assign the task of data recording to one team member to ensure accountability and that this key activity is completed accurately. DATA TO COLLECT See the PREDICT Guide: Surveillance Data Collection for details about data collection and submission. USAID PREDICT Protocol for Bat and Rodent Sampling Methods 6 Minimum data: Table 1 lists the minimum set of data (fields) that should be recorded for all specimens. Table 1. Data fields required for all specimens at all sites. Field Name Explanation Animal Classification Class of the animal, e.g. Captive wild, wild, domestic, feral domestic Animal ID Unique ID of the Animal sampled Condition At Sampling The condition of the animal when sampling begins e.g. “apparently healthy”, “injured” or “died (fresh carcass)”, etc. Country Country of collection site Domestic Animals Present at Site List of all domestic animals present at the site Identification by Who identified wildlife Identification certainty Level of certainty of wildlife identification Laboratory storage The storage method used at the laboratory method Most Prominent The most prominent anthropogenic change that has occurred in the last 6 months Anthropogenic Change at at the site e.g. “area with ecotourism” or “crop growing”, etc. Site Primary Risk Interface Describes the potential for human or domestic animal contact at the situation in which animals were handled or sampled. Reason for collection Description of reason for collection e.g. “opportunistic”, “active surveillance”, etc. Recorder affiliation Organization of person collecting data Recorder ID (Name or email) Name or email of person collecting data Site Latitude In Decimal degrees Site Longitude In Decimal degrees Site name or ID Unique name of site where data was collected Species English name Common English name of animal per Kingdon, Francis (field guides) or IUCN Specific genus species name based on ITIS; if the complete genus species is Species scientific name unknown use the next known level of taxonomic classification e.g. genus, subfamily, family Specimen ID Unique ID that references a specimen Specimen Type Type of specimen used. If “tissue”, describe further. Start date Date the sampling event started State/Province State or Province of collection site, e.g. "Sabah" or "Kampot" Storage Location Facility Name Name of the facility where the specimen are located Storage Location within Facility Description of where the specimens are located within the facility Storage Medium The storage medium used e.g. “10% formalin” or “Viral transport media”, etc. Taxa Group Taxa group that animal belongs USAID PREDICT Protocol for Bat and Rodent Sampling Methods 7 Additional (Optimum) Data To Collect: • Age class* • Sex • Whole body photograph • Body weight • Forearm/radius length (tip of elbow to wrist) • Head length (rostrum to occipital crest) • Body length (occipital crest to sacrum with head bent forward 900 to spine) • Identifying characteristic photographs • Additional morphometric measurements • Reproductive status *Age classes - For some bat species it will be possible to classify bats into one of three age classes: Pre-weaned juvenile -- pup is still clinging to dam and suckling. Juvenile -- pup is independent from dam, may be adult sized, but sexually immature. Absence of secondary sexual characteristics such as elongated teats, being gravid at the time of capture, and for male Pteropodid bats, tiny barbules present on the glans penis. Incomplete fusion of phalangeal symphysis (head of phalanx not yet fused with shaft of phalanx as viewed when wing is backlit – this is more apparent with larger bats) Adult -- secondary sexual characteristics present, adult size. Complete fusion of phalangeal symphysis. USAID PREDICT Protocol for Bat and Rodent Sampling Methods 8 SECTION 3. SAMPLE COLLECTION The following basic set of samples should be collected from each animal: • • • • Saliva (oropharyngeal swab) Urine (free catch method or urogenital swab) Blood (serum; rbc/wbc pellet; thin blood smear (fixed)) Feces (fresh fecal sample or rectal swab) Additional samples to be collected if possible without undue harm to the animal: • • Collect two 2 mm wing punches (biopsies) placed in a cryovial in 95% ethanol (1 per tube) if necessary for species identification purposes. Collect ectoparasites in 95% ethanol. Notes regarding sampling materials: • ‘Cryovials” refers to plastic, internally threaded screw-top vials with a silicon Oring to prevent leakage. 1-1.8mL NUNC or Corning brand are recommended to ensure the tubes fit in a standard 9x9 or 10x10 cryobox. • Tubes will be labeled with a unique identifier number. Printed labels should be used. One option is the barcode printers and labels made by Electronic Imaging Materials (www.eiminc.com). Details on Sample Collection and Storage Media: Samples to collect from dead or euthanized animals: Collect approximately 200 mg (pea-sized) sample of large intestine, small intestine, liver, lung, kidney, spleen, and brain (if possible). A 200 mg sample of each tissue should be placed in an empty cryovial and frozen, and a duplicate sample should be placed in 1.0 ml VTM. A third sample of each organ tissue, about 1 cm3, should be placed in a small jar of 10% buffered formalin and kept at room temperature for histopathology. Samples to collect from live animals: • 2 Oropharyngeal swabs- 1 in lysis buffer, 1 in VTM: Using sterile, polyestertipped swabs with either an aluminum or plastic shaft, rub the swab tip gently but thoroughly against the back of the animal’s throat, saturating the swab with saliva USAID PREDICT Protocol for Bat and Rodent Sampling Methods 9 (recommend Puritan® Small Tapered Polyester-Tipped Swab from VWR, Catalog No.: 89133-756). Place 1 swab in a cryovial filled with 0.5-1 ml Nuclisens Lysis Buffer (here on referred to as “lysis buffer”) and use alcohol-wiped (or ethanol-wiped), flame-sterilized scissors to cut the shaft of the swab above the tip. [Note: If the plastic shaft can be snapped, then scissors are not necessary and the risk of cross-contamination is reduced. To snap the swab, lift the swab a little above the bottom of the vial then snap it. This will ensure the swab will not block the cap]. Place the other swab into 1 ml of virus transport media (here on referred to as “VTM,” see Chua et al. 2002) in a cryovial. Store in a liquid nitrogen dry shipper or dewar & transfer to -80˚C freezer when possible. • Feces- about 200 mg in a cryovial- 1 in VTM and 1 in an empty tube: Place a 200 mg (pea size) piece of fresh feces in a 1.0 ml empty cryovial and another 200 mg piece in 1.0 ml VTM in a cryovial. Freeze in dry shipper or dewar with liquid nitrogen and transfer to -80˚C freezer when possible. • If feces are not available, collect 2 rectal swabs- 1 swab in VTM, 1 swab in a tube with lysis buffer: [Note: VTM can be used as a lubricant to decrease the risk of trauma to the rectum. DO NOT USE LYSIS BUFFER AS A LUBRICANT – IT IS HIGHLY IRRITATING TO TISSUE]. Dip sterile swab tips briefly into VTM before inserting gently into the animal’s rectum. Place 1 swab in a cryovial filled with 1.0 ml of VTM using alcohol-wiped (or ethanol-wiped), flame-sterilized scissors to cut the shaft of the swab above the tip. Place the other swab into a cryovial with 1.0 ml of lysis buffer. Store in a dewar or dry shipper with liquid nitrogen dry shipper and transfer to -80˚C freezer when possible. • Blood- serum divided into two aliquots; blood clot divided and placed in VTM and lysis buffer; 2 thin smears: For bats > 100 gm: Use a nonheparinized syringe to collect blood (not to exceed 1% of the total body weight as specified in PREDICT Animal Sampling IACUC protocols). Place blood into a serum vacutainer (red-top) tube containing serum-clotting factor. After allowing the blood to clot, either spin tube in a centrifuge or allow tube to stand vertically on ice overnight. Use a sterile pipette tip and pipette gun to draw off serum and place even aliquots into 2 cryovials (minimum 60 µl). The remaining blood clot should be divided and half placed in a cryovial with 1.0 ml VTM, and the other half into a cryovial with 0.5 ml lysis buffer. Place tubes into liquid nitrogen in dry shipper or dewar and transfer to -80˚C freezer when possible. For bats <100 gm: Use the following blood dilution technique (based on Smith et al. 2010). Insectivorous bats are often <60 gm and this technique can be used for bats and rodents as small as 12 gm. Bat is restrained in one hand and the wing is extended. The radial artery or vein is punctured using the tip of a sterile 25g (gauge) needle and a bleb of blood is allowed to form. Using a pipette or pipette gun draw up 12 µl and place it into 108 µl phosphate buffered saline (PBS) in a 1.2 ml Eppendorf tube. Continue to draw up blood in 12 µl aliquots and place in the same tube until the maximum amount of blood safely allowed (approx 6 µl USAID PREDICT Protocol for Bat and Rodent Sampling Methods 10 blood volume per gm of animal mass) is collected. Add an equal number of 108 µl aliquots of PBS to maintain a 1:10 dilution. Blood tubes can be centrifuged to separate dilute serum from blood cell pellet. Make sure to note the dilution ratio of blood to PBS on the data sheet. Collect serum and red blood cell pellet as above. • Urine -- place urine sample in lysis buffer at an optimal ratio of 1 part urine: 3 parts lysis buffer; and 1 part urine: 2 parts VTM (e.g. ~250 µl bat urine in 750 µl lysis buffer. Note that for very small volumes of urine, a minimum of 300 µl lysis buffer is required: [NOTE: LARGER FRUIT BATS TEND TO URINATE AS THEY ARE REMOVED FROM THE COTTON BAG. URINE MAY BE COLLECTED AT THIS POINT USING A TUBE OR USE A PIPETTE TO SUCK UP URINE FROM A SURFACE, THOUGH THIS IS LESS DESIRABLE FOR CULTURING]. Store in dry shipper or dewar with liquid nitrogen and transfer to -80˚C freezer when possible. • Ectoparasites (e.g. bat flies, lice, fleas): Place ectoparasites in approx. 0.5 ml of 95% ethanol. Store at room temperature. • One 2 mm wing punch: Carefully use sterile punch biopsy on left wing membrane close to the body. Avoid blood vessels. Place the biopsy in a cryovial with 0.5 ml 95% ethanol. Store in cryovial at room temperature. USAID PREDICT Protocol for Bat and Rodent Sampling Methods 11 SECTION 4 – FIELD SAMPLING STATION SET-UP Select and arrange the sampling station to help the sampling team Proper station set up will: • Reduce time and stress on animals caused by handling. • Avoid contamination of clean materials by used ones, and contamination and potential exposure to infectious agents of samples, animals and people. • Allow sampling discreetly and without interference. • Facilitate disinfecting the area after sampling with minimal negative impact on the environment. A detailed sampling protocol for the taxonomic groups/species must be pre-established, and a data recording spreadsheet must be pre-prepared (see Section 2). It is beneficial to assign a duty to each member of the team (such as record keeping or sample tube labeling), to minimize confusion and avoid repetition or omission of any sampling steps. One team member should be deemed officially in charge at the sampling station to ensure smooth processing of the animal(s) and to avoid disagreements on any decisions that may arise, which would delay processing of the animal(s). Organization of the Sampling Area: Sampling materials should be located at a designated sampling station where investigators agree sampling will take place. A good field sampling station should be: 1. An area that is easy to disinfect: 2. Out of view of the general public and away from interference; and 3. A location where, if disinfection efforts fail, it is not likely that humans or other animals will be put at risk (e.g., a picnic area). Materials should be organized in a manner for easy access and swift processing of the animals (e.g., in chronological use order), to minimize stress on the animals and the handling time. Sampling materials must also be arranged for easy access by the individual doing the specific sampling technique (i.e. venipuncture, swabbing), and with sufficient space to avoid contamination of unused materials (by contaminated materials or other animals). USAID PREDICT Protocol for Bat and Rodent Sampling Methods 12 SECTION 5. BAT PROCESSING Procedure: 1. Live bats should be placed into porous cotton bags (with draw-string mouths) and kept in a cool dry place until sampling time, not to exceed 6 hours. 2. Bats should be weighed (in grams) in bags using a Pesola hanging scale or a tabletop scale with or without a container (such as a cup). The container should be tared and both bat and bag should be weighed. Once the bat is removed from the bag for sampling, the bag should be re-weighed and subtracted from previous total. The bat should be removed from the bag and urine should be collected and then 2 oral and 2 rectal swabs should be taken with fine aluminum or plastic shafted swabs [Note: check bag for fresh feces. If feces are available, these may be used as a sample and then a rectal swab is not necessary. The sampler must be certain that the feces belong to the bat being sampled. Bags should be either discarded after first use or washed/disinfected between uses]. Swabs should be cut on the shaft as close as possible to the end-swab without touching it. Scissors should be wiped with ethanol or isopropyl alcohol and flame sterilized after cutting each swab. One oral and one rectal swab should be placed into separate vials of VTM and one oral and one rectal swab should be placed into separate cryovials filled with 0.5-1 ml lysis buffer. Sealed, labeled vials with samples should be put into a dry-shipper or a dewar filled with liquid nitrogen or otherwise stored at -80˚C. 1. The following digital photographs* should be taken of each bat: 1. Full body in anterior-posterior presentation and wings extended with identification card displaying unique identifying number 2. Full anterior facial (macro setting) 3. Full lateral facial/head (macro setting) 4. View of parted pelage on ventrum and dorsum (macro setting) *Proper PPE should be worn at all times while holding animals, including while holding animals for photos. 5. The following biometrics (in millimeters) should be taken (Menzel et al., 2002) [NOTE: these measurements add time to the sampling effort]. For micro-bats these are common measurements and they are valuable for identification. For fruit bats, generally, only a few measurements are taken such as forearm length, head length, and body length. For larger fruit bats, it is also useful to evaluate body condition based on pectoral muscle mass--a quick and subjective USAID PREDICT Protocol for Bat and Rodent Sampling Methods 13 measurement of nutritional status and robustness, which is a useful when assessing health in the context of infection. Record pectoral muscle mass as one of three categories: “Poor” (emaciated, prominent sternum), “Fair” (flat across pectoral muscles and sternum), “Good” (pectoral muscles are rounded and extend/bulge past the sternum). Biometric measurements: o Forearm/radius length (‘elbow to wrist’) o Ear length (most distal tip of ear to middle of the base) (Microchiroptera or microchiropeterans only) o Tragus length (top of tragus to base of ear) (Microchiroptera only) o Body length (measured with the bat in ventral recumbancy from the tip of nose to the base of tail) (note: we separate out head length from body length on Pteropodid bats that is easier to do if the bat is awake). o Hind foot length (‘ankle to toe’) (Microchiroptera only) o Tail length (from base to tip) (Microchiroptera) o Tibia length (‘knee to ankle’) (Microchiroptera) 6. Based on morphometrics and unique characteristics, identify bats to genus, and species (where possible), age class, and sex. For female bats, also determine pregnancy status by gently palpating the abdomen and determine lactation status by gently attempting to express milk from the teats. 7. Manually restrain bats during blood collection. For larger bats, two or preferably three people are required for these manipulations: one person to safely restrain the bat, one to take samples, and a third to manage the tubes (e.g. unscrew the lids, hold them up to the sample taker, make sure the lids are replaced tightly and kept in order) and record samples. Smaller insectivorous bats may be restrained and sampled by the same person. Anyone sampling bats should have had previous training in bat venipuncture to avoid injury to the animal. In addition: • • • • It is recommended that large fruit bats (Pteropus, Aceradon, and other large species) be anesthetized using either injectable medetomidine (50 ug/kg) + ketamine (5 mg/kg) or gas anesthesia (isoflurane 4-5% induction, 2% maintenance). Note: Pregnant women should avoid or minimize exposure to isoflurane. The person restraining the bat is responsible for monitoring respiration and communicating the status appropriately. Live bats must be bled with caution to maintain a ratio no greater than 10 µl of blood to 1 gm of bat body weight (equivalent to 1% bodyweight). [NOTE: for bats <100g we use the maximum amount of 6 µl per gram of body weight) Bats must be fully recovered from anesthesia before releasing to prevent injury. USAID PREDICT Protocol for Bat and Rodent Sampling Methods 14 • For deceased or euthanized bats, collect as much blood as possible. Cardiac puncture is recommended. 8. Apply pressure to site of bleeding using a cotton ball until bleeding ceases (approximately 1 minute). Do not recap needle – this increases risk of needlestick injury. Needles should be discarded into a sharps container. 9. Place collected blood into serum vacutainer tubes (if >1 ml blood collected) or 1.5 ml conical Eppendorf tubes. Place blood in a labeled vacutainer (or Eppendorf tube) in rack on ice for up to 2 hours prior to centrifuging. Centrifuge the blood samples. (If a centrifuge is not available, red-top tubes with blood can be left standing on ice overnight to allow serum to separate.) Use a pipette to draw off serum, and store serum in 1.0 ml cryovials in a dry shipper or dewar. As soon as possible, remove samples and place in cryoboxes and store in a -80 °C freezer. 10. Do not recap needle. Place needle in sharps container and syringe in biohazard bag. All biohazard materials should be delivered to a disposal site or should be burned and buried in the field. Deliver medical waste to an incinerator or other secure medical waste disposal where possible. 11. If necessary for species identification, one 2 mm wing biopsy punches should be taken from the left wing of each bat and placed in 0.5 ml ethanol in a 1.0 ml vial. 12. Release bats as close to their site of capture as possible and follow all other guidelines for release as stated in the PREDICT IACUC protocol. 13. If Avisoft or other sonic-detection device is available, record the bat’s calls upon release (optional). USAID PREDICT Protocol for Bat and Rodent Sampling Methods 15 SECTION 6. RODENT PROCESSING Procedure: 1) Remove animals from traps by placing a handling bag over the back door and coaxing animal out by running an instrument along outside of trap. DO NOT BLOW INTO THE TRAPS. 2) Weigh the animal (grams) using the proper spring scale while the animal is in the handling bag and prior to inserting the anesthetic ball into the bag (see below). After the animal is anesthetized and removed, weigh the empty bag and subtract the bag weight from the total. 3) Anesthetize rodents with isoflurane using an anesthetic ball: • Apply 0.4 ml of isoflurane to cotton ball and put the cotton ball into a metal tea ball (0.4 ml is the appropriate dose for a mouse, adjust the dose as needed for larger rodents). Note: Pregnant women should avoid or minimize exposure to isoflurane. Carefully place the metal ball into the bag with the rodent. Watch animal closely until anesthetized--Breathing will become quick then slow as the animal progresses further under anesthesia. Toe pinch (to measure withdrawal reflex) will indicate proper depth of anesthesia. When withdrawal reflex is suppressed, remove rodent from bag for processing. Scruffing (pinching) the skin where the rodent’s spine meets the head between the handler’s forefinger and thumb is the best way to control the animal when the anesthetic wears off. 4) Collect blood samples immediately after the rodent is anesthetized. USAID PREDICT Protocol for Bat and Rodent Sampling Methods 16 SECTION 7. RODENT BLEEDING TECHNIQUES Use any one of the procedures below to collect the appropriate amount of blood from each rodent. If you combine these methods, make sure the total blood collected from the animal does not exceed safety guidelines. Do not attempt venipuncture without at least one field person present with prior experience, especially with the jugular and retro-orbital approach. See procedure videos at: https://www.aalaslearninglibrary.org/demo/course2.asp?strKeyID=6AC02BD5-17144633-A71D-3CF95BF52C350&Library=10&Track=8&Series=1243&Course=2451&Lesson=26652 Retro-Orbital Bleeding (See illustration and photo on next page): 1) Anesthetized animal is placed on its side (whichever side you feel comfortable with). 2) Place forefinger and thumb above and below the eye. 3) Push skin down towards the work surface and in the posterior direction being careful not to crush the esophagus of the animal. This will cause the eye to protrude to the point that you have access to the retro-orbital sinus. 4) Gently insert a standard non-heparinized micro-hematocrit capillary tube under the eyeball and into the eye socket being careful not to nick or damage the eyeball or surrounding tissue. 5) Gently push capillary tube in until it stops (capillary bed) and twist the tube. Blood should flow into the capillary tube. Fill 1-3 capillary tubes per animal depending upon animal size and age (Note: A standard micro-hematocrit capillary tube can hold about 75 ul of blood which equals the maximum blood draw for a 15 gm animal. See http://oacu.od.nih.gov/ARAC/documents/Rodent_Bleeding.pdf). Take minimal amounts from juveniles and pregnant females. 6) Place the full capillary tube into a labeled 1.2 ml Eppendorf (recorder will do step 8 will the sample collector is doing step 7). 7) Close eye with a cotton ball and apply gentle pressure to stop bleeding. 8) Attach the rubber black bulb pipettor to expel the blood from the capillary tube into labeled 1.2 ml Eppendorf as soon as possible after collection to limit coagulation that will prohibit evacuation from capillary tube. Spin in a microcentrifuge or allowed to settle overnight on ice to let the serum separate. Then, the serum can be transferred to a cryovial and frozen. Depending on its size, the red cell clot should be divided and half placed in 0.5 ml lysis buffer and half placed in 0.5 ml VTM. 9) Store blood in cooler immediately for short-term storage. USAID PREDICT Protocol for Bat and Rodent Sampling Methods 17 Retro-orbital bleeding: 1. Place micro-hematocrit tube in medial canthus of eye and direct it under the globe. 2. Twist slowly as you advance it. USAID PREDICT Protocol for Bat and Rodent Sampling Methods 18 Alternative Techniques For Bleeding Mice and Other Small Rodents Lateral Tail Vein Bleed 1. Use a tourniquet. The veins are located on either side of the tail and are quite superficial. 2. Use a needle with the appropriate gauge (usually 27ga or 25ga), entering the skin at a shallow angle about one third down the length of the tail. Be careful not to collapse the vein. 3. Consider using a small syringe or hematocrit tubes to collect the blood. Tail clip (for mice and other small rodents) 1. Carefully clip off the very tip of the tail. 2. Apply hematocrit tubes to the end of the tail and collect blood. Cardiac puncture – Use only when the rodent has been euthanized or on large anesthetized rodents if sampler has experience with this technique. Note: A maximum of 2 attempts should be made to collect blood via cardiac puncture in order to reduce the risk on internal organ laceration. For mice and small rodents: • The use of a 1 ml (cc) syringe with a 25G needle is recommended. • Find the xiphoid process as a reference point. • Insert the needle at a 35-40 degree angle just under and to the left of the xiphoid process. • As the needle is inserted into the chest, gently aspirate until blood begins to flow. Overzealous withdrawal may collapse the heart. • If you do not get blood flow on the first try, withdraw the needle and repeat entire process. Probing for the heart is not recommended. For rats and large rodents: The procedure is the same as for mice, except it is recommended that a 6 ml or 12 ml syringe with a 20-22 G needle be used. Alternative Techniques for Bleeding Rats and Larger Rodents Jugular – The jugular vein is recommended for larger rodents, particularly for guinea pigs, chinchillas etc. Apply pressure to the jugular vein on one side. Direct the needle into the vein and collect the sample. Ventral Tail Vein - Use a tourniquet, as above. The vein is located both centerally and ventrally In the tail. The vein is deeper than the vein used in mice and it is not readily visualized. As with the mice, start 1/3 of the way down the tail. * Always ensure adequate hemostasis by applying pressure to site of bleeding using a cotton ball or gauze until bleeding ceases (approximately 1 minute). USAID PREDICT Protocol for Bat and Rodent Sampling Methods 19 SECTION 9. COLLECTING FECAL SAMPLES 1. Empty trap contents onto trap carrier lid or other flat surface uncontaminated by other fecal samples. 2. DO NOT PUT YOUR FACE NEAR THE FECES OR ANY OTHER TRAP CONTENTS! 3. Collect fecal pellets from trap contents into labeled centrifuge tube with forceps. Collect as much fecal matter as possible while avoiding collecting non-fecal material to the extent possible. 4. Remove all trap contents from collection surface, spray collection surface with alcohol and allow the trap surfaces to dry before collecting the next sample. 5. Return the rodent to trap after the trap contents have been removed. USAID PREDICT Protocol for Bat and Rodent Sampling Methods 20 SECTION 10. REFERENCES CDC and WHO (Centers for Disease Control and Prevention and World Health Organization). 1998. Infection Control for Viral Haemorrhagic Fevers in the African Health Care Setting. Atlanta, Centers for Disease Control and Prevention, pp. 198. Chua K. B., Koh C. L., Hooi P. S., Wee K. F., Khong J. H., Chua B. H., Chan Y. P., Lim M. E., and Lam S. K. (2002) Isolation of Nipah virus from Malaysian Island flying-foxes. Microbes and Infection 4:145– 151. Bats Food and Agriculture Organisation of the United Nations. 2011. Investigating the role of bats in emerging zoonoses: Balancing ecology, conservation and public health interests. Edited by S.H. Newman, H.E. Field, C.E. de Jong and J.H. Epstein. FAO Animal Production and Health Manual No. 12. Rome. http://www.fao.org/docrep/014/i2407e/i2407e00.pdf Smith,C., C. DeJong and H.E. Field (2010) Sampling small quantities of blood from microbats. Acta Chiropterologica. 12(1): 255-258. LeBreton, M., J. D. LeDoux and J.M. Takuo (2009) GVFI-Cameroon Field Sample Collection and Processing Protocol Bats, Rodents and Shrews, Cameroon. September 2009. Menzel M.A., J. M. Menzel, S. B. Castleberry, J. Ozier, W.M. Ford and J.W. Edwards (2002) Illustrated Key to Skins and Skulls of Bats in the Southeastern and Mid-Atlantic States. USDA Forest Service, PA. 10p(Accessed25.04.09:http://www.fs.fed.us/ne/newtown_square/publications/research_notes/pdfs/2002/r nne376.pdf) Heard D., J. Towles , and D. LeBlanc. (2006) Evaluation of medetomidine/ketamine for short-term immobilization of variable flying foxes (Pteropus hypomelanus). Journal of Wildlife Diseases 42(2) 43741. Jonsson N. N., S.D. Johnston, H. Field, C. De Jong, and C. Smith (2004) Field anaesthesia of three Australian species of flying fox. The Veterinary Record 154:664. Rodents Hudson, P. and J. Sinclair (2010) Mouse Research Standard Operating Procedures. Pennsylvania State University. Quesenberry and Carpenter (2004) Ferrets, Rabbits and Rodents Clinical Medicine and Surgery, 2nd Edition. Elsevier: St. Louis. USAID PREDICT Protocol for Bat and Rodent Sampling Methods 21 USAID PREDICT Protocol for Bat and Rodent Sampling Methods 22