1
ReNamer User Manual
www.den4b.com
PDF generated using the open source mwlib toolkit. See http://code.pediapress.com/ for more information.
PDF generated at: Sun, 23 Mar 2014 00:23:19 CET
Contents
Articles
Basics
1
ReNamer
1
Introduction
2
Quick Guide
3
Step-by-step
4
Adding files and folders
4
Managing Rules
8
Previewing Files
11
Renaming Files
12
Rules
14
Using the Rules
14
Overview of Rules
14
Insert Rule
15
Delete Rule
16
Remove Rule
18
Replace Rule
19
Rearrange Rule
21
Extension Rule
23
Strip Rule
24
Case Rule
25
Serialize Rule
27
CleanUp Rule
29
Translit Rule
30
RegEx Rule
34
PascalScript Rule
36
UserInput Rule
39
Pascal Script
42
Pascal Script
42
Quick Guide
44
Types
47
Functions
49
User Scripts
Appendices
61
63
Using Presets
63
Manual Editing
69
Analyze
71
Program settings
72
Main Menu and Keyboard Shortcuts
78
Menus for the Files Pane
80
Context Menus
87
Date and Time Format
89
Binary Signatures
90
Meta Tags
93
Analyze
96
Regular Expressions
98
Command Line Mode
105
Sorting Files
108
Using Masks
109
Renaming Folders
109
Renaming to Another Folder
110
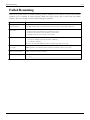
Failed Renaming
112
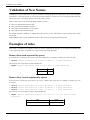
Validation of New Names
113
Examples of rules
113
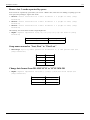
Examples of Rearrange rule
115
References
Article Sources and Contributors
126
Image Sources, Licenses and Contributors
128
Article Licenses
License
130
1
Basics
ReNamer
ReNamer is a very powerful and flexible file
renaming tool.
ReNamer offers all the standard renaming
procedures, including prefixes, suffixes,
replacements, case changes, removing the
content inside brackets, adding number
sequences, changing file extensions, etc.
Advanced users can program their own
algorithm using PascalScript rule.
ReNamer allows you to combine multiple
renaming actions as a rule set, which can be
saved, re-loaded, and edited. In addition, it
can rename folders and process regular
expressions. It can handle Unicode
(non-English scripts).
ReNamer supports a variety of meta tags,
such as: ID3v1 [1], ID3v2 [1], EXIF [2], OLE
[3]
, AVI [4], MD5 [5], CRC32 [6], SHA1 [7]
and many more.
References
[1]
[2]
[3]
[4]
[5]
[6]
[7]
http:/ / en. wikipedia. org/ wiki/ ID3
http:/ / en. wikipedia. org/ wiki/ EXIF
http:/ / en. wikipedia. org/ wiki/ Object_Linking_and_Embedding
http:/ / msdn. microsoft. com/ en-us/ library/ ms779636. aspx
http:/ / en. wikipedia. org/ wiki/ MD5
http:/ / en. wikipedia. org/ wiki/ CRC32
http:/ / en. wikipedia. org/ wiki/ SHA1
Introduction
Introduction
ReNamer is a very powerful and flexible file renaming tool with the following features:
• The workflow toolbar makes renaming easy.
• ReNamer can rename files belonging to different folders (or even different computers) at a time.
You can also filter the contents of the folders before renaming.
• ReNamer offers extensive set of rules for renaming. Each rule has controllable parameters.
• ReNamer can stack multiple rules in any sequence and apply in that order.
• ReNamer provides full preview (the affected file names can be highlighted).
• ReNamer allows you to try out the stack of rules on user-defined text
(this allows safe experimentation, without risking real files).
• ReNamer can automatically handle name-conflicts arising from the renaming.
• You can save the stack of rules as a "preset" and re-use it later with a keyboard shortcut.
• ReNamer can rename folders.
• ReNamer can move files to other folders.
• ReNamer can rename Windows network (neighbourhood) files also.
• ReNamer can use RegEx (Regular Expressions) for the renaming.
• ReNamer supports Unicode filenames (e.g. Asian scripts, Cyrillic, French, Spanish, Arabic, Hebrew, etc).
• ReNamer allows scripting (Pascal Script) to create complex renaming logic.
(many scripts are available on the Forum [1]).
• ReNamer can extract a large variety of meta tags from files and use them for the renaming.
(e.g. ID3v1 [2], ID3v2 [3], EXIF [4], OLE [3], AVI [4], MD5 [5], SHA1 [5], CRC32 [6], etc)
• ReNamer can export/import the renaming-related information.
• ReNamer can take automatic actions based on outcome of renaming operation
(e.g. clear off all successfully renamed files from the pane, but retain the problematic files)
• ReNamer can be run in command line mode, with lots of parameters.
This allows you to select your files in explorer (or any other application) and do one-touch renaming.
2
Introduction
3
References
[1]
[2]
[3]
[4]
[5]
[6]
http:/ / www. den4b. com/ forum/
http:/ / www. id3. org/ ID3v1
http:/ / www. id3. org/
http:/ / exif. org
http:/ / en. wikipedia. org/ wiki/ Sha1
http:/ / en. wikipedia. org/ wiki/ Crc32
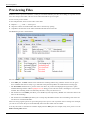
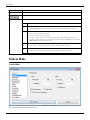
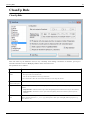
Quick Guide
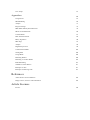
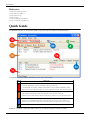
The ReNamer interface is shown below. Click on any part of the screenshot to see full description.
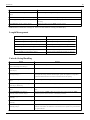
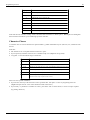
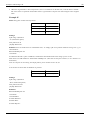
Using ReNamer is very simple. Just follow the four steps shown below.
Step
What to do
1
Select the files from various folders and add them to the working area.
2
Add rules to create a sequence of operations. Delete or edit an existing rule. Change the order of the rules.
3
Preview the results (check before proceeding with the actual renaming).
4
Press this button to rename files and folders.
a. Change the default behavior for the "Add Folders" button (optional step).
b. Add individually selected files (Add Files) and/or all files in selected folders (Add Folders), and/or...
c. Drag-n-drop files from Windows Explorer (or any other application) into this area (called "Files pane").
a. Allows addition and deletion of rules. Also change the order of any rule in the stack.
b. Click in this area to add a rule (or to edit an existing rule, or just move it to a new position in the list).
a. Set options (e.g. highlight changed names, experiment with your own text, resolve conflicts, etc.).
b. Click to see preview of the new file names in the bottom pane (not required in auto-preview mode).
ReNamer is so intuitive that you would be able to use it without reading the manual any further.
Quick Guide
The rest of the chapters provide more details on all aspects of ReNamer. Use them as reference.
There is an older version of this guide available here: Quick Start.
Step-by-step
As discussed before in the Quick Guide, ReNamer is used in just four steps, which are explained in this section
(follow the links):
1.
2.
3.
4.
Load the files and/or folders to be renamed.
Load the renaming rules in a stack.
Preview the renamed files/folders to check if the result is as expected.
Rename the files/folders.
Adding files and folders
In this section, we will see how to place files and folders in ReNamer's working area (also called the Files pane).
This consists of:
1. Adding files and folders,
2. Removing some files from the pane, and
3. Changing the order of files in the pane.
ReNamer has multiple methods for these actions, as described below
4
Adding files and folders
5
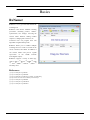
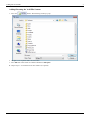
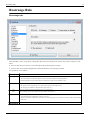
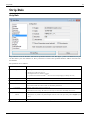
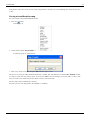
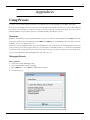
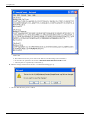
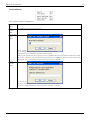
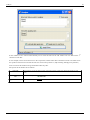
Adding files using the 'Add Files' button
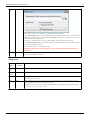
1. Press the
button. The following window pops up:
2. Navigate to the required folder and select files.
3. Press OK. The selected files are added to ReNamer's Files pane.
4. Repeat steps 1-3 to load files from other folders (as required).
Adding files and folders
6
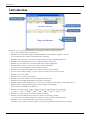
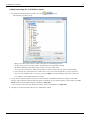
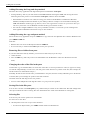
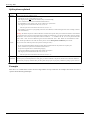
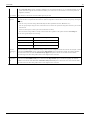
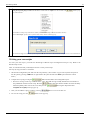
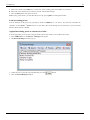
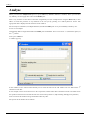
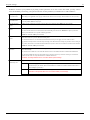
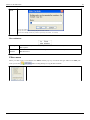
Adding items using the 'Add Folders' button
1. To add all the files belonging to a folder, press the
The following window pops up:
button.
• When you select a node in the tree, all its sub-nodes are automatically selected.
In other words, when you select a folder, its subfolders are automatically selected.
• By default, ReNamer adds all files from a folder, but not the folder itself.
So if you want to rename the folder itself (and not its contents), then select this option using the Filters.
• You can select any node from the tree. That means you can even select any/all drives on your computer!
• You can select multiple nodes at a time, by pressing CTRL first and then cliking on different nodes of the
tree. All those nodes will be added at one stroke.
2. If you want to add only certain items from the selected folder, set ReNamer's Filters by clicking on the "Filter
Settings" button and then selecting different options. Depending on your selected options in this window, the Add
folders window will add different items to ReNamer's Files pane.
• You can also set the filters by clicking the "Filters" button (located above the Files pane)
3. Navigate to the desired folder and press the "Add Folders" button.
Adding files and folders
Adding files using the Drag-and-drop method
Select the files in any application and drag-and-drop them into ReNamer's Files pane.
• To drag-and-drop, click on your file selection with LMB. Without releasing the LMB, start moving the mouse.
Now bring the mouse pointer over the ReNamer's Files pane, and then release the LMB.
• If the ReNamer's window is not visible, first drag your selection onto ReNamer's task button in Windows
Taskbar (normally located at the bottom of your desktop). Wait for a couple of seconds without releasing the
LMB. The ReNamer window pops up, and stays above other applications' windows on your screen. Now you
can move your mouse over the ReNamer window and drop your selection of files.
• You can also configure ReNamer to stay on top of all other windows, so even when you are working in the
other applications ReNamer will remain on top of other windows.
Adding files using the copy-and-paste method
Select the files in any application and press CTRL+C to copy them into the clipboard. Now switch to ReNamer and
press SHIFT+CTRL+V.
Note that:
• Renamer does not use the usual keyboard shortcut CTRL+V.
• It is not necessary to click inside the Files pane for the paste operation.
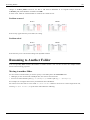
Removing files or folders from pane
If you have added more files by mistake, you can remove them easily in just two steps:
1. Select the items
2. Press the DEL key. (This only removes the files/folders from the ReNamer. It does not delete them from the
disk!)
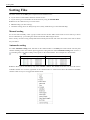
Changing the order of the files in the pane
Certain rules (e.g. the Serialize Rule) act on the list of the files in "from-top-to-bottom" order (as opposed to acting
on each file independently). In such cases, each file gets its name based on its position in the list. (For example, the
nth file in the list is named Track-n.mp3.)
Normally, the files are listed in the order you added them to the pane (the most recently added file goes to the bottom
of the list). But you can change the position of the files in the list.
Just click on the file and drag it to the new position.
• You can select multiple files and drag all of them as a group to the new position.
Sorting files in the files pane
You can also sort files in the Files pane by any column with just a click on the column title. The little triangle will
show up to indicate the order of sorting. For more information have a look at the full article on sorting files.
Selecting files
You can carry out various operations on selected files.
To select one or more files:
1. Click anywhere in the row except on the check box.
• To select non-adjacent files, press CTRL and then click on individual rows.
7
Adding files and folders
8
• To select files listed in adjacent rows, first click on the row at one end, then keep the SHIFT pressed down,
and click on the row at the other end.
2. Draw a lasso (rectangle) with the mouse in the Files pane. All the rows touched by the rectangle are selected.
• If you repeat these actions on an item, they toggle the selection status (selected-unselected).
When selecting only one row, use Up and Down arrow keys to change the selection to adjacent row.
Marking and Unmarking the files
A file is marked by putting a tick in its check box
. Conversely, it is unmarked by removing the tick
.
ReNamer acts only on the marked files. An unmarked file is neither previewed nor renamed.
So unmarking a file is useful to exempt a file from renaming, without having to remove it from the Files pane.
To mark/unmark the files:
1. Click on the check box.
2. Select the files and press the Spacebar (on keyboard)
(Repeat of these actions on any item toggles its marked/unmarked status.)
Note that the marked/unmarked status of a file has no relation with its selected/unselected status.
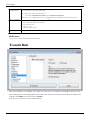
Managing Rules
This section explains how to add rules, remove rules, edit a rule and change the order in which they are applied to
files and folders.
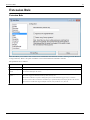
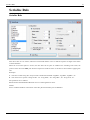
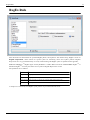
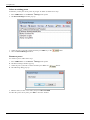
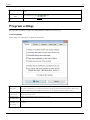
Adding rules
1. Rules can be added by using any of the following methods:
• Click the
button,
• Click inside the Rules area,
• Press the Ins key when the ReNamer window is active.
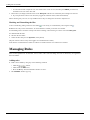
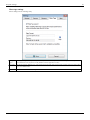
2. The Add Rule window pops up:
Managing Rules
9
Select the desired rule.
3. The options for the selected rule appear immediately in the Configuration area (at right).
Set the desired parameters, as explained in each rule.
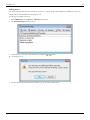
4. Press the
button at the bottom of the window. The rule is added to the stack and the window is closed.
5. Repeat steps 1-5 to add more rules. Each new rule is added at the end of the stack.
6. To close the window without adding a rule press the "Close" button (or the window close icon at the top right
corner).
Removing (deleting) rules
To remove an existing rule, select it and press DEL or click on the
button.
Changing the order of the rules
All rules are applied to each file in the order they appear. Even with the same set of rules, the end-result can be very
different if the order of the rules is changed.
You can change the order of rules using any of the following methods:
1. Using the
and
buttons.
2. Pressing CTRL + Up/Down arrows.
3. Drag-and-drop any rule with mouse.
Managing Rules
10
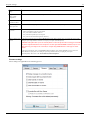
Editing rules
Editing a rule means changing its parameters and options, and then saving the rule.
You can edit a rule using any of the following methods:
1. Double-click on it,
2. Right-click on it and select the Edit Rule option
3. Select it and press ENTER.
A window similar to the Add Rules window appears. There are only two minor differences: the button at the bottom
is titled Save Rule, and the rules list in the left pane is grayed out (because you are not supposed to select rules in
this window).
Change the parameters and options, and press the Save Rule button or ENTER.
Selecting a rule
When a rule is selected, its entire row is highlighted. Only one rule can be selected at a time.
To select a rule, use any of the following methods:
1. Click anywhere in the row except on the check box.
2. Use the Up and Down arrow keys on your keyboard to move the selection to another rule.
Marking and Unmarking a rule
A rule is marked by putting a tick in its check box
. Conversely, it is unmarked by removing the tick
.
ReNamer uses only the marked rules for the preview and renaming operations.
So unmarking a rule is useful to temporarily disable the rule without having to remove it from the Rules pane.
To mark/unmark the rules:
1. Click on the check box.
2. Select a rule and press the Spacebar (on your keyboard)
(Repeat of any of these actions toggles the marked/unmarked status.)
The reasons for unmarking a rule are:
1. You want to remove the effect of a rule and see what happens to the files.
2. You have a favorite set of rules that you use often. However, you need to remove a few rules in some cases. A
trick is to save the superset of rules and reload them automatically each time you start ReNamer. Then in each
session, unmark some rules.
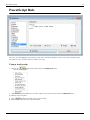
Previewing Files
Previewing Files
ReNamer shows a preview of the files, so that you can decide whether your rules are working as expected. If some
files show unexpected results, edit some of the rules and check the preview again.
Let us see how preview works.
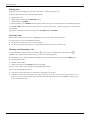
In the example below, there are three rules in the stack:
1. Replaces "." "_" "%20" "-" with a space.
2. Strips the contents of round brackets and removes unnecessary spacing.
3. Capitalizes the first letter of the name and makes all other letters lowercase.
The ReNamer preview is shown below.
We can see that:
• In the Files pane, the State column shows whether the renaming will face any problems. In this case, the green
arrow identifies files that are ready to go, while files with potential problems are marked with a warning sign.
• The New Name column shows a preview of the new names. If you have the Highlight changed names option
enabled all changed names will be highlighted in red during preview. The first name is unchanged, so it is shown
in black. The remaining names are affected by the rules, so they are shown in red.
• The check boxes in the Rules pane allow you to disable any rule temporarily. (Disable one of the rules and see the
effect on the renaming.)
• The check boxes in the Files pane allow you to exempt any file/folder from the current renaming. New names are
not shown for such unmarked files.
There are many program options for previewing and preview process can vary based on those settings. For example,
you can set it to refresh the preview automatically when new files and/or rules are added.
You may also want to customize the columns displayed in the Files pane. For example, many users prefer to see the
Path and New path columns.
11
Previewing Files
12
• To customize columns, right-click on the strip that contains all column-headers. A menu pops up all available
columns. Select the columns you want. From now on, ReNamer remembers the new settings.
Manual Preview mode
If you do not select Automatic Preview mode, you must press the
button to see the preview.
This Manual Preview' mode is actually useful if you do not want to miss out the subtle changes that can happen to
the file names when you are adding new rules or if you adjust the file names manually after preview. It can also save
you a lot of time when processing large amount of files, so instead of generagin a preview on every change you can
preview manually only when you need to.
While using the Manual Preview mode, keep the following in mind:
• Files will be renamed exactly as you see in the preview (WYSIWYG policy).
Be sure to press the
applied in the actual renaming!
button after changing your rules, otherwise these changes will not be
• If you change the items manually, these changes are lost if you press the
button.
Renaming Files
When the
button is pressed, the following happens:
1. The marked files are renamed according to the Name and New Name columns (or Path and New Path if
changes affect the full path) in the Files pane.
• If some of the rules do not seem to have applied, the reason could be that the ReNamer is in Manual Preview
mode and you did not refresh the preview after adding/editing some of the rules. To update the preview, press
the
button again.
• If your set of rules is not meant to move files from one folder to another, you can as well assume that files are
renamed according to the Name and New Name columns of the Files pane.
2. The Name column now contains the new name of the item, and
3. The New Name column becomes empty
• It is supposed to show a preview of the proposed new name, so once the file is renamed there is no new name
any more.
4. Old names are remembered to allow reverting of the changes using the Undo Renaming option from the Main
Menu.
After the renaming is complete various additional actions can be performed based on Program settings for renaming.
For example, the list of Rules and Files can be automatically cleared off, or program can automatically close.
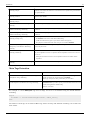
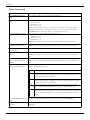
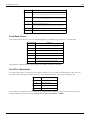
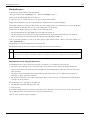
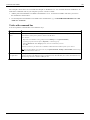
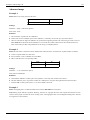
When is a file considered "renamed successfully"?
Each renaming operation can have one of the following outcomes:
Renaming Files
13
Outcome
Is it considered as successfully renamed?
A file that was unmarked (that is, was NOT marked for the current round of renaming)
No
A file name that was changed during the renaming operation.
Yes
A file name that did not change because none of the renaming rules were applicable.
Yes
A file name that caused error during renaming (e.g. invalid file name, name conflict, etc.)
No
You can set ReNamer's Program settings to take some conditional actions on the files based on their outcome. For
example, you can clear off the files that were successfully renamed.
Note: When the new name of the file is the same as the original name the renaming operation is still performed, but
without any changes applied. It is important to note that such renaming operation can still fail, for example, because
the original file no longer exists.
14
Rules
Using the Rules
You can load a stack of rules in ReNamer. These rules act on the loaded files in the "top-to-bottom" order. This
allows you to achieve very complex renaming algorithms.
• A rule modifies the name and then passes it to the next rule, which acts on the modified name (not the original
name).
• Any rule can be used multiple times, each time with different settings.
All you have to do is to visualize how each rule in the stack affects the file name when the file name "passes
through" the stack.
The first subtopic provides an overview of Rules.
The subsequent subtopics show the specifics of each rule:
• How each option works, and how to set it.
• Examples (typical uses).
Tip: If you are going to use the same set of rules frequently, it is best to save it as a Preset. This allows you to
re-load the entire set with a keyboard shortcut (such as CTRL+1). A huge timesaver!
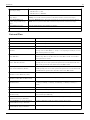
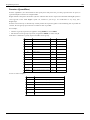
Overview of Rules
Overview of Rules
ReNamer has an extensive set of rules. These rules can be combined together, in a logical sequence, to perform
nearly any thinkable operation with the filename. You can also manually edit the name of any file.
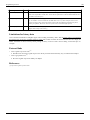
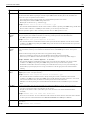
The table below lists all rules, with a brief description of each rule.
The subsequent chapters provide more details for each rule (follow the links).
Rules
Description
Insert
Insert the specified text into the filename: as prefix, as suffix, at the specified position, before- or after the specified text. There is also
an option to insert meta tags into the filename.
Delete
Delete a portion of the filename, usually defined by character positions: from the specified position, from the occurrence of the
specified delimiter, until the specified number of characters, until occurrence of the specified delimiter or till the end. This rule can be
set to process the filename in a right-to-left manner.
Remove
Remove the specified text from the filename: first, last or all occurrences. Optionally, wildcards can be used within this rule, to
remove masked text fragments.
Replace
This rule is very much like the Remove rule (above). It has similar options, except that instead of removing the text fragments, it will
replace them with the specified text.
Rearrange
Chop up the existing file name using any delimiter or position and reuse any/all of the parts in any order to compose a new name.Add
your strings, or use the meta tags extracted from the file to compose the new name.
Extension
Change extension of files to the specified extension, or to the extension automatically detected through the internal database of binary
signatures.
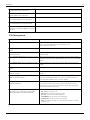
Overview of Rules
Strip
Strip all occurrences of the specified characters from the filename. This rule has predefined character sets, like digits, symbols,
brackets, but you can also define your own character set.
Case
Change the case of the filename: capitalize each word, to lower case, to upper case, invert case, or capitalize only the first letter and
force the rest to lowercase (as in a sentence). There is also an option to force case for the manually entered fragments, for example:
CD, DVD, India, ReNamer, etc.
Serialize
Use numeric incremental or random sequences of digits to put filenames into an order.
CleanUp
Cleanup filenames from (or for) commonly used naming conventions for Internet, peer-to-peer networks, and other resources.
Translit
Transliterate Non-English characters from different languages into their English/Latin representation. Useful for preparing files for
network storage and transfer. Several transliteration maps are built in, and you can define your own maps.
RegEx
RegEx (=Regular Expressions) is used for complex pattern/expression matching and replacing operations.
Although it may look complex at first, you can learn it quite easily, using the guide provided in this manual!
PascalScript Scripting allows programming-aware users to code their own renaming rule using predefined set of functions. This rule uses
Pascal/Delphi programming syntax and conventions. Extremely powerful feature in the right hands.
UserInput
Rule that simply sets the new names of the files to the names entered in a list (one name per line).
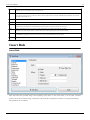
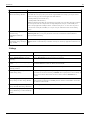
Insert Rule
Insert Rule
This rule inserts the specified string at the beginning of the name, or end of the name, or at any other specified
position. It can also insert the string conditionally (only when the existing name contains a second specified string).
The parameters are as follows:
15
Insert Rule
16
Parameter
Details
What
Enter the string that will be inserted.
Insert meta tag
Click the button to see a list of meta-tags.
Where
Select any one of the following options:
Prefix
Adds the string before the existing name.
Suffix
Adds the string after the existing name.
•
Position
If the skip extension option is not selected, the specified text will be inserted after the extension.
Insert at the set position (the count starts from 1).
•
Count spaces and special characters also.
•
You can count in the right-to-left direction
•
You may use Analyze window to check the position by pointing to the character with mouse or
keyboard instead of counting it by yourself. Just select the file (or files) in the Files pane and choose the
Analyze name option from the context menu.
After
text
Inserts the text entered in the "what" box after the text entered in the "after text" box.
Before
text
Inserts the text entered in the "what" box before the text entered in the "before text" box.
•
•
If the "after text" string is not found in the name, the "what" text will not be inserted.
If the "before text" string is not found in the name, the "what" text will not be inserted.
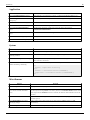
Delete Rule
Delete Rule
This rule will delete all characters located between the From and the Until positions. Optionally, it can delete from
the specified position till the end of the name.
Delete Rule
17
The parameters are as follows:
Parameter
From
Details
From which character-position you want to start the deletion. Select from the following options:
•
•
The starting position (count starts from 1)
The delimiter from where the deletion starts.
•
•
Until
The delimiter can be a single character or even a string.
Typically , . / ( ) - and space are used as delimiters.
Till which point you want to delete: Select from the following options:
•
•
Count: Specify how many characters to be deleted, starting from the FROM position.
Delete till a specified delimiter is reached.
•
• You can use two different delimiters in From and Until sections.
• The delimiter can be a single character or even a string.
• Typically , . / ( ) - and space are used as delimiters.
Delete all characters till the end.
Skip extension
If this check box is unselected, the extension will be included in the rule.
Right-to-left
If you select this option, ReNamer counts the position from the extreme right. (The From and Until
positions switch places.)
•
When this option is selected, the "till the end" option in Until deletes all characters on the left
(what we regard as the beginning of the name)
For example, to keep only the four characters on the right side of the name (and delete all the rest of
the characters on the left), use:
From
Until
Position 5 Till the end
Do not remove delimiters If you select this option, the delimiters themselves will be retained.
•
If you have used two different delimiters in From and Until sections, both of them will be retained.
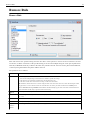
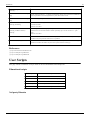
Remove Rule
18
Remove Rule
Remove Rule
This rule removes the specified string from the file name. It has options to remove the first occurrence, the last
occurrence, or all the occurrences of the specified string. You can enter multiple strings at a time (just separate them
with *|*). If ReNamer finds any of them in the name, they will be removed. You can create a pattern with wildcards,
so that any string that matches the pattern will be removed.
The parameters are as follows:
Parameter
Remove
Details
Enter the string to be removed.
•
•
•
You can enter multiple strings at a time. Press the + button to separate two strings
If the name does not contain the specified string, the rule will not act on it.
If the name contains more than one of these strings, it will remove all of them.
TIP: Sometimes, the file names have a common string that needs to be removed. In such cases, rather than entering the whole
string by hand, it is easier to borrow it from one of the file names. To do this, just click on a file name in the Files pane of
ReNamer BEFORE launching the Remove rule. ReNamer will automatically copy the entire name of the selected file into the
Remove field. Now edit this entry to get the desired common string.
button
Inserts a separator (*|*) sequence between two delimiter entries. (You can directly type *|* instead of clicking on this button.)
Occurrences
In case the strings occur multiple times in the name, specify which occurrences should be removed. (Options are: first only, last
only, or all)
Skip extension
If this check box is selected, the rule won't touch the extension.
Case sensitive
Will only remove a specified string from the name if the case matches exactly.
Interpret
symbols as
wildcards
The following wildcards are allowed (compare with RegEx).
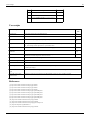
Remove Rule
19
Represents
Example
* any number of characters (including numbers, space, underscores, etc.).
abc* equals abc followed by 0 or more
characters.
? Any single character (including numbers, space, underscores, etc.)
ab?d equals abcd, ab1d, ab d, ab_d, etc.
[] Brackets enclose a set of characters, any one of which may match a single
character at that position.
foo[ab]ar equals fooaar and foobar
- (only within a pair of brackets) denotes a range of characters.
foo[a-z]ar equals fooaar, foobar, foocar,
foodar, etc.
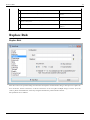
Replace Rule
Replace Rule
This rule removes the specified string from the name and replaces it with another string. It has options to replace the
first occurrence, the last occurrence, or all the occurrences. You can replace multiple strings at a time. You can
create a pattern with wildcards, so that any string that matches the pattern will be removed.
The parameters are as follows:
Replace Rule
20
Parameter
Find
Details
Enter the string to be replaced.
•
•
•
button
Replace
You can enter multiple strings at a time. They will be searched & replaced in the order as they appear. Press the +
button to insert a separator between two strings. Instead of pressing this button, you can also enter *|* from the
keyboard.
If the name does not contain the specified string, the rule will not act on it.
If the name contains more than one of these strings, it will replace them according to the Occurrences parameter.
Inserts a separator (*|*) sequence between two delimiter entries. (You can directly type*|* You can use this button in the
Replace box also. In that case, the nthe entry in the Find box is replaced by the nths entry in the Replace box. (e.g. A
-->A', B -->B' etc.) }
Enter strings that will replace the "Find" strings.
•
Note that the number of strings (separated with *|*) in "Find" and "Replace" boxes should be the same. If there is more
strings in the "Find" box than in the "Replace" box the spare strings will be removed (replaced with an empty string).
If there is more strings in the "Replace" box, the spare strings will be ignored.
Insert meta tag
Click the button to see a list of meta-tags.
Occurrences
In case that strings occur more than once in the filename, specify which occurrences should be replaced. (Options are: first
only, last only, or all)
Skip extension
If this check box is selected, the extension will be ignored by the rule.
Case sensitive
Will only remove a specified string from the name if the case matches exactly.
Interpret symbols as
wild cards
The following wild cards are allowed (compare with RegEx).
Represents
Example
* any number of characters (including numbers, space, underscores, etc.).
abc* equals abc followed by 0 or more
characters.
? Any single character (including numbers, space, underscores, etc.)
ab?d equals abcd, ab1d, ab d, ab_d,
etc.
[] Brackets enclose a set of characters, any one of which may match a single foo[ab]ar equals fooaar and foobar
character at that position.
- (only within a pair of brackets) denotes a range of characters.
foo[a-z]ar equals fooaar, foobar,
foocar, foodar, etc.
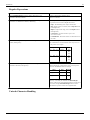
Beware
If you enter multiple find and replace strings they will be executed as multiple Replace rules, so first string will go
first and only after replacing all (or first, or last) occurrences of that string the second string in the Find box will be
searched & replaced.
Find Replace
A|B
B|A
Name
New Name
ABBA.mp3 AAAA.mp3
You may expect the new name to be BAAB.mp3, but it's not. This happens because first all A's are replaced with B's
(so we've got BBBB.mp3) and only then all B's are replaced with A's (and the final result is AAAA.mp3).
If you need to apply character-to-character mappings you should use Translit rule.
Rearrange Rule
21
Rearrange Rule
Rearrange rule
This rule allows you to chop up the existing file name and reuse any/all of the parts in any order to compose a new
name.
• You can also add your own text, or use meta tags while composing the new name.
• You can also use the whole original name, and insert literal text (or meta tags) around it.
The parameters are as follows:
Parameter:
Split using
How to use:
Specifies how to split the existing name into parts.
•
You can use only one of the three options at a time (you cannot combine the chopping methods)
For detailed explanation of split methods please look below at the split options explained section.
Right-to-left
If selected, the numbering starts from right.
•
•
The characters of the original names are counted from right (the count begins with 1)
The chopped parts will also be numbered from right ($1, $2, etc.)
Adds a *|* sequence between two delimiter entries, to separates them.
(You can directly type the *|* sequence instead of clicking on this button.).
New pattern
How to compose the new name from the parts created from the original name (see above).
•
•
You can add meta tags and literal text wherever you want.
$0 refers to the whole original name. This allows you to quickly compose a new name by inserting a string at the beginning
and/or end.
Click the button to see a list of meta-tags. Select any meta tag to insert it in the new name template.
Rearrange Rule
22
Split options explained
Option:
Delimiters
What it does:
Chop the name where the delimiter occurs.
•
•
•
•
•
The delimiter can be a single character or a string.
The chopped parts do not contain the delimiters (they are omitted totally)
Spaces, numbers and symbols are treated like normal characters.
Several delimiters can be used at a time. Use the | character to separate them.
The chopped parts are numbered from left, as $1, $2, $3, etc.
The same parts can be referred from the end as $-1, $-2, $-3, etc.
•
If the delimiter occurs at the very beginning of the name, the resultant $1 contains nothing (because there is nothing on the left
side of the delimiter).
Warning: The number of parts into which the filename is broken down depends solely on the number of delimiters in the filename.
If you reference fewer parts in the output pattern that the number of available parts - not referenced parts will be lost! For example,
take filename "Artist - Title" and to swap them around one would use " - " as a delimiter and "$2 - $1" as a new pattern which will
result in "Title - Artist", but if some filename appears with more dashes like "Artist - Title - Album" the result will also be "Title Artist" and last part will be lost. To make sure that no parts are lost use Exact pattern of delimiters option instead.
Positions
Chop the name at the indicated position (the position count begins with 1).
•
•
•
•
•
If you enter position n, ReNamer will chop the n-th character and all characters beyond that in a separate piece.
Spaces, numbers and symbols are treated like normal characters.
No part of the original name is omitted during chopping.
You can enter multiple positions. Separate them with the *|* sequence.
The chopped parts are numbered from left, as $1, $2, $3, etc.
The same parts can be referred from the end as $-1, $-2, $-3, etc.
Exact pattern Chop the name using the exact pattern (sequence) of the delimiters.
of delimiters With this option you basically define how many parts you want the filename to be split into and the order in which the delimiters
must occur. If you specify 1 delimiter then you end up with exactly 2 parts, if you specify 2 delimiters you'll get 3 parts, and so on.
Examples
This rule is so versatile that it can be used in a huge number of ways. Therefore its examples have been moved to a
separate article Rearrange Examples.
Extension Rule
23
Extension Rule
Extension Rule
This rule allows you to attach a new extension. It is useful when the extension of a file is missing (or if the file has a
wrong extension). There is an option to find the correct extension based on the file's structure.
The parameters are as follows:
Parameter
Details
New extension
New extension that has to be added to the filename.
Append to the original
filename
If this option is selected, the new extension will be placed after the old extension. If it is deselected (default option) the
new extension will replace the old one.
Detect using binary
signature
wmv|asf". ReNamer also pops up an error window (because the combined extension is invalid).
Just read the suggested extensions and then try them out one by one.
This method is still better compared to making wild guesses, because ReNamer suggests only 2-3 extensions.
For more accurate results, use ReNamer with TrID script, a specialized utility for identifying the file's real extension.
Be aware that even TrID often suggests multiple extensions, and you still have to try them out.
Strip Rule
24
Strip Rule
Strip Rule
Strip characters from the filename. The rule has predefined character sets, like digits, symbols and brackets, but you
can also define your own character set. Every occurrence of each of the specified characters will be removed from
the filename.
The parameters are as follows:
Parameter
English
Details
Strip all English characters (both capital and small).
•
•
Digits
Numbers (0-9) will not be stripped.
Non-English characters will not be stripped.
[1]
(e.g. characters with diacritical mark , which are used in many languages in Europe and Asia)
Strip digits
Symbols
Strip symbols (all characters that are considered to be symbols are showed in the box on the right)
Brackets
Strip brackets (but not the contents of the brackets)
•
User-defined
Define any character that needs to be stripped off.
•
Strip all characters except
selected
Skip extension
If you want to delete the content as well, use the CleanUp rule instead.
Note that this is not a string. All characters in the entry are searched for individually and removed.
Retains the selected characters only, and strips the rest.
•
This option is very useful to strip all non-English characters: Select this option along with the English option
above.
If this check box is selected, the extension will be ignored by the rule.
Strip Rule
25
References
[1] http:/ / en. wikipedia. org/ wiki/ Diacritic
Case Rule
Case Rule
This rule changes the case of the filename. Options are: capitalize, to lower case, to upper case, invert case, and put
only first letter capital (as in a sentence).
There is also an option to force case for specific text-fragments, such as CD, DVD, RF, etc. These fragments would
not look natural in any other case (e.g. cd, dvd, rf), so the rule allows you to prevent changing the case of such terms
in one stroke.
The parameters are as follows:
Parameter
Case change
Details
Several options are offered.
•
The case of each option itself illustrates how that option works. For example, Capitalize Every Word.
•
Capitalize Every Word will first make all letters lowercase and then convert the first letter of each word into UPPERCASE.
•
Capitalize AND Preserve will convert the first letter of each word into UPPERCASE; but will not affect the rest of the letters.
•
all lower case will convert all letters to lowercase.
•
ALL UPPERCASE will convert all letters to UPPERCASE.
•
iNVERT cASE will change all capital letters to lowercase, and all lowercased letters to UPPERCASE.
•
First letter capital will change only the first letter to UPPERCASE, and rest of the letters to lowercase. (Compare this with
the Capitalize AND Preserve option above.)
Case Rule
26
•
The (none of the above) option is provided to disable the case conversions listed above it, so you could independently use the
options listed on the right side of the window. This allows you to convert the case of extension, or case-convert specific text
fragments (see below).
Skip extension
If this check box is selected, the extension will be ignored by the rule.
Force case for
fragments
This option forces the case of specified text-fragments (strings) in the file name.
Note: This check box is coupled with the box below it. (Enter the fragments in the box and then activate the option by selecting the
check box.)
•
You can set any case for the strings (ALLCAPS, Only first letter capitalized, lowercase, MixedCase, etc.)
•
You can specify multiple strings at a time, each with its own case format. To separate the strings from each other, put a comma
between them.
(Note: In versions prior to v5.50, a space was used instead of a comma.)
•
The case for these strings will be set exactly as entered in the box, regardless of the options selected in Case change list.
Here are some typical examples of such strings:
Case
ALLCAPS
Examples
CD, DVD, TV, HTML, XML, C++, USA, GIMP
Only the First letter capitalized Java, India, English, Sunday, Easter, February
Mixed case
OpenSUSE, OpenOffice, ReNamer
Extension
always upper
case
Forces the extension to uppercase. Note: This setting overrides any other setting that can alter the extension. For example, consider
a case where the all lowercase option is selected and the skip extension option is deselected. Logically, the extension should be
converted into lowercase too. But if the Extension always upper case option is selected, the case of the extension will be
converted to uppercase. This setting will override even the fragments case-conversion.
Extension
always lower
case
Forces the extension to lowercase. Note: This setting overrides any other setting that can alter the extension. For example, consider
a case where the ALL UPPER CASE option is selected and the skip extension option is deselected. Logically, the extension
should be converted into ALLCAPS. But if the Extension always lower case option is selected, the case of the extension will be
converted to lowercase. This setting will override even the fragments case-conversion.
Serialize Rule
Serialize Rule
Serialize Rule
This rule works on a set of files, and inserts incremental numeric series or random sequences of digits in the names
of those filenames.
When the incremental option is chosen, the files listed in the pane are numbered in ascending order. Thus, the
position of the file in the Files pane becomes important. Check the order of the files in the list before applying this
rule.
Examples:
1. You have a bunch of log files, and you want to make them look like "log0001", "log0002", "log0003", etc.
2. You want to force specific sorting for files: "01 - Song XYZ", "02 - Song ABC", "03 - Song YYY", etc.
The parameters are as follows:
Parameter Incremental Random Pad with zeros to reach length Insert where
Details
Inserts serialized numbers in the names of the files placed in the Files pane of ReNamer.
27
Serialize Rule
28
Index start
Starting number. If the folder already has some files with serialized numbers, start with the next number.
Step
Usually 1, but you may like to enter a higher number here if files with intermediate numbers are expected later. Also, negative
numbers can be used to make decremental indexes, e.g. -1, -2, -3, etc.
Reset if folder
changes
Since ReNamer can work on files collected from multiple folders, this control allows you to reset the counter for each of those
folders. The effect is as if you are repeating the same commend for each of the folders separately.
Inserts a random number in the file name.
Length
Unique if
possible
Specify how many digits your random number should have.
•
ReNamer will create random numbers with specified length (number of digits). So a length of 4 means the random digits will
be from 0000 to 9999 (inclusive).
•
Note that random numbers are padded with leading zeroes by default
Normally, random numbers can repeat themselves. If this option is selected, ReNamer will try to use unique numbers.
ReNamer will pad the remaining places with leading zeros. For example 457 becomes 000457 if it is padded to reach
6 digits, and 0457 if padded to 4 digits.
Specify where to insert the number.
Prefix
Before the original filename
Suffix
After the original filename
•
If the skip extension option is selected, the specified text will be inserted before the extension.
Position Insert the number at the specified position.
Note that if the "pad with zeros" option (above) is selected, the padded number is inserted.
CleanUp Rule
29
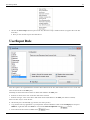
CleanUp Rule
CleanUp Rule
This rule cleans up the filenames from (or for) commonly used naming conventions for Internet, peer-to-peer
networks and other resources. Multiple problems can be removed at once.
The parameters are as follows:
Parameter
Strip out content of
brackets
Details
A typical use of this option is to strip the needless comments attached to filenames, such as (best!!).
•
•
This option removes the brackets also.
You can select any/all of the various types of brackets.
If you do NOT want to delete the content within the brackets, use the Strip rule instead.
Replace these
characters with spaces
These characters occurring in the file names are removed and a space is inserted in their place.
Fix spaces
Replace multiple consecutive spaces with a single space. It also removes spaces from the beginning and the end of the
filename:
•
•
Normalize unicode
spaces
If skip extension is selected it removes spaces from the beginning and end of the base name (before the extension).
If skip extension is deselected it removes spaces from the beginning and from the end of the filename (after the
extension).
Replace all Unicode white space characters with a standard space bar character code. Unicode character set contains a
number of different characters (C1_SPACE type) that represent a white space with slightly different properties (e.g.
wider, narrower, etc).
CleanUp Rule
Insert a space in front
of capitalized letters
30
Often words in the file name are just joined together, without spaces or underscores to separate them. Each word begins
with a capital letter, so that you can read it easily.
This option separates such words in the file name.
For example, SeparateTheseWords.pdf becomes Separate These Words.pdf.
(Note that if there is a capitalized letter at the very beginning of the name, ReNamer does NOT add a space before it.)
Prepare for SharePoint
Prepares the file for hosting it on Microsoft Sharepoint
1.
2.
3.
4.
Skip extension
[1]
.
strips standard forbidden filename characters
strips consecutive dots
strips #, %, ~, &
replaces { and } with ( and )
If this check box is selected, the extension will be ignored by the rule.
References
[1] http:/ / www. microsoft. com/ sharepoint/ prodinfo/ what. mspx
Translit Rule
This rule transliterates one alphabet into another. Its main goal is to transliterate Non-English characters from
different languages into their English/Latin representation. For example, the German character ü can be transliterated
to ue (the name Müller can be also written as Mueller).
This rule uses transliteration maps (explained below).
Translit Rule
31
Transliteration maps
To transliterate, we create a pair of equivalent characters, like this: ü=ue
(Note that the right side of this equation has two characters. Any number of characters may be placed on both sides
of the equation.)
We need several such equivalent character pairs to convert one language into another. The entire set is called a
transliteration map. (This is really some kind of a find-and-replace rule.)
ReNamer has several such built-in maps. Each map is named after a language (the second language in all maps is
English).
Each map can be used in both directions (e.g. French-to-English or English-to-French.)
When you start up the Translit Rule, its window does not show any maps. You are free to do any of the following:
1. Use any of the built-in maps (and use it in forward or reverse direction)
2. Create your own map and use it.
3. Edit a built-in map first, and then use it.
Let us see how to do this.
Automatic case conversion
Translit rule does automatic case conversion with an algorithm adopted specifically for transliteration. Translit rule
discard the case on the input, i.e. "A=B" is same as "a=b". Case is decided upon case of the input fragment. Multiple
character fragments are treated as part of words, with their case decided based on the case of letters around them.
The logic for the case conversion is as follows (ReNamer Beta from 23 Aug 2009):
set OUTPUT-PART to lower case
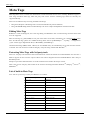
if first letter in INPUT-PART is upper case then
if length of OUTPUT-PART bigger than 1 then
if next letter in original name is upper case then
convert whole OUTPUT-PART to upper case
else
convert only first letter in OUTPUT-PART to upper case
else
convert whole OUTPUT-PART to upper case
Using a built-in transliteration map
To select any of the built-in maps, press the
button. A list of available transliteration maps pops up:
Translit Rule
32
Click on the desired transliteration map. As an example, let us click on the French (to English) transliteration map.
The Rules window changes immediately to show the French characters and their English equivalents.
You can edit any of the entry in this list, add new entries, or delete any of the entries.
Note that such editing does not alter the saved version of the map. (The map is edited just for a one-time use. So, if
you select the same Translit map again, ReNamer will load the original version, not the edited version.) We will see
how to edit and save a map later.
Next, select the rule's parameters as shown below:
Parameter
Details
forward
This is transliteration from-left-to-right direction, as defined in the map.
backward
This is transliteration from-right-to-left direction, as defined in the map.
skip extension If this check box is selected, the extension will be ignored by the rule.
Finally, press the
button to add the rule to the stack.
Making your own transliteration map
Click in the Translit Alphabet window, and start entering your custom alphabet.
Transliteration alphabet consists of two equivalence parts (or a couple), which are entered one per line and two parts
separated with "=" (equal sign). Alphabet should not contain spaces and should have case discarded (case is adjusted
automatically). Also, make sure to put couples which contain greater number of characters at the top, so they will get
processed first and will not get processed partially by shorter representations. Below is a simple example:
щ=sh
ю=yu
я=ya
ь='
э=e
After entering all such transliterations, press the
button to add the rule to the rule-stack.
Translit Rule
Note that this rule is not saved yet (it was just composed for a one-time use). The following topic shows how to save
a map.
Saving a transliteration map
To save a newly composed Transliteration rule,
1. Press the
button.
A menu pops up.
2. Select the last option (Save Translit...).
A window pops up, as shown below:
3. Enter a new name for the map and press OK. The new map is saved.
The process of saving an edited Transliteration map is similar. The only difference is that the Save Translit window
(see above) shows the current map's name. You can press OK to save the changes you've just made, or enter a new
name to create a new translit map for the edited version of the current map.
The new map's name is added to the map list.
From now on, the new map will also be available as "standard".
33
RegEx Rule
34
RegEx Rule
This rule finds text that matches the specified RegEx pattern, and replaces it with another string. RegEx is short for
Regular Expressions, which stands for special syntax for describing search and replace patterns. Regular
Expressions are very powerful and they are really worth learning. The RegEx syntax is explained in the appendix.
Note: The TRegExpr [1] RegEx engine used by ReNamer is a little different from the standard PERL RegEx
Windows RegEx [3]. You may check the correct syntax in Regular Expressions section.
The parameters are as follows:
Parameter
Details
Expression
RegEx pattern to match or find.
Replace
RegEx pattern that replaces the found pattern.
Skip extension If this check box is selected, the extension will be ignored by the rule.
Case-sensitive If this option is selected, ReNamer will search for the text in case-sensitive manner.
A simple set of commonly used RegEx syntax patterns is provided in the hint menu:
[2]
or
RegEx Rule
Tip: ReNamer users have posted many RegEx patterns at the User Forum [1]. You can copy and use them.
References
[1] http:/ / www. regexpstudio. com/
[2] http:/ / perldoc. perl. org/ perlre. html
[3] http:/ / msdn. microsoft. com/ en-us/ library/ 6wzad2b2(VS. 85). aspx
35
PascalScript Rule
PascalScript Rule
This rule uses Pascal/Delphi programming syntax and conventions. ReNamer comes with some preloaded scripts.
We will see how to use them, and how to add a new script.
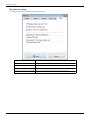
Using a ready script
1. Click on the
button (located just below the Configuration pane).
A list of scripts appears.
2. All available scripts are listed above the line. Click on any script to load it into the Configuration pane.
3. Edit the script if required
4. Press
button to add the script to the rule stack.
5. Repeat steps 1-4 to add more script-based rules.
36
PascalScript Rule
37
Borrowing scripts from forum
Even if you do not know how to write a script, you can easily use scripts written by others.
First, visit the User Forum [1] and search for a suitable script. The Forum already has a large number of such scripts.
Some of these scripts have embedded comments about how to customize the script. If you cannot find a suitable
script, you can ask other users to write the script for you.
TIP: If you are looking for scripts only, try to use begin or end words in your search phrase as these are the words
that are present in every single script.
Once you find such a script, follow these simple steps:
Step
Details
1
Copy the script Copy the script from the forum (ensure that nothing is left out).
2
Clear the ReNamer's Configuration pane Open the Pascal Script Rule in ReNamer. Select the three lines you see in the Configuration
pane, and press DEL or paste the script while these lines are selected.
•
3
4
The three lines already provided in the window are meant to begin a script from scratch; but since you are pasting a ready-made script,
they must be removed first, otherwise they will interfere with your script.
Paste the script into ReNamer pane Use the CTRL+V shortcut or right-click and select Paste.
Compile the script Press the
button.
• In case some error comes up, the error message will identify the line number of the faulty statement.
You can try and troubleshoot the problematic statement in the script using the
ReNamer opens a window like this:
button.
Now enter the line number in the window and press OK. It takes you to the faulty statement.
Try to edit the statement and compile the script again.
(Note that if the script compiles successfully, the
button is not required at all.)
PascalScript Rule
38
5
Saving the script and giving it a name: The save button is hidden under the scripts menu. So first click on the
up a window like this:
button. It pops
Note that all the existing scripts are listed here. (When you save the new script, it will also be added to this list.)
Select the Save script... option (at the very bottom of the menu). Another window pops up.
Enter a name that suggests the function of your script. Press OK. The new name is added to the list of scripts. Now use it as described above.
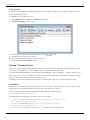
Writing your own scripts
To write your own scripts, you must have knowledge of Pascal script. Learning Pascal script is easy. Refer to the
Pascal Script section.
Here, we will assume that you already know how to write pascal scripts.
The step-by-step procedure is as follows:
1. Click in the Configuration pane and enter the script directly. (You can also copy it from anywhere and paste it
into the pane by pressing CTRL+V. Or right-click in the pane and select the Paste option from the context
menu.)
2. Compile the script by pressing the
button located below the Configuration pane.
• If an error message comes up, troubleshoot the script. The fault message usually includes the line number of
the problematic statement in the script. Press the
button and enter that line number to locate the faulty
statement quickly. Then correct the errors and press the
Compiled successfully! message pops up.
3. Now you can add the script as a rule by pressing
4. To save the script press the
button. A list pops up:
button again. Repeat this till a
button or save it for later use.
PascalScript Rule
39
5. Click on the Save Script...(the last option in the list). Now this script is added to the list (it appears above the line
in the list).
• Now you can use that script as described above.
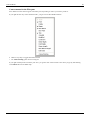
UserInput Rule
This rule replaces the original filenames with the names taken from the list. (The nth line in the list serves as the new
name for the nth file in the Files pane.)
Naturally, the list should contain names for all the files loaded in the Files pane.
• If the list is shorter, then some of the files will not be renamed.
• If the list is longer, some of the names will remain unused (but all files in the Files pane will be renamed).
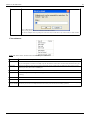
There are three ways to create the list:
1. Click in the pane, and manually type the list (one name per line).
2. Copy the list from any application to your clipboard. Switch to ReNamer. Click in the UserInput pane and press
CTRL+V, right-click and select Paste or choose the Load from clipboard from
menu).
3. Load a list from the text file (available from
menu).
UserInput Rule
40
The optional parameters are as follows:
Parameter
Description
Insert in front of the
current name
Inserts the name before the file name.
Insert after the current
name
Inserts the name after the current name. The actual position depends on the Skip extension option.
Replace the current
name
Replaces the existing filename with the new name. The effect on extension depends on the Skip extension option:
Skip extension
•
•
If the option is selected, the extension is ignored and user input strings will affect only the base name of files.
If the option is deselected, user input strings will replace entire filename, including the extension, or will be added
after the old extension (if the Insert after the current name option is selected).
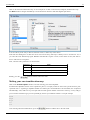
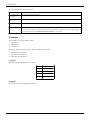
Examples
For example, if you have this three files:
• Old name 1
• Old name 2
• Old name 3
Then your list of new names should contain exactly three lines like:
• New name for old name 1
• new name for old name 2
• New name for old name 3
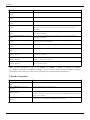
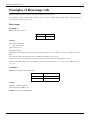
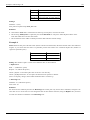
Example 1
File list is longer then the list of new names:
File name
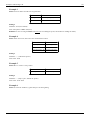
Example 2
List of new names is longer then the file list:
List of new names
One.txt
First.txt
Two.txt
Second.txt
Three.txt
Third.txt
Four.txt
(will not be renamed)
UserInput Rule
41
File name List of new names
One.txt
First.txt
Two.txt
Second.txt
Three.txt
Third.txt
(not used) Fourth.txt
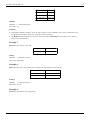
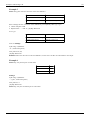
Example 3
Missed item in the list of new names can cause incorrect ordering:
File name List of new names
One.txt
First.txt
Two.txt
Third.txt
Three.txt
Fourth.txt
Four.txt
Fifth.txt
42
Pascal Script
Pascal Script
The PascalScript Rule in ReNamer uses Pascal Script component to allow users to program their own renaming rule.
To master Pascal Script, follow these steps:
1. Learn the basic syntax and concepts of Pascal Script
2. Understand the specific variables, procedures and functions that are defined within ReNamer
3. Learn how to use these variables/functions/procedures in scripts
Let us see these steps in more details.
Learn the basics
To learn the basics of Pascal Script, please refer to the Pascal Script Quick Guide.
Types and functions
In this section, we will see all types, procedures and functions which can be used within ReNamer.
• Types
• Procedures and functions
Note: Most of these are not part of the "standard" Pascal Script, so you may not find them in other applications.
Script cookbook
In this section, we will see how to write scripts for some common renaming tasks.
They also demonstrate how to use ReNamer's types, procedures and functions.
1. How to rename a file (using the FileName variable)
2. How to skip extention (basic FileName utilities)
3. How to convert the filename to ALLCAPS (the WideUpperCase function)
4. How to operate on words (Unicode string-handling routines)
5. How to serialize files (basic conversion routines)
6. How to initialize variables
7. How to create interactive dialogs
8. How to work with folders and paths (FilePath constant)
9. How to break the script execution
10. How to read file content
11. How to import functions
12. How to split file path into parts (folders, base, extension)
13. How to store/load variables for later reuse
Pascal Script
Scripts repository
• Official Scripts Repository.
• The Forum [1] contains several ready scripts.
Study them and adopt them for your purpose.
Tips
A few quick tips:
• In Pascal Script, ReNamer has defined the FileName variable to represent the New Name of the File.
Therefore, in your script, you will have to manipulate this variable to change the filename.
• The FilePath constant holds the original path of the file. It allows you to access the file directly.
• ReNamer supports UDFs (User-Defined Functions) and also importing of external functions from DLLs.
• Try to use WideString type instead of an ordinary String type. This will allow ReNamer to handle Unicode
filenames.
(In other words, it will be able to handle non-English scripts, such as Cyrillic, Asian, German, French, etc.)
Warning: Do not override ReNamer's built-in variables, types and functions.
Warning: Some of the functions are able to alter your file system (create new folders, move files, etc.). So use them
with caution! Remember that scripts are executed during Preview (NOT Rename) operation. So you let the script
alter your system by pressing Preview or having Auto Preview on.
Important: The only product of PascalScript that doesn't affect your files until Rename operation is the content of
the FileName variable. "New Name" (and "New Path") fields of filetable are replaced with this variable content.
After Preview you may check if you like them and if you do - press Rename. Only then the actual renaming of the
files will take place.
External links
• RemObjects Pascal Script [1]
Developers of the Pascal Script component.
• Delphi Basics [2]
Help and reference for the fundamentals of the Delphi/Pascal language.
References
[1] http:/ / www. remobjects. com/ ps
[2] http:/ / www. delphibasics. co. uk/
43
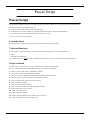
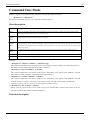
Quick Guide
Quick Guide
If you are not familiar with Pascal Scripting, first go through the excellent tutorial [1] written by Tao Yue.
The following is a short overview of Pascal Script.
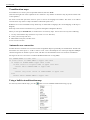
Basic pascal script
The structure of a basic script is as follows (keywords are shown in ALLCAPS bold):
CONST
<Constant declarations>
TYPE
<Type declarations>
VAR
<Variable declarations>
BEGIN
<Executable statements>
END.
Note that:
• The main code must be within the begin and end. keywords.
• All statements in the script use the semicolon ";" as terminator. Only the last statement (END.) uses a dot as
terminator.
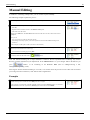
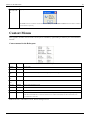
Control structures
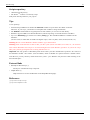
All the typical control structures (building blocks) occurring in Pascal Script are described in the following table.
The table shows a flow chart and Pascal Script code required to implement that logic. To compose your own
PascalScript rule, you can simply copy and paste the code and then edit it to finish your script.
In actual implementation, just substitute the following:
• Replace <Condition> with an actual Pascal statement that tests for a condition.
• Replace <Action> with code block that takes action relevant to the condition. There may be several statements.
Branching
These structures are used to execute different blocks of code depending upon a condition.
44
Quick Guide
Branching
structure
45
Pascal script
Flowchart (Logic)
Remarks
if-then
if <Condition> then
begin
<Action>
end;
Execute the <Action> statement only if the
<Condition> is met. Otherwise pass on the
control to the next statement that follows the
<Action>.
if-then-else
if <Condition> then
begin
<Action-1>
end else
begin
<Action-2>
end;
Two alternative actions are provided.
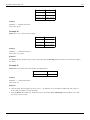
case X of
1:
begin
<Action-1>
end;
2:
begin
<Action-2>
end;
else
begin
<Default Action>
end;
end;
This code structure has several <Action> blocks,
each with its own condition.
case/switch
If <Condition> is met, execute <Action-1>.
Otherwise execute <Action-2>.
Thus one of these two <Actions> are definitely
executed.
After execution of the action, pass on the control
to the next statement.
•
•
•
•
Any given <Action> block is executed only if
its condition is met.
One and only one <Action> is executed. After
that, the control passes on to the next
statement. (It does not check for the next
condition.)
The conditions are checked in the "top down"
order. So even if the other conditions are also
met, their <Actions> will never be executed.
The code structure can optionally have a
<Default Action>. It is executed if (and only
if-) none of the conditions are met.
This is a generalized version of the if-then-else
block (above).
Quick Guide
46
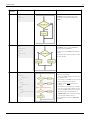
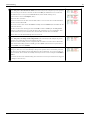
Loops
Loops are used to execute a block of code iteratively till a certain condition is met.
Loops
For To
Do
Pascal script
for I := X to Y do
begin
<Action>
end;
Flowchart (Logic)
Remarks
Execute the <Action> a certain number of
times. This example shows that the counter is
incremented by 1, but it can be any statement
that changes the value of the counter vaiable
towards the target value.
Similarly, the decision block can have any
logical expression with the counter.
Make sure that the exit condition is reached at
some point of time; otherwise the loop will
execute endlessly, and ReNamer will appear to
be hung.
While Do while <Condition> do
begin
<Action>
end;
Check for a condition and if it is met, execute
the <Action>. The loop is repeated till the
condition is met. When the condition is not
met, the loop is terminated and control passes
to the next statement. Note that if the condition
fails in the first-ever check, the <Action> may
not be executed at all.
Make sure that the condition will fail at some
point of time; otherwise the loop will execute
endlessly, and ReNamer will appear to be
hung.
Sometimes the condition is set to be always
TRUE, and then a statement inside the
<Action> block breaks the loop based on a
different condition.(See the break command
below)
Repeat
Until
repeat
<Action>
until <Condition>;
This structure is similar to the While loop (see
above). However, the only difference is that
the <Action> is taken first and then the
condition is checked. As a result, the
<Action> is executed at least once.
Quick Guide
Break
47
Break;
OR
This statement is placed in any of the above loops to terminate the loop when a condition
is met. Typically, it is used as the <Action> statement in a if-then block. This block is
then embedded (nested) inside the other code block that is to be contionally terminated.
if <Condition> then Break;
See the Case block above, which uses the break statement as integral part of its structure.
Continue Continue;
This statement is placed in any of the above loops to jump to the end of the current
iteration, bypassing all the subsequent statements within the loop. However, the execution
of the loop continues (the next iteration starts).
OR
if <Condition> then Continue; Typically, it is used as the <Action> statement in a if-then block. This block is then
embedded (nested) inside the other code block, just before the statements that are to be
skipped in the current iteration.
Control
Exit Exit;
The Exit procedure abruptly terminates the current function or procedure. If exiting a function, then
Result contains the last set value.
OR
if <Condition> then Exit;
Warning: use with caution - jumping is a concept at odds with structured coding - it makes code
maintenance difficult.
References
[1] http:/ / www. taoyue. com/ tutorials/ pascal/ contents. html
Types
This page lists and explains all supported types in Pascal Script used within ReNamer.
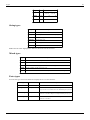
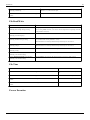
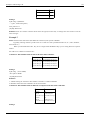
Integer types
Type
Size
Lowest Value
Highest Value
1 byte
0
255
-128
127
0
65,535
SmallInt 2 bytes
-32,768
32,767
Cardinal 4 bytes
0
4,294,967,295
-2,147,483,648
2,147,483,647
Byte
ShortInt 1 byte
Word
2 bytes
Integer
4 bytes
Int64
8 bytes -9,223,372,036,854,775,808 9,223,372,036,854,775,807
Floating point types
Types
48
Type
Size
Range
Single
4 bytes
1.5 x 10-45 .. 3.4 x 1038
Double
8 bytes
5.0 x 10-324 .. 1.7 x 10308
Extended 10 bytes 3.6 x 10-4951 .. 1.1 x 104932
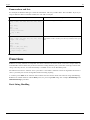
String types
Type
Description
Char
Stores a single Ansi character.
String
Holds a sequence of Ansi characters of any length.
AnsiChar
Alias for Char type.
AnsiString
Alias for String type.
WideChar
Stores a single Unicode character.
WideString Holds a sequence of Unicode characters of any length.
Note: Unicode article highlights the difference between Unicode and Ansi.
Mixed types
Type
Description
Boolean Provides an enumeration of the logical True and False values.
Array
Single and multi dimensional indexable sequences of data.
Record
Provides means of collecting together a set of different data types into one named structure.
Variant Provides a flexible general purpose data type.
PChar
Pointer to a Char value, and can also be used to point to characters within a string.
Extra types
Several extra types have been defined to simplify the use of some functions.
Type
Declared as
Description
TDateTime
Double
Holds date and time
TStringsArray
Array of WideString Holds an indexable sequence of WideString.
Deprecated in v5.74.4 Beta. Please use TWideStringArray instead.
TWideStringArray Array of WideString Holds an indexable sequence of WideString.
Added in v5.74.4 Beta. Replaces ambiguous TStringsArray type.
TAnsiStringArray
Array of AnsiString
Holds an indexable sequence of AnsiString.
Added in v5.74.4 Beta.
Types
49
Enumerations and Sets
For example, the Boolean data type is itself an enumeration, with two possible values: True and False. If you try to
assign a different value to a Boolean variable, the code will not compile.
Example
Description
type
TDay = (Mon, Tue, Wed, Thu, Fri, Sat, Sun);
var
Day: TDay;
begin
Day := Mon;
if Day <> Tue then
Day := Wed;
end.
An enumeration is simply a fixed range of named values
type
TDay = (Mon, Tue, Wed, Thu, Fri, Sat, Sun);
TDays = set of TDay;
var
Days: TDays;
begin
Days := [Mon, Tue, Wed];
if Sun in Days then
Days := Days - [Sun];
end.
Whereas enumerations allow a variable to have one, and only one, value from
a fixed number of values, sets allow you to have any combination of the given
values
Functions
ReNamer has many functions to manipulate the entities related to file names and do some more complex tasks for
individual files. These entities may be derived from the existing filename, path, system date, meta tags from the file,
strings entered by the user, etc. This functionality is available for use via the PascalScript rule.
The difference between a "function" and a "procedure" is that while a function executes an algorithm and returns a
value, a procedure just executes an algorithm without returning anything.
A common prefix Wide in the function name indicates that the function deals with Unicode strings (WideString).
ReNamer has similar functions without Wide prefix, for processing ANSI strings. For example, ShowMessage and
WideShowMessage procedures.
Basic String Handling
Functions
50
Routine
Remarks
procedure Insert(Source: String; var S: String; Index:
Integer);
Inserts the string S into string Source at position Index.
procedure Delete(var S: String; Index, Count: Integer);
Deletes Count characters from the string S, starting from position Index.
function Copy(S: String; Index, Count: Integer): String;
Copies Count characters from string S, starting at position Index, and returns them as a
new string.
function Pos(Substr: String; S: String): Integer;
Returns the position of a string Substr in another string S.
Note: Indexes of characters in strings are 1 based, so first character in string S would be S[1].
Length Management
Routine
Remarks
procedure SetLength(var S: Array; NewLength: Integer);
Sets the length of array variable S to NewLength.
procedure SetLength(var S: String; NewLength: Integer);
Sets the length of string variable S to NewLength.
procedure SetLength(var S: WideString; NewLength: Integer); Sets the length of widestring S to NewLength.
function Length(const S: Array): Integer;
Returns the length of array S (number of elements).
function Length(const S: String): Integer;
Returns the length of string S (number of characters).
function Length(const S: WideString): Integer;
Returns the length of WideString S (number of characters).
Unicode String Handling
Routine
Remarks
procedure WideInsert(const Substr: WideString;
var Dest: WideString; Index: Integer);
Inserts Substr in Dest at position Index.
procedure WideDelete(var S: WideString; Index,
Count: Integer);
Deletes Count characters from S, starting from the Index position.
procedure WideSetLength(var S: WideString;
NewLength: Integer);
Change the length of string S to a new length specified by NewLength. If new length is smaller
than original, the string is truncated. If new length is greater than original, the string will be
expanded but additional characters will not be initialized and can be anything.
function WideLength(const S: WideString):
Integer;
Returns the length of WideString S.
function WideCopy(const S: WideString; Index,
Count: Integer): WideString;
Returns Count characters from WideString S, starting at position Index.
function WidePos(const SubStr, S: WideString):
Integer;
Find and occurrence of SubStr in S. Returns the position of first occurrence, or 0 if nothing was
found.
function WidePosEx(const SubStr, S:
WideString; Offset: Cardinal): Integer;
Find and occurrence of SubStr in S but start searching from position specified by Offset.
Returns the position of first occurrence, or 0 if nothing was found.
function WideUpperCase(const S: WideString):
WideString;
Returns the ALLCAPS version of the WideString S
function WideLowerCase(const S: WideString):
WideString;
Returns the lowercase version of the WideString S
function WideCompareStr(const S1, S2:
WideString): Integer;
Compares two WideStrings S1 and S2, case-sensitive, and returns an integer based on the
result. The return value is less than 0 if S1 is less than S2, 0 if S1 equals S2, or greater than 0 if
S1 is greater than S2.
Functions
51
function WideCompareText(const S1, S2:
WideString): Integer;
Compares two WideStrings S1 and S2, case-insensitive, and returns an integer based on the
result. The return value is less than 0 if S1 is less than S2, 0 if S1 equals S2, or greater than 0 if
S1 is greater than S2.
function WideSameText(const S1, S2:
WideString): Boolean;
Compares two WideStrings S1 and S2, case-insensitive. Returns TRUE if both are identical,
otherwise returns FALSE.
function WideTextPos(const SubStr, S:
WideString): Integer;
Behaves like WidePos function, except text if processed in case-insensitive manner.
function WideTrim(const S: WideString):
WideString;
Removes leading and trailing spaces and control characters from the given string S.
function WideReplaceStr(const S, OldPattern,
NewPattern: WideString): WideString;
Returns the result of replacing on a string S, a string OldPattern (Case Sensitive), with a
NewPattern.
function WideReplaceText(const S, OldPattern,
NewPattern: WideString): WideString;
Returns the result of replacing on a string S, a text OldPattern (Case Non-Sensitive), with a
NewPattern.
function WideSplitString(const Input, Delimiter:
WideString): TStringsArray;
Splits the Input wherever Delimiter occurs and returns an array that contains the split parts.
•
•
The Delimiter itself can be a multi-character WideString.
(Unlike the usual comma, hyphen or space that are used for this purpose)
The split parts (returned as elements of the array) do not contain the Delimiter.
function WideJoinStrings(const Strings:
TStringsArray; const Delimiter: WideString):
WideString;
Joins all individual items from Strings into a single WideString, with Delimiter inserted
between the joined items.
function WideCaseCapitalize(const S:
WideString): WideString;
Returns the Sentence case version of the WideString S.
Only the first alphabetic character is capitalized. All other alphabetic characters are converted
to lowercase.
•
function WideCaseInvert(const S: WideString):
WideString;
If S begins with numeric characters, the first alphabetic character that follows will be
capitalized.
Inverts the case of all characters in the WideString S and returns the WideString.
Meta Tags Extraction
Function
Remarks
function CalculateMetaTag(const FilePath: WideString; const
MetaTagName: String): WideString;
Extracts and returns the value of a meta tag specified by MetaTagName from
the file specified by the complete absolute path FilePath.
Return type changed from String to WideString in v5.74.4 Beta.
function CalculateMetaTagFormat(const FilePath: WideString;
const MetaTagName, DateTimeFormat: String): WideString;
Same as CalculateMetaTag except an additional parameter
DateTimeFormat is provided to specify custom Date/Time format to be used
instead of the application's default setting.
Added in v5.74.4 Beta.
For example, to extract EXIF_Date tag from an image and set it to the filename using the default date/time
formatting:
begin
FileName := CalculateMetaTag(FilePath, 'EXIF_Date');
end.
The full list of meta tags can be found in Meta Tags article. For help with date/time formatting refer to Date and
Time format.
Functions
52
Regular Expressions
Function
Remarks
function IsMatchingRegEx(const Input, Pattern: WideString; const
CaseSensitive: Boolean): Boolean;
Check for a match against a RegEx pattern.
Added in v5.74.4 Beta.
function ReplaceRegEx(const Input, Find, Replace: WideString;const
CaseSensitive, UseSubstitution: Boolean): WideString;
Find-and-replace function using RegEx. Works like RegEx rule.
The parameters for this and next RegEx functions are:
•
•
•
•
•
function MatchesRegEx(const Input, Find: WideString;const CaseSensitive:
Boolean): TStringsArray;
Input - The WideString that is input to the function.
Find - RegEx pattern to be found (same as Expression field
in the RegEx rule).
Replace - Replacement string (same as the Replace field in
the RegEx rule).
CaseSensitive - Specifies whether to process in a
case-sensitive mode.
UseSubstitution - Determines whether use backreferences in
the result.
Returns a list of RegEx matches as an array. Function returns an
array of full matches, which matched the entire expression, not
the sub-patterns. For example:
Input
Find
Ax1_-_Bx2---Cx3 [A-Z]x\d
function SubMatchesRegEx(const Input, Find: WideString;const
CaseSensitive: Boolean): TStringsArray;
Results
•
•
•
Ax1
Bx2
Cx3
Ax1_-_Bx2---Cx3 ([A-Z])x(\d) •
•
•
Ax1
Bx2
Cx3
This function is very similar to MatchesRegEx, but instead of
returning full matches it will return an array of sub-expression
matches for the first full match. For example:
Input
Find
Results
Ax1_-_Bx2---Cx3 [A-Z]x\d
(empty)
Ax1_-_Bx2---Cx3 ([A-Z])x(\d) •
•
A
1
In this way, it can easily be combined with MatchesRegEx
function, to allow users to find all global matches, and then parse
those matches through SubMatchesRegEx function to find
individual sub-expression matches of each global match.
Unicode Character Handling
Functions
53
Function
Remarks
function IsWideCharUpper(WC: WideChar):
Boolean;
Checks a Unicode character WC and returns TRUE if it is in UPPERCASE.
function IsWideCharLower(WC: WideChar):
Boolean;
Checks a Unicode character WC and returns TRUE if it is in lowercase.
function IsWideCharDigit(WC: WideChar):
Boolean;
Checks a Unicode character WC and returns TRUE if it is a digit (numeric character 0-9).
function IsWideCharSpace(WC: WideChar):
Boolean;
Checks a Unicode character WC and returns TRUE if it is a white-space character, such as:
space, form-feed, newline, carriage-return, tab and vertical-tab (characters classified as
C1_SPACE).
function IsWideCharPunct(WC: WideChar):
Boolean;
Checks a Unicode character WC and returns TRUE if it is a punctuation mark (characters
classified as C1_PUNCT).
function IsWideCharCntrl(WC: WideChar):
Boolean;
Checks a Unicode character WC and returns TRUE if it is a control character (characters
classified as C1_CNTRL).
function IsWideCharBlank(WC: WideChar):
Boolean;
Checks a Unicode character WC and returns TRUE if it is a blank, such as: space and tab
(characters classified as C1_BLANK).
function IsWideCharXDigit(WC: WideChar):
Boolean;
Checks a Unicode character WC and returns TRUE if it is a hexadecimal digit (0-9 or A-F).
function IsWideCharAlpha(WC: WideChar):
Boolean;
Checks a Unicode character WC and returns TRUE if it is a alphanumeric character (a-z or A-Z).
function IsWideCharAlphaNumeric(WC:
WideChar): Boolean;
Checks a Unicode character WC and returns TRUE if it is a alphanumeric character or a numeric
character (a-z, A-Z or 0-9).
function WideCharUpper(const WC:
WideChar): WideChar;
Returns a UPPERCASE version of the input Unicode character. In case of non-alphabetic
character, it returns the same character.
function WideCharLower(const WC:
WideChar): WideChar;
Returns a lowercase version of the input Unicode character. In case of non-alphabetic character,
it returns the same character.
Note: Character classifications, such as C1_UPPER, C1_LOWER, C1_DIGIT, C1_SPACE, C1_PUNCT,
C1_CNTRL, C1_BLANK, C1_XDIGIT, C1_ALPHA - are part of Unicode definitions. More information regarding
classification can be found on the internet. For example: http://www.fileformat.info/info/unicode/ [1].
Unicode Conversion
Function
Remarks
function WideToAnsi(const WS: WideString): Converts a Unicode string to its ANSI version.
String;
function AnsiToWide(const S: String):
WideString;
Converts a ANSI string to its Unicode version.
function UTF8Encode(const WS:
WideString): String;
[2]
Convert Unicode string to the UTF-8
encoded string.
Useful for storing Unicode strings in files, sometimes for compatibility reasons and sometimes to
reduce the size of the file.
function UTF8Decode(const S: String):
WideString;
Convert UTF-8
[2]
encoded string to its full Unicode representation.
Functions
54
Basic Conversion
Function
Remarks
function BoolToStr(B: Boolean):
String;
Convert boolean variable into a string. Returns True or False string.
function IntToStr(Value: Integer):
String;
Converts an integer to a string. The following assumptions are correct:
•
•
•
IntToStr(123) = '123'
IntToStr(0123) = '123'
IntToStr(123) <> '0123'
Note: Be cautious of supplying Int64 type as a parameter as it will be type casted to Integer, which
significantly reduces the range of possible values (refer to Types for more information). You can use
FormatFloat function to convert Int64 values to a string without a loss of range.
function StrToInt(const S: String):
Integer;
Converts a string to an integer. The following equalities are correct:
•
•
•
StrToInt('123') = 123
StrToInt('123') = 0123
StrToInt('0123') = 123
Warning: An error will occur if the parameter to this function cannot be converted to an integer!
function StrToIntDef(const S: String; Behaves like StrToInt function, but instead of producing an error on incorrect input function allows the
const Default: Integer): Integer;
Default value to be specified, which will be returned if the input cannot be converted to an integer.
function FloatToStr(Value:
Extended): string;
Converts supplied floating point value to its string representation, using default system format.
function StrToFloat(const S: string):
Extended;
Converts supplied string to a floating point value.
Warning: An error will occur if the parameter to this function cannot be converted to a floating point
value!
function StrToFloatDef(const S:
string; const Default: Extended):
Extended;
Behaves like StrToFloat function, but instead of producing an error on incorrect input function allows the
Default value to be specified, which will be returned if the input cannot be converted to a floating point
value.
function FormatFloat(const Format:
string; Value: Extended): string;
Converts supplied floating point value to its string representation, using user specific Format. Format
string may contain following specifiers:
Specifier
Represents
0 (zero)
Digit placeholder. If the value being formatted has a digit in the position where the "0"
appears in the format string, then that digit is copied to the output string. Otherwise, a "0" is
stored in that position in the output string.
# (hash)
Digit placeholder. If the value being formatted has a digit in the position where the "#"
appears in the format string, then that digit is copied to the output string. Otherwise, nothing
is stored in that position in the output string.
. (dot)
Decimal point. The first "." character in the format string determines the location of the
decimal separator in the formatted value, any additional "." characters are ignored.
, (comma) Thousand separator. If the format string contains one or more "," characters, the output will
have thousand separators inserted between each group of three digits to the left of the decimal
point. The placement and number of "," characters in the format string does not affect the
output.
function DateToStr(D: TDateTime):
String;
Converts a date to a string, using system format for the short date, for example: dd/mm/yyyy.
function StrToDate(const S: String):
TDateTime;
Converts a date string to a proper TDateTime value, using system format for the short date, for example:
dd/mm/yyyy.
Functions
55
function IntToHex(Value: Integer;
Digits: Integer): String;
Converts an integer to its hexadecimal representation. Here are samples:
function HexToInt(const HexNum:
String): Integer;
Converts a hexadecimal value to its decimal representation.
Warning: An error will occur if the parameter to this function cannot be converted to an integer!
function HexToIntDef(const
HexNum: String; Default: Integer):
Integer;
Behaves like HexToInt function, but instead of producing an error on incorrect input function allows the
Default value to be specified, which will be returned if the input cannot be converted to an integer.
function Ord(X: Char): Byte;
Return an ordinal value (byte representation) of a character.
function Chr(X: Byte): Char;
Return a character by its ordinal value (byte representation).
•
•
IntToHex(1234, 1) = '4D2'
IntToHex(1234, 8) = '000004D2'
Date and Time
Function
Remarks
function Date: TDateTime;
Returns the current system date.
function Time: TDateTime;
Returns the current system time.
function Now: TDateTime;
Returns the current system date and time.
function EncodeDate(Year, Month, Day: Word):
TDateTime;
Generates date value for the specified Year, Month, Day. Parameters must be within a valid
date range: Year = 0..9999, Month = 1..12, Day = 1..31 (depending on month/year). An error
will be raised if parameters are invalid.
function EncodeTime(Hour, Min, Sec, MSec:
Word): TDateTime;
Generates time value for the specified Hour, Min, Sec, MSec. Parameters must be within a
valid time range: Hour = 0..23, Min = 0..59, Sec = 0..59, MSec = 0..999. An error will be
raised if parameters are invalid.
function TryEncodeDate(Year, Month, Day: Word; Behaves exactly like EncodeDate function, except this function returns the TRUE or FALSE
var Date: TDateTime): Boolean;
depending on the success of the operation. If operation was successful, function will return
TRUE and the generated date value will be written in the Date variable.
function TryEncodeTime(Hour, Min, Sec, MSec:
Word; var Time: TDateTime): Boolean;
Behaves exactly like EncodeTime function, except this function returns the TRUE or
FALSE depending on the success of the operation. If operation was successful, function will
return TRUE and the generated time value will be written in the Time variable.
procedure DecodeDate(const DateTime:
TDateTime; var Year, Month, Day: Word);
Extracts Year, Month and Day components from a given DateTime value.
procedure DecodeTime(const DateTime:
TDateTime; var Hour, Min, Sec, MSec: Word);
Extracts Hour, Min, Sec and MSec components from a given DateTime value.
function DayOfWeek(const DateTime:
TDateTime): Word;
Returns the day of the week (as an index) for the specified DateTime value. The indexes are:
1 = Sunday, 2 = Monday, 3 = Tuesday, 4 = Wednesday, 5 = Thursday, 6 = Friday, 7 =
Saturday.
function DateTimeToUnix(D: TDateTime): Int64;
Converts D value of type TDateTime to a Unix timestamp.
function UnixToDateTime(U: Int64): TDateTime;
Converts a Unix timestamp to a value of TDateTime type.
function FormatDateTime(const Fmt: String; D:
TDateTime): String;
This function provides rich formatting of a DateTime value into a string. Date and time
format is defined by the Fmt string.
function IncYear(const AValue: TDateTime; const
ANumberOfYears: Integer): TDateTime;
Increments a TDateTime variable by a number of years (plus or minus).
function IncMonth(const AValue: TDateTime;
ANumberOfMonths: Integer): TDateTime;
Increments a TDateTime variable by a number of months (plus or minus).
function IncWeek(const AValue: TDateTime; const Increments a TDateTime variable by a number of weeks (plus or minus).
ANumberOfWeeks: Integer): TDateTime;
Functions
56
function IncDay(const AValue: TDateTime; const
ANumberOfDays: Integer): TDateTime;
Increments a TDateTime variable by a number of days (plus or minus).
function IncHour(const AValue: TDateTime; const
ANumberOfHours: Int64): TDateTime;
Increments a TDateTime variable by a number of hours (plus or minus).
function IncMinute(const AValue: TDateTime;
const ANumberOfMinutes: Int64): TDateTime;
Increments a TDateTime variable by a number of minutes (plus or minus).
function IncSecond(const AValue: TDateTime;
const ANumberOfSeconds: Int64): TDateTime;
Increments a TDateTime variable by a number of seconds (plus or minus).
function IncMilliSecond(const AValue:
Increments a TDateTime variable by a number of milliseconds (plus or minus).
TDateTime; const ANumberOfMilliSeconds: Int64):
TDateTime;
File Management
Function
Remarks
function WideFileSize(const FileName: WideString): Int64;
Returns the size of the file in bytes. If file does not exist "-1" is returned. The return
value is of type Int64 which can store the maximum file size of
9,223,372,036,854,775,807 bytes.
function WideFileExists(const FileName: WideString):
Boolean;
Check whether specified file exists. Returns TRUE if file exists, otherwise FALSE.
function WideDirectoryExists(const Directory:
WideString): Boolean;
Check whether specified directory exists. Returns TRUE if directory exists,
otherwise FALSE.
function WideForceDirectories(Dir: WideString): Boolean; Makes sure that that all directories in the path exist. If they don't, function will try to
create them, recursively. Returns TRUE if all folders exist or have been successfully
created.
function WideCreateDir(const Dir: WideString): Boolean;
Create specified directory (non-recursive). Returns TRUE on success, otherwise
FALSE.
function WideDeleteFile(const FileName: WideString):
Boolean;
Delete physical file from the disk. Returns TRUE on success, otherwise FALSE.
function WideRenameFile(const OldName, NewName:
WideString): Boolean;
Rename file from OldName to NewName. Returns TRUE on success, otherwise
FALSE.
function WideCopyFile(FromFile, ToFile: WideString;
FailIfExists: Boolean): Boolean;
Rename file from FromFile to ToFile. If FailIfExists flag is TRUE, file will not be
copied when destination file already exists, otherwise, destination file will be
overwritten. Returns TRUE on success, otherwise FALSE.
function WideFileSearch(const Name, DirList:
WideString): WideString;
Search through the directories passed in DirList for a file named Name. DirList is a
list of path names delimited by semicolons. If file matching Name is located,
function returns a string specifying a path name for that file. If no matching file
exists, function returns an empty string.
procedure WideScanDirForFiles(Dir: WideString; var
Files: TStringsArray; const Recursive, IncludeHidden,
IncludeSystem: Boolean; const Mask: WideString);
You can get a list of the files inside a folder.
•
•
•
•
•
•
Dir: The folder you want to scan.
Files: Where the list of files is going to be saved.
Recursive: Do you want to scan the subfolders?
IncludeHidden: Do you want to list the hidden files?
IncludeSystem: Do you want to list the system files?
Mask: You can list everything ('*'), or only the files that contain some string
(example: '*.txt').
Functions
57
procedure WideScanDirForFolders(Dir: WideString; var
Folders: TStringsArray; const Recursive, IncludeHidden,
IncludeSystem: Boolean);
You can get a list of the folders inside other folder.
•
•
•
•
•
Dir: The folder you want to scan.
Folders: Where the list of folders is going to be saved.
Recursive: Do you want to scan the subfolders?
IncludeHidden: Do you want to list the hidden folders?
IncludeSystem: Do you want to list the system folders?
File Name Utilities
Function
Remarks
function WideExtractFilePath(const FileName: WideString):
WideString;
Returns the drive and directory portion from "FileName", including the trailing
path delimiter, e.g. "C:\Folder\".
function WideExtractFileDir(const FileName: WideString):
WideString;
Returns the drive and directory portion from "FileName", excluding the trailing
path delimiter, e.g. "C:\Folder".
function WideExtractFileDrive(const FileName: WideString): Returns the drive letter, e.g. "C:".
WideString;
function WideExtractFileName(const FileName:
WideString): WideString;
Returns the filename with extension, e.g. "FileName.txt".
function WideExtractBaseName(const FileName:
WideString): WideString;
Returns the base name of the file, i.e. file name without extension and path
components.
Input
Document.txt
Output
Document
C:\Folder\Document.txt Document
function WideExtractFileExt(const FileName: WideString):
WideString;
Returns the file's extension with the dot, e.g. ".txt".
function WideChangeFileExt(const FileName, Extension:
WideString): WideString;
Replaces the original extension, and returns the new filename with extension, e.g.
"FineName.txt" -> "FineName.pdf".
function WideStripExtension(const FileName: WideString):
WideString;
Strips off the extension from the filename, maintaining the path component
unaffected.
Input
Document.txt
Output
Document
C:\Folder\Document.txt C:\Folder\Document
function WideExpandFileName(const FileName:
WideString): WideString;
Converts the relative file name into a fully qualified path. This function does not
verify that the resulting path refers to an existing file.
function WideExtractRelativePath(const BaseName,
DestName: WideString): WideString;
Creates a relative path to go from BaseName to DestName. For example:
BaseName: C:\Folder\FileName.txt
DestName: C:\Documents\Article.pdf
Result:
..\Documents\Article.pdf
function WideExtractShortPathName(const FileName:
WideString): WideString;
It converts a path into it's representation in DOS format.
function WideIncludeTrailingPathDelimiter(const S:
WideString): WideString;
With this function you can ensure that a path for a folder contains the path
delimiter ("\") at the end of the path.
Functions
58
function WideExcludeTrailingPathDelimiter(const S:
WideString): WideString;
With this function you can ensure that a path for a file does not contain the path
delimiter ("\") at the end of the path.
function WideSameFileName(const S1, S2: WideString):
Boolean;
Compares the filenames S1 and S2, and returns TRUE if they are identical.
File Read/Write
Function
Remarks
function FileReadFragment(const FileName:
WideString; Start, Length: Integer): String;
Starting at position Start, read Length number of characters of the file FileName and return
them as a string. Start is 0-based, so in order to start the fragment at the beginning of the file,
set this parameter to 0 (zero).
function FileReadLines(const FileName:
WideString): TAnsiStringArray;
Read all lines from a file FileName. Added in v5.74.4 Beta.
function FileReadLine(const FileName:
WideString; LineNum: Integer): String;
Read a line from a file FileName specified by a line index LineNum. LineNum is 1 based,
so to get the first line set this parameter to 1 (one).
Note: This function is extremely inefficient and provided only for convenience!
function FileCountLines(const FileName:
WideString): Integer;
Count number of lines in the file.
Note: This function is extremely inefficient and provided only for convenience!
function FileReadContent(const FileName:
WideString): String;
Return the entire content of the file as a String.
procedure FileWriteContent(const FileName:
WideString; const Content: String);
Write Content to the file. If target file already exists, it will be overwritten.
procedure FileAppendContent(const FileName:
WideString; const Content: String);
Append Content to the end of the file. If target file does not exist, it will be created.
File Time
Function
Remarks
function FileTimeModified(const FileName: WideString): TDateTime;
Returns last modified time of the specified
file.
function FileTimeCreated(const FileName: WideString): TDateTime;
Returns creation time of the specified file.
function SetFileTimeCreated(const FileName: WideString; const DateTime: TDateTime):
Boolean;
Sets creation time for the specified file.
function SetFileTimeModified(const FileName: WideString; const DateTime: TDateTime):
Boolean;
Sets last modified time for the specified file.
Process Execution
Functions
59
Function
function ShellOpenFile(const
FileName: WideString): Boolean;
Remarks
Run (open) a file specified by FileName. Works like "Start > Run" command. Parameter does not have to be
an executable file, it can by any file or protocol with assigned handler. For example, you can open a Word
document or a web page, and associated application will be launched:
•
•
ShellOpenFile('http://www.den4b.com/');
ShellOpenFile('C:\Document.doc');
Beware: This function will evaluate the command for the appropriate way of execution which may sometimes
lead to unexpected results. For example when executing ShellOpenFile('notepad') it could actually run a
Windows Notepad application normally located in "C:\Windows\notepad.exe", or some other "notepad.exe"
file located on the search path (%PATH%), or even open "notepad" folder located in the current working
directory.
function ExecuteProgram(const
Command: String;
WaitForProgram: Boolean):
Cardinal;
Execute a command line specified by parameter Command. Works like "Command Prompt". Parameter
WaitForProgram allows you to specify whether the code needs to wait until the command (launched
program) has finished executing.
function ExecConsoleApp(const
Execute a command line specified by parameter CommandLine and record its standard output in the variable
CommandLine: String; out Output: Output. Works like "Command Prompt". Should be used only for console style applications. Returns the exit
String): Cardinal;
code.
Dialogs
Function
Remarks
procedure ShowMessage(const Msg: String);
Show a simple dialog with the message specified by Msg parameter.
procedure WideShowMessage(const Msg:
WideString);
Same as ShowMessage function but parameter is Unicode text.
function DialogYesNo(const Msg: String):
Boolean;
Show a simple prompt with the message specified by Msg parameter and two button: Yes and
No. Returns TRUE if user clicks Yes button, otherwise FALSE.
function WideDialogYesNo(const Msg:
WideString): Boolean;
Same as DialogYesNo function but parameter is WideString text.
function InputBox(const ACaption, APrompt,
ADefault: String): String;
Displays a simple dialog box with the given ACaption and APrompt message. It asks the user
to enter data in a text box on the dialog. A ADefault value is displayed in the text box initially. If
the user presses OK, the value from the text box is returned, otherwise ADefault value is
returned.
function InputQuery(const ACaption,
APrompt: String; var Value: String): Boolean;
Operates similar to InputBox function. The default value and the value of the text box after the
dialog is closed are transferred via the Value parameter. Function returns TRUE is user clicked
OK, otherwise returns FALSE.
function WideInputBox(const ACaption,
APrompt, ADefault: WideString): WideString;
Same as InputBox function but operates on WideString text.
function WideInputQuery(const ACaption,
APrompt: WideString; var Value: WideString):
Boolean;
Same as InputQuery function but operates on WideString text.
Functions
60
Application
Function
Remarks
function GetApplicationPath: WideString;
Return full path to the application, for example: "C:\Program Files\ReNamer\ReNamer.exe".
function GetApplicationParams:
TStringsArray;
Return an array of command line parameters which were supplied to the application at launch.
function GetCurrentFileIndex: Integer;
Get index of the current file. Index ranges from 1 to GetTotalNumberOfFiles.
function GetTotalNumberOfFiles: Integer;
Get total number of files in the application.
function GetCurrentMarkedFileIndex:
Integer;
Get index of the current file, counting only marked files. Index ranges from 1 to
GetTotalNumberOfMarkedFiles.
function GetTotalNumberOfMarkedFiles:
Integer;
Get total number of marked files in the application.
function GetAllFiles: TStringsArray;
Get file paths of all available files. (v5.74.2 Beta)
function GetMarkedFiles: TStringsArray;
Get file paths of all marked files. (v5.74.2 Beta)
System
Function
Remarks
function WideGetCurrentDir: WideString;
Returns the current working directory.
function WideSetCurrentDir(const Dir:
WideString): Boolean;
Sets the current working directory to the directory specified by parameter Dir.
function WideGetTempPath: WideString;
Returns system defined temporary directory. If returned value is empty it means that temporary
folder could not be determined.
function WideGetEnvironmentVar(const
VarName: WideString): WideString;
Returns an environment variable by its name. For example:
var
UserName, ComputerName: WideString;
begin
UserName := WideGetEnvironmentVar('USERNAME');
ComputerName := WideGetEnvironmentVar('COMPUTERNAME');
end.
Miscellaneous
Function
Remarks
procedure Sleep(Milliseconds: Cardinal);
Sleep (pause the execution) for specified number of Milliseconds.
procedure DivMod(Dividend: Integer;
Divisor: Word; var Result, Remainder:
Word);
Perform integer division and fetch the remainder as well, all in one operation. Dividend is the integer
into which you are dividing. Divisor is the value by which to divide Dividend. Result returns the result
of the integer division. Remainder returns the remainder (the difference between Result * Divisor and
Dividend).
procedure Randomize;
Prepares the random number generator. Note: Should only be called once per application cycle, at the
start of the process!
function RandomRange(const AFrom,
ATo: Integer): Integer;
Return a random integer number within the specified range from AFrom (inclusive) to ATo
(non-inclusive).
function GetClipboardText: WideString; Get the content of the the clipboard (text only).
Functions
61
procedure SetClipboardText(const S:
WideString);
Set the content of the the clipboard (text only).
function Base64Encode(const S: String):
String;
[3]
Encode string S into Base64 . Useful for encoding binary data in order to minimize the likelihood of
data being modified in transit through different systems, like email or internet.
function Base64Decode(const S: String):
String;
Decode Base64
function URLDecode(const EncodedStr:
AnsiString): WideString;
Decode URL encoded string. All occurrences of %XX hex format are decoded, then entire string is
decoded from UTF8.
Added in v5.74.4 Beta.
function URLEncode(const Str:
WideString; UsePluses: Boolean):
AnsiString;
Encode string into URL encoding. Input string is encoded with UTF8, then all characters except digits
and Latin letters are encoded in %XX hex format. Optionally, spaces can be encoded as "+" (plus
signs).
Added in v5.74.4 Beta.
function GetTickCount: Cardinal;
Retrieves the number of milliseconds that have elapsed since the system was started (up to 49.7 days,
then timer resets). The precision of this timer is very limited.
function SizeOf(X): Integer;
Pass a variable reference to determine the number of bytes used to represent the variable. Pass a type
identifier to determine the number of bytes used to represent instances of that type.
[3]
string;
References
[1] http:/ / www. fileformat. info/ info/ unicode/
[2] http:/ / en. wikipedia. org/ wiki/ UTF-8
[3] http:/ / en. wikipedia. org/ wiki/ Base64
User Scripts
This page contains a collection of scripts which can be used in ReNamer's PascalScript rule.
Educational scripts
Script
Description
Initialize
How to initialize the code.
Import DLL
Demonstrates how to call functions of 3rd party DLL.
Date and Time
How to use date and time of the file.
Move filename portion How to move part of the filename to a new position.
Index filenames
3rd party libraries
How to insert an incrementing number into the filename.
User Scripts
62
Script
Description
Forum Link
TrID
Detecting file extension.
[1]
Xpdf
Extract PDF tags.
[2]
Exiv2 Extract EXIF/IPTC/XMP tags from any images. [3]
[4]
User scripts
Script
Description
Forum
Link
Separate words
Insert a space in front of each capitalized letter.
[5]
AVI video codec
Extract name of video codec used encoding AVI file.
[6]
RegEx Case Convertion
Convert case of capturing groups of your regular expression.
[7]
[8]
Using MasterFile
Renaming folder basing on the MetaTag of the first file in the folder. In this particular case: adding the
ID3_Year metatag from the mp3 file to it's parent folder name.
[9]
Hours span
Add hours to a date embedded in the filename in format "yyyy-mm-dd hh-nn-ss.JPG".
[10]
Roman numerals
serialization
Serialization with Roman numerals.
[11]
[12]
EAN-13 checksum
Calculate the checksum digit for the EAN-13 barcode
Serialize duplicates
Serialize duplicated filenames by append a counter to the filename.
Partial case change
Change case of specific parts of the file name.
URL decode
Decode a URL encoded filename.
Index files per folder
This script adds a serialization index to the end of every file on per folder basis. The index is incremented only when
the folder path changes.
Random characters and
length
Generate new names consisting of random selection of characters and of random length.
Convert file content from
ANSI to UTF-8
Convert the content of processed files from ANSI (default system code page) to UTF-8 encoding.
References
[1] http:/ / www. den4b. com/ forum/ viewtopic. php?id=550
[2] http:/ / www. den4b. com/ forum/ viewtopic. php?id=349
[3] http:/ / www. den4b. com/ forum/ viewtopic. php?id=407
[4] http:/ / www. den4b. com/ forum/ viewtopic. php?id=109
[5] http:/ / www. den4b. com/ forum/ viewtopic. php?pid=2529#p2529
[6] http:/ / www. den4b. com/ forum/ viewtopic. php?pid=3484#p3484
[7] http:/ / www. den4b. com/ forum/ viewtopic. php?pid=3454#p3454
[8] http:/ / www. den4b. com/ forum/ viewtopic. php?pid=3459#p3459
[9] http:/ / www. den4b. com/ forum/ viewtopic. php?pid=1626#p1626
[10] http:/ / www. den4b. com/ forum/ viewtopic. php?id=696
[11] http:/ / www. den4b. com/ forum/ viewtopic. php?id=828
[12] http:/ / www. den4b. com/ forum/ viewtopic. php?pid=3327#p3327
[13] http:/ / en. wikipedia. org/ wiki/ EAN-13
[14] http:/ / www. den4b. com/ forum/ viewtopic. php?id=930
[13]
.
[14]
63
Appendices
Using Presets
A "preset" is a set of rules that is saved with a user-defined name. It can optionally save the Filter setting also.
You can save frequently used sets of rules as presets, and load them instantly. This saves you a lot of time. Without
the presets, you would have to compose the same set of rules each time you start the program. You can create an
unlimited number of presets, but in practice, you would normally need about 4-5 presets.
Shortcuts
ReNamer automatically assigns keyboard shortcuts to presets, so that they can be loaded into the Rules pane with
least effort. Shortcuts have the following form: CTRL+1, CTRL+2, etc. Unfortunately, there are only 9 shortcuts
available, one for every digit from 1 to 9.
Presets are sorted in alphabetic order. You can manipulate the order of the presets by renaming them. If you want
some specific preset to always appear at the top, you can insert an exclamation mark "!" (or some other symbol that
is at the top of the sorting order) in front of the preset name. If you have several presets that you want to push to the
top, you can prefix them with something like this: "!1", "!2", "!3", etc.
Managing Presets
Save a preset
1.
2.
3.
4.
Create a list of rules (Managing rules).
Set the required Filter settings (optional).
Press CTRL+S, or use the Presets > Save As menu option.
A window pops up:
Using Presets
64
5. Enter a new name in the Name box, or select one of the existing presets listed below to overwrite it.
6. Put a tick in the check box if you want to save the current filter settings.
7. Press the Save button. The preset is saved.
Note: At any point of time, you can abort the process by pressing ESC or closing the window.
Load an existing preset
You can load any of the presets by pressing its shortcut (CTRL+1, etc. see above). If you do not remember the
shortcuts, use the Preset > Load menu to see the master list of all existing presets and select a preset from that
list.The selected preset is loaded.
Append an existing preset to current set of rules
You can append any of the presets to the end of the current rules stack. To do it, follow these steps:
1. Press CTRL+M or use the Presets > Manage menu option.
2. The Presets manager window pops up:
3. Select the preset you want to append and then press the
4. Close the Preset Manager window.
button.
Using Presets
65
Delete an existing preset
Sometimes you may not need a preset any longer. To delete it, follow these steps:
1. Press CTRL+M or use the Presets > Manage menu option.
2. The Presets manager window pops up:
3. Select the preset you want to delete and then press DEL key or the
4. Close the Preset Manager window.
button.
Rename a preset
To rename a preset, follow these steps:
1. Press CTRL+M or use the Presets > Manage menu option.
2. The Preset manager window pops up.
3. Select the preset you want to rename and then press F2 or the
4. The following dialog pops up:
5. Edit the name (or enter a new name), and press OK or ENTER.
To abort the process at any time, press ESC or close the window.
button.
Using Presets
66
Edit a preset
The preset manager can show the contents of a preset (i.e., settings of all rules and filters) as editable text. You can
simply edit the rules and filters by changing the text.
To edit a preset, follow these steps:
1. Press CTRL+M or use the Presets > Manage menu option.
2. The Presets manager window pops up:
3. Select the preset you want to edit and then press F4 or the
4. A warning pops up:
button.
5. Click on Yes. A Notepad (text editor) window pops up with the selected preset:
Using Presets
Notice that:
• This window shows the preset name in the title bar, and all settings (rules and filters).
• In each rule, the parameters are shown in ParameterName:ParameterValue format.
• All such pairs are separated by a semicolon (;).
6. Edit the settings and then close the file. A confirmation dialog pops up.
7. Click on Yes. Now the preset is edited.
67
Using Presets
68
Copy a preset
You may want to duplicate an existing preset and create a variation by editing it (or just take a backup of the preset
before experimenting with it).
To duplicate a preset, follow these steps:
1. Press CTRL+M or use the Presets > Manage menu option.
2. The Presets manager window pops up:
3.
4.
5.
6.
Select the preset you want to duplicate and then press the
A duplicate copy of the preset is created.
Now go ahead and edit the original present (or its copy).
Finally close the Presets Manager window.
button.
Backup / Transfer Presets
Presets are stored as plain text files normally located in the "Presets" folder. By default, this Presets folder is in the
same diretory as "ReNamer.exe", but it could also be stored in your Windows user profile.
You can tell by launching ReNamer and opening the Presets Manager: "Presets > Manage..." (Ctrl+P). In the top you
will see the path to the presets folder (see pictures above). There is also a menu item "Presets > Browse..." which
will open Windows Explorer with the Presets folder in view.
To backup or transfer the stored presets to an another location or PC, simply copy *.rnp files and you are done.
VirtualStore
If ReNamer is installed in the protected folder such as Program Files on Windows Vista, 7 or 8, the Presets folder
will be placed in so called VirtualStore by the UAC (User Account Control) system.
To access the VirtualStore folder open Windows Explorer and type in the address bar:
• %LOCALAPPDATA%\VirtualStore
The actual path to the VirtualStore can differ. Here are few examples:
• C:\Users\<USERNAME>\AppData\Local\VirtualStore\Program Files
(x86)\ReNamer\Presets\*.rnp
• C:\Users\<USERNAME>\AppData\Local\VirtualStore\Program
Files\ReNamer\Presets\*.rnp
• C:\Benutzer\<USERNAME>\AppData\... (for German version of Windows)
Manual Editing
69
Manual Editing
In addition to combining multiple rules, you can rename any file manually.
The following example explains the process:
1
In the Files pane, select the file to be manually renamed (click anywhere on its row).
2
To enter Edit mode, do any of the following:
1. Press F2
2. Right-click on the filename and select the Edit New Name option
3. Slow-click on the file-name.
ReName enters Edit mode. The New Name column shows the file name in a box, and the file's name is
highlighted.
Now you can:
•
Type a new name to replace the old name entirely.
•
Use left/right arrow keys to place your cursor anywhere in the name and add/delete/change a few
characters.
In this example, we will replace 2 with 3 (the effect is shown below).
3
To end the Edit mode, press ENTER (or click anywhere outside the edit box). The newly edited name is
shown as preview (the file is not renamed yet).
•
4
You can abort the renaming by pressing ESC.
To actually rename the file, click on the
button.
Note that manual renaming has a major limitation: it must be the last operation before renaming. Any further
Preview operation will discard your adjustments. If the Auto Preview is on, your changes will be discarded if you
press
button, or do something in the ReNamer GUI (such as adding/removing a file,
adding/removing/editing a rule).
This happens because manual renaming is not a rule; so its results cannot be passed on to the other rules for further
processing. The rules stack always start with the file's original name.
Examples
1
Example-1: Manual renaming is always lost if Preview button is pressed. If we press the Preview button, the
manual renaming is lost, and the rules in the Rule pane take over again!
In this example, we renamed the second file manually, and then pressed the Preview button. As a result, the
ALLCAPS rule acted on the original name (Name2) again, and converted it into NAME2.
Manual Editing
2
Example-2: Manual renaming may be lost when files are added
(if the Auto preview when new files are added mode is turned ON). In this example, the preview options are
set to refresh the preview whenever new files are added to the Files pane of ReNamer. So, if we add a new
file, ReNamer behaves as if we pressed the Preview button (and the manual renaming is lost).
So the net effect is same as the Example-1 (above).
Compare the three screenshots:
The first screenshot shows the effect of the Case Rule, which is set to convert the name to ALLCAPS. Both
file names are turned ALLCAPS.
The second screenshot shows that the file Name2 is manually renamed to Manual. (The ALLCAPS rule still
works on the first file.)
The third screenshot shows what happens when the New file is added to the Files pane: The auto preview
mode forces a refresh of the pane. As a result, the name of the second file is reset to its original name. Then
the ALLCAPS rule acts afresh on all three names, and turns all the three file names to ALLCAPS.
The net effect is as if the manual renaming was never done at all.
3
Example-3: The effect of manual renaming may be lost when you add a new rule
(if the Auto preview on change of rules configurations mode is turned ON). In this example, the preview
options are set to refresh the preview on any change to the rules.
The file was renamed manually, and then a single Case Rule was added to convert the names to ALLCAPS.
Notice that this rule actually ignored the manually given name (Name 3) and acted on the original name of
the file (Name2), and made it NAME2.
4
Example-4: Manual renaming works if done after all the rules are added (no matter what the AutoPreview
settings are). This is the reverse of the Example-3. The preview options are also set to refresh the preview on
any change to the rules. But this time the ALLCAPS (Case) rule was added first. As soon as it was added, It
acted on both files. The second file was manually renamed after that. So its name is changed from NAME2 to
Name 3.
To conclude, the effect of the manual renaming survived because it was done after the last Preview (triggered
by adding the rule in this case).
70
Analyze
Analyze
When you select the Analyze tool option (or press SHFT+A), ReNamer launches a window, where you can enter
any arbitrary text and apply rules entered in the Rules pane.
This is very useful to see the effect of the rules using dummy text (for example before using the Insert rule). It also
allows to check the positions of any character in the text just by pointing to it with keyboard or mouse. The
appropriate data is displayed in the status bar of the window.
The text may be a filename (or multiple filenames) loaded from Files pane or any text manually created by user.
Let us see an example.
I had already added a single Insert Rule in the Rules pane of ReNamer. It was set to insert "x" (without the quotes) at
the 3rd position.
Now I press SHFT+A.
A window pops up:
In this window, I have entered some arbitrary text to show the effect of the rule. Notice how x is added at the 3rd
character in each line.
In our example, I have moved the cursor to the 3rd position, and the status line at the bottom of the screenshot shows
this position. That reassures me that the rule does insert an x at position-3. (My renaming will happen as planned.)
Now I can close this window and go ahead and rename my files.
The options in the window are as follows:
71
Analyze
72
Line wrap
Wraps a line if it exceeds the window's width. (note that the window's width can be adjusted by dragging its right
border.)
Automatically apply
rules
You do not have to press the
button.
Apply rules for each line Applies the rule to each line separately.
Program settings
This appendix describes the settings that change ReNamer's behavior in various ways.
General settings
These settings are applicable to the ReNamer application.
Always on top (main
window only)
Keeps the ReNamer window above the other windows.
Remember last
position and size
ReNamer will retain the same size and position in the next session. You will not need to resize/re-position the ReNamer
window each time you start it.
Remember sorting
options (files table)
ReNamer will retain the file sorting order in the next session.
Save rules
configuration on exit,
load on start up
In the next session, ReNamer retains all rules that are currently loaded in the Rules pane. Useful if you use the same rules
every time.
This feature is useful when you are using the drag-and-drop method to add files from Windows Explorer. When you are
working in Windows Explorer, the ReNamer window does not vanish below the Windows Explorer window.
Program settings
73
Always show
non-main forms
centered
All windows and dialog boxes (except the main window) appear in the center of the ReNamer window. You still may shift
the new window, but when you close it and open again it will be opened in the center of ReNamer window. If the option is
deselected window would reopen in its old position.
Folders also have
extensions, process
them as such
Extension is considered to be whatever follows the last dot in the filename. Prior to v5.74.5 Beta a dot in the name of a
folder was also considered to identify an extension, hence, the Skip Extension option in rules also applied to folders. In
newer versions the extension in folders is no longer treated as such, however, this behavior can be changed with this
setting.
Use natural order
sorting algorithm
ReNamer has two different types of sorting algorithms:
Order
Natural
Example
Name1.ext
Remarks
Numbers are sorted in their natural order.
Name2.ext
Name10.ext
Name20.ext
Lexicographical
Name1.ext
Sorts like in a dictionary. All entries are sorted based on characters' positions, counted
Name10.ext from left.
Name2.ext
Name20.ext
If this option is selected, filenames are sorted in Natural order; otherwise they are sorted in Lexicographical order.
Preview settings
These settings are applicable only to the previewing.
Program settings
74
Autosize table on
change
Each column resizes automatically to accommodate the longest name in it.
Auto preview on
change of rules
configurations
Whenever a rule is added/deleted/edited, the preview refreshes automatically
Auto preview when
new files are added
Whenever a file is added, the preview refreshes automatically
Fix conflicting new
names on preview
If the new file names are going to conflict, then this option resolves the conflict by adding a suffix number in (n) format.
Validate new filenames Raises a warning if new filenames are not valid:
on preview
• There are duplicates in the New path column
• New path contains forbidden characters
• New path is already taken by an existing file
• New path exceeds maximum length (256 characters)
Real-time update of the If this option is selected, when you click the Preview button, files will be updated one-by-one and displayed in the table.
preview
During the processing, ReNamer continues to accept any user inputs (mouse/keyboard).
WARNING: This option allows you to use mouse/keyboard even when the previous rules are being processed. This
may lead to unpredictable behavior and consequences! Use this option with EXTREME CAUTION, only for cases
when some heavy processing is done on each file, for example: using HASH functions or other types of content
analysis.
If this option is deselected, when you click Preview button, ReNamer shows nothing till all files are processed; after
which all files are displayed at once. During the processing, ReNamer will stop accepting any user inputs
(mouse/keyboard). This mode is safe. For normal use, deselect this option!
Rename settings
These settings are applicable to the renaming process.
Program settings
75
ReNamer can boost your productivity by doing certain operations on its own. On the other hand, you may want to
have the flexibility of choosing your options each time. So this panel lets you decide how to strike a balance!
Display message on
successful rename
Deselect if you do not want a message each time.
Close program after
successful rename
Useful if you use ReNamer sparingly (rename once and close ReNamer.)
Clear rules list after
rename
Useful if you use a different set of rules each time. This option will clear off the Rules pane automatically.
Clear files table on
rename
Useful if you want to load another set of files for each new renaming.
(This setting is not applicable to the pop-up windows that show the error messages. Those windows are always shown.)
In case of problem, ReNamer stays open.
Note that even files that were not renamed in the last round will get cleared off. So, deselect this option if you tend to
rename your loaded files in 2-3 separate renaming operations.
NOTE: This will make Undo option unusable.
Clear renamed files on
rename
Clears off the files once you have finished renaming them.
Note that the files that were not renamed will remain behind, so that you can apply a new set of rules to them.
Note that the currently marked set of rules may not change some file names (for example, if you want to insert a string at
10th position, and we have some files with shorter file names.) Even in such cases, the files are considered to be renamed.
NOTE: This will make Undo option unusable.
Overwrite files with
new names
If there is a naming conflict as a result of renaming, the newly renamed files can overwrite the existing files with the same
names automatically.
Note that the name conflict can occur with a file that exists in the same folder, but which is NOT loaded in ReNamer.
Note also that multiple files from the same folder may be renamed in such a way that most of them get overwritten in
sequence. In the worst case, only the last file to be renamed will survive!
CAUTION: Your important files can be overwritten without your knowledge!
Must be successfully
confirmed by user
(Applicable only when Overwrite files with new names option is selected):
Selected
ReNamer will pop up confirmation dialog for every file that is to be overwritten. The old file will be
overwritten only if you confirm. (If the renamed file has no conflicts in its folder, ReNamer will rename it
without asking for permission.).
Deselected If a renamed file has the same name as an existing file, ReNamer will overwrite the old file silently.
CAUTION: Your important files can be overwritten without your knowledge!
Program settings
Meta tags settings
These settings are for meta-tags only.
Meta tag
support
Extracting meta-tags from files puts heavy demand on system resources. So if you do not need meta-tags, deselect this option. The
system will become more responsive (not only ReNamer, but other applications as well.).
Date format
Sets the date format for ReNamer's use. (The selected date format will be used for naming files.) See Date-time format used in Meta
tags to see available formats.
Preview
Tests the current date-time format, using current time.
76
Program settings
77
Miscellaneous settings
A general-purpose tab to provide all miscellaneous settings.
Register preset extension (*.rnp)
Associate the .rnp extension with ReNamer.
Add to folders context menu
in Windows Explorer, a ReNamer option is added to the context menu for folders.
Add to Send to context menu
in Windows Explorer, a ReNamer option is added to the Send to... context menu.
Change text of "Drag your files here"
The lower pane of ReNamer will show your custom text when empty
Change text of "Click here to add a rule" The upper pane of ReNamer will show your custom text when empty
Main Menu and Keyboard Shortcuts
78
Main Menu and Keyboard Shortcuts
In this appendix, all the menus and context menu options are described.
File menu
Menu option
New Project
Keyboard Shortcut
CTRL+N
What it does...
Create a new project. Clear all rules and files.
Undo Renaming SHFT+CTRL+Z
If possible, reverses the effect of the last renaming operation.
Paste Files
SHFT+CTRL+V
Pastes the selection of files from the clipboard into the Files pane.
(We assume that you have already copied some files into the clipboard)
Add files
F3
Starts a window to select specific file(s) from any folder and add them to the Files pane.
Add folders
F4
Starts a window to add all files from a chosen folder (behavior depends on Filter settings)
Preview
F5
Manual preview (not required if auto-preview mode is on)
Rename
F6
Renames the file with a name shown in the New Name (New Path) column in the Files pane.
Exit
ALT+F4
Closes the application
Settings menu
Menu option Keyboard Shortcut
All Settings
F8
What it does...
See Program settings for details.
General
Shows the General tab of the Settings dialog.
Preview
Shows the Preview tab of the Settings dialog.
Rename
Shows the Rename tab of the Settings dialog.
Meta tags
Shows the Meta Tags tab of the Settings dialog.
Miscellaneous
Shows the Miscellaneous tab of the Settings dialog.
Filters
CTRL+F
Changes the default behavior when adding folders.
Presets menu
Note: Presets are explained here
Menu
option
Keyboard
Shortcut
Load
What it does...
Opens a submenu with a list of all available presets. Click on a preset to load its rules in the Rules pane. If the preset
was saved with any filter settings, they will also be set.
Note: Be aware that all current rules will be lost. If you want to add a preset in the end of the current rules stack use
Append preset option from Preset Manager.
Save As...
CTRL+S
Saves the current preset.
Manage
CTRL+M
Opens the Preset Manager dialog.
Browse...
Browse to folder where presets are stored (via Windows Explorer).
Import...
Select presets from any folder in your file system, which you want to be copied to ReNamer's Presets folder.
Main Menu and Keyboard Shortcuts
79
The following window pops up:
Create
links
Shortcuts will be created for every available preset and placed in the selected folder.
•
•
If the Load with Preset option is selected, links will only open new ReNamer window with the preset loaded into
Rules pane and files that where sent to the link loaded into Files pane. Now you can edit rules, delete or add some
more rules, and finally rename the files.
If the preset contained any filter settings, they will be applied to the files that where sent to the link.
If the Rename with Preset option is selected, the linked preset will be loaded and all files which were sent to the
link will be automatically renamed.
For more information, please see Command Line usage.
WARNING: Be careful with the "Rename with Preset" option. It will rename files without asking for your
confirmation!
Rescan
Scans the preset folder for new presets. Useful if you have manually modified the content of the presets folder as you
don't have to restart ReNamer to use them.
Help menu
Menu
option
Help
(online)
Keyboard
Shortcut
F1
What it does...
Open online manual.
User
Manual
Opens "User Manual" file which is distributed with the application (PDF format).
History
Opens "History.txt" file which is distributed with the application. The file contains the list of changes for the
current and previous versions.
About
Alt+F1
Shows a dialog that provides you with general information about ReNamer, and contact details in case you are
facing any difficulties that are not covered in this manual.
A right click on the white header of the dialog will place ReNamer's version information to the clipboard. (Now
you can paste it into your posts at the forum.)
Menus for the Files Pane
80
Menus for the Files Pane
ReNamer has a menu bar between the Rules and Files panes
This appendix describes options available from this menu.
.
Files button
When you click on the
button, the following list pops up:
Analyze Name
Opens analysis window, and loads the names of the selected files into it.
Edit New Name F2
Starts manual editing of the selected filename.
Shell
Options for Windows shell operations.
Mark
Options for marking specific items.
Clear
Options for removing specific items from the Files pane.
Select
Options for selecting specific items.
Move
Options for moving specific items.
Remove selected items Del Remove selected items from the ReNamer's File pane.
(This command does not delete the items from the disk.)
This menu provides second-level options, as follows:
Shell submenu
Menus for the Files Pane
81
Open File
Enter
Open the selected file using its default associated application.
Open with
Notepad
Shift+Enter
Open the file with notepad. Useful when you want to see the raw data in the file. (When viewed this way, the file
will not be displayed in its original formatting. It may not be easily readable.)
Open operating Ctrl+Enter
folder
Launch Windows Explorer and open the folder where the selected file is located. Highlight (select) the file in it.
File properties
Alt+Enter
Display the properties of the selected file. Typically, file size, dates (created/modified/accessed), comments,
author, attributes (hidden, system, etc.)
Cut Files to
clipboard
Shift+Ctrl+X Cuts the selected file(s) to clipboard.
Note: If you paste these files in Windows Explorer, all files will be moved to one folder, no matter where they
were initially located.
Copy Files to
clipboard
Shift+Ctrl+C Copies selected file(s) to clipboard.
Note: If you paste these files in Windows Explorer, all files will be copied to one folder, no matter where they
were initially located.
Delete files to
Recycle Bin
Deletes the selected file(s) to Recycle Bin. (They can be recovered from the Recycle Bin.) Note that if the file is
too large for the Recycle Bin, Windows will warn you that it will not be put in Recycle Bin, but deleted
permanently. If you confirm, the file is deleted permanently.
There are 2 possible uses for Copy to clipboard and Cut to clipboard options:
• 3rd party application can retrieve that list of files from the clipboard (using Paste operation or Win API).
• Paste all files into a singe destination folder via Windows Explorer, even when files are scattered across different
directories.
Mark submenu
Note: Marking of files is explained here.
Mark Shift+M
Mark all selected files. If some files are already marked, they remain marked.
UnMark Shift+U
Unmark all selected files. If some files are already unmarked, they remain unmarked.
Invert Marking Ins Marked files become unmarked, and vice versa.
Mark only
changed
(Inc. Case)
Mark files that have been changed. Files that had just change of case (and nothing else) will also be marked.
("Change of case" means some letters are converted capital-to-small and/or small-to-capital)
Mark only
changed
(Exc. Case)
Mark files that have been changed, but do not consider changes of case.
("Change of case" means some letters are converted capital-to-small and/or small-to-capital)
Mark only selected Mark files that are selected. If some unselected files are already marked, they will be unmarked.
Menus for the Files Pane
Mark by Mask
Pops up a Mask window:
Specify a mask pattern. All files that match this mask will be marked.
You can enter multiple masks (separating them with semicolon). If a file matches any of these masks, it will be marked.
Clear submenu
Note: The term "Clear" means remove from Files pane of ReNamer.
Clear All
Clear all files loaded in the pane.
Clear Renamed
Clear all files which have been renamed just before this command. Note that even if some files are not affected by the rules,
they are still regarded as renamed successfully. Only files that failed to rename (those with an x mark) will remain in the pane.
Clear Failed
Only files that failed to rename (those with an x mark) will be cleared. All other files (including files whose names were not
altered by the rules) will remain in the Files pane.
Clear Valid
Clear files that have valid names after Preview (but haven't been renamed yet).
Clear Invalid
Clear files that got invalid (causing conflicts, empty or with forbidden characters etc.) names after Preview (but before
renaming).
Clear Marked
Clear all marked files.
Clear Not Marked Clear all files that are not marked.
Clear Not
Changed Ctrl+D
Clear all files that haven't been changed by the Preview. This also includes all files that have their New Name field empty (eg.
because they have been successfully renamed or haven't been previewed since last renaming operation).
82
Menus for the Files Pane
Select submenu
Note: Selection of files is explained here.
Select All Ctrl+A
All files in the pane will be selected.
Invert
Selection Ctrl+I
Selected files become deselected, and vice versa.
Select by Name
Length Ctrl+L
Pops up a window:
Specify the length of file name. Only files that exceed that length will be selected.
The length refers to the whole filename including dot and the extension.
Note: A typical application is to check if the file can be put on a CD/DVD. The maximum length allowed in ISO 9660-compliant
file-system is 64 characters. Longer file names are truncated when you burn a CD/DVD. It is difficult to correlate such files with
their originals. To avoid such problems, shorten the names before burning the CD/DVD.
Select by
Extension
Ctrl+E
Pops up a window:
Specify the extension (without the dot). All files having that extension will be selected.
You can enter multiple extensions (they must be separated by semicolons - not comma).
83
Menus for the Files Pane
84
Select by Mask Ctrl+M
Pops up this window:
Specify the mask. All files matching that pattern will be selected.
You can enter multiple masks (they must be separated by semicolons - not comma).
Move submenu
Up Ctrl+Up
Moves the selected file up. This is used to re-arrange files in the list. It is easier to use the keyboard shortcut
CTRL+UpArrow.
Down
Ctrl+Down
Moves the selected file down. This is used to re-arrange the files list. It is easier to use the keyboard shortcut
CTRL+DownArrow.
Filters menu
When you click on the
when you use the button, the Filters window pops up. It controls what gets added to the Files pane
button or Drag & Drop or Copy & Paste methods.
The options work as follows:
Menus for the Files Pane
85
Option
Effect
Add files within
folders
When this option is selected, ReNamer scans the selected folders iteratively (including its
subfolders), and loads all the files for renaming. If you want to rename only the folders
(and not their contents), UNTICK this option, and select the Add folders as files checkbox.
Add folders as
files
If this option is selected, ReNamer treats a folder just like a file (not as a container that
holds files and subfolders). So only the folder is loaded, and not the files in it. This is useful
for renaming the folder itself.
Include
subfolders
Loads contents from all subfolders recursively.
If this option is unselected, when you add a folder, its subfolders will be ignored.
Include hidden
items
To protect hidden items, deselect this option.
Include system
items
To protect files reserved for system (OS), deselect this option.
Skip root folders Works when the Add folders as files and Include subfolders options are selected. When it's
when added as
on, ReNamer adds all the subfolders but not the root folder itself.
files
Masks
All added files (or folders as files) must match specified mask(s). For example, if you enter
*.jpg;*.gif;*.png as masks, ReNamer will add only files with these extensions. Everything
else will be filtered out(not added to ReNamer).
Apply only to
the file name
Changes how the masks (see above) are applied. For example, suppose you have file
C:\Folder\File.ext. If this option is ON, only the filename part (File.ext) will be checked
against the mask(s). But if this option is OFF, the entire path (C:\Folder\File.ext) will be
checked against the mask(s).
Press Save to save changes.
Filters menu is also accessible from the Add Folder window. For details see Adding items using the 'Add Folders'
button section.
Export menu
When you click on the
button, the following list pops up:
Menus for the Files Pane
86
Export file paths and undo paths
Exports file paths and undo paths to the .csv (comma separated) or .txt (tab separated) file.
Export file paths and new names
Exports file paths and new names to the .csv (comma separated) or .txt (tab separated) file.
Import file paths and new names
Imports file paths and new names from the .csv (comma separated) or .txt (tab separated) file.
Import files from text-list or play-list
Imports file paths from the .txt/.log file (one file per line) or .m3u/.pls playlist.
Note: It will load file paths into Files pane only if the file really exists on your file system.
Export as batch renaming file (Full paths)
Export as batch renaming file (Only names)
Export new names to clipboard
Export new names to clipboard. One name per line.
Import new names from clipboard
Imports new names from clipboard. Every name should be placed in a new line.
If there is less lines in the clipboard text than files in Files pane last files won't be renamed.
If there is more lines in the clipboard text than files in Files pane, then last lines won't be used.
Export all columns to clipboard
Exports all columns to clipboard as a tab separated text.
Options menu
When you click on the
button, the following list pops up:
Autosize columns
Auto-size all columns, to accommodate the longest entry in each column.
Validate new
names
Check if the new names are valid.
Fix conflicting
new names
Add incremental numbers as suffixes to avoid conflicts in names. For example, if a new name for a file is Name1, and if such a
file already exists in the target folder, then a suffix (2) is added to the newly renamed file. If more than one files have such
name conflicts, ReNamer uses incremental numbers (i.e. (2), (3)...) as suffixes to make sure that each file gets a unique name.
Highlight changed
names
Usually you load files only because you want to change their names. Yet, sometimes, some files escape all the rules you have
loaded and remain unchanged. In such cases, you may want to know why that happened. ReNamer can highlight files that are
going to be changed. Now you can investigate the remaining files.
Note: Highlight changed names option works as a switch: it turns highlighting ON and OFF.
Tip: You can unmark the rules selectively and see the effect on the files. That will tell you which rules are working on which
files. Once your analysis is over, you can mark all rules.
Analyze sample
text
It opens the Analyze window. Thanks to that option you don't have to load files to the Files pane just to check if your rules
work as desired.
It is extremally useful when you want to help others on the forum.
•
•
•
Enter any text that looks like your target files, and see whether the rules work as desired on that text.
Edit the rules if the desired result is not achieved
Once you are satisfied with the rules, apply them on the real files or post the set of rules on the forum.
Note: Analyze sample text won't be any help if the rules base on the files properties (and not only on the filename). Analyze
tool won't be able eg. to extract Meta tag from the text in its window.
Apply rules to the
clipboard
When you choose this option your rules will be applied to the text in clipboard instead of files in the Files pane. This might be
useful eg. when working with word processors that don't support RegEx'es.
Menus for the Files Pane
Count marked and
selected files Alt
+I
87
It pops up a window like this
where Total stands for total number of files loaded into the Files pane, and Marked and Selected stand for number of marked
and selected files respectively.
Context Menus
This appendix describes context-sensitive menu options available by right-clicking in different parts of the ReNamer
window.
Context menus for the Rules pane
Action
Shortcut
Description
Add Rule
Ins
Add a new rule
Edit Rule
Enter
Edit the selected rule.
Duplicate
Rule
Shift+Ins
Duplicate the selected rule. Duplicated rule will appear jus below the oryginal rule.
Remove
Rule
Del
Remove the rule (see note below)
Remove All
Rules
Shift+Del
Remove all rules (see note below)
Move Up
Ctrl+Up
Move the rule upward in the stack
Move Down
Ctrl+Down Move the rule downward in the stack
Mark All
Shift+M
Mark all rules (all of them will be active on the marked files)
UnMark All
Shift+U
Unmark all rules (all rules become inactive). This is useful if you have added too many rules and getting strange
results. First, unmark all rules, so that none of them is active. And then add (mark) one rule at a time and see its
incremental effect on the files.
Note: If the rule is edited but not saved, then the changes are lost.
Context Menus
Context menus for the Files pane
Two different context menus appear in the Files pane, depending on where your mouse pointer is.
If you right-click on any of the column headers, you get a list of all available columns.
• Click on any entry to toggle that column on/off.
• Use Cancel sorting option to turn sorting off.
If you right-click anywhere inside the pane area, you get the same context menu as the menu you get by left-clicking
on the Files button of the Menu strip.
88
Date and Time Format
89
Date and Time Format
Date-Time format is mostly used by the meta tags. You can define almost any thinkable format for all tags which
extract a date-time field from the file. You can change it from within the Settings menu. Below is a list of variables
which you can use.
Variable
Description
d
Displays the day as a number without a leading zero (1-31).
dd
Displays the day as a number with a leading zero (01-31).
ddd
Displays the day as an abbreviation (Sun-Sat).
dddd
Displays the day as a full name (Sunday-Saturday).
e
Displays the year in the current period/era as a number without a leading zero (Japanese, Korean and Taiwanese locales only).
ee
Displays the year in the current period/era as a number with a leading zero (Japanese, Korean and Taiwanese locales only).
g
Displays the period/era as an abbreviation (Japanese and Taiwanese locales only).
gg
Displays the period/era as a full name. (Japanese and Taiwanese locales only).
m
Displays the month as a number without a leading zero (1-12). If the m specifier immediately follows an h or hh specifier then minute is
displayed.
mm
Displays the month as a number with a leading zero (01-12). If the mm specifier immediately follows an h or hh specifier then minute is
displayed.
mmm
Displays the month as an abbreviation (Jan-Dec) using the strings given by the ShortMonthNames global variable.
mmmm Displays the month as a full name (January-December) using the strings given by the LongMonthNames global variable.
yy
yyyy
Displays the year as a two-digit number (00-99).
Displays the year as a four-digit number (0000-9999).
h
Displays the hour without a leading zero (0-23).
hh
Displays the hour with a leading zero (00-23).
n
Displays the minute without a leading zero (0-59).
nn
Displays the minute with a leading zero (00-59).
s
Displays the second without a leading zero (0-59).
ss
Displays the second with a leading zero (00-59).
z
Displays the millisecond without a leading zero (0-999).
zzz
Displays the millisecond with a leading zero (000-999).
am/pm
a/p
"xx"
Uses the 12-hour clock for the preceding h or hh specifier, and displays "am" for any hour before noon, and "pm" for any hour after
noon. The am/pm specifier can use lower, upper, or mixed case, and the result is displayed accordingly.
Uses the 12-hour clock for the preceding h or hh specifier, and displays "a" for any hour before noon, and "p" for any hour after noon.
The a/p specifier can use lower, upper, or mixed case, and the result is displayed accordingly.
Characters enclosed in single or double quotes are displayed as-is, and the formatting is not applied to them. The only way to put d, m, y
or any other meaningful letter into your format.
For example, if we assume that the date is 25-th of October 2007 and the time is 16:59:00, then sample formats and
their outputs would be:
• dd-mm-yyyy hh.nn.ss format will produce 25-10-2007 16.59.00, which is an easily readable format for the date
and time.
Date and Time Format
90
• "It's" dddd, hh:nn:ss AM/PM format will produce It's Thursday, 4:59:00 PM, which is unsuitable for
filenames because of : forbidden character.
• yyyymmddhhnnss format will produce 20071025165900, which is ideal for serializing files because the filename
is relatively short, most probably unique, contains only digits, and also makes files automatically sorted in
chronological order.
Binary Signatures
ReNamer's Extension rule uses an internal binary signature base for detecting file extensions.
These signatures are in binary (hex) format and in files can be seen only using specialized applications, such as Hex
Editor XVI32 [1]. This list if up to date for ReNamer 5.50+ Beta 32, from 19 July 2010.
482B424544562050726F6475637473204C6963656E7365204B65792046696C650000000000000000000000000
KEY, Avira Product Key
FFFE570069006E0064006F0077007300200052006500670069007300740072007900200045006400690074006
REG, Registry Data File 5.00
41565020416E7469766972616C2044617461626173652E202863294B6173706572736B79204C6162203139393
AVC, Kaspersky Anti-Virus Database
00000002FFFFFFFFFFFFFFFF00000000000000000000000000000000000000000000000000000000000000000
MAC, MacPaint Bitmap Graphic
1A45DFA3934282886D6174726F736B61428781014285810118538067, MKV, Matroska
Video Stream
24464C3240282329205350535320444154412046494C45, SAV, SPSS Data
4C0000000114020000000000C000000000000046, LNK, Windows Shortcut
5B436C6F6E6543445D0D0A56657273696F6E3D, CCD, CloneCD Control File
000100005374616E6461726420414345204442, ACCDB, Access 2007 Database
File
000100005374616E64617264204A6574204442, MDB, Microsoft Access Database
4D454449412044455343524950544F52, MDS, Media Descriptor CD Image File
0006156100000002000004D200001000, DB, Netscape Navigator (v4) database
file
52494646????????43444441666D7420, CDA, Compact Disc Digital Audio
(CD-DA)
52494646????????415649204C495354, AVI, Windows Audio Video Interleave
52494646????????524D494464617461, RMI, Windows Musical Instrument
Digital Interface
52494646????????57415645666D7420, WAV, Waveform Audio
89504E470D0A1A0A0000000D49484452, PNG, Portable Network Graphics
50532D58204558450000000000000000, EXE, Playstation Executable
3026B2758E66CF11A6D900AA0062CE6C, WMA|WMV|ASF, Windows Media File
4F67675300020000000000000000, OGG, Ogg Vorbis Audio
??BE000000AB0000000000000000, WRI, Microsoft Write Document
0000000020000000FFFF0000FFFF, RES, Resource File
0000020006040600080000000000, WK1, 1-2-3 Spreadsheet
38425053000100000000000000, PSD, Photoshop Image
??????10123A001019040010, SIS, Symbian OS Installer File
414F4C204665656462616720, BAG, AOL Instant Messenger Buddy List
Binary Signatures
52494646????????41434F4E, ANI, Windows Animated Cursor
EFBBBF234558544D33550D0A, M3U8, MP3 Playlist (UTF-8)
110000005343410F000000, PF, Windows Prefetch
4D54686400000006000100, MID, Musical Instrument Digital Interface
(MIDI)
5B6175746F72756E5D0D0A, INF, Autorun File
64383A616E6E6F756E6365, TORRENT, BitTorrent Metainfo File
504B0304140008000800, JAR, Java Archive
424547494E3A564D5347, VMG, Nokia Text Message
5B706C61796C6973745D, PLS, Winamp Playlist
2E524D460000001200, RM, RealMedia Streaming Media
67696D702078636620, GZ, GIMP Image
234558544D33550D0A, M3U, MP3 Playlist
D0CF11E0A1B11AE1, DOC|PPT|XLS, Microsoft Office Document
5245474544495434, REG, Windows Registry Data
300000004C664C65, EVT, Windows NT/2000 Event Viewer Log
4D53434600000000, CAB, Microsoft Cabinet File
????????6D6F6F76, MOV, QuickTime Movie
FF4B455942202020, SYS, Keyboard Driver
255044462D312E, PDF, Adobe Portable Document Format
526172211A0700, RAR, WinRAR Compressed Archive
000001BA210001, MPG, MPEG 1 System Stream
52454745444954, REG, Registry Data File
377ABCAF271C, 7Z, 7-Zip Compressed Archive
AC9EBD8F0000, QDF, Quicken Data
D7CDC69A0000, WMF, Windows Metafile
010009000003, WMF, Windows 3.x Metafile
4A4152435300, JAR, JARCS Compressed Archive
424547494E3A, VCF, vCard File
2E7261FD00, RA, RealMedia Streaming Media
7B5C727466, RTF, Rich Text Format File
000001BA44, MPG, ProgDVBR MPEG2 Video
464F524D00, AIFF, Audio Interchange File
49735A21, ISZ, UltraISO ISO Zipped Format
4B4C7377, KEY, Kaspersky Anti-Virus Key
4D502B07, MPC, Musepack Audio
93B20000, LNG, SourceEdit Language Definition
DF0000?F, DCU, Delphi Compiled Unit
00000100, ICO, Windows Icon
01000000, EMF, Extended (Enhanced) Windows Metafile Format
CFAD12FE, DBX, Outlook Express E-mail Folder
47494638, GIF, Graphic Interchange Format
49492A00, TIF, Tagged Image Format
4D4D002A, TIF, Tagged Image Format
00000200, CUR, Windows Cursor
C5D0D3C6, EPS, Encapsulated PostScript
3F5F0300, HLP, Windows Help File
91
Binary Signatures
49536328, CAB, Install Shield v5.x or 6.x Compressed File
504B0304, ZIP, ZIP Compressed Archive
E3828596, PWL, Windows Password List
EDABEEDB, RPM, RedHat Package Manager
50533244, SYS, PlayStation 2 Icon
FF575043, WPD, WordPerfect Document
464C5601, FLV, Flash Video
000001, MPG, MPEG Video File
465753, SWF, Macromedia Flash Format
435753, SWF, Shockwave Flash (v5+)
FFD8FF, JPG, JPEG/JIFF Image
1F8B08, GZ, GZip Compressed Archive
1F9D90, Z, UNIX Compressed Archive
494433, MP3, MP3 Audio
FFFB, MP3, MP3 Audio
FFFA, MP3, MP3 Audio
4D5A, EXE|COM|DLL|SYS, Windows Executable
424D, BMP, Windows OS/2 Bitmap Graphics
9501, SKR, PGP Private Keyring
9901, PKR, PGP Public Keyring
For more information regarding known file signatures look here:
•
•
•
•
http://mark0.net/soft-trid-e.html (TrID)
http://filext.com/
http://file-extension.net/seeker/
http://www.garykessler.net/library/file_sigs.html
References
[1] http:/ / www. chmaas. handshake. de/ delphi/ freeware/ xvi32/ xvi32. htm
92
Meta Tags
93
Meta Tags
Meta Tags allow users to extract meta information associated with files and use it for renaming. ReNamer supports a
wide range of built-in meta tags, while 3rd party tools can be used for extracting tags which are currently not
supported directly.
There are two different ways for using the built-in meta tags:
• Using Insert, Replace or Rearrange rule to insert meta data directly into the filename,
• Using CalculateMetaTag function in PascalScript to do more complex manipulations with the meta data.
Editing Meta Tags
ReNamer is a file renaming tool, not a meta tag editing tool. ReNamer does not edit meta tags and this feature will
never be supported.
Most of meta tags (e.g. ID3, EXIF) are not part of the names of the files, instead they are contained inside certain
files. To edit meta tags, please use a suitable meta tag editor such as mp3BookHelper [1], mp3Tag [2] or TagScanner
[3]
(for various tags in digital audio files) or PhotoME [4] (for EXIF tags).
Checksum-based tags (MD5, SHA1, CRC32) are non-editable: They are calculated by the system from the contents
of the file. You can use them to check the integrity of any file using software like Exactfile [5].
Extracting Meta Tags with 3rd party tools
There are 3rd party tools which let extract meta data from various file formats for which ReNamer does not have a
built-in support. In such cases the output of these tools can be integrated and used within ReNamer with a help of
PascalScript rule.
Sample scripts which demonstrate the use of this method can be found in the Scripts section.
Here is list of some 3rd party tools which can be used for extracting meta data: ExifTool
MediaInfo [9]
List of built-in Meta Tags
Note: The list of meta tags is taken from ReNamer 5.73.2 Beta.
Tag
Description
Date_Now
Current Date
File_SizeBytes
Size of file in bytes
File_SizeKB
Size of file in KB
File_SizeMB
Size of file in MB
File_DateCreated
File created date
File_DateModified
File last modified date
File_FilePath
Full path of the file
File_FileName
Full name of the file
File_BaseName
Base name of the file
File_Extension
Extension of the file
File_FolderName
Name of the parent folder
File_DOSName
Short name in the 8.3 format
[6]
, FFmpeg
[7]
, Exiv2
[8]
,
Meta Tags
94
ID3_Artist
ID3 Artist
ID3_Title
ID3 Title
ID3_Album
ID3 Album
ID3_AlbumArtist
ID3 Album Artist
ID3_Year
ID3 Year
ID3_Genre
ID3 Genre
ID3_TrackNo
ID3 Track Number
ID3_PartOfSet
ID3 Part Of Set
WMA_Artist
WMA Artist
WMA_Title
WMA Title
WMA_Album
WMA Album
WMA_Year
WMA Year
WMA_Genre
WMA Genre
WMA_TrackNo
WMA Track Number
FLAC_Artist
FLAC Artist
FLAC_Title
FLAC Title
FLAC_Album
FLAC Album
FLAC_Year
FLAC Year
FLAC_Genre
FLAC Genre
FLAC_TrackNo
FLAC Track Number
Audio_Duration
Duration of an Audio file
Audio_DurationMins
Duration of an Audio file in minutes
Audio_DurationSecs
Duration of an Audio file in seconds
HTML_Title
Title tag extracted from an HTML file
EXIF_Date
EXIF Original Date
EXIF_Model
EXIF Camera Model
EXIF_Make
EXIF Camera Make
EXIF_Description
EXIF Image Description
IPTC_ObjectName
IPTC Object Name
IPTC_Caption
IPTC Image Caption
IPTC_Headline
IPTC Image Headline
IPTC_Location
IPTC Location Name
IPTC_City
IPTC City
TIFF_Date
TIFF Date
TIFF_Model
TIFF Model
TIFF_Make
TIFF Make
TIFF_Description
TIFF Description
GIF_Frames
Number of frames in GIF file
Image_AspectRatio
Aspect Ratio of an image
Meta Tags
95
Image_WidthAndHeight
Width and Height of an image in pixels
Image_Width
Width of an image in pixels
Image_Height
Height of an image in pixels
Image_Pixels
Amount of pixels in the image
Document_Title
Summary Information: Title
Document_Subject
Summary Information: Subject
Document_Author
Summary Information: Author
Document_PageCount
Summary Information: Number of Pages
Hash_CRC32
CRC32 Checksum of a file
Hash_MD5
MD5 Hash of a file
Hash_SHA1
SHA1 Hash of a file
Hash_SHA256
SHA256 Hash of a file
Hash_SHA512
SHA512 Hash of a file
Email_DateSent
Email date sent
Email_Subject
Email subject
Email_Sender
Email sender
Outlook_ID
Outlook Message: ID
Outlook_DateSent
Outlook Message: Date Sent
Outlook_DateHeader
Outlook Message: Date Header Value
Outlook_Subject
Outlook Message: Subject
Outlook_Sender
Outlook Message: Sender
Outlook_Body
Outlook Message: Body Text
AVI_FramesPerSecond
AVI Frames per Second
AVI_TotalFrames
AVI Total amount of Frames
AVI_Duration
AVI Duration in H:M:S format
AVI_DurationMins
AVI Duration in Minutes
AVI_DurationSecs
AVI Duration in Seconds
AVI_WidthAndHeight
AVI Dimensions in WxH format
AVI_Width
AVI Width in Pixels
AVI_Height
AVI Height in Pixels
AVI_VideoCodec
AVI Video Codec
BinarySign_Extension
Binary File Signature: Extension
BinarySign_Description
Binary File Information: Description
VersionInfo_FileVersion
Version Information: File Version
VersionInfo_ProductVersion Version Information: Product Version
VersionInfo_Product
Version Information: Product
VersionInfo_Company
Version Information: Company
VersionInfo_Copyright
Version Information: Copyright
VersionInfo_Description
Version Information: Description
Meta Tags
96
VersionInfo_Comments
Version Information: Comments
References
[1]
[2]
[3]
[4]
[5]
[6]
[7]
[8]
[9]
http:/ / mp3bookhelper. sourceforge. net/
http:/ / www. mp3tag. de/ en/
http:/ / www. xdlab. ru/ en/
http:/ / www. photome. de/
http:/ / www. exactfile. com/
http:/ / www. sno. phy. queensu. ca/ ~phil/ exiftool/
http:/ / www. ffmpeg. org/
http:/ / www. exiv2. org/
http:/ / mediaarea. net/ en/ MediaInfo
Analyze
When you select the Analyze tool option (or press SHFT+A), ReNamer launches a window, where you can enter
any arbitrary text and apply rules entered in the Rules pane.
This is very useful to see the effect of the rules using dummy text (for example before using the Insert rule). It also
allows to check the positions of any character in the text just by pointing to it with keyboard or mouse. The
appropriate data is displayed in the status bar of the window.
The text may be a filename (or multiple filenames) loaded from Files pane or any text manually created by user.
Let us see an example.
I had already added a single Insert Rule in the Rules pane of ReNamer. It was set to insert "x" (without the quotes) at
the 3rd position.
Now I press SHFT+A.
A window pops up:
Analyze
97
In this window, I have entered some arbitrary text to show the effect of the rule. Notice how x is added at the 3rd
character in each line.
In our example, I have moved the cursor to the 3rd position, and the status line at the bottom of the screenshot shows
this position. That reassures me that the rule does insert an x at position-3. (My renaming will happen as planned.)
Now I can close this window and go ahead and rename my files.
The options in the window are as follows:
Line wrap
Automatically apply
rules
Wraps a line if it exceeds the window's width. (note that the window's width can be adjusted by dragging its right
border.)
You do not have to press the
Apply rules for each line Applies the rule to each line separately.
button.
Regular Expressions
98
Regular Expressions
Introduction
Regular Expressions (RegEx) allow you to use precise search conditions, such as:
• Your search string must be located at the beginning (or at the end) of a line,
• The specified text must occur n times, etc.
RegEx expressions use $ . ^ { [ ( | ) * + ? \ characters (called metacharacters) in various combinations to specify all
these conditions.The search engine interprets these metacharacters, rather than finding a literal match for them.
The RegEx search expression is called a "RegEx pattern", because a single expression can match a large number of
actual text that has the specified pattern. For example, the RegEx pattern b?t matches with bat, bet, bit, bot and but,
etc.
Remember that RegEx strings are case-sensitive (The words cat, CAT, cAt, Cat, caT, cAT, CAt and CaT are not
equivalent).
So our RegEx pattern b?t also matches with bAt, bEt, bIt, bOt and bUt, etc.
Also, note that even the digits (0-9) are "numeric characters" for RegEx.
So our RegEx pattern b?t also matches with b5t, b7t, etc.
In this section, the RegEx expressions (patterns) are shown in bold orange. The target strings (which are compared
with the RegEx expression for a possible match) are shown in bold black. A part of the target text is color-coded to
provide a clue as to why a certain part matches (green color), or does not match (red color)
Simple (literal) matches
When the search string does not contain any metacharacters, the RegEx engine works like "normal" search. (it tries
to find an exact copy of the search string.) (This is also known as "literal match").
If you want to find a literal match for a metacharacter, put a backslash \ before it. (The \ character is called "escape
character", because it lets the metacharacter escape from its special duty, and lets it act as a normal character. Its
combination with a metacharacter is called "escape sequence").
For example, metacharacter ^ matches the beginning of string, but \^ matches the character ^.
Note that the RegEx pattern \\ matches the character \.
RegEx pattern
Matches
Remarks
foobar
foobar
This RegEx pattern does not contain any metacharacters; so all characters are matched literally.
\^FooBarPtr
^FooBarPtr The \^ escape sequence searches for the character ^ literally .
Escape sequences
We already saw one use of escape sequence (above).
Specific escape sequences are interpreted as special conditions, as listed below.
Regular Expressions
99
RegEx pattern
\xnn
matches
Character represented by the hex code nn
\x{nnnn}
two bytes char with hex code nnnn (unicode)
\t
tab (HT/TAB), same as \x09 (Hex 09)
\n
new line (NL), same as \x0a (Hex 0a)
\r
carriage return (CR), same as \x0d (Hex 0d)
\f
form feed (FF), same as \x0c (Hex 0c)
foo\x20bar
matches foo bar (note the space in the middle), but does not match foobar
\tfoobar
matches foobar preceded by a tab (the tab is needed for the match)
Note that the tab, new line, carriage return, and form feed are known as "white spaces". But RegEx can distinguish
between them. This allows you to make high-precision searches.
Character Classes
A character class is a list of characters in square brackets [], which will match any one (and only one-) character from
the list.
Note that:
• The characters are not separated with a comma or a space.
• If you repeat any character in the list, it is considered only once (duplicates are ignored).
• A hyphen - is used to indicate range of characters.
RegEx Pattern
[abdef]
Remarks
Matches d, e, or f (only one character), but no other characters
[c-m]
Matches any one (and only one) of the small alphabetical characters, from c to m
[G-J]
Matches any one (and only one) of the capital alphabetical characters from G to J
[a-zA-Z]
[5-8]
[\n-\x0D]
Matches any one (and only one) of the alphabetical characters (capital or small)
Matches any one (and only one) of numerical characters from 5 to 8
Matches any one (and only one) of #10, #11, #12 or #13
(Note the use of escape sequence inside a class)
There are some special conditions:
• If you do not want any of the characters in the specified class, then place ^ at the very beginning of the list
(RegEx interprets that as "none of the characters listed in this class").
• If you want [ or ] itself to be a member of a class, put it at the start or end of the list, or create a escape sequence
(by putting \ before it).
Regular Expressions
100
RegEx Pattern
Remarks
[-az]
matches a, z, and (since – is put at the beginning, the escape sequence is not needed)
[a\-z]
matches a, z, and (since – is not at the beginning/end, the escape sequence is needed)
[^0-9]
matches any non-digit character
[]-a]
matches any character from ] to a.
(since ] is at the beginning, the escape sequence is not needed)
foob[aeiou]r
Matches with foobar, foober, etc. but not foobbr, foobcr, etc.
foob[^aeiou]r
Matches with foobbr, foobcr etc. but not foobar, foober, etc.
Predefined Classes
Some of the character classes are used so often that RegEx has predefined escape sequences to represent them.
RegEx Pattern
Remarks
\w
an alphanumeric character, including an underscore (_)
\W
a non-alphanumeric character
\d
a numeric character
\D
a non-numeric character
\s
any space (same as the [ \t\n\r\f] class)
\S
a non space
.
any character in line (the symbol is just a dot)
Notice that the capitalized letter is used to negate (for example, compare \w with \W)
Word/Text Boundaries
A word boundary (\b) is a spot between two characters that has a \w on one side of it and a \W on the other side of it
(in either order), counting the imaginary characters off the beginning and end of the string as matching a \W.
RegEx Pattern
Remarks
\b
word boundary
\B
not word boundary
\A
start of text (^ is an alternative)
\Z
end of text ($ is an alternative)
These markers are combined with the search string to specify where exactly you want the search string to be. For
example, \bhis\b will search for a whole word his, but will ignore this, history or whistle.
Regular Expressions
101
Iterators (Quantifiers)
Iterators (quantifiers) are meta-characters that specify how many times the preceding expression has to repeat, A
typical example is to find a 3-to-5 digit number.
RegEx newbies often place the iterators after the character that needs to repeat. Just remember that RegEx syntax is
exact opposite of the usual English syntax. So, instead of "four dogs", we would have to say "dogs four",
RegEx-style.
Iterators can be 'Greedy' or 'Non-Greedy'. Greedy means the expression grabs as much matching text as possible. In
contrast, the non-greedy expression tries to match as little as possible.
For example,
• when b+ (a greedy expression) is applied to string abbbbc, it returns bbbb,
• but when b+? (a non-greedy expression) is applied to abbbbc, it returns only b.
Note that a ? attached to a greedy expression makes it non-greedy.
RegEx pattern
Remarks
Greedy?
Remarks
*
zero or more
Yes
equivalent to {0,}
+
one or more
Yes
equivalent to {1,}
?
zero or one
equivalent to {0,1}
{n}
exactly n times
Yes
{n,}
at least n times
Yes
at least n but not more than m times
Yes
*?
zero or more
No
equivalent to {0,}?
+?
one or more
No
equivalent to {1,}?
??
zero or one
No
equivalent to {0,1}?
{n}?
exactly n times
No
{n,}?
at least n times
No
at least n but not more than m times
No
{n,m}
{n,m}?
Let us see some examples:
RegEx pattern
Remarks
foob.*r
matches foobar, foobalkjdflkj9r and foobr
foob.+r
matches foobar, foobalkjdflkj9r but not foobr
foob.?r
matches foobar, foobbr and foobr but not foobalkj9r
fooba{2}r
matches foobaar
fooba{2,}r
matches foobaar, foobaaar, foobaaaar etc. but not foobar
fooba{2,3}r
matches foobaar, or foobaaar but not foobaaaar or foobar
Regular Expressions
102
Alternatives
A RegEx expression can have multiple alternative characters or subexpressions. The metacharacter | is used to
separate the alternatives.
For example, fee|fie|foe will match with fee, fie, or foe in the target string.
It is difficult to understand where each alternative starts and ends. This is why it is a common practice to include
alternatives in parentheses, to make it easier to understand.
For example, fee|fie|foe can be written as f(e|i|o)e, to make it easier to understand.
Alternatives are tried from left to right, so the first alternative found for which the entire expression matches, is the
one that is chosen. For example, when matching foo|foot against barefoot, only the foo part will match, because that
is the first alternative tried, and it successfully matches the target string. (This is important when you are capturing
matched text using parentheses.)
RegEx Pattern
foo(bar|foo)
Remarks
matches foobar or foofoo
Also remember that alternatives cannot be used inside a character class (square brackets), because | is interpreted as a
literal within []. That means [fee|fie|foe] is same as [feio|]. (The other characters are treated as duplicates, and
ignored).
Subexpressions
Parts of any RegEx pattern can be enclosed in brackets (), just like using brackets in a mathematics formula. Each
part that is enclosed in brackets is called a "subexpression".
The brackets serve two main purposes:
• Better readability, as in the mathematical formula a+(b+c).
• Make a functional group, as in the mathematical formula a(b+c). This group is evaluated first.
Let us see some examples:
RegEx Pattern
Remarks
(fee)|(fie)|(foe) Much better readability than the equivalent RegEx pattern fee|fie|foe.
(foobar){2,3}
foobar{2,3}
foob([0-9]|a+)r
Matches with the entire enclosed string foobar repeated 2 or 3 times. (i.e., matches with foobarfoobar or
foobarfoobarfoobar)
(The iterator acts on the entire subexpression. Compare with the example below!)
Matches with fooba followed by the character r repeated 2 or 3 times.
(i.e., matches with foobarr or foobarrr) (The iterator acts only on the last character.)
matches only the character foob0r, foob1r, foobar, foobaar, foobaaaar, etc.
(The subexpression is evaluated first.)
Regular Expressions
Backreferences
You must have told (or heard-) jokes like this one:
"Two guys walk in a bar. The first guy says.... Then the second guy replies....".
Then you are already familiar with backreferences!
A "backreference" is a numbered reference to a previously mentioned thing.
RegEx also has backreferences. Let us understand how backreferences are defined in RegEx.
The RegEx engine tries to find text that matches the whole RegEx pattern. If a matching text is found, the RegEx
engine identifies the matching text for each of the subexpressions in the pattern.
At this stage, the RegEx engine gives numbers to these matching parts:
• The text that matches the entire RegEx expression takes the number '0'.
• The text matching any subexpression is given a number based on the position of that subexpression inside the
pattern. In other words, text matching the nth subexpression will take the number 'n'.
Now we use those numbers to refer to the entire pattern and/or subexpressions. (That is why these numbers are
called "backreference".)
The backreference to the nth subexpression is written as \n.
The backreferences can be used to compose the RegEx pattern itself, as shown below:
(.)\1+
matches aaaa and cc (any single character that is repeated twice or more)
(.+)\1+ matches aaaa, cc, abababab, 123123 (a set of one or more characters, repeated twice or more)
(The character-sets are alternately colored blue and pink for easy identification. Observe how a RegEx pattern can match quite different
text!)
Substitution of text using backreference
The backreferences are also used in find-and-replace operations, to re-assemble new text from old.
• The expressions \1 through \9 serve as backreferences to the subexpressions found in the RegEx pattern. The
expression \0 is used to represent the text that matches the whole RegEx pattern. These are used in the "find" part
of the operation.
• The expressions $1 through $9 represent the actual text that matches the respective subexpressions. These are
used in the "replace" part of the operation.
• The expressions $0 refers to the whole original name. Note: it is not necessary to enclosed them in round brackets
() for this use, $0 is just there.
The replacement text is typically a combination of• The text that matched the subexpressions, and
• Some new text.
Note that the RegEx pattern may have some parts that are not enclosed in (). (In other words, it may have parts that
are not subexpressions.) Such parts are not used in the replacement text.
Here are some "find-and-replace" examples:
103
Regular Expressions
104
Expression
Replace
Description
(.*) (.*)
$2, $1
Switch two words around and put a comma after the resulting first word. Example: if input string is "John
Smith", then output will be "Smith, John". Notice that the replacement text also has additional literal text in
the middle (comma and space).
\b(\d{2})-(\d{2})-(\d{4})\b $3-$2-$1 Find date sequences in dd-mm-yyyy format and reverse them into yyyy-mm-dd format.
(e.g. 25-10-2007 is converted to 2007-10-25). Note: This is not a very robust example, because \d can
represent any digit in range of 0-9. That means sequences like 99-99-9999 also will match this pattern,
resulting in a problem. This in fact shows that you need to be careful with RegEx patterns!
\[.*?\]
Remove the contents of the [...] (square brackets), and the brackets too.
(Replace with nothing means deleting.)
Limitations for binary data
One of the known limitation of RegEx engine when working with binary data is that the input string is not searched
beyond the first occurrence of NULL character (\x00). This would not affect file names because there are simply no
NULL characters in them, but may affect parsing of binary content of files when working in Pascal Script for
example.
External links
• www.regular-expressions.info [1]
• Excellent site devoted to regular expressions. Nicely structured and with many easy-to-understand examples.
• www.regexpstudio.com [1]
• Freeware regular expressions library for Delphi.
References
[1] http:/ / www. regular-expressions. info/
Command Line Mode
105
Command Line Mode
ReNamer supports several command line parameters. The general format is as follows:
"ReNamer.exe" <Parameters>
Please note that multiple parameter types cannot be combined together.
Short description
Parameter
Description
<files>
Paths to files and folders which will be automatically added to the program. Program's default settings will be used for adding
folders. Masked paths can also be used, e.g. "C:\Pictures\*.jpg"
/preset
<preset>
<files>
Load preset specified by a preset name or a full path. Optionally, paths to files/folders can be appended to the end on this
command, and they will be automatically added to the program.
/rename
<preset>
<files>
Load preset specified by a preset name or a full path and proceed with Preview and Rename actions. Upon successful Preview and
Rename operations, program will close automatically. Otherwise, graphical user interface will become visible and an appropriate
error message will be displayed. Paths to files/folders can be appended to the end on this command, and they will be automatically
added to the program.
/enqueue
<files>
Add following files/folders to already running instance of the program. If no running instance is found - launch a new one.
/list <files>
Load a list of files/folders from the following list files.
/uninstall
Remove all manually turned on associations with the program, e.g. presets association. For advanced users only!
Examples:
• "ReNamer.exe" /enqueue "C:\Folder" "C:\Pictures\*.jpg"
This command will add to already running instance of the program contents of folder "C:\Folder" (depending on
the default settings) and all *.JPG files from folder "C:\Pictures".
• "ReNamer.exe" /preset "MyRules" "C:\Folder"
This command will launch a new instance of the program, will load the preset with the name "MyRules", and will
add contents of folder "C:\Folder" (depending on the default settings).
• "ReNamer.exe" /rename "MyRules" "C:\Folder"
This command will launch a new instance of the program, will load the preset with the name "MyRules", will add
contents of folder "C:\Folder" (depending on the default settings), and will execute Preview and Rename
operations (program will close upon successful completion of all operations).
• "ReNamer.exe" /list "List1.txt" "List2.txt"
Where "List1.txt" and "List2.txt" are lists of files (one per line), with absolute or relative paths (relative to the list
file). The contained paths will be loaded into ReNamer.
Extended description
Command Line Mode
106
Parameters
<files>
Description
Launch ReNamer and add all files to the Files pane. You will have to finish the rest of the steps yourself: add rules, preview the
items and rename them. While composing the command, replace <files> with the absolute paths to files and folders to be
renamed. Use a space to separate the entries in the list.
•
•
•
Even if a Renamer window is already running, this command will always launch a new window.
When adding folders, ReNamer's Filter settings will be used.
Masked paths can also be used, e.g. "C:\Pictures\*.jpg"
Example: "ReNamer.exe" "C:\Folder" "C:\Pictures\*.jpg"
•
This command will launch ReNamer, and add contents of folder "C:\Folder" (depending on the Filter settings) and all *.JPG
files from folder "C:\Pictures" to its Files pane. Now add rules, preview the items and rename them.
Note: This explanation applies to all the commands given below wherever <files> parameter is used.
/preset
<preset>
<files>
Launch ReNamer and load the preset specified by a preset name or a full path to the preset file. (The /preset part is a literal enter it just as shown.) You will have to finish the rest of the steps yourself: preview the items and rename them.
•
The <files> parameter (explained above) is optional.
Example: "ReNamer.exe" /preset "MyRules" "C:\Folder"
•
/rename
<preset>
<files>
This command will launch a new ReNamer window, load the preset with the name "MyRules", and add contents of folder
"C:\Folder" to the Files pane (depending on the Filter settings). You can add even more files and folders. Now preview the
items and rename them.
Launch ReNamer, load preset specified by a preset name or a full path to the preset file, add the files and folders listed at the end
on this command line, and then proceed with Preview and Rename actions. (The /rename part is a literal - enter it just as
shown.)
ReNamer's behavior changes basing on whether there are any problems during renaming.
•
•
If the Preview and Rename operations are successful, ReNamer window will be closed automatically.
If there are any errors, ReNamer's main window will stay open and an appropriate error message will be displayed.
Example: "ReNamer.exe" /rename "MyRules" "C:\Folder"
•
•
/enqueue
<files>
This command will launch a new ReNamer window, load the preset with the name "MyRules", add contents of folder
"C:\Folder" to the Files pane (depending on the Filter settings), and execute preview and rename operations.
The ReNamer window will be closed if the renaming is successful. But if there are any errors in preview/renaming, the
window will stay open and display the error message. You will have to take the appropriate action and then finish the
renaming.
Add the listed files/folders to an already running instance of ReNamer. If no running instance is found, launch a new one. (The
/enqueue part is a literal - enter it just as shown.)
Example: "ReNamer.exe" /enqueue "C:\Folder" "C:\Pictures\*.jpg"
•
•
/list <files>
This command will check if a ReNamer window is already running. If it is found, it will add the contents of folder
"C:\Folder" to the Files pane (depending on the Filter settings) and all *.JPG files from folder "C:\Pictures". You can add
even more files and folders. Now you will have to add rules, preview the items and rename them.
If ReNamer is not already running, this command will launch new ReNamer instance and folllow the process described
above.
Load a list of files/folders from the list files that follow the command. (The /list part is a literal - enter it just as shown.)
•
•
A list file is a text file that contains a list of filepaths (one file per line).
The paths can be absolute or relative (when relative path is used, the reference is the list file and not the ReNamer
executable).
Example: "ReNamer.exe" /list "List1.txt" "List2.txt"
•
/uninstall
The "List1.txt" and "List2.txt" are two text files. Each list file contains a list of files, which are listed in the form of absolute
or relative paths. The command loads files listed in List1.txt and List2.txt into the Files pane of ReNamer.
Remove all manually turned on associations with the program, e.g. presets association. (The /uninstall part is a literal - enter it
just as shown.)
Example: "ReNamer.exe" /uninstall
Command Line Mode
107
The examples shown above do not include the full path to "ReNamer.exe" as it can differ between installations. To
make these commands work on your computer you have a choice of either:
1. Add the path of the ReNamer executable to the Windows PATH environment variable. After that, you can use
the commands as shown above.
2. Use the full path to the ReNamer executable in the command line, e.g. "C:\Tools\ReNamer\ReNamer.exe" /list
"List1.txt" "List2.txt".
Tricks with command line
You can exploit the command line in two different ways:
Application
Launch ReNamer with
options
How
Normally, you launch ReNamer from the Quick Launch bar. At such times, it starts without any rules. But you can
launch ReNamer with any of the parameters shown in the table above.
Here is the trick:
1.
2.
3.
4.
Right-click on the ReNamer icon (typically located on Desktop or in the Quick Launch Bar).
A menu pops up. Select the last option ("Properties"). A window pops up.
Select the Shortcut tab. In the Target input box, enter the command line you want.
Press OK.
From now on, whenever you click on the icon, ReNamer will be launched with all the options you've selected.
Tip: You can create multiple copies of the icons in your Quick Launch Bar, Desktop or Menu START, and then assign
a different command line to each icon.
Launch ReNamer from Many applications allow you to launch Windows commands. In such cases, you can select different files in that
other applications
application and then invoke ReNamer from the command line mode. This will allow you to rename selected files directly,
without having to add them to ReNamer's Files pane first.
Sorting Files
108
Sorting Files
The order of items in the Files pane is important in two different cases:
1. If you want to rename folders and their contents at once.
2. If you want to give serial number to the file names by using the Serialize Rule
ReNamer has two different ways to sort the items:
• Manual sorting (one-time sorting);
• Automatic sorting (items are always kept sorted, newly added items get sorted automatically).
Manual sorting
To sort the items manually, select a group of items and use the files table context menu to move items up or down
the list. Alternatively, you can drag the selection around the table using the mouse.
This is strictly one-time sorting. Newly added items will be placed at the end of the current list, in the order in which
they are added.
Automatic sorting
To enable automatic sorting mode, left-click on the column headers of the Files pane. Items will be sorted by that
column. Clicking on the same column again toggles the sorting direction. When automatic sorting mode is active, a
(ascending order) or (descending order) appears in the column-header. Two examples are shown below.
Sorted by Name in ascending order
Sorted by Created Date in descending order
ReNamer allows you to sort files by any of the available columns. The default screen does not show all of these
available columns. To see them, right-click on the column headers. A context menu shows the full list of available
columns. Click on any row to toggle that column on/off.
Sorting Files
Canceling automatic sorting
To cancel the automatic sorting, right-click on the column headers. A context menu appears (see the figure above).
Select the Cancel sorting (last) option. Once you cancel the automatic sorting, newly added items will simply
appear at the end of the current list, in the order in which they are added.
Preserving the original order
Sometimes you have already ordered items (e.g. in Windows Explorer), and you want ReNamer to preserve that
order.
To do that, turn off the automatic sorting first, and only then add items to ReNamer.
Keep in mind the following quirk of Windows: When you are adding your selection, you must focus on the top (first)
item in the selection, otherwise the same order will not be maintained when items are transfered to ReNamer. For
example: In case of drag-and-drop, you need to select all your files and drag the selection by the very first file.
Note: The initial list of items (files and folders) is processed in the supplied order, but if you are adding folders the
content of folders will be added in order determined by the file system, because folders are automatically scanned for
the contained items.
Using Masks
Renaming Folders
ReNamer has several filter options which configure how added items (files and folders) are treated.
By default, folders are not added to the renaming list as items, instead, their contents are added to the renaming list.
To rename the folders themselves, open filter settings and enable option "Add folders as files".
Extensions in folders
Note that Skip extension option also affects folders. (If there are any periods in the name of a folder, the portion on
the right side of the last period is treated as extension.
A typical example is folders that contain tutorials: 01. Introduction, 02. Basics, etc.) Here, the words "01" and "02"
are treated as names, and "introduction" and "Basics" are treated as extensions.
Conflicting order
Renaming a folder also affects all of its content. Therefore renaming of folders requires a little more care.
A problem can occur if you try to rename folders and their content in a single run. Items in the renaming list are
processed from top to bottom. The order of items in this case is extremely important for successful renaming.
Important: Parent folders must always appear below their contained items. This can be easily achieved by sorting
items in descending order by the Folder or Path column.
If a parent folder is renamed first, the actual path for its contents changes instantly, with its new name. However, the
subfolders and files contained in that folder are still listed in ReNamer with their old path. As a result, ReNamer is
unable to find those items at the specified location, and therefore it cannot rename them.
For example, assume you have a folder named "C:\Folder" and a file named "C:\Folder\File" in it. Assume also that
you have listed Folder above File in ReNamer. As soon as first Folder is renamed to New_Folder, the path for File
109
Renaming Folders
110
changes to C:\New_Folder\. However, the File is still listed in ReNAmer at its original location (with the
C:\Folder\ path). Thus ReNamer is unable to find File.
In other words, while the contained folder is renamed, the contents are not.
Problem occurred
Preview
Rename
Items as they appear after they were added, no sorting.
Problem solved
Preview
Rename
Items after they were sorted in descending order by Folder column.
Renaming to Another Folder
You can optionally move renamed files/folders to another location. You can also sort files into multiple folders
based on their meta tag properties.
Moving to another folder
To move items to another folder you need to specify a new folder path in the New Name field.
• Although you can use this trick in multiple rules, the easiest is the Insert rule.
• You can use either absolute path (e.g. "C:\Example\") or relative path (e.g. "..\Example\").
For example, let us imagine that we have just added few files to ReNamer.
We want to move those files to a new folder "C:\New Folder". What we need to do is to add a single Insert rule,
inserting "C:\New Folder\" as prefix. This will result in the following:
Renaming to Another Folder
111
Name
New Name
Text.txt
C:\New Folder\Text.txt
Song.mp3
C:\New Folder\Song.mp3
Document.doc C:\New Folder\Document.doc
Now you can proceed with the renaming as usual.
• If the target folder does not already exist, ReNamer will create it automatically.
Tip: Make the "New Path" column visible in the files table so that you can see the final destination for each item.
This can be particularly useful when working with relative paths, because ReNamer will resolve all relative paths to
absolute paths, so you do not have to guess the final destination.
Sorting files into multiple folders
When you have loaded multiple files in ReNamer, you can use the properties of these files to sort them into different
folders (also called "binning").
To do this, instead of hard-coding the path, use a meta tag in the new path (see this example, which uses the Replace
rule).
• If the folders do not exist already, ReNamer will create them.
• You can even create a hierarchy in a single renaming operation (just use multiple meta tags in the "New Path").
For example, "C:\MetaTag1\MetaTag2\FileName" will create two levels of folders and sort the files
into them.
Instead of moving the file, can we copy it?
As we saw above, to move a file to a another folder ReNamer changes the whole path of the file, which effectively
moves the file. Copying a file, however, requires creating a new instance of the file and copying the content to the
new location. ReNamer is designed for renaming files and does not directly support copying.
A simple workaround is to manually create a copy of files with an external application (such as Windows Explorer)
and then rename the copied files. This will let you keep the original files as they were and create a renamed copy
using ReNamer's functionality as normally.
Failed Renaming
112
Failed Renaming
There can be several reasons for a failed renaming operation. Validation process will try to prevent some common
problems prior to renaming by raising warnings during the preview process, but it cannot catch all possible
problems. The most common reasons for failed renaming are as follows:
Reason
Solution
File path exceeds maximum
number of characters
Shorten the name of the file or any of its parent folders so that the total characters in the entire path is within the
limit. Note: Windows defines maximum number of characters using a constant MAX_PATH = 260.
Destination file already exists
(name conflict)
There are multiple options:
Source file does not exist
This can happen because:
•
•
•
•
•
Rename the name in the list (Refer to Fix conflicting new names).
Rename the 'other' file that is at the destination to avoid conflict.
Manually edit the new name of the file to avoid conflict.
You moved or manually renamed the file outside of ReNamer.
You renamed its folder first.
Just remove the items listed in Files pane, and then add them again (with the new path).
The file is being blocked by
other program
Find the program that is currently using the file (using utilities like the Windows Task Manager or Process
Explorer) and close it. (Sometimes the file is still being downloaded, in which case just wait!)
You don't have sufficient
privileges to rename the file.
Get privileges by contacting the Admin (or the owner if the item is shared on a neighborhood PC). If you are the
Admin, check the permissions of the folder.
Invalid destination path
You may have included invalid characters to the file name, such as:
\/:*?"<>|
Validation of New Names
113
Validation of New Names
Validation is a process which tries to prevent common renaming problems by analyzing the list of files and target
destinations. A warning message is given when possible problems are discovered. Users should generally eliminate
all warnings prior to renaming, otherwise items may fail to rename.
Here is a list of reasons for a warning during validation process:
1.
2.
3.
4.
There are duplicated destination paths
New path contains forbidden characters
New path is already taken by an existing file
New path exceeds maximum length
By default, automatic validation is enabled during the preview process. This behavior can be changed from within
the settings.
Note: Validation may require significant amount of time when processing large amount of files.
Examples of rules
This article is a collection of examples of rules for various common tasks. Another set of examples specifically with
a use of Rearrange rule is a available in a separate article: Rearrange Examples.
Remove first word separated by spaces
If the words are separated by spaced then you can use Delete rule, by deleting everything up to the next space.
1. Delete: Delete from Position 1 until Delimiter " " (skip extension)
Alternatively, this can be achieved with a RegEx rule:
1. RegEx: Replace expression "\A[^\s]+\s*" with "" (skip extension)
Input
Output
Example File Name File Name
Remove first 3 words separated by spaces
If the words are separated by spaced then you can use 3 Delete rules, with each one deleting everything up to the
next space.
1. Delete: Delete from Position 1 until Delimiter " " (skip extension)
2. Delete: Delete from Position 1 until Delimiter " " (skip extension)
3. Delete: Delete from Position 1 until Delimiter " " (skip extension)
Alternatively, this can be achieved with a single RegEx rule:
1. RegEx: Replace expression "\A[^\s]+\s+[^\s]+\s+[^\s]+\s*" with "" (skip
extension)
Input
Output
The quick brown fox jumps over the lazy dog fox jumps over the lazy dog
Examples of rules
114
Remove last 3 words separated by spaces
If the words are separated by spaced then you can use 3 Delete rules, with each one deleting everything up to the
next space, but operating in "right-to-left" mode.
1. Delete: Delete from Position 1 until Delimiter " " (right-to-left) (skip
extension)
2. Delete: Delete from Position 1 until Delimiter " " (right-to-left) (skip
extension)
3. Delete: Delete from Position 1 until Delimiter " " (right-to-left) (skip
extension)
Alternatively, this can be achieved with a single RegEx rule:
1. RegEx: Replace expression "\s*[^\s]+\s+[^\s]+\s+[^\s]+\Z" with "" (skip
extension)
Input
Output
The quick brown fox jumps over the lazy dog The quick brown fox jumps over
Swap names around as "Last, First" to "First Last"
1. Rearrange: Split by exact pattern of delimiters ", ", New pattern "$2 $1"
(skip extension)
Input
Output
Last, First
First Last
Smith, John
John Smith
Mc Donald, John John Mc Donald
Change date format from DD-MM-YYYY to YYYY-MM-DD
1. RegEx: Replace expression "\b(\d{2})-(\d{2})-(\d{4})\b" with "$3-$2-$1"
(skip extension)
Input
Output
31-03-2013 19-52-16.jpg
2013-03-31 19-52-16.jpg
New Year 31-12-2014.jpg New Year 2014-12-31.jpg
Examples of Rearrange rule
115
Examples of Rearrange rule
Rearrange rule can be used in many ways. Few examples are given below.
For simplicity's sake, we have split examples into two sections: Basic usage (typical needs of beginners) and
Advanced usage (for the power users).
Basic usage
Example 1
Task: Swap parts of name.
From:
To:
Artist - Title.mp3 Title - Artist.mp3
Settings:
Split using: (o)Delimiter
" - " (without the quotes)
New pattern: $2 - $1
[X] Skip Extensions
Explanation: We split the string at the hyphen (dash or minus sign -) or whatever you use to separate Artist from
Title
Now, all signs before the dash are stored in variable $1, all after are put in var $2.
Because we want to swap this parts, we simple swap the vars in the output, the "New Pattern": $2 $1
And since this rule removes the used delimiter, we add it on our own: "$2 - $1", or use an new delimiter as e.g.:
"$2_-_$1"
Example 2
Task: Insert text before the original name.
From:
Ring Ring
To:
ABBA - Ring Ring
The winner takes it all ABBA -The winner takes it all
Settings:
Delimiter: none (leave blank)
New order/pattern: ABBA - $0
Remarks: is same as the Insert rule.
Examples of Rearrange rule
116
Example 3
Task: Insert text before and after the original name.
From:
Ring Ring
To:
ABBA- Ring Ring (Live)
The winner takes it all ABBA-The winner takes it all (Live)
Settings:
Delimiter: none (leave blank)
New order/pattern: ABBA- $0 (Live)
Remarks: is same as using the Insert rule twice (one for adding the prefix, and another for adding the suffix).
Example 4
Task: Switch the words, and remove the comma between them.
From:
To:
King, Stephen
Stephen King
Cook, Robin
Robin Cook
Pride and Prejudice, The The Pride and Prejudice
Settings:
Delimiter: ", " (without the quotes)
New Order: $2 $1
Example 5
Task: Move a word to a new position.
From:
To:
Words sample 1234 07-07-07 1234 Words sample 07-07-07
Settings:
Delimiter: " " (only a space, without the quotes)
New Order: $3 $1 $2 $4
Example 6
Task: Get rid of the numbers, hyphen and space at the beginning.
Examples of Rearrange rule
117
From:
To:
01 - Afilename.zip
Afilename.zip
002 - Bfilename.zip
Bfilename.zip
0003 - Cfilename.zip Cfilename.zip
Settings:
Delimiter: "- " (without the quotes)
New Order: $2
Remarks:
1. Note that the delimiter contains a space. If only a hyphen is used as delimiter, then a space would be left out in
the beginning of the name, which you would have to trim separately.
2. The Delete rule also would work (in right-to-left mode). But the Rearrange rule also allows you to add any
string to the truncated names.
Example 7
Task: Move the first part to the end.
From:
To:
TEST.aaa.bbb.100.ext aaa.bbb.100.TEST.ext
Setting:
Delimiter: "." (without the quotes)
New Order: $2.$3.$4.$1
Example 8
Task: Move the artist's name from end to the beginning, and change the name format.
From:
Ring ring_ABBA.mp3
To:
ABBA - Ring Ring.mp3
Material girl_Madonna.mp3 Madonna - Material girl mp3
Settings:
Delimiter: "_" (without the quotes)
New Order: $2 - $1
Example 9
Task: Move the numbers to the beginning.
Examples of Rearrange rule
118
From:
To:
DSC_0001-1.jpg
1-DSC_0001.jpg
DSC_0001-2.jpg
2-DSC_0001.jpg
DSC_0001-10.jpg 10-DSC_0001.jpg
Settings:
Delimiter: "-" (without the quotes)
New Order: $2-$1
Example 10
Task: Insert "sent_" before the last 3 digits.
From:
To:
family_001.jpg family_sent_001.jpg
work_023.jpg
work_sent_023.jpg
friend_098.jpg friend_sent_098.jpg
Settings:
Delimiter: "_" (without the quotes)
New Order: $1_sent_$2
Remarks:
The Insert rule also would work (in right-to-left mode). But the Rearrange rule also allows you to add any string to
the names.
Example 11
Task: Remove the name of the artist (delete text until hyphen).
From:
To:
Sting - All This Time.mp3 All This Time.mp3
Settings:
Delimiter: "- " (without the quotes)
New Order: $2
Remarks:
1. Note the space after the hyphen. If we use just a "-" as delimiter, the second token would be left with a space in
front, which we will have to trim separately.
2. Even the Delete rule would have worked (in right-to-left mode). But the Rearrange rule also allows you to add
any string to the new name.
Examples of Rearrange rule
119
Example 12
Task: Remove the track numbers (and any separator symbol after that) from the beginning of the filenames:
From:
To:
08. Madonna - Like A Prayer.wma Madonna - Like A Prayer.wma
08.-Madonna - Like A Prayer.wma
08 Madonna - Like A Prayer.wma
Settings:
Delimiter: "Madonna" (without the quotes)
New Order: Madonna$2
Remarks:
We chose the string "Madonna" as delimiter because it does not occur anywhere else in the names. The unwanted
characters on the left are assigned to token $1, which we will not omit in the new name. However, there is an
undesired side-effect: ReNamer removes "Madonna" string from the token $2 because it is the delimiter. Therefore,
we have to manually add that missing string "Madonna" to $2, to restore the names.
Example 13
Task: Move the number to front, and remove the square brackets.
From:
To:
Name XXX [0001].jpg 0001 - Name XXX.jpg
Settings:
Delimiter: "[|]" (without the quotes)
New Order: $2 - $1
Remarks:
1. The | character is used to separate the two delimiters.
2. The second delimiter "|" will not produce a token. It is included only to remove it from the new name.
Example 14
Task: Add composer name and duration to an mp3 file, as prefix and suffix, respectively.
From:
To:
Eine kleine Nachtmusik.mp3 Mozart - Eine kleine Nachtmusik (6.37).mp3
Don Giovanni.mp3
Mozart - Don Giovanni (4.5).mp3
Settings:
Positions: 1
New Order: Mozart - $2 (:AudioDuration:)
Remarks:
1. This can also be done by using the Insert rule. However, you have to use that rule twice (once for prefix and the
second time for the suffix). On the other hand, the Rearrange rule allows you to add both in a single stroke.
Besides, you can see the structure of the new name.
Examples of Rearrange rule
120
2. When the original name is sliced at position 1, there is no characters on the left side; so the $1 token is a blank.
The entire name is copied into the $2 token. This is a great trick to compose new name using the whole original
name.
Example 15
Task: Swap parts of name at fixed position.
From:
To:
BusinessRawReport1.doc RawReport1, Business.doc
BusinessRawReport2.doc RawReport2, Business.doc
BusinessRawReport3.doc RawReport3, Business.doc
Settings:
Split using: (o)Positions
"9" (without the quotes)
New pattern: $2, $1
[X] Skip Extensions
Remarks: Since we didn't have an real delimiter here, we simply split at an position within the string, here e.g. at
char number 9:
BusinessRawReport1.doc
123456789
So all before 9th char is put in variable $1, and all from char number 9 till end of string is put in var $2.
That means: $1 holds 'Business' and $2 holds 'RawReport1'. (Note that we skip the extension, so we don't have to
deal with it)
Now we compose our new string, the output pattern, just as we like it to be: '$2, $1'
You can also use more then one delimiter or position:
From:
To:
BusinessRawReport1.doc Raw Business Report1.doc
Settings:
Split using: (o)Positions
"9|12" (without the quotes)
New pattern: $2 $1 $3
[X] Skip Extensions
Remarks:
BusinessRawReport1.doc
123456789
123456789012
$1 holds 'Business'
$2 holds 'Raw'
$3 holds 'Report1'
Examples of Rearrange rule
121
Advanced usage
Example 1
Task: Remove the string from the file name.
From:
To:
Artist - Title [Time 4 02 Cold] [2004].mpg Artist - Title [2004].mpg
Settings:
Delimiter: " [T|d] " (without the quotes)
New Order: $1 $3
Remarks:
1. The | character separates the two delimiters.
2. Notice that we have included spaces in the delimiters, so that they do not end up as part of the tokens.
3. We have selected two different delimiters to represent the beginning and the end of the string we want to remove.
Thus whatever lies between the two delimiters is converted into a token. This token is then omitted in the new
name. This works just like using wildcards for the string (or a RegEx pattern).
Example 2
Task: The file names contain artist name, album name and track name. Sort them into separate folders as follows:
1. Create a separate folder for each artist.
2. For each artist, create a subfolder for each album.
3. Move each file in the corresponding folder.
From:
To:
Title - Artist (Album).mp3 D:\Artist\Album\Title.mp3
Settings:
Delimiter: " - | (|)" (without the quotes)
New pattern: D:\$2\$3\$1
Remarks:
1. Note that the delimiters contain spaces and symbols, so that only text remains in the tokens.
2. The last delimiter ) does not produce a token. It is added just to strip the closing bracket from the last token.
3. Instead of D: a relative path (such as ..\..\) can be added to the front.
Example 3
Task: Sort digital photos in different folders based on the Date taken for each photo.
Note: Many people call this operation "binning", because we segregate the items into separate bins based on some
criteria. (most people associate the word "Sorting" with "rearranging the files in ascending/descending order, without
moving them to other folders")
Examples of Rearrange rule
122
From:
To:
DSC_0001.jpg D:\photos\trip\2009_10_21\DSC_0001.jpg
DSC_0002.jpg D:\photos\trip\2009_10_21\DSC_0002.jpg
DSC_0003.jpg D:\photos\trip\2009_10_25\DSC_0003.jpg
Settings:
Delimiter: - (none)
New pattern: D:\photos\trip\:EXIF_Date:\$0
Remarks:
1. Note that this EXIF data is contained in the meta tag of each photo, not in the file name.
2. The meta tag :EXIF_Date: is replaced by the actual date taken for each photo. Thus all photos taken on the
same date will be moved to the same folder.
3. The actual name of the folder would depend on the Date and Time format settings.
Example 4
Task: Delete the last part of the base name (but the extension should remain). Note that the file names have different
lengths, so you cannot slice the name at a particular position. The names have a different depths also (number of
segments separated by dots).
From:
title.text1.text2.extension
To:
title.text1.extension
title.text1.text2.text3.extension title.text1.text2.extension
Setting: The solution requires a stack of two different rules, as shown below:
1. Replace Rule
Find: "." (without the quotes)
Replace: "#" (without the quotes)
Check "[X] Last" to find and replace last occurrence of an dot only.
Check "[X] Skip Extension" to not replace the file/extension separator as last dot.
(this is a temporary change; which will be eliminated in the second step)
2. Rearrange rule
Delimiter: "#" (without the quotes)
New Order: $1
Remarks:
We had to do this indirectly because the Rearrange rule cannot pick only the last dot as delimiter; and ignore the
other dots. So we used a trick: we first changed the last dot into another character (using the Replace rule), and then
use that new character as delimiter in the Rearrange rule.
Examples of Rearrange rule
123
Example 5
Task: Swap parts with more then one of the same delimiter
From:
To:
I. Author - Book title - True story.pdf Book title - True story (I. Author).pdf
I. Author - Book title.pdf
Book title (I. Author).pdf
First exchange the first occurrence of the delimiter by an completely other sign, e.g. #
• Add an "Replace" Rule
• Replace First " - " with "#", [X] Skip Extension
So we got
From:
To:
I. Author # Book title - True story.pdf Book title - True story (I. Author).pdf
I. Author # Book title.pdf
Book title (I. Author).pdf
Now use Settings:
Split using: (o)Delimiter
" # " (without the quotes)
New pattern: $2 ($1)
[X] Skip Extensions
Remarks: Since this rule removes the used delimiter, we don't have to take care about them in the output.
Example 6
Task: Keep only the last part of a file name:
From:
title text1 text2.txt
To:
text2.txt
title text1 text2 text3.txt text3.txt
Settings:
Split using: (o)Delimiter
" " (space, without the quotes)
New pattern: $-1
[X] Skip Extensions
Task: Keep only the second last part of a file name:
Examples of Rearrange rule
124
From:
title text1 text2.txt
To:
text1.txt
title text1 text2 text3.txt text2.txt
Settings:
Split using: (o)Delimiter
" " (space, without the quotes)
New pattern: $-2
[X] Skip Extensions
Remarks: Since $-1 and $-2 count the tokens from the right (from the end), we will get the same result even if the
name is longer.
Example 7
Task: Sort files with same names (but different extensions) into separate subfolder.
Typically, training websites provide such sets of files for each episode/lecture/lesson, etc. (video, handout,
homework, etc.)
When you download these files, they are in a single folder. ReNamer helps you in sorting them into separate
folders.
We will see two different variations here:
Variation-1: The subfolder name is same as the base name of the files.
From:
To:
Episode 001.pdf Episode 001\Episode 001.pdf
Episode 001.mp4 Episode 001\Episode 001.mp4
Episode 002.pdf Episode 002\Episode 002.pdf
Episode 002.mp4 Episode 002\Episode 002.mp4
Settings:
Split using: - (Leave blank)
New pattern: $0\$0
[X] Skip Extensions
Remarks:
1. All files having the same base name will be sorted into a common subfolder.
2. ReNamer will create these subfolders in the current folder.
Variation-2: The subfolder name is different as compared to the base name of the files.
From:
To:
Handout
Part
001.pdf
001\Handout.pdf
Lesson 001.mp4 Part 001\Lesson.mp4
Handout
Part
002.pdf
002\Handout.pdf
Lesson 002.mp4 Part 002\Lesson.mp4
Settings:
Examples of Rearrange rule
Split using:" " (space, without the quotes)
New pattern: Part $2\$1
[X] Skip Extensions
Remarks:
1. All files having the same number will be sorted into a common subfolder.
2. ReNamer will create these subfolders in the current folder
3. The "Part " is a literal string. (note the space at the end)
125
Article Sources and Contributors
Article Sources and Contributors
ReNamer Source: http://www.den4b.com/w/index.php?oldid=2346 Contributors: Den4b, ERaSeR, Krtek, Narayan, Stefan
Introduction Source: http://www.den4b.com/w/index.php?oldid=1885 Contributors: Den4b, ERaSeR, Krtek, Narayan, Skiwi, Waexu
Quick Guide Source: http://www.den4b.com/w/index.php?oldid=2020 Contributors: Den4b, Narayan, Stefan
Step-by-step Source: http://www.den4b.com/w/index.php?oldid=2416 Contributors: Den4b, Narayan
Adding files and folders Source: http://www.den4b.com/w/index.php?oldid=2725 Contributors: Den4b, Krtek, Narayan
Managing Rules Source: http://www.den4b.com/w/index.php?oldid=2727 Contributors: Den4b, Krtek, Narayan
Previewing Files Source: http://www.den4b.com/w/index.php?oldid=2734 Contributors: Den4b, Krtek, Narayan
Renaming Files Source: http://www.den4b.com/w/index.php?oldid=2741 Contributors: Den4b, Krtek, Narayan
Using the Rules Source: http://www.den4b.com/w/index.php?oldid=2683 Contributors: Den4b, Krtek, Narayan
Overview of Rules Source: http://www.den4b.com/w/index.php?oldid=1919 Contributors: Den4b, Krtek, Narayan
Insert Rule Source: http://www.den4b.com/w/index.php?oldid=1920 Contributors: Den4b, Krtek, Narayan
Delete Rule Source: http://www.den4b.com/w/index.php?oldid=2110 Contributors: Den4b, Krtek, Narayan, Stefan
Remove Rule Source: http://www.den4b.com/w/index.php?oldid=1922 Contributors: Den4b, Krtek, Narayan
Replace Rule Source: http://www.den4b.com/w/index.php?oldid=2163 Contributors: Den4b, Krtek, Narayan
Rearrange Rule Source: http://www.den4b.com/w/index.php?oldid=2323 Contributors: Den4b, Narayan, Stefan
Extension Rule Source: http://www.den4b.com/w/index.php?oldid=2303 Contributors: Den4b, ERaSeR, Krtek, Narayan
Strip Rule Source: http://www.den4b.com/w/index.php?oldid=1926 Contributors: Den4b, Krtek, Narayan
Case Rule Source: http://www.den4b.com/w/index.php?oldid=2539 Contributors: Den4b, Krtek, Narayan
Serialize Rule Source: http://www.den4b.com/w/index.php?oldid=2324 Contributors: Den4b, Krtek, Narayan, Waexu
CleanUp Rule Source: http://www.den4b.com/w/index.php?oldid=2653 Contributors: Den4b, Krtek, Narayan
Translit Rule Source: http://www.den4b.com/w/index.php?oldid=2649 Contributors: Den4b, Krtek, Narayan
RegEx Rule Source: http://www.den4b.com/w/index.php?oldid=2655 Contributors: Den4b, Krtek, Narayan
PascalScript Rule Source: http://www.den4b.com/w/index.php?oldid=1933 Contributors: Den4b, Krtek, Narayan
UserInput Rule Source: http://www.den4b.com/w/index.php?oldid=2657 Contributors: Den4b, FrankMoore, Krtek, Narayan, Stefan
Pascal Script Source: http://www.den4b.com/w/index.php?oldid=2617 Contributors: Den4b, Krtek, Narayan, Stefan
Quick Guide Source: http://www.den4b.com/w/index.php?oldid=2552 Contributors: Den4b, Narayan, OliverSinclair
Types Source: http://www.den4b.com/w/index.php?oldid=2616 Contributors: Andrew, Den4b, Narayan
Functions Source: http://www.den4b.com/w/index.php?oldid=2622 Contributors: Andrew, Den4b, Krtek, Narayan, Prologician, SafetyCar
User Scripts Source: http://www.den4b.com/w/index.php?oldid=2632 Contributors: Den4b, HenryOwens, Krtek, Narayan, Stefan
Using Presets Source: http://www.den4b.com/w/index.php?oldid=2591 Contributors: Den4b, Krtek, Narayan, Stefan
Manual Editing Source: http://www.den4b.com/w/index.php?oldid=2733 Contributors: Den4b, Krtek, Narayan
Analyze Source: http://www.den4b.com/w/index.php?oldid=2336 Contributors: Den4b, Krtek, Narayan
Program settings Source: http://www.den4b.com/w/index.php?oldid=2740 Contributors: Den4b, Krtek, Narayan
Main Menu and Keyboard Shortcuts Source: http://www.den4b.com/w/index.php?oldid=2746 Contributors: Den4b, Krtek, Narayan, SafetyCar
Menus for the Files Pane Source: http://www.den4b.com/w/index.php?oldid=2366 Contributors: Den4b, Krtek, Narayan
Context Menus Source: http://www.den4b.com/w/index.php?oldid=2062 Contributors: Den4b, Krtek, Narayan
Date and Time Format Source: http://www.den4b.com/w/index.php?oldid=2063 Contributors: Den4b, Krtek, Narayan
Binary Signatures Source: http://www.den4b.com/w/index.php?oldid=2064 Contributors: Den4b, ERaSeR, Narayan
Meta Tags Source: http://www.den4b.com/w/index.php?oldid=2713 Contributors: Den4b, Krtek, Narayan
Analyze Source: http://www.den4b.com/w/index.php?oldid=2336 Contributors: Den4b, Krtek, Narayan
Regular Expressions Source: http://www.den4b.com/w/index.php?oldid=2531 Contributors: Den4b, Krtek, Narayan, SafetyCar, Stefan
Command Line Mode Source: http://www.den4b.com/w/index.php?oldid=2712 Contributors: Den4b, Narayan
Sorting Files Source: http://www.den4b.com/w/index.php?oldid=2071 Contributors: Den4b, Krtek, Narayan
Using Masks Source: http://www.den4b.com/w/index.php?oldid=1334 Contributors: Den4b, Krtek
Renaming Folders Source: http://www.den4b.com/w/index.php?oldid=2353 Contributors: Den4b, Narayan
Renaming to Another Folder Source: http://www.den4b.com/w/index.php?oldid=2453 Contributors: Den4b, Narayan
Failed Renaming Source: http://www.den4b.com/w/index.php?oldid=2057 Contributors: Den4b, Narayan
Validation of New Names Source: http://www.den4b.com/w/index.php?oldid=2074 Contributors: Den4b, Narayan
Examples of rules Source: http://www.den4b.com/w/index.php?oldid=2585 Contributors: Den4b
126
Article Sources and Contributors
Examples of Rearrange rule Source: http://www.den4b.com/w/index.php?oldid=2058 Contributors: Den4b, Narayan, Stefan
127
Image Sources, Licenses and Contributors
Image Sources, Licenses and Contributors
Image:ReNamer.png Source: http://www.den4b.com/w/index.php?title=File:ReNamer.png License: unknown Contributors: Den4b
Image:ReNamer Main Outline.png Source: http://www.den4b.com/w/index.php?title=File:ReNamer_Main_Outline.png License: unknown Contributors: Den4b, Narayan
Image:ReNamer Main Steps.png Source: http://www.den4b.com/w/index.php?title=File:ReNamer_Main_Steps.png License: unknown Contributors: Den4b, Narayan
Image:AddFilesButton.png Source: http://www.den4b.com/w/index.php?title=File:AddFilesButton.png License: unknown Contributors: Den4b, Narayan
Image:ReNamer Open Dialog.png Source: http://www.den4b.com/w/index.php?title=File:ReNamer_Open_Dialog.png License: unknown Contributors: Den4b, Narayan
Image:AddFoldersButton.png Source: http://www.den4b.com/w/index.php?title=File:AddFoldersButton.png License: unknown Contributors: Den4b, Narayan
Image:ReNamer Browse Dialog.png Source: http://www.den4b.com/w/index.php?title=File:ReNamer_Browse_Dialog.png License: unknown Contributors: Den4b, Narayan
Image:CheckedCheckbox.png Source: http://www.den4b.com/w/index.php?title=File:CheckedCheckbox.png License: unknown Contributors: Narayan
Image:UncheckedCheckbox.png Source: http://www.den4b.com/w/index.php?title=File:UncheckedCheckbox.png License: unknown Contributors: Narayan
Image:AddRuleButton.png Source: http://www.den4b.com/w/index.php?title=File:AddRuleButton.png License: unknown Contributors: Narayan
Image:HowAddRulesWorks.png Source: http://www.den4b.com/w/index.php?title=File:HowAddRulesWorks.png License: unknown Contributors: Narayan
Image:RemoveButton.png Source: http://www.den4b.com/w/index.php?title=File:RemoveButton.png License: unknown Contributors: Narayan
Image:UpButton.png Source: http://www.den4b.com/w/index.php?title=File:UpButton.png License: unknown Contributors: Narayan
Image:DownButton.png Source: http://www.den4b.com/w/index.php?title=File:DownButton.png License: unknown Contributors: Narayan
Image:Preview.png Source: http://www.den4b.com/w/index.php?title=File:Preview.png License: unknown Contributors: Den4b, Narayan
Image:PreviewButton.png Source: http://www.den4b.com/w/index.php?title=File:PreviewButton.png License: unknown Contributors: Den4b, Narayan
Image:RenameButton.png Source: http://www.den4b.com/w/index.php?title=File:RenameButton.png License: unknown Contributors: Den4b, Narayan
Image:InsertRule.png Source: http://www.den4b.com/w/index.php?title=File:InsertRule.png License: unknown Contributors: Den4b, Narayan
Image:ReNamer Insert Meta Tag Button.png Source: http://www.den4b.com/w/index.php?title=File:ReNamer_Insert_Meta_Tag_Button.png License: unknown Contributors: Den4b
Image:DeleteRule.png Source: http://www.den4b.com/w/index.php?title=File:DeleteRule.png License: unknown Contributors: Den4b, Narayan
Image:RemoveRule.png Source: http://www.den4b.com/w/index.php?title=File:RemoveRule.png License: unknown Contributors: Den4b, Narayan
Image:PlusButton.png Source: http://www.den4b.com/w/index.php?title=File:PlusButton.png License: unknown Contributors: Narayan
Image:ReplaceRule.png Source: http://www.den4b.com/w/index.php?title=File:ReplaceRule.png License: unknown Contributors: Den4b, Narayan
Image:RearrangeRule.png Source: http://www.den4b.com/w/index.php?title=File:RearrangeRule.png License: unknown Contributors: Den4b, Narayan
Image:ExtensionsRule.png Source: http://www.den4b.com/w/index.php?title=File:ExtensionsRule.png License: unknown Contributors: Den4b, Narayan
Image:StripRule.png Source: http://www.den4b.com/w/index.php?title=File:StripRule.png License: unknown Contributors: Den4b, Narayan
Image:CaseRule.png Source: http://www.den4b.com/w/index.php?title=File:CaseRule.png License: unknown Contributors: Den4b, Narayan
Image:SerializeRule.png Source: http://www.den4b.com/w/index.php?title=File:SerializeRule.png License: unknown Contributors: Den4b, Narayan
Image:CleanUpRule.png Source: http://www.den4b.com/w/index.php?title=File:CleanUpRule.png License: unknown Contributors: Den4b, Narayan
Image:TranslitRule.png Source: http://www.den4b.com/w/index.php?title=File:TranslitRule.png License: unknown Contributors: Den4b, Narayan
Image:TranslitMapsButton.png Source: http://www.den4b.com/w/index.php?title=File:TranslitMapsButton.png License: unknown Contributors: Narayan
Image:TranslitMenu.png Source: http://www.den4b.com/w/index.php?title=File:TranslitMenu.png License: unknown Contributors: Narayan
Image:TranslitRuleExample.png Source: http://www.den4b.com/w/index.php?title=File:TranslitRuleExample.png License: unknown Contributors: Den4b, Narayan
Image:SaveTranslitMapDialog.png Source: http://www.den4b.com/w/index.php?title=File:SaveTranslitMapDialog.png License: unknown Contributors: Narayan
Image:RegExRule.png Source: http://www.den4b.com/w/index.php?title=File:RegExRule.png License: unknown Contributors: Den4b, Narayan
File:RegExRuleSyntaxHint.png Source: http://www.den4b.com/w/index.php?title=File:RegExRuleSyntaxHint.png License: unknown Contributors: Den4b
Image:PascalScriptRule.png Source: http://www.den4b.com/w/index.php?title=File:PascalScriptRule.png License: unknown Contributors: Den4b, Narayan
Image:ScriptsButton.png Source: http://www.den4b.com/w/index.php?title=File:ScriptsButton.png License: unknown Contributors: Narayan
Image:PascalScriptsMenu.png Source: http://www.den4b.com/w/index.php?title=File:PascalScriptsMenu.png License: unknown Contributors: Narayan
Image:TryToCompileButton.png Source: http://www.den4b.com/w/index.php?title=File:TryToCompileButton.png License: unknown Contributors: Narayan
Image:GotoButton.png Source: http://www.den4b.com/w/index.php?title=File:GotoButton.png License: unknown Contributors: Narayan
Image:GotoLineDialog.png Source: http://www.den4b.com/w/index.php?title=File:GotoLineDialog.png License: unknown Contributors: Narayan
Image:SaveScriptDialog.png Source: http://www.den4b.com/w/index.php?title=File:SaveScriptDialog.png License: unknown Contributors: Narayan
Image:UserInputRule.png Source: http://www.den4b.com/w/index.php?title=File:UserInputRule.png License: unknown Contributors: Den4b, Narayan
Image:UserInputOptionsButton.png Source: http://www.den4b.com/w/index.php?title=File:UserInputOptionsButton.png License: unknown Contributors: Den4b, Narayan
Image:PascalScriptIfThen.png Source: http://www.den4b.com/w/index.php?title=File:PascalScriptIfThen.png License: unknown Contributors: Narayan
Image:PascalScriptIfThenElse.png Source: http://www.den4b.com/w/index.php?title=File:PascalScriptIfThenElse.png License: unknown Contributors: Narayan
Image:PascalScriptCase.png Source: http://www.den4b.com/w/index.php?title=File:PascalScriptCase.png License: unknown Contributors: Den4b, Narayan
Image:PascalScriptForLoop.png Source: http://www.den4b.com/w/index.php?title=File:PascalScriptForLoop.png License: unknown Contributors: Narayan
Image:PascalScriptWhileLoop.png Source: http://www.den4b.com/w/index.php?title=File:PascalScriptWhileLoop.png License: unknown Contributors: Narayan
Image:PascalScriptRepeatUntilLoop.png Source: http://www.den4b.com/w/index.php?title=File:PascalScriptRepeatUntilLoop.png License: unknown Contributors: Narayan
Image:SavePresetDialog.png Source: http://www.den4b.com/w/index.php?title=File:SavePresetDialog.png License: unknown Contributors: Den4b, Narayan
Image:PresetsManager.png Source: http://www.den4b.com/w/index.php?title=File:PresetsManager.png License: unknown Contributors: Den4b, Krtek, Narayan
Image:Append_preset_button.png Source: http://www.den4b.com/w/index.php?title=File:Append_preset_button.png License: unknown Contributors: Krtek
Image:PresetDeleteButton.png Source: http://www.den4b.com/w/index.php?title=File:PresetDeleteButton.png License: unknown Contributors: Narayan
Image:RenamePresetButton.png Source: http://www.den4b.com/w/index.php?title=File:RenamePresetButton.png License: unknown Contributors: Narayan
Image:RenamePresetDialog.png Source: http://www.den4b.com/w/index.php?title=File:RenamePresetDialog.png License: unknown Contributors: Den4b, Narayan
Image:EditPresetButton.png Source: http://www.den4b.com/w/index.php?title=File:EditPresetButton.png License: unknown Contributors: Narayan
Image:EditPresetWarning.png Source: http://www.den4b.com/w/index.php?title=File:EditPresetWarning.png License: unknown Contributors: Den4b, Narayan
Image:PresetEditWindow.png Source: http://www.den4b.com/w/index.php?title=File:PresetEditWindow.png License: unknown Contributors: Narayan
Image:SaveChangedmpFileDialog.png Source: http://www.den4b.com/w/index.php?title=File:SaveChangedmpFileDialog.png License: unknown Contributors: Narayan
Image:CopyPresetButton.png Source: http://www.den4b.com/w/index.php?title=File:CopyPresetButton.png License: unknown Contributors: Narayan
Image:ManualRenamingSelectFile.png Source: http://www.den4b.com/w/index.php?title=File:ManualRenamingSelectFile.png License: unknown Contributors: Narayan
Image:ManualEditMode.png Source: http://www.den4b.com/w/index.php?title=File:ManualEditMode.png License: unknown Contributors: Narayan
Image:ManualEditModePreview.png Source: http://www.den4b.com/w/index.php?title=File:ManualEditModePreview.png License: unknown Contributors: Narayan
Image:ManuallyRenamedFiles.png Source: http://www.den4b.com/w/index.php?title=File:ManuallyRenamedFiles.png License: unknown Contributors: Narayan
Image:ManualRenamingEx1.png Source: http://www.den4b.com/w/index.php?title=File:ManualRenamingEx1.png License: unknown Contributors: Narayan
Image:ManualRenamingEx4.png Source: http://www.den4b.com/w/index.php?title=File:ManualRenamingEx4.png License: unknown Contributors: Narayan
128
Image Sources, Licenses and Contributors
Image:ManualRenamingEx2.png Source: http://www.den4b.com/w/index.php?title=File:ManualRenamingEx2.png License: unknown Contributors: Narayan
Image:AnalyzeDialog.png Source: http://www.den4b.com/w/index.php?title=File:AnalyzeDialog.png License: unknown Contributors: Narayan
Image:ApplyRulesButton.png Source: http://www.den4b.com/w/index.php?title=File:ApplyRulesButton.png License: unknown Contributors: Narayan
Image:GeneralSettingsDialog.png Source: http://www.den4b.com/w/index.php?title=File:GeneralSettingsDialog.png License: unknown Contributors: Den4b, Narayan
Image:PreviewSettingsDialog.png Source: http://www.den4b.com/w/index.php?title=File:PreviewSettingsDialog.png License: unknown Contributors: Den4b, Narayan
Image:RenameSettingsDialog.png Source: http://www.den4b.com/w/index.php?title=File:RenameSettingsDialog.png License: unknown Contributors: Den4b, Narayan
Image:MetaTagsSettingsDialog.png Source: http://www.den4b.com/w/index.php?title=File:MetaTagsSettingsDialog.png License: unknown Contributors: Den4b, Narayan
Image:MiscSettingsDialog.png Source: http://www.den4b.com/w/index.php?title=File:MiscSettingsDialog.png License: unknown Contributors: Den4b, Narayan
Image:PresetLinksDialog.png Source: http://www.den4b.com/w/index.php?title=File:PresetLinksDialog.png License: unknown Contributors: Den4b, Narayan
Image:MenuStrip.png Source: http://www.den4b.com/w/index.php?title=File:MenuStrip.png License: unknown Contributors: Narayan
Image:FilesButton.png Source: http://www.den4b.com/w/index.php?title=File:FilesButton.png License: unknown Contributors: Narayan
Image:FileMenu.png Source: http://www.den4b.com/w/index.php?title=File:FileMenu.png License: unknown Contributors: Narayan
Image:ShellSubMenu.png Source: http://www.den4b.com/w/index.php?title=File:ShellSubMenu.png License: unknown Contributors: Narayan
Image:MarkSubmenu.png Source: http://www.den4b.com/w/index.php?title=File:MarkSubmenu.png License: unknown Contributors: Narayan
Image:MarkByMask.png Source: http://www.den4b.com/w/index.php?title=File:MarkByMask.png License: unknown Contributors: Narayan
Image:ClearSubmenu.png Source: http://www.den4b.com/w/index.php?title=File:ClearSubmenu.png License: unknown Contributors: Narayan
Image:SelectSubmenu.png Source: http://www.den4b.com/w/index.php?title=File:SelectSubmenu.png License: unknown Contributors: Narayan
Image:SelectByFileNameLengthDialog.png Source: http://www.den4b.com/w/index.php?title=File:SelectByFileNameLengthDialog.png License: unknown Contributors: Narayan
Image:SelectByExtnDialog.png Source: http://www.den4b.com/w/index.php?title=File:SelectByExtnDialog.png License: unknown Contributors: Narayan
Image:SelectByMask.png Source: http://www.den4b.com/w/index.php?title=File:SelectByMask.png License: unknown Contributors: Narayan
Image:MoveSubmenu.png Source: http://www.den4b.com/w/index.php?title=File:MoveSubmenu.png License: unknown Contributors: Narayan
Image:FiltersButton.png Source: http://www.den4b.com/w/index.php?title=File:FiltersButton.png License: unknown Contributors: Narayan
Image:FilterSettingsDialog.png Source: http://www.den4b.com/w/index.php?title=File:FilterSettingsDialog.png License: unknown Contributors: Narayan
Image:ExportButton.png Source: http://www.den4b.com/w/index.php?title=File:ExportButton.png License: unknown Contributors: Narayan
Image:ExportMenu.png Source: http://www.den4b.com/w/index.php?title=File:ExportMenu.png License: unknown Contributors: Narayan
Image:OptionsButton.png Source: http://www.den4b.com/w/index.php?title=File:OptionsButton.png License: unknown Contributors: Narayan
Image:OptionsMenu.png Source: http://www.den4b.com/w/index.php?title=File:OptionsMenu.png License: unknown Contributors: Narayan
Image:Count_marked_selected.png Source: http://www.den4b.com/w/index.php?title=File:Count_marked_selected.png License: unknown Contributors: Krtek
Image:RulesContextMenu.png Source: http://www.den4b.com/w/index.php?title=File:RulesContextMenu.png License: unknown Contributors: Narayan
Image:FilesPaneHeadersContextMenu.png Source: http://www.den4b.com/w/index.php?title=File:FilesPaneHeadersContextMenu.png License: unknown Contributors: Narayan
Image:ReNamer Sort Triangle Ascending.png Source: http://www.den4b.com/w/index.php?title=File:ReNamer_Sort_Triangle_Ascending.png License: unknown Contributors: Den4b
Image:ReNamer Sort Triangle Descending.png Source: http://www.den4b.com/w/index.php?title=File:ReNamer_Sort_Triangle_Descending.png License: unknown Contributors: Den4b
Image:ReNamer Sort Name Ascending.png Source: http://www.den4b.com/w/index.php?title=File:ReNamer_Sort_Name_Ascending.png License: unknown Contributors: Den4b
Image:ReNamer Sort Date Descending.png Source: http://www.den4b.com/w/index.php?title=File:ReNamer_Sort_Date_Descending.png License: unknown Contributors: Den4b
Image:ReNamer Files Table Columns.png Source: http://www.den4b.com/w/index.php?title=File:ReNamer_Files_Table_Columns.png License: unknown Contributors: Den4b
Image:ReNamer Folder Rename Bad Before.png Source: http://www.den4b.com/w/index.php?title=File:ReNamer_Folder_Rename_Bad_Before.png License: unknown Contributors: Den4b
Image:ReNamer Folder Rename Bad After.png Source: http://www.den4b.com/w/index.php?title=File:ReNamer_Folder_Rename_Bad_After.png License: unknown Contributors: Den4b
Image:ReNamer Folder Rename Good Before.png Source: http://www.den4b.com/w/index.php?title=File:ReNamer_Folder_Rename_Good_Before.png License: unknown Contributors:
Den4b
Image:ReNamer Folder Rename Good After.png Source: http://www.den4b.com/w/index.php?title=File:ReNamer_Folder_Rename_Good_After.png License: unknown Contributors: Den4b
129
License
License
Attribution-NonCommercial-NoDerivs 3.0 Unported
//creativecommons.org/licenses/by-nc-nd/3.0/
130