1
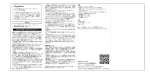
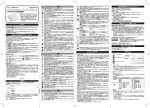
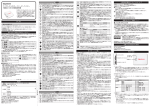
How-To’s For
iPhone / iPad / iPod Touch
Smart Box
1
How-To’s For
Android Smartphones & Tablets
Search Keyword “Smart Box A4” app in Apple App Store and install
1
Search “Smart Box A4” app in Google Play and install
2
Connect to Smart Box
Turn on Smart Box first. Open wifi network settings and connect to “Smart
Box” wifi. A connection indicator icon should appear. We recommend you change
USER MANUAL
the wifi name and password. See instruction in “configurations”.
2
Connect to Smart Box:
Turn on Smart Box first. Go to “settings” “wifi-networks” on IOS device
FCC ID:
PLE-WD2502
and connect to “Smart Box ”.
We recommend you change the wifi name and password. See instructions
in “configurations”.
Smart Box
3
Play Contents:
Quick Start Basics
Insert your USB or SD card that carries your preloaded media/contents.
1 Power On:
what is plugged in. All pre-made folders will show under “folder”. All floating
Launch the Smart Box app. Go to either “USB” or “SD” depending on
Press on/off button for 5 seconds and blue LED square lights up,then green
files will be automatically organized by its format and shown under one of
LED lights on.
the sub categories.
2 Power Off:
To access contents, select the file to bring up a visual. Select media player
Press on/off button for 5 seconds and all LED lights are out.
if prompted. See supported file formats in “media files supported” section of
3 Charge In / Charge Smart Box:
this manual. To return to the Smart Box contents at any time, tap “ Smart
Plug microUSB cable to Smart Box; plug the USB end to a USB wall
Box ” icon on the bottom left corner or “ Back” button on upper left corner.
charger or a working computer. It is suggested to fully charge the battery
5
Upload Photos:
Click “Photo Upload” tab from the bottom of the app. Select an album, click
“select”, make your image(s) selection, then define destination, click “upload
before first use.
to Smart Box ” to save.
4 Charge Out / Charge Mobile Devices Using Smart Box:
6
Connect mobile devices to the USB port on Smart Box. Press on/off
Configurations:
Tap “Settings” icon on the bottom right corner of the app main page.
button for 1 second to charge out.
Internet Bridge: see section 7.
5 Apps:
Change Devices SSID and Password:
Search key word “Smart Box A4” in Apple App Store or Google Play.
It’s highly recommended you change the default SSID and password for added security.
Smart Box Default Setting: Reset to factory default
Features
Change Administrator Password: default password is 0000.
3
Play Contents:
Insert your USB or SD card that carries preloaded contents. Launch the
Smart Box app.Tap “Smart Box” on upper left corner. Go to either “USB” or
“SD” depending on what is plugged in. Select a file, click to play. Select
Internet Bridge Indicator
Power
media player when prompted. See supported file formats in “media files
Battery Indicators
On/Off
supported” section of this manual.
(see chart below)
Card Reader Indicator
Reset SDHC Slot
Charge In
PC Data
USB Charge Out
SD CARD READER
RESET
INTERNET BRIDGE
CHARGE IN
USB DATA
CHARGE OUT
USB DRIVE
Definition of LED Battery Indicators
4
Download Files:
To download a single file, press file name and hold till dialogue window
3 green LED: 80%-100% battery
appears, then select “download”.To download multiple files, click “edit”
2 green LED: 40%-80% battery
button in upper right corner, select files, then press download.
1 green LED: <40% battery
0 green LED: 0% battery if not
connected to power; 100% battery
if connected to power
To check the battery life of the Media Streamer, press
on/off button for 1 second and read LED as stated above.
Definition of LED
Blue LED on when internet bridge
is enabled
Orange LED on when SD card is
detected. Orange LED flashing
when SD data in transmission
Music and video downloads are saved in “local media” tab on the bottom of
the app. Documents are saved in “Document” tab. Photos are saved in the
photo library of your mobile device.
7
Configurations:
Under “setting”, click “Internet Bridge”. Put in admin password (default 0000)
and slide to “on” position.Wait for a second for system to search for available
networks. Select a network to join. Please note, internet bridge mode consumes
more power.
4
Download Files:
press and hold till dialogue window appears, then select file “download”.
To download multiple files, press
download, or tap
icon, then select files Tap
to
to select path and download. All download files can
be accessed through “Download” tab on the drop-down menu next to Smart
Box icon.
5
Upload Files:
Click “Local Drive” tab from the drop down menu on upper left corner, select
Product Name:
A2-25DE
75 x 60 x 16 (mm)
Weight:
88 (g)
Li-ion Battery:
2500mAh
Charge In/Out:
DC 5V / 1000mA
SD Card: SD, SDHC, SDXC
WiFi Operation time:
Up to 8Hrs
Change Devices SSID and Password: It’s highly recommended you change the
WiFi Standby time:
Up to 16Hrs
default SSID and password for added security.
Operation Temp.
0° C ~ 40° C
Connect to Smart Box:
Turn on Smart Box first. Open wifi network settings and connect to
“Smart Box” wifi.
2
Open a web browser, type in URL field IP address 192.168.1.2
Go to either “USB” or “SD” depending on what is plugged in. Click on file
names to view content in a new window.
To download, click on the arrow next to the file name.
*Note: requires browsers compatible with JavaScript and HTML5 and
applications capable of reading the associated file types.
Browsers and applications not included.
- In a place where a magnetic field is generated
system and nuclear energy system. Gigastone shall not be liable for any
personal injury or death or any loss or damages to property arising from
such kind of application.
Gigastone. Gigastone makes no other warranties, including any warranty
*Caution: charging in temperatures outside this range could cause serious
damage, including fire.
respect to the products, provide technical support and warranty service to
CERTIFICATIONS
CE
NOTE: This equipment has been tested and found to comply with the limits for
designed to provide reasonable protection against harmful interference in a
residential installation. This equipment generates, uses and can radiate radio
MEDIA FILES SUPPORTED
frequency energy and, if not installed and used in accordance with the instructions,
Operating System
iOS 5.0 and later; Android v2.2
Supported
and later; Windows 8/7/Vista/ XP;
Mac OSX 10.4 and later; Linux Kernal 2.4 later
Photo
JPG, PNG, BMP
Audio
MP3, M4A, AAC, WAV
Video
MP4, MOV, M4V
Document
DOC, DOCX, PPT, PPTX, XLS, XLSX, PDF, TXT,
HTM
of merchantability or fitness for a particular purpose, whether expressly or implied.
warranty period on products, Gigastone will, in such country/region, with
User Manual
FCC ID: PLE-WD2502
warranties and representations,whether in oral or written, between you and
In the event that the law of certain country/region stipulates a maximum
MicroUSB cord
a Class B digital device,pursuant to part 15 of the FCC Rules. These limits are
Please note, Internet Bridge mode consumes more power.
1
- In a moist place or a place where condensation may occur
traffic control equipment, disaster prevention systems, combustion control
Smart Box
Internet Bridge: see section 7.
How-To
Access Content via Web Browser*
- In a car or a place exposed to direct sunlight, or a places that become hot
medical-related equipment, military or military-related equipment, aircraft,
802.11b/g/n
WiFi Outreach Approx. Up to 20 meters / 66 feet
second for system to search for available networks. Select a network to join.
- In a dusty place
are defective or have a breakdown, including but not limited to medical or
micro USB for charge in
Enter 0000 (default password)
Under “settings”, click “Internet Bridge”. Slide to “on” position. Wait for a
Do NOT place or store the product:
or other equipment which may lead to personal injury or deathif such equipment
PACKAGE CONTENTS
Wireless I/F Wi-Fi:
Internet Bridge:
Do NOT drop or hit this product. Doing so may damage the product.
Gigastone does not recommend applying the products in life support systems
This warranty is solely and entirely on the products and supersedes all other
USB A for charge out and data
Tap “Settings” icon from the drop down menu on upper left corner.
Change Administrator Password:default password is 0000.
Do NOT attempt to disassemble, modify or repair the product by yourself.
Do NOT attempt to charge or use the device outside the specification limits.
USB Drive: 2.0/3.0
Configurations:
Smart Box Default Setting:Reset to factory default
7
Smart Box
Dimension:
click “ok” to save.
(4) Since Gigastone products are not designed for high-safety applications,
Observe the following carefully to avoid damage, fire, or burst of the product:
Part Number:
a file, press and hold until dialogue window pops, tab “upload”, define destination,
6
CAUTIONS
PRODUCT SPECIFICATIONS
To download a single file in “Smart Box”, choose the file to be downloaded,
may cause harmful interference to radio communications.
However, there is no guarantee that interference will not occur in a particular
installation. If this equipment does cause harmful interference to radio or
television reception, which can be determined by turning the equipment off and
on, the user is encouraged to try to correct the interference to by one or more
of the following measures:
local consumers in accordance with such stipulation.
In the event that the law of certain country/region prohibits the exclusion of
implied warranty, Gigastone shall, in such country/region, only be liable for
the implied warranty on the products during Gigastone’s expressed warranty
period.
4 Customer eligible for warranty service.
Gigastone warranty policy applies to all customers who purchased Gigastone
products through authorized agents.
5 Duration of Warranty
Smart Box series products are covered by one-year warranty.
NOTE: Please note that after Gigastone issues a product’s “END-OF-LINE”
(E.O.L) notice, Gigastone will offer a comparable substitute product instead of
- Reorient or relocate the receiving antenna.
repairing the item under warranty. Please visit Gigastone Legacy Products.
- Increase the separation between the equipment and receiver.
6 Additional Remark
- Connect the equipment into an outlet on a circuit different from that to which
(1) Gigastone under no circumstance will be responsible for the information or
the receiver is connected.
- Consult the dealer or an experienced radio/TV technician for help.
data stored in the Gigastone products claimed by warranty.
Gigastone recommends for customer to do a data back up in advance before
sending their products for warranty service.
WARRANTY
(2) Some products may require the use of non-original replacement parts during
1 Warranty Policy
maintenance and repair, so the final repaired products may contain non-original
Gigastone provides replacement or repair service to our customers for defective
components.
products within the applicable warranty period.
(3) In the event of a warranty request for a product that has been discontinued
See http://www.gigastone.com.tw for details.
or is no longer serviced, Gigastone will, at its discretion, offer a comparable
2 Limitation of Warranty
substitute product instead of repairing the item under warranty.
Please note Gigastone is not responsible for providing free repairs
(4) When the customers are returning authorized products to Gigastone they
if the product defect is caused by any of the following factors:
are responsible for one way transportation cost and insurance. Gigastone will
(1) Damage caused by natural calamity or any inappropriate usage.
cover one way transportation cost for those materials under warranty when
(2) Product has been repaired or taken apart by unauthorized technicians.
returning back to customer. However, all related cost for nationalization is
(3) The warranty label is alerted, damaged or missing.
customers’responsibility.
(4) Product serial number does not confirm to our original system or the label
7 RMA Information
has been damaged.
(5) Products purchased from unauthorized agents.
(6) The limited warranty covers only repairs or replacement of Gigastone products.
Gigastone is not liable for any loss of data or any cost incurred from determining
For RMA needs, please contact the local reseller where the purchase was made
for help or Gigastone can provide RMA service from corporate headquarters..
Please refer to http://www.gigastone.com.tw for detailed information.
the source of system problems, removing,servicing or installing Gigastone products.
3 Disclaimer
(1) The warranty Gigastone provides on Gigastone products (“products”) is
limited to repair and replacement of in-warranty products, exclusive of data
recovery and back up. Gigastone shall not be liable for any damage
and/or loss of data stored in products.
(2) Gigastone shall in no event be liable for any defect, damage or data lost
occurred during the delivery of in-warranty products. Prior to claiming warranty
service, Gigastone recommends that you have a backup of your data and
remove your data from in-warranty products.
(3) In no event shall Gigastone be liable under this statement for loss of profit,
loss of anticipated saving, loss of data, or indirect, incidental or consequential
Gigastone
No.69, Qun Yi Rd., Jhunan,Miaoli, Taiwan 350, R.O.C.
Tel: +886-37-288-389 #321
losses or damages to the extent that those losses or damages can be
Email: [email protected]
disclaimed by law.
Website: www.gigastone.com