1
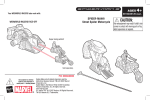
User's manual for the packing and use – Pilot emergency back parachute system PTCH-P50
Page: 1
TS-KCH004-2003
Pages: 29
_____________________________________________________________________________________________________
USER'S MANUAL FOR THE
PACKING AND USE
PILOT EMERGENCY BACK PARACHUTE SYSTEM
PTCH-P50
Issue No.: 2
Date of issue 1.6.2008
MarS a.s.
1.6.2008
Change 07/08
User's manual for the packing and use – Pilot emergency back parachute system PTCH-P50
Page: 2
TS-KCH004-2003
Pages: 29
_____________________________________________________________________________________________________
CONTENTS:
Contents......................................................................................... 2
MarS a.s.
1.
Objective, technical specifications, function description.................. 3
2.
Technical parameters..................................................................... 4
3.
Ordering information....................................................................... 5
4.
Users´ duties.................................................................................. 6
5.
Handling instructions for users ....................................................... 7
6.
Maintenance instructions................................................................ 8
7.
Repair instructions.......................................................................... 8
8.
Storage instructions........................................................................ 9
9.
Transport instructions..................................................................... 9
10.
Packing instructions for the parachute PTCH-P50.......................... 10
10.1
General instructions ....................................................................... 10
10.2
Pre-packing inspection ................................................................... 10
10.3
Replacement of damaged parts...................................................... 12
11.
Packing tools.................................................................................. 14
12.
Pre-packing set-up and parachute packing .................................... 14
12.1
Pre-packing set-up ......................................................................... 14
12.2
Parachute packing.......................................................................... 14
13.
Preflight preparation ....................................................................... 25
14.
Packing of parachutes for the opening with a static line ................. 26
15.
Pre-use preparation of the parachute with a static line ................... 29
Issue number 2
User's manual for the packing and use – Pilot emergency back parachute system PTCH-P50
Page: 3
TS-KCH004-2003
Pages: 29
_____________________________________________________________________________________________________
1.
Objective, technical specifications, function description
1.1
Objective
1.1.1. Herein described parachute system PTCH-P50 (further described as the parachute)
can be utilized to safe the pilot's life in aircraft types where back type emergency
parachute systems are or may be used.
1.2
1.2.1
1.2.2
1.2.3
1.2.4
1.2.5
1.2.6
1.2.7
1.2.8
1.2.9
1.2.10
1.2.11
1.3
Technical specifications
The parachute comprises of the following parts:
Canopy V-066
The main part of the drag inducing area that provides safe descent and landing.
Harness PS-058
Attaches and fixes the parachute to the pilot's body, distributes and hence reduces
dynamic loading caused by the opening shock.
Back padding P-020
Provides the comfortable rest in the aircraft pilot seat. The pack padding is removable
and can be washed (See also 1.2.10 and 1.2.11).
Pilot chute PV-029
Extracts the canopy with the suspension lines from the container.
Bridle SS-065
Connect the pilot chute to the canopy.
Container OP-052
Contains the canopy and suspension lines while in a packed state.
Ripcord U-041
Designed for hand deployment of the canopy.
Carrying bag G-206
Holds the parachute during transport and storage.
Static line VL-023
Independent of the pilot, it retracts ripcord pins after the exit out of the aircraft. This
part is supplied only as a customer option and is used according to conditions
specified in 5.3.
Back padding P-021
Back padding is supplied as a customer option and can be removed. It is
interchangeable with the P-020 cushion, with reinforced (softened) upholstery.
Back padding P-025
Back cushion is supplied as a customer option and can be removed. It is used as
a lumbar cushion increasing the pilot´ s comfort. The cushion fills the space in the
pilot seat bend (if the seat design enables so).
Function description
1.3.1a Manual activation of the parachute: After bailing out of the aircraft and within a safe
distance from the aircraft , the pilot pulls the ripcord out of its pocket on the harness.
This withdraws the ripcord pins and releases the pilot chute.
MarS a.s.
27.6.2008
Change 38/08
User's manual for the packing and use – Pilot emergency back parachute system PTCH-P50
Page: 4
TS-KCH004-2003
Pages: 29
_____________________________________________________________________________________________________
1.3.1b Activation of the parachute with the VL-023 static line: after the exit out of the aircraft
and independent of the pilot, the parachute opening is activated with a static line,
which is attached in the aircraft with one line end. After the line is extended, it pulls
out ripcord pins and releases the pilot chute.
1.3.2 The pilot chute inflates and with the bridle extracts the canopy with the suspension
lines out of the bag. The suspension lines are unstowed and release the diaper.
1.3.3 The canopy fills with air and slows down the fall.
1.3.4 Flight direction of the canopy is controlled by pulling down the steering lines.
2.
Technical parameters
2.1
Technical data
2.1.1 canopy area
44 m2
2.1.2 pilot chute area
0,7 m2
2.1.3 maximum weight of the parachute without
the carrying bag and seat cushion
7,3 kg
2.1.4 maximum weight limit (pilot with the parachute)
115 kg
2.1.5 minimal weight limit (pilot with the parachute)
57 kg
2.1.6 descent rate with suspended 85 kg
4,8 m.s-1
2.1.7 3600 turn around time
8s
2.1.8 dimensions of the packed parachute
490 x 320 x 140 mm
2.1.9 the use of the parachute (its opening) is limited to the speed of 278 km·h-1 (150 kt)
2.1.10 the reliable parachute functioning is guaranteed on condition of an immediate
opening after the bail out or also after a longer freefall with holding time.
2.1.11 the minimum height for bailing out is set to 90 m at minimum speed of 100 km.h-1 on
condition that the opening is immediate after the bail out (the pilot´s body position
must be stabilized during opening of the parachute!). Providing these conditions the
canopy is fully inflated 4 seconds before landing.
2.2
Operational conditions
2.2.1 The thermal resistance of the canopy has been proven in the range between -40°C
and 93,3°C.
2.2.2 The parachute can be packed before use for 6 months in maximum
(relevant date is the day in the month).
2.2.3 For the parachute life it is important not to expose it to direct sunlight unnecessarily.
2.2.4 The parachute is to be protected from rain, wetness or high humidity.
2.3
Service life and warranty
2.3.1 Service life – Reliable function of the parachute is guaranteed for the period of 10
years providing the prescribed conditions for storage, periodical inspections, airing,
use and repairs are met. The service life is measured from the date of manufacture
(month and year) stamped in the parachute log book. The service life may be
extended after an inspection at the manufacturer. Tests of mechanical and physical
properties of the parachute will be carried out and according to their results the
service life may be prolonged, with an extension of maximum two years. If the
parachute requires a repair, it will be done only after receiving the parachute owner's
MarS a.s.
Issue number 2
User's manual for the packing and use – Pilot emergency back parachute system PTCH-P50
Page: 5
TS-KCH004-2003
Pages: 29
_____________________________________________________________________________________________________
agreement with the manufacturer stating the extension of the service life after the
repair in the parachute log book. The parachute must be delivered for a service life
extension before the end of the original service life period. The manufacturer states
the extension period in the parachute log book of the parachute. The service life may
be prolonged repeatedly after repeated tests of mechanical and physical properties of
the parachute fabrics, with the maximum total service life of 15 years.
2.3.2 Warranty – The warranty period is 24 months starting from the date of manufacture
indicated in the parachute log book. The warranty is valid only providing these
conditions:
- the manufacturer's instructions for transport and storage are adhered to.
- the parachute is properly checked, aired and re-packed every 6 months
(determining date is the day in a month)
- the parachute log book is properly maintained.
- damaged or excessively worn parts are repaired or replaced timely.
The warranty is not valid for the parachutes where:
- the parachute log book has been lost.
- the parachute log book does not accompany the parachute.
- the parachute log book is not properly maintained;
- the manufacturer's instructions for storage and transport have not been adhered to.
- the parachute has been mechanically damaged by an incorrect use.
- the parachute has been handled with in ways other than described in the User's
manual for the packing and use.
2.3.3 Warranty after repair – Warranty after a repair carried out by the manufacturer is 24
months starting from the date of repair indicated in the parachute log book. Warranty
after repair is only applicable to the parachute parts that were repaired. If warranty
after repair exceeds the end of the service life it is valid until the end of the service life
only. Warranty after repair is valid providing the conditions indicated in the paragraph
2.3.2. are strictly adhered to.
2.3.3 Warranty after extension of service life – Warranty after extension of service life is not
offered.
3.
Ordering information
3.1
Information needed for ordering a parachute system:
- parachute type
- number of units
- name and address for individual clients
- business name and address for corporate clients
3.2
Information needed for ordering parachute parts:
- parachute type with its serial number and parachute log book
- part name and part number
- number of pieces
3.3
Component list
3.3.1 The parachute consists of the following parts:
-
MarS a.s.
Canopy V-066
Issue number 2
User's manual for the packing and use – Pilot emergency back parachute system PTCH-P50
Page: 6
TS-KCH004-2003
Pages: 29
_____________________________________________________________________________________________________
-
Harness PS-058
Back padding P-020
Pilot chute PV-029
Bridle SS-065
Container OP-052
Ripcord U-041
Carrying bag G-206
3.3.2. The following optional parts can be delivered upon the customer´ s request:
- Static line VL-023
(to be ordered together with the PTCH-P50-02 parachute)
- Back padding P-021
- Back padding P-025
- Chest strap equipped with a buckle consisting of
-- 1219 V-Ring
-- 1231 Hook Snap
(to be ordered together with the PTCH-P50-01 parachute)
3.3.3 Packing tools delivered together with the parachute (in a plastic bag with closing,
code 3611):
- temporary packing pin with a cord
2 pcs PAD red cord, code 2 113
temporary packing pin, code
3 610
- temporary packing pull-up cord
- rubber band - ø 4 cm
- rubber band 2''x3/8''x1/16''
2 pcs PAD khaki cord, code 2 115
8 pcs code 3 001
3 pcs code 3 218
3.3.4 Parachute is supplied with the following documentation:
- Parachute log book
- User's manual for the packing and use
- Authorized release certificate issued by an authorized person EASA 1 FORM
4.
Users´ Duties
4.1.
4.1.1
Operational parachute qualification
It is the duty of users to maintain the parachute in a good technical qualification
condition due to proper storage, maintenance and use while keeping relevant
operational limitations mentioned in the User's manual for the packing and use.
4.1.2 All the parachute handling with either packed or unpacked parachute influences the
maintenance of operational qualification, mostly:
- Periodical inspections and checks of the parachute state
- Timely repairs and damage part replacement
- The way of the parachute storage including regular parachute airing and re-packing
- Meeting operational conditions and limitations.
4.2.
MarS a.s.
Parachute log book
It is the duty of the user to prove the operational qualification by a properly recorded
and filled-in parachute log book with all required data. Instructions of how to fill in the
log book are specified inside the book. This User's manual instructions include
27.6.2008
Change 38/08
User's manual for the packing and use – Pilot emergency back parachute system PTCH-P50
Page: 7
TS-KCH004-2003
Pages: 29
_____________________________________________________________________________________________________
warnings at relevant places emphasizing the need to write down records into a
parachute log book.
5.
Handling instructions for users
5.1
Limitations
5.1.1 Limitations are in accordance with the paragraphs 2.1 and 2.2 of this User's manual.
5.1.2 Limitations for the parachute use with the VL-023 static line are specified in par. 5.3.
5.2
Standard use
5.2.1 The parachute is checked and packed as described in this User's manual for the
packing and use.
5.2.2 After leaving the aircraft and within a safe distance from the aircraft, the pilot opens
the parachute by pulling the ripcord out of ripcord pocket on the harness. Once the
canopy is fully inflated, the pilot starts to controls the flight.
5.2.3 The parachute is controlled by the left and right steering line handle. The parachute
rotates around its axis to the right when the right handle is pulled and rotates around
its axis to the left when the left handle is pulled. Before landing the pilot turns the
parachute against the wind and releases both the steering line handles. Push your
legs together during landing.
5.3
The use of the emergency parachute with the VL-023 static line
5.3.1
Conditions for use
- Aircraft. The static line may be used only in aircrafts that were specially modified
and approved for such a use.
- Anchorage. The static line may be anchored only in such a place designed and
prepared for such a purpose by the aircraft manufacturer and further approved by
a relevant aviation authority.
- Labeling. The anchorage attachment must be identified with a label, which
besides other data must show this attachment strength. Its strength must be in
minimum 3000 N for one parachute.
- Approval. The aircraft user´ s aviation authority has to issue a permit for the use of
an emergency parachute with a static line for a specific aircraft, or set limiting
conditions (when and by whom this way can be used or on the contrary cannot be
used).
5.3.2
Warning
The use of a static line does not enable a controlled parachute opening in such
a manner that would prevent the parachute from getting caught and being
dragged down by falling plane wreckage!
5.3.3
MarS a.s.
Warning
- The use of a static line is not allowed in the Czech Republic civil aviation!
There might be exceptions such as cases of imported gliders where the parachute
with a static line is a part of approved aircraft equipment.
- Warning for packers: When the parachute with a static line is being packed, there
is to be also a usual way of opening with a ripcord.
- Warning for users: Besides the above mentioned information, please, read
Issue number 2
User's manual for the packing and use – Pilot emergency back parachute system PTCH-P50
Page: 8
TS-KCH004-2003
Pages: 29
_____________________________________________________________________________________________________
carefully further instructions and the warning on the static line pocket on the
container.
5.4.
Parachute use risks
- The parachute use may cause serious or fatal injuries,
-
Due to an improper handling, the parachute may not always open correctly,
The parachute equipment may fail to function even if it is designed, manufactured,
assembled, packed, maintained and used properly,
A fault during the parachute activation at a safe altitude may cause serious or
fatal injuries,
Parachute activation during freefalls at minimal height (as per par. 2.1.11) may
cause a serious or fatal injuries,
When the static line is used, it is possible that after the exit out of the aircraft, the
line may get caught by an aircraft part or plane wreckage that may result in an
early parachute opening or its failure.
6.
Maintenance instructions
6.1
Parachute airing
Before re-packing a parachute (according to par. 2.2.2), it is required to air the
parachute properly for at least 24 hours. Airing is done in a dry place, without direct
sunlight and at temperatures exceeding 0°C. The best option is to hang the parachute
on the canopy apex lines. Record performed airing into the parachute log book.
6.2
Before packing
- Before packing the parachute for jump the parachute completeness and technical
condition must be checked.
- The pre-pack inspection must be done according to the instructions specified in the
User's manual for the packing and use.
- Particular attention must be paid to the parts listed in paragraph 6.3.
- Damaged replaceable parts must be replaced.
- Replacement of any part of the parachute must be noted in the parachute log book.
6.3
Replacement of damaged parts
User is entitled to replace the following parts:
- pilot chute PV-029
- bridle SS-065
- back padding P-020
- ripcord U-041
- carrying bag G-206
- static line VL-023
- back padding P-021
- back padding P-025
- end closing loops (manufactured by the parachute manufacturer)
The way of replacement is specified in this User's manual.
6.4
Crucial parachute parts:
- pilot chute PV-029
- bridle SS-065
- canopy V-066 together with the suspension and steering lines
- ripcord U-041, specially its pins
Only an authorized packer or the manufacturer are entitled to assess the condition of
the above parts and decide about their replacement.
MarS a.s.
27.6.2008
Change 38/08
User's manual for the packing and use – Pilot emergency back parachute system PTCH-P50
Page: 9
TS-KCH004-2003
Pages: 29
_____________________________________________________________________________________________________
7.
Repair instructions
The parachute can be repaired. Repairs are done by the manufacturer of the
parachute, only.
8.
Storage instructions
8.1
Before storage the parachutes must be inspected, repaired or any damaged parts
replaced. The parachutes must be stored on shelves in a dry, dark, well ventilated
room. Height of the bottom shelf must be at least 0,1 m as measured from the floor.
The distance between the shelf and any adjacent wall must be at least 0,5 m and
between the shelf and any heating element at least 1 m. Parachutes must be stored
in maximum two layers. It is not allowed to store any iron objects other than
parachute parts, oils, easily inflammable fluids, acids, or substances liberating active
gases in the room where the parachutes are deposited.
8.2
If the parachute is stored for a longer period of time it must be aired for 24 hours
every 6 months. Airing must be done in the shade and at a place with no direct
sunshine. Airing must be noted in the parachute log book.
8.3
The following conditions must be kept in the storage room:
- Temperature during the day
+14 až + 250C
- Relative humidity during the day
35 až 73 %
- Annual average relative humidity
45 až 55 %
8.4
If the above conditions are not adhered to the parachute must be sent to the
manufacturer to assess the mechanical and physical properties of the parachute.
9.
Transport instructions
9.1
Transport and storage instructions - packed parachute
The parachute is stored and transported in the carrying bag packed according to the
instructions described in the User's manual for the packing and use.
9.2
Transport and storage instructions - open parachute
If an opened parachute is to be stored and transported in the carrying bag, it must be
packed in the bag according to this procedure:
-
MarS a.s.
Pleat the canopy and chain-loop the suspension lines. Position the pilot chute on
the apex of the canopy and roll the canopy toward its bottom skirt. Insert the
container, harness and rolled canopy with the lines in the carrying bag.
Close the bag zipper and seal the slider.
Issue number 2
User's manual for the packing and use – Pilot emergency back parachute system PTCH-P50
Page: 10
TS-KCH004-2003
Pages: 29
_____________________________________________________________________________________________________
10.
Packing instructions for the parachute PTCH-P50
10.1
General instructions
Pre-pack inspection, damaged parts replacement, pre-pack set-up and packing
can be done only by a packer certified by the manufacturer.
Before packing the parachute must be checked thoroughly for completeness and any
damage. Damaged parts must replaced with new parts. It is not allowed to use the
parachute with damaged or otherwise non-airworthy parts and materials. During
packing it is not recommended to expose the parachute to direct sunshine.
10.2
Parachute pre-pack inspection:
10.2.1 Canopy and suspension lines (V-066) inspection
Fig.A
Spread the canopy along a packing table.
Check the fabric, binding tapes and
stitching for any damage, burnt lines and
fabric and the fabric for stains. After
inspection use the bridle SS-065 to attach
the canopy to the fixing point of the
packing table.
Fig. A
Fig.B
Straighten the canopy along its whole
length and inspect the suspension lines.
Straighten the lines and inspect them
thoroughly from to skirt of the canopy to
the SL-01 link connectors. Inspect the
lines from all sides
Fig. B
The suspension lines must not be
damaged, worn, or otherwise impaired.
Ensure that all screws of the connector
links are properly tightened.
The screws must be tightened all the
way using a wrench. It must not be
possible to open the screws with your
fingers.
Further inspect bartacks of the
suspension lines together with the
2"x3/8"x1/16" rubber bands holding in
place the end loops of the lines. The
rubber bands must not be damaged.
Fig.C.
MarS a.s.
Fig.C
27.6.2008
Change 38/08
User's manual for the packing and use – Pilot emergency back parachute system PTCH-P50
Page: 11
TS-KCH004-2003
Pages: 29
_____________________________________________________________________________________________________
10.2.2 Inspection of harness PS-058
During harness inspection, check for
any damaged webbing and stitching.
Further, check condition and
functionality of harness hardware.
Fig. D
Fig. D
10.2.3 Inspection of container OP-052
During inspection of the container check for any damaged fabric, binding tape,
reinforcement or grommet.
Check if end closing loops are not damaged and if they are produced by the
parachute manufacturer!
10.2.4 Inspection of back padding P-020
During inspection of the back padding check for any damage of fabric and stitching.
10.2.5 Inspection of ripcord U-041
Inspect the ripcord for any damage of the cable or bends of the pin. Also carefully
look for any signs of the termination ball or pin becoming loose on the cable.
10.2.6 Inspection of the bridle SS-065
Fig.E
Check for any damage of stitching of the
end loops. Fig.E
10.2.7 Inspection of the pilot chute PV-027
During inspection of the pilot chute
inspect the pilot chute canopy fabric,
stitching, and condition of the spring.
Also look for sharp edges on the
grommets stabilizing the pilot chute on
the closing loop.
Fig.E
10.2.8 Inspection of the carrying bag G-206
During inspection of the carrying bag inspect bag fabric and binding tapes for any
damage or dirt.
MarS a.s.
27.6.2008
Change 38/08
User's manual for the packing and use – Pilot emergency back parachute system PTCH-P50
Page: 12
TS-KCH004-2003
Pages: 29
_____________________________________________________________________________________________________
10.3
Replacement of damaged parts
10.3.1 Bridle SS-065
Replace the bridle according to the figures F, G a H.
Fig.F
Fig.G
Fig.H
10.3.2 Pilot chute PV-029
Replace the pilot chute according to figures I, J a K.
Fig.I
MarS a.s.
Fig.J
27.6.2008
Change 38/08
User's manual for the packing and use – Pilot emergency back parachute system PTCH-P50
Page: 13
TS-KCH004-2003
Pages: 29
_____________________________________________________________________________________________________
Fig.K
10.3.3 Ripcord U-041
Replace a damaged ripcord with a new one.
10.3.4 Carrying bag G-206
Replace a damaged carrying bag with a new one.
10.3.5 Back padding P-020
The P-020 back padding is attached to the back/support of the container with a
Velcro tape. By pulling the back padding edge in the direction from the back/support
of the container, the back padding is disconnected from the container. By an opposite
way the back padding is attached with a Velcro tape to the back/support of the
container. Then the replacement is completed.
10.3.6 Back padding P-021
The P-021 back padding is attached to the back/support of the container with a
Velcro tape. By pulling the back padding edge from the back/support of the container,
the back padding is disconnected from the container. By an opposite way the back
padding is attached with a Velcro tape to the back/support of the container. Then the
replacement is completed.
10.3.7 Back padding P-025
The P-025 back padding is attached with an equipped Velcro tape to the
back/support of the container bottom edge in such a manner that it creates a
prolongation of the back/support of the container. Then it is attached at that place and
further it is overlapped along all the remaining edge of the container back/support by
attaching the P-020 or P-021 back padding. By the opposite way the P-025 back
padding is disconnected. This described method can also be used for a replacement.
The use of a P-021 back padding instead of a P-020 back padding or the combination
of a P-025 back padding with one of the P-020 / P-021 back paddings is not a
modification of the PTCH-P50 parachute. The above described options in paragraphs
10.3.5, 10.3.6, and 10.3.7 serve only as a way of how to increase the comfort of the
parachute use or for a replacement of mentioned parts due to a damage or
maintenance (washing).
MarS a.s.
27.6.2008
Change 38/08
User's manual for the packing and use – Pilot emergency back parachute system PTCH-P50
Page: 14
TS-KCH004-2003
Pages: 29
_____________________________________________________________________________________________________
11.
Packing tools.
Temporary packing pin with a cord
- 2 pcs.
.
Cord length (from the pin to knot)
500 mm.
material: PAD cord - red, code 2 113
temporary packing pin, code 3 610
Temp. packing pull-up cord - 2 pcs
Length 1050 mm
material: PAD cord - khaki,
code 2 115
Packing weight - 6 pcs
Green safety tie, tensile strength 4,5 - 7,5 N to seal the ripcord pin.
12.
Pre-packing set-up and parachute packing
12.1
Pre-packing set-up
12.1.1 Stretch the canopy out on the packing table.
Attach the bridle SS-065 to the end of the table
(Fig.L). Separate the suspension lines into two
groups (Fig. M), so that lines no. 1 to 12 are on
the right side and lines 13 to 24 on the left side.
The name plate gore should be the in the
middle and on top.
Fig.L
Fig.M
MarS a.s.
27.6.2008
Change 38/08
User's manual for the packing and use – Pilot emergency back parachute system PTCH-P50
Page: 15
TS-KCH004-2003
Pages: 29
_____________________________________________________________________________________________________
12.1.2 Do the suspension lines check ( Fig. N and O).
Fig.N
12.1.3 Thread the ripcord cable into its flexible
housing. Insert the ripcord handle in the
pocket on the harness ( Fig.P).
Fig.O
Fig.P
12.1.4 Lay out the harness with the container on the packing table as pictured in Fig.R.
Fig. R
12.2
Parachute packing
Place line no.13 (with the diaper) in the middle of the packing table (Fig.1), place line
no. 14 on top of line no. 13 and continue in the same manner up to line no. 24 (Fig. 2
and 2a). Pull out the individual gores.
MarS a.s.
Issue number 2
User's manual for the packing and use – Pilot emergency back parachute system PTCH-P50
Page: 16
TS-KCH004-2003
Pages: 29
_____________________________________________________________________________________________________
Fig.1
Fig.2
Fig.2a
Secure the left half of the canopy with the weights (Fig.3) a flip the right side group of
gores over the left (Fig.4).
Fig.3
MarS a.s.
Fig. 4
Issue number 2
User's manual for the packing and use – Pilot emergency back parachute system PTCH-P50
Page: 17
TS-KCH004-2003
Pages: 29
_____________________________________________________________________________________________________
Place line no.12 in the middle of the packing table (Fig.5), place line no.11 on top of
line no.12 and continue in the same manner down to line no. 1 (Fig.6, 6a).
Fig.5
Fig.6
Fig.6a
Fig.7
After pleating the canopy, check the
suspension lines. Lift the upper risers with
your right hand and separate the inner
lines no.1 and 24 with the left hand
(Fig.7). Slide your hands along the lines to
the bottom of the canopy. There must be
two distinct vertical halves (upper and
lower) on the pleated canopy and the
inner lines in your left hand must be lines
marked no.1 and no. 24.
Fold the skirt up 90 degrees parallel to the radial seams (Fig.8). Long fold both sides
of the canopy to meet at the center. Secure with the weights (Fig.9).
MarS a.s.
Issue number 2
User's manual for the packing and use – Pilot emergency back parachute system PTCH-P50
Page: 18
TS-KCH004-2003
Pages: 29
_____________________________________________________________________________________________________
Fig.8
Fig.9
Long fold both sides to meet at the center again. Then, do the long fold again (Fig.11)
Fig.10
Fig.11
Secure the diaper by stowing the suspension lines (Fig.12, 13, 14, 15, 16).
Fig.12
MarS a.s.
Fig.13
Issue number 2
User's manual for the packing and use – Pilot emergency back parachute system PTCH-P50
Page: 19
TS-KCH004-2003
Pages: 29
_____________________________________________________________________________________________________
Fig.14
Fig.15
16
Fig.16
Move the harness together with the container towards the canopy (Fig.17). Route the
risers as in Fig.18.
Fig.17
MarS a.s.
Fig.18
Issue number 2
User's manual for the packing and use – Pilot emergency back parachute system PTCH-P50
Page: 20
TS-KCH004-2003
Pages: 29
_____________________________________________________________________________________________________
Cover the risers with the side flaps (Fig.19). Apply tension to the flaps and straighten
the risers (Fig.20).
Fig.19
Fig.20
Route the suspension lines towards the center of the container ( Fig.21). Stow the
lines in the rubber bands as depicted in Fig. 22, 23, 24, 25, 26, 27, 28, 29, and 30.
MarS a.s.
Fig.21
Fig.22
Fig.23
Fig.24
Issue number 2
User's manual for the packing and use – Pilot emergency back parachute system PTCH-P50
Page: 21
TS-KCH004-2003
Pages: 29
_____________________________________________________________________________________________________
Fig.25
Fig.26
Fig.27
Fig.28
Fig.29
Fig.30
Pack the canopy in the container as shown in the Fig.31. Place the diaper under the
bottom closing flap (on the bottom of the container) and place the temporary packing
pull-up cords in the closing loops as depicted in Fig.32.
MarS a.s.
Issue number 2
User's manual for the packing and use – Pilot emergency back parachute system PTCH-P50
Page: 22
TS-KCH004-2003
Pages: 29
_____________________________________________________________________________________________________
Fig.31
Fig.32
Continue S-folding the canopy as in Fig.33. Close the bottom part of the container
with the temporary packing pull-up cord and secure the bottom flap with a temporary
packing pin with a cord (Fig.34). Smooth out the canopy that is already closed in the
container.
Fig.33
Fig.34
Fold the second third of the canopy in between the grommets as in Fig.35 and 36.
Fig.35
MarS a.s.
Fig.36
Issue number 2
User's manual for the packing and use – Pilot emergency back parachute system PTCH-P50
Page: 23
TS-KCH004-2003
Pages: 29
_____________________________________________________________________________________________________
Fold the third of the canopy according to the scheme in Fig.37. Straighten out the
vent lines and place them as in Fig.38
The vent lines must not cross the closing loops!
Fig.37
Fig.38
Close the canopy in the container (Fig.39) and secure the container with a temporary
pin (Fig.40).
Fig.39
Fig.40
Arrange the canopy in the container and close the container with the velcro strips
along the sides of the container (Fig.41 and 42).
Make sure that the velcro strips overlap the whole width of the strip. Wrong
placement of the velcro strips may deform the container!
Fig.41
MarS a.s.
Fig.42
Issue number 2
User's manual for the packing and use – Pilot emergency back parachute system PTCH-P50
Page: 24
TS-KCH004-2003
Pages: 29
_____________________________________________________________________________________________________
S-fold the bridle under the pilot chute (Fig.43). Position the pilot chute and make sure
that after compressing the pilot chute the pilot chute grommets touch the container
grommets. Secure the compressed pilot chute with the closing loops and temporary
pins (Fig.44). Arrange the pilot chute fabric according to the Fig.44 and 45.
Fig.43
Fig.44
Fig.45
When packing the parachute for the opening with a static line, please, go to
Chapter 14!
Close the container with the remaining flaps as depicted in Fig.46 and Fig.47. Secure
the closing loops with ripcord pins (Fig.47).
Fig.46
Fig.47
The ripcord pins should be inserted into the closing loop so that the pins
cannot fall out accidentally.
MarS a.s.
Issue number 2
User's manual for the packing and use – Pilot emergency back parachute system PTCH-P50
Page: 25
TS-KCH004-2003
Pages: 29
_____________________________________________________________________________________________________
Remove the temporary packing pull-up cords!
Seal the container with the green safety tie of tensile strength of 4,5 - 7,5 N (Fig.48).
Cover both ends of the tie with a paper tape containing the date of packing, name of
packer and his signature.
Fig.48
Close the covering flap of the ripcord pins (Fig.49). Attach the back padding to the
container (Fig.50).
Fig.49
Fig.50
13.
Preflight preparation
13.1
Before putting on the parachute system check it visually. Make sure that the safety tie
around the pin is intact and correctly routed. Check the position of the ripcord handle
as well as position of the ripcord pin. If any problem is found the parachute must not
be used.
13.2
During putting on the parachute adjust main back web, leg, and chess straps. Fold
and stow the loose webbing ends in the elastic keepers. The harness should not be
loose, however at the same time it should not restrict the pilot's movement.
MarS a.s.
Issue number 2
User's manual for the packing and use – Pilot emergency back parachute system PTCH-P50
Page: 26
TS-KCH004-2003
Pages: 29
_____________________________________________________________________________________________________
14.
Packing of parachutes for the opening with a static line
If the VL-023 static line is used for the PTCH-P50 emergency parachute activation
(opening), during packing proceed up to the Figure no. 45 and then follow this
description as follows:
Close the prepared parachute with flaps as shown in fig. 46VL and 47VL and secure
with temporary packing pins with a line, fig. 47VL.
Fig.46VL
Fig. 47VL
Prepare the static line, fig. 48VL, check the intactness of the static line strap,
intactness of bartacks and loops. Replace a damaged line with a new one.
Pull the static line loops on the ripcord pins, fig. 49VL and insert the pins into closing
loops, fig. 50VL.
Fig. 48VL
Fig. 50VL
MarS a.s.
Fig.49VL
PointA
PointB
B
Issue number 2
User's manual for the packing and use – Pilot emergency back parachute system PTCH-P50
Page: 27
TS-KCH004-2003
Pages: 29
_____________________________________________________________________________________________________
POINT "A"
POINT "B"
Ripcord pins must be inserted in such a manner that would prevent
a pontaneous release of the pin out of the closing loop.
Pull out temporary packing pull-up cords!
Put the static line into rubber bands step by step as shown in figures 51VL – 54VL.
Fig.51VL
Fig. 53VL
MarS a.s.
Fig.52VL
Fig.54VL
Issue number 2
User's manual for the packing and use – Pilot emergency back parachute system PTCH-P50
Page: 28
TS-KCH004-2003
Pages: 29
_____________________________________________________________________________________________________
Seal the parachute as shown in fig. 55VL. Seal the ripcord pin with a green sealing
thread of the strength between 4.5 and 7.5 N. Stick a paper tape (with packing date,
name and signature of the packer) over the thread ends.
Fig. 55VL
Cover such a stowed static line with a static line covering flap, fig. 56VL. Leave a part
of the line necessary for the line anchorage pulled out.
Fig.56VL
Attention! During packing, the static line end must not get wound round or
twisted through the parachute straps and other parts!
The proper line anchorage in an aircraft must respect conditions stated in par. 5.3. If
any failure during parachute activation (opening) with a static line occurs (such as a
forgotten line anchorage in an aircraft, cutting of the line by a damaged aircraft, etc),
it is necessary to open the parachute with a manual release as fast as possible.
Attach the back padding to the parachute container with a Velcro tape, fig. 57VL.
MarS a.s.
Issue number 2
User's manual for the packing and use – Pilot emergency back parachute system PTCH-P50
Page: 29
TS-KCH004-2003
Pages: 29
_____________________________________________________________________________________________________
Fig. 57VL
15.
Pre-use preparation of the parachute with a static line
15.1
Before fitting the parachute on, check the parachute visually for its intactness and
proper sealing. Further check if the ripcord handle is inserted and proper insertion of
ripcord pins. Check proper positioning of the static line as well as proper positioning
of static line loops on ripcord pins. In case of any found discrepancy, the parachute
must not be released for use and jumps.
15.2
During fitting the parachute onto the body, adjust leg and chest straps. Thread strap
risers into rubber loops. The parachute fitting to the parachutist´ s body cannot be
loose, nor limit any movements. Check if the free part of the line is not wound
around or twisted through straps or any other parachute part.
MarS a.s.
Issue number 2