1
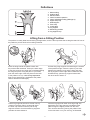
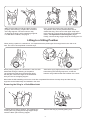
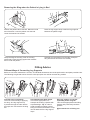
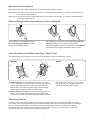
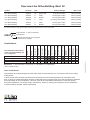
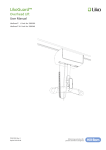
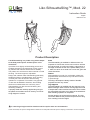
Liko SilhouetteSling™, Mod. 22
Instruction Guide
English
7EN160137-03
Product Description
Liko SilhoutteSling is a pliable sling which adapts
to the body and requires minimal space in the
wheelchair.
It provides for a slightly reclined sitting posture and
excellent support for the entire body, which is good
for patients with reduced head and torso stability.
The patient can hold the arms either outside or inside
the sling. The head support is adjustable.
Design and material make SilhoutteSling particularly
suitable for lifting to moulded seats, since the sling
is usually left in the wheelchair after the lifting
operation is completed. This makes it very popular
in care and rehabilitation situations, where sitting
shells and moulded seats are commonly used.
SilhouetteSling can also be used in bathing and
showering situations.
A properly fitted and carefully applied sling will give
the patient an excellent sense of security, as well as
a high degree of comfort.
Sizes
The SilhoutteSling is available in different sizes. It is
important to choose the correct size in order to achieve
the highest level of comfort and safety. A sling which is
too large increases the risk of the patient sliding out of
it, while one which is too small can cut into the groin and
cause discomfort.
Fabrics
SilhouetteSling is made of a comfortable, pliable net
polyester fabric which allows body heat and moisture
to pass through.
The sling’s lift straps are always made of durable
polyester and are very secure.
Leg Supports
The SilhoutteSling is available with leg supports in two
different designs. Most common are leg supports made
of simple fabric without reinforced inserts, which makes
the sling pliable and easy to put aside in the wheelchair
after the lifting operation is completed.
Another design has reinforced leg supports. The reinforcement distribute the pressure and prevent the sling
from creasing under the thighs.
is a warning triangle used for situations which require extra care and attention.
In this document, the person being lifted is referred to as the patient and the person helping is referred to as the caregiver.
Safety Instructions
Before lifting, keep the following points in mind:
• A responsible person within your organization should decide on a case-by-case basis whether one or more
caregivers are needed.
•Ensure that the sling selected meets the patient’s needs with reference to model, size, fabric and design.
• For safety and hygiene reasons, use individual slings.
• Before lifting, plan the lifting operation so that it can be done as safely and smoothly as possible.
• Before lifting, check that the lifting accessory hangs vertically and can move freely.
• Although Liko’s sling bars are equipped with safety latches, special caution must be exercised: Before the patient
is lifted from the underlying surface, but after the straps have been fully extended, make sure the straps are
properly connected to the sling bar.
• Make sure the patient is sitting securely in the sling before transferring to another location.
• Never lift a patient higher off the underlying surface than is needed to complete the lifting and transfer procedure.
• Never leave a patient unattended during a lifting situation.
• Make sure that the wheels on the wheelchair, bed, gurney, etc., are locked during the lifting/transfer operation.
• Always work ergonomically.
Medical Device Class I
Liko SilhoutteSling has been tested by an accredited testing institute and complies with all the requirements
for MDD Class I products and the harmonized EN ISO 10535 standard.
Liko is quality certified in accordance with ISO 9001 and its equivalent for the medical device industry, ISO 13485.
Liko is also certified in accordance with environmental standard ISO 14001.
Design and Quality by Liko in Sweden
Liko’s products undergo continuous development, which is why we reserve the right to make product changes
without prior notice. Contact your Liko representative for advice and information about product upgrades.
IMPORTANT!
Lifting and transferring a patient always involves a certain risk. Read the instruction guide for both the lift
and lifting accessories before use. It is important to completely understand the contents of the instruction guide.
The equipment should be used only by trained personnel. Ensure that the lifting accessories are suitable
for the lift being used. Exercise care and caution during use. As a caregiver, you are always responsible
for the patient’s safety. You must be aware of the patient’s ability to handle the lifting situation.
Care and Maintenance
Check the sling regularly, especially after washing. Check the following points with regard to wear and damage:
• Fabric
• Straps
• Seams
• Suspension loops
Do not use damaged lifting accessories. If anything is unclear, please contact the manufacturer or supplier.
Washing instructions: See the sling’s product label.
Expected Life Time
The product has an expected life time of 1-3 years with normal use. Expected life time varies depending
on the fabric, use frequency, washing procedure, and weight carried.
Periodic Inspection
The product must be inspected at least once every 6 months. More frequent inspections might be required
if the product is used or washed more often than normal. See Liko’s protocol for Periodic Inspection
for the respective product.
Definitions
5 4 3 2 1
1. Size marking
2. Product label
3. Serial number
4. Label: Periodic Inspection
5. Label: Individual marking (Belongs to)
6. Upper strap loop
7. Head support
8. Torso loop
9. Lower edge
10.Leg support
11.Shortening position
12.Leg support loop
6
7
8
9
10
11
12
Lifting from a Sitting Position
The patient is usually tilted forward during the application, and it is then important that a caregiver stand in front of
the patient to prevent him/her from falling forwards.
Place the sling behind the patient’s back with
the product label outwards. Fold up the lower edge
of the sling around your finger tips to facilitate guiding
the sling into place. Using the palm of your hand,
push the lower edge of the sling down to the level
of the patient’s coccyx - this is very important.
Tip: Correct positioning is facilitated if the patient
leans/is leaned forward slightly.
Pull the sling’s leg supports forward along the outside
of the patient’s thighs. Place the palm of your hand
between the patient’s body and the sling and push
the leg support’s lower edge down towards the seat.
Simultaneously, pull the leg support forward with
the other hand to stretch it.
Pull the leg supports forward to smooth out any
creases in the back. Tip: A gentle hold under
the knee-cap makes it easier to pull the leg
supports forward. Check that both leg supports
protrude the same distance.
Insert the leg supports under each thigh. Tip: The
application of the leg supports is facilitated if the
patient’s legs are slightly raised from the seat.
This can be achieved by placing the patient’s feet
on the foot-rests or on your own leg, as illustrated.
Make sure the fabric lies flat and that it reaches
properly around the leg. Prepare the connection
of the leg supports. The most common way
of applying the sling is with crossed leg supports.
For alternative methods, see page 6.
First, connect the torso loops to the sling bar.
The patient’s arms can be placed either inside or
outside the sling. Then connect the upper strap loops
to the sling bar. Choose loops according to the patient’s
needs, see Adjustment of head support, page 7.
Finally, connect the leg support loops to the sling bar. Lift.
Lifting to a Sitting Position
When placing a patient in a wheelchair, it is important that the patient gets far enough back in the chair to sit
well. This can be accomplished in several ways.
When placing a patient in a wheelchair: Lean the chair
backwards during the lowering of the patient.
Let the buttocks slide down the backrest during
the last part. Control the angle of the wheelchair
with your foot on the tipping support.
Alternative: Apply slight pressure under the patient’s
knees during the lowering sequence, so that the
buttocks are guided towards the backrest of the chair.
Most often the SilhoutteSling is left in the chair after completed lift and then the strap loops and also the leg
supports can be folded away and stashed in the chair.
Removing the Sling in a Chair/Wheelchair
Carefully remove the leg support. The gentlest way
of doing this is by pulling out the leg support loops
under the fabric part of the leg support.
Remove the sling by carefully pulling it up.
Lifting from the Bed
We recommend applying the sling when the patient is lying horizontally, as this is the easiest procedure. In some
cases, e.g., if the patient cannot lie horizontally, the sling can be applied with the patient sitting up in bed (see
Alternative method of applying the sling below).
Think about your own work posture as well as the comfort of the patient. Use the bed’s raising and lowering
functions.
If the bed is not equipped with a head end that can be raised/lowered, special attention must be paid
during the first part of the lift, in order for the patient’s neck not to be strained. The caregiver should then
support the neck manually.
Turn the patient towards you to
prevent him or her from falling out of
the bed. Insert the sling’s edge under
the patient with the lower edge level
with the coccyx. The upper edge
of the head support should then not
be lower than the head in order to
give enough head support during
the lift. Fold the sling so that its centre
corresponds to the patient’s spine
when the patient is turned back
again gently. Carefully pull the sling
out from the other side.
Insert the leg supports under
the legs. This is best done
by pressing the leg support
down against the mattress while
inserting it under the thigh. Make
sure the fabric lies flat and that
it reaches properly around the leg.
The leg supports can be connected
in different ways, see page 6.
Raise the head end of the bed.
First, connect the torso loops
to the sling bar and then the
upper strap loops. Choose loops
according to the patient’s needs,
see Adjustment of head support,
page. 7. Finally, connect the leg
support loops to the sling bar. Lift.
Alternative method of applying the sling: Raise the head end of the bed behind the patient. Lay the sling
on the bed with the product label facing down towards the mattress. Slide the sling down behind the patient’s
back so that the lower edge is in level with the coccyx. Tip! The application is facilitated if the patient leans/is
leaned forward.
Lifting to the Bed
Think about your own work posture as well as the comfort of the patient. Use the bed’s raising and lowering
functions.
If the bed is not equipped with a head end that can be raised/lowered, special attention must be paid
during the last part of the lowering, in order for the patient’s neck not to be strained. The caregiver should
then support the neck manually.
Removing the Sling when the Patient is Sitting in Bed
Position the patient above
the bed. Raise the head end
of the bed. Lower the patient
onto the bed.
Remove the leg supports by pulling out
the leg support loops under the fabric
part of the leg support. Tip: This is
facilitated if the patient’s legs are bent.
Remove the sling by carefully
pulling it up.
Removing the Sling when the Patient is Lying in Bed
Position the patient above the bed. Raise the head
end of the bed. Lower the patient onto the bed.
Lower the head end of the bed.
Place the leg support loops under the leg supports
between the patient’s legs.
Grasp the edge of the sling. Push in the sling
under itself. Press the sling against the mattress
and in under the patient.
Carefully turn the patient onto the side. Grasp the
sling from below and remove it carefully.
Fitting Advice
Different Ways of Connecting Leg Supports
Before a connection alternative is chosen, an individual assessment should be performed to anticipate possible risks.
The following are general advice since the same principles are valid for several sling models.
Crossed-over leg supports.
The most common way of applying
the sling. One leg support loop
is passed through the other before
the loops are connected to the sling
bar.
Overlapped under both thighs.
This can be appropriate, for
example when lifting a patient with
amputated legs. Tip: In order to
avoid the patient’s sitting posture
being too reclined, Extension Loops
can be attached to the leg support
loops.
Each leg support connected
separately to the sling bar.
This can be appropriate when lifting
patients with particularly sensitive
genitals.
Increased risk of sliding out.
Adjustment of Head Support
The head support of the SilhoutteSling can be adjusted for two different positions.
Alternative 1: The outer loop of the upper strap loop is connected to the sling bar. The patient’s head will then be
in a slightly reclined posture.
Alternative 2: The inner loop of the upper strap loop is connected to the sling bar. The patient’s head will then be
in a more upright posture.
Different Sitting Positions Depending on Choice of Sling Bar
SilhoutteSling in combination with Liko
Universal SlingBar 350/450 provides a
slightly reclined sitting posture.
SilhoutteSling in combination with Liko Sling Cross-bar
450/670 provides a more reclined sitting posture.
Universal SlingBar 350/450 in combination with SideBars
provides the same degree of reclined sitting posture.
The Patient does not Sit Well in the Sling – Why is This?
The following are general advice since the same principles are valid for several sling models.
WRONG!
A.
RIGHT!
B.
A. Risk of sliding out. The buttocks hang down. The sling
may be too large. It can also be due to the fact that the sling
has not been pulled down the patient’s back sufficiently.
Before lifting, check that the lower edge is stretched and
that the fabric reaches properly around the legs.
B. A sling that is too small can cause the leg supports to cut
into the groin, causing discomfort and the sling bar to be
too close to the face and/or the head to get sufficient support.
The lower edge of the sling is at the same
level as the coccyx. The leg supports are
properly positioned under the legs.
Shortening Position
In certain cases, it can be advantageous to shorten the leg support loop in order for the patient to sit well
in the sling. The shortening position can be used temporarily in order to test for the right length, but extended
use may damage the bartacks. If you want to shorten the leg support loop for long-term use, however,
we recommend that you tie a knot in the loop to shorten it about 10 cm (4 in). In this case, it is the outer
leg support loop which should be connected to the sling bar.
Overview Liko SilhoutteSling, Mod. 22
Product
Prod. No.
Size
Patient’s Weight¹
Max. Load²
Liko SilhouetteSling
3522603
XS
Extra Small
Liko SilhouetteSling
3522604
S
Small
20-28 kg (44-62 lbs)
200 kg (440 lbs)
25-50 kg (55-110 lbs)
200 kg (440 lbs)
Liko SilhouetteSling
3522605
M
Medium
45-75 kg (99-165 lbs)
200 kg (440 lbs)
Liko SilhouetteSling
3522306
L
Large
65-100 kg (143-220 lbs)
200 kg (440 lbs)
Liko SilhouetteSling
3522614
S
Small
25-50 kg (55-110 lbs)
200 kg (440 lbs)
Liko SilhouetteSling
3522615
M
Medium
45-75 kg (99-165 lbs)
200 kg (440 lbs)
¹The indicated patient weight is only a guideline – there may be deviations.
²For retained maximum load, lift/accessories intended for the same load or more are required.
3 Net polyester 6 Thin net polyester
3522- - 5
Indicates size
0 Without reinforcement in leg supports
1 Reinforced leg supports
Sling Cross-bar 670
SideBars +
Slim 350
3
3
2
1
3
3
2
2
1
1
1
1
1
1
1
1
3
3
2
2
1
1
2
2
1
1
1
1*
1
1
1
1
1
1
1
1
Explanation: 1 = Recommended, 2 = May work, 3 = Not advised, 4 = Inappropriate
* Arms outside the sling
Other Combinations
Combinations of accessories/products other than those recommended by Liko can result in risks for the safety
of the patient.
In those cases where another manufacturer recommends Liko’s accessories/products in combination with
their or others’ accessories/products, and the combinations are not approved by Liko, that manufacturer assumes
the responsibility for that combination. Liko then refers to the responsible manufacturer’s instruction guides
and recommendations concerning usage, maintenance, cleaning, checking and inspection of the combination
in order to fulfil the EN ISO 10535 requirements.
© Copyright Liko AB 2010-08
Sling Cross-bar 450
4
3
3
3
Univ. SideBars +
Universal 450
Cross-bar
2
1
1
1
SideBars +
Standard 450
Univ. TwinBar 670
2
1
1
1
Univ. SideBars +
Universal 350
Wide 670
Universal 350
1
1
1
1*
Universal 600
1
1
1
1*
Universal 450
1
2
2*
2*
Standard 450
SilhoutteSling, XS
SilhoutteSling, S
SilhoutteSling, M
SilhoutteSling, L
Slim 350
Recommended combinations
of the Liko SilhoutteSling and
Liko’s sling bars:
Mini 220
Combinations