1
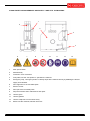
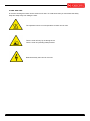
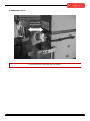
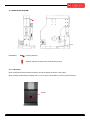
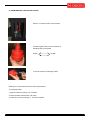
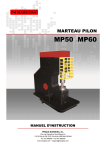
POWER HAMMER
MP50 MP60
INSTRUCTIONS BOOK
PRADA NARGESA, S.L
Ctra. de Garrigàs a Sant Miquel s/n
17476 PALAU DE STA. EULALIA (GIRONA) SPAIN
Tel. 972 568085 - Fax 972 568320
www.nargesa.com - [email protected]
www.nargesa.com
Thank you for choosing our machines
THERE IS A DVD INCLUDED
AS AN ESSENTIAL PART OF
THIS BOOK.
IT’S GOT THE STEP-BY-STEP
PERFORMANCE OF THE
MACHINE AND SOME
EXAMPLES OF WORKS
THAT CAN BE CARRIED OUT
WITH IT.
INSTRUCTIONS BOOK OF POWER HAMMER MP50
2
ÍNDEX
1. GENERAL NOTES …………….………………...……………………………….………….. 4
1.1. Introduction ……………......………………………………………………………… 4
1.2. Transport ………………….……...………………………………………………….. 5
1.3. Electrical information ……………………………………………………………….. 5
1.4. Maintenance …………………………………………………………………………. 5
1.5. Safety ………………………………………………………………………………… 5
2. GENERAL WARRANTY TERMS ……………………...…………………………………… 6
3. GENERAL SAFETY TERMS ….…………………………………………………………….. 7
3.1. General safety instructions ………………………………………………………… 7
3.2. Important points ………..…………………………………………………………… 7
3.3. Explanation for operator ……………………………………………………………. 8
3.4. Personal protection ………..………………………….……………………………. 8
4. MAIN SAFETY ARRANGEMENTS AND SAFETY LABELS OF THE MACHINE …... 9
5. RISK ANALYSIS …………………………………………………………………….……… 10
6. TECHNICAL DATA ……….…………………………………………………………….….. 11
7. AN IDEAL POWER HAMMER ………………………………………………………….… 12
7.1. Heavy-duty operation …………………………………….……………………….. 12
7.2. Operation …………..………………………………………….…………………….. 12
7.3. Lubrication sistems …………………………………………….…………………. 12
8. TRANSPORTING, LIFTING AND CARRYING …………………………….…………… 13
9. SAFETY AND WORKING AREA ……………………………………………….………… 14
10. MAIN DIMENSION OF THE MACHINE …………………………………….….………. 15
11. MACHINE FOUNDATION PLAN ……………………….………………………….……. 16
12. OPERATION SYSTEM OF THE MACHINE …………………….…………………...… 17
12.1. Flow chart ………………..……………………………………….………………… 17
13. FRONTAL PARTS GROUP ……………………….……………………….…………….. 18
14. THE CRANKSHAFT ……………………….…………………………………….………… 19
15. VALVE ADJUSTMENT ………………………..…………………………………………… 20
16. THE WORKING POSITION OF AIR VENTILE …………………..…………….……… 21
17. PART LIST ……….…………………………………………………………………….….. 22
18. EMERGENCY STOP ………………………..……………….…………………………… 24
19. LUBRICATION SYSTEM ……………………………………….………………………… 25
19.1. Lubrication ………………………………………………….…………………….. 25
20. THE WORKING LENGHT …………..……………………………….…………………… 26
21. MAINTENANCE FOR RETURN FILTER …………..………………….……………….. 27
22. CHANGING OF THE HAMMERS ………………………………………….……………. 28
23. ELECTRICAL SHEMAS ……………………………………………………….…………. 29
24. TOOLING ……………….……………………………………………………………………. 30
INSTRUCTIONS BOOK OF POWER HAMMER MP50
3
1. GENERAL NOTES
1.1. Introduction
This User’s Manual is absolutely for your safety and is essential for the machine to have a long production
life. As long as you keep up with our Manual you will be able to run your machine smoothly and safely.
Keep in mind that the machine is designed absolutely to perform maximum safety and for efficient working.
In this Manual you can find instructions and information about:
- Correct installations of the machine
- Description of the functional parts of the machine
- Set-up and start-up adjustments
- Correct standard and scheduled maintenance
- Simple safety regulations and accident prevention.
Therefore, as far as the user’s safety is concerned, in this handbook the possible risks con-nected with
machine operation are pointed out as follows:
Attention: Showing the risks of accident, if instructions are not followed.
Warring:
Showing the probable damages to the machine or equipment, if the in-structions are not
strictly followed.
Note:
It gives useful information.
It is certainly necessary that the operator should read and understand all the Attention, War-ring, Note specified in this Manual before starting with operation of the machine and before any lubri-cation or maintenance intervention
On all steps of installation, operation and maintenance safety must be your first concern for the protection
of yourself, other users and the service of the machine. In case of any failure please first refer to this Manual, and then if a solution cannot be found contact first of all the distributor where you purchased our product. Do not forget to refer to the draw¬ings and the numbers for any spare part needed or to define any
problem. Make sure you have the serial number and production year of the machine.
Our technical staff will make their best to help you in the most convenient way.
INSTRUCTIONS BOOK OF POWER HAMMER MP50
4
1.2. Transport
As soon as you receive the machine, check for any visible transport damages. Should there be any visible
damages; report it straight away to the transporter company and of course PRADA NARGESA SL or your
supplier.
Remove any protective crates around the machine and read the instructions on related chap¬ters of this
Manual carefully to set up the machine. If the machine is damaged while transport, immediately take some
photographs for insurance claims.
Take precautions while loading / unloading or moving the machine to avoid any injuries. Refer also to related chapter of this Manual for the best way of handling the machine.
1.3. Electrical Information
All necessary connection procedure can be found on this Manual. Do not try to connect the machine before
reading these procedures and fully understanding the drawings. For any unclear matters get in touch with
Prada Nargesa S.L. or any of the Nargesa distributors. Have the machine connected by a qualified electric
technician. For, as we made clear in the “general conditions of guarantee”, under no circumstances installing mistakes, including electrical connection mistake, can not be covered by guarantee agreement.
Always turn off power before making any con¬nections or disconnecting the machine.
1.4. Maintenance
Your machine is designed and produced to work efficiently and smoothly. To achieve this you should also
take care while operating the machine. Regard Maintenance sections to have the longest life from your machine. Try and use original spare parts where necessary and most importantly do not overload the machine
or do not make any unauthorized modifications.
1.5. Safety
Take all precautions possible to avoid any personal injury while using the machine. Keep in mind to protect
the third party people around the machine. Refer to safety directives.
INSTRUCTIONS BOOK OF POWER HAMMER MP50
5
2. GENERAL WARRANTY TERMS
- Your machine is covered by manufacturer’s guarantee for a period of 12 months from the date of purchase against manufacture defects. The warranty period does not exceed 18 months from the date of delivery
from the manufacturer’s factory.
- Warranty covers only manufacture defective parts and / or components that are reported as “defec-tive”
by PRADA NARGESA or the Agent Technician and must be reported to Sahinler in writing by fax or email.
- The manufacturer is responsible for the supply of free of charge spares only and cannot be held responsible for loss of work.
- Shipping and customs fees for the spare part must be paid by the end-user.
- If a technician travel is necessary NARGESA will not charge for labor and workmanship costs but the customer must pay traveling and accommodation charges.
- Warranty claim does not relieve the Customer from payment obligations.
- The Customer can not ask or demand any reimbursement of damage nor the Customer will have the right
to extend or delay payment obligations nor the cancellation of order and the refunding of damages as the
guarantee is given for the defective parts of the machine and not for the job.
Note: All warranty claims must be applied with the Model, Serial Number and the Manu-facture Year of the
machine.
INSTRUCTIONS BOOK OF POWER HAMMER MP50
6
3. GENERAL SAFETY TERMS
3.1. General Safety Instructions
Following instructions are meant for the operator of the machine and it is the End-User’s responsibility to
make sure the operator reads and understands the following and the User’s Manual for safe operation.
- Read the User’s manual before operating the machine.
- Never touch rotating or moving parts.
- Always inform electric faults to electric technicians.
- Keep your working dress or long hair or necklace etc away from rotating parts.
- Make sure you know the position of Emergency Stop Buttons on the machine.
- Switch off the machine when NOT working.
- Work with necessary safety clothes if necessary (safety shoes, glasses , earplugs etc).
- Control the Safety features before working and ensure they are working properly.
- See and understand Safety Labels on the machine.
- Perform periodic maintenance.
- DO NOT overload the machine.
- If you see abnormal behavior of the machine, stop the machine and inform your supervisor immediately.
- Be careful of other people around the machine during operation.
- Never modify electric unit.
- Never remove any mechanic or electronic safety features from the machine.
- Be extremely careful during transport or re-placement of the machine and follow transport instructions in
the manual to safety handle the machine.
3.2. Important points
- The machine must be used by qualified and technical personnel at all times.
- All modifications and changes on the machine without the written confirmation of manufacturer is forbidden and if such a case occurs all responsibilities of the manufacturer will be out of consideration.
- Any such modification is also breach of CE directives
- The machine can be stored and used in closed areas however beware not to put it near any explosive,
flammable or in any dangerous articles.
- In case any use of non-original spares or accessories and in case of injuries then, the manufacturer will
not responsible of such claims.
- Beware of third persons entering the operation area of the machine.
- Beware of any obstacles entering the operation area of the machine.
- In long term stand-by’s turn the main button to position 0 (zero)
INSTRUCTIONS BOOK OF POWER HAMMER MP50
7
3.3. Explanation for operator
Operator under age of 16 years to operate the machine is strictly forbidden (EC-Directive). The operator of
the machine should carefully read this manual and understand the danger he might be in if he misuses or
abuses the machine. If any part of this manual is unreadable or illegible please contact to the dealer and
manufacturer
The owner of the machine should be responsible for operating the machine with qualified personnel.
3.4. Personal protection
Gloves and safety glasses and safety cap are recommended during operator.
Attention:
- No material should be fed if the machine is running.
- All emergency stop must be easily accessible.
- The user must be careful for third persons entering the operation area of the machine.
Note: If any labels are lost or unreadable contact the manufacturer for new supplies.
PUSH THE “EMERGENCY STOP” BUTTON IN EMERGENCY POSITION AND PULL
YOUR FOOT.
DON’T USE COLD MATERİAL AT ALL
INSTRUCTIONS BOOK OF POWER HAMMER MP50
8
4. MAIN SAFETY ARRANGEMENTS AND SAFETY LABELS OF THE MACHİNE
1
5
2
3
4
6
7
8
9
10
11
12
13
1
Main power button
2
Machine body
3
Protection cover of hammer
4
Foot pedal; use the “foot pedal” to operation the machine
5
Emergency stop; “emergency button” instantly stops all the machine activity by disabling the electric
supply until released.
6
Don’t approach to the moveable parts.
7
Electric current
8
Don’t put to the moveable parts.
9
Stop the machine when maintenance and repair
10
Use the glove
11
Use the glasses
12
Use the earphone to environment noisy
13
Before use the machine,read the user book
INSTRUCTIONS BOOK OF POWER HAMMER MP50
9
5. RISK ANALYSIS
In machine working time there can be some kind of risks. To avoid these risks you must follow the safety
steps and keep away from taking the risks.
The operation is done in hot temperature so there can be risks.
There is a risk of burry fly out during the hit
There is a risk of spreading metal powders.
Natural electricity risks can be occurred.
INSTRUCTIONS BOOK OF POWER HAMMER MP50
10
6. TECHNICAL DATA
TYPE
MP50
MP60
Working outfit
Air - pressure pneumatic
Air - pressure pneumatic
Nominal dropping
50 Kg.
60 Kg.
Number of hits
220 rpm.
220 rpm.
Motor power
7,5 HP 1400 RPM
7,5 HP 1400 RPM
Hit course
Max: 230 mm.
Max: 230 mm.
Oil system
Pneumatic oiling system
Pneumatic oiling system
Control
PEDAL
PEDAL
Heads of hammer and
Heads of hammer and
anvil are intrechangeable
anvil are intrechangeable
1150 Kg.
1175 Kg.
Hammer and anvil
Approximate weight
ILLUSTRATIONS AND SPECIFICATIONS ARE NOT BINDING.
WE RESERVE THE RIGHT TO CHANGE THEM WITHOUT PRIOR NOTICE.
INSTRUCTIONS BOOK OF POWER HAMMER MP50
11
7. AN IDEAL POWER HAMMER
7.1. Heavy-duty operation
The MP50, MP60 power hammers have been manufactured with a solid structure. That is why in high-cost
works you always think of power hammers. In double-effect air-pressure operations as well as heavy operations high performance obtained. The steel-construction body, on which all parts and units are installed
gives dynamic rigidity.
7.2. Operation
The machine body contains two cylinders, run by an electric motor, the fly-wheel transfers air from the back
cylinder to the front cylinder, at the same time producing the shock. No external air is necessary.
These power hammers are used economically in small, medium and mass-production mechanical work
shops , reducing physical labour to a minimum.
Power Hammers have a wide working range including plain and carved mould works, inflating, drilling, hot
cutting, bending , bounding, open mould workings and many similar works like this.
7.3. Lubrication systems
Lubrication occurs with a developed, mechanical lubrication system, which is adjusted with a level according to working frequency.
INSTRUCTIONS BOOK OF POWER HAMMER MP50
12
8. TRANSPORTING, LIFTING AND CARRYING
Before preparing the machine for instal-lation and start-up, an accurate visual control is required in order to
detect any possible damages occurred during transporting and handling phases.
Your machine is located on a wooden grid and the package is a waterproof plastic cover.
If one or several parts of the machine have been damaged while shipping, the installa-tion of the machine
has to be suspended. PRADA NARGESA SL has to be informed of the unexpected occurrence straight
away.
While lifting take care of these points:
- Always lift and carry the machine from the handles.
- Take precautions for handling and lift-ing.
- Check if the load is properly balanced by lifting it some centimeters.
- Lift the machine, proceeding with care, without sudden accelerations or quick changes of directions.
- Place the machine where it must be installed, lower the machine slowly till it touches the floor.
Figure 1 shows a way of carrying the ma-chine.
Steel bar St 45, Ø25, Length: 450 mm.
You can use a crane with hook or a fork¬lift for
handling operation.
Attention: Lifting and carrying operations should be carried out by skilled workers, such as truck operator,
crane operator, etc. Also, it is necessary to keep in mind that having large safety margins will provide you
efficient working con¬ditions and enable you to take into consideration most of the precautions.
INSTRUCTIONS BOOK OF POWER HAMMER MP50
13
9. SAFETY AND WORKING AREA
The length of empty working free areas around the power hammer machine.
The manufacturer doesn’t accept any responsibility for damages due to the nonobservance
of the above specifications.
Note: All machines must be carefully adjusted before operation with a water gauge.
INSTRUCTIONS BOOK OF POWER HAMMER MP50
14
10. MAIN DIMENSIONS OF THE MACHINE
INSTRUCTIONS BOOK OF POWER HAMMER MP50
15
11. MACHINE FOUNDATION PLAN
The machine works with very high vibration. Therefore it must be firmly planted on a cement base.
1- Dig 1 meter deep hole
2- Cement the hole
3- Place foundation bolts while the cement is wet
4- Fill the empty space between hole and cement with hard sand. This will absorb most of the hit noise
5- After the cement is dry put 10 cm high mortar. Mortar must be filled with small pebbles for long service
life.
Place 5 cm thick hard wood on mortar and place the machine above and fix the founding bolts
INSTRUCTIONS BOOK OF POWER HAMMER MP50
16
12. OPERATION SYSTEM OF THE MACHINE
Before start to work, make sure that the handle be on "A” position (as shown in
the figure). Then start the machine and after a few seconds working, pull handle to "B" position. Now the
machine is ready to proceed hammering operation. When the machine stops pull handle back to “A”.
When the handle is on the position of “A” air is compressed from rear cylinder by the way of canal to outside ventile it doesn't let air to enter into the hammer.
Thus motor works and in a short time it reaches to high turning velocity. That
means, the air moves from cylinder to frontal side of power hammer, so , hammer
begins to hit upper body.(when handle is on “B” position).
B
A
12.1. Flow Chart
1. Make the necessary electrical wiring connection and check if the motor is turning right
2. Clean up all protective oil on machine piston
3. Turn right the main function switch then machine starts to run(you will hear the voice)
4. The machine has A/B lever.Please take the lever to the B position.
5. After the lever on B position the piston starts to get upper
6. Then push the foot pedal then piston will start to hit down
7. In this case you can forge the parts you need
8. Please pay attention to lubricate the machine daily
9. Just open oil pump half tour during the machine operation
10. See oil level glass if the oil is finished please fill up the oil tank
11. When closing the machine off First get the A/B lever to the A position
11. When closing the machine off First get the A/B lever to the A position
13. Also pay attention during changing the die(Tool)do not hit the hammer to the surface of the piston. This
is very important point in order not to damage the piston
INSTRUCTIONS BOOK OF POWER HAMMER MP50
17
13. FRONTAL PARTS GROUP
Front piston
Ram die key
Front piston head
Ram die
Anvil die
Anvil die key
Die holder
Anvil
INSTRUCTIONS BOOK OF POWER HAMMER MP50
Anvil bed
18
14. THE CRANKSHAFT
Piston arm is pinned to the shaft to avoid the parts getting loose which are connected.
Before changing belt. Piston arm must be loosened (by using two screwdriver to counter bolt and nut.)
At every 200 working hours, the bolts and nuts must be controlled and tightened once a more.
Front hammer ring
INSTRUCTIONS BOOK OF POWER HAMMER MP50
Back piston ring
19
15. VALVE ADJUSTMENT
This valve is used to adjust
The machine is adjusted in the factory for optimal hit. It MUST NOT be changed.
If this adjustment is changed for any reason and if you need to readjust the hitting power of the machine
follow these steps:
1. Loosen the counter-nut
2. For harder hits rotate the adjustment screw clock-wise
3. For softer hits rotate the adjustment screw counter-clock-wise
4. Always leave min. 2 mm distance between adjustment screw and the spring
5. If the distance between spring and screw is less than 2 mm the hammer will not move
If the distance is too much hammer will hit irregular
Adjusting bolt
INSTRUCTIONS BOOK OF POWER HAMMER MP50
Counter nut
20
16. THE WORKING POSITION of AIR VENTILE
1. The air ventile of machine is shown in the figure, is the position of stop position. When the handle comes
to A position, the air is pumped out from compression cylinder. Because M and N canals are open
so it is sent out from N canal passing over a filter. At this position food-pedal stays above
Note: In this position you can not pump air into the front cylinder. If it goes into front cylinder the hammer
might loose
2. In the second figure, air is compressed into hammer directly. In this connection, power hammer begins to
work in a full tempo. Because the N canal is closed.
INSTRUCTIONS BOOK OF POWER HAMMER MP50
21
17. PART LIST
INSTRUCTIONS BOOK OF POWER HAMMER MP50
22
Nr.
DESCRIPTION
Nr.
DESCRIPTION
1
Die seat
32
Oil tap
2
Die key
33
Oil reservoir
3
Bottom die
34
Back cylinder
4
Top die
35
Back piston
5
Front piston
36
Back cylinder nech
6
Top die key
37
Back cylinder nech nut
7
Front cylinder neck
38
Crank arm
8
Assembly bolt
39
Crank cylinder housing
9
Front piston bronze key
40
Crank shaft
10
Front cylinder
41
Flywhell
11
Front piston metal ring
42
Motor belt
12
Cylinder cap assembly bolt
43
Motor
13
Cylinder cap
44
Exhaust
14
Ram adjusting ball
45
Anvil
15
Ram adjusting valve
46
Anvil not
16
Ram adjusting valve nut
47
Anvil spring
17
Spring
48
Anvil bolt
18
Pipe
49
Back cover bolt
19
Top valve
50
Electric box
20
Top valve housing
51
Spring washer
21
Bottom valve (A-B)
52
Top cover seal
22
Bottom valve housing (A-B)
53
O-Ring
23
Plastic hose
54
Seal
24
Air exhaust bolt
55
Back piston spring
25
Back cylinder cap
56
Oil Cap
26
Air intake adjustment valve
57
Oil gauge
27
Bolt
58
Belt tensioner
28
Air ıntake adjustment bolt
59
1306 ball bearing
29
Back piston metal ring
60
30210 conical bearing
30
Oil adjustment ball
61
30308 conical bearing
31
Spring
62
6004 ball bearing
INSTRUCTIONS BOOK OF POWER HAMMER MP50
23
18. EMERGENCY STOP
Push to stop
Pull to release
Pull the emergency stop button firmly to release
INSTRUCTIONS BOOK OF POWER HAMMER MP50
24
19. LUBRICATION SYSTEM
Explanation:
Oil Can (SAE 30)
Greaser (Grease must be press at 200 working hours)
19.1. Lubrication
Open oil tap (behind the machine) clockwise and oil the piston as shown in the picture.
Open oil tap 5 minutes during working every 1 hour or open it low position (1/4 turn ) and oil it all day.
Oil tap
INSTRUCTIONS BOOK OF POWER HAMMER MP50
25
20. THE WORKING LENGTH
The working length of HAMMER is shown in the figure
MP50
MP60
Dimension 1
400 mm
400 mm
Dimension 2
340 mm
340 mm
Dimension 3
225 mm
225 mm
ATTENTION
The stroke of the machine is 230 mm. However, if the bottom cement which is under the anvil gets loose,
the stroke will be longer.(more than normal length) it may cause damage on machine neck.
The anvil which is tightened by pins, can break the neck screws, if it gets loose and it that position the machine is worked. Both events will cause big damage on the machine, and these points must be checked
before operating.
INSTRUCTIONS BOOK OF POWER HAMMER MP50
26
21. MAINTENANCE FOR RETURN FİLTER
Picture 1 is view the filter in the machine
The filter tightens way of anti-clockwise or
dismantle way of clockwise
OPEN
CLOSE
To use air-pistol for cleaning the filter
Cleaning the return filters and write same explanations
To change the filter
1. Open the filter by turning it to clockwise
2. Clean the filter element with a air pistol
3. Close the cover by turning it to counter-clockwise
INSTRUCTIONS BOOK OF POWER HAMMER MP50
27
22. CHANGING OF THE HAMMERS
Powerhammer has two changeable hammer on it. If one or two hammers must be changed then firstly please tie the handle, which is on the up position, with a hard wood.
Please turn off the main switch. If needed to change both hammers.
Untie the iron key assembled on the hammer and let it be away.
Please be careful when changing the up hammer. Than locate the other hammer there and tie with the key.
Both hammer must be parallel to each other. The key which will tie the upper hammer should always be
assembled from front side. The key which will tie the bottom hammer should always be assembled from the
back side.
To adjust the hammer’s parallelism, sheet materials must be assembled shown on the picture to have the
parallelism.
Sheet metals
INSTRUCTIONS BOOK OF POWER HAMMER MP50
28
23. ELECTRICAL SCHEMAS
ELECTRICAL PARTS LIST (400V)
SO --- EMERGENCY STOP (FAK-R/V/KC01/IY MOELLER)
Q1 --- RELAY THERMAL OVERLOAD PROTECTION OF MOTOR L (10-16A) (PKZMO-16 MOELLER)
H1 --- LIGHT INDICATOR (230 .... 400 V) (L-RT-PKZO MOELLER)
U --- TRIPS VOLTAGE (230 .... 400 V) (E-PKZO MOELLER-GR)
INSTRUCTIONS BOOK OF POWER HAMMER MP50
29
24. TOOLING
REF 140-14-01-00001
REF 140-14-01-00002
REF 140-14-01-00003
REF 140-14-01-00004
REF 140-14-01-00005
REF 140-14-01-00006
REF 140-14-01-00007
REF 140-14-01-00008
REF 140-14-01-00009
REF 140-14-01-00010
REF 140-14-01-00011
REF 140-14-01-00012
REF 140-14-01-00013
REF 140-14-01-00014
REF 140-14-01-00015
REF 140-14-01-00016
REF 140-14-01-00017
REF 140-14-01-00018
REF 140-14-01-00019
REF 140-14-01-00020
Standard tooling
INSTRUCTIONS BOOK OF POWER HAMMER MP50
30
REF 140-14-01-00021
REF 140-14-01-00022
REF 140-14-01-00023
REF 140-14-01-00024
REF 140-14-01-00025
REF 140-14-01-00026
REF 140-14-01-00027
REF 140-14-01-00028
REF 140-14-01-00029
REF 140-14-01-00030
REF 140-14-01-00031
REF 140-14-01-00032
REF 140-14-01-00033
REF 140-14-01-00034
REF 140-14-01-00035
REF 140-14-01-00036
REF 140-14-01-00037
INSTRUCTIONS BOOK OF POWER HAMMER MP50
31
WARRANTY REGISTRATION
1. Among www.nargesa.com on our site
2. Select the menu Warranty Registration
3. Complete the form with your details and press Send
4. The window Message Sent confirms your data has been successfully sent to Prada
Nargesa SL. Your machine has been registered and has a warranty of three years in
total.