1
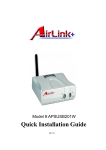
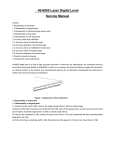
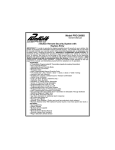
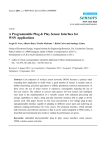
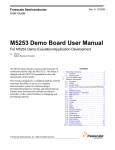
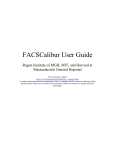
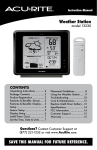
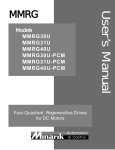
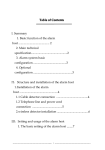
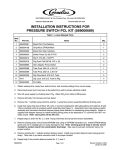
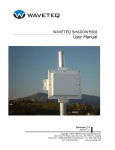
Dear User, Much appreciated for purchasing our lock! To help you quick understand the operation and have good states of the lock, please read this manual carefully before use and keep it for further reference. This manual introduces the product configuration, function and operation, installation and maintenance, also FAQ included for your reference and study. Please kindly noted this manual applies to I100 series lock only and not applicable to the others models we produced. Due to the technology development, we may do some necessary improvement for our product without notice in advance, but we ensure that the products will be more excellent and will not affect your use and operation. Please kindly understand and hope you will enjoy our lock! Thank you! Contens Chapter1 Product Introduction.............................................................. 1 ¾ Product structure ........................................................................... 1 ¾ Product Features ........................................................................... 2 ¾ Door Open Directions & Lock Handle Choice ............................... 4 Chapter2 Operation and Use .............................................................. 5 ¾ Keypad & Display Introduce .......................................................... 5 ¾ Initial Status ................................................................................... 6 ¾ System Reset ................................................................................ 6 ¾ User Privilege ................................................................................ 7 ¾ Management Menu Diagram ......................................................... 9 ¾ Enter Management Menu ............................................................ 10 ¾ User management ....................................................................... 11 ¾ Set language/date/time/time format/silent mode ......................... 15 ¾ Check Record .............................................................................. 17 ¾ Expand Function.......................................................................... 18 ¾ Unlock Mode................................................................................ 22 ¾ Emergency Power Supply ........................................................... 23 ¾ Load Batteries and use................................................................ 24 ¾ Normal Opening Function............................................................ 24 ¾ Keys Alarm Function.................................................................... 24 ¾ Tips of Fingerprint Collection ....................................................... 25 Chapter3 Installation ......................................................................... 26 ¾ Installation picture........................................................................ 26 ¾ Installation step............................................................................ 27 Chapter4 Maintenance and Warranty................................................. 32 ¾ Routine Maintenance................................................................... 32 ¾ FAQ.............................................................................................. 33 Appendix ............................................................................................. 35 ♦ Important Notes ........................................................................... 35 Technical Parameter .................................................................... 36 Principles for Warranty ................................................................ 37 Packing list................................................................................... 38 Chapter1 Product Introduction This chapter will introduce the I100 serial model fingerprint door lock’s structure, features, function and working enviroment, it will help you to understand the lock well and fast. ¾ Product structure Antenna(Option) Sliding Cover Defence function button Fingerprint sensor Battery Indicator light Battery Cover LED display Knob Reset button Touch keypad Lock body Lock body Handle Handle key Screw cover Emergency power interface Indoor Outdoor Note: This manual applies to I100 series lock, the pictures aboved for information only. 1 ¾ Product Features Unlock Mode Unlock by Fingerprint / Password / Mechanical key Unlock by Combination mode: Password+Fingerprint; Fingerprint+Fingerprint Unlock by Remote control(option) Double Locked Function The door can be double locked on carry handle inside or outside, The multi-point mortise, top and bottom bolt will both closed. Normal Opening Mode(Passage Mode) This lock can be set to Normal Opening Mode in which state can be directly down to open the door handle. Enter Opening mode: After fingerprint or password (except management password) verification the success, long press numeric keys 9 before opening the door, system tip operation success, enter normal opening mode, green lights flashing(about 3 seconds a flash) in this mode. Cancel Opening mode: You can cancel normal opening mode by opening the door a either way(except mechanical keys) or taking down the battery power. Multiple Alram Function Door not closed competely alarm Standard: When the door not closed completely and latch bolt under press status, the lock will sound beeps and red indicator light flashing after 5 seconds. Option: Security Manager HSC100 will send the notice message to the registered mobile phone. 2 Keys unlock alarm The lock sounds alarm when the door unlocked by any keys. Tamper alarm When the lock body be removed or opened by force, It will caused alarm and the red indicator light keep flashing. The alarm will last 30 seconds. Note: The alarm can be cleared after unlock operation by any register fingerprint or password(except key). Low battery warning When battery going too low, there is a warning both on the LCD display and red indicator light. Please replace battery. False password alarm Input the error password 3 times or invalid 32 digits in total, the keypad will auto-locked for 15 minutes. During this period, any operation is invalid and will lead alarm. Duress alarm(option) Duress User ID number: 90-99 When under duress status, the duress finger will activate the alarm and it will be deal as a background task, the alarm signal will send to the registed mobile automatically. Note: The Security Manager HSC100 should be installed and with correctly registration. For details please refer the Security Manager HSC100 manual. 3 Message Interactive function(option) The lock connecting with the security manager by wireless. • Any unlock operation(except by keys), the security manager will send a unlock notice message to the registered mobile phone. • Tamper alarm, Password breaking alarm and Duress alarm, the security manager will send alarm notice message to the registered mobile phone. Note: For details, please refer the security manager HSC100 manual. ¾ Door Open Directions & Lock Handle Choice Left open door/Left handle lock when you stand outdoor, the fixed hinges are on the door left side, that be defined as a left opening door, it shall matching the left handle lock. which be further divided into left (push) handle lock and left (pull) handle lock. Right open door /Right handle lock: when you stand outdoor, the fixed hinges are on the door right side, that be defined as a right opening door, it shall matching the right handle lock. which be further divided into right(push) handle lock and right (pull) handle lock. 4 Chapter2 Operation and Use This chapter will introduce the operation of I100 series fingerprint door lock, include the general function and management setting. Please carefully remember the registered user’s information. ¾ Keypad & Display Introduce The I100 mode with touch keypad design, total with 12keys. Keys & Function: 1. 0~9 digital and letter keys. 2. “3” & “6” integrate the UP/DOWN function; 3. “#” for confirm or wakeup the lock 4. “ * ” for cancel, return to the last level menu and delete user. Cancel keys “ * ” will be valid when setting user name, user ID number and user password. It’s not support to cancel the error digital input when unlock by password! Note: The touch keypad only working when it be activated. Activate method: Just touch the kaypad area by hand, the kaypad will wakeup and the keys will lighting. 5 Just touch the kaypad the kaypad will wakeup area by hand and the keys will lighting ¾ Initial Status Fingerprint record is zero; Admin password is 00123456; Time format: 24 hour; Language: Chinese Voice: Chinese Key unlock alarm: Closed Note: Please to register your own admin password and admin fingerprint as soon as the lock finished installation. ¾ System Reset Remove the battery-box cover on the indoor side. Press and hold the reset button by a needle (as following picture). The normal password user and fingerprint user will be cleared all. Admin password renew to the default 00123456. The Admin fingerprint will still exist after reset operation. reset button example 6 Note: 1) Kindly recommend do reset operation only under status by admin password forgot. Otherwise it need to re-enroll all user one by one! 2) System language should be setting after each reset operation or replace the battery. ¾ User Privilege Items Capacity User ID Privilege Admin Password 1 group 00 add/delete/clear user password, user fingerprint, remote control; reset admin fingerprint/password; enroll/cancel Security Manager. User Password 9 groups 01-09 unlock the door Admin fingerprint 1 00 add/delete/clear user password, user fingerprint, remote control; unlock the door; reset admin fingerprint/password; enroll/cancel Security Manager. User Fingerprint 99 01-99 unlock the door (90-99 also with oblige alarm function ) Admin Mobile (Option) 1 00 unlock/lock the door, Security Manager management Remote control (Option) 10 00-09 unlock/lock the door Note: 1. Password introduce: a) Each lock can be store 10 groups(00~09) passwords b) The 00 is the default admin ID Number, 01-09 is user ID Number. c) Password consists of 8 digits (2 digits ID No.+6 digits password). Example: Admin password: 00123456. 00 is the ID No., 123456 is the password. Shall input all the eight digits completly when unlock the door. d) The ID no. can’t be repeat(the system will refused enroll automatically). Each ID No. matching with one group password and only. 7 2. Fingerprint introduce: a) Each lock can be store 100pcs(00~99) fingerprints. b) The 00 is the default admin ID Number and 01-99 is user ID Number, Note: 90-99 are ID number for duress alarm fingerprint. c) The ID no. can’t be repeat(the system will refused enroll automatically). Each ID No. matching with one fingerprint and only. d) Fingerprint can’t repeat also(the system will refused enroll automatically). Each finger should be enroll once and only. e) 3. Place your finger for collection or verification when the reader lights on. The admin password and admin fingerprint is very important and can support all the management and setting. Such as reset the admin password/admin fingerprint, add/delete new user and etc. Please to register your own admin password and admin fingerprint as soon as the lock finished installation and keep in good memory for futher management. 8 'r Management Menu Diagram II Mainmenu I I II II u II II I Reset Admin PW Reset Admin FP Add user PW Add userFP Delete user PW Delete user FP Clear user PW Clear user FP I II II II II II II II II II About I I Language Date Time Timer format Mute I I r Open records Resetting time I Check all record Designate PW Designate FW Designate RM 9 User space Add remote Delete remote Eruoll Sec Mgr Cancel Sec Mgr II ¾ Enter Management Menu Only the admin password and admin fingerprint be allowed to enter the menu. By admin fingerprint verify admin fingerprint By admin password Verify success, Press up/down to press“#” to the select the menu, first leve menu press“#” to enter Sub-menu Input admin Password & press“#” Note: Move up the sliding cover will automatic wakeup the finger sensor.Also can press “ # ” to activate the sensor when timeout. 10 ¾ User management Reset admin password Enter the Sub-menu and select “reset Admin PW” by up/down key and press “#” to access. Operation interface as follow: Select the Menu and press “#” Input user name Input new password and press “#” and press “#” Repeat input the Operation Password and Success press “#” Note: After reset, the default admin password will be replaced by the new one. The default admin ID Number is 00, it will offer automatically by system and can’t be modified. User name be consist by 0~8 digitals or characters. It’s not obligatory (The following is the same). Reset admin fingerprint Enter the Sub-menu and select “reset Admin FP” by up/down key and press “#” to the access. Operation interface as follow: Select the menu Input user Name and press “#” and press “#” Put the same finger to the fingerprint Operation reader 3 times for image capture Success Note: The admin password Numbers fixed for 00 and can’t be modify. Please capture the fingerprint when the reader lights on. 11 Add user password Enter the Sub-menu and select “Add PW” by up/down key and press “#” to access next menu. Operation interface as follow: Select the menu Input user ID NO. Input user Input your and press “#” or use the default name and password and Repeat the password one and press “#” press “#” press “#” and press “#” Add user fingerprint Enter the Sub-menu and select “Add FP” by up/down key and press “#” to access next menu. Operation is same as the admin fingerprint reset Operation interface as follow: Note : 1) Repeat fingerprint is not allowed, lock will detect that and refuse to register; 2) 90-99 fingerprint ID NO. is for duress fingerprint; 3) User ID NO. can be input by manual or accept the default one. 12 Delete user password Enter the Sub-menu and select “Delete PW” by up/down key and press “#” to access next menu. Operation interface as follow: Select the menu and press “#” Press up/down to choose the password need be deleted and press “#” to confirm Delete user fingerprint Enter the second menu and select “Dele FP” by up/down key and press “#” to access next menu. Operation interface as follow: Select the menu Press up/down to choose the fingerprint user and press “#” need be deleted and press “#” to confirm 13 Clear user password (not including admin. password) Enter the Sub-menu and select “Clear user PW” by up/down key and press “#” to access next menu. Operation interface as follow: Select the menu and press “#” Choose “enter”+“#”, clear user password, choose “cancel”+“#” cancel the operation. Clear user fingerprint (not including admin. fingerprint) Enter the Sub-menu and select “Clear user FP” by up/down key and press “#” to access next menu. Operation interface as follow: Select the menu and press “#” Choose “enter”+“#”, clear user fingerprint, choose “cancel”+“#” cancel the operation. 14 ¾ Set language/date/time/time format/silent mode Please enter the first menu preparing for the follow setting. Language Setting Operation interface as follow: Select “Setting” Select “Language” Select the Operation and press “#” and press “#” language Success and press “#”to confirm Date setting Operation interface as follow: Select “Setting”and Select “Date” press “#” Input the year Input the month Input the date and press “#” and press “#” and press “#” and press “#” Operation Success Note: The year should between 2000 to 2099 and others is invalid. 15 Time setting Operation interface as follow: Select “Setting” Select “Time” Input the hour Input the minute Operation and press “#” and press “#” and press “#” and press “#” Success Note: If setting12 hour format that should to select A.M and P.M by button “#”, any other button is invalid. Time format setting Operation interface as follow: Select “Setting” Select “Timer format” Select Timer format Operation and press “#” and press “#” you want and press “#” Success Silent mode setting Operation interface as follow: Select “Setting” Select “Mute” and press “#” and press “#” Press up/down to choose mute on/off and press“#” to finish Note: When the silent function is effective, the alarm sound is still valid. 16 Keys Unlock Alarm Setting: Operation interface as follow: Select “Setting” Select “Key alarm” Press up/down to choose Operation and press “#” and press “#” key alarm on/off and Success press“#”to finish Note: When select keys alarm close mode, the lock will no sounds alarm when unlock by keys. ¾ Check Record(unlock record/reset time/ space remained) Please enter the first menu preparing for the follow setting. Open records z z z z z z Check All: All the records will be list by chronological. Designate Password User: Input the specific password ID NO., Designate Fingerprint User: Input the specific fingerprint ID NO., Designate Remote Control: Input the specific remote ID NO., Remote unlock records: Check all the records unlock by remote. Keys unlock record: Check all the record unlock by keys. Operation interface as follow(to check the designate password for example): Select “Check” Select “Open records” Select “designate Input the user ID Press up/down to and press “#” and press “#” check the record password” and press “#” 17 NO. and press “#” at different times Note: PW----unlock by password; FP------unlock by fingerprint; RM-----unlock by Remote Control; KY-----unlock by Keys. Reset time record(display the latest one) Operation interface as follow: Select “Check” Select “Resetting time” Display the latest ones and press “#” and press “#” User space (Check user count and space remained) Operation interface as follow: Select “Check” Select “User space” display enrolled password, and press “#” and press “#” fingerprint and the left ones, Press up/down to check ¾ Expand Function (Remote Control, Security Manager, Combination Mode) Please enter the first menu preparing for the follow setting. 18 Add remote control Operation interface as follow: Select “Expand” Select “Add and press “#” Input user ID NO.Input user name press the key of remote” and and press “#” and press “#” your remote press “#” Note: 1) The remote control ID NO. can be input by manual from 00-99 and also can accept the default one; 2) The remote control can’t be enrolled repeated, the lock will detect automatically and refused; 3) If failed caused by overtime or something wrong with the remote control, please repeat the operation. Delete remote control Operation interface as follow: Select “Expand” Select “Delete remote” Press up/down to choose the remote you and press “#” and press “#” want to delete and press “#” to confirm 19 Enroll Security Manager Operation interface as follow: Select “Expand” Select “Enroll Sec Input admin phone and press “#” Mgr” and press “#” NO. and press “#” Success, a confirm Enrolling… message will be sent to the admin phone Note: 1) Only administrator’s cell phone NO. can be allowed to manage the Security Manager HSC100. 2) The Security Manager HSC100 should be under enroll status. 3) ) Please do again if shows failed or no reply after 20 seconds. For details, please refer the Security Manager HSC100 manual. Cancel security Manager Operation interface as follow: Select “Cancel Sec Choose “Enter”+“#”to confirm Mgr” and press “#” “cancel”+“#” to cancel the operation. Note: Canceled the Security Manager will disable the remote unlock operation, but alarm function is working still! 20 Add Combination Mode (Password+Fingerprint, Fingerprint+Fingerprint) Select”Add Combination” and press”#” Select”PW+FP” or “FP+FP” mode, Press “#” confirm Input one group of the registed password or one of the registed Fingerprint, press “ #” confirm Input another Operation fingerprint that Success need to binding, press”#”confirm Note: 1) The combination only available for the users already registed. 2) Admin password and admin fingerprint is not allowed be combination. 3) Each password and fingerprint can be combination once and only. Delete Combination Mode Select the Select”Delete combination need Combination” to delete and and press”#” Operation Success press”#” About the lock itself verify administrator→press“#”→about →press“#”, it will shows you the information of the lock. 21 ¾ Unlock Mode Unlock by key i. Pull out the key cover by the key hook attached. ii. Insert the key and rotating 270 degree, Then turn the lever to unlock the door. Note: If the alarm been set, the lock will sounds alarm when unlock by keys. Unlock by user password i. Wakeup the touch keypad, input 8 digit user password(2 ID NO. +6 digit password), press “#”. ii. The green indicator lights on means verify sucessful. Turn the handle to unlock the door. Note: Under combination mode, after the password input, it should to vefiry the fingerprint that be bindinged to unlock the door. Unlocked by fingerprint i. Open sliding cover, the finger sensor will active and lights on, put the finger on the sensor. ii. The green indicator lights on if verify sucessful. Pull down the lever to open the door. Note: 1) The “#” button can activate the lock again if operation timeout(no need to sliding cover again) 2) Under combination mode, the 2 different fingerprints in the same group be required to unlock the door. 22 About Combination Mode: 1. The sequence(who first, who second) for the 2 user in the same group without limited 2. The unlock record for the 2 users will both stored in the memory 3. The notice message in mobile phone will only show one user. 4. Any user in the combination be deleted, the combination will invalid automatically; The remained user can unlock the door alone. Unlock by remote control(optional) Just for the locks with remote control. Press unlock/lock button, could unlock/lock the door. Remote control distance is about 80 meters with the surrounding environment. ¾ Emergency Power Supply In case that battery runs out and mechanical key has not been taken along, an external 9V battery (6F22, 9V) can work as an emergency power supply. Connect it to the interface at the bottom of the exterior assembly to supply power. And then unlock the door by all the other way. 9V battery (6F22, 9V) 23 ¾ Load Batteries and use Method A. loosen the screw and remove the cover. B. Put the corresponding battery into the boxes based on the specifications of the locks. C. Fix the cover back. Notes Please use the high quality AA alkaline battery that meet lock requirement; When out of service for a long period, batteries should be taken out; Never mix the new AA battery with the used one; Take out the battery if the lock will in idle long time; Preserve the environment by handing over the used batteries to the designed place for reclaim; Keep the batteries away from children and pets; ¾ Normal Opening Function Setting: After fingerprint or password(except the Admin password) verify successful, press “9” before put down the handle to open the door. When the green indicate light flash every 3 seconds, it means normally-open function is activated. Cancell: Unlock by normal modes (except key), the normal opening mode will cancell automatically. Or it can be cancelled by reinstall the battery inside. ¾ Keys Alarm Function When the setting be activated, any keys unlcok the door will lead alram. The alarm will last about 30 seconds and can’t be clear, it will auto-stop after 30 seconds. 24 ¾ Tips of Fingerprint Collection The principle of fingerprint identify technology that is comparing the features from the 2 different templates of the same finger, so collect the fingerprint correctly will significant enhance the success rate of verification. Method: put the finger on the reader moderately. Refer to the following figures: OK NO NO OK NO NO OK OK NO NO 25 Installation Chapter3 This chapter will introduce the installation of I100 series. ¾ Installation picture 13 12 01 Door Frame 11 02 Striking box 10 03 Striking Plate 04 Screw 05 Bottom Latch 06 Mortise 07 Door 08 Spindle 09 Lock body(Outside) 10 Top Latch 11 Spindle holder 12 Lock body(Inside) 13. Screw 08 04 01 02 05 06 07 03 26 09 ¾ Installation step Step 1 Drilling Holes on the Door This product is applicable for wooden doors and burglarproof doors. The hole pattern picture 1 is as follows (please follow the 1:1 template in the packing list): picture1 27 Step 2 Drilling Holes for Striking Box As shown in picture 2, process the striking hole and make sure that it is at the same height with the lock and that it aligns with the edge of door when closed. Tapping screw for wooden door Metric screw for iron door A 15 2.5 88.8 95.8 162.8 240.5 26.5 18 A Section A-A picture2 Step 3 Determine the direction of mortise As shown in the picture 3 confirm the position of Latch bolt first before install the Mortise. If it is in the opposite position, loosen the Latch bolt fixing screw first and then pull the latch bolt out and rotate it by 180 degrees, then fix it and tighten the screw. Rotating position Latch bolt fixing screw Picture 3 28 Step 4 Determine the unlock direction slid the slider according to the direction of arrow, Rotating handle can adjust the direction of door opening picture 4 Step 5 Fix mortise As shown in the picture 5, use tapping screw to fix mortise and top/bottom bolt on the door. top bolt door mortise tapping screw bottom bolt picture 5 29 Step 6 Fix the spindle As shown in the picture 6, install the spindle head on the door aim to the mortise hole and put into the hole on the door. fixing screw spindle spindle head spindle door(inside) picture 6 Step 7 Install exterior and interior As shown in the picture 7, put the exterior wire harness through the hole to the back side door then connect with the power wire, then aim the interior lever hole to the spindle, knob to the mortise hole, use screw to fix exterior and interior assembly and install the battery cover and insert the cover plug. Lock body Power Cable Lock body(Inside) Spindle Screw M6 Screw M4 Door Spindle Holder Battery box Cover Screw Cover Picture 7 30 Step 8 Install striking box and striking plate As shown in the picture 8, install striking box on the door frame and install the striking plate, use four screws to fix it check and make sure that the mortise works well at last. Tapping screw for wooden door, metric screw for iron door. Striking box Striking plate door frame Fix with screws Picture8 Step 9 Adjustment When the lock is fixed on the door, please adjust it as Chapter 2 till the lock works well. Notes for Installation Check the door thickness before installation whether it is within the requirements. I100 series are applicable for door thickness of 40-100mm. Do not press the internal wire harness when fixing assemblies. During installation, handle the lock carefully so as not to scratch the assemblies. 31 Chapter4 Maintenance and Warranty This chapter will introduce the maintenance and FAQ of I100 Series fingerprint door lock. ¾ Routine Maintenance The lock face is prohibited to contact with corrosive substances so as not to damage the prevention layer of the lock face and affect the glossiness of lock face. The lever is a key part of the door lock, and its performance will directly influence its operation. Do not hang any objects on the lever. If the door is deformed, the friction between bots and striking box will be enlarged and the bolt cannot extend fully. Hereby, the position of door striking plate should be adjusted. The surface of reader will be dirty or wet after use of a long time. Here, you can wipe off the dirt with a dry and soft cloth. Please according to the specific models to replace the AA batteries timely when low battery warning has been heard. Pay attention to the positive and negative poles of batteries during replacement. Please keep the mechanical key well. Do not use any hard and sharp object, including fingernail, to scratch the reader. Put the finger flat on the reader during acquisition and verification. If the lock can not be rotated flexibly or the lock can not be kept in correct position, you should invite the professionals to fill the mortise with mechanical lubricant. Ensure that transmission part of the assemblies with lubricant to maintain its smoothness and extend its lifetime. It is recommended to check the screw condition once every six months or one year. Add some graphite powder or pencil powder to the keyway regularly (six-month or one year) or when the key cannot inserted or pulled out smoothly. However, any oil is rejected so as to prevent the grease sticking the ball spring and the cylinder cannot rotate and unlocked. 32 ¾ FAQ Problem 1. After successfully fingerprint/password/ remote control verification, the green LED light will be on but the door can not be opened. Cause ①Incorrect installation of lock. ②Mechanical problems of mortise or the lock cylinder wire harness is damaged or installed incorrectly. Please turn to professionals for help. ①Use the wrong key. Use correct mechanical key. Try to open the door first, and ask a professional to check the lock and replace the damaged parts with new ones. ②The cylinder is damaged. 2. Can not unlock the door by mechanical key. ③The mortise is damaged. ④There are some mechanical problems with clutch. ①This fingerprint has not been enrolled. ②This fingerprint has been deleted. ③The position of the effective fingerprint is offset too much. ④This fingerprint is damaged. 3. After fingerprint verification, it is indicate that the verification is failed Solution ⑤The finger is too dry or wet or cold. ⑥Press the reader too Tightly so that the fingerprint is deformed. ⑦Press the reader too slightly and most of the finger is not on the reader. ⑧Influenced by direct sunlight. 33 Unlock the door with enrolled fingerprint or by the other way. Verify the fingerprint again. Put the finger flat on the reader and narrow the distance between reader and finger, or unlock the door by other way. Enroll other fingerprint (It is recommend that One user enroll over 2 fingerprints); or unlock the door by other way. Keep the finger wet\dry\warm, before verification or unlock the door by other way. Use the correct way to verify the fingerprint again. Use any opaque object to cover the light and then verify the fingerprint. Problem 4. Rotate the exterior lever, but the latch can not retract completely. 5. After verification of enrolledpassword/fingerprint/ remote control, the motor is not activated and the door can not be unlocked. Cause ① Dirt bonded on parts has blocked the cylinder. ② Top and bottom bolt are loosen ①The connection wire is loosened. ② Problems with motor. ①The batteries run out or the positive and negative poles are reversed. 6. No response from keypad. 7. After verification of enrolled password/fingerprint/ remote control, the motor is activated, but the exterior lever turns uselessly, and the door cannot be unlocked. 8. The door lock is in normally-open or normally-closed status, and cannot be used normally. 9. Can not unlock/lock the door by remote control ②The keypad locked automatically after input the wrong password 3 times or 32 digit password ③The connection wire harness for exterior and interior assemblies is loosened. Solution Please turn to professionals for help. Ask a professional to check the door lock and replace the damaged parts. Check the battery after unlocking the door by emergency power supply or by other way. Operating the lock 15 minutes later, or unlock the door by other way. Ask professionals to check the lock after unlocking the door by mechanical key. ①The lever does not return when verifying. Verifying after returning the lever. ②No mounting spring is installed in the lever. Ask professionals to check the lock. ①Problems with clutch. ②No mounting spring is installed in the lever. ① The power is run out or remote control is broken(no light responding) ② Something wrong with the lock (remote light is on) 34 Ask professionals to check the lock. Replace the battery or ask professionals to check the remote control. Ask professionals to check the lock. Appendix ♦ Important Notes 1. Fingerprint lock is a kind of high-tech product, The installation always direct impact on the operation and service life of the lock. We stronly recommend to install the lock by professional person. 2. Kindly recommend to install the lock after room decoration. That will avoid the lock surface be damaged and also protect the lock from influenced by the wet paint. 3. After installation and test, please clear all users information (Fingerprints and Password) in the lock memory, then register your own admin password and admin fingerprint at the first time. 4. To avoid any inconvenience caused by the flat battery, please replace new 5. If you are going for long trip or the lock will unused long time, please carry the batteries as soon as the low voltage alarm happens. keys along with you, and remove the batteries to ensure the service life of the lock. 6. If the user have bad quality fingerprint, we recommend to try the thumb and each user to register 2 fingers. 7. User capacity: Fingerprint 100pcs; Password 10 groups(8 digits each). Remote Control: 10pcs. 8. Please record clearly all the user information and fill in the Registration Form for further management as below. 9. Factory default: administration password is 00123456, no fingerprint in memory. 24 hour time format. 35 Technical Parameter No. Item Technical Parameters 1 Sensor resolution 2 Anti-sabotage ability of sensor 3 Start-up time ≤ 5 second 4 Contrast 1:N 5 FRR ≤1% 6 FAR Enrolled information and other settings ≤0.0001% The information will not lose when out of power or replacing batteries. 8 Search angle 360° 9 Fingerprint update model Auto update 10 Fingerprint template capacity 100 11 Password setting Random combine 12 Password length 8 digits ( 2 digits ID NO. + 6 digits password) 7 Bright background, 500dpi Free of damage by 1000 times of continuous impact with a 4H pencil 20cm away. 13 Password capacity 10 groups 14 Remote control capacity(Option) 10 15 Cell Phone Capacity Depends on the security manager HSC100’s capacity 16 Voice Prompt Human Voice 17 Operating system Double circuits 18 Power supply AA batteries 2 groups each group contains 4 PCS 19 Operating voltage 6V 20 Emergency power supply 9V DC 21 Lifetime of battery for fingerprint 5,000 times to unlock the door 22 Lifetime of battery for password 6,000 times to unlock the door 23 Low battery warning 4.8±0.2V 24 Static power consumption 25 Dynamic power consumption ≤ 130 μA <250mA 26 Anti-static 8KV for touch discharge, and 15KV for air discharge. 36 No. Item Technical Parameters 27 Operating temperature 28 Operating humidity -10℃ to 55℃ 10% to 90% 29 Storage temperature -20℃ to 70℃ 30 Light interference 31 Reader Avoid strong direct light. Hard glass, nano-finish surface, extremely resistant to friction. 32 Open door direction Left handed and right handed Note: Parameters subject to change without prior notice for technology innovations by the company. Principles for Warranty Our company offers lifelong maintenance for the products. The warranty period free of charge is within one year from the date of purchase. When the warranty period is expired, the maintenance fee will be charged for the products. As for the following situations, the free maintenance service will not be offered: 1 The products without warranty card or any valid purchase certificate; or the warranty or purchase certificate do not conform with the products; 2 Damage caused byanthropicfactor including the unnormal working environment, incorrect operation mode or bad quality battery. 3 Disassembly, repair or any change for the lock without unauthorized. 4 Damaged by force majeure. 37 Packing list No. Name Amount 01 Exterior assembly 1 02 Interior assembly 1 03 Mortise 1 04 Striking plate 1 05 Striking box 1 06 Cross head screw(optional) 4 07 Spindle(optional) 2 08 Screws for mortise and striking plate (optional) 8(iron door) 6(wooden door) 09 Exterior shim plate 1 10 Interior shim plate 1 11 Mechanical key 1 12 User manual 1 13 Template 1 14 Service Card 1 15 Certificate of quality 1 16 Battery 17 Spindle head AA battery (8pcs) 1 Note: The list above is the basic configuration for the I100 series, the actual list may little difference just subject to the real product. 38