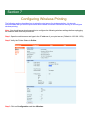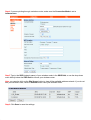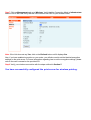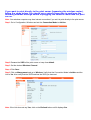
1
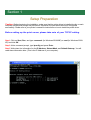
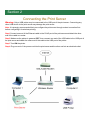
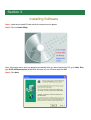
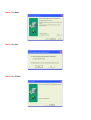
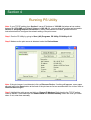
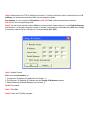
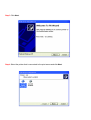
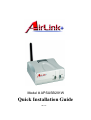
Model # APSUSB201W
Quick Installation Guide
Ver. 1A
Section 1
Setup Preparation
Caution: Before beginning the installation, make sure that the printer driver is installed locally on each
computer that will print through the print server. Otherwise, the print server will not be configured
successfully. Please refer to your printer’s manual for instructions on how to install the printer driver.
Before setting up the print server, please take note of your TCP/IP setting.
Step 1 Click on Start, Run, and type command (for Windows 95/98/ME) or cmd (for Windows 2000/
XP) and click OK.
Step 2 At the command prompt, type ipconfig and press Enter.
Step 3 Write down the information for the IP Address, Subnet Mask, and Default Gateway. You will
need these information later. (This is the IP Address of your computer).
Section 2
Connecting the Print Server
Warning: Only a USB printer may be connected to the USB port of the print server. Connecting any
other USB device to the print server may damage the print server.
Note: It is strongly recommended that you configure the print server through a wired connection first
before configuring it for wireless printing.
Step 1Connect one end of the Ethernet cable to the RJ-45 port of the print server and attach the other
end of the cable to a router.
Step 2 Make sure the printer is powered OFF, then connect one end of the USB cable to the USB port of
the print server and attach the other end of the cable to the USB port of the printer.
Step 3 Turn ON the printer.
Step 4 Plug one end of the power cord into the print server and the other end into an electrical outlet.
Section 3
Installing Software
Step 1 Insert the provided CD and wait for the setup menu to appear.
Step 2 Click on Install Utility.
Note: If the setup menu does not appear automatically after you have inserted the CD, go to Start, Run,
type D:\PS Utility\setup.exe (where D is the letter of your CD drive) and click OK.
Step 3 Click Next.
Step 4 Click Next.
Step 5 Click Yes.
Step 6 Click Finish.
Section 4
Running PS Utility
Note: If your TCP/IP setting from Section 1 has an IP Address of 192.168.1.x (where x is a number
between 2 - 253) AND your Default Gateway is 192.168.1.1, you may skip this section and proceed to
Section 5, Verifying Network Connection. If either criteria does not match, please follow the
instructions below to configure the network setting of the print server.
Step 1 Run the PS Utility by going to Start, (All) Programs, PS Utility, PS Utility v2.00.
Step 2 Make sure the print server is detected under the Device Name.
Note: If the print server is not detected, click on Discover Device. If nothing still appears, use a paper
clip and hold in the Reset button at the back of the print server for ten seconds while it is on then click on
Discover Device again.
Step 3 Highlight the print server and click on Change IP Address. Refer back to the TCP/IP setting
noted in Section 1 and make sure the Subnet Mask and Default Gateway match the ones you wrote
down. If not, enter them manually.
Step 4 Refer back to the TCP/IP setting from Section 1. Note the first three sets of numbers from the IP
Address you wrote down and enter them into the respective fields.
For example: If your computer’s IP Address is 192.168.0.100, enter the same three numbers:
192.168.0 in the corresponding fields.
Step 5 You can leave the last number 254 as is unless another network device (i.e. the Default Gateway
from Section 1) is already using that number. If another network device is already using 254, then change
it to another number that is currently not in use (preferably 200 - 253).
Step 6 Validity Check:
Make sure the last number on:
1. Computer’s IP Address (IP Address from Section 1)
2. Print Server’s IP Address (IP Address on the Change IP Address window)
3. Default Gateway (Default Gateway from Section 1)
are NOT the same.
Step 7 Click OK.
Step 8 Close the PS Utility program.
Section 5
Verifying Network Connection
Step 1 Click on Start, Run.
Step 2 For Windows 95/98/ME type command and click OK. For Windows 2000/XP, type cmd and
click OK.
Step 3 At the command prompt, type ping and the IP Address of the print server and press Enter.
For example, if you have changed the IP Address of the print server to 192.168.0.254, type
ping 192.168.0.254
If you kept the factory default IP address, type ping 192.168.1.254
You should get four Reply from messages back from the print server similar to the following picture.
Step 4 Once you have received the four Reply from messages, you can proceed to the next section.
If you get Request timed out or Destination host unreachable message, please double-check your
network cable connection and try again.
If you still do not get any Reply from messages, use a paper clip and hold in the Reset button at the back
of the print server for ten seconds while it is turned on.
Note: Resetting the print server with the Reset button will reset the print server’s IP address to the factory
default. If you need to change the IP address of the print server again, use the PS Utility. After you have
changed the print server’s IP address, try to ping the print server again.
Section 6
Running PS Wizard
Warning: Make sure you have installed the printer driver locally on every computer in your network
before running the PS Wizard. Otherwise, the PS Wizard will not run properly. Be sure to run the PS
Wizard on all the computers in your network.
Step 1 Insert the provided CD and wait for the setup menu to appear.
Step 2 Click on PS Wizard.
Note: If the setup menu does not appear automatically after you have inserted the CD, go to Start, Run,
type D:\PS Utility\PS Wizard.exe (where D is the letter of your CD drive) and click OK.
Step 3 Click Next.
Section 4
Step 4 Select the printer that is connected to the print server and click Next.
Step 5 Double-click on the Print Server Name, select the Printer Port Name, and click Next.
Step 6 Click Reboot (for Windows 95/98/ME) or Finish (for Windows 2000/XP).
Step 7 Run the PS Wizard on all the computers in your network that will use the print server.
You have successfully configured the print server for printing.
Section 7
Configuring Wireless Printing
The following section describes how to setup the print server for wireless printing. It is strongly
recommended that you test the print server with a wired connection first before moving on to configure
wireless printing.
Note: You should use a wired connection to configure the following wireless settings before unplugging
the network cable from the print server.
Step 1 Open the web browser and type in the IP address of your print server. (Default is 192.168.1.254)
Step 2 Vefiry the Printer Status is Online.
Step 3 Click on Configuration and then Wireless.
Step 4 If you are printing through a wireless router, make sure the Connection Mode is set to
Infrastructure.
Step 5 Type in the SSID (network name) of your wireless router in the SSID field, or use the drop-down
menu directly below the SSID field to choose your wireless router.
Note: you can also click on the Site Survey button to view all the available wireless network. If you do not
see your wireless router, clilck on Refersh and/or reset your wireless router.
Step 6 Click Save to save the settings.
Step 7 Click on Management and go to Wireless. Verify that the Connection Mode is Infrastructure
and the Link is Yes. Also verify that the SSID matches the SSID of your wireless router.
Note: If the Link does not say Yes, click on the Refresh button until it displays Yes.
Also, if you have enabled encryption on your router, you will also need to set the identical encryption
settings on the print server. For more information regarding how to set the encryption settings, please
refer to the user’s manual on the provided CD.
Step 8 Verify your wireless connection with the steps outlined in Section 5.
You have successfully configured the print server for wireless printing.
If you want to print directly to the print server (bypassing the wireless router),
follow the steps below. You should use a wired connection to configure the
following wireless settings before unplugging the network cable from the print
server.
Note: Your wireless computer may lose Internet connection if you set it to print directly to the print server.
Step 1 Go to Configuration, Wireless and set the Connection Mode to Ad-Hoc.
Step 2 Rename the SSID of the print server or keep it as default.
Step 3 Set the desired Wireless Channel.
Step 4 Click Save.
Step 5 Click on Management and go to Wireless. Verify that the Connection Mode is Ad-Hoc and the
Link is Yes. Also verify that the SSID matches the SSID you have set.
Note: If the Link does not say Yes, click on the Refresh button until it displays Yes.
Step 6 Manually change the TCP/IP setting of your wireless client to use a static IP address and assign
the appropriate IP Address, Subnet Mask, and Default Gateway according to your network. If you do
not know how to do this, it is recommended that you do not print directly to the print server, but print
through the wireless router instead.
Step 7 Configure your wireless adapter to Ad-Hoc mode, using the same SSID and Channel number as
the print server.
Note: If you have enabled encryption on your wireless network adapter, you will also need to set the
identical encryption settings on the print server. For more information regarding how to set the encryption
settings, please refer to the user’s manual on the provided CD.
This print server does not support most multi-functional printers (i.e. printers
with scanner, fax, copier, etc. functions). If your printer is a multi-functional
printer it may not work with this print server. For a list of compatible printers,
please visit our web site at www.airlinkplus.com
For more information on how to use the web configuration or setup for Mac
OS, please refer to the User’s Manual in the provided CD.
Section 8
Technical Support
E-mail: [email protected]
Toll Free: 1-888-746-3238
Web Site: www.airlinkplus.com