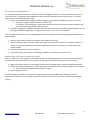
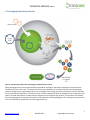
1
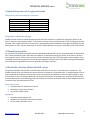
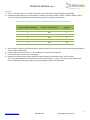
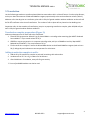
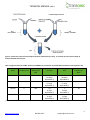
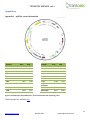
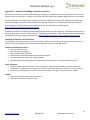
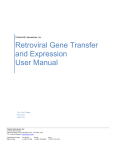
TECHNICAL MANUAL 0008.1 MGC premier Lentiviral V5-Tagged ORFs TOH7000 (human), TOM7000 (mouse), TOR7000 (rat) Format: Bacterial Glycerol Stock This manual provides information for the propagation, transfection, transduction and viral packaging of the pLX304 lentiviral vector. Appendix 2 contains basic safety information for production and handling of lentiviral particles. Review local safety guidelines for complete regulations. 1. pLX304 vector information The pLX304 ORF expression vector allows transient and stable transfection; as well as the stable delivery of the ORF into host cells via a replication-incompetent lentivirus. Transduction of primary and non-dividing cells V5 tag for additional functionality Blasticidin resistance for enrichment of transduced cells 5’ LTR PGK BlastR CMV ORF V5 tag 3’ LTR Hybrid Long Terminal Repeat Drives expression of selection marker Blasticidin resistance marker Drives expression of ORF Open Reading Frame Epitope tag Long Terminal Repeat Figure 1. Schematic depicting elements of the pLX304 vector expressing the V5 tagged ORF. The vector elements table describes the utility of the various elements shown. See appendix 1 for a more detailed vector map. 1 www.transomic.com 866-833-0712 [email protected] TECHNICAL MANUAL 0008.1 2. Replication protocols for glycerol stocks Materials for individual and plate replication LB-Lennox Broth (low salt) Glycerol Carbenicillin 96-well plates Aluminum seals Disposable replicators VWR EM1.00547.0500 VWR EM-4760 VWR 97063-144 VWR 62407-174 VWR 29445-082 Genetix X5054 Catalog # Propagate culture for storage pLX304 lentiviral cultures should be propagated in LB broth with ampicillin or carbenicillin (100 μg/ml) at 30°C for 30 hours or until the culture appears turbid. 2-10 ml starter cultures can be inoculated using 2 to 10 µl of the glycerol stock provided. Once turbid, place 920 μl of culture into a polypropylene tube and add 80 μl sterile glycerol (8% glycerol). Mix well and store at –80˚C. Glycerol stocks kept at -80°C are stable indefinitely as long as freeze/thaw cycles are minimized. 3. Plasmid preparation For transfection and transduction experiments the pLX304 plasmid DNA will first have to be extracted from the bacterial cells. Cultures should be grown in LB broth with ampicillin or carbenicillin (100 μg/ml) at 30°C for 30 hours or until the culture appears turbid. 2-10 ml starter cultures can be inoculated using 2 to 10 µl of the glycerol stock provided. Either a standard plasmid mini-preparation or one that yields endotoxin free DNA can be used. When isolating plasmid DNA for virus production using endotoxin free kit will generally yield higher viral titers. 4. Blasticidin selection (blasticidin kill curve) The optimal blasticidin concentration should be determined for a cell line prior to transduction or transfection. The pLX304 lentiviral vector has a blasticidin resistance marker for selection in mammalian cells. To establish stable cell lines, once transfection/transduction has occurred, the cells can be placed on blasticidin to select for stable integrants. Since cell lines differ in their sensitivity to blasticidin, the optimal concentration of blasticidin (pre-transfection/transduction) should be determined. In the following protocol the lowest concentration of blasticidin that provides adequate selection is determined for the experimental cell line. Required materials Complete media for experimental cell line Blasticidin (1 mg/ml stock solution) 24-well tissue culture plate Equipment Automatic pipetter/Pipette-aid Disposable or autoclaved tissue culture pipettes CO2 cell culture incubator at 37C 2 www.transomic.com 866-833-0712 [email protected] TECHNICAL MANUAL 0008.1 Protocol 1. Plate 5 x 10⁴ cells per well in 11 wells of a 24-well tissue culture plate using media without blasticidin. 2. Prepare blasticidin dilutions in culture media for antibiotic titration as shown in Table 1. Make a diluted working stock of 1 mg/ml blasticidin (blasticidin should be stored at 5-10 mg/µl stock solution). Table 1 Dilutions and volumes required for establishing optimal blasticidin concentration Volume of Blasticidin Stock (1 mg/ml) Solution Added (µl) 0 1 2 3 4 5 Total Volume of Media plus Antibiotic per 24 Well (µl) 500 500 500 500 500 500 Final Concentration (µg/ml) 0 2 4 6 8 10 3. Begin antibiotic selection the following day by replacing antibiotic free media with media containing the appropriate concentrations of blasticidin. 4. Incubate cells with 5% CO2 at 37°C, or use conditions normal for your target cells. 5. Check cells daily to estimate rate of cell death. 6. Replenish the media containing the appropriate concentrations of blasticidin every 2 days for 6 days. Note: The optimal blasticidin concentration will kill the cells rapidly (2 - 4 days). This is particularly important for screens involving essential genes that may be selected against prior to the experiment. 3 www.transomic.com 866-833-0712 [email protected] TECHNICAL MANUAL 0008.1 5. Transfection Use the following procedure to transfect plasmid DNA into mammalian cells in a 24-well format. For other plate formats, scale up or down the amounts of DNA and OMNIfect reagent proportionally to the total transfection volume (Table 2). Adherent cells: One day prior to transfection, plate cells in 500 μl of growth medium without antibiotics so that cells will be 70–95% confluent at the time of transfection. The number of cells to plate will vary based on the doubling time. Suspension cells: On the same day of transfection, just prior to preparing transfection complex, plate 160,000 cells per well in 500 μl of growth medium without antibiotics. Transfection complex preparation (Figure 2): Volumes and amounts are for each well to be transfected. 1. Plasmid DNA preparation: Dilute 0.5 µg of plasmid DNA in a microfuge tube containing Opti-MEM® I Reduced Serum Media*** up to a total volume of 25 µl. 2. OMNIfect reagent preparation: In a separate microfuge tube, add 1 µL of OMNIfect into 24 µl Opti-MEM® I Reduced Serum Media*** for a total volume of 25 µl. 3. Final transfection complex: Transfer the diluted DNA solution to the diluted OMNIfect reagent (total volume = 50 µl). Mix gently and incubate at room temperature for 10 minutes. Adding transfection complex to wells: 1. Add the 50 µl of transfection complex to each well containing cells and medium. 2. Incubate cells at 37°C in a CO2 incubator for 24-48 hours. 3. After 24-48 hours of incubation, assay cells for gene activity. *** serum-free DMEM medium can also be used. 4 www.transomic.com 866-833-0712 [email protected] TECHNICAL MANUAL 0008.1 Figure 2: Transfection protocol for 24 well plates (volumes indicated are per well). To transfect the entire plate multiply all volumes and DNA amount by 24. Table 2: Suggested amounts of DNA, medium and OMNIfect for transfection of plasmid DNA into adherent and suspension cells. Tissue Culture Plates Surface Area per Well (cm2) µl Plating Medium per Well 6- well 9 2000 µg Plasmid DNA per Well µl OMNIfect per Well µl Transfection Complex per Well† 2 4 200 (in 100 µl (in 100 µl Opti-MEM® I) Opti-MEM® I) 12-well 4 1000 1 2 100 (in 50 µl (in 50 µl Opti-MEM® I) Opti-MEM® I) 24-well 2 500 0.5 1 50 (in 25µl (in 25µl Opti-MEM® I) Opti-MEM® I) 96-well 0.3 200 0.1 0.2 10-20 (in 10µl (in 10µl Opti-MEM® I) Opti-MEM® I) † Total volume of the transfection complex is made up of equal parts of DNA solution and OMNIfect solution. 5 www.transomic.com 866-833-0712 [email protected] TECHNICAL MANUAL 0008.1 Transfection Optimization: It is important to optimize transfection conditions to obtain the highest transfection efficiency with lowest toxicity for various cell types. The optimal ratio of OMNIfect to DNA is relatively consistent across many cell types. For further optimization try the following steps in order. 1. Use the recommended ratio of DNA:transfection reagent (at 1 μg DNA:2 μl OMNIfect), but vary the volume. a. Start with a range of volumes that cover +20% to -20%. For example, in a 24-well plate a range of 40 μl to 60 μl of transfection complex would be added to the well. (The plating media would remain the same.) 2. If further optimization is needed, transfection efficiency and cytotoxicity may be altered by adjusting the ratio of DNA (μg) to OMNIfect reagent (μl). A range of ratios from 1:1.5 to 1:2.5 is recommended. Note: If transfection conditions result in unacceptable cytotoxicity in a particular cell line the following modifications are recommended: 1. Decrease the volume of transfection complex that is added to each well. 2. Higher transfection efficiencies are normally achieved if the transfection medium is not removed. However, if toxicity is a problem, aspirate the transfection complex after 6 hours of transfection and replace with fresh growth medium. 3. Increase the cell density in your transfection. 4. Assay cells for gene activity 24 hours following the addition of transfection complex to cells. Blasticidin selection of transfected cells If less than 90% of all cells are green, use blasticidin selection to reduce background from untransfected cells. Refer to the protocol for the blasticidin kill curve in section 4 to determine the optimal concentration for each cell line. 1. Begin the antibiotic selection by replacing the medium with complete medium supplemented with blasticidin. 2. Replace the selective media every 2-3 days. Monitor the cells daily and observe the percentage of surviving cells. a. All untransfected cells should be gone within 3-5 days. 3. Collect samples for assay. If selecting stably transfected cells, continue to replace the media containing blasticidin. Observe the cells for approximately 7 days until you see single colonies surviving the selection. Colonies can be isolated and expanded for analysis. 6 www.transomic.com 866-833-0712 [email protected] TECHNICAL MANUAL 0008.1 6. Packaging lentiviral particles Figure 3: Schematic depicting lentiviral packaging of pLX304 lentiviral vectors When packaging lentivirus, the genetic elements required for assembly of replication incompetent viral particles are transfected into the cell in trans. The lentiviral transfer vector (pLX304) is co-transfected with the desired packaging vectors encoding the env, gag and pol protein into a packaging cell line. gag, pol and env provide the proteins necessary for viral assembly and maturation. The transfer vector contains sequences that will be packaged as the viral genome and code for the ORF and selection cassette that will integrate into the targeted cell’s genome. Viral particles are released from the packaging cell and can be harvested from the supernatant of the packaging cell. The resulting viral supernatant can be concentrated or applied directly to the targeted cell line. 7 www.transomic.com 866-833-0712 [email protected] TECHNICAL MANUAL 0008.1 Considerations before packaging the pLX304 lentiviral vector: Required Materials Note: All plasmids are purified using endotoxin-free purification. All plasmids are resuspended in dH2O. FuGENE6 (Promega, Cat. # E2691) Complete culture medium (DMEM + 10% FBS, 1X Pen/Strep, and 1X L-glutamine) OPTI-MEM I + GlutaMAX-I (Gibco, Cat. # 51985-034) Transfer vector dilute plasmid(s) to 0.2 g/l Lentiviral packaging mix o pCMV-dR8.2 - (Addgene) o pCMV-VSV-G - (Addgene) 10 cm tissue culture plates Filter, 0.45 μm made of cellulose acetate, or polysulfonate (low protein binding). o Note: The filter used should not be nitrocellulose. Nitrocellulose binds proteins present in the membrane of lentivirus and destroys the viral particles. Equipment Automatic pipetter/Pipette-aid Disposable or autoclaved tissue culture pipettes CO2 cell culture incubator at 37C Protocol Note: For smaller scale production, plate cells in one well of a 6-well plate and use 1/6th of the reagents. 1. On the day prior to transfection, seed 4-5 x 10⁶ HEK293Tcells into a 100 mm plate in a total volume of 12 ml complete culture medium (DMEM + 10% FBS, 1X Pen/Strep, and 1X L-glutamine). It is recommended that the cells be 70- 80% confluent at the time of transfection. 2. Two hours prior to transfection remove the culture media and replace with 2 ml of fresh culture media containing no antibiotics. 3. Allow FuGENE6 (Promega, Cat. # E2691) and OPTI-MEM I + GlutaMAX-I (Gibco, Cat. # 51985-034) to come to room temperature. 4. Preparation of transfer vector and lentiviral vector packaging mix for transfection: Note: All plasmids are resuspended in dH2O. a. Transfer vector – dilute plasmid(s) to 0.2 g/l b. Lentiviral packaging mix (0.5 g/l): i. 100 l pCMV-dR8.2 (0.5 g/l) ii. 50 l pCMV-VSV-G (0.5 g/l) 5. Mix FuGENE6 by inverting or vortexing briefly. In one well of a polystyrene round-bottom plate add the following: a. 807 l of OPTI-MEM b. 45 l of FuGENE6 6. Incubate FuGENE6/OPTI-MEM mixture for 5 minutes at room temperature. 7. Add 30 μl transfer vector, 18 μl Lenti packaging mix to the FuGENE6/ OPTI-MEM mixture. Mix immediately and incubate an additional 15 min at room temperature. 8. Add entire transfection mix dropwise to cells/culture. Swirl gently. 9. Return to incubator with 5% CO2 at 37°C. 8 www.transomic.com 866-833-0712 [email protected] TECHNICAL MANUAL 0008.1 10. Collect viral particles (supernatant) 48 hours post-transfection. 11. Centrifuge the media briefly (800 x g for 10 min) or filter through a 0.45 μm filter to remove cellular debris. Note: The filter used should be made of cellulose acetate, or polysulfonate (low protein binding), instead of nitrocellulose. Nitrocellulose binds proteins present in the membrane of viral particles and destroys them. 12. Aliquot supernatant into sterile cryovials and store at -80°C. a. Make 2 x 50 µl aliquots for titering and divide the rest into transduction aliquots. Note: The 50 µl aliquots will be used in the functional titering protocol. They should be stored at -80C overnight prior to titering to reflect any loss of function due to freeze/thaw cycle that will occur for the transduction aliquots. Freshly harvested viral particles from well-transfected cells should have a titer of approximately 1-5 x 10⁶ TU/ml when measured on NIH-3T3 or HEK293T cells. 9 www.transomic.com 866-833-0712 [email protected] TECHNICAL MANUAL 0008.1 7. Functional titer and transduction optimization The number of viral particles used and the transduction efficiency will determine the average number of lentiviral integrations into the target cell genome. The following protocol is designed to evaluate functional titer of the virus produced in the previous section by selecting for resistant colonies. A kill curve should be performed as described in section 4. Increasing transduction efficiency: Optimizing transduction conditions can extend the utility of viral particles and limit cell toxicity. A number of variables influence transduction efficiency including components of the media, duration of transduction, cell type, cell health and plating density. It is possible to optimize many of these variables prior to the experiment. Serum is a known inhibitor of transduction and should be minimized (0 - 2%) in transduction media. For cells sensitive to low serum conditions either reduce the transduction time in low serum media or increase the transduction time in complete media. Transduction volume should be kept to a minimum. Media should barely cover cells. Extending transduction incubation times may increase efficiency. However, it may be necessary to increase the volume of media applied to the cells for transduction to limit the effects of evaporation. Hexadimethrine bromide (Polybrene) is a cationic lipid known to enhance viral particle binding to the surface of many cells types. A range of concentration (0 - 10 µg/ml) should be tested to determine the highest transduction efficiency that can be achieved with minimal cell toxicity. Cell density may influence transduction efficiency. Plate cells at a range of densities to determine its effect on your cell line. Rapidly dividing cells are often transduced more efficiently. Determining Functional Titer Functional titer must be determined using the experimental cell line to ensure optimal transduction. The functional titer is the number of viral particles, or transducing units (TU), able to transduce the target cell line per volume and is measured in TU/ml. Cell type, media components and viral production efficiency influence functional titer. It should therefore be calculated for every batch of virus produced and every cell line. Once a baseline titer is known, this protocol can be used to further optimize transduction efficiency. To do so, follow this procedure and alter variables known to influence transduction efficiency. The following protocol evaluates titer by manually counting positive colonies. If the packaging protocol was followed for viral particle production, use the titering aliquots made in the virus production section above to determine the titer. HEK293T cells are readily transduced under standard conditions and are included in the protocol as a positive control for transduction. Required materials 10 www.transomic.com 866-833-0712 [email protected] TECHNICAL MANUAL 0008.1 HEK293T cells Complete media for HEK293T cells and experimental cell line Serum free media for each cell line 24-well tissue culture plate Lentiviral particles (Harvested or purchased) Microcentrifuge tubes Polybrene Equipment Automatic pipetter /Pipette-aid Disposable or autoclaved tissue culture pipettes CO2 cell culture incubator at 37C Fluorescent microscope with GFP filter (refer to Appendix 4 for alternative methods that do not require this) Protocol 1. Plate cells (HEK293T and experimental cell line) 24 hours prior to transduction in a 24 well plate. Plate at a density of 7 x 10⁴ cells per well in 12 wells with complete media. Incubate for 24 hours with 5% CO2 at 37°C. 2. Prepare a serial dilution series with serum free media and viral supernatant as shown in Table 3 and Figure . a. Set up 5 sterile microcentrifuge tubes. b. Add 160 µl of serum free medium to each tube containing 5-8 g/ml Polybrene. c. Add 40 µl of viral stock to the first microfuge tube. d. Mix well by gently pipetting up and down (10 - 15 times) without creating bubbles and discard the tip. e. Transfer 40 µl from the first microcentrifuge tube to the second tube. Mix well and discard the tip. f. Repeat the procedure for the 4 remaining tubes. g. Incubate at room temperature for 10-15 minutes. 3. Remove media from each well. 4. Add 200 µl of serum free media to each well containing cells. 5. Add 25 µl from each viral dilution to two wells (225 µl final volume) for a total of 10 wells per cell line. The remaining two wells (without viral particles) should be evaluated as negative controls. 6. Rock plate gently a few times to mix. 7. Incubate overnight with 5% CO2 at 37°C. 8. Replace the viral supernatant with complete media and allow cells to grow for 48 hours. 9. Select resistant colonies using Blasticidin selection a. Begin the antibiotic selection by replacing the media with complete media supplemented using the optimal blasticidin concentration determined in “blasticidin kill curve” b. Continue feeding and observe the cells for approximately 7 days until you see single colonies surviving the selection. The negative control should have no surviving cells. c. Use a microscope to count the number of surviving colonies. d. Calculate the functional titer using the number of colonies visible at the largest dilution that has colonies. 10. Use the calculation below and Table 3 to determine functional titer. 𝑇𝑈 (𝑁𝑢𝑚𝑏𝑒𝑟 𝑜𝑓 𝑐𝑜𝑙𝑜𝑛𝑖𝑒𝑠 ) × (𝐷𝑖𝑙𝑢𝑡𝑖𝑜𝑛 𝑓𝑎𝑐𝑡𝑜𝑟) ÷ 0.025 𝑚𝑙 = 𝐹𝑢𝑛𝑐𝑡𝑖𝑜𝑛𝑎𝑙 𝑡𝑖𝑡𝑒𝑟 𝑚𝑙 For Example: If the average number of colonies counted in well A4 and B4 is 70 the titer is calculated as follows: 70 colonies X 625 ÷ 0.025 ml = 1.75 X 10⁶ TU/ml For Example: www.transomic.com 866-833-0712 [email protected] If the average number of colonies counted in well A4 and B4 is 70 the titer is calculated as follows: 70 colonies X 625 ÷ 0.025 ml = 1.75 X 10⁶ TU/ml 11 TECHNICAL MANUAL 0008.1 Dilution table and schematic for titration protocol Table 3 Dilution factors for calculating viral titer Tube Viral particles 1 2 3 4 5 6 40 µl (from titer aliquot) 40 µl (from Tube 1) 40 µl (from Tube 2) 40 µl (from Tube 3) 40 µl (from Tube 4) 0 µl Dilution medium 160 µl 160 µl 160 µl 160 µl 160 µl Dilution factor 5 25 125 625 3125 n/a Figure 4 Schematic of serial dilution for viral particle titering. (-) indicates untransduced control. Example: Typical virus production will yield 1-5 x 10⁶. The expected number of fluorescent colonies for a viral titer of 1 x 10⁶ would yield the following number of fluorescent colonies in titering assay: Tube 1 2 3 Dilution 1/5 1/5 1/5 Diluted titer TU/ml 200,000 40,000 8,000 ml transduced cells 0.025 0.025 0.025 Fluorescent colonies expected 5,000 1,000 200 Counting 50-200 colonies is sufficient for an accurate measure of titer. 4 1/5 1,600 0.025 40 5 1/5 320 0.025 8 6 n/a 0 0 0 12 www.transomic.com 866-833-0712 [email protected] TECHNICAL MANUAL 0008.1 V. Transduction Guidelines & Protocols This protocol provides a basic outline of the transduction process. The following should be optimized prior to transduction: Transduction media: % Serum, Polybrene µg/ml Time exposed to transduction media: hours or overnight Selection media: µg/ml blasticidin Required materials Complete media for experimental cell line Selection media: complete media for experimental cell line supplemented with blasticidin Transduction media containing viral particles (optimized for serum and Polybrene concentration) Equipment Automatic pipetter /Pipette-aid Disposable or autoclaved tissue culture pipettes CO2 cell culture incubator at 37C Assay specific equipment Protocol: Prepare cells 1. Plate cells such that they are actively dividing and 60 - 70% confluent at the time of transduction. 2. Feed cells with complete media 3 - 4 hours prior to transduction. 3. Make transduction media just prior to transduction. Transduce cells 4. Exchange media with transduction media. (Note: media should be serum free for maximum transduction efficiency. Alternatively, see section 7 for information on transduction optimization.) 5. Incubate cells 12 - 24 hours in transduction media. 6. Replace transduction media with complete media (no blasticidin). Blasticidin selection 7. Allow cells to grow for 48 hours. 8. Replace media with selection media. 9. Continue feeding cells selection media until untransduced cells have been removed. Analysis 10. Analyze cellular phenotype or harvest cell for gene expression analysis according to your experimental design. 13 www.transomic.com 866-833-0712 [email protected] TECHNICAL MANUAL 0008.1 Appendices Appendix 1 – pLX304 vector information Element RSV promoter 5' LTR gag RRE PGK Bsd cPPT CMV attR1 CmR Start 3 232 568 1078 1714 2226 2681 2857 Stop 231 412 932 1319 2216 2639 2798 3438 3445 3678 3569 4337 Element ccdB attR2 V5 WPRE 3' LTR SIN SV40 ori f1 ori AmpR promoter AmpR pUC Origin Start Stop 4679 4984 5025 5149 5151 5192 5234 5822 5893 6128 6366 6501 6708 7163 7189 7293 7294 8415 8154 9030 Figure 5: Detailed map of the pLX304 vector, vector element table and sequencing primer The full sequence is available here. 14 www.transomic.com 866-833-0712 [email protected] TECHNICAL MANUAL 0008.1 Appendix 2 – Safety and handling of lentiviral particles Recombinant lentivirus is considered a Biosafety Level 2 organism by the National Institutes of Health and the Center for Disease Control and Prevention. However, local health and safety regulations should be determined for each institution. For more information on Biosafety Level 2 agents and practices, download Biosafety in Microbiological and Biomedical Laboratories (BMBL), Fifth Edition (Revised December 2009) published by the U.S. Department of Health and Human Services Centers for Disease Control and Prevention and NIH. The publication can be found here: http://www.cdc.gov/biosafety/publications/bmbl5/. If additional measures are needed, review biosafety guidance documents such as the NIH’s “Biosafety Considerations for Research with Lentiviral Vectors” which refers to “enhanced BL2 containment”. More information can be found through the NIH Office of Biotechnology Activities web site (http://oba.od.nih.gov/rdna_rac/rac_guidance_lentivirus.html) Summary of Biosafety Level 2 Practices The following is meant to be a summary of Biosafety Level 2 practices and should not be considered comprehensive. A full account of required practices should be determined for each institute and/or department. Standard microbiological practices Limit access to work area Post biohazard warning signs Minimize production of aerosols Decontaminate potentially infectious wastes before disposal Use precautions with sharps (e.g., syringes, blades) Review biosafety manual defining any needed waste decontamination or medical surveillance policies Safety equipment Biological Safety Cabinet, preferably a Class II BSC/laminar flow hood (with a HEPA microfilter) used for all manipulations of agents that cause splashes or aerosols of infectious materials; exhaust air is not recirculated Protective personal equipment includes: protective laboratory coats, gloves, face protection if needed Facilities Autoclave available for waste decontamination Chemical disinfectants available for spills 15 www.transomic.com 866-833-0712 [email protected] TECHNICAL MANUAL 0008.1 Limited use licenses This product is covered by several limited use licenses. For updated information please refer to www.transomic.com/support/productlicenses Contact Information For more information or technical support please visit our website at www.transomic.com or contact us via email or phone. Corporate Headquarters transOMIC technologies inc. 601 Genome Way, Suite 1222 Huntsville, AL 35806 USA Phone: 866-833-0712 Fax: 256-327-9515 E-mail: [email protected] Unless otherwise expressly stated on the Product or in the documentation accompanying the Product, the Product is intended for research only and is not to be used for any other purpose, including without limitation, unauthorized commercial uses, in vitro diagnostic uses, ex vivo or in vivo therapeutic uses. © 2015 transOMIC technologies Inc. All rights reserved. 16 www.transomic.com 866-833-0712 [email protected]