1
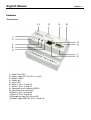
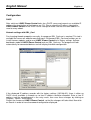
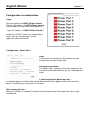
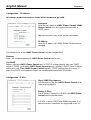
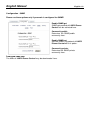
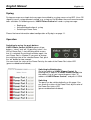
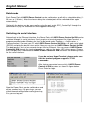
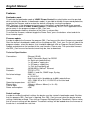
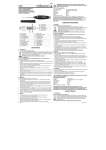
IPower Control 4xDIN
User Manual
English
LINDY No. 32655
www.LINDY.com
For Home and Office Use
Tested to Comply with
FCC Standards
© LINDY ELECTRONICS LIMITED
&
LINDY-ELEKTRONIK GMBH
-
FIRST EDITION (FEB 2010)
English Manual
English 2
Security Advise ..................................................................................................................... 3
Description ............................................................................................................................ 3
Hardware .............................................................................................................................. 4
Connections ...................................................................................................................... 4
Package Content ............................................................................................................... 5
Installation ......................................................................................................................... 5
Status LED ........................................................................................................................ 5
Configuration ........................................................................................................................ 6
DHCP ................................................................................................................................ 6
Network settings with GBL_Conf ....................................................................................... 6
Configuration via webinterface .............................................................................................. 7
Login ................................................................................................................................. 7
Configuration - Power Ports .............................................................................................. 7
Configuration – IP Address ............................................................................................... 8
Configuration - IP ACL ...................................................................................................... 8
Configuration - HTTP ........................................................................................................ 9
HTTP Port ......................................................................................................................... 9
Configuration - SNMP ..................................................................................................... 10
Configuration - Syslog ..................................................................................................... 11
IP Access Control List ......................................................................................................... 12
SNMP ................................................................................................................................. 12
SNMP-communities......................................................................................................... 12
SNMP-Traps ................................................................................................................... 12
Syslog ................................................................................................................................. 13
Operation ............................................................................................................................ 13
Switching by using the push buttons .............................................................................. 13
Switching by Webinterface .............................................................................................. 13
Switching ......................................................................................................................... 13
Batchmode.......................................................................................................................... 14
Switching via serial interface............................................................................................... 14
Features.............................................................................................................................. 15
Bootloader mode ............................................................................................................. 15
Firmware update ............................................................................................................. 15
Technical information ...................................................................................................... 15
Default settings................................................................................................................ 15
English Manual
English 3
Security Advise
The device must be installed only by qualified personnel according to the following installation
and operating instructions. The manufacturer does not accept responsibility in case of improper
use of the device and particularly any use of equipment that may cause personal injury or
material damage. The device contains no user-maintenable parts. All maintenance has to be
performed by factorytrained service personnel. Check if the power cord, the plug and the socket
are in proper condition. The device can be connected only to 230V AC (50 or 60 Hz) or 12/24V
DC power supply sockets. Always connect the device to properly grounded power sockets. The
device is intended for indoor use only. Do NOT install them in an area where excessive
moisture or heat is present. Because of safety and approval issues it is not allowed to modify
the device without our permission. Please note the safety advises and manuals of connected
devices, too. The device is NOT a toy. It has to be used or stored out or range of children.
Packaging material is NOT a toy. Plastics has to be stored out of range of children. Please
recycle the packaging materials. In case of further questions, about installation, operation or
usage of the device, which are not clear after reading the manual, please do not hesitate to ask
our support team.
Description
With LINDY IPower Control 4x DIN electrical devices can be switched via a TCP/IPwork.
There are only two steps necessary for installation: The connection to an electric circuit and a
TCP/IPwork and the configuration of the IP settings. Afterwards LINDY IPower Control 4x DIN
can be controlled by all PCs of thework.
English Manual
Hardware
Connections
1) Power Port LEDs
2) Power supply 24 V DC (Pins 1 and 2)
3) Button "select"
4) Button "ok"
5) status LED
6) Relais 1 (Pins 12 and 13)
7) Relais 2 (Pins 16 and 17)
8) Connector serial Interface (RS232)
9) Connector Ethernet (RJ45)
10)Relais 4 (Pins 34 and 35)
11)Relais 3 (Pins 30 and 31)
12)Emergency stop (Pins 24 and 25)
13)Power supply 230V AC (Pins 18 and 19)
English 4
English Manual
English 5
Package Content
Included in delivery are:
• LINDY IPower Control 4xDIN
• Short manual
Installation
1.) Connect the power supply cable to the power supply pins of
LINDY IPower Control and a socket. LINDY IPower Control
now is booting and shortly after ready for usage.
2.) Plug the Ethernet cable into the connector on the front side of
LINDY IPower Control 4x DIN and connect it to your
Ethernet.
3.) Connect the clients to the Power Ports of LINDY IPower Control.
Status LED
The Status LED shows different states of the device:
• Status LED red: Device is not connected to the ethernet
• Status LED orange: Device is connected to the ethernet, TCP/IP settings are not
allocated
• Status LED green: Device is connected to the ethernet, TCP/IP settings allocated, device
is ready to use
• Status LED blinks alternately red and green: Device is in Bootloader mode.
English Manual
English 6
Configuration
DHCP
After switch-on LINDY IPower Control looks for a DHCP server and requests an available IP
address (for deactivation of that feature see 2.2). Please check the IP adress allocated to
LINDY IPower Control in the DHCP server settings to make sure that the same address is
used at every reboot.
Network settings with GBL_Conf
For changing thework properties manually, the program GBL_Conf.exe is required. This tool is
available for free on our website www.lindy.com. Furthermore GBL_Conf.exe enables you to
install firmware updates and to reset LINDY IPower Control to its factory settings. Activate
bootloader mode of LINDY IPower Control and run GBL_Conf.exe. The program will look
automatically for connected devices and will display theirwork configuration.
If the displayed IP address accords with the factory settings (192.168.0.2), there is either no
DHCP server available in thework or no free IP address could be allocated. Enter a free IP
address and the accordingmask in the entry mask, then save these changes by clicking on
Program - Device - SaveConfig.
Restart the firmware of LINDY IPower Control, so that the changes will take effect. Now click
on Search in order to have thenewwork configuration displayed.
English Manual
English 7
Configuration via webinterface
Login
Go to the website of LINDY IPower Control.
Enter the IP address of LINDY IPower Control
into the address line of your internet browser:
http://”IP address of LINDY IPower Control”/
and press LOGIN. To enter the configuration
menu, click on „Configuration“ on the
upper left side of the screen.
Configuration - Power Ports
Label
A name with a maximum of 15 characters can be
entered here for each Power Port.
After power-up switch
The Power Port’s switching state after a power-on of
the device can be defined here (on, off, remember last
state).
If switching on after power-up, wait ...
A switching delay of a Power Port can be defined here that is applied after switch on of the
device. The delay can last up to 8191 seconds.
After turning off, wait ...
While this function is enabled, the Power Port will reactive after the stated time, when it got
switched off.
English Manual
English 8
Configuration – IP Address
All changes made here require a restart of the firmware to get valid.
Hostname
Enter the host name of LINDY IPower Control. LINDY
IPower Control uses this name to connect with a
DHCP server.
IPower Control 4
Special characters may result inwork malfunction.
IP Address
Here the IP address of LINDY IPower Control can be
changed.
Netmask
The subnet mask of the LINDY IPower Control may be changed here.
Gateway
Here, the standard gateway of LINDY IPower Control can be set.
Use DHCP
Adjusts, whether LINDY IPower Control gets its TCP/ IP settings directly from your DHCP
server. If DHCP is activated, LINDY IPower Control proves, whether a DHCP server is active
within your LAN. Then LINDY IPower Control requests TCP/IP settings from this server. If
there is no DHCP server present inwork, we recommend to deactivate this option.
Configuration - IP ACL
Reply ICMP-Ping requests
Sets whether or not, the LINDY IPower Control shall
react on ping requests.
Enable IP Filter
The IP Access Control List (IP ACL) of LINDY IPower
Control can be activated here.
If IP ACL is active, DHCP and SNMP only work, if all
relevant servers and clients are registered in this list.
English Manual
English 9
Configuration - HTTP
All changes made here require a restart of the firmware to get valid.
HTTP Port
Enter the HTTP port number, if necessary.
Possible numbers are 1 ... 65534
(standard: 80). To get access to LINDY
IPower Control, you have to enter the port
number behind the IP address of LINDY
IPower Control, e.g.:
http://192.168.0.2:1720
Require HTTP Password
Password protected access can be
activated here. In this case, a user and an
administrator password have to be defined.
Passwords may have a maximum lengths
of 15 characters. Administrators are
authorized to switch all ports and to modify
the settings of LINDY IPower Control and
of all ports. The username of the administrator is “admin”.
Users are authorized to switch all ports but are not allowed to modify the settings of neither
LINDY IPower Control nor the ports. The username of the user is “user”. If you have forgotten
your password, activate the bootloader mode of LINDY IPower Control, start GBL-Conf.exe
and deactivate the password request.
Check Password on start page
If this option is activated, the user has to enter his password, before logging in to the web
interface.
English Manual
English 10
Configuration - SNMP
Please use these options only if yourwork is configured for SNMP!
Enable SNMP-get
SNMP-get protocol of LINDY IPower
Control can be activated here.
Community public
Determine the SNMP public
community here.
Enable SNMP-set
Activate SNMP-set protocol of LINDY
IPower Controlwith this option.
Community private
Determine the SNMP private
community here.
Download SNMP MIB
The MIBs of LINDY IPower Control may be downloaded here.
English Manual
English 11
Configuration - SNMP Trap Receiver List
Please use these options only if yourwork is configured for SNMP!
[
Enable Traps
Activates SNMP-traps. if enabled,
LINDY IPower Control will dispatch
SNMP-traps to all receivers listed.
Receivers have to be listed as follows:
IP address (and, if necessary the
HTTP port), e.g.: 192.168.0.2:8000
Trap Version
Make a choice between SNMP-traps
standard 1 and 2c.
Find more information about the
SNMP functions of LINDY IPower
Control, you can on page 12.
Configuration - Syslog
Enable Syslog
Enable or disable Syslog for the
IPower Control.
Syslog Server IP
If syslog is activated, enter her the
IP address of your Syslog server
Syslog Port
Type the port number, that your
Syslog server uses to receive syslog
information.
Find more information about Syslog
on page 13.
English Manual
English 12
IP Access Control List
IP Access Control List (IP ACL) acts as an IP filter for your LINDY IPower Control. When is
active, hosts and subnets can only contact LINDY IPower Control, if their IP adresses are
stated in this IP ACL. e.g.: „http://192.168.0.1“ or „http://192.168.0.1/24“. If you locked yourself
out by accident, please activate the bootloader mode of LINDY IPower Control, start Gbl_Conf.
exe and deactivate IP ACL. You may find more information about the configuration of IP ACL on
page 8.
SNMP
To get detailed status information of LINDY IPower Control the SNMP protocol can be used.
SNMP communicates via UDP (port 161) with LINDY IPower Control: SNMP can be used to
switch the power ports as well.
Supported SNMP commands:
• SNMPGET: request status information
• SNMPGETNEXT: request the next status information
• SNMPSET: LINDY IPower Control request change of status
You will need awork Management System, e.g. HP-Open View, OpenNMS, Nagios etc., or the
command line tools of-SNMP to request information of LINDY IPower Control via SNMP.
SNMP-communities
SNMP authentifies requests by so called communities. The public community has to be added
to SNMP-read-requests and the private community to SNMP write requests. You can see the
SNMP communites like read/write passwords. SNMP v1 and v2 transmit the communities
without encryption. Therefore it is simple to spy out these communities. We recommend to use
a DMZ or IP ACL.
SNMP-Traps
SNMP-Traps are system messages, sent via SNMP-protocol to different clients. On following
events, LINDY IPower Control will dispatch an SNMP-Trap:
• Switching of the Power Ports
Please find more information about configuration of SNMP on page 10 .
English Manual
English 13
Syslog
Syslog messages are simple text messages transmitted to a syslog server using UDP. Linux OS
regularly have a syslog daemon installed, e.g. syslog-ng. For Windows there are some freeware
tools available. On following events, LINDY IPower Control will send a syslog message:
• Booting up
• Activation/deactivation of syslog
• Switching of Power Ports
Please find more information about configuration of Syslog in on page 11.
Operation
Switching by using the push buttons
LINDY IPower Control 4x DIN disposes of two
buttons: “select” and “ok”. By pushing “select”, the
LED of Power Port 1 starts blinking which means
that it is selected. By pushing the button again, the
next Power Port is selected. If you want to change
the switching state of the selected Power Port, push
the “ok” button for two seconds.
You can check the status of the Power Ports by the color of the Power Port status LED
(green=enabled/red=disabled).
Switching by Webinterface
Go to the website of LINDY IPower Control. By
entering the IP address of LINDY IPower Control into
the address line of your internet browser: http://”IP
address of LINDY IPower Control”/ and press LOGIN
Switching
The ports can be switched directly on this page. You
can check the status of the Power Ports by the color of
the Power Port status LED
(green=enabled/red=disabled).
English Manual
English 14
Batchmode
Each Power Port of LINDY IPower Control can be switched on or off with a selectable delay (130 sec. or 1-30 min.). After the chosen delay the selected port will be switched off/on again
automatically.
Optionally the device can be accessed by using the perl script „EPC_Control2.pl” through the
command line (e.g. for automatic or time-triggered switching).
Switching via serial interface
Alternatively to the Ethernet interface, the Power Ports of LINDY IPower Control 4x DIN can be
switched through its serial interface. It only requires a terminal program like HyperTerminal, a
program provided under Windows for free (to be found under Programs -> Accessories ->
Communication). Connect your PC with LINDY IPower Control 4x DIN by a 9- pole serial cable
(RS232) and plug the device into a outlet. Now you can turn on LINDY IPower Control 4x DIN.
The boot process lasts a few seconds longer than by Ethernet. You can access LINDY IPower
Control 4x DIN through the terminal program as soon as the status LED shines green. Choose
the COM port that is connected to LINDY IPower Control 4x DIN and enter the following values
for the serial interface:
If you do not use HyperTerminal, please make sure
that the terminal program supports VT100
commands.
After having connected successfully, LINDY IPower
Control 4x DIN answers as shown in figure below.
Press Enter for login.
Now the Power Ports can be switched on and
off per number keys. By pressing c you can
check thework configuration and by pressing
Esc you can log out.
English Manual
English 15
Features
Bootloader mode
To activate the bootloader mode of LINDY IPower Control the select button must be pushed
while restarting the device. In bootloader mode it is possible to disable the password protection,
to update the firmware and to restore the default settings by running the program
GBL_Conf.exe. If the device runs already, press the buttons select and ok for three seconds.
The bootloader mode of LINDY IPower Control is indicated by “BOOT-LDR” appended to the
device name in the program window of GBL_Conf.exe.
During bootloader mode an alteration of the relais is not possible.
To restart the firmware, witohout toggle the Power Ports, press the buttons select and ok for
three seconds again.
Firmware update
In order to update the firmware the program GBL_Conf.exe and the latest firmware are needed.
Start the device in bootloader mode and run the program GBL_Conf. exe. On the left side of the
program window, select the device, that should be updated, click on Program DeviceFirmware
Update and determine the location of the new firmware. Please note: The up-to-date firmware
and GBL_Conf.exe can be found at www.lindy.de, free to download.
Technical Specification
Connections:
Netw ork:
Protocols:
Sw itched voltage:
Relais:
Operating temperature:
Dimensions:
Total w eight:
Power consumption:
Ethernet (RJ45),
Sub-D Connector (9-pol.) for RS232
4 x Relais pin (potentialfree)
1 x AC pow er supply pins
1 x DC pow er supply pins
1 x Pins for Emergency-off
10/100 MBit/s 10baseT Ethernet
TCP/IP, HTTP,
SNMP v1 and v2c, SNMP traps, Syslog
230 V AC
or 12/24V DC
High-inrush relais (loadable up to 60A), potentialfree,
16 A / 230V AC or 5 A / 12/24V DC at resistive load
0°C-50°C
104mm x 65mm x 90mm (L x H x W)
ca.400g
<5W
Default settings
In order to restore the default settings the device must be started in bootloader mode. Besides
that the program GBL_Conf.exe is required. Run GBL_Conf.exe and select the device whose
settings should be restored. Then click on Program DevicegReset to Fab default. Please notice
that all current settings will be deleted. The default settings will be loaded when the firmware of
the device is restarted the next time.
Radio Frequency Energy, Certifications
CE Statement, EMC Compatibilty
This device complies with EN Standards EN55022 and EN55024 according to the relevant EC EMC
Directive. It must be used with shielded cables only to maintain EMC compatibility.
Dieses Produkt entspricht den einschlägigen EMV Richtlinien der EU und darf nur zusammen mit
abgeschirmten Kabeln verwendet werden.
LINDY Herstellergarantie
LINDY gewährt für dieses Produkt über die gesetzliche Regelung hinaus eine zweijährige
Herstellergarantie ab Kaufdatum. Die detaillierten Bedingungen dieser Garantie finden Sie auf der
LINDY Website aufgelistet bei den AGBs.
WEEE (Waste of Electrical and Electronic Equipment),
Recycling of Electronic Products
In 2006 the European Union introduced regulations (WEEE) for the collection and recycling of all waste
electrical and electronic equipment. The wheelie bin symbol shown indicates that this product must not
be disposed of with household waste. Instead the product must be recycled in a manner that is
environmentally friendly. For more information on how to dispose of this product, please contact your
local recycling centre or your household waste disposal service. Each individual EU member state has
implemented the WEEE regulations into national law in slightly different ways. Please follow your
national law when you want to dispose of any electrical or electronic products.
More details can be obtained from your national WEEE recycling agency.
Germany / Deutschland
Die Europäische Union hat mit der WEEE Direktive umfassende Regelungen für die Verschrottung und
das Recycling von Elektro- und Elektronikprodukten geschaffen. Diese wurden von der Bundesregierung
im Elektro- und Elektronikgerätegesetz – ElektroG in deutsches Recht umgesetzt. Dieses Gesetz
verbietet vom 24.März 2006 an das Entsorgen von Elektro- und Elektronikgeräten über die
Hausmülltonne! Diese Geräte müssen den lokalen Sammelsystemen bzw. örtlichen Sammelstellen
zugeführt werden! Dort werden sie kostenlos entgegen genommen. Die Kosten für den weiteren
Recyclingprozess übernimmt die Gesamtheit der Gerätehersteller.
LINDY No: 32655
1st Edition, Frebruary 2010
www.lindy.com