1
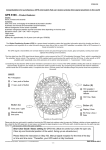
Voice Internet Phone Gateway
Quick Installation Guide
IPC 1000 Series
ARTDio Company Inc.
Edition 1.0
Note: For more detailed hardware installation instructions, please refer to the IPC 1000 series User’s Manual.
Step 1. Preparation
Connect the phone to perform basic configurations
Connect an analog phone to the FXS port of IPC 1000 series unit as the picture below and power on.
Please notices that do not connect phone line of the telephone company to the FXS port as doing so may cause damage to the
product!
Connect a phone to the IPC 1000 series unit
Step 2.Configure Region ID
Skip this step if you are installing your IPC 1000 series unit in the default region. The default Region ID is printed on the label
located outside the box. If you are installing your IPC 1000 series unit at any region other than that which is specified, you will need
to configure the IPC 1000 series unit to the correct Region ID.
Region ID
The Region ID is coded as follows:
ID NO.
Country
ID NO.
Country
ID NO.
Country
ID NO.
Country
01
Argentina
02
Australia
03
Philippines
04
Portugal
05
Brazil
06
Canada
07
China
08
Russia
09
Sweden
10
Vietnam
12
France
13
Germany
15
Hong Kong
18
India
22
Italy
23
Japan
24
Korea
26
Malaysia
27
Mexico
28
Netherlands
29
New Zealand
36
Singapore
38
Slovenia
39
South Africa
40
Spain
42
Switzerland
43
Taiwan
44
Thailand
46
British
47
USA
60
Iran
61
Dubai
(Note: If your Region ID is not listed on the chart above, please refer to the IPC 1000 series User’s Manual)
Using a phone to configure the region ID
1. Pick up the phone and press
2. ##0000
You will hear 3 short tones.
3. 9507#
Assuming you are modifying for China, the last 2 digits “07” are China’s regional ID.
4. 971#
Enable the new region ID. (This action will change all setting values to
return to their default values)
5. Hang up the phone
Step 3.Configure Phone number, IP address and WEB password
The configuration procedure depends on the way you get the IP address, static IP, DHCP and PPPoE. According to the
network condition, you can select one of them to do the configuration.
1. Static IP Address
Using a phone to configure basic information
1.
Pick up the phone and press
2.
##0000
You will hear 3 short tones.
3.
012#
The number “2” represents the Taipei area code.
4.
0282261111#
The phone number is 82261111
5.
030#
Enable “static” IP mode.
6.
04210*62*149*250#
Configures the IP Address “210.62.149.250”.
7.
05255*255*255*128#
Configures the Subnet Mask “255.255.255.128”.
8.
06210*62*149*254#
Configures the Default Gateway “210.62.149.254”.
9.
882834#
The numbers ”2834” in this string are the web based management password.
10. 981#
Restarts. (The system should be restarted immediately)
11. Hang up the phone
Note: This is the area code of the phone number. For example, “2” for Taipei, “21” for Shunghai, “10” for Peking and “408” for
San Jose (USA).
2. DHCP Mode
If want to setting the DHCP mode to get an IP, please follow the actions:
Using a phone to configure basic information
1.
Pick up the phone and press
2.
#0000
You will hear 3 short tones.
3.
012#
The number “2” represents the Taipei area code.
4.
0282261111#
The phone number is 82261111
5.
031#
Enable “DHCP” IP mode.
6.
882834#
The numbers ”2834” in this string are the web based management password.
7.
981#
Restarts. (The system should be restarted immediately)
8.
Hang up the phone
3. PPPoE Mode
PPPoE modes use dynamically assigned IP addresses and because of this there are difficulties with regards to Web based
management. We strongly suggest that you use a private and fixed IP address such as 192.168.0.2 (default setting) so that you can
use the web based interface to configure the IPC 1000 series unit’s other advanced configurations.
1. Using a phone to configure information
1. Pick up the phone and press
2.
##0000
You will hear 3 short tones.
3.
012#
The number “2” represents the Taipei area code.
4.
0282261111#
The phone number is 82261111
5.
04192*168*0*2#
Configures the IP Address “192.168.0.2”.
6.
05255*255*255*0#
Configures the Subnet Mask “255.255.255.0”.
7.
882834#
The numbers ”2834” in this string are the web based management password.
8.
981#
Restarts. (The system should be restarted immediately)
9.
Hang up the phone
2. Configure the TCP/IP Properties of the PC connected to the IPC 1000 series unit
You can use a popular browser such as IE or Netscape to perform further configurations. You need to use Ethernet
connection to connect a PC to the IPC 1000 series unit and modify the PC’s TCP/IP properties (IP Address and Subnet Mask) so
that they are located in the same subnet. You can then use the browser to configure the device.
Click to highlight your
Network Card’s
TCP/IP options.
Click the “Properties”
Fill in the IP Address
and Subnet Mask.
They must be in the
same subnet as the
IPC 1000 series unit.
Note: If the IPC 1000 series unit’s IP address has been set to public or static IP mode; you must configure the IP Address and
Subnet Mask of the PC to be in the same subnet as the IPC 1000 series unit rather than using IP address “192.168.0.5” and Subnet
Mask “255.255.255.0” as the above illustration demonstrates.
3. Entering the Web Based Management Interface
Fill in”WEB” (all capitals) and the
The IPC 1000 series
password that you have configured
unit’s IP address
in the basic configuration section
Press the “OK” button
4. Configuring the IPC 1000 series unit’s IP Modes using the Web Based Interface
Note: If you need to configure any other parameters after the IP mode configuration is done, do not restart the IPC 1000 series unit
as it will use the new IP setting. When this happens, you may no longer be able to access the IPC 1000 series unit using a web
browser. You will then need to use a phone or console to configure the IP back to its default or fixed IP address such as
“192.168.0.2”.
1. Select BASIC
2. Select PPPoE
Button.
4. Click the “Apply”
button to apply any
3. Enter the
PPPoE
information.
Fill in the (PPPoE) account
username and password, re-enter
the password to confirm
10. Using a phone to restart the System
After you have set all the parameters, you need to restart IPC 1000 series to start PPPoE and get a new IP address.
1.Pick up the phone and press
2. ##0000
You will hear 3 short tones.
3. 981#
Restarts the IPC 1000 series unit.
4. Hang up the phone.
4. Editing Phone book or IP learning
You have to configure the IP of the called number or doing the IP learning before making IP phone calls. If the recipient IPC
1000 series unit is using a public and static IP address, you can manually edit the IP address and phone number in your phone
book and then directly call the recipient phone number over IP. However if the recipient IPC 1000 series is using DHCP or PPPoE, it
requires an IP learning process to acquire recipient IP address. You can also join an IPN series to get the recipient IPC 1000 series’
IP address. Following shows you how to edit phone book and IP learning.
Editing Phone Book
1. Click the PHONEBOOK button to go to the phonebook
configuration page.
2. Fill in the country
code, area code and
phone number
5. Click the “Apply”
button to apply
any changes
3. Fill in the
IP address
4. Fill in the signaling
UDP port.
IP Learning
Unless the party receiving the call is using a fixed IP address which can be manually added to the static phone book, you will
have to “learn” the IP address of the called party’s phone number before making calls to that particular number. Following table
shows you how to do it.
Local IPC 1000 series
1.
Remote IPC 1000 series
Assuming the user makes a traditional phone call through
After a few seconds the phone will begin ringing. (The FXO LED
the PSTN to reach a remote IPC 1000 series unit, for
should be flashing)
example ”002862164458275” (You will then hear the ring
back tone).
2.
3.
Waiting for the recipient to answer the phone, ask called
Pick up the phone and press the“
party to press the “
procedure will begin.
” key twice. (Within one second)
Waiting for the recipient press the “
” key twice, the
learning procedure should then begin. Later you will hear
” key twice, the learning
At this point the user will hear short sounds that should continue
for about 15 seconds
short sounds that should continue for about 15 seconds
4.
If the learning procedure was successful, you will hear three Confirm that the learning process has completed successfully.
short sounds in rapid succession.
You should now be almost ready to commence voice
communication.
5.
Hang up the phone to end the IP learning process
Hang up the phone
procedure.
The user can retry dialing a VoIP phone number, for example The phone should ring. Pick up the phone to begin voice
“#002862164458275#”
communication over IP.
Join IIPN service
Contact your distributor and ask for a IPN service. After connecting to the IPN, you can get an IPN ID and make a VOIP call.
Example: # IPN ID #
5 . Placing VoIP Calls
The way making VoIP calls are almost the same as making traditional phone calls that you would use every day. If the
recipient IPC 1000 series is located in local, the number is the same as the destination number with leading and ending ‘#’ keys. If
the recipient IPC 1000 series is located in different area (long distance call), place the long distance access code and area code in
front of the destination number and leading and ending ‘#’ keys. If the recipient IPC 1000 series is located in different country
(international call), you must add international access code + country code + area code + destination number and leading and
ending ‘#’ keys.
How to dial
Description
Traditional Phone Calls
Phone Number
Making traditional phone calls through the PSTN
On-net calls (between two IPC 1000 series units) and Outbound Transit Calls
“#”+ phone number + “#”
For on-net calls and outbound transit calls
“#” + fax number + ‘ ”
For on-net FAX and outbound transit FAX
Inbound Transit Calls – Making local calls from a traditional phone to a local IPC 1000 series unit first and then
transferring it to another IPC 1000 series unit
“#” + Inbound Transit Password + "“#”+ phone number + “#” Inbound transit calls
“#” + Inbound Transit Password + “#” + fax number + "‘*”
Inbound transit FAX
6 . SIP Configuration
Before configuring SIP, you need an SIP proxy’s domain name or IP address if you are making SIP calls through SIP
proxy. Following pictures guide you configuring the SIP Proxy’s parameters.
1. Click the ADVANCED button
to go to the configuration page.
2. Click the SIP COMMON button
to go to the SIP configuration page.
3. Enter domain name or IP address
of Proxy Server and select Enable
8. Click the “Apply”
button to apply any
changes
4. Enter domain name or IP address of
Proxy Server and select Enable
5. Select a port to configure.
6. Enter SIP phone number.
7. Enter the contact address
Configure outbound authentication if SIP proxy server or other SIP phone request for authentication.
1. Click the ADVANCED button to
go to the configuration page.
2. Click the SIP
OUTBOUND
4. Click the “Apply” button to apply any changes
3. Enter information for authentication
including realm, username, port and password.
7 . SIP Phone Books
Configure SIP phone book to map SIP phone number with index. Making a SIP call by using analogy phone, just pick
up the phone and dial *# index #.
1. Click the PHONEBOOK button
to go to the configuration page.
6. Click the “Apply” button
to apply any changes
2. Click the SIP
button.
5. Select via
proxy or not.
3. Enter numbers.
4. Enter information of other SIP phone
number including name, host and port.
8 .Placing SIP Calls
After you have configured the SIP phone on the SIP phone book, you can easily make SIP call as follow:
1.
Pick up the phone
2.
Dial
“ *# ” + Index + "“#”