1
OPERATING INSTRUCTIONS, continued
REASSEMBLING THE Stapler:
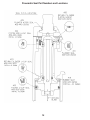
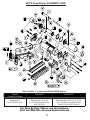
1. Be sure the Rubber Seat, Support Ring and
Cylinder are installed in the Body and are facing the
correct way.
2. All seal surfaces must be clean and lubricated
generously with Pneumatic Light Air Tool Oil
lubricant.
Replace any part that shows signs of wear.
3. Use care when installing the seals into their
respective cavities. Be sure the Seals are contained
in their groove and do not come out as the parts
slide together. Generous cavity lead in chamfers
have been provided to help Seal installation.
4. Carefully insert the Piston Rod into the return
Cylinder and screw the Piston onto the rod. Be sure
the Piston is facing the correct way, ears up, hex
down.
5. Assemble the Driving Blade, Dowel Pin and Jam
Nut on to the Piston Rod.
6. Insert the Driving Blade Assembly up into the
bottom of the Stapler Body Cylinder.
7. Be sure there is a new O-Ring Gasket in the top
groove of the Return Cylinder.
RUBBER BUMPER INSTALLED, IT WILL DAMAGE THE
Stapler.
TO CLEAR A Staple JAM:
1. It helps to tap the Driving Blade back to the retracted
position before trying to remove a jammed staple. A
spare Driving Blade works best for this.
2. Try to pull the jammed staple out of the gate with a
pair of long nose pliers. If this does not work remove the
four (4) cap screws holding the Foot, Gate and Staple
Channel Assembly together.
3. Separate the Foot and gate with a screw driver just
enough to clear out the jammed staple.
4. Put thread locking compound on all screws and
reassemble the components.
8. Insert the Plunger into the top cavity of the Body.
Line up the holes and install the three Plunger
retaining screws. It is important that the three #1032 screws are tight or air leakage will occur. Our
recommendation is to use 1-2 drops of blue Loctite®
or similar on the 3 screws.
9. Position the Safety Yoke in the Plunger groove.
10. Install the Body Cap and Plunger Rubber Cap.
11. Turn the Stapler upside down. Install the Rubber
Bumper, Staple Channel Assembly and Adapter
Foot. Be sure to align up the Driving Blade with the
slot in the Foot before the Stapler is closed up.
12. NEVER FIRE THE Stapler WITHOUT THE
For Step-by-Step Videos and Instructions,
Visit our Web Site at: www.Powernail.com
7