1
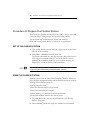
Affymetrix® Chromatin
Immunoprecipitation Assay Protocol
P/N 702238 Rev. 3
For research use only.
Not for use in diagnostic procedures.
Trademarks
Affymetrix®, GeneChip®,
, HuSNP®, GenFlex®, Flying Objective™,
CustomExpress®, CustomSeq® , NetAffx™, Tools To Take You As Far As Your Vision®,
The Way Ahead™, Powered by Affymetrix™, and GeneChip-compatible™, are
trademarks of Affymetrix, Inc.
All other trademarks are the property of their respective owners.
Limited License
Subject to the Affymetrix terms and conditions that govern your use of Affymetrix
products, Affymetrix grants you a non-exclusive, non-transferable, nonsublicensable license to use this Affymetrix product only in accordance with the
manual and written instructions provided by Affymetrix. You understand and agree
that except as expressly set forth in the Affymetrix terms and conditions, that no
right or license to any patent or other intellectual property owned or licensable by
Affymetrix is conveyed or implied by this Affymetrix product. In particular, no right or
license is conveyed or implied to use this Affymetrix product in combination with a
product not provided, licensed or specifically recommended by Affymetrix for such
use.
Patents
Arrays: Products may be covered by one or more of the following patents and/or sold
under license from Oxford Gene Technology: U.S. Patent Nos. 5,445,934; 5,700,637;
5,744,305; 5,945,334; 6,054,270; 6,140,044; 6,261,776; 6,291,183; 6,346,413; 6,399,365;
6,420,169; 6,551,817; 6,610,482; 6,733,977; and EP 619 321; 373 203 and other U.S. or
foreign patents.
Copyright
©2005-2006 Affymetrix Inc. All rights reserved.
i
Contents
CHAPTER 1
Overview
1
INTRODUCTION
3
CHROMATIN IMMUNOPRECIPITATION ASSAY PROTOCOL
OPTIMIZATION
4
MATERIALS
Buffers
Miscellaneous Reagents and Supplies
CHAPTER 2
Chromatin Immunoprecipitation Assay
6
9
11
13
PROCEDURE A: PREPARE CELLS
15
PROCEDURE B: FIX CELLS, LYSE, AND SONICATE
WHOLE CELL EXTRACTS
Adherent Cells
Suspension Cells
Wash Cell Pellet
15
15
16
16
PROCEDURE C: CHECK SONICATION EFFICIENCY
18
PROCEDURE D: INCUBATE WITH SPECIFIC ANTIBODY
20
PROCEDURE E: IMMUNOPRECIPITATE AND WASH
21
PROCEDURE F: REVERSE CROSSLINKS
22
PROCEDURE G: CLEANUP DE-CROSSLINKED SAMPLES
23
PROCEDURE H: PCR AMPLIFY IMMUNOPRECIPITATED
DNA TARGETS
23
PROCEDURE I: FRAGMENT AMPLIFIED TARGETS
29
PROCEDURE J: LABEL FRAGMENTED DOUBLESTRANDED DNA
31
ii
CHAPTER 3
Affymetrix® Chromatin Immunoprecipitation Assay Protocol
Hybridization and Array Processing
PROCEDURE A: HYBRIDIZE LABELED TARGET ON
THE ARRAYS
CHAPTER 4
CHAPTER 5
Array Washing and Staining
35
39
PROCEDURE A: ENTER EXPERIMENT INFORMATION
41
PROCEDURE B: PREPARE THE FLUIDICS STATION
Set Up the Fluidics Station
Prime the Fluidics Station
42
42
42
PROCEDURE C: WASH AND STAIN PROBE ARRAYS
Fluidics Protocols
Wash and Stain the Probe Array on Fluidics Station 450
Shut Down the Fluidics Station
43
44
45
48
Scanning
SCAN
Handling the Probe Array
Scanning the Probe Array
APPENDIX A
33
Cleanup of Double-Stranded DNA
CLEANUP OF DOUBLE-STRANDED DNA
49
51
51
53
55
57
contents
APPENDIX B
APPENDIX C
Buffers and Solutions Required for Array
Hybridization, Washing, and Staining
iii
59
BUFFERS AND SOLUTIONS REQUIRED FOR ARRAY
HYBRIDIZATION, WASHING, AND STAINING
61
PREPARING THE STAINING REAGENTS
65
Contact Information
CONTACT INFORMATION
67
69
iv
Affymetrix® Chromatin Immunoprecipitation Assay Protocol
Chapter
1
Overview
Chapter
1
3
Introduction
The Affymetrix® Chromatin Immunoprecipitation (ChIP) Assay is
designed to generate double-stranded labeled DNA targets that
identify sites of protein-DNA interactions or chromatin modifications
on a genome-wide scale. This assay has been designed specifically for
use with Affymetrix GeneChip® Tiling Arrays for ChIP-on-chip
studies in order to study transcription factor binding sites, histone
protein modifications, and other chromatin-protein interactions.
ChIP experiments can be used as a powerful tool to complement RNA
transcription studies because they enable researchers to study the
DNA-protein interactions that regulate gene expression. Following
the protocol, cells are first fixed with formaldehyde to crosslink DNA
to any associated proteins. The cells are then lysed and DNA is sheared
into smaller fragments using sonication. Protein-DNA complexes are
then immunoprecipitated with an antibody directed against the
specific protein of interest. Following the immunoprecipitation,
crosslinking is reversed, samples are protease-treated and the purified
DNA sample is amplified using a random-primed PCR method.
Subsequently, targets are fragmented and labeled to hybridize onto
GeneChip® Tiling Arrays. By comparing the hybridization signals
generated by an immunoprecipitated sample versus an antibodynegative or non-specific antibody control, the regions of chromatinprotein interaction can be identified.
Studies were performed at Affymetrix to evaluate the robustness and
sensitivity of the ChIP assay; however, because of the variability
associated with the quality and affinity of various antibodies against
their intended targets, results may vary from one antibody to the next.
The procedure outlined in this protocol describes all the necessary
steps and reagents for fixing cells, fragmenting chromatin,
immunoprecipitating sheared chromatin, amplifying and labeling
precipitated DNA.
We would like to acknowledge Mark Biggin and Xiao-Yong Li of the
Lawrence Berkeley National Lab for sharing their modifications to the
ChIP protocol. We have incorporated their improvements to the
amplification step (page 23) with their approval.
4
Affymetrix® Chromatin Immunoprecipitation Assay Protocol
Chromatin Immunoprecipitation Assay Protocol Optimization
This protocol has been developed for use with GeneChip® Tiling
Arrays. Exact protocol conditions will require optimization by each
user due to the variability inherent in:
• Experimental Biology: cell types, proteins of interest, antibodies
• Assay conditions: DNA fragmentation, PCR conditions
To ensure success with this protocol, it is critical that users optimize
the following steps in the ChIP protocol prior to performing
microarray hybridizations. Additional information on the
optimization steps are available throughout this protocol.
Sonication conditions of fixed cells.
Some cells are resistant to sonication treatment. Micrococcal
nuclease treatment may improve DNA shearing for some cell lines.
2. Antibody Qualification.
Antibodies should be qualified for use with chromatin
immunoprecipitation experiments. ChIP qualification
information is available from www.chiponchip.org or directly
from antibody vendors.
3. Antibody Titration.
Antibody affinities and avidities can vary, so the amount of antibody
may need to be titrated to achieve optimal sample enrichment.
4. PCR amplification of immunoprecipitated DNA.
The optimal number of PCR cycles may require optimization to
avoid saturation and ensure that the IP enrichment is maintained.
1.
5.
QPCR Positive Control.
A QPCR control is recommended to test ChIP conditions. This test
requires a known protein binding to a known DNA sequence. After
performing ChIP with an antibody to the known protein, QPCR is
used to verify that the known DNA binding elements are enriched
in experimental vs. negative control samples. This QPCR test can
also be used to ensure that the enrichment of experimental samples
vs. control samples is maintained after IP column clean up.
chapter 1 | Overview
Fix cells to
crosslink DNA
to protein
Sonicate to lyse
cells and shear
chromatin
Day 1
Take small aliquot to
decrosslink and check
sonication efficiency
Immunoprecipitate
main sample with
selected antibody
Couple to
Protein-A beads
and wash to
purify IP'd DNA
Decrosslink and
proteinase treat
IP'd DNA
GeneChIP®
Sample Cleanup
Module
Linear
Amplification
Day 2
Clean up
IP'd DNA
Random
Primer/Adapter
Sequenase, dNTPs
Adapter
5'
3'
5'
3'
Adapter Primer, dNTP + dUTP,
Taq polymerase
5'
3'
5'
3'
PCR amplify
and incorporate
dUTP
5'
U
3'
U
3'
5'
5'
3'
U
U
U
3'
U
5'
Uracil DNA Glycosylase
APE 1
Fragmentation
Day 3
+
Fragment and
label amplified
DNA target
Terminal Deoxynucleotidyl
Transferase DLR (Biotin-labeled)
Terminal Labeling
+
Hybridization
SAPE Biotinylated
anti-streptavidin antibody
Hybridize arrays
Washing/Staining
Day 4
Scanning
Legend
Proteins
Antibody
Figure 1.1
Chromatin Immunoprecipitation Assay Schematic
Protein-A beads
DNA
5
6
Affymetrix® Chromatin Immunoprecipitation Assay Protocol
MATERIALS
Table 1.1
Materials Required
Material
Source
Part Number
Formaldehyde Solution (37%), 500 mL
Sigma-Aldrich
F8775
Glycine, 1 kg
Sigma-Aldrich
50046
Phosphate Buffered Saline (PBS) pH 7.4 (1X), liquid
Various
IGEPAL® CA-630
Sigma-Aldrich
9036-19-5
Phenylmethanesulfonyl Fluoride Solution (PMSF), 250 mL
Sigma-Aldrich
93482
Microccocal Nuclease (MNase) (Optional)
USB
70196Y
EGTA (optional)
Sigma-Aldrich
E3889-100G
Protease Inhibitor Tablet
Roche
11873580001
Proteinase K
New England BioLabs
P8102S
LiCl (8M), 500 mL
Sigma-Aldrich
L7026
Glycogen
Roche
10901393001
Triton-X100 (non-ionic viscous liquid)
Roche
10789704001
Protein A Sepharose™ CL-4B
Amersham
17-0963-03
Antibody*
Various
Decrosslink and check sonication efficiency
Immunoprecipitation
* NOTE: Antibody should be qualified for chromatin immunoprecipitation. See www.chiponchip.org for a list of qualified antibodies.
chapter 1 | Overview
Table 1.1 (Continued)
Materials Required
Material
Source
Part Number
Sequenase™ Version 2.0 DNA Polymerase
USB
70775Y
Primer A: 200 µM GTTTCCCAGTCACGGTC(N)9
Various
HPLC purified
Primer B: 100 µM GTTTCCCAGTCACGGTC
Various
HPLC purified
Taq Polymerase 5 U/µL
Various
10X PCR Buffer
Various
dATP 100 mM
Various
dCTP 100 mM
Various
dGTP 100 mM
Various
dTTP 100 mM
Various
dUTP 100 mM
Various
BSA 20 mg/mL
Various
DTT 0.1M
Various
PCR Amplification
Wash Buffer
Tris-HCl
Various
EDTA
Various
SDS, 100g
Sigma-Aldrich
NaCl
Various
Deoxycholate (sodium salt), 100 g
Sigma-Aldrich
MgCl2, 1M
Various
CaCl2, 1M
Sigma-Aldrich
21115
Affymetrix
900812
71725
D6750
Fragmentation and Labeling
GeneChip® WT Double-Stranded DNA Terminal Labeling Kit,
30 Rxn
7
8
Affymetrix® Chromatin Immunoprecipitation Assay Protocol
Table 1.1 (Continued)
Materials Required
Material
Source
Part Number
Affymetrix
900371
QIAGEN
1018144
GeneChip® Hybridization, Wash, and Stain Kit
Affymetrix
900720
Control Oligonucleotide B2, 3nM
Affymetrix
900301
DNA Cleanup
GeneChip® Sample Cleanup Module, 30 Rxn
ERC
Buffer*,
85 mL
Hybridization, Stain and Wash
*
NOTE: The GeneChip® Sample Cleanup Module includes 20 mL of cDNA Binding Buffer. In order to process 30 samples following the Affymetrix®
Chromatin Immunoprecipitation Assay Protocol, additional cDNA Binding Buffer is required. This buffer should be purchased directly from
QIAGEN. When purchasing the cDNA Binding Buffer from QIAGEN, please order "ERC Buffer," part number 1018144.
chapter 1 | Overview
9
BUFFERS
Table 1.2
Buffers
Lysis Buffer (Store at 4°C)
10 mM Tris-HCl (made from stock 1M Tris-HCl pH 7.5)
10 mM NaCl
3 mM MgCl2
0.5% IGEPAL
1 mM PMSF (add fresh)
Pre-IP Dilution Buffer (Store at RT)
10 mM Tris-HCl (made from stock 1M Tris-HCl pH 7.5)
10 mM NaCl
3 mM MgCl2
1 mM CaCl2
4% IGEPAL
1 mM PMSF (add fresh)
IP Dilution Buffer (Store at RT without protease inhibitors)
20 mM Tris-HCl (made from stock 1M Tris-HCl pH 8)
2 mM EDTA
1% Triton X-100
150 mM NaCl
Protease Inhibitor Stock (add fresh)
Protease Inhibitor Stock
Prepare a 25X stock by dissolving 1 protease inhibitor tablet in 2 mL
of nuclease-free water
ChIP Wash 1 (Store at RT)
20 mM Tris-HCl (made from stock 1M Tris-HCl pH 8)
2 mM EDTA
1% Triton X-100
150 mM NaCl
1 mM PMSF (add fresh)
10
Affymetrix® Chromatin Immunoprecipitation Assay Protocol
Table 1.2 (Continued)
Buffers
ChIP Wash 2 (Store at RT)
20 mM Tris-HCl (made from stock 1M Tris-HCl pH 8)
2 mM EDTA
1% Triton X-100
0.1% SDS
500 mM NaCl
1 mM PMSF (add fresh)
ChIP Wash 3 (Store at RT)
10 mM Tris-HCl (made from stock 1M Tris-HCl pH 8)
1 mM EDTA
0.25M LiCl
0.5% IGEPAL
0.5% Deoxycholate (sodium salt)
Elution Buffer
25 mM Tris-HCl (made from stock 1M Tris-HCl pH 7.5)
10 mM EDTA
0.5% SDS
chapter 1 | Overview
11
MISCELLANEOUS REAGENTS AND SUPPLIES
Table 1.3
Miscellaneous Reagents and Supplies
Material
Supplier
Part Number
Miscellaneous Reagents
Absolute ethanol
Gold Shield Chemical Co.
RNA-6000 Nano LabChip Kit
Agilent
5065-4476
Novex XCell SureLock™ Mini-Cell*
Invitrogen
EI0001
TBE Gel, 4-20%,10 mm, 12 well*
Invitrogen
EC62252
5X Sucrose Gel Loading Dye
Amresco
E-274
10X TBE Buffer
Cambrex
50843
SYBR® Gold
Invitrogen
S-11494
10 bp DNA ladder and 100 bp DNA ladder
Invitrogen
10821-015 and 15628-019
ImmunoPure NeutrAvidin
Pierce
31000
PBS, pH 7.2
Invitrogen
20012-027
Gel-Shift Assay (Optional)
Miscellaneous Supplies
1-2% Agarose Gells
Various
1.5 mL RNase-free Microfuge Tubes*
Ambion
12400
1.5 mL Non-stick RNase-free Microfuge Tubes*
Ambion
12450
0.2 mL MicroAmp Reaction Tubes (8 tubes/strip)*
Applied Biosystems
N801-0580
MicroAmp Caps for 8 Strip Tubes
Applied Biosystems
N801-0535
Pipette for 25 mL*
VWR
53283-710
Pipet-Aid*
VWR
53498-103
Dolphin-nose Tubes
Costar (Corning)
3213
SpinX Columns
Costar (Corning)
8163
MicroSpin™ S-300 HR Columns
GE Healthcare
27-5130-01
12
Affymetrix® Chromatin Immunoprecipitation Assay Protocol
Table 1.3 (Continued)
Miscellaneous Reagents and Supplies
Material
Supplier
Part Number
Instruments
Rotating Benchtop Platforms
Various
Branson Sonifier® S-450D
Branson Ultrasonics
101-063-590
Double Step Micro Tip Assembly
Branson Ultrasonics
101-063-212
NanoDrop® ND-1000*
Nanodrop Technologies
ND-1000
GeneChip® Hybridization Oven 640
Affymetrix
8001318
Eppendorf Centrifuge*
Eppendorf
5417C
Refrigerated Centrifuge with swing bucket rotor
Various
Tube-Strip Picofuge™
Stratagene
400540
GeneChip® Fluidics Station 450 or 400
Affymetrix
00-0079
GeneChip® Scanner 3000 7G
Affymetrix
00-0073
GeneChip® Autoloader (Optional)
Affymetrix
90-0351
ABI GeneAmp PCR System 9700*
Applied Biosystems
N/A
Bioanalyzer 2100
Agilent
G2940CA
Heating Block*
VWR
13259-030
Pipette for 0.1 to 2 µL*
Rainin
L-2
Pipette for 2 to 20 µL*
Rainin
L-20
Pipette for 20 to 200 µL*
Rainin
L-200
Pipette for 100 to 1,000 µL*
Rainin
L-1000
*Or equivalent instrument/supplies.
Chapter
2
Chromatin Immunoprecipitation Assay
Chapter
2
15
Procedure A: Prepare Cells
Grow enough cells for the number of immunoprecipitation (IP)
reactions to be performed (usually 5 x 10⁷ cells per IP for
suspension cells, depending on IP efficiency). Prepare enough cells
for two IP reactions. An antibody-minus (Ab- or mock IP) or nonspecific IgG is recommended as a negative control using the same
number of cells as the IP condition. The Ab- target would be
treated identically to the experimental sample to serve as the
“Control” group in the downstream two-sample analysis.
2. Use ~ 0.5 - 2 x 10⁸ cells per IP. For example, grow 200 mL of
1 x 10⁶ cells/mL for a total of 2 x 10⁸ cells.
1.
Procedure B: Fix Cells, Lyse, and Sonicate Whole Cell
Extracts
DAY 1
Centrifugation steps involving cells are best performed with a
swing-bucket type rotor.
ADHERENT CELLS
End users may optimize the sequence of fixing and harvesting cells
to minimize the degree to which cell physiology is disrupted.
Add formaldehyde to the culture flask to a final concentration of
1% and incubate in a fume hood for 10 minutes.
2. Add 1/20 volume of 2.5 M glycine and incubate at room
temperature (RT) for 5 minutes with gentle mixing.
3. Pour off formaldehyde media into an appropriate waste container
and add enough ice-cold 1X PBS to cover the bottom of the flask
to wash cells. Pour off PBS into a formaldehyde waste container
and add enough PBS to cover bottom of flask.
1.
16
Affymetrix® Chromatin Immunoprecipitation Assay Protocol
Using a cell scraper, scrape off cells to re-suspend and check flask
with microscope to ensure that most cells are re-suspended.
5. From here, go to Step 1 of the Wash Cell Pellet section below.
4.
SUSPENSION CELLS
1.
Fix cells by adding formaldehyde to a final concentration of 1%
(add 5.5 mL of 37% formaldehyde to 200 mL of culture medium).
Incubate at room temperature (RT) in fume hood for 10 minutes,
gently swirl 200 mL culture or invert tube containing 20 mL of
adherent cells occasionally to mix cells.
3. Add 1/20 volume 2.5 M glycine and incubate at RT 5 minutes
with gentle mixing to quench formaldehyde reaction. Perform
remaining steps on ice.
4. Pellet cells at 4°C, (300-500g), 4 minutes and discard supernatant
in formaldehyde waste.
2.
WASH CELL PELLET
Wash pellet with 10 mL ice-cold 1X PBS to resuspend cells, and
transfer to 15 mL tube.
2. Pellet cells at 4°C, (300-500g), 4 minutes and discard supernatant
and repeat wash with ice-cold 1X PBS once.
3. Wash the pellet 3 times with 10 mL Lysis Buffer with fresh PMSF.
Pellet cells at (300-500g) 5 minutes between washes.
1.
Discard supernatant and proceed to the next step or flash freeze
pellet and store at –80°C.
5. Resuspend the pellet in 1 mL pre-IP dilution buffer (add 60 μL
PMSF) and bring final reaction volume to 1.5 mL with pre-IP
dilution buffer.
4.
chapter 2 | Chromatin Immunoprecipitation Assay
6.
17
Add to the tube:
Table 2.1
Component
*
Volume for 1 Rxn
100 mM PMSF
40 µL
25X Protease Inhibitor Stock
100 µL
Pre-IP Dilution Buffer
460 µL
20% SDS
100 µL
5 M NaCl
80 µL
Nuclease-free Water
220 µL*
Final Sample Volume Before Sonication
2.5 mL
if using optional MNase, see details on page 19.
7.
Sonicate sample to lyse cells and shear DNA to 100-1000 bp
fragments. Some cell types (e.g., Jurkat) may require optional
MNase treatment. See page 19 for details.
Optimized shearing conditions are cell-type and instrument
dependent. It is recommended that conditions are optimized with a
single sample prior to scaling up procedures to multiple samples.
Best sonication conditions at Affymetrix were achieved with a
Branson Sonifier 450D (using a double-step microtip) set at 60%
duty, 50% amplitude, 1 minute pulses with 1 minute rest. Both
pulsing and resting steps were performed in an ice bath, 8 to 10
pulses total for HL-60 cells. Number of pulses may be dependent on
cell density as well as cell type.
8.
Aliquot the sonicated samples into two 1.5 mL microcentrifuge
tubes, then microcentrifuge 14,000 rpm 10 minutes at 4°C to
remove cellular debris.
9.
Pool supernatants (from Step 8) in a 15 mL conical tube.
18
Affymetrix® Chromatin Immunoprecipitation Assay Protocol
10. The
sonication efficiency can be checked by taking an aliquot
(100 μL) of this supernatant, de-crosslinking it (see Procedure C,
below), and running the de-crosslinked DNA on a 1-2% agarose
gel.
11. Divide the samples into aliquots equivalent to ~ 5 x 10⁷ cells
(1 IP), flash freeze and store at –80°C for later use or take straight
through the IP.
Procedure C: Check Sonication Efficiency
Add 100 μL 10 mM Tris pH 8.0 to the 100 μL aliquot taken from
the sonicated samples.
2. Add 2 μL Proteinase K (20 mg/mL) and mix well by vortexing.
3. Incubate 42°C for 2 hours, then 65°C for 6 hours to overnight
(This step can be performed in a thermocycler.)
1.
Clean-up using Affymetrix cDNA cleanup columns, from the
GeneChip® Sample Cleanup Module, eluting with 20 μL Elution
Buffer (see Cleanup of Double-Stranded DNA on page 57).
5. Load 100-500 ng of purified DNA sample on an agarose gel to
check sonication efficiency. Typically, sheared DNA size ranges
from 100-4000 bp, with the average size fragment between 2001000 bp.
4.
chapter 2 | Chromatin Immunoprecipitation Assay
19
Figure 2.1
(A) Sheared DNA from HL-60 cells following 8 sonication pulses show the optimal size range for
immunoprecipitation (~200-1000 bp with the majority of DNA fragments between 300-500 bp). Certain cell
types may be more resistant to shearing by sonication and would require treatment with Micrococcal
nuclease (MNase) to fragment chromatin. (B) Jurkat cells after 15 pulses of sonication show little
fragmentation of crosslinked chromatin. (C) Fragmentation of Jurkat chromatin is achieved with MNase
treatment. MNase enzyme concentration may have to be titrated based on cell type and density, lane1: 200U,
lane2: 100U, lane3: 25U. The ‘laddering’ phenomenon seen with MNase treatment is common due to the
specific cleavage of DNA by MNase between nucleosomes.
Optional DNA Shearing Method
Micrococcal Nuclease Treatment
1. Add appropriate units of MNase based on prior optimization of
MNase to effectively shear crosslinked chromatin. This can range
from 25 U to 200 U or more for each IP performed.
2. Incubate at 37°C, 10 minutes.
3. Add 30 μL 200 mM EGTA to stop the reaction.
20
Affymetrix® Chromatin Immunoprecipitation Assay Protocol
Procedure D: Incubate With Specific Antibody
If the sample (from Procedure B Step 11, on page 18) was frozen,
thaw.
2. Transfer supernatant to a 15 mL tube and add 5 volumes of IP
dilution buffer containing protease inhibitors (tablet from Roche,
add before use).
1.
Pre-equilibriate protein A Sepharose™ beads by washing 100 μL
beads with 1 mL IP dilution buffer, pellet cells by centrifuging
for 2 minutes at 2,000 rpm at 4°C in a microcentrifuge. Remove
~ 800 μL supernatant.
4. Pre-clear chromatin by adding 200 μL pre-equilibrated Protein A
Sepharose beads.
3.
Incubate on a rotating platform at 4°C for 30 minutes.
6. Centrifuge at 2,000 rpm for 2 minutes at 4°C in a swinging bucket
rotor.
7. Transfer supernatant to a new 15 mL tube and discard beads.
8. Add 10 to 15 μg of antibody per IP. Usually, a negative control is
performed using the same number of cells with a non-specific IgG
or no antibody (mock IP) control.
5.
The amount of antibody to be added is dependent on quality,
affinity, specificity, and type of antibody used. Users may have to
titrate the amount of antibody used for each IP.
9.
Incubate on rotating platform at 4°C overnight (or for at least
3 hours at RT).
chapter 2 | Chromatin Immunoprecipitation Assay
21
DAY 2
Procedure E: Immunoprecipitate and Wash
1.
Pre-equilibrate protein A Sepharose™ beads by adding 1 mL IP
Dilution Buffer and 200 μL beads for each IP’d sample. Centrifuge
2,000 rpm 2 minutes at 4°C.
2.
Discard around 800 μL supernatant: save ~ 400 μL of beads in
buffer at the bottom of the tube.
3.
Transfer 400 μL beads to each sample.
Add PMSF to each tube sample (final concentration 1mM PMSF
in final volume).
Incubate on rotating platform at RT for 1 to 3 hours.
Centrifuge at 2,000 rpm at 4°C for 4 minutes, and then discard
supernatant.
Resuspend the pellet with 700 μL ChIP wash 1 (containing 1 mM
PMSF added fresh), mix and transfer to spin-X column.
4.
5.
6.
7.
Incubate on rotating platform at RT for 1 minute.
9. Centrifuge at 2,000 rpm at RT for 2 minutes and discard flowthrough.
10. Repeat steps 7–9.
11. Wash the beads with 700 μL ChIP wash 2 (containing 1 mM fresh
PMSF).
8.
12. Incubate
on rotating platform at RT for 5 minutes.
13. Centrifuge at 2,000 rpm at RT and discard flow-through.
14. Wash the beads with 700 μL ChIP wash 3.
15. Incubate on rotating platform at RT for 5 minutes.
16. Centrifuge at 2,000 rpm at RT and discard flow-through.
22
Affymetrix® Chromatin Immunoprecipitation Assay Protocol
17. Wash
the beads with 700 μL TE (10 mM Tris-HCl pH 8, 1 mM
EDTA).
18. Incubate on rotating platform at RT for 1 minute.
19. Centrifuge at 2,000 rpm at RT and discard flow-through.
20. Repeat steps 17 through 19.
21. Transfer the spin-X column with beads to a dolphin-nose tube.
22. Add 200 μL Elution Buffer to the column.
23. Incubate at 65°C for 30 minutes.
24. Centrifuge at 3,000 rpm at RT for 2 minutes.
25. Add 200 μL Elution Buffer to the column.
26. Centrifuge at 3,000 rpm at RT for 2 minutes. This 400 μL eluted
sample is the “enriched” or “IP’d” sample.
Procedure F: Reverse Crosslinks
Add 5 μL Proteinase K (20mg/mL) per 100 μL of negative control
or IP sample, mix well. (20 μL for 400 μL of eluted sample.)
2. Incubate in incubator at 65°C overnight.
1.
chapter 2 | Chromatin Immunoprecipitation Assay
23
DAY 3
Procedure G: Cleanup De-crosslinked Samples
1.
Clean up samples using Affymetrix cDNA cleanup columns. Elute
twice with 20 μL Elution Buffer (Appendix A, page 55). Total
elution volume recovered is ~ 38 μL.
2. IP efficiency can be checked at this stage in the protocol using
polymerase chain reaction (PCR) and designing primer sets against
regions that are known to be bound by the protein of interest and
immunoprecipitated using the antibody being investigated. A
significant increase or enrichment for the specific target should be
observed for the IP condition compared to the Ab- control. Using
quantitative real-time PCR, Affymetrix has routinely obtained >8fold enrichment for IP samples compared to the Ab- samples.
Procedure H: PCR Amplify Immunoprecipitated DNA
Targets
Dilute Sequenase™ stock with Sequenase Dilution Buffer (included
with enzyme) to 1.3 U/μL. Four microliters of this 1.3 U/μL working
stock will be needed for each sample being amplified.
1.
Use 10 μL of IP’d or negative control sample for initial round of
linear amplification.
24
2.
Affymetrix® Chromatin Immunoprecipitation Assay Protocol
Set up first round reaction. Set up 1 reaction for single array
products (e.g., Human Promoter 1.0R Array). Setup 3 reactions for
multi-array sets (e.g., Human Tiling 2.0R Array Set).
Table 2.2
*
Component
Volume for 1 Rxn
Purified DNA
10 µL
5X Sequenase™ Reaction Buffer*
4 µL
Primer A (200 µM)†
4 µL
Total Volume
18 µL
Included with enzyme.
† Primer
3.
A: GTTTCCCAGTCACGGTC(N)9 (HPLC purified)
Cycle conditions: Random priming.
95°C for 4 minutes.
B. Snap cool samples on ice.
C. 10°C hold.
D. Prepare first cocktail.
A.
Table 2.3
First Cocktail
Component
Volume for 1 Rxn
20 mg/mL BSA
0.1 µL
0.1 M DTT
1 µL
25 mM dNTPs
0.5 µL
Diluted Sequenase™ (1/10 from 13 U/µL stock) 1 µL
Total Volume
2.6 µL
Add 2.6 μL per sample.
F. Mix well by pipetting, and put the sample back in thermocycler
block.
E.
chapter 2 | Chromatin Immunoprecipitation Assay
25
10°C for 5 minutes.
H. Ramp from 10°C to 37°C over 9 minutes.
I. 37°C for 8 minutes.
J. 95°C for 4 minutes.
G.
Snap cool on ice.
L. 10°C hold.
M. Add 1.0 μL of 1.3U/μL Sequenase™ to each sample.
N. 10°C for 5 minutes.
O. Ramp from 10°C to 37°C over 9 minutes.
P. 37°C for 8 minutes.
Q. Repeat from J) to P) for 2 more cycles.
R. 4°C hold.
4. For each IP, purify with Microspin S-300 HR (GE Healthcare)
columns (2 columns per reaction) as follows:
K.
Add 20 μL of 10 mM TE pH 8.0 to each reaction.
B. Spin 2 columns (A & B) at 3,000 rpm for 1 minute, discard
flow-through.
C. Transfer reaction volume (~ 43 μL) to column A, while
equilibrating column B with 300 μL of 10 mM Tris pH 8.0.
D. Spin both columns at 3,000 rpm for 1 minute, keep flowthrough from column A (sample) and discard flow-through of
column B (Tris buffer).
A.
Transfer flow-through of column A to column B with new
collection tube.
F. Spin at 3,000 rpm for 2 minutes.
G. Collect ~ 56 μL of first round purified DNA per reaction.
E.
26
5.
Affymetrix® Chromatin Immunoprecipitation Assay Protocol
Prepare dNTP/dUTP mix.
Prior to proceeding with the PCR amplification of
immunoprecipitated DNA targets, prepare a dNTP mixture
containing dUTP at the concentrations indicated below. Please note
that this dNTP + dUTP mixture is only required for the PCR
amplification reaction outlined in Table 2.4 and not in the
Sequenase™ reaction setup in Table 2.3.
dCTP – 10 mM
dATP – 10 mM
dGTP – 10 mM
dTTP – 8 mM
dUTP – 2 mM
Store at –20°C.
6.
PCR Mix Setup:
Table 2.4
Component
Volume for 1 Rxn
First-round DNA from Step 4
20 µL
10X PCR Buffer
10 µL
25 mM MgCl2*
3 µL
10 mM dNTPs + dUTP
3.75 µL
100 µM Primer B†
4 µL
5 U/µL Taq Polymerase
2 µL
Nuclease-free Water
57.25 µL
Total Volume
100 µL
*
Add MgCl2 if using magnesium-free 10X PCR Buffer.
†
Primer B (GTTTCCCAGTCACGGTC)
chapter 2 | Chromatin Immunoprecipitation Assay
7.
27
Cycle conditions:
A.
15 cycles1
95°C 30 seconds.
2) 45°C 30 seconds.
3) 55°C 30 seconds.
4) 72°C 1 minute.
B. 15 cycles1
1)
95°C 30 seconds.
2) 45°C 30 seconds.
3) 55°C 30 seconds.
4) 72°C 1 minute.
For every subsequent cycle add 5 seconds.
E.g., cycle 1: 60 seconds, cycle 2: 65 seconds, etc...
C. 4°C hold.
8. Check amplified DNA on 1% agarose gel.
1)
1
Number of PCR amplification cycles may require optimization. QPCR can be used to evaluate enrichment of immunoprecipitated sample.
28
Affymetrix® Chromatin Immunoprecipitation Assay Protocol
Figure 2.2
PCR-amplified ChIP targets from HL-60 cells immunoprecipitated with an Sp1
antibody. Replicate PCR reactions (lanes 1 to 3) were performed on the same IP
sample and product sizes ranged from 200 bp to over 2 Kb but the actual product
sizes may vary depending on original size of sheared chromatin.
9.
Purify PCR samples with Affymetrix cDNA cleanup columns,
provided in the GeneChip Sample® Cleanup Module, eluting
twice with 20 μL of Elution Buffer.
10. Measure
DNA using a NanoDrop or other UV-vis
spectrophotometer. Normally, greater than 9 μg of amplified
DNA is obtained from each reaction.
Maintenance of IP enrichment post-amplification is crucial in
obtaining good array results. QPCR should be performed to postamplified samples to ensure that differences between the IP and
Ab- samples are maintained. Primer sets can be designed for DNA
regions that are known to be specifically immunoprecipitated using
the antibody of interest.
chapter 2 | Chromatin Immunoprecipitation Assay
29
Procedure I: Fragment Amplified Targets
1.
Fragment the samples using the appropriate table below
depending on what array type the target will be hybridized to.
Table 2.5
Fragmentation Mix for single arrays (e.g., Human Promoter 1.0R Array)
Component
Volume/Amount in 1 Rxn
Double-Stranded DNA
7.5 µg
10X cDNA Fragmentation Buffer*
4.8 µL
UDG, 10 U/µL*
1.5 µL
APE 1, 100 U/µL*
2.25 µL
Nuclease-free Water*
Total Volume
up to 48 µL
48.0 µL
* Available in GeneChip® WT Double-Stranded DNA Terminal Labeling Kit (P/N 900812)
Table 2.6
Fragmentation Mix for multi-array sets (e.g., Human Tiling 2.0R Array Set)
Component
Volume/Amount in 1 Rxn
Double-Stranded DNA
9 µg
10X cDNA Fragmentation Buffer*
4.8 µL
UDG, 10 U/µL*
1.5 µL
APE 1, 100 U/µL*
2.25 µL
Nuclease-free Water*
Total Volume
up to 48 µL
48.0 µL
* Available in GeneChip WT Double-Stranded DNA Terminal Labeling Kit (P/N 900812)
®
30
Affymetrix® Chromatin Immunoprecipitation Assay Protocol
Set up fragmentation mix according to either Table 2.5 or Table
2.6) Flick-mix and spin down the tubes.
3. Incubate the reactions at:
• 37°C for 1 hour.
• 93°C for 2 minutes.
• 4°C for at least 2 minutes.
4. Flick-mix, spin down the tubes, and transfer 45 μL of the sample
to a new tube.
2.
5.
The remainder of the sample is to be used for fragmentation
analysis using a Bioanalyzer or agarose gel. Please see the Reagent
Kit Guide that comes with the RNA 6000 LabChip Kit for
instructions.
If not labeling the samples immediately, store the fragmented
DNA at –20°C.
Figure 2.3
Bioanalyzer trace of fragmentation products following treatment of amplified
ChIP targets with UDG and APE 1. Independently amplified Sp1 IP or Absamples from HL-60 cells were fragmented according to the protocol and
products were analyzed on an Agilent Bioanalyzer with the RNA 6000 Nano
LabChip Kit. Analyzing fragmented DNA on the RNA 6000 LabChip is
recommended because it quickly assesses the degree and uniformity of the
fragmented products.
chapter 2 | Chromatin Immunoprecipitation Assay
31
Procedure J: Label Fragmented Double-Stranded DNA
1.
Prepare the Double-Stranded DNA Labeling Mix as described in
Table 2.7.
Table 2.7
Double-Stranded DNA Labeling Mix
Component
Volume in 1 Rxn
5x TdT Buffer*
12 µL
TdT*
2 µL
DNA Labeling Reagent, 5 mM*
1 µL
Total Volume
15 µL
* Available in the GeneChip® WT Double-Stranded DNA Terminal Labeling Kit (P/N 900812).
Add 15 μL of the Double-Stranded DNA Labeling Mix to the
DNA samples, flick-mix, and spin them down.
3. Incubate the reactions at:
• 37°C for 60 minutes.
• 70°C for 10 minutes.
• 4°C for at least 2 minutes.
4. Remove 2 μL of each sample for gel-shift analysis (refer to the
GeneChip® Whole Transcript (WT) Sense Target Labeling Assay
Manual).
2.
32
Affymetrix® Chromatin Immunoprecipitation Assay Protocol
Chapter
3
Hybridization and Array Processing
Chapter
3
35
Procedure A: Hybridize Labeled Target on
the Arrays
This Procedure requires the use of the GeneChip® Hybridization,
Wash, and Stain Kit (P/N 900720). Alternatively, users may prepare
their own hybridization mix using Table B.2 and either Table B.3 or
Table B.4 in Appendix B.
1.
Prepare the Hybridization Cocktail in a 1.5 mL RNase-free
microfuge tube as shown in Table 3.1 and Table 3.2, below
depending on what array type the target will be hybridized to.
Table 3.1
Hybridization Cocktail for single tiling arrays (e.g., GeneChip® Human Promoter
1.0R Array)
Component
Volume in 1
Rxn
Final Concentration
or Amount
~ 60.0 µL*
~ 7.5 µg
Control Oligonucleotide B2
3.3 µL
50 pM
2X Hybridization Mix†
100 µL
1X
DMSO
14.0 µL
7%
Fragmented and Labeled DNA Target
Nuclease-free Water
Total Volume
up to 200.0 µL
200.0 µL
*
This volume is 56 µL if a portion of the sample was set aside for gel-shift analysis.
†
Available in the GeneChip® Hybridization, Wash, and Stain Kit. If preparing buffers, see Appendix B for buffer composition.
36
Affymetrix® Chromatin Immunoprecipitation Assay Protocol
Table 3.2
Hybridization Cocktail for use with serial hybridizations (e.g., GeneChip® Human
Tiling 2.0R Array Set and GeneChip® Mouse Tiling 2.0R Array Set)
Component
Volume in 1
Rxn
Fragmented and Labeled DNA Target
Control Oligonucleotide B2
2X Hybridization
Mix†
DMSO
Nuclease-free Water
Total Volume
*
Final Concentration
or Amount
~ 60.0 µL*
~ 9.0 µg
4 µL
50 pM
120 µL
1X
16.8 µL
7%
up to 240.0 µL
240.0 µL
This volume is 58 µL if a portion of the sample was set aside for gel-shift analysis.
† Available in the GeneChip® Hybridization, Wash, and Stain Kit. If preparing buffers, see Appendix
B for buff-
er composition.
Flick-mix, and centrifuge the tube.
3. Heat the Hybridization Cocktail at 99°C for 5 minutes. Cool to
45°C for 5 minutes, and centrifuge at maximum speed for
1 minute.
4. Inject ~ 200 μL of the specific sample into the array through one
of the septa (see Figure 3.1 for location of the septa on the array).
Save the remaining hybridization cocktail in –20°C for future use.
2.
Place array in 45°C hybridization oven, at 60 rpm, and incubate
for 16 hours.
6. After hybridization, remove the hybridization cocktail for future
use.
5.
chapter 3 | Hybridization and Array Processing
Figure 3.1
GeneChip® Probe Array
37
38
Affymetrix® Chromatin Immunoprecipitation Assay Protocol
Chapter
4
Array Washing and Staining
Chapter
4
41
Procedure A: Enter Experiment
Information
To wash, stain, and scan a probe array, an experiment must first be
registered in GeneChip® Operating Software (GCOS). Please follow
the instructions detailed in the “Setting Up an Experiment” section of
the GCOS User’s Guide.
The fields of information required are:
• Experiment Name
• Probe Array Type (For multi-array sets, please refer to the design
number indicated on the array cartridge label.)
• Sample Name
• Sample Type
• Project
Sample templates, experiment templates, and array barcodes can also
be employed in GCOS to standardize and simplify the registration
process. Please see the Affymetrix GeneChip® Operating Software User’s
Guide (P/N 701439) for more information.
The Project, Sample Name, and Experiment Name fields establish a
sample hierarchy that organizes GeneChip data in GCOS. In terms of
the organizational structure, the Project is at the top of the hierarchy,
followed by Sample Name and then Experiment Name.
PROJECT
SAMPLE
EXPERIMENT
42
Affymetrix® Chromatin Immunoprecipitation Assay Protocol
Procedure B: Prepare the Fluidics Station
The GeneChip® Fluidics Station 450/250 or 400 is used to wash and
stain GeneChip® Tiling Arrays. It is operated using GCOS.
Use the GeneChip® Hybridization, Wash, and Stain Kit
(P/N 900720) or prepare buffers as indicated in Appendix B.
SET UP THE FLUIDICS STATION
1.
Turn on the Fluidics Station using the toggle switch on the lower
left side of the machine.
2.
Select Run → Fluidics from the menu bar.
The Fluidics Station dialog box appears with a drop-down list for
selecting the experiment name for each of the fluidics station
modules. A second drop-down list is accessed for choosing the
Protocol for each of the fluidics station modules.
Refer to the Fluidics Station User’s Guide for instructions on
connecting and addressing multiple fluidics stations.
PRIME THE FLUIDICS STATION
Priming ensures that the lines of the GeneChip® Fluidics Station are
filled with the appropriate buffers and the Fluidics Station is ready for
running fluidics station protocols.
Priming should be done:
• when the Fluidics Station is first started.
• when wash solutions are changed.
• before washing, if a shutdown has been performed.
• if the LCD window instructs the user to prime.
To prime the fluidics station, select Protocol in the Fluidics
Station dialog box.
2. Choose Prime_450 for the respective modules in the Protocol
1.
chapter 4 | Array Washing and Staining
43
drop-down list.
3. Change the intake buffer reservoir A to Wash Buffer A (nonstringent wash buffer), and intake buffer reservoir B to Wash
Buffer B (stringent wash buffer).
4. Select the All Modules check box, then click Run.
Procedure C: Wash and Stain Probe Arrays
After 16 hours of hybridization, remove the hybridization cocktail
from the probe array and add to any remaining Hybridization Cocktail
that was saved in Chapter 3, Procedure A. Fill the probe array
completely with the appropriate volume of Non-Stringent Wash
Buffer (Wash Buffer A), as described in Table 4.1 below.
Table 4.1
Format
Total Fill Volume
49
250 µL
64
250 µL
100
160 µL
If necessary, at this point, the probe array can be stored at 4°C for
up to 3 hours before proceeding with washing and staining.
Equilibrate the probe array to room temperature before washing
and staining.
This procedure takes approximately 90 minutes to complete.
44
Affymetrix® Chromatin Immunoprecipitation Assay Protocol
FLUIDICS PROTOCOLS
Table 4.2
Fluidics Protocols for GeneChip® Tiling Arrays
Fluidics Station 400
EukGE-WS2v5
Fluidics Station 450
FS450_0001
Post Hyb Wash #1
10 cycles of 2 mixes/cycle with Wash
Buffer A at 30°C
10 cycles of 2 mixes/cycle with Wash
Buffer A at 30°C
Post Hyb Wash #2
6 cycles of 15 mixes/cycle with Wash
Buffer B at 50°C
6 cycles of 15 mixes/cycle with Wash
Buffer B at 50°C
Stain
Stain the probe array for 10 minutes in
SAPE solution at 35°C
Stain the probe array for 5 minutes in
SAPE solution/Stain Cocktail 1 at 35°C
Post Stain Wash
10 cycles of 4 mixes/cycle with Wash
Buffer A at 30°C
10 cycles of 4 mixes/cycle with Wash
Buffer A at 30°C
2nd Stain
Stain the probe array for 5 minutes in
antibody solution at 35°C
Stain the probe array for 5 minutes in
antibody solution/Stain Cocktail 2 at
35°C
3rd Stain
Stain the probe array for 5 minutes in
SAPE solution at 35°C
Stain the probe array for 5 minutes in
SAPE solution/Stain Cocktail 1 at 35°C
Final Wash
15 cycles of 4 mixes/cycle with Wash
Buffer A at 35°C. The holding
temperature is 25°C
15 cycles of 4 mixes/cycle with Wash
Buffer A at 35°C.
Holding Buffer
N/A - manual process
Fill the probe array with Array Holding
Buffer.
• Wash Buffer A = non-stringent wash buffer
• Wash Buffer B = stringent wash buffer
chapter 4 | Array Washing and Staining
45
Table 4.3
Format
FS450 Fluidics
Protocol
FS400 Fluidics
Protocol
49
FS450_0001
e.g., Human Tiling 2.0R Array Set
EukGE-WS2v5 and add
Array Holding Buffer
64
FS450_0001
e.g., Human Promoter 1.0R Array
EukGE-WS2v5 and add
Array Holding Buffer
100
FS450_0002
e.g., S. pombe Tiling 1.0 FR Array
Midi_euk2v3 and add
Array Holding Buffer
WASH AND STAIN THE PROBE ARRAY ON FLUIDICS STATION 450
If a Fluidics Station 450 instrument is unavailable, proceed with
washing and staining with the appropriate FS400 fluidics protocol.
Add Holding Buffer to the cartridge manually prior to scanning.
In the Fluidics Station dialog box on the workstation, select the
correct experiment name from the drop-down Experiment list.
The Probe Array Type appears automatically.
2. In the Protocol drop-down list, select FS450_0001 or
FS450_0002 to control the washing and staining of the probe array.
3. Choose Run in the Fluidics Station dialog box to begin the
washing and staining.
Follow the instructions in the LCD window on the fluidics station.
If you are unfamiliar with inserting and removing probe arrays
from the fluidics station modules, please refer to the appropriate
Fluidics Station User’s Guide or Quick Reference Card (P/N 08-0093
for the FS-450/250 fluidics station).
4. Insert the appropriate probe array into the designated module of
the fluidics station while the cartridge lever is in the down, or
eject, position. When finished, verify that the cartridge lever is
returned to the up, or engaged position.
1.
46
5.
6.
7.
8.
9.
Affymetrix® Chromatin Immunoprecipitation Assay Protocol
Remove any microcentrifuge vials remaining in the sample holders
of the fluidics station module(s) being used.
Follow the instructions on the LCD window. Place the following
three vials (the microcentrifuge vials) into the sample holders 1, 2,
and 3 on the fluidics station.
• Place one vial containing 600 μL of SAPE Solution Mix/Stain
Cocktail 1 in sample holder 1.
• Place one vial containing 600 μL of Antibody Solution Mix/
Stain Cocktail 2 in sample holder 2.
• Place one vial containing 800 μL Array Holding Buffer in
sample holder 3.
• Press down on the needle lever to snap needles into position and
to start the run.
The run begins. The Fluidics Station dialog boxes at the
workstation terminal and the LCD window display the status of
the washing and staining as they progress.
At the end of the run, or at the appropriate prompt, remove the
microcentrifuge vials containing the stain solutions and replace
with three empty microcentrifuge vials.
Remove the probe arrays from the fluidics station modules by first
pressing down the cartridge lever to the eject position.
Check the probe array window for large bubbles or air pockets.
• If bubbles are present, proceed to Table 4.4.
• If the probe array has no large bubbles, it is ready to be scanned
on GeneChip® Scanner 3000 7G. Pull up on the cartridge lever
to engage washblock and proceed to Chapter 5, Scanning on
page 49.
If you do not scan the arrays right away, keep the probe arrays at
4°C and in the dark until ready for scanning.
If there are no more samples to hybridize, shut down the fluidics
station following the procedure outlined in the section, Shut Down
the Fluidics Station on page 48.
chapter 4 | Array Washing and Staining
47
Table 4.4
If Bubbles are Present
Return the probe array to the probe array holder. Engage the washblock by
gently pushing up on the cartridge lever to the engaged, or closed, position.
Follow the instructions on the LCD window. The fluidics station will drain the
probe array and then fill it with a fresh volume of Array Holding Buffer. When
finished, the LCD window displays ‘EJECT CARTRIDGE.’ Again, remove the
probe array and inspect for bubbles. If no bubbles are present it is ready to be
scanned. Proceed to Chapter 5, Scanning on page 49.
If your attempt to fill the probe array without bubbles is unsuccessful manually
drain the 1x Array Holding Buffer from the array, using a micropipette, and fill
the array completely with a fresh aliquot of 1x Array Holding Buffer. Inspect the
array and ensure that no bubbles are present. Excessive washing will result in
a loss of signal intensity.
48
Affymetrix® Chromatin Immunoprecipitation Assay Protocol
SHUT DOWN THE FLUIDICS STATION
After removing a probe array from the probe array holder, the LCD
window displays the message ENGAGE WASHBLOCK.
2. If you are using the Fluidics Station 400, latch the probe array
holder by gently pushing up until a light click is heard. Engage
the washblock by firmly pushing up on the cartridge lever to the
ENGAGE position.
If you are using the Fluidics Station 450, gently lift up the
cartridge lever to engage, or close, the washblock.
• The fluidics station automatically performs a Cleanout
procedure. The LCD window indicates the progress of the
Cleanout procedure.
3. When the fluidics station LCD window indicates REMOVE
VIALS, the Cleanout procedure is complete.
4. Remove the sample microcentrifuge vial(s) from the sample
holder(s).
1.
If no other arrays are to be processed, place wash lines into a bottle
filled with deionized water.
6. Choose Shutdown or Shutdown_450 for all modules from the
drop-down Protocol list in the Fluidics Station dialog box. Click
the Run button for all modules.
The Shutdown protocol is critical to instrument reliability. Refer
to the appropriate Fluidics Station User’s Guide for more
information.
7. After Shutdown protocol is complete, flip the ON/OFF switch of
the fluidics station to the OFF position.
5.
To maintain the cleanliness of the fluidics station and obtain the
highest quality image and data possible, the bleach protocol is
highly recommended. Please refer to the GeneChip® Fluidics
Station 450/250 User’s Guide (P/N 08-0092) available at
www.affymetrix.com.
Chapter
5
Scanning
Chapter
5
51
Scan
The GeneChip® Scanner 3000 7G is also controlled by GeneChip®
Operating Software (GCOS). The probe array is scanned after the wash
protocols are complete. Make sure the laser is warmed up prior to
scanning by turning it on at least 10 minutes prior to use. If probe
array was stored at 4°C, warm to room temperature before scanning.
Refer to the GCOS online help and the appropriate scanner user’s
manual for more information on scanning.
The scanner uses a laser and is equipped with a safety interlock
system. Defeating the interlock system may result in exposure to
hazardous laser light.
You must have read, and be familiar with, the operation of the
scanner before attempting to scan a probe array. Please refer to the
the GeneChip® Scanner 3000 Quick Reference Card or user’s manual.
HANDLING THE PROBE ARRAY
Before you scan the probe array, follow the directions in this section on
handling the probe array. If necessary, clean the glass surface of the
probe array with a non-abrasive towel or tissue before scanning. Do not
use alcohol to clean glass.
Before scanning the probe array cartridge, apply Tough-Spots® label
dots to each of the two septa on the probe array cartridge to prevent
the leaking of fluids from the cartridge during scanning.
Apply the spots just before scanning.
On the back of the probe array cartridge, clean excess fluid from
around septa.
2. Carefully apply one Tough-Spots to each of the two septa. Press to
ensure that the spots remain flat. If the Tough-Spots do not apply
smoothly, that is, if you observe bumps, bubbles, tears, or curled
edges, do not attempt to smooth out the spot. Remove the spot and
apply a new spot. See Figure 5.1.
1.
52
Affymetrix® Chromatin Immunoprecipitation Assay Protocol
Figure 5.1
Applying Tough-Spots® to the probe array cartridge
3.
Insert the cartridge into the scanner and test the autofocus to
ensure that the Tough-Spots do not interfere with the focus. If you
observe a focus error message, remove the spot and apply a new
spot. Ensure that the spots lie flat.
chapter 5 | Scanning
53
SCANNING THE PROBE ARRAY
1.
2.
3.
4.
5.
Select Run → Scanner from the menu bar. Alternatively, click
the Start Scan icon in the tool bar.
• The Scanner dialog box appears with a drop-down list of
experiments that have not been run.
Select the experiment name that corresponds to the probe array to
be scanned.
A previously run experiment can also be selected by using the
Include Scanned Experiments option box. After selecting this
option, previously scanned experiments appear in the drop-down
list.
Once the experiment has been selected, click the Start button.
• A dialog box prompts you to load an array into the scanner.
Open the sample door on the scanner and insert the probe array
into the holder. Do not force the probe array into the holder. Close
the sample door of the scanner.
Click OK in the Start Scanner dialog box.
• The scanner begins scanning the probe array and acquiring
data. When Scan in Progress is selected from the View menu,
the probe array image appears on the screen as the scan
progresses.
54
Affymetrix® Chromatin Immunoprecipitation Assay Protocol
Appendix
A
Cleanup of Double-Stranded DNA
Appendix
A
57
Cleanup of Double-Stranded DNA
This Procedure requires the use of the GeneChip® Sample Cleanup
Module.
1. If not already done, add 24 mL of Ethanol (100%) to the cDNA
Wash Buffer supplied in the GeneChip Sample Cleanup Module.
2. Add 5X volumes of cDNA Binding Buffer to sample, and vortex
for 3 seconds.
The GeneChip® Sample Cleanup Module includes 20 mL of cDNA
Binding Buffer. In order to process 30 samples following the
Affymetrix® Chromatin Immunoprecipitation Assay Protocol,
additional cDNA Binding Buffer is required. This buffer should be
purchased directly from QIAGEN. When purchasing the cDNA
Binding Buffer from QIAGEN, please order "ERC Buffer," part
number 1018144.
3.
4.
5.
6.
7.
8.
Apply the sample to a cDNA Spin Column sitting in a 2 mL
Collection Tube (max capacity of column = 700 μL; if volume
exceeds 700 μL, spin 700 μL at ≥ 8,000 x g for 1 minute, discard
flow-through, and repeat).
Spin at ≥ 8,000 x g for 1 minute. Discard the flow-through.
Transfer the cDNA Spin Column to a new 2 mL Collection Tube
and add 750 μL of cDNA Wash Buffer to the column. Spin at
≥ 8,000 x g for 1 minute and discard the flow-through.
Open cap of the cDNA Spin Column, and spin at ≤ 25,000 x g for
5 minutes with the caps open. Discard the flow-through, and place
the column in a 1.5 mL collection tube.
Pipet recommended amount of cDNA Elution Buffer directly to
the column membrane and incubate at room temperature for
1 minute. Then, spin at ≤ 25,000 x g for 1 minute.
Take 2 μL from each sample to determine the yield by
spectrophotometric UV measurement at 260 nm, 280 nm and
320 nm:
Concentration of Double-Stranded cDNA (μg/μL) =
[A260 - A320] x 0.05 x dilution factor
μg DNA = eluate in μL x DNA in μg/μL
58
Affymetrix® Chromatin Immunoprecipitation Assay Protocol
Appendix
B
Buffers and Solutions Required for Array
Hybridization, Washing, and Staining
Appendix
B
61
Buffers and Solutions Required for Array
Hybridization, Washing, and Staining
Table B.1
Reagents for Hybridization, Wash, and Satin
Material
Source
P/N
GeneChip® Control Oligo B2, 3 nM
Affymetrix
900301
Acetylated Bovine Serum Albumin (BSA) solution (50 mg/mL)*
Invitrogen
15561-020
Herring Sperm DNA*
Promega
D1811
R-Phycoerythrin Streptavidin*
Molecular Probes
S-866
Goat IgG, Reagent Grade*
Sigma-Aldrich
I 5256
Anti-streptavidin antibody (goat), biotinylated *
Vector
Laboratories
BA-0500
Water, Molecular Biology Grade*
Cambrex
51200
5M NaCl, RNase-free, DNase-free*
Ambion
9760G
MES hydrate SigmaUltra*
Sigma-Aldrich
M5287
MES Sodium Salt*
Sigma-Aldrich
M5057
EDTA Disodium Salt, 0.5M solution (100 mL)*
Sigma-Aldrich
E7889
DMSO*
Sigma-Aldrich
D5879
Surfact-Amps® 20 (Tween-20), 10%*
Pierce
28320
PBS, pH 7.2*
Invitrogen
20012-027
20X SSPE (3M NaCl, 0.2M NaH2PO4, 0.02M EDTA)*
Cambrex
51214
Tough-Spots®, Label Dots
USA Scientific
9185-0000
* Available in the GeneChip® Hybridization, Wash, and Stain Kit (P/N 900720).
62
Affymetrix® Chromatin Immunoprecipitation Assay Protocol
Table B.2
Buffers Required to be Prepared
12X MES Stock Buffer
(1.22M MES, 0.89M [Na+])
For 1,000 mL:
64.61g of MES hydrate
193.3g of MES Sodium Salt
800 mL of Molecular Biology Grade water
Mix and adjust volume to 1,000 mL
The pH should be between 6.5 and 6.7. Filter through a 0.2 µm filter.
IMPORTANT: Do not autoclave. Store at 2°C to 8°C and shield from
light. Discard solution if yellow.
2X Hybridization Buffer
(Final 1X concentration: 100 mM MES, 1M [Na+], 20 mM EDTA, 0.01% Tween-20)
For 50 mL:
8.3 mL of 12X MES Stock Buffer
17.7 mL of 5M NaCl
4.0 mL of 0.5M EDTA
0.1 mL of 10% Tween-20
19.9 mL of water
IMPORTANT: Store at 2°C to 8°C and shield from light.
Wash Buffer A: Non-Stringent Wash Buffer (included in P/N 900720)
(6X SSPE, 0.01% Tween-20)
For 1,000 mL:
300 mL of 20X SSPE
1.0 mL of 10% Tween-20
699 mL of water
Filter through a 0.2 µm filter.
appendix B | Buffers and Solutions Required for Array Hybridization, Washing, and Staining
63
Table B.2 (Continued)
Buffers Required to be Prepared
Wash Buffer B: Stringent Wash Buffer (included in P/N 900720)
(100 mM MES, 0.1M [Na+], 0.01% Tween-20)
For 1,000 mL:
83.3 mL of 12X MES Stock Buffer
5.2 mL of 5M NaCl
1.0 mL of 10% Tween-20
910.5 mL of water
Filter through a 0.2 µm filter.
IMPORTANT: Store at 2°C to 8°C and shield from light.
2X Stain Buffer
(Final 1X concentration: 100 mM MES, 1M [Na+], 0.05% Tween-20)
For 250 mL:
41.7 mL of 12X MES Stock Buffer
92.5 mL of 5M NaCl
2.5 mL of 10% Tween-20
113.3 mL of water
Filter through a 0.2 µm filter.
IMPORTANT: Store at 2°C to 8°C and shield from light.
10 mg/mL Goat IgG Stock
Resuspend 50 mg in 5 mL of 150 mM NaCl.
Store at 4°C
IMPORTANT: If a larger volume of the 10 mg/mL IgG stock is
prepared, aliquot and store at –20°C until use. After the solution has
been thawed it should be stored at 4°C. Avoid additional freezing
and thawing.
1X Array Holding Buffer
(100 mM MES, 1M [Na+], 0.01% Tween-20)
For 100 mL:
8.3 mL of 12X MES Stock Buffer
18.5 mL of 5M NaCl
0.1 mL of 10% Tween-20
73.1 mL of water
Store at 2°C to 8°C and shield from light.
64
Affymetrix® Chromatin Immunoprecipitation Assay Protocol
Table B.3
Hybridization Cocktail for single tiling arrays (e.g., GeneChip® Human Promoter
1.0R Array) if not using the GeneChip® Hybridization, Wash, and Stain Kit
Component
Volume in
1 Reaction
Final Concentration
or Amount
Fragmented and Labeled DNA Target
~60 µL
~ 7.5 µg
Control Oligonucleotide B2
3.3 µL
50 pM
Herring Sperm DNA (10 mg/mL)
2.0 µL
0.1 mg/mL
Acetylated BSA (50 mg/mL)
2.0 µL
0.5 mg/mL
2X Hybridization Buffer
100 µL
1X
DMSO
14 µL
7%
RNase-free Water
Total Volume
up to 200.0 µL
200.0 µL
Table B.4
Hybridization Cocktail for use with serial hybridizations (e.g., GeneChip® Human
Tiling 2.0R Array Set and GeneChip® Mouse Tiling 2.0R Array Set) if not using
the GeneChip® Hybridization, Wash, and Stain Kit
Component
Volume in
1 Reaction
Final Concentration
or Amount
Fragmented and Labeled DNA Target
~60 µL
~ 9.0 µg
Control Oligonucleotide B2
4.0 µL
50 pM
Herring Sperm DNA (10 mg/mL)
2.4 µL
0.1 mg/mL
Acetylated BSA (50 mg/mL)
2.4 µL
0.5 mg/mL
2X Hybridization Buffer
120 µL
1X
DMSO
16.8 µL
7%
RNase-free Water
Total Volume
up to 240.0 µL
240.0 µL
appendix B | Buffers and Solutions Required for Array Hybridization, Washing, and Staining
65
Preparing the Staining Reagents
Prepare the following reagents. Volumes given are sufficient for one
probe array.
SAPE Stain Solution
Streptavidin Phycoerythrin (SAPE) should be stored in the dark at
4°C, either foil-wrapped or kept in an amber tube. Remove SAPE
from the refrigerator and tap the tube to mix well before preparing
stain solution. Do not freeze SAPE. Always prepare the SAPE stain
solution fresh, on the day of use.
Table B.5
SAPE Solution Mix
Components
Volume
Final
Concentration
2X Stain Buffer (see page 63)
300 µL
1X
50 mg/mL BSA
24 µL
2 mg/mL
1 mg/mL Streptavidin Phycoerythrin (SAPE)
6 µL
10 µg/mL
Molecular Biology Grade Water
270 µL
—
Total Volume
600 µL
Mix well. The 600 μL of SAPE Solution Mix will be used for the 1st
and 3rd stain.
If using the Fluidics Station 400, after the first stain is done save the
tube with the SAPE stain solution. Reuse the saved tube for the
third stain.
66
Affymetrix® Chromatin Immunoprecipitation Assay Protocol
Antibody Solution
Table B.6
Antibody Solution Mix
Components
Volume
Final Concentration
2X Stain Buffer
300.0 µL
1X
50 mg/mL BSA
24.0 µL
2 mg/mL
10 mg/mL Goat IgG Stock
6.0 µL
0.1 mg/mL
0.5 mg/mL biotinylated
antibody
3.6 µL
3 µg/mL
266.4 µL
—
Molecular Biology Grade Water
Total Volume
600 µL
Mix well. The 600 μL of Antibody Solution Mix will be used for the
2nd Stain.
Array Holding Buffer
To prepare the Array Holding Buffer, refer to Table B.2 on page 63.
Appendix
C
Contact Information
Appendix
C
69
Contact Information
Affymetrix, Inc.
3420 Central Expressway
Santa Clara, CA 95051
USA
E-mail: [email protected]
Tel: 1-888-362-2447 (1-888-DNA-CHIP)
Fax: 1-408-731-5441
Affymetrix UK Ltd
Voyager, Mercury Park,
Wycombe Lane, Wooburn Green,
High Wycombe HP10 0HH
United Kingdom
E-mail: [email protected]
UK and Others Tel: +44 (0) 1628 552550
France Tel: 0800919505
Germany Tel: 01803001334
Fax: +44 (0) 1628 552585
Affymetrix Japan, K. K.
Mita NN Bldg
16 Floor, 4-1-23 Shiba,
Minato-ku, Tokyo 108-0014
Japan
Tel: (03) 5730-8200
Fax: (03) 5730-8201
70
Affymetrix® Chromatin Immunoprecipitation Assay Protocol