1
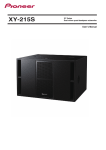
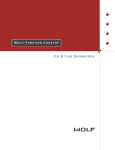
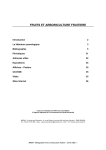
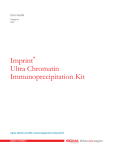
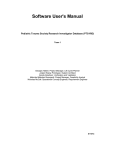
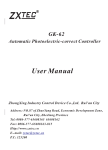
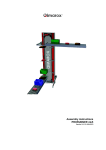
User Manual ™ CASE Cellular Activation of Signaling ELISA Directly Monitor Protein Phosphorylation without Cell Lysis See Purchaser Notification for limited use license and warranty information (page 3). Part #1013A Version 2.7 3/2/2009 CASE™ Cellular Activation of Signaling ELISA Directly Monitor Protein Phosphorylation without Cell Lysis User Manual (For Catalog Numbers FE-001 through FE-021) Ordering and Technical Service Contact Information: Tel: Fax: On-line Order: E-MAIL: 1-888-503-3187 (US) 301-682-9200 (outside US) 1-888-465-9859 (US) 301-682-7300 (outside US) www.SABiosciences.com [email protected] (to place an order) [email protected] (for technical support) You may place orders by fax, e-mail or from our website. Each order should include the following information: Your contact information (name, phone, email address) Product name, catalog number and quantity Purchase order number or credit card information (Visa or MasterCard) Shipping address Billing address For more information, visit us at www.SABiosciences.com SABiosciences Corporation 6951 Executive Way, Suite 100 Frederick, MD 21703 USA 2 CONTENTS I. Background and Introduction 4 II. Materials Provided 6 III. Additional Materials Required 7 IV. Protocol 8 A. Working Solution Preparation 8 B. Cell Culture and Preparation 10 C. Incubation with Primary and Secondary Antibodies 14 D. Colorimetric Detection 15 E. Determination of Relative Cell Number 16 V. Troubleshooting Guide 17 Method Reference: Versteeg HH, Nijhuis E, van den Brink GR, Evertzen M, Pynaert GN, van Deventer SJ, Coffer PJ, Peppelenbosch MP. A new phosphospecific cell-based ELISA for p42/p44 mitogen-activated protein kinase (MAPK), p38 MAPK, protein kinase B and cAMP-response-element-binding protein. Biochem J. 2000 Sep 15;350 Pt 3:717-22. LIMITED PRODUCT WARRANTY This warranty limits our liability to replace this product in the event the product fails to perform due to any manufacturing defect. SABiosciences Corporation makes no other warranties of any kind, expressed or implied, including without limitation, warranties of merchantability or fitness for a particular purpose. SABiosciences Corporation shall not be liable for any direct, indirect, consequential or incidental damages arising out of the use, the results of use or the inability to use this product. NOTICE TO PURCHASER This product is intended for research purposes only and is not intended for drug or diagnostic purposes or for human use. The purchase of a CASE™ Kit includes a limited, nonexclusive license to use the kit components for research use only. This license does not grant rights to use the kit components for reproduction of any kit component, to modify kit components for resale, or to use a CASE™ Kit to manufacture commercial products without written approval of SABiosciences Corporation. No other license, expressed, implied or by estoppel, is granted. Technical Support: [email protected] 3 www.SABiosciences.com CASE™ Cellular Activation of Signaling ELISA I. Background and Introduction As an intracellular signal transduction pathway involving a protein kinase cascade is activated by an extracellular stimulus, the extent of phosphorylation of an upstream regulatory protein increases. Monitoring the phosphorylation status of this protein helps verify whether the stimulus activates the pathway and helps determine the effect of various treatments, inhibitors, or activators on that activation. Two traditional methods are widely used to measure the phosphorylation status of a protein, Western blot analysis with phospho-specific antibody or [32P] incorporation followed by gel electrophoresis. Both methods are tedious, require a large amount of cells and treatment reagents, and are not suitable for high-throughput studies. The Cellular Activation of Signaling ELISA (CASE™) Kits employ a cell-based ELISA that directly measures protein phosphorylation on 96-well cultured cells. The CASE™ Kits include a complete antibody-based detection system for colorimetric quantification of the relative amount of phosphorylated protein and total target protein. This simple and efficient cell-based protein phosphorylation assay eliminates the need to prepare cell lysates and to perform a Western blot or the need to use r-[32P]-ATP for in vitro kinase assays. The entire assay occurs directly in cell culture wells without sacrificing specificity, reproducibility, or sensitivity. With its 96-well plate format, the CASE™ assay requires very small amounts of cells and treatment reagents, and the assay procedure is compatible with high-throughput studies. These features make the CASE™ kits especially suitable for screening compounds that activate or inhibit important signaling pathways. In the CASE™ assay, cells are seeded into 96-well plates. After your experimental treatment, the cells are fixed to preserve any activation-specific protein modification, such as phosphorylation. Two primary antibodies are included in the kit. One antibody recognizes only the activated (phosphorylated) form of the specific target protein, while another recognizes the specific target protein regardless of its activation state. Following incubation with primary and secondary antibodies, the amount of bound antibody in each well is determined using a developing solution and an ELISA Plate Reader. The absorbance readings are then normalized to relative cell number as determined by a cell staining solution. The amount of phosphorylated protein, once normalized to the amount of total protein, is then directly related to the extent of downstream pathway activation. Features and Advantages of the CASE™ Kits: Quantitative: Cell-based ELISA determines level of total and activated form of protein at same time Simple: Easy, quantitative, and non-radioactive protocol with minimal hands-on time No Extractions: Directly measure protein phosphorylation state on cells fixed in a 96well culture plate Technical Support: [email protected] 4 www.SABiosciences.com Version 2.7 CASE™ Kit Quick Reference Procedure: (Assay time: < 3 hours of hands-on time) Figure 1: Overview of Cellular Activation of Signaling ELISA (CASE™) Kit Procedure. Technical Support: 888.503.3187 (US) 5 301.682.9200 CASE™ Cellular Activation of Signaling ELISA II. Materials Provided: This kit includes enough of the following reagents for 96 assays: Box 1: Assay & Detection Reagents (Store at 4oC) Box 2: Primary Antibodies1 (Store at -20oC) DILUTION FACTOR COMPONENTS: COMPONENTS: 10× Antigen Retrieval Buffer2 Anti-Phospho-Protein Specific Antibody Anti-Pan-Protein Specific Antibody 10× Washing Buffer2 Antibody Dilution Buffer Blocking Buffer, dry powder3 Cell Staining Solution Developing Solution Secondary Antibody(s) 1, 4 (Dilute 1:16 before use.) Stop Solution Washing Buffer Reservoir (4) 1:100 1:100 1 Each antibody stock must be freshly diluted into Antibody Dilution Buffer on the same day of the experiment. Use Dilution Factor specified for each antibody on its Product Information sheet. See page 9 for more details. 2 10× Washing Buffer and 10× Antigen Retrieval Buffer must be diluted to 1× with distilled H2O before use. 3 Just before use, dissolve powder in 30 ml 1× Washing Buffer by mixing well. Once dissolved, Blocking Buffer may be stored at 4 °C for up to two (2) weeks. 4 Catalog number FE-015, the CASE Kit for p53 S15, contains two Secondary Antibodies. Secondary Antibody A must be used with the Pan-Protein Specific Primary Antibody, and Secondary Antibody B must be used with the Phospho-Protein Specific Primary Antibody. Shipping and Storage Conditions: Box 1 is shipped at ambient temperature and should be stored at 4 C. Box 2 is shipped on dry ice and should be stored at –20 C. Shelf Life: All reagents are stable as is if it is not used for 6 months after receipt of the kit and stored at the recommended temperature. Technical Support: [email protected] 6 www.SABiosciences.com Version 2.7 III. Additional Materials Required: The following supplies are also required but are not included as part of the CASE™ kit: Multi-Channel Pipettor Parafilm Rocking platform Microwave oven ELISA Plate Reader (or spectrophotometer) capable of reading at 450 and 595 nm Tissue Culture Plates: Choose the type of tissue culture plate that is best suited to your cell line and treatment. 96 Well Clear Flat Bottom TC-Treated Microplate, Corning Costar, 3595 CellBIND® 96 Well Clear Flat Bottom Polystyrene Microplates, Corning Costar, 3300 96 Well Clear Flat Bottom Poly-D-Lysine Coated Microplate, Corning Costar, 3665 NOTE: Because the entire CASE protocol occurs directly in tissue culture plates, good cell attachment is essential for the success of the experiment. The TC-treated plates provide the lowest non-specific background, while the CellBIND® and poly-D-lysine coated plates provide better cell attachment but sometimes also generate a higher non-specific background signal. For tightly-attached adherent cells, such as A431, we recommend using the TC-treated plates. For more loosely-attached adherent cells, such as NIH 3T3 or HEK-293, or for suspension cells, we recommend using the CellBIND® or poly-D-lysine coated plates. We highly recommend pre-testing which type of tissue culture plate is best suited for your cell lines. The following solutions are required for performing the CASE assay but are not included with the kit. These solutions must be prepared from materials obtained from other manufacturers before starting the CASE procedure: 1× Phosphate-Buffered Saline (PBS) Dissolve 8.0 g of NaCl, 0.2 g of KCl, 1.44 g of Na2HPO4, and 0.24 g of KH2PO4 in 800 ml of distilled H2O. Adjust the pH to 7.4. Bring the final volume to 1 liter with distilled water. Dispense in convenient volumes and sterilize by autoclaving. Store at room temperature. 37% Formaldehyde Molecular Biology Grade from any chemical supplier For example: Sigma (Cat. No. F8775) 30% H2O2 (concentrated hydrogen peroxide) Molecular Biology Grade from any chemical supplier For example: Sigma (Cat. No. H1009) 10% NaN3 (sodium azide): Dissolve 10 g of sodium azide into 100 ml of ddH2O. Use appropriate caution – sodium azide is a hazardous substance. 1% SDS (sodium dodecyl sulfate) Dissolve 1 g of sodium dodecyl sulfate into 100 ml of ddH2O. Store at room temperature. Technical Support: 888.503.3187 (US) 7 301.682.9200 CASE™ Cellular Activation of Signaling ELISA IV. Protocol: Please familiarize yourself with the entire CASE Kit protocol before starting the experiment. A. Working Solution Preparation: The following working solutions should be freshly prepared from the stock solutions each time the experiment is performed using the following recipes: 1. Cell Fixing Buffer: Prepare either 4% or 8% Cell Fixing buffer depending on the type of your cell culture. Cell Fixing Buffer 4% Fixing Buffer For adherent cells Reagent 1× PBS 37% Formaldehyde Total Volume Volume for 96 wells 10.7 ml 1.3 ml 12 ml OR 8% Fixing Buffer For suspension cells 1× PBS 37% Formaldehyde Total Volume 9.4 ml 2.6 ml 12 ml WARNING: Formaldehyde and its vapors are highly toxic. Always prepare and use formaldehyde solutions under a chemical fume hood and wear protective gloves and eyewear and a lab coat. Dispose formaldehyde waste according to your institution’s hazardous waste disposal protocol. 2. 1× Washing Buffer: 10X Washing Buffer must be diluted to 1× with distilled H2O before use. 3. Quenching Buffer: To 11.48 ml of 1× Washing Buffer, add 400 l of 30% H2O2, and 120 l of 10% NaN3 for a final volume of 12 ml, enough for 96 wells. 4. 1× Antigen Retrieval Buffer: 10× Antigen Retrieval Buffer must be diluted to 1× with distilled dH2O before use. 5. Blocking Buffer: Just before use, dissolve blocking buffer powder (provided in kit box 1) in 30 ml 1× Washing Buffer by mixing well. Once dissolved, Blocking Buffer may be stored at 4 °C for up to two (2) weeks. Technical Support: [email protected] 8 www.SABiosciences.com Version 2.7 6. Antibody Dilution: Each antibody provided in the kit must be freshly diluted using Antibody Dilution Buffer each time the experiment is performed. Dilute just enough of the antibodies as needed for the planned experiment. If you use the antibodies wisely, enough material is provided in the kit to process a total of 96 assays or, in other words, 96-wells with each primary antibody and a total of (2 × 96 =) 192 wells with the secondary antibody. Diluted Antibody Volume of Diluted Antibody (Prepared in Antibody Dilution Buffer) 8 assays 12 assays 96 assays Anti-Phospho-Protein Specific Primary Antibody 500 l 750 l 6000 l Anti-Pan-Protein Specific Primary Antibody 500 l 750 l 6000 l Secondary Antibody 2000 l 3000 l 24000 l Both primary antibodies in all CASE Kits should be diluted by a factor of 1:100. The secondary antibody(s) in all CASE Kits should be diluted by a factor of 1:16. FOR EXAMPLE: If the required dilution factor for an anti-phospho-protein specific antibody is 1:100 and 12 assays are to be performed, calculate the amount of stock antibody to dilute: 750 l (from table above) / 100 (dilution factor) = 7.5 l. Thus, 7.5 l of antibody should be diluted into 750 l of Antibody Dilution Buffer. Perform this calculation separately for both primary antibodies and the secondary antibody using their dilution factors and the total volumes in the table above. NOTE: For catalog number FE-015, the CASE Kit for p53 S15, only make half of the recommended volume of the above dilution for each of the two included Secondary Antibodies, A for use with the Pan-Protein Specific Primary Antibody and B for use with the Phospho-Protein Specific Primary Antibody. Technical Support: 888.503.3187 (US) 9 301.682.9200 CASE™ Cellular Activation of Signaling ELISA B. Cell Culture and Cell Preparation: NOTE: A fresh and healthily growing cell culture is crucial for a successful CASE experiment. Only use cells growing in log-phase to set up a CASE experiment. If the cell culture is already too old (that is, if the cells are over-confluent, if the culture medium turns yellow in color, or if adherent cells have started floating to a significant extent), split the cells once into a fresh tissue culture flask or dish and fresh medium. Allow the cells to grow into log phase once more before seeding into a 96-well plate to set up the CASE experiment. (See page 7 for recommendations on selecting tissue culture plates.) 1. Plan your experiment and your cell culture carefully. For example, see Figure 2. Figure 2: Example of how to plate cells for use with the CASE™ Kit for AKT S473 (Cat. No. FE-001). Seed cells and plan treatment in two identical sets of cell culture wells. In the example here, a 96well plate is divided into two sets, and treatments are identical in both sets in a symmetrical fashion. Duplicate wells are used here for each dose and time point. Cells were treated with various concentrations (0, 1, 10, or 100 ng/ml) of IGF-1 with or without the kinase inhibitor LY294002 for 0, 10, 30, or 60 minutes. The 96-well plate was used in a CASE™ Kit Assay; half of the plate was treated with the anti-phospho-protein specific primary antibody, and half with the anti-pan-protein specific primary antibody. Eight wells of cells were not treated with primary antibody but only with secondary antibody (2° Antibody ONLY), and eight wells were not plated with cells but were treated with both primary and second antibodies (Blank). The different shades in 96-well plate represent theoretical signal intensities from the experiment. a. Each treatment point (or assay determination) requires two sets of cells treated in an identical fashion. One set of cells will be incubated with the phospho-protein specific antibody to measure phosphorylated protein; the other set of cells will be incubated with the pan-protein specific antibody to measure total protein. Each experimental condition (e.g. time point, concentration point, etc.) should be performed in duplicate or triplicate to control for systematic variation. Technical Support: [email protected] 10 www.SABiosciences.com Version 2.7 b. You should also include wells for control purposes such as: i. Blank wells (not seeded with any cells) ii. Detection control wells (seeded with cells, only incubated with secondary but not primary antibody) iii. Experimental control wells (seeded with cells but not experimentally treated) c. Seed cells into a 96-well plate the day before your treatment, with the idea that the cell culture density should be at roughly 50-80 percent confluence on the day of your treatment and the CASE experiment. (See page 7 for recommendations on selecting tissue culture plates.) FOR EXAMPLE: In the experiment outlined in Figure 2, cells are seeded at 2.0 ×10⁴ cells per well on day 0 and allowed to sit and grow overnight. On day 1, the cells are starved in serum-free medium overnight. On day 2, the relevant wells of cells are pretreated with the inhibitor for one hour followed by the IGF1 treatment as described in the figure legend. Then, the CASE assay protocol is performed as described below. For the majority of cell lines with a doubling time of 18-24 hours, seeding an initial density of roughly 1.5 × 10⁴ cells per well will yield the appropriate cell density by the time of the CASE assay. If you have not established a growth curve for your cell line in 96-well tissue culture plates, perform a pilot cell seeding experiment before seeding cells for the CASE experiment. Cell densities that are too high or too low at the time of the CASE assay give poor results. Re-seed cells if the cell growth or confluence conditions are not appropriate. NOTE: It is not necessary to plate cells in all 96 wells. Only add cells to the wells that you plan to use and prepare only as much antibody dilution as you need. 2. Allow cells to grow overnight. Then, perform treatments as defined by your experiment on the next day. NOTE: Take special care when removing tissue culture medium by vacuum suction. Cell loss while changing medium or treatment solutions is one of the most common causes of poor CASE assay results. Use low vacuum pressure or attach an additional 200-l sterile plastic pipet tip over your glass Pasteur pipet used for vacuum suction. 3. Fix Cells: a. For adherent cells, remove the culture medium, and add 100 l of 4% Cell Fixing Buffer to each well. b. For suspension cells, directly add 100 l of 8% Cell Fixing Buffer to the 100 l of culture medium in each well. To minimize formaldehyde evaporation, seal the open plate with a piece of parafilm and place the lid onto the plate. Incubate for 20 minutes at room temperature. WARNING: Formaldehyde and its vapors are highly toxic. Always prepare and use formaldehyde solutions under a chemical fume hood and wear protective gloves and Technical Support: 888.503.3187 (US) 11 301.682.9200 CASE™ Cellular Activation of Signaling ELISA eyewear and a lab coat. Dispose formaldehyde waste according to your institution’s hazardous waste disposal protocol. You may use the fixed cells right away or the fixed cells are also stable for several weeks in Cell Fixing Buffer. Seal with parafilm or in a zip lock bag and refrigerate at 4 °C. In this way, you can accumulate many plates in the refrigerator, and perform the CASE assays later when desired. NOTE: To minimize cell loss during all of the wash steps in the following protocol, never dispense liquid directly onto the cell surface. Instead, gently touch the pipet tips to and gently dispense the liquid down the wall of cell culture wells, always using the same side of the wells. To remove wash solutions, flip the plate over a sink and then tap the plate gently onto a paper towel to remove any remaining liquid. From this point forward, avoid the use of vacuum suction to remove solutions from the plate. Technical Support: [email protected] 12 www.SABiosciences.com Version 2.7 4. Remove the Cell Fixing Buffer and wash cells twice with 200 l of 1× Washing Buffer for 5 minutes each with rocking. 5. Remove Washing Buffer, add 100 l of Quenching Buffer and incubate for 20 minutes at room temperature. 6. Remove Quenching Buffer and wash cells once with 200 l of 1× Washing Buffer for 5 minutes with rocking. 7. Remove the Washing Buffer and add 100 l of 1× Antigen Retrieval Buffer. With the lid off, place the plate into a microwave oven. Microwave the plate at 375 Watts for 3 minutes. Calculated the appropriate power setting to deliver this wattage from your microwave. For instance, 30% power (or level 3) delivers 375 W using a 1250 W microwave. Carefully, remove the plate from the microwave oven, cover the plate with its lid, and allow it cool to room temperature. 8. Remove Antigen Retrieval Buffer, and wash cells once with 200 l of 1× Washing Buffer for 5 minutes with rocking. 9. Remove the Washing Buffer, add 100 l of Blocking Buffer, and incubate for 1 hour at room temperature. Technical Support: 888.503.3187 (US) 13 301.682.9200 CASE™ Cellular Activation of Signaling ELISA C. Incubation with Primary and Secondary Antibodies: 1. Remove Blocking Buffer and wash cells once with 200 l of 1× Washing Buffer for 5 minutes with rocking. 2. Remove Washing Buffer, and add 50 l of diluted primary antibody (either the phospho-protein or the pan-protein specific antibody) to each appropriate well. See page 9 for antibody dilution instructions. To the negative control wells, add 50 l of Antibody Dilution Buffer instead. 3. Cover the plate with its lid, and incubate at room temperature for 1 hour. 4. Remove the primary antibody, and wash cells twice with 200 l of 1× Washing Buffer for 5 minutes each with rocking. 5. Remove the Washing Buffer, and add 100 l of dilute secondary antibody to each well. Incubate for 1 hour at room temperature. 6. Meanwhile, transfer only the needed amount of Developing Solution (100 µl per well) into a clean Washing Buffer Reservoir and allow it to warm to room temperature while protected from light. NOTE: For catalog number FE-015, the CASE Kit for p53 S15, be sure to add the dilution of Secondary Antibody A to the wells that held the Pan-Protein Specific Primary Antibody and to add the dilution of Secondary Antibody B to the wells that held the Phospho-Protein Specific Primary Antibody. Technical Support: [email protected] 14 www.SABiosciences.com Version 2.7 D. Colorimetric Detection: 1. Remove the secondary antibody, and wash cells twice with 200 l of 1× Washing Buffer for 5 minutes each with rocking. Then, wash the cells once with 200 l of PBS for 5 minutes with rocking. 2. Remove the PBS, and add 100 l of Developing Solution (pre-warmed to room temperature) into each well. Protect plate from direct light. Incubate for 1 to 10 minutes at room temperature. 3. Monitor the blue color development until the darkest staining well turns a mediumto dark-blue. DO NOT OVERDEVELOP ANY WELLS. 4. Add 100 l of Stop Solution into each well to stop reaction. The Stop Solution turns the blue color to yellow. NOTE: Do not add Stop Solution to the Washing Buffer Reservoir that contained the Developing Solution. Use a clean reservoir for Stop Solution. Stagger the addition of the Developing and Stop Solutions in a manner that allows each well to develop for the same length of time. NOTE: Large air bubbles in the 96-well plate can significantly and artificially inflate your OD readings. To avoid the appearance of air bubbles, remove a sufficient volume of every solution from the washing buffer reservoir, avoid pipetting air bubbles, and examine the plate before placing into your ELISA plate reader. Carefully break any air bubbles with a pipet tip. WARNING: The Stop Solution is corrosive. Always wear protective gloves and eyewear and a lab coat when handling this solution. 5. Within 5 minutes, read absorbance at 450 nm on an ELISA Plate Reader. Blank the instrument according to the manufacturer’s instructions. Technical Support: 888.503.3187 (US) 15 301.682.9200 CASE™ Cellular Activation of Signaling ELISA E. Determination of Relative Cell Number: 1. Remove the assay solution as described above. Wash the wells once with 200 l of 1× Washing Buffer for 5 minutes with rocking. Wash the wells once with 200 l of dH2O for 5 minutes with rocking. Be sure to remove any excess liquid by tapping plate gently on paper towel. Air-dry at room temperature for 5 minutes. 2. Add 100 l of Cell Staining Buffer to each well and incubate for 30 minutes at room temperature. WARNING: The Cell Staining Buffer is an intense stain. Avoid contact with skin and clothing. 3. Rinse the plate twice with 200 l of dH2O, and then wash the wells twice with 200 l of dH2O for 5 minutes each with rocking. NOTE: Wash out as much of the residual color as possible to insure that the OD595 reading will reflect the real cell number. 4. Add 100 l of 1% SDS to each well and incubate on a rocker for 1 hour at room temperature. NOTE: Large air bubbles in the 96-well plate can significantly and artificially inflate your OD readings. To avoid the appearance of air bubbles, remove a sufficient volume of every solution from the washing buffer reservoir, avoid pipetting air bubbles, and examine the plate before placing into your ELISA plate reader. Carefully break any air bubbles with a pipet tip. 5. Read absorbance at 595 nm on an ELISA Plate Reader. If the signals are greater than the linear range of the instrument, remove 50 l of the 1% SDS solution from every well, and add 50 l of dH2O to each well. Repeat the reading of the absorbance at 595 nm on the ELISA Plate Reader. 6. Normalize the antibody reading to the relative cell number: Divide the OD450 readings for each well by its OD595 reading. 7. To determine the relative extent of target protein phosphorylation, normalize the phospho-protein specific antibody OD450:OD595 ratio to the pan-protein specific antibody OD450: OD595 ratio for the same experimental condition. Technical Support: [email protected] 16 www.SABiosciences.com Version 2.7 V. Troubleshooting Guide: A. No or weak signal in wells incubated with either the phospho-protein specific or the pan-protein specific primary antibody: 1. Improper Plate Reader settings: Verify the wavelength and filter settings of the ELISA Plate Reader. 2. Cold Developing Solution: Warm the Developing Solution to room temperature before use. 3. Insufficient numbers of cells remain on the plate: Check cells on the plate using microscope and perform steps to Determine Relative Cell Number to measure how many cells remain on the plate. 4. Cells do not contain detectable levels of the target protein: Verify expression of the protein in your cell line by Western analysis using a pan-protein specific antibody. B. No response observed to experimental treatments in wells incubated with phospho-protein specific antibody: 1. Cells culture conditions are not appropriate: When cells are not healthy (i.e. the cell culture is not fresh) or the cell density is too low or over confluent, cells may not respond to your treatment properly. Seed cells the day before your treatment so that the cell culture density is at roughly 50-80 percent confluence before your treatment. If you have not established a growth curve for your cell line in 96-well tissue culture plates, perform a pilot cell seeding experiment before seeding cells for the CASE experiment. For the majority of cell lines with a doubling time of 18-24 hours, seeding an initial density of roughly 1.5 ×10⁴ cells per well will yield the appropriate cell density by the time of the CASE assay. 2. Treatment does not activate target protein: By Western analysis using a phosphoprotein specific antibody, verify that your treatment conditions are actually activating the target protein. Use a well-established treatment known to induce the specific protein phosphorylation event as your positive control. 3. Insufficient antibody sensitivity: If the absorbance readings in the wells incubated with phospho-protein specific antibody are significantly above background but do not change in response to your treatment, then the ability to detect smaller changes can be improved by decreasing the concentration of anti phospho-protein specific antibody to half. Technical Support: 888.503.3187 (US) 17 301.682.9200 CASE™ Cellular Activation of Signaling ELISA C. Poor sensitivity (low absorbance readings for antibodies): Primary antibody concentration is too low: For low protein expression levels (as determined by Western analysis), double the concentration of the primary antibodies and decrease the incubation volume by half. Take extra care in dispensing the smaller volumes and in sealing the plate to avoid evaporation. D. The A450 readings for the wells incubated with the phospho-protein specific antibody are higher than the A450 readings from wells incubated with the pan-protein specific antibody: The phospho-protein specific antibody is simply more sensitive than that the panprotein specific antibody. This phenomenon occurs in several of our CASE Kits. It does not affect your final assay results. Remember that the CASE Kits do not involve a calibration curve and therefore can only be used for relative measurement. E. High background in all wells: 1. Developing time too long: Be sure to stop the colorimetric development as soon as the darkest positive wells turn a medium to dark blue. 2. Improper blocking and washing: Be sure that washing, quenching, and blocking steps were all performed according to the recommendations in the protocol. Remember to add the solutions carefully down the sides of the wells and to remove liquids by inverting plates over a sink and then tapping the plate gently on a paper towel. 3. Secondary antibody concentration is too high: Decrease the secondary antibody concentration to half or reduce the secondary antibody incubation time from 1 hour to 30 minutes. F. High absorbance in blank wells: Stop Solution was contaminated with Developing Solution: Be sure to use a new and clean Buffer Reservoir for Stop Solution. Do not use a Buffer Reservoir that has been previously used to contain Developing Solution to hold Stop Solution. G. Significant signal variation among replicate wells: 1. Cell loss during incubation and washing: Be sure to normalize antibody signals with the cell staining reading (A595). A well with an A595 reading close to the reading of a blank well (lacking cells) indicates a complete loss of cells from that well. Omit this well from your data set. Technical Support: [email protected] 18 www.SABiosciences.com Version 2.7 2. Large air bubbles in the 96-well plate can significantly and artificially inflate your OD readings, especially when using the 1% SDS solution. To avoid the appearance of air bubbles, remove a sufficient volume of every solution from the washing buffer reservoir, avoid pipetting air bubbles, and examine the plate before placing into your ELISA plate reader. Carefully break any air bubbles with a pipet tip. 3. Improper antibody incubation and washing: Be sure to fill all wells with the appropriate antibody and follow the recommendations for washing. Use a rocker in every wash step. H. No antibody solution in wells after overnight incubation: Be sure to seal the open plate with sealing tape then with a piece of parafilm and place the lid onto the plate. The plate may also be stored in a zip-lock or heat-sealed bag. Be sure to store the plate on a level, stable surface. If you have additional questions, please check our website (www.SABiosciences.com) for a more complete listing of Frequently Asked Questions (FAQs), or call our Technical Support Representatives at 1-888-503-3187 or 301-682-9200. . Technical Support: 888.503.3187 (US) 19 301.682.9200 CASE™ Cellular Activation of Signaling ELISA Part #1013A Version 2.7 3/2/2009