1
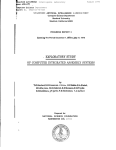
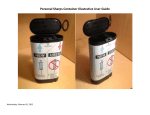
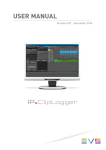
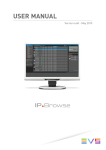
USO RESTRITO
USER MANUAL
Director's Cut
Version 6.57 - December 2014
USO RESTRITO
USER MANUAL IPDirector 6.57 Director's Cut
Copyright
EVS Broadcast Equipment SA– Copyright © 2005-2014. All rights reserved.
Disclaimer
The information in this manual is furnished for informational use only and subject to
change without notice. While every effort has been made to ensure that the information
contained in this user manual is accurate, up-to-date and reliable, EVS Broadcast
Equipment cannot be held responsible for inaccuracies or errors that may appear in this
publication.
Improvement Requests
Your comments will help us improve the quality of the user documentation. Do not
hesitate to send improvement requests, or report any error or inaccuracy on this user
manual by e-mail to [email protected].
Regional Contacts
The address and phone number of the EVS headquarters are usually mentioned in the
Help > About menu in the user interface.
You will find the full list of addresses and phone numbers of local offices either at the end
of this user manual (for manuals on hardware products) or at the following page on the
EVS website: http://www.evs.com/contacts.
User Manuals on EVS Website
The latest version of the user manual, if any, and other user manuals on EVS products
can be found on the EVS download center, on the following webpage:
http://www.evs.com/downloadcenter.
I
USER MANUAL IPDirector 6.57 Director's Cut
USO RESTRITO
Table of Contents
TABLE OF CONTENTS
III
WHAT'S NEW?
IV
1.
INTRODUCTION
1.1. Product Overview
1
1.2. Licenses
2
1.3. Typical Workflow
3
1.4. Limitations
4
1.5. Opening the Director's Cut
4
2.
5
USER INTERFACE
2.1. Overview of the Director's Cut Window
5
2.2. Status Bar
6
3.
8
CONFIGURING THE PRODUCTION
3.1. Overview of the Configuration Area
8
3.2. Configuring A/V Sources and Destinations
9
3.2.1. Setting Audio/Video Parameters
13
3.2.3. Managing A/V Sources and Destinations Configurations
15
16
3.3.1. Overview of the Production Management Window
16
3.3.2. Selecting a Production
17
3.3.3. Editing a Production
18
3.3.4. Managing Productions
20
3.4. Opening the Working Bin
4.
9
3.2.2. Setting Destination Targets
3.3. Configuring the Production
Table of Contents
1
WORKING WITH TAKES
21
22
4.1. Overview of the Takes Management Pane
22
4.2. Managing Scenes
23
4.3. Recording Takes
24
4.4. Reviewing Takes
25
4.4.1. Introduction
25
4.4.2. How to Assign a Player Channel or the Software Player
25
4.5. Monitoring the Transfer Status
26
4.6. Sending the EDL
27
III
EVS Broadcast Equipment SA
Issue 6.57.A - December 2014
What's New?
In the user manual, the icon
has been added on the left margin to highlight
information on new and updated features.
The sections updated to reflect the new and modified features in Director's Cut 6.57
(compared to version 6.56) are listed below.
Use of licenses
The DB Connect license has been renamed IPDirector Live PAM Core license.
See section "Licenses" on page 2.
List of video inputs
The Director's Cut input type has been renamed Mixer OUT.
See section "Setting Audio/Video Parameters" on page 9.
IV
What's New?
USER MANUAL IPDirector 6.57 Director's Cut
1.
Introduction
1.1.
Product Overview
USO RESTRITO
Description
Director's Cut is an IP Director module allowing production operators to stream the
director’s cut and the ISOs clips from the EVS production servers to post-production NLE
systems, and to send associated metadata (all the cut points from the switcher input) as
an EDL, in native formats.
Director's Cut is dedicated to single live or near-live post-produced multi-camera
productions, like shows, entertainment, operas, music concerts, special events,
awards... It reduces production times, drastically reduces post-production time, and
allows editors to focus more on the artistic aspect.
The Director's Cut module is a software option, which requires the license key 110 being
imported to XSecure. For more information on the required license key, contact the
Support or Sales team.
Configuration of the Production
Before working on a production, a few parameters must be configured:
•
Video input(s) (with associated audio inputs, if needed)
•
Destinations target(s) (they may differ from a video input to another)
•
A file format for the streamed clips
•
The timecode of the production
•
A metadata profile (if needed)
•
A bin to store the media of the production (optional)
The configuration settings can be saved, so that they can be easily reused later.
See section "Configuring the Production" on page 8.
Scenes and Takes Edition in the Production
Once the production has been configured, the operators will start and stop recording
takes. They might organize them into scenes, or set some as "bad" takes.
Whenever during the production recording (as soon as at least one take has been shot and
is complete, most often when the production is ended), the operators can send the EDL.
The EDL contains all the director's cut points. The different camera angles are grouped so
that they can be displayed in a multi-camera viewer. The audio channels are also
associated in the EDL.
A Transfer Monitoring window inside the module allows to follow up the current transfers.
A review channel can be picked out to replay the current production takes.
1. Introduction
1
EVS Broadcast Equipment SA
Issue 6.57.A - December 2014
See section "Working with Takes" on page 22.
Supported EDL Formats
Director's Cut supports the following EDL export formats:
1.2.
•
AVID media composer (AAF)
•
AVID interplay (webservice AAF checkin)
•
FCP (XML EDL)
•
Adobe Premiere Pro CC7.x (XML EDL)
•
IPDirector NL or targets (basically on removable HDD)
Licenses
As explained in section "Licences" in the General Functions manual, IPDirector will start if
valid licenses for IPDirector Live PAM Core and IPAccess are available.
Then, Director's Cut will require a specific license imported to XSecure to start.
This can be a static license (key 110) or a floating license (key 111).
Actually, the system first checks whether a static license for Director's Cut exists on the
workstation. If there is one valid static license, it is used. If there is no static license, the
system requests a floating license. If such a license is available, it is used for that user. If
there is no floating license left at that time, the user gets an error message.
The Director's Cut icon on the IPDirector Application bar is unavailable and its color is
dimmed when no fixed license is installed on the workstation and no floating license is
installed on the setup.
2
1. Introduction
USER MANUAL IPDirector 6.57 Director's Cut
USO RESTRITO
1.3.
Typical Workflow
A common timecode reference is shared between the EVS servers, the switcher, and the
DC-100 EVS switcher gateway .
Camera inputs are connected to the switcher inputs and to the EVS server recorders.
The switcher output is connected to one EVS server recorder, and to the DC-100 EVS
switcher gateway over Ethernet. The EVS switcher gateway understands the output from
most switchers on the market, and can translate this information for the Director's Cut
module. When assigning a DC-100 switcher gateway to the production (in the
configuration settings), all the information about cameras and director's cut points is
automatically retrieved from the switcher output. It can then be integrated in the EDL for
the post-production team. For a complete information about the EVS switcher gateway,
refer to the DC-100 – Technical Reference Manual.
Director's Cut can work in a connected/shared environment, or not. The destination
targets can be directly available for the post-production operators through network
connections, or can be transportable storage devices. When the production and postproduction entities are connected, as shown on the diagram, all the scenes and takes are
directly sent to the targets as growing clips as soon as the record starts. This makes it
possible for the editor to start working even if the show is not over. When the production
and post-production entities are not connected, all the scenes and takes are streamed to
removable hard disks with the director’s cut EDL. The disks are then transported to the
post-production facility and ingested there.
1. Introduction
3
EVS Broadcast Equipment SA
1.4.
Issue 6.57.A - December 2014
Limitations
The current version of Director's Cut has the following limitations:
1.5.
•
The primary TC of all the recorders selected during Director's Cut configuration must
be set to LTC.
•
The production name is limited to 50 characters.
•
In the Autoname setting, it is mandatory to define at least one variable which is
specific to each clip.
•
The clips (takes) created on the EVS video servers by Director's Cut have no
guardbands.
•
The EDL generated by Director's Cut cannot be used in Xedio Clean Edit.
•
When an EDL generated by Director's Cut is imported in Avid Standalone, the
metadata of the edit are not displayed at the Edit level but only at the Media level.
•
When an EDL generated by Director's Cut is imported in Avid Interplay, the
multicamera group and media are not automatically imported with the edit. The user
must import them separately.
Opening the Director's Cut
To open the Director's Cut module, select the corresponding icon
the IPDirector Application bar. The Director's Cut window will open.
4
on
1. Introduction
USER MANUAL IPDirector 6.57 Director's Cut
User Interface
2.1.
Overview of the Director's Cut
Window
USO RESTRITO
2.
Illustration
The Director's Cut window contains the areas highlighted on the screenshot below:
Note
From version 6.55, the interface skin has slightly changed, so the color shade of
some user interface elements (such as title bar, buttons) may differ from the
screenshots included in the current manual.
2. User Interface
5
EVS Broadcast Equipment SA
Issue 6.57.A - December 2014
Area Description
The table below describes the various parts of the Director's Cut window:
Area
Description
1.
Configuration This area allows you to configure the production, the A/V sources
area
and the destination targets.
See section "Configuring the Production" on page 8 and
"Configuring A/V Sources and Destinations" on page 9.
It gives the name of the selected production.
2.
Takes
This area displays the list of takes for the scenes already recorded
Management or being recorded. It allows you to edit the takes, to organize
pane
scenes, and to send the EDL.
See section "Working with Takes" on page 22.
3.
Transfer
Monitoring
pane
This area displays information about transfers, as explained in the
section "Monitoring the Transfer Status" on page 26.
4.
Status bar
This bar displays information on current settings and statuses.
See section "Status Bar" on page 6.
Adaptable Display
The layout of the Director's Cut window can be adapted to users’ needs:
2.2.
•
the Transfer Monitoring pane can be displayed or hidden by clicking the Transfer
Monitoring button.
•
the Transfer Monitoring pane and the Takes pane can be enlarged or reduced by
moving the intersection line between them
Status Bar
The Status bar displays status information, and allows you to set a player channel for the
review of production takes.
It contains five areas shortly described in the table below, from left to right:
6
Field
Description
Capacity left
Not currently available.
EDL sending status
Last EDL transfer status.
EVS switcher gateway
Name of the DC-100 EVS switcher gateway, as set in the
Configuration window. See section "Managing A/V Sources
and Destinations Configurations" on page 15.
2. User Interface
USO RESTRITO
USER MANUAL IPDirector 6.57 Director's Cut
2. User Interface
Field
Description
Configuration name
Current configuration name, as set in the Configuration
window. See section "Managing A/V Sources and
Destinations Configurations" on page 15.
Associated Channel
zone
This area provides information regarding the associated
player channel, if any.
When no channel is associated to the Director's Cut
application, No Channel is displayed.
See section "Reviewing Takes" on page 25 for more
information on how to assign a player channel.
7
EVS Broadcast Equipment SA
Issue 6.57.A - December 2014
3.
Configuring the Production
3.1.
Overview of the Configuration Area
General Description
The Configuration area allows you to access configuration settings, and to manage the
current production.
Illustration
Area Description
Part
Description
Opens the Configuration window, that allows you to define
current working parameters, as audio/video inputs
assignments, or destination targets. See section
"Configuring A/V Sources and Destinations" on page 9.
Those working parameters can be saved as a configuration,
so that they can be re-used in another production. See
section "Managing A/V Sources and Destinations
Configurations" on page 15.
Production text area
Displays the current production name.
Opens the Production Management window, that allows you
to select, update, create and remove a production. See
section "Configuring the Production" on page 16.
Opens a Database Explorer window focused on the bin
containing the production materials. See section "Opening
the Working Bin" on page 21.
8
3. Configuring the Production
USO RESTRITO
USER MANUAL IPDirector 6.57 Director's Cut
3.2.
Configuring A/V Sources and
Destinations
3.2.1.
Setting Audio/Video Parameters
Introduction
The system can be used with or without a DC-100 switcher gateway.
If a switcher gateway is selected, the video input assignment is retrieved from the
switcher as soon as the connection has been established.
In case no switcher gateway is available, the users must set the video input assignments
one by one from the A/V Configuration tab of the Configuration window.
3. Configuring the Production
9
EVS Broadcast Equipment SA
Issue 6.57.A - December 2014
Managing the Video Inputs
Working with a Switcher Gateway
Select the DC-100 EVS switcher gateway from the Switcher Gateway dropdown list.
When the system tries to establish the connection to the switcher gateway, a status
message is displayed above the field: “Connecting ...”. If the connection has failed, the
message becomes “Connection error ...”. When the connection is successfully
established, the message becomes "Connected", and the recorders video inputs are
automatically added in the Video Input Assignment list.
Working without Switcher Gateway
Note
When working without an DC-100 EVS switcher gateway, the operator must
manually add the recorders video inputs. In this case, the director's cut points
will not be written in the metadata EDL.
Managing video inputs manually is possible only if no switcher gateway is
selected.
How to add a video input
Click the
button. An item is appended to the list of video inputs.
How to remove a video input
Select an item from the list of video inputs, and click the
selected item disappears.
button. The
Warning
There is no confirmation asked when removing an item. This action is not
reversible.
How to actualize the list
Click the
10
button.
3. Configuring the Production
USO RESTRITO
USER MANUAL IPDirector 6.57 Director's Cut
List of Video Inputs
No parameter can be modified from the list when a DC-100 switcher gateway is used.
The list of video inputs displays the following information:
Field
Description
Input
Name of the video input, as it has been entered in the switcher.
Recorder
Recorder channel assigned to the video input to record it on the
corresponding EVS server.
Note
The primary TC of all the selected recorders must have been set
to LTC.
InputType
Type of the video input.
Three options are available:
• Camera: corresponds to the video recorded by a camera.
• Mixer OUT: corresponds to the switcher output. This option can be
selected only once.
• Hide: corresponds to other input, such as graphics, that must not be
taken into account by the Director's Cut module.
Capacity
Capacity left on the recorder channel.
Audio
Checkbox allowing to add in the list of audio inputs below as many audio
lines as audio channels available for the recorder assigned to the current
video input.
Managing the Audio Inputs
How to add audio inputs
In the list of video inputs, tick the audio checkbox of the associated recorder. Audio inputs
(4, 8, 16) are added in the list.
How to remove audio inputs
In the list of video inputs, untick the audio checkbox of the associated recorder. Audio
inputs are removed from the list.
3. Configuring the Production
11
EVS Broadcast Equipment SA
Issue 6.57.A - December 2014
List of Audio Inputs
There can be at most 24 audio inputs in the list, regardless of the number of video inputs
they are associated to.
The list of audio inputs displays the following information:
12
Field
Description
Input
Name of the associated video input.
Channel N°
Audio channel number.
Name
Name of the audio input. If needed, edit the field and set
a name to the audio input, for example "FrontL",
"BackR", etc.
3. Configuring the Production
USO RESTRITO
USER MANUAL IPDirector 6.57 Director's Cut
3.2.2.
Setting Destination Targets
Introduction
The destination parameters must be set through the Destinations tab of the Configuration
window.
The Destinations tab allows to browse for destinations targets (that may differ from an
input to another), to define a string pattern for the name of streamed videos, to set the
timecode of the production, and to enable other options.
Assigning a Destination Target to All Inputs
1. From the Destination Target area, tick the Apply to all inputs checkbox.
2. Then, click the
button. The Target window opens.
3. Browse through the available target folders, and select a target folder. Click OK to
validate.
3. Configuring the Production
13
EVS Broadcast Equipment SA
Issue 6.57.A - December 2014
Assigning a Destination Target to Each Input
1. From the Destination Target area, make sure that the Apply to all inputs checkbox
is not ticked.
2. From the Destination Target by Input area, click the
you want to assign a target to. The Target window opens.
button in each input line
3. Browse through the available target folders, and select a target folder. Click OK to
validate.
Defining a Pattern for the Export Filename
You can define a pattern for the filename of the videos streamed to the destination targets.
The filename pattern can combine static text as well as dynamic variables (as the
production date, or the production owner). The variables available for use in the file naming
are shortly described in a text area below the File format string field.
Tip
Double-click a variable in the scroll list to insert it directly in the field.
For example, with a file format string defined as %PROD-%TAKE-%SCENE-%CAMLBL,
the recorded video clips of one take would be named U2-Take 1-Scene1-03_XT112690_
REC1, U2-Take 1-Scene1-03_XT112690_REC2, and U2-Take 1-Scene1-03_XT112690_
REC3.
Defining the TC Track
By default, the timecode reference for the production is set to 00:00:00:00. To change the
timecode, edit the Default TC Track field, and click ENTER to validate.
The timecode is set once for the whole production. It runs when a take is being recorded; it
stops when a take is stopped or the system is idle.
Exporting Bad Takes in the EDL
All the takes, good or bad, are streamed as video clips. The metadata of the bad takes can
be written in the EDL. If you do want the bad takes metadata to be available for the postproduction, you can tick the Export bad takes in the EDL checkbox.
Creating an EDIT
Select the Create an EDIT option if you will use the streamed videos with IPEdit or Xedio
CleanEdit.
Note
Xedio CleanEdit supports 5 audio tracks. If the production is configured with
more than 5 audio inputs, information will be lost when creating an EDIT.
14
3. Configuring the Production
USO RESTRITO
USER MANUAL IPDirector 6.57 Director's Cut
3.2.3.
Managing A/V Sources and Destinations
Configurations
Introduction
The configuration settings (A/V sources and destinations) can be saved and named as a
configuration from the Configuration window, so that they can be re-used later.
Possible Actions
In order to ...
Proceed as follows:
Select a configuration
Select an existing configuration from the drop-down list.
Create a configuration
•
Click the
button, type a name for the
new configuration, and click OK to confirm. A new
configuration with default settings has been created.
OR
•
Rename a
configuration
Save a configuration
Click the
button, type a name for the
new configuration, and click OK to confirm. A new
configuration with the current settings has been created.
Click the
button, type a new name for the
configuration, and click OK to confirm.
•
Click the
configuration.
button to save the current
OR
•
Click the
button to save the current
configuration and exit the Configuration window.
OR
•
Delete a configuration
Click the
button to save the current
settings as a new configuration.
Click the
button, and click Yes to confirm.
The Configuration window displays default configuration
settings.
Note
Giving the same name as an existing configuration does not replace the existing
configuration. Both configurations will coexist in the dropdown list (with the
same name).
3. Configuring the Production
15
EVS Broadcast Equipment SA
Issue 6.57.A - December 2014
3.3.
Configuring the Production
3.3.1.
Overview of the Production Management
Window
General Description
The Production Management window allows you to select an existing production from the
Production directories, and to manage productions.
The Production Management window opens when you click the
Configuration Settings area of the Director's Cut main window.
button from the
Illustration
Area Description
16
Area
Description
1.
Production
Directories area
This area displays the Productions folder as a tree.
2.
Production
Selection area
This area lists the productions found in the directory selected in
the Productions Directories area, and provides fields to filter
the list.
3.
Productions
Management
toolbar
This toolbar features buttons allowing you to create, edit and
delete productions.
3. Configuring the Production
USO RESTRITO
USER MANUAL IPDirector 6.57 Director's Cut
3.3.2.
Selecting a Production
General Description
The Production Management window allows you to display a list of the productions found
in the Productions directory (and sub-folders), and to select a production from this list. To
facilitate the selection, the list can be filtered out.
The Production Management windows opens when you click the
Configuration Settings area of the Director's Cut main window.
button from the
Illustration
3. Configuring the Production
17
EVS Broadcast Equipment SA
Issue 6.57.A - December 2014
Possible Actions
In order to ...
Proceed as follows:
Select the directory of the
production
1. By default, the Productions directory does not
contain any sub-folder. Use the right click to
create, rename, publish and delete sub-folders in
the Productions directory.
2. From the tree folder structure, select a directory.
All the productions found in this directory are
displayed in the productions list.
Note
Any new production will be created in the
directory selected here.
3.3.3.
Select a production from the
productions list
1. Click the production row. It is highlighted.
2. Click OK from the Production Selection toolbar
to validate the selection and exit the window.
Filter the list on the
production name
Enter in the Find Production field the characters
contained in the production name.
Filter the list on the
production date
Click the calendar icons
fields.
Remove a filter
Click the
next to the From and To
at the right of the filter line.
Editing a Production
General Description
The Production window allows you to set a production name and date, to select a working
bin where to store the production materials, or to associate a metadata profile to a
production.
The Production windows opens when you create or update a production from the
Production Management window.
18
3. Configuring the Production
USO RESTRITO
USER MANUAL IPDirector 6.57 Director's Cut
Illustration
Possible Actions
In order to ...
Proceed as follows:
Name the production
Edit the Name field.
Note
The production name is limited to 50
characters.
Set a date for the production
By default, the current date is pre-set. Click the
calendar icon
next to the Date field to change it.
Select a bin where to store the If needed, select or create a bin from the bins tree
media of the production
folder structure where to store the production
materials.
Select a metadata profile to be If needed, select a metadata profile from the
associated to the production
dropdown list. The metadata will be written in the
EDL.
For further information about metadata profiles, refer
to the General Functions manual.
3. Configuring the Production
19
EVS Broadcast Equipment SA
3.3.4.
Issue 6.57.A - December 2014
Managing Productions
General Description
The Production Management window allows you to create, edit, and delete productions.
The Production Management windows opens when you click the
Configuration Settings area of the Director's Cut main window.
button from the
Illustration
Possible Actions
In order to ...
Proceed as follows:
Create a new production
1. From the Production Directories area, select the
directory where you want the new production.
2. Click the
button from the
Production Management toolbar. The Production
window opens with empty settings.
Note
The production name is limited to 50
characters.
Edit a production
Click the
button from the
Production Management toolbar. The Production
window opens.
20
3. Configuring the Production
USO RESTRITO
USER MANUAL IPDirector 6.57 Director's Cut
In order to ...
Proceed as follows:
Delete a production
Click the
button from the
Production Management toolbar. Click Yes to
confirm the deletion.
3.4.
Opening the Working Bin
From the Configuration Settings area of the Director's Cut main window, click the Open
Bin button to open a Database Explorer window, focused on the bin associated to the
production.
Note
If no bin has been specified, the Open Bin button is grayed off.
See section "Editing a Production" on page 18.
3. Configuring the Production
21
EVS Broadcast Equipment SA
Issue 6.57.A - December 2014
4.
Working with Takes
4.1.
Overview of the Takes Management
Pane
General Description
The Takes Management pane area contains information on the current production
timecode, the takes (and scenes) of the current production, and a toolbar to manage and
edit the takes.
Illustration
Areas
22
Area
Description
1.
Timecode field
This field displays the current timecode of the production. (By
default, the starting timecode of a production is set to
00:00:00:00.)
The timecode is incremented each time a take is recorded. It
stops when the take recording is stopped or the system is idle.
2.
Scenes/takes
list
This tables displays information about the scenes and takes of
the production.
3.
Toolbar
This area allows you to manage scenes, to start and stop the
recording of takes, and to send the EDL.
4. Working with Takes
USO RESTRITO
USER MANUAL IPDirector 6.57 Director's Cut
Fields in the Scenes/Takes List
4.2.
Field
Description
Take
Take number.
OK
Quality of the take. A take can be good
TCTrack
Timecode when the take has been started (according to the timecode set
in the production configuration).
StartTime
Timecode when the take has been started (according to the EVS server
timecode reference).
Duration
Duration of the take.
REC
Status of the clip transfer from the recorder to the EVS server. It should
be , or an error occurred.
Tfr status
Status of the take transfer to the destination target(s). It should be
running, then , or an error occurred.
or bad
.
Managing Scenes
Introduction
By default, the scenes/takes list displays an empty scene, named "Scene 1". This scene
can be renamed, but it can not be deleted. If the production is not meant to be divided in
several scenes, record all the takes in that unique scene.
Possible Actions
In order to ...
Proceed as follows:
Add a scene
Click the
button from the toolbar. An empty
scene is appended to the production.
Rename a scene
Right-click the scene row in the table, and select 'Rename'
from the dropdown list. Enter a new name for the scene, and
click OK to confirm.
Delete a scene
Right-click the scene row in the table, and select 'Delete'
from the dropdown list. Click Yes to confirm the deletion.
Warning
Deleting a scene deletes all the takes included in
the scene. This is not reversible.
4. Working with Takes
23
EVS Broadcast Equipment SA
4.3.
Issue 6.57.A - December 2014
Recording Takes
Introduction
The Takes Management pane features controls to start and stop recording takes.
Limitations
•
In the Autoname setting, it is mandatory to define at least one variable which is
specific to each clip.
•
The clips (takes) created on the EVS video servers by Director's Cut have no
guardbands.
Possible Actions
In order to ...
Proceed as follows:
Start the recording of a
take
Click the
button from the toolbar. The take
starts being recorded in the current scene.
When a take has been started, the DC-100 switcher gateway
starts recording the incoming switcher notifications. The
system creates a growing clip, and streams all selected
inputs in the A/V configuration to the destination target(s):
• AVID Interplay : the files are automatically checked in
Interplay and dropped to the destination folder.
• FCP and Nearline : files are dropped in the destination
folder.
The new assets are inserted in the bin of the production. The
current take is added in the list of takes, below the current
scene. During the recording process, the system updates the
current take information (duration and running streams) and
the TC track accordingly.
Stop the recording of a
take
Click the
button from the toolbar.
When a take has been stopped, the system stops the
streams and closes the files. By default, the new take is
flagged as a good take.
24
4. Working with Takes
USO RESTRITO
USER MANUAL IPDirector 6.57 Director's Cut
In order to ...
Proceed as follows:
Flag a take as bad
•
Click the
button from the toolbar. The
take is set to bad, and the recording is stopped.
OR
• Right-click the item in the grid, and select 'Set as BAD'.
Flag a take as good
Right-click the item in the grid, and select 'Set as GOOD'.
Review a take
Double-click the item in the grid. The take is played on the
defined review channel. See section "Reviewing Takes" on
page 25.
Retry a take transfer
Right-click the item in the grid, and select 'Retry'.
Delete a take
Right-click the item in the grid, and select 'Delete'.
4.4.
Reviewing Takes
4.4.1.
Introduction
Before sending the EDL to the destination target, takes can be reviewed in the Control
Panel and trimmed, if needed.
To be able to load a take on the Control Panel, the same player channel, or the Software
Player, must have been assigned to both the Director's Cut module and the Control Panel
module. See section "How to Assign a Player Channel or the Software Player" on page
25.
Thanks to the transport functions of the Control Panel or the ShuttlePRO, the take can be
browsed. Their clip creation functions allow to trim a take by marking a new IN point
and/or a new OUT point and clicking the Update button. The take start time and duration
are automatically updated in the Scenes/Takes list.
Refer to the Control Panel for more information on its functions. Refer to the General
Functions manual for more information on the ShuttlePRO management.
4.4.2.
How to Assign a Player Channel or the
Software Player
Users will be able to select a player from the Associated Channel zone.
This can be:
•
a player channel from an EVS video server
•
the workstation channel, this means the player channel set as linked from the
IPDirector Configuration window of the Remote Installer
4. Working with Takes
25
EVS Broadcast Equipment SA
•
Issue 6.57.A - December 2014
the Software Player, if the workstation has a valid license for the OCX Software
Player, and if the Software Player is currently associated to a Control panel or a
Playlist panel.
To associate a player channel to the application, proceed as follows:
1. Right-click the Associated Channel zone on the right of the Status bar.
A contextual menu is displayed.
2. Select a player channel from the menu.
The player channel name is displayed in the Associated Channel zone.
4.5.
Monitoring the Transfer Status
Purpose
The Transfer Monitoring pane provides detailed information on the takes transfers, would
they be scheduled, on-going, finished or failed.
Accessing the Transfer Status Information
Information on the transfer status is available
•
In the Transfer Monitoring pane located at the bottom of the Director's Cut window,
below the Takes Management pane. It can be shown by clicking the Transfer
Monitoring button.
•
In the Transfer Monitoring pane of the Database Explorer by clicking Tools >
Transfer Monitoring from the Database Explorer toolbar. In this pane, you can only
see transfer information about the item selected in the Elements grid.
•
in the Transfer Monitoring window by clicking Tools > Transfer Monitoring from the
Menu bar of the main IPDirector window.
Illustration
26
4. Working with Takes
USO RESTRITO
USER MANUAL IPDirector 6.57 Director's Cut
Area Description
The table below describes the various parts of the Transfer Monitoring pane:
Name
Description
Transfer Jobs
grid
Transfer jobs are presented in rows and all their associated parameters
and metadata are in columns.
Filters are available from fields displayed above each column and
allow searches on a specific column of the grid.
Current
Transfer Only
This button gives access to the list of transfers currently in progress
and scheduled. Its background is colored when it is enabled:
To go back to the list of all the transfers, click the Current Transfers
Only button again.
4.6.
My Transfers /
All Transfers
option list
My Transfers: this option only shows the transfers initiated by the
logged user.
All Transfers: this option shows all the transfers initiated by all the
users. It is only available for administrators / media managers or users
with appropriate user rights.
Clear History
This button removes all the transfers jobs from the list.
Cancel Job
This button cancels the selected transfer job. It is available for
transfers currently in progress.
Refresh
This button allows users to manually refresh the view at a point in time.
Otherwise, the system automatically refreshes the view.
Clear Selected
This button removes the selected transfer job from the list.
Sending the EDL
Exporting EDL from Director's Cut
When the show is completed, or any time during the show, as soon as at least one take
has been shot and is completed, you can export the EDL to the destination target.
To send the EDL, click the
button from the Takes Management pane.
The system creates and EDL with all the takes recorded so far, and sends it to the
destination target(s).
The EDL file has the same name as the production, with the .xml (FCP) or .aaf (AVID)
extension.
Note
If used, non-linear transition effects between cameras in the director's cut are
converted in simple constant mixes in the EDL.
4. Working with Takes
27
EVS Broadcast Equipment SA
Issue 6.57.A - December 2014
Limitations
•
The EDL generated by Director's Cut cannot be used in Xedio Clean Edit.
•
When an EDL generated by Director's Cut is imported in Avid Standalone, the
metadata of the edit are not displayed at the Edit level but only at the Media level.
•
When an EDL generated by Director's Cut is imported in Avid Interplay, the
multicamera group and media are not automatically imported with the edit. The user
must import them separately.
Recovery of the EDL in Avid Media Composer
With Avid Media Composer, the EDL information is shown as follows:
28
4. Working with Takes
USER MANUAL IPDirector 6.57 Director's Cut
Recovery of the EDL in Final Cut Pro
USO RESTRITO
With Final Cut Pro, the EDL information is shown as follows:
4. Working with Takes
29
USO RESTRITO
Corporate
+32 4 361 7000
North & Latin America
+1 973 575 7811
EVS Headquarters
Liège Science Park
16, rue Bois St Jean
B-4102 Seraing
Belgium
To learn more about EVS go to www.evs.com
Asia & Pacific
+852 2914 2501
Other regional offices
www.evs.com/contact
EVS Broadcast Equipment is continuously adapting and improving its products in accordance with the ever changing
requirements of the Broadcast Industry.
The data contained herein is therefore subject to change without prior notice. Companies and product names are
trademarks or registered trademarks of their respective companies.