1
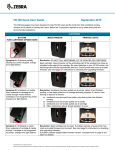
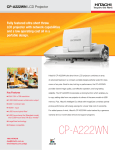
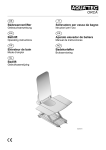
Lights
Bottom*
Side
Problem
Solution
Media Out
Replace with new cartridge
us Indicator
t): Orange
us Indicator
t): Orange
HC100 Good User Guide
No wristband under mouth of
cartridge
us Indicator
t): Orange
No wristband on roll
Cartridge
Cartridge
Printer
Printer Lights
Lights
Bottom*
Bottom*
Side
Side
Problem
Problem
Solution
Solution
July 2013
Media
Media Status
Status Indicator
Indicator
(Small
(Small Light):
Light): Orange
Orange
Wristband broken Fill out Cartridge and Printer Information
The following pages have been designed to help HC100
users get the most from their wristband printing solution and to
off or retracted
section on page 3 then submit form to
assist in training new users. Below are 3 symptomsinside
reported
to us by users along
with our recommended resolutions.
of cartridge
reseller
Media
Media Out
Out
Cartridge
r Lights
Problem
No wristband
under mouth of
Bottom*
Side
Wristbands present on roll
cartridge
Printer
Status Indicator
Indicator
No
wristband
under
BOTTOM
MEDIA
WINDOW
Printer
Status
No wristband under mouth
mouth of
of
No
No wristband
wristband on
on roll
roll
(Large
Orange
ht):
Orange TURN CARTRIDGE
DOWN cartridge
(Large Light):
Light): UPSIDE
Orange
us Indicator
cartridge
Media
t): Orange
Media Status
Status Indicator
Indicator
us Indicator
t): Indicator
Orange
us
(Small
(Small Light):
Light): Orange
Orange
Cartridge
er Lights
Bottom*
Printer
Printer Lights
Lights
tus Indicator
ght): Orange
Media
Media Status
Status Indicator
Indicator
(Small
(Small Light):
Light): Orange
Orange
Side
Bottom*
Bottom*
Replace
Replace with
with new
new cartridge
cartridge
Solution
Printer Lights
CARTRIDGE
Bottom*
Media
Status Indicator
PRINTER
LIGHTS
(Small Light): Orange
Using scissors, cut the protruding
portion of the wristband as flush as
possible to the edge of the cartridge (see
Problem
Solution
below). Reinsert
the wristband cartridge
Cartridge
partially
Cartridge Wristband
Media Out
Replace
with
new cartridge
Problem
Solution
Wristband
broken
Fill
Cartridge
and
inProblem
your HC100™
printer;
remaining
Solution
Wristband
broken
Fill out
out the
Cartridge
and Printer
Printer Information
Information
sticking
Side
Side out;
off
retracted
section
on
out.33 then
off or
or wristband
retracted should
sectionfeed
on page
page
then submit
submit form
form to
to
cartridge/printer
inside of
of cartridge
cartridge
reseller
inside
reseller
jammed
us Indicator
No wristband
under mouth of No wristband under mouth of
Printer
No wristband
on roll
Printer Status
Status Indicator
Indicator
No wristband
under mouth
of
Wristbands
ht):
Orange
Printer Status Indicator
cartridge
No wristband under m
Wristbands present
present on
on roll
roll
(Large
Light):
Orange
cartridge
us Indicator
Wristband
present
under
(Large Light):
Orange
cartridge
MediaPULL
Out
Replace with
new cartridge
Wristbands
present
on
roll
Symptom
A:
Wristband
Resolution:
DO
NOT
WRISTBAND
OUT
OF
PRINTER
OR CARTRIDGE.
(Large
Light):
Orange
cartridge
t): Indicator
Orange
Media
Out
Replace
with
new
cartridge
us
Media
Status
Indicator
mouth
of
cartridge
Media
Out
Replace
with
new
cartridge
Media Status Indicator
Using
Using scissors,
scissors, cut
cut the
the protruding
protruding
out,
printer
(Small
Light):
Orange
ht): Orange partially sticking
Eject cartridge. Using scissors cutEject
the& protruding
part
ofthe
the
wristband
as close as
(Small Light): Orange
portion
wristband
as
as
Status
Indicator
us Indicator
reinsert cartridge
in of
same
printer
portion
of
theMedia
wristband
as flush
flush
as
stopped, orange error light
Bottom*
possible
to
of
cartridge
(see
possible to the edge of the cartridge.
Re-insert
cartridge
in
your
HC100
possible
to the
the edge
edge
of the
theLight):
cartridge
(seeprinter, the
t): Orange
(Small
Orange
If problem persists,
eject Reinsert
cartridge
and
below).
the
wristband
cartridge
below).
Reinsert
the
wristband
cartridge
atus Indicatorflashes.
Wristband
partially
No wristband
under
mouth
of
Media
Status
Indicator
remaining
band
should
automatically
feed
out.
Ensure
printer
has
most
up-to-date
The
printer
does
not
Printer
Status
Indicator
No
under
mouth
of
Wristband
Printer Status Indicator
reinsert
inpartially
a different
HC100™
printer.
If the remaining
No wristband
wristband
under on
mouth
in
your
printer;
No wristband
rollof
Wristband
Fillsticking
out Cartridge
and
Information
No
wristband
onbroken
roll
in Printer
your HC100™
HC100™
printer; the
remaining
out;
Norecognize
wristbandthe
ht): Orange
(Large
Light):
cartridge
cartridge
stickingon
out;
media
(Large
Light): Orange
Orange
(Small
Light):
Orange
firmware. See next
page on
forroll
instructions
checking
andform
upgrading
firmware.
cartridge
wristband
should
feed
cartridge
works,
refer
to
Cleaning
the
wristband
should
feed out.
out.
off or retracted
section
on
page
3
then
submit
to
cartridge/printer
cartridge/printer
cartridge;
cartridge
Media
tus Indicator
Media Status
Status Indicator
Indicator
Smart
Card
and
Contacts
on
page
2
for
jammed
inside of cartridge
reseller
jammed
(Small
is not jammed and the cartridge
ght): Orange
(Small Light):
Light): Orange
Orange
and the first printer used.
contains a partial to
Printer
Wristband present
Printer Status
Status Indicator
Indicator
full roll on
of
present under
under
Wristbands
IfWristband
problem broken
persists,Fill
fillout
outCartridge
Cartridge
and
us Indicator
No wristband
under
mouth of Wristband
Wristbands present
present on roll
roll
(Large
mouth
Wristband
broken
Fill out
Cartridge and
and Printer
Printer Information
Information
(Large Light):
Light): Orange
Orange
broken Fill out
Cartridge
and Printer
Information
mouth of
of cartridge
cartridge
Wristbands
present on roll Wristband
wristbands
off
or
retracted
on
page
33 then
form
ht): Orange
Printer
Informationsection
section
on
page
3 submit
cartridge
off
or
retracted
section
on
page
then
submit
form to
to
Media
Status
Indicator
Eject
&
reinsert
cartridge
in
off or retracted
section
onofpage
3 thenEject
submit
form tocartridge
us Indicator
Wristband
present
under
Media Status
Indicator
& reinsert
in same
same printer
printer
inside
cartridge
reseller
submit form to resellerreseller
inside then
of cartridge
Wristbands
present
on
roll
(Small
Light):
Orange
us
reseller
Printer
Status
Indicator
(Smallof
Light):
Orange
If
problem
persists,
eject
cartridge
and
Cartridgeinside of cartridge
t): Indicator
Orange
No wristband under m
mouth
cartridge
Using scissors, cut
the protruding
If problem
persists,
eject cartridge and
Printer Lights
Solution
The
printer
TheProblem
printer does
does not
not reinsert
aa different
printer.
If
ht): Orange
reinsert in
inas
different
HC100™
printer.
If
(Large
Light):
Orange
Bottom*
Side
cartridge
portion
of the
wristband
flush
asHC100™
Printer Lights
ridge upside down Printer Status Indicator
recognize
recognize the
the media
media
No wristband under mouth of
cartridge works, refer to Cleaning the
works, refer
Cleaning the
Printer
StatusIndicator
Indicator
No wristband under mouth of Wristbands present on roll
possible
to the edge cartridge
of the cartridge
(seetoStatus
Media Status
cartridge;
Wristbands present on roll
Printer
Indicator
cartridge; cartridge
cartridge Smart
Contacts
on
2
(Large
atus Indicator
No wristband under m
cartridge
No wristband
underOrange
mouth of
Media
Smart Card
Card and
and
ContactsStatus
on page
pageIndicator
2 for
for
(Large Light):
Light):
Orange
cartridge
(Small
Light):
Orange
is
not
jammed
and
below).
Reinsert
the
wristband
cartridge
Wristbands
present
on
roll
is
not jammed
and
the
cartridge
and
the
first
printer
used.
B:
Wristband
not
Resolution:
Wristband
has
been
pulled
out
of
printer,
before
it
had
finished
printing, or cartridge
ht): Orange Symptom
Wristband
partially
cartridge
(Large
Light):
Orange
the
cartridge
and
the
first
printer
used.
(Small
Media
contains
a
partial
to
Media Status
Status Indicator
Indicator
Using
scissors,
cut
the
protruding
in youra HC100™
the
remaining
contains
partial to printer;
Using
scissors,
cut the
protruding
out;
underside
has been pulled out sticking
of cartridge
following
symptom
A,
above.
User
training
is required
(Small
Light):
fullwristband
roll
tus Indicatorvisible from
(Small
Light): Orange
Orange of
portion
of
the
wristband
as
as
roll of
of cut should
feed
If
persists,
fill
Cartridge
and
portion
of out.
theMedia
wristband
as flush
flush
as
Status
Indicator
Usingfull
scissors,
the
protruding
If problem
problem
persists,
fill out
out
Cartridge
and
cartridge/printer
wristbands
to ensure;
possible
to
the
edge
of
the
cartridge
(see
ght): Orange cartridge but is visible through
wristbands
Printer
Information
section
on
page
3
possible
to
the
edge
of
the
cartridge
(see
portion of the wristband
as flush
as (Small
Printer
Information
section
on page
3
Light):
Orange
Printer
Indicator
jammed
Media
Out
Replace
with
new
cartridge
below).
Reinsert
the
wristband
cartridge
Printer Status
Status
Indicator
Wristband present
present
under
then
submit
form
to
reseller
below).
Reinsert
the
wristband
cartridge
media window.
Cartridge
is Wristband
a) under
wristbands
are
removed
from
only
when
printer
finished printing
Wristbands
present
on
Wristband
then
submit
form
tohas
reseller
toprinter
thepartially
edge of
the
cartridge
(see
Wristbands
present
on roll
rollpossible
Wristband
partially
(Large
mouth of
of cartridge
cartridge
in
your
HC100™
printer;
the
remaining
(Large Light):
Light): Orange
Orange
mouth
your cartridge
HC100™ printer; the remaining
sticking
out;
not recognised by printer,
below).pulled
Reinsert
the wristband
sticking
out;
b) wristbands
are partially
not forcibly
out
of inprinter
wristband
Wristband
Bottom*
wristband should
should feed
feed out.
out.
cartridge/printer
*Rotate
upside
cartridge/printer
in your
HC100™ printer; the remaining
*Rotate
cartridge
upside down
down
us Indicatororange
error cartridge
light
flashes.
Wristband
present
under
sticking
out;
c)
wristbands
are
not
forcibly
pulled
out
of
cartridge
jammed
Wristbands present on roll
jammed should feed out.
Media Status Indicator
wristband
ht): Orange
Printer of
Status
Indicator
No wristband under mouth of
mouth
cartridge
cartridge/printer
No wristband on roll
d) follow instructions
above should symptom A occur(Small Light): Orange
(Large Light): Orange
cartridge
jammed
us Indicator
Eject & reinsert cartridge in same printer
Printer Lights
ht): Orange
Printer
Status
Indicator
Printer
StatusIndicator
Indicator
Media Status
(Large
(Large Light):
Light): Orange
Orange
(Small
Light):
Orange
Wristband
present
under
Media
Status
Indicator
Media Status Indicator
(Small
Light):
Orange
mouth
cartridge
(Smallof
Light):
Orange
Wristband
Wristband present
present under
under
mouth
mouth of
of cartridge
cartridge
Wristbands
Wristbands present
present on
on roll
roll
If problem persists, eject cartridge
and Status Indicator
Printer
Wristband present
The printer does not reinsert in a different HC100™ printer.
If in
Eject
&
reinsert
cartridge
Eject & reinsert cartridge
in same
same printer
printer
(Large Light):
Orange
Wristbands present on roll
mouth of cartrid
recognize the media
cartridge works, refer
to
Cleaning
the
IfIf problem
eject
cartridge
and
Printer
Indicator
No wristband under m
problem persists,
persists,
ejectStatus
cartridge
and
cartridge; cartridge The
Wristband
broken
Fill
out
Cartridge
and
Printer
Information
printer
does
not
Smart
Card
and
on
2 for
printer
does
notContacts
reinsert
in
different
HC100™
printer.
IfIf
Media
Status
Indicator
tus Indicator
EjectThe
&
reinsert
cartridge
in same
reinsert
in aprinter
apage
different
HC100™
printer.
Light):
Orange
cartridge
off cartridge
or retracted
section
page(Large
3used.
then submit
form
to
the
is not jammed and recognize
recognize
the media
media
cartridge
works,
refer
Cleaning
the
the
and the
first on
printer
cartridge
works,
refer to
toLight):
CleaningOrange
the
ght): Orange
(Small
If
problem
persists,
eject
cartridge
and
inside of cartridge
reseller
cartridge
contains a partial to cartridge;
cartridge;
cartridge Smart
Card
and
Contacts
on
page
2
for
Smart Card andMedia
ContactsStatus
on pageIndicator
2 for
The printer does not reinsert
is
and
injammed
a different
printer.
Ifthe first
is not
not
jammed
and HC100™
the
and
printer
used.
full roll of
the cartridge
cartridge
and
the
first
printer Orange
used.
If problem
persists,
fill
out Cartridge
and
recognize the media
(Small
Light):
contains
aa partial
to
cartridge
works,
refer
to
Cleaning
the
contains
partial
to
wristbands
Printer Status Indicator
Printer
Information
section
on
page 3
cartridge; cartridge
No wristband under mouth of
full
of
and
on
pagepersists,
2 for
full roll
roll
ofContacts
IfIf problem
fill
Cartridge
and
Wristbands present on roll Smart Card
Printer
Status
Indicator
us Indicator
Wristband
present
under
problem
persists,
fill out
out
Cartridge
and
No wristband under m
(Large Light):
Orange
cartridge
wristbands
is
not
jammed
and the cartridge
thenand
submit
form
to reseller
Wristbands
present on roll
wristbands
the
first
printer
used.
Printer
Information
section
on
33
Symptom
C:
Wristband
is
Resolution:
Eject
cartridge
and
re-insert.
If
problem
persists,
ensure
printer
has
most cartridge
Printer
Information
section
on page
page
ht): Orange
mouth
of
cartridge
(Large
Light):
Orange
Printer
Status
Indicator
Wristband
present
under
contains apresent
partialontoroll
Printer
StatusIndicator
Indicator
Wristband present under
Media Status
then
submit
to
reseller
Wristbands
then
submit form
form
to protruding
reseller
Using
scissors,
cut the
Wristbands
present
on roll
(Large
Light):
Orange
mouth
of
cartridge
visible from
underside
of
up-to-date
firmware
and
re-insert.
See
next
page
for
instructions
on
checking
and
(Large Light):
Light): Orange
Orange
mouth of cartridge
full roll of
If problem persists, fill outportion
Cartridge
and
ridge upside down (Small
of the
wristband
as flush
as
Media
Status
Indicator
cartridge
& media
window.
upgrading firmware.
wristbands
*Rotate
cartridge
upside
down
possible
the 3edge
of theLight):
cartridge
(see
Printer Information section
on to
page
*Rotate
cartridge
upside
down
(Small
Orange
atus IndicatorCartridge
Wristband
present
under
is not recognised Wristbands
by If problem
Reinsert the wristband
cartridge
then submit
form below).
to reseller
present on roll
persists
despite
latest
firmware
version,
complete
form
on
page
6 and return
Wristband
partially
ht): Orange
mouth of cartridge
in your HC100™ printer; the remaining
atus Indicator
ht): Orange
printer, orange error light
tridge upside
down
flashes.
sticking out;
cartridge/printer
jammed
to reseller.
Printer Status Indicator
(Large Light): Orange
Wristband present
mouth of cartrid
Printer Status Indicator
(Large Light): Orange
mouth of cartrid
wristband should feed out.
Wristband present
*Rotate cartridge upside down
Printer Status Indicator
(Large Light): Orange
Media Status Indicator
Wristband present under
mouth of cartridge
Wristbands present on roll
Media Status Indicator
Eject & reinsert cartridge in same printer
Routine Maintenance
For best results from your printer, Zebra recommends that users upgrade to the latest firmware version* and carry out
routine maintenance as follows;
Determining Firmware Version
To determine your current firmware version, complete the following steps to print a configuration wristband:
Make sure the printer is on and ready to print with a wristband cartridge inserted.
Press and hold PAUSE/FEED until the green lights turn off on the printer status indicators, and the
orange lights blink once.
Release PAUSE/FEED. A wristband prints with the printer configurations details and firmware version.
The example below shows version V54.17.12Z.
The latest version number of firmware can be seen and downloaded from the ‘firmware and service packs’ section of
the HC100 pages of our web site at; http://www.zebra.com/gb/en/support-downloads/desktop/hc100.html#mainpartabscontainer_5e2d=firmware-servicepacks
If your printer configuration* has an earlier version, Zebra recommend upgrading to the latest version for best results.
*Original WLAN (802.11b/g) enabled HC100 printers, i.e. part number HC100-300x-0200, will only support older versions of
firmware. Firmware upgrades should not be attempted on these printer configurations.
Updating Firmware
Full firmware download details can be viewed on page 73 of the printer's associated user manual.
http://www.zebra.com/content/dam/zebra/manuals/en-us/printer/hc100-ug-en.pdf
Caution - During the firmware download process, the printer status indicator turns to a steady half-orange and halfgreen state as the printer writes to flash memory. Do NOT power cycle the printer during this phase. Doing so makes
the printer inoperable.
For help with the following maintenance instructions, please refer to the diagrams on page 5
Cleaning the Media Path Using a Swab and Alcohol/Water Mix
CAUTION – Remove all rings, watches, hanging necklaces, identification badges, or other metallic objects that could
touch the printhead or drop into the media cartridge slot.
CAUTION – Before proceeding, discharge any built-up static electricity by touching the printer’s metal back plate near
its power switch or by using an anti-static wriststrap and mat.
CAUTION – The printhead may be hot and could cause severe burns. Allow the printhead to cool.
Use the swab from a Preventative Maintenance Kit (part 47362) or a clean swab dipped in a solution of isopropyl
alcohol (90%) and deionized water (10%).
1
2
3
4
5
6
7
8
9
10
11
12
13
14
15
16
Press the Eject button and remove the media cartridge from the printer.
Turn off the printer power
Refer to Figure 4. Press both upper cover release buttons simultaneously; the upper cover will partially
open.
Refer to Figure 6. Rotate the upper cover up and back.
Refer to Figure 7. Grasp the metal lever plate on the printhead assembly and rotate upward to expose
the printhead elements.
Refer to Figure 8. Using the swab from the Preventative Maintenance Kit or a swab dipped in the alcohol
solution, wipe along the brown strip on the printhead assembly from end to end. Allow the solution to
evaporate.
Refer to Figure 9. Using the swab, wipe the media chute surfaces. Allow the solution to evaporate.
Refer to Figure 10. Rotate the two side clips on the platen roller upward.
Refer to Figure 11. Remove the platen roller from the printer.
Refer to Figure 12. Using the swab, thoroughly clean the platen roller. Allow the solution to evaporate.
Refer to Figure 13. Place the platen roller back into its place in the printer.
Refer to Figure 14. Secure the platen roller by rotating the two side clips back into place.
Refer to Figure 15. Align the snap tabs on the bottom of the media chute with the slots in the printer
chassis.
Refer to Figure 16. Press down on the metal lever plate to snap the printhead assembly back into place.
Refer to Figure 17. Close the upper cover.
Turn on the printer power and reinsert the wristband cartridge. Dispose of the used swab according to
your local regulations.
Cleaning the Smart Card and Contacts
CAUTION – Remove all rings, watches, hanging necklaces, identification badges, or other metallic objects that
could touch the printhead or drop into the media cartridge slot.
CAUTION – Before proceeding, discharge any built-up static electricity by touching the printer’s metal back
plate near its power switch or by using an anti-static wriststrap and mat.
1
2
3
4
5
6
7
8
Press the Eject button and remove the wristband cartridge from the printer
Turn the printer off
Disconnect the power cord from the back of the printer
Refer to Figure 1. Using the cleaning swab from the Preventative Maintenance Kit, or a swab dipped in
isopropyl alcohol/deionized water solution (mixed 90/10), clean the gold smart card contacts on the back
of the wristband cartridge. Allow the solution to evaporate before putting the cartridge back in the printer.
Refer to Figure 2. Using the cleaning swab and vertical strokes, clean the gold media cartridge sensor
pins, which are visible at the back of the media cartridge slot. Allow the solution to evaporate before
proceeding.
Insert the power cord into the back of the printer
Turn on the printer power and reinsert the wristband cartridge. Dispose of the used swab according to
your local regulations.
If your wristband cartridge is still not recognized, fill out the form on page 6 and submit the form to your
reseller.
Cleaning the Printhead Using Cleaning Card
1
2
3
4
5
6
7
8
9
10
11
Press the Eject button and remove the wristband cartridge from the printer.
Turn the printer off.
Remove the cleaning card (part 61332M) from its packaging.
Refer to Figure 4. Press both upper cover release buttons simultaneously; the upper cover will partially
open.
Refer to Figure 5. Insert the cleaning card into the media chute until ¼ inch is visible from the front of the
printer.
Close the upper cover of the printer.
Press and hold the Eject button.
Turn on the printer power.
Hold the Eject button for approximately 15 seconds while the printer powers up and performs a self-test.
Release the Eject button when the cleaning card begins moving; cleaning is complete when the card
stops moving. Remove and dispose of the cleaning card after the cleaning process. The cleaning card
contains isopropyl alcohol, discard according to your local regulations.
Reinsert the media cartridge
Maintenance diagrams
Figure 1
Figure 2
Figure 6
Figure 7
Figure 10
Figure 11
Figure 14
Figure 15
Figure 4
Figure 8
Figure 12
Figure 16
Figure 5
Figure 9
Figure 13
Figure 17
Unexplained Issues
As with all Zebra products, our commitment to quality and reliability ensures that any complaints are investigated
thoroughly. Should you experience any issues with your HC100 wristband printing solution which cannot be resolved
having followed the guidance from this document, we encourage end users to raise a complaint with their Zebra reseller
so that relevant information can be registered with Zebra. In order for a complaint to be investigated in the quickest
possible way, we ask that you ensure the following information is included in any correspondence.
Please rest assured that we will continue to record and investigate all complaints in order that you can rely on
Zebra’s consistently high quality products.
End user
Zebra Partner/
Reseller
Cartridge information
Part number
Batch number
DOM
Printer information
Part number
(see label on
underside of printer)
Serial number
(see label on
underside of printer)
Firmware version
(see page 2 for
instructions on how to
find firmware version)
Problem description