1
*t r1**t
*]i p !tt, I
User manual
Before using the product, Please read this
manual carefully and keep it properly for
future reference, when necessary
User manual
I
Product introduction
Preface
Thank you for purchasing the Full HD LCD screen waterproof
sport camera. This product is quite small and delicate with
wonderful waterproof humanity design. With a multipurpose
damp, it can help you achieve omni-directional video /
monitoring under all kinds of outdoor conditions.
underuater activity fan, are you always impressed by the
beautiful scene in the sea or lakes, or are you still looking for a
companion that can help you record your unforgettable
As an
experiences?
this camera, it is ideal for outdoor and undeMater pursuits.
Water-proof feature makes it possible to take photos and record
vidos under water up to 20 meters. With HD lens and low light
level sensitivity, you will never miss any opportunity of taking
beautiful underuater shots again.
Try
This manual contains important safety and operating
information. Please read all the information carefully before you
use the device to avoid accidents and keep it for future
reference.
ll lmportant
safety precautions
.
1, Wipe by clean water after used and keep it dry for storage.
Do not use with corrosive liquid to clean the surface of the
this camera safely, please read and follow the
instruction carefully before using it. We will be not
responsible for maintaining, if camera damaged by
To use
product.
.
unreasonable operation.
2.
. Pleaseavoidcamerafromdroppingorharshimpacting,avoid
TFT LCD screen from shaking violently, or it may cause damage
.
or abnormal display on TFT screen.
Please use
the qualified adapto(sv 1A or above) and
.
.
minutes,anddonotopenthewaterproofcoverbefore
cleaning is finished. sand or water may get inside places
where it cannot be seen. lf not rinsed, waterproo,
performance will be degraded.
3. Allowthecameratositinpurewaterpouredintoa
USB
Cableforunitcharging.lfnot,wewillnotberesponsiblefor
.
Always clean the camera with water after use within 30
cleaning bowl for more than 5 minutes. Then, gently shake
the camera and press each button inside the water to clean
any loss caused by electric short, burned, even exploded.
unit in time:
'1. When the battery watermark indicates it is low power
Please charge
away any salt, sand or other materials.
2.
When OSD clue on camera willturn off automatically.
ln order to prevent program error, never disconnect
the
omera suddenly from a
fomatin memory.
PC
lll
A€cessory
during transferring files or
standard Accessories
Do not disassemble the camera and not clean unit by using
conosive liquid.
.
To
.
.
The camera is operable up to a water depth of 20m for 180
Adapto(EurduVUl(
mioutes. Take care when using the camera outdoor Do not
AUST standared Charqer)
.
o
kep the camera waterproof, tightly close the waterproof
cover properly for best water sealing.
Don't open the waterproof cover under water
this appliance under water depth over 20m.
ll water has entered the camera, open the waterproof cover
and remove the card carefully, Allow camera to air-dry for at
l6st 24 hours and contact qualified seruice personnel.
Gening after using the camera under/near water
**
& s
use
*
*l
IL,
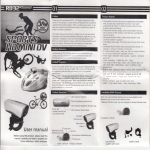
Mounting bracket
Option Accessories
ln view of different usage purpose, such as motorbike,
airplanes,golf carts, vehicle, bicycles and many others round and
square rail applications,we also offer the optional accessories to
user to meet their different demand.
>01 Mount bracket
>O2 Suction cup mount
>03 Base bracket
>O4 Adhesive base (with 'lpc 3M sticker)
>05 Upright bracket
>06 90' bracket
>O7 Hexagonal plastic nut
>08 Anise plastic nut
>09 Silicon strap 15cm
>10 Silicon strap 35cm
> 1
Silicon strap 70cm
Option 2
&i
Sucker
MicrosD card & HDMI Cable
1
Option
1
HDMI cable
&
s ,F
"'"tl*i9i:l:rn*::f'
4-
s
lV Product overview
os systerm: Microsoft Windows2000AP/V|STI'/wlN 7lMacl0.A
or above
Product Features
> Waterproof up to 20 meters. ideal for outdoor and
underuater pursuits
>
>
1.5
1/
rr
HD
2.5
V
480*240 TFT-LCD screen
5 MP COMS sensor
> F/2.8 f:3.53mm 140' wide-angle
A. Full HD30=1920*1080P(1 6:9), 30pfs
B. 1080P30=1440*1080P(16:9), 30pfs
C. 7 2OP3O= 1 28O*7 20P(1 5:9), 30pfs
D. WVGAP= 848*480(16:9), 60fps
> 12MP photo resolution, JPG format
Built-in high capacity Li-battery lasting video recording for 3 h
Built-in 8ry1 W speaker, easy inform function
Support HDMI and Tv-out. easy to share more funs
Unique loop recording
Optional continuous photo-taking time:
2Sl5S/1 0SB05/60S/OFF
>
>
>
>
>
1
Video/Photo/Power buttor
2
LED
3
4
5
Up/FBl
6
Down/FFl Volume +
7
8
porl
11
USB/rV-OUT
12
Reset
lndicator light
13
Micphone hole
ModdEsc button
1A
Speaker hole
15
LED
16
Laser
Menu/OK button
17
Camera lens
LCD Screen
18
Buckle
9
HDMI port
'19
Base
l0
Micro SD card slot
20
LCD cable
light button
button
HD camera lens. let you
shoot more freely
> Optional video resolutions:
>
>
>
>
>
Product Structures( with pictdte)
Support driving recorder, easy for obtain evidence
Laser light help for fixing position of the target object
2 high brightness LED lights for night using
Flashlight function lasting working up to 1 5h
Support MicroSD card up to 32 GB (CLASS 4 or above
r<ommended)
> Support PC charging
is
Volume-
white light
lighl
lnstallation ( with picture)
LED light button
Video/Photo/Power button
lrP
lndicator light
light
white light
Laser
LED
Camera lens
Pull back
&@"
w
r*:3
Open the back cover
ET
Menu/OK button
Down/FFl Volume +
Up/FB/ Volume Mode/Esc button
l,
USB/[V-OUT
Micphone hole
HDMI port
Micro SD card slot
Speaker hole
Reset
button
LCD cable
Install the
bracket
i
port
lnstructions of microsD card
'1
)
For video resolution is HD 1 080P, please use at least a brand
high-speed (CLASS 4 or above) microsD card to achieve better
and more fluent video quality.
2)
ln order to make the camera and microSD card reach good
compatibility, we suggestyou to format microsD card byTV
setting when you use it fir5t time because it won't reach good
compatibility if format microsD card by PC. After format
microsD card by TV setting, it can avoid some situations, such
as purple indicator flashes quickly warning or camera
automatically stops. etc.
3) Please copy the files taken in the camera to your computer
desktop. and then replay it to avoid ragged playback.
Charging & indicating
'l) Please use the qualified adapto(5V 1A or above) and USB
cable for unit charging.
2) Charging time is about 4h, red LED indicator keeps on during
charging, red LED indicator will go out after fully charged.
3) For this unit comes with built-in rechargeable libattery,
please charge unit for 8h in first three times, and recharge it
after battery is used up for long-time lifespan.
4) Waysofcharging
a. Charging by adaptor connect UsB cable with adaptor, and
then connect UsB cable with unit for unit charging.
b. Charging by PC, directly connect to Pc by USB cable for unit
charging no matter unit turning on&off, but it needs longer
time for charging.
Notes:
It is a normal phenomenon that the temperature o{ unit and
adaptorwillincreasealitfleduringcharging:,,'
lnstructions before using and matters needing attention
The unit supports time&date stamp, when use it first time or no
operation for a long time, please set up correct time and date
before using, please refer to system settings.
Vl
Function specification
1. Turning on
>
lnsert microsD card, long press " QD " . blue LED indicator is
lit up with warning tone and LcD screen opens and shows
" Welcome".That means the unit enters into standby mode.
>
lnitialization time depends on capacity and load data quantity
of microsD card, please check LCD screen warning.
For video resolution is HD 1 080P. please use at least a brand
high-speed (CLASS 4 or above) microsD card to achieve better
and more fluent video quality.
>
Notes:
i .'
1'),:Theib[i!:iridicbtoJlaslidi]diriakl]r,endinormbiiddtry?it!!!Ei
I ri:ar]o€ar3,ia Lcp:aafuEh wheri,tlrindd:on.urilholtrl}krc-6.Dtaid,r
2),After..tting,diitinq,iecordff
.
.m0Ct.(mcoiafarltlrts;.!rri!.
:1
.
,:wila!'toiittiiiriiir 6ii.6nd,ariiii,iiitdntd€cr.ri*dii*i,ttiid!,
mode.
2. Turning off
>
ln any mode, Iong press "@"then the blue indicatorflashes
several times quickly and with warning tone the LCD screen
shows" Goodbye".
>
>
During working, battery mark in top right corner of screen
becomes red and there is low power warning tone, unit will
turn off automatically.
After turn on unit, battery mark in top right corner of screen
becomes red and there is low power warning tone, unit will
turn off automatically.
3. Modetransfer
ln the condition of not turning on continuous photo-taking
function, there are just video-recording and photo-taking
functions. After power on, the unit would automatically enter
into video recording nandby mode. Short press "@,,, unit will
circle in below 2 modes:
Model: Video recording standby mode;
Mode2: Photo taking standby mode.
The consequence of the mode circle is : Power on->mode 1 >mode 2->mode 1
ln the condition of turning on continuous photo-taking function,
the unit would automatically enter into video recording standby
mode after power on. Short press "@", unit will circle in below
3 modes:
4.
Video Recording
Recording
System date
System time
Model: Video recording standby mode;
Mode2: Photo taking standby mode;
Mode3: Continuous photo-taking standby mode.
The consequence of the mode circle is : Power on->mode
>mode 2->mode 3->mode 'l
>
1
-
After unit turns on. short press "@", unit enters into video
recording standby mode, then short press '@ ", red "REc'
appears in top right corner of screen, blue indicator flashes
slowly, that's mean unit is recording video.
>
"@"
>
Short press
again, blue indicator flashes severaltimes
quickly with warning tone, progress circle of saving files will
appears in the screen. When progress circle is missing, blue
indicator will be constantly on, that means video recording is
stopped and saved.
>
a.
b.
During video recording mode, the buttons function as below;
Short press "<" or ">" to achieve EV "+" or EV.L,,, please
set up prompt screen brightness according to environment.
Short press "@" to real-time snapshot a picture, long press
c.
"@" to enter into system setting.
Short press "@" to transfer modes, long press
into playback mode.
d.
Short press
"@"
to turn on
LED
"@,,to enter
white light or laser light.
fger,,
1) whq the loop r*ording
.
..
function is off, the unit will
automatically save a file after it fully record a 4GB video fill
I and. then start to record the new file.
2) When microsD card is full (Loop recording function is off),
battery used up or standby mode for 3 minutes (time slot can
be set up), unit will shut down automaiically.
5.
Photo Taking
Photo size
I
il
ln the unit tuining on state. short press "@" to
photo-taking standby mode, short press "@,,, there will be
warning tone, red "(1" mark appears in top right corner of
screen and blue indicator flashes several times quickly. After a
shutter sound. progress circle of saving files will be missing in
the screen and blue indicator will be constantly on, that
means a picture is taken and saved.
>
a.
During picture-taking mode, the buttons function as below;
Short press "<" or ">" to achieve EV "+" or EV'L,,, please
b.
set up prompt screen brightness according to environment.
Short press "@ " to take a picture, long press,,@,, to enter
c.
into system setting.
Short press "@" to transfer modes, long press ,,@,,to enter
into playback mode.
d.
Short press
"@"
to turn on
LED
white light or laser light.
Notes:
1)
indicator will flash quichy during photo-taking, dm,t
the unit in cas for a better picture quality.
2) When microsD card i5 full (L@p reording function is off).
battery:g5qd up or standby lrod€ {or 3 miririts (tinie slot can
be set up), unit will shut down automatically.
Blue
shake
Continuous phuto time
Battery
System
date
System
Left shots
-14-
time
Left shots
System time
7. Mdeo recording during driving
>
6. Continuous photo taking
> ln the unit turning on state, short press
>
>
"@" to continuous
photo-taking standby mode, short press "@ ", there will be
warning tone, red "O" mark appears in top right corner of
screen and blue indicator flashes quickly. After a shutter
sound, progress circle of saving files will be missing in the
screen, a picture is taken and saved and then start to take
another picture within setting time slot, like the cycle.
Short press "(D ", blue indicator is constantly on, continuous
photo-taking is stopped.
During continuous picture-taking mode. the buttons function
as below;
a- Short
press
"<"
or
">"
to achieve EV "+" or EV'1", please
set up prompt screen brightness according to environment.
b- short press "@" to take a picture. long press "@" to enter
into system setting,
press "@" to transfer modes, long press "@ " to enter
into playback mode.
Short press "@" to turn on LED white light or laser light.
c. short
d.
>
>
ln the unit turning on state, refer to "systerm setting" to set
driver recorder to "ON" and save setting, then turn off unit.
Open back cover, connect unit to car charger by USB cable.
When a car starts, car charger charges unit, after a warning
tone, unit will automatically turn on and "USB CONNECTING"
mark appears in the screen. then blue indicator will flash
slowly, "REC" becomes red, that means unit automatically
enters into video recording mode.
> When a car turns off, car charger stops to charge unit, unit
will still record video 1 minute and then automatically turn
off.
> During driver recording mode, the buttons function as belowj
a. Short press "@ " to stop video recording, long press "@ "
to turn off unit.
b, Short press "<" or ">" to achieve EV "+" or EV'r", please
set up prompt screen brightness according to environment.
c. Short press "@" to real-time snapshot a picture, long press
"@ " to enter into system setting.
d. Short press "@" to transfer modes, long press "@" to enter
into playback mode.
e. Short press "@" to turn on LED white light or laser light.
Not€S:ll
plq35q,gie,qqr,aharger.in'good
quality, it not, bad quelity
ati
charger will burn unit or couldn't charge unit.
4) Please set driwr r(order to OFF if you don't use this function
s) Wh6n.initrosD
eid is{ttl (Lbopi(ording{unction-is,off};
unit will shut down automatically.
File
type
Playback
file
>
"@" to photo playback mode,
or ">" to browse video and photo files.
Short press "@" to
into playback interface, short press
"nt",
again to playback pictures. During playback, buttons function
as followinq;
a. short press "@", pause or resume play.
b. Short press "@" pertime, return to previous layer menu.
c. During pausing play, short press "<" or ">" to achieve
upward or downward play photos.
Pictures playback: Long pretr
short press
B.
TV-OUT
"<"
and TV playback function
The unit has AV &HDMI two options for the audio and video
output, you could choice any one you like. Here we suggest to
use
A.
>
Playback by unit
Long press "@" to
trrn on camera,
Via AV cable, please connect AV cable
>
user manual.
Via HDMI cable, please connect one plug of HDMI cable to
you can see PowER
warning tone. and then blue indicator
will be constantly on and unit enters into standby mode.
> Videos playback: Long press "@ " to video playback mode.
short press "<" or ">" to browse video and photo files.
Short press "@ " to enter into playback interface, short press
again to playback video files. During playback, buttons
function as following;
a. Short press "@", pause or resume play.
b. short press "@" per time. return to previous layer menu.
c. During video playing. long press "<" or ">" to achieve fast
fomard or backward play videos.
d. During video playing, short press "<" or ">" to achieve
volume "+" or volume'L" .
LOGO and hear short
-'18-
the HDMI output for a better HD video quality.
to the camera's
USB&AV-OUT port. the yellow plug connect with TV video
input port(yellow), white plug connect with TV audio input
port(white). Please set up the signal input by refer to the ry
>
the camera's HDMI port, another plug connect with TV HDMI
port. Please set up the signal input by refer to the TV user
manual.
>
After well connect with TV, turn on unit to playback video and
photo files, operation ways are same as playback by unit.
Notes:
1) lf thecapacityof videofiles istoo big, itwould be normal
condition to wait some seconds to play the video.
2.)
lflhend
3) Ihe conssq!ah!9gtl!&imir.!!.:ai!! ktiii.,ii'iiid6:o.i ihbiro,rl.:,i
1->mode 2->mde 3->mode &>mode 0
I0. Flashlight and laser positioning function
The unit has the single flashlight and laser positioning function.
When this single function works, the DV system would come to
9. LED and Laser light
Unit provides 2 high brightness LED lights and 1 laser light.
ln any turning on state (except ry-out playback mode), short
press "@ ", the LED light and laser light will circle in below
five modes:
Modeo: All lights go out. (Unit would enter into this mode
after turn on)
l/odel: The laser light would light up for 30 seconds for the
purpose of positioning the object, and then laser light will 90
out.
Mode 2: The LED lights are constantly on for the purpose of
video recording and strength the color quality in the dark
place condition.
Mode 3: The laser light is constantly on for positioning in all
the recording state.
Mode 4: The LED lights keep quickly flashing in a high
frequency to save flashlight energy.
the state of turning off, it would help to get more longer time
for the usage. The way to operate as below details:
> During DV system is power off, long press "@", flashlight is
lit up, then short press "() ", unit will circle in below 5
modes:
Mode 0: Torch state: Flashlight is lit up and can be working
up to
1
5h.
Mode 1: The laser light is on for positioning purpose.
Mode 2: The LED lights keep quickly flashing in a high
frequency to save flashlight energy.
Mode 3: Laser light flashes slowly for intermittent laser
positioning.
Mode 4: Turn off all LED lights.
lff autorhaiically if micro SD card is ful[; no . ,.,1
operatiqnrin,iiaidby mOde for 3 minutes (time slot a;tn be sei
3) Unit will turri
up),
bltit
is.stiff in
-the
iha;ginj
itatus"
,
,l
t1.
>
>
System setting and the diagram
There are two ways to do the system setting for the camera,
by the product or by the TV, the button functions are the
>
same.
When you choose setting by the TV, please refer to the
"TV-OUT and TV playback function", turn on the unit, and
then connect unit with computer by AV cable or HDMI cable
B,
C.
to set the signal input. Then enter into the video or photo
standby mode, long press "@ ", TV will display system
setting interface.
Buttons functions as follows:
Long press "@ " to turn on/off the camera.
Long press "@ " to enter into the system setting menu.
Short press "<" or ">" to achieve upward or downward
menu choice.
D. Short press
E.
"@"
to enter into and confirm the menu, long
p.ess "@ " to save and quit the menu.
Short press "@" to return the video standby mode directly.
re
Connecting computer
turn on back cover;
Connect unit to computer by USB cable. long press ,,@ ,, to
turn on unit. and a removable disk will appear in,,my
computer", you can view the pictures or videos files in the
removable disk, and you can also copy these files to your
computer
Remove disk: Click "Removable disk" mark in the bottom
right corner of computer to safely remove hardware.
Firstly
Notes:
. .,..,...
,
Plese do not iemdve oii& I;omtcornpqter iai&hnu auring
lomatting. uploading or downl@ding files to avoid unit
12. Shooting when charging
>
>
>
turn on back covef
ln the condition of turning on, refer to "system setting,,
chapter, please set driving recorder to "OFF";
Firstly
Connect USB cable with adaptor, and then connect USB cable
with unit;
>
Long press "@D" to turn on unit, "USB CONNECTTNG" mark
appears in the screen. after warning tone finishes. you can
operate any function of the unit.
Notes:
1)
Please ure
.
thequilified addptoi6V. lAorAbove)iand
USB
for unit charging.
2) lf driverre(orddr ffin{ii.qn' is.ON, unit M!!,irllq-etifatty.eot",
into driver recording function one connecting with adaptor
Cable
,NO
.1tetq
RESOLUTION
gm
FULL HD3O/1O8OP3O
lltrtruilii6h3t
:::
lr
:l
2
QUAUTI
CAR
12
BEEP SOUND
I\,4ODE
lum oryott the
lr!/oFt
)IVOFF
furn ory'off the
<mad tone
lMtM2MtIU3Mhl/s
OFF
MII!/OFF
;et the time of
amera tum off
LCD AUTO TURN
30YlMll!/5Mll\UNO
;et the time of LCD
13 AUTO POWER
Vidrc quality
{riomafi.allv
seftino
PHOTO
SIZE
rrw5rwswr2M
14
Phdto SiTF
TLUUKE)LEI\ I/
4
A/HITE BALANCE
INCANDESCENT
OFF
15 IIME AND DATE
/AUTO/D4000/D5000
sKtt{/sPoTLtGHT A/Ar
the Video/Photo
SCENVSPORTSAAND
scene according to
SCAPVPORTRAIT
environment
101'l:01:01 01:01
.ORMAT
{o/rEs
17
)EFAULT SETTING
{o/YES
18
:IRMWARE
w
ER/AUTO/NIGHT
ct
lrivino
Vid@ Sp{ifiation
,TnptoAM/GAP60
fuM
I1
icren tum off
rutomaticllv
;et the time and
,ate of the
/idec/Dhoto
Set
the format of
Set
5
SCENE
/SUNSET/SAND
6
SELF CAPTURE
29sS/1 0S/305/60V
Set
7
TIME STAIVP
)ATE-TIMVOFF
Turn on or
turn off
8
FLICKER
\uTo/60Hz50Hz
Illuminant frequenc
9
TV ryPE
NTSqPAL
Vid@ output
format
l0
RECORD
)FFl2MIlV5MIN
MD time settinq
OVERWRITE
,15MIN
********
)uery camera's
/FRSION
the self capture
and the time
the time stamp
vER.
,et Gmera's system
eset function
Notes:
Choose W cmnectim, it is normal phenomenon that the screen
of the caroera,wlllt!-r1.'9{:i9!!gll1e!yl,,,,,, ri, :,,,,, i
Vlll
System Resetting
tf the unit couldn't work well for any reason, there are two ways
to reset unit. and unit will be mandatory shutdown. Please
restart unit to operate functions-25-
I
a)
b)
Press "Reset"
Long press
IIE @mera couldn't turn of
button to reset unit;
for 5 seconds to reset unit
"@"
Press
"rset" and
restart
a.chtrk whether UsB @ble
is
damaged and USB Gble is well
lX TroubleshootingTips
conn{ted or not
fhe computer cann't
b.The memory
rrcgnize the Gmera when
a.Charge
Camera couldn't
turn on
unit in care unit is out of
power
b.Try
without any operation
if memory card is full
automatially
c.Check
The
vidm files deadlocks or
a.Use brand high sped(Class
b.The memorv card mavbe damaoe
a.Check whether AV&HDMI cable is
well conncted and cables quality
LCD
scren doesn't display
files in unit
reord
or photograph
lmages are dim or
focus
1/75
sensor
Scren
't
out of
5,
SoMPaMOSSFNSOR
TFT-|
aD 4AO*740
IPG
8M 3200*2400 JPG
5M 2592*19M JPG
3M 2048*1536 JPG
17M 4OOO*3O0O
Ptpto Resolution
&
Consumption
Mode of Vid@
1920*1080P 30 fps
1700pcY4cB
2600pcY4GB
11 min
M
M
49 min
19 min
H MOV format
(MA\
T4CR\
/&R\
1440*'1080P 30 fps
11 min
49 mrn
19 mtn
H
MOV
format
H
Ch<k whether the inside lens of thr
848 x 480P 60 fps,
Gmera is dirtv or the camera is
leakino or noi
gOOfrs/4GB
l2oopcyzrcS
QUALN
H
Make sure you have a memory mrd
inserted into the camera and the
batteru still has oower
-26.
l*
LCD
not
b.Ch(k whether LJSB and HDMI
ports of unit are good and
relwant ports are well connected
or not
c.Check setting for TV signal input is
rioht or not
The camera couldn't
vido
is good or
rc
X Specification
above) memory cards
jumps
the system of your rc, try to
connect to another
Elkive
4 or
may be
c.[/ake sure that cmera supports
is used up
b.Standby time exceds 3 minutes
crd
malfundioninq
to reset the cmera
a.Ch{k if the battery
camera turns off
pfug it in or @nn't
dqilnload or upload the file
from the Gmera
1
280*720P 30 fps.
H
MOV
format
MOV format
(4CB)
(4GB)
(4GB)
62min
82 min
32 mtn
(4GB)
(4GB)
(4GB)
62min
82min
l2min
(4GB)
(4GB)
(4GB)
Lens
sp(irication
MlN. illumination
Ft2
1
8
f=3. 53 mm 140'wide anqle
LUX
Flashlight using
15h
Laser positioning
20M (lndoor)
Built-in Speaker
Yes,8O/1W
Operation Tone
Available
Battery apacity
3.7Vl
continuous recording
About 3h (LED light off)
sp(.
charqinq
charqinq time
USB
lP
'lA
or above
About 4h
Available
of Memory
Capacity
DC5V
500mAh
UsB2-0 Hioh SDeed
port
HDMI
Type
1
of Memory
grade
Micrc 5D Grd
2GB-32G8
IPXS
(tasting 3h under 20lvl)
Weight
1309
Dimension
107 (L) *65 (H) *s7 (W) (mm)
date re rentioned abore.
2),,picturis, deeigr aird spi ctficati6ns illatstisted:tn!!!i!!{${nti::
may be slighfly different ,rcm the actcl prcduct and
. packaging that shall. be aubi€ctto changqruttrOtUtiiiiii:li:l