1
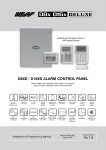
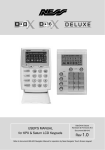
Installation & Operation
Saturn Keypad
Product part number
Document part number
106-108-WHT Saturn Keypad White
106-108-BLK Saturn Keypad Black
106-108-OMT Saturn Keypad Ocean Mist
890-405
Rev 1
• Architecturally designed premium keypad
• Glossy glass-look fascia
• High Contrast LCD icon display
• White and Red LCD backlighting
• Red LCD backlighting for alarm memory
• Satin finish tactile buttons
• Laser etched graphics
• Adjustable keypad beep volume
• Adjustable LCD brightness
• Adjustable blue keypad backlighting
Image: Saturn keypad White
• Supports D8x/D16x V6 panels
1
Installation
To release the keypad from the base,
push the two locking lugs at the bottom
of the keypad and lift the keypad out and
away.
To fit the keypad to the base align the
top locating lugs then swing the keypad
down to lock the bottom lugs.
Accessories supplied:
1 x 4 wire loom
2 x Low profile self tapping screws
2 x Low profile machine screws
4 x Gel crimp connectors
Important Note
To achieve an extremely low
profile this premium keypad is
designed with close internal
tolerances.
Use only the Low Profile
screws provided. Larger
screw heads may damage
the circuit board and
invalidate your warranty.
Push lugs with a
flat screwdriver to
release keypad
2 x mounting holes to suit single
gang wall bracket/saddle.
Cable entry.
Recess cutout 47mm x 76mm
2
Installation
Wiring
Keypad should be wired to the control panel using minimum 7/020 security cable.
Up to three Saturn keypads can be connected per control panel as long as the
maximum current draw for all detectors and keypads is below 500mA.
Maximum allowable cable distance is 100m including cable to all keypads.
Wire additional keypads in “star” configuration to the control panel.
TAMP
0V
TELEPHONE
+12V
RD
Z8
C
Z7
N PINS
stics. Connect an
horn speaker to
o dialler tones.
Z6
4 pin header.
C
Z5
Z4
NK
TAMPER & PROGRAM LINK
= Sealed, normal state
= Tamper alarm state
r up with link off to enter
er program mode
C
Z3
Z2
C
Z1
D8x / D16x
Main Board
0V
BOX TAMPER
SWITCH
N.C. Contacts
(WHITE)
Crimp connectors
(Supplied)
+12V
DAT
KEYPAD
PROG
TAMP
J1
S
Saturn Keypad REAR
CLK
COM
+12V
DAT
CLK
COM
Blue
White
Black
+12V
Red
RESET
STR
“HEARTBEAT” LED
Constantly flashes
SIREN
AC
17V
AC
EARTH
3
Saturn Operation
For the User
Unique Features
Adjustable White
LCD back lighting
Adjustable red LCD
backlighting for Alarm
Memory
Stylish and elegant
glass-look fascia
Key pairs for Panic, Fire
& Medical alarms
Satin finish buttons
with tactile “click”
Adjustable keypad beep
volume
Adjustable blue keypad
backlighting
Low installation
profile
Adjust Chime Volume
Press and hold the 0 key. Release when the desired volume is reached.
A short beep will be heard at the highest level.
10 Levels
Adjust Key Beep Volume
Press and hold the P key. Release when the desired volume is reached.
A short beep will be heard at the highest level.
10 Levels
4
Saturn Operation
For the User
Adjust Keypad Backlight Brightness
Press and hold the 6 key. Release when the desired brightness is reached.
A short beep will be heard at the highest level.
10 Levels
Adjust LCD brightness - White backlight
Press and hold the 9 key. Release when the desired brightness is reached.
Brightness level 1-10 is displayed on the LCD during adjustment.
10 Levels
Red backlight
Saturn Keypad has a unique high visibility flashing RED backlight mode which is
triggered by any alarm event. The red backlighting is designed to be especially
visible to alert you that an alarm event has occurred and is present in the alarm
memory.
Adjust LCD brightness - Red backlight
Press and hold the 7 key. Release when the desired brightness is reached.
Brightness level 1-10 is displayed on the LCD during adjustment.
ED
ing R
Flash
10 Levels
Red backlight options
The flashing red backlight option has three methods of operation, selectable by
options 1 to 3.
Press and hold the 8 key. Release when the desired option 1, 2 or 3 is reached.
Red backlight Options
1. Red backlight is cleared by any keypress
(Default).
2. Red backlight flashes until the Alarm
Memory icon is cleared.
3. Red backlight is disabled.
5
Saturn Operation
For the User
Special Key Functions
These Double Key functions are only available when the Saturn keypad is used with D8x/
D16x panels V6 and later. Not applicable to previous panel versions.
Panic Alarm
1. Press the two Panic keys together for PANIC alarm. (Press
and hold the keys for at least 1.5sec)
2. If programmed by the installer, the Panic keys are also used
to turn AUX outputs ON or OFF. (See D8x/D16x V6 Installation
Manual P141E-P144E).
To operate AUX1 press 11* to turn on, press 11# to turn off.
To operate AUX2 press 22* to turn on, press 22# to turn off.
To operate AUX3 press 33* to turn on, press 33# to turn off.
To operate AUX4 press 44* to turn on, press 44# to turn off.
Fire Alarm
Press the 1 & 3 keys together for FIRE alarm.
(Press and hold the keys for at least 1.5sec)
Medical Alarm
Press the 4 & 6 keys together for Medical alarm.
(Press and hold the keys for at least 1.5sec)
Note: Fire Alarm and Medical Alarm are disabled by
default. See P126E control panel programming.
6
Saturn Programming
For the Installer
Programming
Programming option P126E in the D8x/D16x V6 and later control panels enable the Saturn
KP Panic, Medical and Fire alarms as well as the Chime mode. Saturn can also be used with
previous versions of D8x/D16x panels but these Saturn options will not be available.
P126E
Program Mode level
Installer Program mode / NessComms
V5.3 or later.
Factory Default
All off.
Notes
• One or all options can be enabled.
• To operate Saturn double key
functions press and hold the matching
keys for at least 1.5sec. (In normal
operating mode only, keypad pairs are
disabled in programming mode).
Related Options
P61E 5E-8E Keypad PANIC outputs
P75E 2E Report Medical alarms
P75E 3E Report Panic alarms
P75E 4E Report Fire alarms
D8x/D16x Panel / Keypad Options
The Saturn keypad has keypad pairs for Panic,
Fire and Medical alarms and special chime
modes.
These program options are available only in
D8x/D16x V6 and later.
To Program
1. Press P126E.
2. Press 1E-5E to turn an option ON or OFF.
1E ON, enables double key PANIC.
2E ON, enables double key FIRE.
3E ON, enables double key MEDICAL.
4E ON, enables Entry Chime in Day mode.
Used to announce entry in Day mode.
5E ON, enable Chime in Saturn keypads.
Used to announce entry in Monitor mode.
7
www.ness.com.au
Ness Saturn Keypad Installation & Operation Notes, Revision 1
Document Part Number 890-405
For the products:
106-108-WHT Saturn Keypad White
106-108-BLK Saturn Keypad Black
106-108-OMT Saturn Keypad Ocean Mist
Copyright Notice
All rights reserved. No part of this publication may be reproduced, transmitted or stored in a retrieval system in any form or by
any means, electronic, mechanical, photocopying, recording, or otherwise, without the prior written permission of Ness.
Ness reserves the right to make changes to features and specifications at any time without prior notification in the interest of
ongoing product development and improvement.
© 2011 Ness Security Products Pty Ltd ABN 28 069 984 372
8