1
CHAPTER II
OPERATION UNDER NORMAL CONDITIONS
CHAPTER I
1.1 PRESENTATION
Aimpoint’s Reflex Sights are rugged precision electronic optical red dot
sights developed for civilian, military and law enforcement applications.
Aimpoint sights are designed for the ”two eyes open” method of sighting, which greatly enhances situational awareness and target acquisition
speed. Thanks to the parallax-free design, the dot follows the movement
of the user’s eye while remaining fixed on the target, eliminating any
need for centering. Further, the sight allows for unlimited eye-relief. The
CompM3 is compatible with 1st , 2nd and 3rd generation night vision
devices, while the CompML3 is optimized for applications, which do not
require night vision compatibility.
The new CompM3 and CompML3 sights are using the new revolutionary Advanced Circuit Efficiency Technology, called ACET, introduced in
2005.
ACET combines Aimpoint’s superior accuracy and ease of use with
significantly lower power usage.
1.2 Specification – Model CompM3, CompML3
Material – housing:
Material – rubber cover:
Material – lens covers:
Surface finish:
Optical magnification:
Eye relief:
Optical coating:
Dot size:
Switch, dot brightness:
Extruded, high strength aluminum, anodized
Chloroprene rubber (corresponding to
MIL-R-6855)
Thermoplastic elastomer, black, non-glare
Hard Anodized, Dark Graphite Grey, matte
Rubber cover: Black or Dark Earth Brown
1X
Unlimited, no centering required
Anti Reflex coating, all surfaces
Multi-layer coating for reflection
Band Pass coating for NVD compatibility
(CompM3)
2 and 4 MOA
CompM3: 10 positions: 4 NVD, 6 daylight of
which 1 Extra Bright
CompML3: 10 positions: 1 Off, 9 daylight of
which 1 Extra Bright
Battery:
One 3 Volt Lithium battery type
2L76 or DL1/3N
Battery life (hours):
50,000 h on setting 7 out of 10,
(ACET Diode)
Typically 500,000 h at NVD setting (CompM3)
Length (incl. lens covers): 130 mm (5.1”)
Width:
62 mm (2.4”), incl rubber cover,
55 mm (2.2”) without
Height:
58 mm (2.3”), incl rubber cover,
55 mm (2.2”) without
Weight:
270 gram (9.5 oz), incl rubber cover,
220 gram (7.8 oz) without
Adjustment:
Range ±2 m at 100 meters, in windage and
elevation 1 click = 10 mm at 80 meters =
13 mm at 100 meters = 1/2” at 100 yards.
Mounting:
One wide ring, 30 mm diam, or Aimpoint QR
Ring
Max temperature range:
-45 ºC to +70 ºC (-50 ºF to +160 ºF)
Water resistance:
Submersible to 45 m (135 ft) water depth
MOA: Minute Of Angle 1MOA = 30 mm at 100 meters = 1” at 100 yards
NVD: Night Vision Device
2.1 ASSEMBLY AND PREPARATION FOR USE
WARNING: Insure the weapon is unloaded and the safety selector is in
the ”safe” position before attempting to install, remove or perform maintenance on the sight.
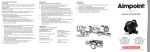
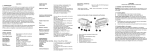
fig. 2
2.1.1 Installing Battery
a) Remove battery cap by turning it counter clockwise.
b) Insert battery with positive (+) end toward cap.
Caution while replacing battery (not necessary when the sight is
unused)
Before installing battery cap, inspect that the O-ring is present and not
damaged. Failure to do so could result in water leakage into the battery compartment.
c) Install battery cap by turning clockwise until snug. Hand tighten only.
Using tools could damage equipment.
d) Verify that red dot is present by turning the rotary switch
clockwise.
2.1.2 Installing Ring and Sight on the weapon
Aimpoint’s sights are designed for installation on most types of weapons.
If your weapon does not have or support an appropriate base(s), please
consult your dealer, gunsmith or other qualified source.
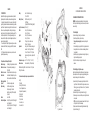
fig. 1
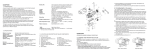
1.3 Location and description of major components and functions
See fig. 1
1. Battery Lid
2. Battery (DL1/3N or similar)
3. Cover for adjustment screw
4. Adjustment Screw (elevation)
5. Rotary Switch
6. Rubber Strap
7. Eye Protection
8. Lens Cover, rear
9. Lens Cover, front
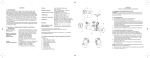
fig. 3: Seen from rear
a) Assemble the sight to the weapon by using Aimpoint´s wide 30 mm
ring or QR-mount. If other standard 30 mm rings are used, make sure
that the ring(s) covers a length of minimum 25 mm or 1” (two standard
rings could possibly be used).
b) Ensure that the sight is correctly positioned in the ring (fig.3).
c) When using lens covers, ensure that they are correctly positioned and
can be opened.
NOTE: make sure that you have space between the bottom front part
of the sight and the top of the base/weapon.
d) Finally, make sure that all screws are firmly tightened around the sight.
e) Complete the zeroing (2.2.1).