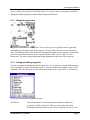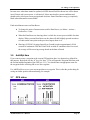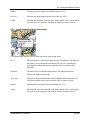
1
User’s Manual
TM
ActiveCaptain Mobile
for Palm OS®
Active Corporation
Castine, Maine
v1.1
ACTIVECAPTAIN MOBILE FOR PALM OS
USER'S MANUAL
TABLE OF CONTENTS
Page #
1.0
THE BASICS.............................................................................................. 2
1.1
1.2
1.3
1.4
1.5
1.5
1.6
1.7
2.0
Installing the software..........................................................................................................2
1.1.1 Installing the free trial version.................................................................................2
1.1.2 Re-installing or updating the software....................................................................3
Installing and activating purchased regions........................................................................3
1.2.1 Activating purchased regions..................................................................................3
1.2.1.1 Network activation...................................................................................3
1.2.1.2 Manual activation.....................................................................................4
Starting ActiveCaptain Mobile ............................................................................................5
Basic operation.....................................................................................................................6
1.4.1 Panning.....................................................................................................................6
1.4.2 Double-tapping........................................................................................................6
1.4.3 Keys..........................................................................................................................6
1.4.4 Zooming...................................................................................................................7
1.4.5 More Detailed Chart / Less Detailed Chart ............................................................7
1.4.6 Follow Mode............................................................................................................8
1.4.7 Data Boxes...............................................................................................................8
Menus ...................................................................................................................................8
1.5.1 Actions menu...........................................................................................................9
1.5.2 View menu.............................................................................................................10
1.5.3 Markers menu ........................................................................................................11
The Chart List.....................................................................................................................11
Import/Export.....................................................................................................................14
Preferences .........................................................................................................................14
1.7.1 General preferences ...............................................................................................15
1.7.2 Warnings preferences............................................................................................16
1.7.3 Units preferences ...................................................................................................16
1.7.4 Keys preferences ...................................................................................................17
1.7.5 GPS preferences ....................................................................................................18
1.7.6 Captain preferences ...............................................................................................18
WAYPOINTS & ROUTES........................................................................ 20
2.1
Waypoints ..........................................................................................................................20
ACM/Palm OS User’s Manual
Copyright © 2008 Active Corporation
2.2
3.0
ADDING A GPS (OPTIONAL) ................................................................. 34
3.1
3.2
3.3
3.4
3.5
3.6
3.7
4.0
2.1.1 Creating waypoints................................................................................................20
2.1.2 Moving waypoints.................................................................................................20
2.1.3 Waypoint popup menu .........................................................................................21
2.1.4 Listing and editing waypoints...............................................................................21
2.1.5 Activating a waypoint............................................................................................22
2.1.6 Locating a latitude/longitude position with a waypoint ......................................23
Routes.................................................................................................................................23
2.2.1 Creating routes.......................................................................................................23
2.2.2 Saving routes..........................................................................................................24
2.2.3 Moving waypoints in a route ................................................................................24
2.2.4 Inserting waypoints in a route...............................................................................25
2.2.5 Deleting waypoints in a route ...............................................................................25
2.2.6 Locking a route ......................................................................................................25
2.2.7 Listing routes .........................................................................................................25
2.2.8 Editing routes.........................................................................................................26
2.2.9 Editing waypoints in routes ..................................................................................27
2.2.10 Route popup menus............................................................................................28
2.2.11 Activating a route ................................................................................................31
2.2.12 Measuring distances with routes ........................................................................32
Settings and configuration.................................................................................................34
3.1.1 Configuring a Bluetooth GPS with Palm OS.......................................................35
GPS cursor..........................................................................................................................36
Follow Mode ......................................................................................................................37
3.3.1 Using Follow Mode...............................................................................................37
3.3.2 Follow max detail ..................................................................................................38
3.3.3 Actions that break follow mode............................................................................39
Display Rotation ................................................................................................................39
Data Boxes .........................................................................................................................40
Add Wpt Here ....................................................................................................................42
GPS status ..........................................................................................................................42
ACTIVECAPTAIN MARKERS & FIND .................................................... 45
4.1
4.2
4.3
4.4
4.5
Types of markers................................................................................................................45
Retrieving markers .............................................................................................................45
Marker popup menus.........................................................................................................46
4.3.1 Marina (red) popup menu .....................................................................................46
4.3.2 Anchorage (green) popup menu...........................................................................47
4.3.3 Local Knowledge (blue) popup menu..................................................................48
Marker List .........................................................................................................................49
Details .................................................................................................................................50
4.5.1 Marina Details: Sections and Groups ...................................................................51
4.5.2 Anchorage Details: Groups...................................................................................52
ACM/Palm OS User’s Manual
Copyright © 2008 Active Corporation
4.6
4.7
5.0
NOTES & TIPS ........................................................................................ 59
5.1
5.2
5.3
5.4
5.5
5.5
5.6
5.7
6.0
4.5.3 Local Knowledge Details: Groups........................................................................53
Reviews...............................................................................................................................53
4.6.1 Stars and ratings.....................................................................................................54
Find .....................................................................................................................................55
4.7.1 Find by Location ...................................................................................................55
4.7.2 Find by Marina ......................................................................................................56
4.7.3 Find by ICW ..........................................................................................................57
Warnings and safety tips ...................................................................................................59
External power sources and battery limitations ...............................................................59
Default key definitions.......................................................................................................60
Route creation hints ...........................................................................................................61
Measuring distances...........................................................................................................61
Using Data Boxes...............................................................................................................62
Finding a specific latitude/longitude position...................................................................62
Getting help ........................................................................................................................62
FREQUENTLY ASKED QUESTIONS (FAQ’S)....................................... 65
6.1
6.2
6.3
6.4
Device questions ................................................................................................................65
Software questions.............................................................................................................66
Region activation questions...............................................................................................66
Technical support questions..............................................................................................67
ACM/Palm OS User’s Manual
Copyright © 2008 Active Corporation
1.0
ACM/Palm OS User’s Manual
THE BASICS
1.0 The Basics
WARNING REGARDING NAVIGATIONAL USE: ACTIVECAPTAIN MOBILE IS
INTENDED SOLELY AS AN AID TO NAVIGATION. NAVIGATION REQUIRES THE
APPLICATION OF SOUND JUDGMENT AND EXPERTISE IN THE PROCESS OF
INTEGRATING NAVIGATIONAL INFORMATION FROM ALL AVAILABLE SOURCES.
ACTIVECAPTAIN SHOULD NEVER BE USED AS THE SOLE SOURCE OF
INFORMATION FOR NAVIGATION.
1.0
THE BASICS
Welcome to ActiveCaptain Mobile! The following pages will familiarize you with ActiveCaptain
Mobile’s features and prepare you for navigation on your Palm OS device. You can use
ActiveCaptain Mobile with or without a GPS. Use it just like a paper chart in your pocket (see
Chapters 1 and 2). Connect a GPS receiver and you will have a powerful moving chart display
(see Chapter 3). Add an Internet connection and you can overlay thousands of ActiveCaptain
markers from the ActiveCaptain web site, www.activecaptain.com (see Chapter 4).
Throughout this manual, we will refer to ActiveCaptain Mobile as ACM.
1.1
Installing the software
There are two ways that the software can be installed. You can install the free trial version or you
can just install the application software. We strongly suggest that you install the free trial as your
first step in using ActiveCaptain Mobile. The free trial version is the full, complete software
application. Until a region of charts is purchased, it will only work with the demo region of charts.
The demo region includes all of the NOAA charts for the Penobscot Bay, Maine in the United
States along with low detail charts for the entire US coastline. The free trial version does not time
out and includes all functionality including GPS support and ActiveCaptain marker access.
If you have already installed the trial version and need to re-install the software or are upgrading
to a new version, you can directly install the software alone (see 1.1.2). When you purchase
regions, you do not need to re-install the software - you only need to install and activate the new
regions (see 1.2).
1.1.1 Installing the free trial version
The free trial software is available on the Downloads page in the Going Mobile tab of the
ActiveCaptain web site. Download the .zip file for the Palm OS free trial version. One of the files
in the zip file is ReadMe.txt. This file is a text file with the latest information about installing the
free trial to your Palm device. Installation of the free trial’s demo region requires that a memory
card with at least 40 MB of free space is available for your device.
ACM/Palm OS User’s Manual
Page 2
1.0 The Basics
1.1.2 Re-installing or updating the software
Download the .prc file from the “Redownload Purchased Software” section of the Downloads
page. Install this file on your Palm device with HotSync.
1.2
Installing and activating purchased regions
Once you have purchased additional regions for ActiveCaptain Mobile, you can download them
at any time from the “My Account” page of the ActiveCaptain web site. “My Account” is a link
available on every page of the web site on the blue band in the upper right.
Each region file is a .zip file. Unzip the file and follow the ReadMe.txt text file instructions.
You can install region files with HotSync or with a memory card reader-writer. It is much faster
to use a memory card reader-writer. Be prepared that installing a region file can take 10 minutes
or more.
Please make sure to follow the ReadMe.txt instructions carefully, especially if using a memory
card reader-writer. Even if you have moved files to your device before, failing to follow all of the
instructions can corrupt your memory card.
The most common problem with installation of region files with a memory card reader-writer is
that the .rgn files must be put into the ActiveCaptain directory of the memory card. This directory
has to be placed on the root of the memory card. You cannot just drag the .rgn file to the
memory card - it must be placed into the ActiveCaptain directory.
1.2.1 Activating purchased regions
Purchased regions that have been installed on your Palm device need to be activated before they
can be used. You should only have to activate a region once (unless you hard reset your device or
replace it). If you have an Internet data connection on your device, use network activation. If you
don’t have an internet connection, you will have to manually enter the Activation Code.
1.2.1.1 Network activation
Regions that have been installed need to be activated once on your Palm device. When
ActiveCaptain Mobile starts, it looks for new regions that have not been activated. If any are
found, you are asked if you would like to use network activation.
ACM/Palm OS User’s Manual
Page 3
1.0 The Basics
If you select Yes, the ActiveCaptain web site will be accessed and all Activation Codes for the
regions you have purchased will be downloaded.
In order to access the ActiveCaptain web site, you need to enter your ActiveCaptain account
email and password. If you haven’t previously done that, you will be prompted for it.
Select Remember to save the data in the Preferences so you won’t have to enter it again.
After the ActiveCaptain web site is accessed, you’ll be given a report of the Activation Codes
returned.
1.2.1.2 Manual activation
Regions that have not been activated previously or with network activation must be manually
activated before they can be used. The Activate Region form will be displayed to give you the
opportunity to enter an Activation Code.
ACM/Palm OS User’s Manual
Page 4
1.0 The Basics
There are three steps required to manually activate a region:
1.
Obtain the Device ID from the Activate
Region form. It is shown next to the
Device ID label. The Device ID is also
displayed in the About form (Menu >
Actions > About).
2.
Go to the “My Account” page on the
ActiveCaptain web site. Select a region
in the “New license purchases” area and
type in the Device ID obtained from the
Region Activate form on your Windows
Mobile device. Select “2. Get Activation
Code”.
3.
Use the Activation Code for the region
activated and tap the 9 digit number into
the Activate Region form on the Palm
device. Select OK and the region will be
activated.
Use the “My Account” page to re-download regions when there are updates or to re-obtain
Activation Codes if you need them.
1.3
Starting ActiveCaptain Mobile
To start ActiveCaptain Mobile, select “ActiveCapn” in the application launcher. ACM will work
from internal memory or from the memory card. Because ACM is a larger program, you might
want to keep it loaded in memory so it will start faster.
ACM/Palm OS User’s Manual
Page 5
1.0 The Basics
1.4
Basic operation
Throughout these instructions, the words “select” and “press-and-hold” are used to describe
specific operations.
Select
Quickly touch a button or an item on the screen. “Double-tap” means
selecting the same item or area twice in quick succession.
Press-and-hold
Press the stylus or your finger against an item on the screen and hold it there
for a second. This often displays a popup menu based on the item that you
were pressing on.
ActiveCaptain Mobile for Palm OS is designed so that many operations can be performed easily
with a finger instead of the stylus.
1.4.1 Panning
Use the stylus or your finger to drag the chart around the screen. This works the same way as
clicking-and-dragging with your mouse on your desktop computer: simply hold the stylus to the
chart image and drag the stylus across the screen. The entire chart image will shift in the direction
you drag just like you were dragging a real paper chart.
1.4.2 Double-tapping
To center the chart on a particular position, double-tap that position.
If you’re panning across a chart and you come to the chart’s edge, you can open an adjacent
chart by double-tapping the pen outside the chart border. If more than one adjacent chart is
available, ActiveCaptain Mobile will open the chart whose scale best matches the chart scale you
were previously viewing.
1.4.3 Keys
All of the hard and soft keys on your Palm device can be assigned to different commands. This
makes selecting commands more reliable than trying to hit a small menu on a moving boat with a
stylus!
This User’s Manual will describe all keys by their default definitions - the definitions that exist
when the application is first installed. If someone has changed the key definitions using Menu >
Actions > Preferences > Keys, the definitions of the keys might not match this document.
You should re-define the keys for your device so that they make sense to you. For example, the
default “zoom in” command is the Down key. The default “zoom out” command is the Up
button. For some, this makes perfect sense. But others prefer Up to “zoom in” and Down to
ACM/Palm OS User’s Manual
Page 6
1.0 The Basics
“zoom out”. The Key Preferences form gives you the ability to change the keys however you
would like. See 1.7.4 for information on re-defining the keys.
1.4.4
Zooming
Zooming magnifies or reduces the chart that is currently being displayed. Zooming a chart is
instantaneous. There is no delay when you perform this command. This is important because
with a small screen, it is easy to lose track of where you are on a large chart. Don’t let that happen
to you. Zoom out, pan around, and zoom back in to keep reference of your location.
By default, the chart will be zoomed in for a closer view by pressing the Down key. To zoom out
for a wider view, press the Up key. The View menu (see 1.5.2) can also be used for zooming but
you’ll find that you’ll always use the hard keys.
When you reach the limit for zooming in or out, a warning beep will sound to notify you that no
further zooming is possible.
Tip: Zooming out makes for faster panning across long distances. Zoom out and pan the chart.
When you reach the general area of interest, zoom back in for greater detail.
1.4.5
More Detailed Chart / Less Detailed Chart
The chart regions you have loaded have many charts in different scales. Changes in scale provide
different levels of detail. A 1:40,000 chart will show much greater detail and a much smaller area
than a 1:2,000,000 chart. It is very valuable to switch between these different levels of detail for
help in locating an area or panning quickly over hundreds or thousands of nautical miles.
ACM/Palm OS User’s Manual
Page 7
1.0 The Basics
By default, the next chart with more detail will be loaded by pressing the Right key. To load the
next chart with less detail, press the Left key. The View menu (see 1.5.2) can also be used for
loading a more detailed or less detailed chart.
When you use the more detailed chart command and there is no chart with more detail available
for the position viewed, a warning beep will sound. Using the less detailed chart command will
eventually display the world map. Trying to use the less detailed chart command again will also
cause a warning beep to sound.
There is an important interaction between loading more or less detailed charts and zooming. You
will find that you are often pressing the Up, Down, Left, and Right keys to get the view you want
for a particular location. Just like zooming, loading a new chart is instantaneous. Use all of these
commands to move between different locations quickly without losing track of where you are.
Tip: Requesting a More Detailed Chart uses the center of the display as the point where new
charts are found. To find a location quickly from the world map, double-tap the location to center
it. Then press the Right key to bring in a more detailed chart of that position.
1.4.6 Follow Mode
Pressing the Center button (the button in the middle of left, right, up and down) will put ACM
into Follow Mode. In Follow Mode, the GPS cursor is locked in the center of the screen. As your
position changes, the chart will be panned underneath the GPS cursor so it remains in the center
of the screen.
When you’re not in Follow Mode, the GPS cursor has a red band drawn around it to warn you
that the GPS is not locked in the center of the screen. See 3.3 for more detailed information
about Follow Mode.
1.4.7 Data Boxes
The “d” key will default to toggle the display of Data Boxes. Data Boxes show three different
navigation parameters (speed, course, distance to waypoint, etc). You can also toggle display of
Data Boxes by selecting the Data Boxes item from the View menu. See 3.5 for more detailed
information on Data Boxes.
1.5
Menus
ACM has three menus: Actions, View and Markers. The Actions menu contains general
commands for controlling the application. The View menu contains commands that control the
view of the chart in the display. The Markers menu contains commands to access and control the
connection of ACM to the ActiveCaptain web site for markers and for finding locations, marinas,
and waterway positions.
ACM/Palm OS User’s Manual
Page 8
1.0 The Basics
1.5.1
Actions menu
Chart List:
Displays a list of charts in the current region and allows you to manually
switch regions.
Chart Details:
Shows additional details about the currently visible chart.
Region Details:
Shows additional details about the region currently being used.
Waypoint List:
Displays the list of saved waypoints for editing, displaying, and other
functions.
Route List:
Displays the list of saved routes for editing, displaying, and other
functions.
Import:
Imports waypoints or routes from other software.
Export:
Exports waypoints or routes to other software.
GPS:
Shows current GPS status and allows access to GPS settings.
Preferences:
Accesses internal settings that are saved when you exit ACM.
About:
Displays the Device ID and version number of your copy of the
application.
ACM/Palm OS User’s Manual
Page 9
1.0 The Basics
1.5.2
View menu
Data Boxes:
Toggles the display of Data Boxes on the screen.
Zoom In:
Magnifies the currently displayed chart.
Zoom Out:
Reduces the currently displayed chart.
More Detailed Chart: Loads a new chart with more detail based on the center position of the
chart being displayed.
Less Detailed Chart:
Loads a new chart with less detail based on the center position of the
chart being displayed.
Follow Mode:
Forces the GPS cursor to be locked in the center of the screen. As the
GPS position changes, the chart will pan underneath as necessary.
Follow Max Detail:
Enters Follow Mode and ensures that the GPS cursor is always displayed
on the most detailed chart available.
Go Back:
Returns the display to the position being viewed when you entered
Follow Mode.
Display Rotation:
Allows you to select the orientation of your chart. Includes an item that
will keep the GPS cursor pointing in an upward direction by rotating the
chart as you turn.
ACM/Palm OS User’s Manual
Page 10
1.0 The Basics
1.5.3
Markers menu
Retrieve All:
Retrieves all markers for the currently displayed area from the
ActiveCaptain web site.
Retrieve Marinas:
Retrieves only the marina markers for the currently displayed area from
the ActiveCaptain web site.
Retrieve Anchorages: Retrieves only the anchorage markers for the currently displayed area
from the ActiveCaptain web site.
Retrieve LK:
Retrieves only the local knowledge markers for the currently displayed
area from the ActiveCaptain web site.
Remove Markers:
Removes all markers from the display.
Marker List:
Shows a list of all currently displayed markers. Use this to access markers
when they are crowded together or covered by the GPS cursor or other
display items.
Find:
Allows you to find markers by location, marina name or waterway mile
marker (ICW’s).
1.5
The Chart List
There are three ways you can bring up a list of all the charts installed on your device:
Actions menu:
Choose the Chart List item from the Actions menu.
Chart popup:
Press-and-hold the stylus directly on the background chart image until the
Chart popup menu appears. Select Chart List... from the popup. Note that
displaying the Chart List in this way will default to showing only charts
available for the latitude/longitude position where the stylus was pressed.
ACM/Palm OS User’s Manual
Page 11
1.0 The Basics
“c” key:
By default, the “c” key on the keyboard will directly open the Chart List.
The Chart List
The “Show” popup menu allows you to display all charts in the current region, only charts that
contain the area of your current GPS position, or only charts that contain the location of your pen
position (if opened by pressing-and-holding on the chart background).
The “Sort” popup menu allows you to select the way that charts are sorted in the list. You can
sort the list by chart ID, name, or scale:
ID:
The ID is the official number assigned to the chart by the agency that
produced it.
Name:
The official title of the chart given by the agency that produced it.
Scale:
The ratio of distance on the original (paper) chart compared to actual
ground distance. This ratio is given as “1:x.” For example, a paper chart
whose scale is 1:24,000, one inch on the chart corresponds to 24,000
inches (2,000 feet) on the ground.
A chart’s scale tells you the detail level of the chart. Lower displayed
numbers mean more detail. Higher displayed numbers mean less detail
although high-scale charts typically cover a wider area. For ease of use,
the Scale numbers shown in the Chart List are abbreviated by removing
the “1:”. For example, the scale of a 1:40,000-scale chart would be listed
as “40K.” A 1:59,000,000-scale chart would be listed as “59M.” This is
done to save space on the display.
To open one of the charts in the list, select the chart you want and then select the Select button.
The Select button will close the form and display the chart highlighted in the list.
ACM/Palm OS User’s Manual
Page 12
1.0 The Basics
Chart Details
To obtain more details about a chart, select the chart in the Chart List and select the Details
button. The Chart Details form will then show the Chart ID, Chart Name, Chart Scale and the
edition number of the chart.
Select Done to close the form and return to the main chart display without changing charts.
The Chart List can also be used to manually switch regions if you have purchased more than one
region. At the top of the Chart List form is the name of the current region. To manually select a
different region, select the Regions button and then select the desired region from the list. On
returning to the Chart List, the list will contain charts from the newly selected region with a chart
containing the currently displayed position. Select one of the new charts and select the Select
button.
Regions List
In most cases, you shouldn’t have to manually select a region. Panning a chart, double-tapping at
a chart edge, using More Detailed Chart, and movement of the GPS will switch regions
automatically if needed.
To view additional details about a region, select the region and select the Details button in the
Region List form. This will display the Region ID, Region Name, the number of charts in the
region, the version number and the file name.
ACM/Palm OS User’s Manual
Page 13
1.0 The Basics
Region Details
You can also display the Region Details form for the current region being used. Select the Region
Details item in the Actions menu.
1.6
Import/Export
ActiveCaptain Mobile allows you to import or export MXF and RXF files containing waypoints
and routes. MXF/RXF is a standard format used in nautical software and other conversion
software. This lets you share your waypoints and routes with other ACM users or convert
waypoints and routes for use with other navigation software. Access Import or Export from the
Actions menu.
When you select Import, a list of all MXF and RXF files stored on your device will be displayed.
Select the file you want and select the Import button. Imported waypoints and routes are not
automatically displayed. Use the Waypoint List and Route List forms to display the waypoints
and routes you would like to display on the charts.
Choosing Export will display a list of the stored routes or waypoints. Select Routes or Waypoints
from the popup menu at the top of the form. Check the checkbox next to the waypoint(s) or
route(s) you would like to export, and select the Export button. You will be prompted for a file
name. The All or None buttons are shortcuts to selecting all items (or no items) in the list. All
exported files are saved to the ActiveCaptain directory on the memory card.
1.7
Preferences
To change the saved settings for ACM, select the Preferences item from the Actions menu (or
press the default “p” key). The popup menu on the top of the screen allow you to select different
categories of settings: General, Warnings, Units, Keys, GPS, or Captain.
ACM/Palm OS User’s Manual
Page 14
1.0 The Basics
1.7.1
General preferences
North up icon
Check this to show the North Up icon in the bottom left of the display.
The North Up icon is a good way to verify the rotation of the display
along with the rotation/skew of the chart. The North Up icon will always
point to true North.
Depth units
Depth soundings on charts are displayed in feet, meters or fathoms. The
units of measurement, or depth datum, are typically noted in the chart
margin which might not be easily visible. The Depth Units Preference
setting will show the depth units (if known) in the lower right corner of
the screen: Feet, M (meters), Fa (fathoms) or FaFt (Fathoms and Feet chart has both, review chart for proper datum).
Course line extension
A line can be displayed from the GPS icon towards the direction of travel.
You must be connected to a GPS for this feature to display. When you
check the box, a popup menu appears allowing you to select the length of
the course line extension. You can select this line based on distance or
time. The units for distance are determined by the units chosen under
Preferences/Units. Time-based course line extensions will be calculated
from your average speed over ground.
ACM/Palm OS User’s Manual
Page 15
1.0 The Basics
1.7.2
Warnings preferences
Application start up
Displays a warning each time ACM starts.
Application exit
Displays a warning before ACM exits. This is useful to stop the
application from quitting because one of the application buttons was
accidentally pressed.
Region size support
Some older Palm devices do not have enough internal memory to support
all regions. This warning will check the free memory available when ACM
first starts.
1.7.3
Units preferences
Bearings
Choose whether your bearings should be measured from True or
Magnetic North. To provide readings in Magnetic North, a variation
amount is either added or subtracted, depending on your location on the
globe. This variation, called magnetic variation or magnetic declination, is
the angle between True North and the direction in which a compass
needle points.
Magnetic variation is taken from the connected GPS unit (if the GPS
ACM/Palm OS User’s Manual
Page 16
1.0 The Basics
provides this data), or else it is calculated from the chart itself (for charts
of sufficient detail - 100,000 scale or lower). If no magnetic variation is
available, the Data Box will show “no mag.”
Speed
KT (knots), MPH (miles per hour), or KPH (kilometers per hour).
Distance
NM (nautical miles), MI (miles), or KM (kilometers). Smaller distances
may be shown either in YD/FT (yards/feet) or M (meters).
1.7.4
Keys preferences
The Keys preferences panel displays the key shortcuts for the commands available within ACM.
Many of the keys are predefined in the software. For example, selecting “c” will automatically
bring up the Chart List. You can choose to change these key shortcuts to meet your personal
preferences and needs. For example, different people think of zooming in as an Up key type of
action instead of the default Down key mapping. The Keys tab allows you to change any of the
key definitions.
To change a key definition, select the command from the list and select the Edit Key button.
Enter the new key which you would like to assign to this command and select OK. If you select a
key which is already used for another shortcut, a warning message will appear and allow you to
override the other key definition. Selecting the Default button will reset all of the keys to the
ActiveCaptain Mobile default settings. See Chapter 5.3 for a list of the default key definitions.
ACM/Palm OS User’s Manual
Page 17
1.0 The Basics
1.7.5
GPS preferences
The GPS preferences panel controls the settings for the GPS port and driver. Additional
information on using ActiveCaptain Mobile with a GPS can be found in Chapter 3.
1.7.6
Captain preferences
The Captain preferences panel provides your email address and password for the ActiveCaptain
web site. This account information is required before you can access the web site for markers,
perform a Find operation, or activate regions. If either of the fields is blank, you will be prompted
to enter the information when you attempt to connect to the web site.
ACM/Palm OS User’s Manual
Page 18
2.0
ACM/Palm OS User’s Manual
WAYPOINTS & ROUTES
2.0 Waypoints & Routes
2.0
WAYPOINTS & ROUTES
Waypoints and routes are the basic navigation objects in ActiveCaptain Mobile. A waypoint is a
single position (latitude, longitude). A route is a list of waypoints defining a path from one
location to another.
2.1
Waypoints
2.1.1 Creating waypoints
ActiveCaptain Mobile allows you to place waypoints at points of interest on the chart. These
waypoints are shown as blue circles.
To create a waypoint, press-and-hold the stylus on the chart location you’d like to mark until a
popup menu appears. Select New Wpt. This opens the Waypoint Edit form.
Name
The name for the waypoint. When you first create a waypoint, the default
name is “No Name”. You should overwrite this with a name of your own
choosing.
Latitude, Longitude
These are the coordinates of the point you selected with your stylus. If
you would like to move the waypoint to a different lat/lon, you can
change these coordinates (IMPORTANT: be sure to view this waypoint’s
new location on the chart before using it for navigation).
Active
Designates that the waypoint should be activated for following.
Lock position
Keeps the waypoint from being accidentally dragged out of place.
2.1.2 Moving waypoints
Unless a waypoint is locked (see above), you can move it by dragging it with the stylus. If you
press-and-hold on the waypoint for about a second, the Waypoint popup menu will appear - to
ACM/Palm OS User’s Manual
Page 20
2.0 Waypoints & Routes
close it, simply select anywhere outside the menu. You can also move a waypoint by manually
editing the latitude/longitude position with the Waypoint Edit form.
2.1.3
Waypoint popup menu
Waypoints are not labeled on the screen. You can always see a waypoint’s name by pressingand-holding the waypoint until a menu pops up. The top of the menu tells you the waypoint’s
name. Selecting the name item will open the Waypoint Edit form for the waypoint. Use the other
menu items to perform functions on the waypoint (Delete, Hide, Lock, Unlock, Activate,
Deactivate). The items in the popup menu change depending on the state of the waypoint.
2.1.4 Listing and editing waypoints
All your waypoints are displayed in the Waypoint List. It’s a good idea to assign different names
to your waypoints, so you can tell them apart. To view the list and make changes to any of your
waypoints, select the Waypoint List item from the Actions menu (or press the “w” default key).
The waypoints are listed in alphabetical order.
Checkboxes
The checkbox next to each waypoint name indicates whether the
waypoint is visible on the chart. This lets you keep the chart from
becoming cluttered and allows you to focus on specific points. Up to 50
ACM/Palm OS User’s Manual
Page 21
2.0 Waypoints & Routes
waypoints can be checked for display. To remove a waypoint from the
display, clear the checkbox. A diamond symbol in the box indicates that
the waypoint is active.
Done
Closes the Waypoint List form.
Edit
Opens the Waypoint Edit form on the selected (highlighted) waypoint so
you can change its name, adjust the latitude/longitude position, lock its
position, or activate it
Delete
Deletes the selected (highlighted) waypoint. A warning is given before the
waypoint is actually deleted.
Locate
Closes the Waypoint List and centers the display on the selected
waypoint location. If the waypoint was previously hidden it will
automatically be restored to view. If the waypoint is not located on the
chart that was previously viewed, a chart closest in scale to that chart is
selected.
2.1.5 Activating a waypoint
Activate a waypoint to set a direct course for a single destination from your current GPS position.
A blue line is drawn between the GPS cursor and the waypoint to show the course of travel.
To activate a waypoint, press-and-hold the stylus on the waypoint until the popup menu appears.
Select Activate from the menu list. You can also activate a waypoint from the Waypoint Edit
form (see 2.1.1).
Many of the Data Boxes items are calculated by information based on an active waypoint. See
3.5 for more information about Data Boxes.
IMPORTANT: Preview Entire Length of Travel Line
When setting course for a distant location, be sure to preview the entire length of the travel line to
be certain it does not lead you over obstructions. In drawing the travel line, ActiveCaptain Mobile
shows you the most direct, shortest route, but this does NOT take into consideration any possible
obstructions or danger areas. If your final destination is some distance away, you may want to
use multiple waypoints to break the trip into several shorter segments. You can also use a route to
negotiate your way around intervening obstructions, such as any land masses, shallow areas, etc.
When you reach your destination waypoint - or if you want to change course - you can remove
the blue travel line by pressing-and-holding the waypoint or chart background and selecting
Deactivate. Or use the Waypoint List or Waypoint Edit form to clear the Active checkbox.
ACM/Palm OS User’s Manual
Page 22
2.0 Waypoints & Routes
2.1.6 Locating a latitude/longitude position with a waypoint
There will be times when you want to locate a specific latitude/longitude position. Using a
waypoint is a good way to do this. Create a new waypoint by pressing-and-holding the stylus on
the chart background. Select New Wpt and change the name and latitude/longitude position.
Now open the Waypoint List form (Menu > Actions > Waypoint List or press the default “w”
key). Select the new waypoint and select the Locate button.
2.2
Routes
2.2.1 Creating routes
ActiveCaptain Mobile allows you to create a series of waypoints joined in sequence by lines.
Each sequence of waypoints is called a route. Routes are used primarily to indicate paths of travel
from one location to another.
To create a route, press-and-hold the stylus on the chart location where you’d like to set the
starting location of the route. From the popup menu that appears, select New Route. This opens
the New Route form. It’s a good idea to replace the default “No name” with a name that you’ll
recognize. Under “Starting location” fill in something descriptive for the area where this route
begins. What you write here will be used for the name of this route’s starting waypoint. Selecting
OK will create the route and display its starting location. A blue dot will be placed at the location
you pressed.
ACM/Palm OS User’s Manual
Page 23
2.0 Waypoints & Routes
Press-and-hold the stylus on the next location where you want to set the second waypoint and
select Add Wpt Here from the popup menu. Continue in this way until you have finished adding
waypoints and want to save the route you’ve created. A single route can contain up to 52
waypoints.
2.2.2
Saving routes
Use Add Wpt & Save Route from the popup menu to add the final point to the route and save the
route. Use “Save Route” to save the route without adding the last point selected.
When you save the route, the End Route form will appear. This allows you to name the route’s
ending waypoint. Providing descriptive names for the starting and ending waypoints will assist
you in navigating from the start to end especially when you reverse the route (see 2.2.11).
2.2.3 Moving waypoints in a route
You can use your stylus to drag waypoints and reposition them on the chart. This can be done
while you’re creating the route or after you’ve saved the route. As you move waypoints, the lines
between them stretch and shrink as necessary.
ACM/Palm OS User’s Manual
Page 24
2.0 Waypoints & Routes
2.2.4
Inserting waypoints in a route
To insert a new waypoint in a route, press-and-hold the line between any two waypoints and
choose Insert Wpt. The new waypoint will be placed on the line where you pressed: you can then
drag it to another location, and the line will follow along as needed. If you need to add a
waypoint to the beginning or end of your route, press-and-hold the stylus on the line after the
first waypoint or before the end waypoint and select Insert Wpt. Then adjust the two waypoints
to their desired position.
2.2.5 Deleting waypoints in a route
If you want to remove a specific waypoint, press-and-hold your stylus on the waypoint and
choose Delete Wpt. You will be asked for confirmation before it is deleted.
2.2.6 Locking a route
When you have created a route and know that all of the waypoints are properly positioned, it’s a
good idea to lock the route. Locking the route prevents the waypoints from accidentally being
moved on your chart. You can lock a route with the Route Edit form (see 2.2.8) or by pressingand-holding the stylus anywhere along the route and selecting Lock from the popup menu.
2.2.7 Listing routes
All of your routes are displayed in the Route List. To view the list and/or make changes to any of
your routes, select the Route List item from the Actions menu (or press the “r” default key).
ACM/Palm OS User’s Manual
Page 25
2.0 Waypoints & Routes
The routes are listed in alphabetical order.
Checkboxes
The checkbox next to each route name indicates whether the route is
visible on the chart. Up to 3 routes can be checked for display. To remove
a route from display, clear the checkbox. A diamond symbol in the box
indicates that that route is active.
Done
Closes the Route List form.
Edit
Opens the Route Edit form on the selected (highlighted) route for making
more in-depth modifications.
Delete
Deletes the selected (highlighted) route. A warning is given before the
route is actually deleted.
Locate
Closes the Route List and centers the display on the first waypoint
location of the selected route. If the route was previously hidden it will
automatically be restored to view if there were fewer than three routes
already visible. If the route is not located on the chart that was previously
viewed, the chart closest in scale to that chart is selected.
2.2.8 Editing routes
Open the Route Edit form by highlighting a route in the Route List and selecting Edit. A shortcut
to the Route Edit form is also available by pressing-and-holding directly on any waypoint or line
segment in a route and selecting the route’s name at the top of the popup menu.
ACM/Palm OS User’s Manual
Page 26
2.0 Waypoints & Routes
Route
Allows you to change the name of the route.
From
Allows you to change the name of the starting waypoint.
To
Allows you to change the name of the ending waypoint.
Active
Designates that the route should be activated for following. The direction
of travel is between the From waypoint and the To waypoint.
Lock waypoints
Keeps the waypoints in the route from being accidentally dragged out of
place.
Wpts...
Opens the Route Waypoints List form (see 2.2.9) showing all of the
waypoints in the route. This form is a great way to find out the total
distance of a route. You can also edit individual waypoints from this
form.
Reverse
Reverses the From and To locations specifying the direction of travel
when the route is activated.
2.2.9
Editing waypoints in routes
ACM/Palm OS User’s Manual
Page 27
2.0 Waypoints & Routes
Access this form by selecting the Wpts button from the Route Edit form (see 2.2.8). This form
provides a list of all waypoints in a route and the total distance for the route. Waypoints in the
middle are automatically numbered.
Select one of the waypoints and then select the Edit button to manually edit the latitude/longitude
position of the waypoint. You can also open this form for a waypoint in a route by pressing-andholding the stylus on a waypoint and selecting the “Wpt:” name or number near the bottom of
the popup menu.
2.2.10 Route popup menus
There are many ways to access the different parameters of a route. It’s common to access route
information from the Route List form and edit a selected route by selecting the Edit button (see
2.2.8). In addition, many of the route parameters can be obtained by the popup menus.
Pressing-and-holding the stylus on a waypoint of a saved route produces a popup menu with the
following items:
Rte: (name)
Displays the name of the route. Selecting this item will open the Route
Edit form (see 2.2.8) on the route.
Delete...
Deletes the entire route after a confirmation form.
Hide
Hides the entire route. You can make it visible again by using the Route
List form (see 2.2.7) and checking the checkbox next to the route.
ACM/Palm OS User’s Manual
Page 28
2.0 Waypoints & Routes
Lock/Unlock
Sets the lock state of the route. If the route is not currently locked, Lock
will be displayed. If the route is currently locked, Unlock will be
displayed.
Activate/Deactivate
Activates the route if it is currently not activated (see 2.2.11). Deactivates
the route if it is currently active.
Wpt: (name/#)
The name or number of the waypoint in the route. Selecting this item is a
shortcut to the Route Waypoint Edit form (see 2.2.9)
Delete...
Deletes the waypoint from the route after a confirmation form.
Skip Wpt
Only displayed if the waypoint selected is the currently active waypoint in
the activated route. Selecting this item will skip this waypoint and move to
the next waypoint in the route’s path.
Goto Wpt
Only displayed if the route is active and the waypoint selected is not the
currently active waypoint. Selecting this item will change the currently
active waypoint to the waypoint that was used to display the popup
menu.
Pressing-and-holding the stylus on a line segment of a saved route produces a popup menu with
the following items:.
Rte: (name)
Displays the name of the route. Selecting this item will open the Route
Edit form (see 2.2.8) on the route.
Delete...
Deletes the entire route after a confirmation form.
Hide
Hides the entire route. You can make it visible again by using the Route
List form (see 2.2.7) and checking the checkbox next to the route.
ACM/Palm OS User’s Manual
Page 29
2.0 Waypoints & Routes
Lock/Unlock
Sets the lock state of the route. If the route is not currently locked, Lock
will be displayed. If the route is currently locked, Unlock will be
displayed.
Insert Wpt
Adds a new waypoint on the line segment where the stylus was pressed if
the route is unlocked. After the waypoint is inserted, drag it to the desired
location.
Activate/Deactivate
Activates the route if it is currently not activated (see 2.2.11). Deactivates
the route if it is currently active.
Pressing-and-holding the stylus on a waypoint of a route being created produces a popup menu
with the following items:.
Delete Wpt
Only displayed if the route has more than 1 waypoint defined. Deletes the
waypoint in the route being created.
Cancel Route...
Cancels the creation of the new route after a confirmation form.
Pressing-and-holding the stylus on a line segment of a route being created produces a popup
menu with the following items:.
ACM/Palm OS User’s Manual
Page 30
2.0 Waypoints & Routes
Insert Wpt
Adds a new waypoint on the line segment where the stylus was pressed.
After the waypoint is inserted, drag it to the desired location.
Cancel Route...
Cancels the creation of the new route after a confirmation form.
2.2.11 Activating a route
Activate a route to set a path from the routes starting waypoint to its ending waypoint from your
current GPS position. An active route’s line segments are drawn in bright red. A blue line is
drawn between the GPS cursor and the active waypoint in the route.
To activate a route, press-and-hold the stylus on the route until the popup menu appears. Select
Activate from the menu list. You can also activate a waypoint from the Route Edit form (see
2.2.8). When you activate a route with the popup menu, the Activate Route form will be
displayed allowing you to set the starting and ending positions for the route. Use the Reverse
button to switch locations when returning along the route’s path.
Many of the Data Boxes items are calculated by information based on an active route. See 3.5 for
more information about Data Boxes.
A blue line will appear on the screen, connecting the GPS Icon to the active waypoint/route. The
line shows you what direction you need to travel in order to reach your destination.
IMPORTANT: Preview Entire Length of Travel Line
When setting course for a distant location, be sure to preview the entire length of the travel line to
be certain it does not lead you over obstructions. In drawing the travel line, ActiveCaptain Mobile
shows you the most direct, shortest route between waypoints, but this does NOT take into
consideration any possible obstructions or danger areas. Make sure to check all parts of the route
carefully with the most detailed charts before following it.
When you reach the ending waypoint of the route - or if you want to change course - you can
remove the blue travel line by pressing-and-holding the route or chart background and selecting
Deactivate. Or use the Route List to select the route, select Edit and clear the Active checkbox.
ACM/Palm OS User’s Manual
Page 31
2.0 Waypoints & Routes
2.2.12 Measuring distances with routes
Routes provide a good way to measure distances on a chart. To measure a distance, start by
creating a route along the path you would like to measure. You can use as many waypoints as
you need to cover the entire distance. To see the length of the route, press-and-hold directly on
any waypoint along the route or the route line, and select the route name at the top of the popup
menu. The Route Edit form will appear, select the Wpts... button. The Route Waypoints form
displays the distance between each waypoint, as well as the total distance of the route.
ACM/Palm OS User’s Manual
Page 32
3.0
ACM/Palm OS User’s Manual
ADDING A GPS (Optional)
3.0 Adding a GPS (Optional)
3.0
ADDING A GPS (OPTIONAL)
A GPS is not required for ActiveCaptain Mobile but if you have one, there are many more
capabilities available to you. A GPS provides your current position and allows the software to
plot your position on a nautical chart. As your boat moves through the water, your position will
be updated on the display.
3.1
Settings and configuration
The GPS settings and configuration are available under the Preferences form. Select the GPS tab
at the bottom. Alternately, select the GPS item from the Actions menu (or press the “g” key by
default) and select the Settings button.
The GPS settings require selecting a port where the GPS is connected and optionally a baud rate.
Type
The type of GPS connected. The first item is labeled None. Selecting that
will turn off all GPS connectivity. Selecting Serial will allow you to
specify a baud rate for a GPS attached to the serial port. Selecting
Bluetooth will allow you to connect to a Bluetooth GPS. Selecting
Garmin iQue will support the internal GPS for Garmin iQue Palm devices.
Baud
The baud rate speed used to connect to the GPS for a GPS attached to the
serial port. This parameter is only available when the Type is set to Serial.
GPS
The Bluetooth GPS connected. This parameter is only available when the
Type is set to Bluetooth. Select the “Select” button to find the Bluetooth
GPS.
Select...
Opens the Bluetooth discovery form to find a Bluetooth GPS in
proximity. If a Bluetooth GPS has been selected, this button will be
replaced with “Change” to change the selected GPS and “Clear” to
remove the GPS name from being saved.
ACM/Palm OS User’s Manual
Page 34
3.0 Adding a GPS (Optional)
Auto-connect at startup
Check this if you would like the GPS to be connected each time the
application starts.
Connect
Select this button to immediately attempt to connect to the configured
GPS. You must select Connect after changing the GPS parameters to
connect.
If the Type is set to Bluetooth and a Bluetooth GPS has been selected, the name and
configuration parameters of the GPS will be saved when ACM exits. If “Auto-connect” was
checked, that GPS will be automatically attached to when ACM re-starts.
3.1.1 Configuring a Bluetooth GPS with Palm OS
Configuring a Bluetooth GPS with a Palm device requires multiple steps. Consult the
documentation for your particular device before attempting to configure it for Palm OS. What
follows are the basic requirements for setting up a Bluetooth GPS with Palm OS v5.4 (the current
version shipping with most smartphones). Using these steps will allow the GPS to be reconnected without entering additional information when you need to use the GPS.
To configure a Bluetooth GPS, you must pair the GPS with your device. Specifying the GPS as a
“Trusted Device” will allow it to be quickly re-connected in the future.
1.
Select Bluetooth from the application launcher. You can also get to this form by loading the
Prefs application and selecting Bluetooth under the Communication heading.
2.
Verify that Bluetooth is On. Note that turning off the Bluetooth radio will save battery power
so you should turn it off when you are not using a GPS if you want to maximize your
battery reserve time. You should also set your Device Name. Visibility allows other
smartphones to find your device. For security reasons, you might want to set this to Hidden.
3.
Select “Setup Devices” and then “Trusted Devices” from the Setup Devices form.
4.
Select “Add Device”. Your Palm device will search for Bluetooth devices in your area. Make
sure your GPS is turned on and in proximity (within 30 feet).
5.
Select your GPS from the device list and select OK.
6.
Enter the passkey for your GPS. Consult the documentation for your GPS to determine the
passkey. Typical passkeys for GPS devices are: “0183” or “0000” or “1234”. Select OK after
you have entered the passcode.
7.
A GPS pairing will be attempted. Select Done. Your GPS is ready to connect to
ActiveCaptain Mobile.
ACM/Palm OS User’s Manual
Page 35
3.0 Adding a GPS (Optional)
You don’t have to set up your GPS as a trusted device but if you do, you won’t be required to
enter the passkey when you connect in ACM.
3.2
GPS cursor
The GPS cursor, shaped like a triangle, indicates your location. As you move, the GPS cursor
moves across the chart. The triangle points in the general direction of your travel (assuming your
GPS is reporting it).
The color of the GPS icon indicates the validity of your GPS position. In order to accurately
report your location, your GPS depends on communication with the satellites in the GPS (Global
Positioning System) network. The strength of the GPS signal depends on the number and
strength of satellite signals received.
Black
Your GPS is on, configured properly, and sending valid position data. The
GPS cursor is a valid representation of your current location.
Gray
Caution - position data is not valid. Your GPS is on, configured properly,
but has not acquired enough satellite data to determine a precise position.
The position shown is the last known position and does not necessarily
represent your true location. You should not rely upon a gray GPS cursor
for navigational use.
The GPS cursor is often gray when you first start your GPS and it is
acquiring satellites. If it turns gray after a valid position has been fixed
(black GPS cursor), you should immediately take steps to reestablish
satellite communication: move away from tall obstructions in order to
give the GPS a clear view of the sky. Once your position has been
reestablished, the GPS cursor will turn black
Red
There is no GPS connection. The GPS cursor is red whenever your GPS is
turned off or is not in use. A red cursor may also mean that your GPS
isn’t configured properly under Menu > Actions > Preferences > GPS.
The position shown is the last known position and does not necessarily
ACM/Palm OS User’s Manual
Page 36
3.0 Adding a GPS (Optional)
represent your true location. You should not rely upon a red GPS cursor
for navigational use.
The location of the GPS cursor is updated whenever the GPS provides new data - typically once
per second. The GPS cursor color is updated every five seconds. Make sure your GPS unit has a
clear view of the sky at all times, so it can maintain satellite communication for accurate
positioning.
3.3
Follow Mode
3.3.1 Using Follow Mode
Follow Mode keeps the GPS cursor locked in the center of the display. As you move, the GPS
cursor will remain in the center and the chart will pan underneath.
When you want to quickly access Follow Mode, press the shortcut key on your Palm device. The
default key is the center button of the 5-way navigation pad (Up, Down, Left, Right, Center).
When you enter Follow Mode, a chart that best matches the scale of your current chart will be
opened that displays the position of the GPS.
You can also enter Follow Mode by selecting the Follow Mode item from the View menu.
After entering Follow Mode, select Go Back from the View menu to return to the position you
were viewing when Follow Mode was entered. This allows you to explore other locations while
quickly returning to the GPS location and jumping back to the place you were exploring. The
default key for Go Back is the “b” key.
If your GPS position reaches the edge of a chart while in Follow Mode, ActiveCaptain Mobile
will automatically open the adjacent chart. If more than one chart is available for the adjacent
area, ActiveCaptain Mobile will select the chart whose scale best matches the scale of the
previous chart. However, you don’t have to wait for ActiveCaptain Mobile to open the next chart
for you - you can open it yourself by double-tapping outside the chart boundary. This prevents
you from blindly entering a new coverage area.
ACM/Palm OS User’s Manual
Page 37
3.0 Adding a GPS (Optional)
The quickest way to tell if you are currently in Follow Mode is to look at the GPS cursor. In
follow mode, there is no red circle drawn around the GPS cursor. Whenever you are not in
Follow Mode, a red circle is drawn around the cursor as a warning that the GPS cursor is not
locked in the center with Follow Mode.
3.3.2
Follow max detail
Follow Max Detail is a Follow Mode enhancement. In addition to keeping the GPS cursor in
view, Follow Max Detail ensures that your GPS position is always displayed on the most detailed
chart available.
Select the Follow Max Detail item from the View menu to enter this mode. ActiveCaptain Mobile
will automatically switch to the most detailed chart scale available for your current GPS location.
A plus sign within the GPS Icon indicates Follow Max Detail.
Follow Max Detail is especially handy whenever you approach a harbor entrance, inlet, etc. for
which you have detailed coverage; ActiveCaptain Mobile will automatically open the detailed
chart.
ACM/Palm OS User’s Manual
Page 38
3.0 Adding a GPS (Optional)
3.3.3 Actions that break follow mode
Follow Mode is immediately deactivated if you take any action that moves the GPS cursor
manually. This includes:
® Panning the chart by dragging it with the stylus or your finger;
® Opening a chart that doesn’t contain the GPS position;
® Re-centering the chart by double-tapping the stylus.
Follow Max Detail is immediately reduced to standard Follow Mode if you purposely switch to a
different chart scale. You can still zoom in and out without breaking Follow Max Detail. You will
also return to standard Follow Mode by selecting the Follow Mode item from the View menu or
by pressing its shortcut key (Center by default).
3.4
Display Rotation
Select the Display Rotation item from the View menu to display the Display Rotation form. You
can also display this form by pressing-and-holding on the North Up icon if it is displayed. And of
course, there is a shortcut key defined for Display Rotation too (defaults to the “t” key).
Use Display Rotation to specify how chart rotation is handled. You can force rotation to a
specific quadrangle based on the orientation of the original chart. Select Use GPS (course up) to
automatically rotate the display based on the orientation of the original chart and the course angle
provided by the GPS. Using this mode will keep the GPS icon pointing in an upward direction as
you turn.
ACM/Palm OS User’s Manual
Page 39
3.0 Adding a GPS (Optional)
3.5
Data Boxes
ActiveCaptain Mobile can display three Data Boxes along the bottom of the screen. You can
customize the Data Boxes to show different kinds of information. The information is updated
automatically as it is received or calculated. Toggle the Data Boxes on and off by selecting the
Data Boxes item from the View menu. The default key shortcut for this is the “d” key.
There are thirteen types of information that can be displayed in each Data Box. There are two
ways to specify the information you would like in a Data Box:
® Press-and-hold the Data Box until a popup menu appears. The popup menu lists the
thirteen available data types. Select the one you want for that Data Box.
® Repeatedly tap a Data Box to “scroll” through the available data types. Each time you
tap the box, it will show a different type of data. Stop tapping when you reach the data
type you want.
The following Data Box information types are available:
SOG
Speed Over Ground. The SOG as reported by the GPS.
AVE SOG
Average Speed Over Ground. The average speed during the last 30-60
seconds (approx).
COG
Course Over Ground. The general direction of travel, in degrees, as
reported by the GPS.
GPS POS
GPS Position. The latitude and longitude currently reported by the GPS.
WPT RNG
Waypoint Range. The distance between your current GPS position and
the active waypoint.
ACM/Palm OS User’s Manual
Page 40
3.0 Adding a GPS (Optional)
WPT BRG
Waypoint Bearing. The bearing to follow to reach the active waypoint
from your current GPS position.
WPT TTG
Waypoint Time to Go. The approximate amount of time it will take to
reach the active waypoint at your present speed. This is calculated by
dividing WPT RNG by AVE SOG.
PEN RNG
Pen Range. Distance from the GPS cursor to the last place you tapped
your stylus on the display.
PEN BRG
Pen Bearing. Heading, in degrees, from the GPS cursor to the last place
you tapped your stylus on the display.
PEN POS
Pen Position. The latitude and longitude of the last place you tapped your
stylus on the display.
RTE XTE
Route Cross-Track Error. The distance you must travel to return to the
route leg. An arrow preceding the distance number tells you whether you
need to turn left or right to get back on course.
RTE DTG
Route Distance to Go. The approximate distance left to travel in the route
you’re following.
RTE TTG
Route Time to Go. The approximate amount of time it will take to reach
the final waypoint in the route you’re following, assuming your present
speed remains constant. (Calculated by dividing RTE DTG by AVE
SOG).
The information shown in most Data Boxes depends on the accuracy of your GPS signal. If your
GPS signal is weakened or lost, the information in your Data Boxes may no longer be accurate.
ACM/Palm OS User’s Manual
Page 41
3.0 Adding a GPS (Optional)
In some cases when data cannot be updated, old GPS data will still be shown, but will be drawn
in red. Data in red is not current - it is historical. It does not describe current conditions and
should not be relied upon for any navigational decisions. Some Data Boxes may go completely
blank when information is unavailable.
Final miscellaneous notes on Data Boxes:
® To change the units of measurement used for Data Boxes, use Menu > Actions >
Preferences > Units.
® When the Data Boxes are showing, there is a little less screen space available for chart
display. When you turn Data Boxes on, the chart will shift slightly upward in order to
re-center on the same point as the previous (larger) chart view.
® Showing AVE SOG (Average Speed Over Ground) requires approximately 30-60
seconds of continuous GPS data. Until 30-60 seconds of continuous data is received,
the average will be a moving average based on the data collected.
3.6
Add Wpt Here
If you want to create a waypoint at the current GPS position, there is a shortcut key defined for
this purpose. By default it is the “h” key (for “here”). This will open the Waypoint Edit form with
the current latitude/longitude of the GPS (see 2.1.1). You should enter an appropriate name for
the waypoint before selecting OK to save the waypoint.
Use Add Wpt Here to save your current position as a waypoint. This is often the perfect thing for
saving an anchor position when anchoring, for example.
3.7
GPS status
ACM/Palm OS User’s Manual
Page 42
3.0 Adding a GPS (Optional)
Selecting the GPS item from the Actions menu opens the GPS Status form. This form shows the
signal strength of each satellite being tracked by the GPS. The GPS generally requires three or
more satellites with high signal strength in order to fix a position.
ACM/Palm OS User’s Manual
Page 43
4.0
ACM/Palm OS User’s Manual
ACTIVECAPTAIN MARKERS & FIND
Page 44
4.0 ActiveCaptain Markers & Find
4.0
ACTIVECAPTAIN MARKERS & FIND
With ActiveCaptain Mobile you can display markers from the ActiveCaptain web site directly on
NOAA charts. You can also find positions by location name, marina name, or waterway mile
marker (the Atlantic ICW, for example). You will need an Internet connection on your mobile
phone in order to access these features.
NOTE: Additional charges from your phone plan may result from using the Internet connectivity
with ActiveCaptain Mobile. Make sure you understand your capabilities and costs of connecting
to the Internet from your phone.
4.1
Types of markers
Markers are accessed under the Markers menu. The ActiveCaptain web site has three basic
marker types:
Red
Marine facilities such as marinas, fuel docks, and repair facilities.
Green
Anchorages.
Blue
“Local Knowledge” positions of bridges, locks, boat ramps, inlets, marine
stores, Wal-Mart’s, etc.
4.2
Retrieving markers
Select one of the “retrieve” items from the Markers menu to download markers for the area
currently being viewed. When you retrieve markers, ActiveCaptain Mobile will connect to the
Internet to access the ActiveCaptain web site. If you have entered your Captain email address
and password under Preferences, ActiveCaptain Mobile will automatically connect and download
the markers. Otherwise, you will be prompted to enter the missing information.
The different retrieve items in the Markers menu will retrieve the following types of markers in
the displayed area:
ACM/Palm OS User’s Manual
Page 45
4.0 ActiveCaptain Markers & Find
Retrieve All...
Retrieves all types of markers. This will usually be the way you’ll retrieve
markers. By default, the shortcut key for this is “a” (all).
Retrieve Marinas...
Retrieves only the marina markers.
Retrieve Anchorages...
Retrieves only the anchorage markers.
Retrieve LK
Retrieves only the local knowledge markers.
If you would like to clear the display from all markers, select the Remove Markers item from the
Markers menu. This is helpful to quickly unclutter your screen.
4.3
Marker popup menus
Pressing-and-holding on a marker will produce a popup menu showing the name of the marker,
basic information about the marker, and commands to access more in-depth information about
the marker.
4.3.1
Marina (red) popup menu
Marina markers have the following items in the popup menu:
Marina - #
Shows that this is a marina. The number is the index of the marker, crossreferenced in the marker list (see 4.4). Selecting this item displays a simple
marker form and allows access to details, reviews, and centering.
marina name
The name of the marina. Selecting this item also displays the simple
marker form.
stars (reviews)
The average number of stars the marina has received for reviews along
ACM/Palm OS User’s Manual
Page 46
4.0 ActiveCaptain Markers & Find
with the number of reviews received in parenthesis. Marinas can receive
between 1 (poor) and 5 (excellent) stars. If no reviews have been written
for this marina, “No Rating” will be displayed.
phone number
The phone number for the marina. Selecting this item allows you to dial
the marina. You’ll get a chance to confirm dialing before the marina will
be called. You can also edit the number or select which number to dial if
there are multiple phone numbers for the marina.
Details...
Selecting this item displays the Details form (see 4.5.1).
Reviews...
Selecting this item displays the Reviews form (see 4.6.1). If the marina
has no reviews, this item won’t appear in the popup menu.
Center
Selecting this item will center the chart on the marker. This is useful when
you want to zoom in and out and keep the marker perfectly centered.
4.3.2
Anchorage (green) popup menu
Anchorage markers have the following items in the popup menu:
Anchorage - #
Shows that this is an anchorage. The number is the index of the marker,
cross-referenced in the marker list (see 4.4). Selecting this item displays a
simple marker form and allows access to details, reviews, and centering.
anchorage name
The name of the anchorage. Selecting this item also displays the simple
form.
stars (reviews)
The average number of overall stars the anchorage has received in reviews
along with the number of reviews received in parenthesis. Anchorages can
receive between 1 (poor) and 5 (excellent) overall stars. All anchorages
have at least one review.
ACM/Palm OS User’s Manual
Page 47
4.0 ActiveCaptain Markers & Find
Details...
Selecting this item displays the Details form (see 4.5.2).
Reviews...
Selecting this item displays the Reviews form (see 4.6.2).
Center
Selecting this item will center the chart on the marker. This is useful when
you want to zoom in and out and keep the marker perfectly centered.
4.3.3
Local Knowledge (blue) popup menu
Local Knowledge markers have the following items in the popup menu:
LK - #
Shows that this is a Local Knowledge marker. The number is the index of
the marker, cross-referenced in the marker list (see 4.4). Selecting this
item displays a simple marker form and allows access to details and
centering.
LK name
The name of the Local Knowledge marker. Selecting this item also
displays the simple marker form.
Type: type
The type of the Local Knowledge marker (Bridge, Inlet, Boat ramp, etc).
The types available are the same as on the ActiveCaptain web site.
Details...
Selecting this item displays the Details form (see 4.5.3).
Center
Selecting this item will center the chart on the marker. This is useful when
you want to zoom in and out and keep the marker perfectly centered.
ACM/Palm OS User’s Manual
Page 48
4.0 ActiveCaptain Markers & Find
4.4
Marker List
Selecting Marker List from the Markers menu displays a list of all markers currently displayed on
your screen. Markers are listed in alphabetical order with a number and abbreviation of the
marker type next to each name. The number corresponds to the marker displayed on the chart.
To the right of the marker name is the average number of stars the marker has received (marinas
and anchorages) and the number of reviews in parenthesis.
When you select a marker from the list, the full marker name will appear at the bottom of the
screen.
The buttons at the bottom provide a set of commands:
Done
Closes the Marker List form.
Details
Opens the Marker Details form on the marker selected in the list.
Reviews
Opens the Marker Reviews form on the marker selected in the list.
Center
Closes the Marker List form and centers the display on the marker
selected in the list. If the marker is not located on the chart that was
previously viewed, a chart closest in scale to that chart is selected.
ACM/Palm OS User’s Manual
Page 49
4.0 ActiveCaptain Markers & Find
4.5
Details
The Marker Details form provides in-depth details about a single marker. In order to obtain the
details, the ActiveCaptain web site is accessed for the information.
The Marker Details form depends on the type of marker being accessed. At the top will be popup
menus for the different categories of detail items. Marinas have so many detail items (over 100)
that two popups are used: Section and Group. Anchorages and Local Knowledge markers only
have Group popup menus. The categorization mimics the way that the detail data is displayed on
the ActiveCaptain web site details window so it should be familiar to you.
Each Marker Details form has a main text area that shows the text of the detail group selected.
Below this field are buttons providing a set of commands:
Done
Closes the Marker Details form.
left arrow
Switches to the previous field that has detail data.
right arrow
Switches to the next field that has detail data.
Reviews
Opens the Marker Reviews form on the marker.
Edit
Allows you to edit the detail data for updating the ActiveCaptain web site.
This is an important component of ActiveCaptain Mobile but isn’t
enabled yet. It will be included as a free update in a later release.
Using the left and right arrow buttons is the quickest way to see all of the details for a marker. For
marinas especially, the arrow buttons skip over fields that currently have no current information
and allow you to quickly see the data available. At any time, you can also select entries in the
popup menus at the top to manually view a particular detail item.
ACM/Palm OS User’s Manual
Page 50
4.0 ActiveCaptain Markers & Find
SPECIAL NOTE
Any text displayed in the field of the Marker Details form can be selected with the stylus by
dragging across the text desired. This selected text can be copied to the clipboard or dialed by
selecting the Menu key. A menu bar with a Selection menu will be displayed with the following
items:
Copy
Copies the selected text to the clipboard. It can then be later pasted into
another application. This is often helpful if a web site URL is referenced
and you would like to open that page in the device’s web browser.
Dial...
Dials the number selected after confirming it and allowing you to edit the
number. This is often helpful when a phone number is embedded in one
of the detail fields.
4.5.1 Marina Details: Sections and Groups
The following Sections and Group popup menus are accessible for all marina (red) markers:
Section
Group
General
Name, addr, phone - mailing address and phone number of the marina
Facility type - type of facility
Seasonality - season/year round information
Payments accepted - types of payments accepted
Payment discounts - types of discounts allowed
VHF channel - contact channel on VHF
Links - email address and web site
People - owner, manager, harbormaster, dockmaster
Units - length/depth, fuel, currency
Notes - general notes
Navigation
Approach - information about reaching the marina by the water
Tide & current - basic tide and current strength to expect
Depths - approach, transient dockage, fuel dock
Position - latitude/longitude
Dockage
Docks - types of docks at the facility (floating, wooden, etc)
Size restrictions - any type of restrictions based on size
Slips - transient, total, price, date of price
Moorings - transient, total, price, date of price
AC power - type of AC available, price, etc.
Cable TV - availability, price, etc.
Phone hookup - availability, price, etc.
ACM/Palm OS User’s Manual
Page 51
4.0 ActiveCaptain Markers & Find
Water - availability, price, etc.
Dinghy access - dockage, price, other info
Liveaboard info - general information for liveaboards
Fuel
Fuel types - gas, diesel availability
Fuel price - prices and date of prices, fuel discounts
Propane - availability
Services
Pets - welcome/unwelcome, other information
Disability access - information about disability services
Launch service - availability, price, description
Pump out - availability, price, description
Ice - availability, price, description
Trash - availability, price, description
Showers - availability, price, description
Heads - availability, price, description
Laundry - availability, price, description
Grocery - availability, description
Hardware - availability, distance, description
Restaurants - distance, description
Bars - distance, description
Hotels & motels - distance, description
Repairs - capabilities, description
Haul out - capabilities, description
Storage - availability, price, description
Fishing supplies - availability, distance, description
Chartering - availability, description
Internet access - availability, WiFi, cellular
Boat ramp - availability, price, description
Transportation - types, description
Attractions - types, description
Other services - other information
4.5.2 Anchorage Details: Groups
The following Group popup menu is accessible for all anchorage (green) markers:
Group
Name - name of the anchorage
Position - latitude/longitude
Description - general information about the anchorage
Approach - information about reaching the anchorage
ACM/Palm OS User’s Manual
Page 52
4.0 ActiveCaptain Markers & Find
Internet access - availability, WiFi, cellular
Pets - facilities for pets
Ratings - average rations: overall, current protection, holding, wind protection, wake protection,
scenery, and shopping
4.5.3 Local Knowledge Details: Groups
The following Group popup menu is accessible for all local knowledge (blue) markers:
Group
Name - name of the local knowledge and category type
Position - latitude/longitude
Notes - additional information about the local knowledge marker
In addition, the following markers have additional groups:
Bridges
Restrictions, closed height, bridge type, VHF channel
Locks
Restrictions, VHF channel
4.6
Reviews
The Marker Reviews form provides access to all of the reviews written about a marina or
anchorage. In order to obtain the review, the ActiveCaptain web site is accessed for the
information.
The Marker Reviews form has the name of the marker at the top and a single, large, scrolling text
area containing a single review. Below this field are buttons providing a set of commands:
Done
Closes the Marker Reviews form.
left arrow
Switches to the previous review available for the marker.
right arrow
Switches to the next review available for the marker.
ACM/Palm OS User’s Manual
Page 53
4.0 ActiveCaptain Markers & Find
Details
Opens the Marker Details form on the marker.
Rate It
Allows you to provide a rating for the marker and write or edit your own
review. This is an important component of ActiveCaptain Mobile but isn’t
enabled yet. It will be included as a free update in a later release.
The text of each review is displayed in the same way. The top shows the review number and the
total number of reviews along with the number of stars given to the marker by the reviewer. Next
is the date that the review was written, the title of the review, and the captain who wrote the
review. The total number of points that the captain has acquired in ActiveCaptain is shown next
to the name in parenthesis. This number gives an indication of how experienced the captain has
been in making updates, writing reviews, and adding new markers.
SPECIAL NOTE
Any text displayed in the field of the Marker Reviews form can be selected with the stylus by
dragging across the text desired. This selected text can be copied to the clipboard or dialed by
selecting the Menu key. A menu bar with a Selection menu will be displayed with the following
items:
Copy
Copies the selected text to the clipboard. It can then be later pasted into
another application. This is often helpful if a web site URL is referenced
and you would like to open that page in the device’s web browser.
Dial...
Dials the number selected after confirming it and allowing you to edit the
number. This is often helpful when a phone number is embedded in one
of the detail fields.
Reviews are as important as details for an item. Each written review is a place where a Captain
has written their opinions, good or bad, about a marker. Each reviewer gives the marker between
one and five stars. When stars are displayed for a marker, the number of reviews written for that
facility will be shown next to the stars. This gives you an indication of the quality of the rating.
For example, 20 Captains rating a marina with 5 stars is more valuable than a single Captain
rating the marina with 5 stars.
4.6.1 Stars and ratings
Marinas and anchorages are given “stars” as a quick way to provide an overall rating. Anchorages
have 6 additional categories of ratings that are used to give information about the anchorage area.
The overall stars rating for a marker is shown as one to five stars. A one-star marker generally has
some major problems associated with it. A five-star marker is considered to be exceptional. Of
course, the text of the reviews should give much more detailed information about the marker than
any single number can.
ACM/Palm OS User’s Manual
Page 54
4.0 ActiveCaptain Markers & Find
Anchorages have 6 additional categories of ratings. Each of these rating values is also between
one and five. One is considered poor (or not available) and five is considered excellent. The
anchorage categories are:
Current protection
Protection from current forces that the anchorage provides.
Holding
Quality of the bottom to hold an anchor.
Wind protection
Protection from wind forces that the anchorage provides.
Wake protection
Protection from boat wakes that the anchorage provides.
Scenery quality
The physical beauty of the anchorage.
Shopping facilities
Availability and proximity to shopping.
4.7
Find
There are three ways to look up a position inside ActiveCaptain Mobile. In order to perform these
find operations, the ActiveCaptain web site is accessed for the information.
Find by Location
Looks up a position based on a country, state, and city.
Find by Marina
Looks up a position based on the name of a marina.
Find by ICW
Looks up a position based on a mile marker of one of the well-known and
marked waterways.
The Find form is accessed by selecting the Find item from the Markers menu. At the bottom of
this form are three tabs allowing you to select the type of data you would like to look up.
4.7.1
Find by Location
Select the location you would like to find based on the country and city names. If the country has
ACM/Palm OS User’s Manual
Page 55
4.0 ActiveCaptain Markers & Find
states or provinces associated with it, you will also be prompted to select one. Select the Find
button to look up the information and center the chart at the location found.
If the location cannot be found, there will be an indication of the reason. You can then edit your
request or cancel it.
4.7.2
Find by Marina
Select the name or part of the name of the marina you would like to find. Select the “Starts
with...” checkbox if the marina name must begin with the text entered in the name field.
Capitalization does not matter when looking up a marina name but spacing and special characters
will change the results.
Select the Find button to look up the marina. All of the marinas that match the criteria you
provided will be displayed in a Marinas Found form along with their state/providence and
country location. Below this list are buttons providing a set of commands:
Done
Closes the Marinas Found form.
Go
Closes the form and centers the chart on the marina selected.
Details
Closes the form and opens the Marker Details form on the selected
marina.
ACM/Palm OS User’s Manual
Page 56
4.0 ActiveCaptain Markers & Find
Reviews
4.7.3
Closes the form and opens the Marker Reviews form on the selected
marina.
Find by ICW
Select the ICW type from the popup and then use the slider to select a specific mile marker. The
slider can be dragged into position or tapped on each side of the slider to bump the value up or
down. Only mile markers that are printed on charts are allowed to be selected. For the US NOAA
charts, the mile markers generally change in increments of 5 miles. In addition, some waterways
do not begin at mile marker 0.
The ICW’s currently supported are the official ones designated by NOAA on the US NOAA
charts. They include the Atlantic ICW, Dismal Swamp, Florida West Coast, Gulf (West of
Harvey Locks), Gulf (East of Harvey Locks), Okeechobee Lake Route, and Okeechobee Rim.
ACM/Palm OS User’s Manual
Page 57
5.0
ACM/Palm OS User’s Manual
NOTES & TIPS
Page 58
5.0 Notes & Tips
5.0
NOTES & TIPS
This section contains various notes and tips that will help you make the most out of
ActiveCaptain Mobile.
5.1
Warnings and safety tips
When using ActiveCaptain Mobile, you should consider the following guidelines:
ActiveCaptain Mobile is a navigation aid, not a sole reference. Do not rely solely upon
ActiveCaptain Mobile for any navigational decisions. You should always be prepared for possible
equipment failure or loss of battery power, GPS inaccuracies, etc. Never enter any situation in
which your safety would be endangered without benefit of ActiveCaptain Mobile’s chart display
and navigational data.
Always keep a lookout during navigation. Attention should be paid not only to ActiveCaptain
Mobile’s display, but also to your physical surroundings. Maintain constant observation of your
surroundings, wind and weather conditions, and possible obstructions or dangerous areas.
5.2
External power sources and battery limitations
Before setting out with ActiveCaptain Mobile, you should be aware of possible power limitations,
and be equipped to counteract these limitations.
As you may already know, without an external power source, your device will typically turn off
after a certain period of inactivity, based on your Palm System Settings. These settings are
available by running the Prefs application and selecting Power. The backlight settings should also
be considered for power issues and visibility. Those settings are available in the Power panel too.
In addition to those power settings, ActiveCaptain Mobile has a special power capability to allow
your Palm device to be used as a chartplotter providing a continuous display. If ACM detects that
your Palm device is being powered with an external power adapter and you have a GPS
connection, your Palm device will not turn off while running ACM. Since it is being powered,
there is no danger of losing your battery reserve. If your device is in this state and the power is
removed, five short beeps will be played to warn you. Once power is removed, the Palm display
will power off after the timer set in the Power Prefs panel.
AC power adapters are available for use in cars, on boats, etc. There are many additional
accessories available that will help you to keep your device charged on your boat. Consult the
ActiveCaptain web site’s Going Mobile section. There is a series in that section about using
mobile phones on a boat that provide numerous suggestions.
ACM/Palm OS User’s Manual
Page 59
5.0 Notes & Tips
There is a free utility for Palm devices called “AlwaysOn” that allows you to change the auto-off
timer to larger times or turn it off completely. This utility can be obtained from:
http://www.freewarepalm.com/utilities/alwayson.shtml
CAUTION: Be extremely careful if you choose to disable your device’s auto-off timer. When the
timer is disabled, there is nothing to stop the battery capacity from being drained. If this happens,
the device will protect itself by turning off - you will not be able to turn your device back on until
it has been recharged. This poses an obvious safety risk if you are using ActiveCaptain Mobile on
a trip and you are unable to recharge your device or make phone calls.
5.3
Default key definitions
Within ActiveCaptain Mobile, you can define shortcut keys for the many commands available. If
your Palm device has a physical keyboard, you will often take advantage of these shortcuts. To
access the shortcuts, select the Preferences item from the Actions menu and select the Keys tab
(see 1.7.4).
The Keys Preference form has a button to reset all key definitions back to their default values.
The following are those default key definitions:
Key
Command
c
C
R
w
r
i
e
g
p
Actions > Chart List
Actions > Chart Details
Actions > Region Details
Actions > Waypoint List
Actions > Route List
Actions > Import
Actions > Export
Actions > GPS
Actions > Preferences
d
Down
Up
Right
Left
Ctr (center)
x
b
t
View > Data Boxes
View > Zoom In
View > Zoom Out
View > More Detailed Chart
View > Less Detailed Chart
View > Follow Mode
View > Follow Max Detail
View > Go Back
View > Display Rotation
a
m
n
Markers > Retrieve All
Markers > Retrieve Marinas
Markers > Retrieve Anchorages
ACM/Palm OS User’s Manual
Page 60
5.0 Notes & Tips
l (ell)
v
Space
f
Markers > Retrieve LK
Markers > Remove Markers
Markers > Marker List
Markers > Find
h
Add Wpt Here
5.4
Route creation hints
Here are some hints for creating routes:
® Zoom out until you see an overview chart of the area containing your route area. Start
creating your route in this zoomed out view with large segments. Once you have the major
waypoints entered, end the route, zoom in, and edit the route to avoid obstacles by adding
new waypoints and adjusting their positions. By starting in a zoomed out view, you’ll get the
basic straight lines drawn first to keep your route as small as possible.
® When you’ve finished creating a route, always view the route on the most detailed charts and
zoomed in to closely examine the entire course of travel.
® Always name a route being created. Always name the starting and ending waypoints.
® When you are done editing the route, lock it. This will stop any accidental re-positioning of a
waypoint.
® When you activate a route, use the Data Boxes to help with navigation. The RTE TTG (route
time-to-go) Data Box is especially helpful in answering the question, “When will we get
there?”.
5.5
Measuring distances
It is very common to measure distances and bearings when on a boat. There are two ways to
quickly determine this information:
1. If you just need to measure the distance between your current GPS location and another
point, the easiest way to do that is with Data Boxes. Display the Data Boxes and select the
PEN RNG (pen range) in one box and PEN BRG (pen bearing) in another. Now each time
you tap the pen on the screen, the Data Boxes will show the distance and bearing to the point
you tapped.
2. If you need to measure the distance between two positions or along a path of three or more
points, create a temporary route. When the route is complete, use the Edit Route form (see
2.2.8) and select the Wpts button. That will show you the total length of the route and the
bearings between waypoints. You can easily move the different waypoints of the route to
ACM/Palm OS User’s Manual
Page 61
5.0 Notes & Tips
quickly examine other distances as needed too. Delete the temporary route when you are
done with it.
5.5
Using Data Boxes
Data Boxes provide utility in a variety of common boating situations. Here are some example
configurations for different uses:
Moving without a route
Use: GPS POS (GPS position), AVE SOG (average speed over
ground), and PEN RNG (pen range).
Cruising along a route
Use: RTE TTG (route time-to-go), WPT TTG (waypoint time-to-go),
and AVE SOG (average speed over ground). These will allow you to
see the time remaining for the entire route, the next waypoint, and
your average speed. Some cruisers might like RTE DTG (route
distance-to-go) and WPT RNG (waypoint range) instead. In
addition, RTE XTE (route cross-track error) is an excellent way to
determine how far off course you are.
At anchor
First, set a waypoint at the anchor position when it is first lowered.
Use the “Add Wpt Here” command which defaults to the “h” key.
Then activate that waypoint and display the WPT RNG and WPT
BRG for waypoint range and bearing. Now you can watch your
distance from the point where your anchor was dropped.
5.6
Finding a specific latitude/longitude position
There are times when you want to quickly locate a specific latitude/longitude position. There are
two ways to do this:
1. Display the PEN POS Data Box. This will show the latitude/longitude position every time
you tap the stylus on the chart. Now you can position the chart (zooming out, detail out, etc)
and approach the latitude/longitude you are looking for.
2. Create a new waypoint with the latitude/longitude you would like to locate. Open the
Waypoint List form, select the new waypoint, and select the Locate button. The chart will be
centered on the waypoint. If you pre-position the chart to be near the desired
latitude/longitude before you create the waypoint, the starting waypoint data will be close and
will only require changing a few digits.
5.7
Getting help
This document is your most extensive resource for information on using ActiveCaptain Mobile.
Be sure to read these instructions thoroughly. Other help sources:
ACM/Palm OS User’s Manual
Page 62
5.0 Notes & Tips
Abridged Help
Choose the About item from the Actions menu and select the Help
button. The Help notes provide an overview of basic features and are
useful when you’re using ActiveCaptain Mobile and need a reminder
about a particular function.
Palm
You can obtain general help on your Palm device by visiting the Palm
web site at http://www.palm.com. Look at the Support section and
especially the Knowledge Library and Help Forums.
Technical Support
We want to help you. If you’re having a problem with something that you
can’t figure out, write to us: [email protected]. If you get really
stuck, call us at 207-326-9100.
ACM/Palm OS User’s Manual
Page 63
6.0
ACM/Palm OS User’s Manual
FREQUENTLY ASKED QUESTIONS (FAQ’s)
6.0 Frequently Asked Questions (FAQ’s)
6.0
FREQUENTLY ASKED QUESTIONS (FAQ’S)
This section contains lists of the questions we get asked the most. It’s a good place to start your
search if you have a question about ActiveCaptain Mobile.
6.1
Device questions
Q: Where can I find general help with using my Palm device?
A: Try the Palm web site http://www.palm.com. Look at the Support section and especially the
Knowledge Library and Help Forums.
Q: How should I power my device on my boat?
A: Generally through a 12 volt cigarette lighter type of power supply. You can also recharge your
device at home and run it on its internal battery. In addition, there are many other power supplies
and accessories that can be used. Check out the resources in the Going Mobile section of the
ActiveCaptain web site. You’ll find a series of articles about using mobile phones on boats that
we keep updated about many issues like this.
Q: How will I power my device when using ActiveCaptain Mobile if I do not have access to
power?
A: You can run your device on its internal battery and use a power conservation strategy. Battery
life varies greatly between devices. When running on batteries we recommend that you keep the
unit off unless you are actually looking at a chart or need to get your position with the GPS. Turn
off device radios that you aren’t using (WiFi, Bluetooth, cellular). Such a strategy can work for as
long as 3 days, depending on your device model. External battery and solar power chargers are
also available for most devices.
Q: What type of Palm device do you recommend?
A: ActiveCaptain Mobile will work on any Palm OS device running version 4.1 or later. This
includes all devices sold today and going back to the Palm m515 released in 2002. The device
must also have a memory card for storing region data. There are so many different devices - it’s
impossible to pick just one. We generally suggest devices that are available from the cellular
carrier that you’ll be using. They will come all set up and ready to be connected to the internet
allowing you to take the most advantage of the device and ActiveCaptain Mobile. If you find a
specific device and would like to know if we have any experience with it, write to our support
email address ([email protected]).
The Going Mobile tab of the ActiveCaptain web site has a series of articles describing many
different aspects of using mobile phones on boats. Check out the series in the Resources section.
There is an article about each major type of high-end mobile phone available including one about
Palm OS devices. For more information, refer to those articles.
Q: Do I need to use a stylus?
ACM/Palm OS User’s Manual
Page 65
6.0 Frequently Asked Questions (FAQ’s)
A: No, you can use your finger on the touchscreen. To accurately position waypoints and edit
routes, you will want to use the stylus. When you’re just cruising around on the charts, you’ll
find that your finger is an excellent chart positioning tool.
6.2
Software questions
Q: What is installing software?
A: Installing is the process of copying the ActiveCaptain Mobile Software from your PC to your
device. You install software using HotSync and one of our setup procedures.
Q: How do I download and install the latest version of the software?
A: Go to the ActiveCaptain web site and click on the Going Mobile tab. Get to the product
section for ActiveCaptain Mobile for Palm OS and then to the Downloads page for that section.
That will take you to a page where you can download the latest version of the software.
Q: What do I do if my ActiveCaptain Mobile Software gets accidentally deleted from my
device?
A: Get the latest version from the ActiveCaptain web site and re-install it. It will remember all of
your settings. If the settings have been deleted too, it will prompt you to activate all of your
installed regions prior to using them. Activate regions using network activation or click “My
Account” on the blue band of every web page on the ActiveCaptain web site. That will assist you
with downloading and manually activating the regions you have purchased.
Q: If I reinstall my software, will I also need to reinstall my charts and charts?
A: No, not if your charts and charts are stored on a memory card.
6.3
Region activation questions
Q: What is an Activation Code?
A: An Activation Code is a 9-digit number for each region you have purchased. It uses a Device
ID to securely link a region to your device. The Device ID is also a 9-digit number available in the
About form (Menu > Actions > About) or in the manual region activation form. If you activate
your regions using network activation, you won’t have to enter any of these numbers - it will
automatically be downloaded for you.
Q: How much does ActiveCaptain cost?
A: ActiveCaptain with a single region costs $19.95. Each additional region also costs $19.95. All
14 NOAA regions are bundled together for only $49.95. International regions will have different
prices depending on the country and area of the region.
Q: How do I purchase ActiveCaptain?
A: All of the software and regions can be purchased on the ActiveCaptain web site. Go to the
Going Mobile tab and view information about the products you are interested in. Many pages
ACM/Palm OS User’s Manual
Page 66
6.0 Frequently Asked Questions (FAQ’s)
have a “Buy Now” button to walk you through the buying process. All purchases are done
through PayPal for the ultimate in security and privacy.
Q: Can I use my Activation Codes for more than one device?
A: No. Your Activation Codes are bound to a particular device. You must purchase a separate
Activation Code for each separate device.
Q: What if I upgrade or replace my device?
A: You will need to purchase a new Activation Code. Contact us if this happens within a year of
purchasing the product.
6.4
Technical support questions
Q: How do I get Technical Support?
A: Write to: [email protected]
We absolutely, positively want to help you. We answer all emails as soon as possible - usually
well within a day. If we don’t answer, write again in case the email was lost. We pride ourselves
on being extremely responsive.
Q: Is telephone technical support available?
A: We’d prefer emails because it allows us to keep track of the question and issues. But if you’re
really stuck, call us: 207-326-9100.
ACM/Palm OS User’s Manual
Page 67