1
Manual high hinged columns
6-8-10-12 meter
MEN28.002.R01
The purpose of this manual is to provide the installer / service technician sufficient information to install and
operate the Sapa high hinged column in a responsible manner. Therefore the quality of Sapa lighting columns will
be guaranteed. This user manual provides information about Sapa’s high hinged columns and any accessories. It
is assumed that the installer / service technician has sufficient knowledge and experience to work on building
construction and electrical installations. It is also assumed that the installer / service technician has the basic
knowledge of safety and competence necessary to operate machines and tools required for the operation of the
column.
Attention:
Read this manual before using the hinged column.
* Always wear personal protection equipment, helmet, gloves and safety glasses.
* During operation it is prohibited to stand in the area of the hinged arm.
* The cord of the winch must be moved in free space and should not come into
contact with any sharpen objects.
* When the winch is operated there must be a visual motion of the arm.
If there is not, stop turning and control.
* If visual damage to the cord is detected, raise the column carefully and
contact Sapa.
1
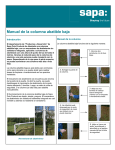
Lowering the column:
Picture 01
Unscrew the 2 bolts from the door.
Picture 02
Remove the door.
Picture 03
Remove the padlock and turn on the safety
pin to the left.
Picture 04
Unscrew the locking bolt using a too
(dimension across flats 24 mm), so it
lays free on the brace.
2
Picture 05
By pulling the pin down the hinge column will
be unlocked.
Picture 06
Install the lifting handle with hexagon
extension piece on the axis of the
winch.
Picture 07
By unscrewing the winch (counter clockwise)
the arm will come out a little.
Picture 08
If the arm does not come out a little
bring the arm just past the dead point
with your hand.
3
Picture.09
Tilt the column by turning the winch to the left.
If the winch is operated there must be a visual
motion of the arm. If it does not, stop turning
and control.
Picture 10
Note: During operation it is prohibited to
stand in the area of the hinged arm.
Picture 11
Keep turning until the column is tilted to the buffer
(at the height of the hinge point). Make sure that
the column is lowered slowly. Stop running at time
so there will be a light tension at the cord.
Depending the column height the angle is variable.
4
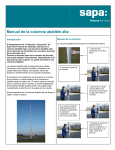
Raising the column:
Picture 12
Turn the winch clockwise to see the column
right. If the winch is operated there must be a
visual motion of the arm. If it does not, stop
turning and control. Note: During operation it
is prohibited to stand in the area of the hinged
arm.
Picture 13
At the end, note the cord isn’t twisted and
goes into the column without any knots.
Picture 14
Turning up the arm. Stop running at time so
there will be a light tension at the cord. Make
sure the cord is properly wound as well and
remove the lifting handle with hexagon
extension piece.
Picture 15
Lock the column by pushing the pin up.
Put the handle of the pin in the “parking
position”.
5
Picture 16
Then tighten the locking bolt with the tool.
(dimension across flats 24 mm)
Picture 17
Turn the handle of the pin to the right, so it
lays on the brace.
Picture 18
Place the padlock, so it blocks the handle.
Picture 19
Re-fit the door.
6
Picture 20
Tighten the 2 bolts to the door.
Sapa Pole Products
Alcoalaan 12, 5151 RW Drunen
Netherlands
Telephone: +31 416 386200
Fax: +31 416 386230
www.sapapoleproducts.com
7