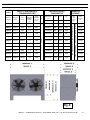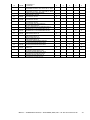
1
NOTEC 100 07-2011/C 06-2006/B ISTRUZIONI PER L’INSTALLAZIONE, USO E MANUTENZIONE INSTRUCTION FOR THE INSTALLATION, USE AND MAINTENANCE INSTALLATIONS, GEBRAUCHS UND WARTUNGSANLEITUNG MODE D’EMPLOI POUR L’INSTALLATION, L’UTILISATION E L’ENTETRIEN IMPIANTO UNIT ANLAGE SYSTEME MISAERM MEP 7 MEP 13 MEP 16 MEP 18 MEP 26 MEP 50 MEP 70 MEN 6 MEN 13 MEN 20 MEN 28 INDICE pag. 2 INDEX pag. 10 INHALT seite 18 SOMMAIRE pag. 26 MISA S.R.L. – VIA MONACHELLE VECCHIA, 7 – 00040 POMEZIA ( ROMA ) ITALY – TEL. 06/91.18.91 FAX 06/91.20.788 -1- INDICE: ELENCO ILLUSTRAZIONI: Fig.1-2 MONTAGGIO EVAPORATORE DIMENSIONE UNITA’ EVAPORANTE ………………………..............................3 Fig.3 - MONTAGGIO UNITA’ CONDENSANTE SULLA CELLA ……………………………………..………....................4 Fig.4 - MONTAGGIO UNITA’ CONDENSANTE A MURO ..……………….………………………............……....................4 Fig.5 - STRUMENTAZIONE QUADRO ELETTRICO .......…………….....……………………………………………………….4 Fig.6 - MONTAGGIO UNITA’ CONDENSANTE INCASTELLATA ………………………..…………………..………...……...5 Fig.7 - DIMENSIONI UNITA’ CONDENSANTE …………………….……………………………………….……….……………39 Fig.8 - DIMENSIONE QUADRO ELETTRICO ……………………………....……………………………………..……………40 Fig.9 - POSIZIONI PARTI DI RICAMBIO MEP 7 -13- 16 MEN 6 -13 .…………………………….……..……………46 Fig.10 –POSIZIONI PARTI DI RICAMBIO MEP 18-26 -50 -70 MEN 20-28 …………………………..……………………49 ELENCO SCHEMI ELETTRICI: SCHEMA ELETTRICO PER MISAERM MONOFASE ……………………………………………………..... 43 SCHEMA ELETTRICO PER MISAERM TRIFASE …………………………………………………...…..44 ELENCO TESTI DI COMMENTO: ISTRUZIONI USO E MANUTENZIONE A) INFORMAZIONI GENERALI ......…….....................................................................................................................6 A.1 PREMESSA .………......................................................................................................................................6 A.2 DESTINAZIONE D’USO E RESTRIZIONI ...............................................................................................6 B) INSTALLAZIONE .....…...........................................................................................................................................6 B.1 DISIMBALLO E MOVIMENTAZIONE DEL PRODOTTO ....………………………...........................................6 B.1.1 IMMAGAZZINAMENTO E TRASPORTO ……….………………......................................................6 B.1.2 INTEGRITA’ DELL’IMBALLO ……………………..……….................…....................................….....6 B.1.3 RIMOZIONE DELL’IMBALLO E MOVIMENTAZIONE .......…...................................................…..6 B.1.4 SMALTIMENTO DELL’IMBALLO ……………..…………………...……...............……………...........6 B.2 MONTAGGIO DELL’UNITA’ SPLIT …………………………………………………………..………...……………6 B.2.1 MONTAGGIO EVAPORATORE ……………………………………..…….……………………6 B.2.2 MONTAGGIO DELL’UNITA’ CONDENSANTE SULLA CELLA ………………………………………6 B.2.3 MONTAGGIO DELL’UNITA’ CONDENSANTE A MURO ………………..……………………………6 B.2.4 MONTAGGIO DELL’UNITA’ CONDENSANTE INCASTELLATA ……….……………………6 B.2.5 MONTAGGIO DEI TUBI PRECARICATI PER IMPIANTI MONOFASE … …..………………7 B.2.6 MONTAGGIO DEI TUBI PRECARICATI PER IMPIANTI TRIFASE …………………….7 B.3 MONTAGGIO DEL QUADRO ELETTRICO ………………………………………………….……...……………7 B.4 COLLEGAMENTO ELETTRICO ………………………………………..……………….……...……………7 C) AVVIAMENTO DELL’IMPIANTO ……..…………………………………………………………………………………7 D) USO DELL’IMPIANTO ………..………………...………………………………………………………………………..7 D.1 DESCRIZIONE E FUNZIONAMENTO DEL QUADRO DI COMANDO ………………………………………..7 D.1.2 SEGNALAZIONE DI ALLARME ………..…..………………………………………………………………….8 D.1.2.1 SEGNALAZIONE DI ALLARME DERIVANTE DA SONDE GUASTE ……………………………8 D.2 IMPOSTAZIONE PARAMETRI STRUMENTO ……..………….…………………….……………………………8 D.3 COPY CARD ………………………………………………………...………………………………………………...8 D.4 NORME PER LA BUONA CONDUZIONE DELL’IMPIANTO …………………………………………………...8 E) MANUTENZIONE …………………………………………………………………………………………………………10 E.1 MANUTENZIONE ORDINARIA ………………….…………….……………………………………………….10 E.2 MANUTENZIONE STRAORDINARIA ……………………………………………………………………………10 F) ANOMALIE DI FUNZIONAMENTO ……………………………………………………………………………… 10 G) SMALTIMENTO RIFIUTI E DISMISSIONE ………………………………………………………………………...10 DATI TECNICI ..............................................................................................................................................…..............38 SCHEMI ELETTRICI ………………………………………………………………………………………………………………….41 PARTI DI RICAMBIO ...............................................................................................................................….................…...45 DICHIARAZIONE DI CONFORMITA’ .....................................................................................................................…..52 MISA S.R.L. – VIA MONACHELLE VECCHIA, 7 – 00040 POMEZIA ( ROMA ) ITALY – TEL. 06/91.18.91 FAX 06/91.20.788 -2- FRIGODIFFUSORE DIMENSIONE B [mm] 18 674 22 674 26 974 Fig. 1 IMPIANTO MEP18 MEP26-50-70 MEN20 MEN28 A [mm] 678 B [mm] 412 C [mm] 298 1.048 782 298 865 597 375 Fig. 2 MISA S.R.L. – VIA MONACHELLE VECCHIA, 7 – 00040 POMEZIA ( ROMA ) ITALY – TEL. 06/91.18.91 FAX 06/91.20.788 -3- Fig. 3 Fig. 4 Fig. 5 MISA S.R.L. – VIA MONACHELLE VECCHIA, 7 – 00040 POMEZIA ( ROMA ) ITALY – TEL. 06/91.18.91 FAX 06/91.20.788 -4- Fig. 6 MISA S.R.L. – VIA MONACHELLE VECCHIA, 7 – 00040 POMEZIA ( ROMA ) ITALY – TEL. 06/91.18.91 FAX 06/91.20.788 -5- A) INFORMAZIONI GENERALI A.1 PREMESSA Il presente manuale ha lo scopo di fornire tutte le informazioni necessarie per effettuare correttamente l’installazione, l’uso e la manutenzione dell’impianto. Esso costituisce parte integrante ed essenziale del prodotto e dovrà essere consegnato all’utilizzatore. Prima di ogni operazione leggere attentamente le istruzioni qui contenute. Il costruttore declina ogni responsabilità per qualsiasi operazione effettuata sull’impianto trascurando le indicazioni qui contenute. A.2 DESTINAZIONE D’USO E RESTRIZIONI L’impianto MISAERM è stato progettato e costruito per essere installato su celle destinate alla refrigerazione e conservazione di prodotti alimentari. Ogni altro utilizzo è da ritenersi improprio e quindi pericoloso. Si raccomanda di proteggere l’apparecchio da un utilizzo improprio che possa costituire un pericolo. Il costruttore declina ogni responsabilità per danni causati a persone o cose derivati da errori di installazione ed uso improprio e comunque da inosservanza delle istruzioni fornite dal costruttore. B.1.3 RIMOZIONE DELL’IMBALLO MOVIMENTAZIONE E L’imballo dell’impianto è predisposto per essere movimentato tramite un carrello a forche. Al fine di non graffiare le lamiere si consiglia di movimentare l’impianto tramite il suo pallet fino in prossimità della zona di installazione. Per rimuovere l’imballo svitare le viti poste nella parte inferiore e sollevare lo stesso. B.1.4 SMALTIMENTO DELL’IMBALLO Lo smaltimento degli imballi deve essere fatto in conformità alle norme vigenti nel paese di utilizzo del prodotto. I componenti in materiale plastico soggetti ad eventuale smaltimento con riciclaggio sono contrassegnati nei seguenti modi: polietilene: sacchetto istruzioni PE polistirolo espanso: protezioni PS cartone pressato: protezioni B) INSTALLAZIONE Per assicurare un corretto funzionamento del prodotto ed il mantenimento delle condizioni di sicurezza durante l’utilizzo seguire scrupolosamente le istruzioni riportate di seguito in questo paragrafo. L’installazione dell’impianto deve essere realizzata in conformità alle norme vigenti inerenti la progettazione, l’installazione e la manutenzione degli impianti frigoriferi e deve essere eseguita da personale professionalmente qualificato secondo le istruzioni del costruttore. L’impianto elettrico di alimentazione delle unità dovrà essere realizzato secondo le norme CEI e nel rispetto delle Leggi n. 186/68 e n. 46/90. Un’errata installazione può causare danni a persone o cose, nei confronti dei quali il costruttore non può essere considerato responsabile. ATTENZIONE: Non avviare l’impianto fintanto non sia stato collegato l’ impianto di messa a terra. B.1 DISIMBALLO E MOVIMENTAZIONE DEL PRODOTTO B.1.1 IMMAGAZZINAMENTO E TRASPORTO Immagazzinare la macchina all’asciutto ed al riparo dalle intemperie nell’imballo originale. La temperatura di immagazzinamento deve essere compresa tra –20 °C e 60°C. Durante il trasporto utilizzare l’imballo originale ed evitare scosse ed urti. B.1.2 INTEGRITÀ DELL’IMBALLO Prima di procedere al disimballo del prodotto verificare l’integrità dello stesso e delle eventuali protezioni. Eventuali danni devono essere tempestivamente segnalati al vettore. In nessun caso comunque alcun apparecchio danneggiato potrà essere reso al costruttore senza preavviso e senza averne ottenuta preventiva autorizzazione scritta. PC B.2 MONTAGGIO DELL’UNITA’ SPLIT B.2.1 MONTAGGIO EVAPORATORE Impianti monofase: Smontare il carter in plastica. Tracciare sul soffitto N°4 fori di fissaggio Ǿ3,5 e bloccare l’evaporatore con le viti Ǿ4,2 x 13 come indicato in FIG. 1. Impianti trifase: Smontare i carter laterali dell’evaporatore. Eseguire sul soffitto della cella N°4 fori Ǿ12 rispettando le quote indicate per consentire la sostituzione delle resistenze di sbrinamento in caso di guasti. Montare l’evaporatore per mezzo delle barre filettate, piastre, dadi e rondelle in dotazione. B.2.2 MONTAGGIO DELL’UNITA’ CONDENSANTE SULLA CELLA Montare la staffa angolare con N°9 rivetti ø 4 x 9,5 come indicato nella FIG.3. Agganciare l’unità condensante interponendo la guarnizione adesiva 3 x 10 fra l’unità stessa e la cella. B.2.3 MONTAGGIO DELL’UNITA’ CONDENSANTE A MURO Montare la staffa a muro tramite N° 4 tasselli M6 x 50 come indicato nella FIG.4. Agganciare l’unità condensante interponendo la guarnizione adesiva 3 x 10 fra l’unità stessa e il muro. B.2.4 MONTAGGIO DELL’UNITA’ CONDENSANTE INCASTELLATA Eseguire le seguenti operazioni come indicato in FIG.6: 1.) Eseguire l’assieme piede-montante con le N°6 viti e dadi M8 in dotazione 2.) Posizionare la prima unità condensante e bloccarla con le viti M8 in dotazione 3.) Posizionare i N°2 distanziali in legno agli angoli dell’unità già montata e appoggiare la seconda unità. I N°6 fori di MISA S.R.L. – VIA MONACHELLE VECCHIA, 7 – 00040 POMEZIA ( ROMA ) ITALY – TEL. 06/91.18.91 FAX 06/91.20.788 -6- fissaggio coincideranno adesso perfettamente e si potrà bloccare l’unità con le viti M8. Rimuovere i due distanziali e ripetere l’operazione nel caso di incastellatura di una terza unità. 4.) A questo punto bloccare a terra l’assieme creato usufruendo dei N°4 fori presenti sui piedi dopo aver preparato un’area d’appoggio perfettamente livellata. 5.) In caso di incastellature promiscue di unità condensanti trifase e monofase, avvalersi per le monofase dei distanziali in alluminio e delle viti più lunghe fornite allo scopo (set fornito in opzione dalla Misa). B.2.5 MONTAGGIO PRECARICATI PER MONOFASE DEI TUBI IMPIANTI ATTENZIONE: L’ATTACCO RAPIDO FEMMINA ED IL MASCHIO CORRISPONDENTE DEVONO ESSERE PERFETTAMENTE ALLINEATI PRIMA DI INIZIARE IL SERRAGGIO, IN MODO DA EVITARE DI ROVINARE LA FILETTATURA. IL SERRAGGIO DELL’ATTACCO RAPIDO FEMMINA NEL MASCHIO DEVE AVVENIRE IN MODO RAPIDO E COMPLETO AFFINCHE’ LE GUARNIZIONI CREINO LA GIUSTA TENUTA. UN SERRAGGIO PARZIALE DELL’ATTACCO PUO’ CAUSARE LA PERDITA DEL GAS DELL’IMPIANTO. Eseguire sulla cella un foro diametro 50 mm nella posizione più opportuna per l’uscita dei tubi (gas e liquido) e dei cavi elettrici dell’evaporatore. Avvitare i tubi sui relativi attacchi rapidi lato evaporatore e lato unità condensante, avendo cura di non invertire il tubo del liquido ed il tubo del gas caldo. Sagomare i tubi lungo il loro percorso avendo cura di piegarli con un raggio adeguato ed evitare strozzature che pregiudichino il buon funzionamento dell’impianto B.2.6 MONTAGGIO DEI TUBI PRECARICATI PER IMPIANTI TRIFASE Eseguire sulla cella un foro diametro 50 mm nella posizione più opportuna per l’uscita dei tubi (gas e liquido) e dei cavi elettrici dell’evaporatore. Montare sui rubinetti dell’unità condensante i raccordi in dotazione, eseguire le N°4 saldature, realizzare il vuoto lato tubazioni ed evaporatore attraverso le valvole a spillo ¼” dei rubinetti. B.3 MONTAGGIO ELETTRICO DEL QUADRO Montare il quadro elettrico sulla parete cella mediante le quattro viti in dotazione. Una volta serrate le viti applicare i N°4 tappi nell’apposita sede della vite al fine di garantire il grado di protezione IP65. Eseguire le connessioni elettriche collegando il cavo delle sonde ed il cavo a 7 poli dell’evaporatore, il cavo proveniente dall’unità condensante ed il cavo di alimentazione. B.4 COLLEGAMENTO ELETTRICO L’alimentazione deve essere eseguita con un cavo di sezione 3 x 2,5 mm attraverso interruttore magnetotermico con apertura dei contatti minimo 3 mm, oppure spina polarizzata; in entrambi i casi l’ubicazione del dispositivo di sezionamento deve essere in posizione visibile. ATTENZIONE: La sicurezza elettrica dell’apparecchio è assicurata soltanto quando lo stesso è correttamente collegato ad un efficace impianto di messa a terra, eseguito come previsto dalle vigenti norme di sicurezza. Verificare che la tensione di linea corrisponda alla tensione indicata sulla targa matricola. La tolleranza consentita è di +/10% del valore nominale. Le operazioni di installazione devono essere effettuate esclusivamente da personale qualificato in conformità alle normative vigenti. C) AVVIAMENTO DELL’IMPIANTO Dare tensione agendo sull’interruttore compressore di FIG.5. Impostare la temperatura di esercizio della cella, qualora si voglia variare quella già impostata. Per visualizzare il set point premere e rilasciare il tasto “set”. Apparirà il label “set”; premere nuovamente il tasto set per visualizzare il valore impostato. Per variare il valore del set-point agire, entro 15 secondi, sui tasti e . ATTENZIONE: Nel caso di impianti di refrigerazione in bassa temperatura si raccomanda di portare la cella alla temperatura di funzionamento gradualmente in modo da non creare eccessive pressioni che potrebbero danneggiare la cella. D) USO DELL’IMPIANTO ATTENZIONE: Tutti gli impianti MISAERM sono progettati in modo tale che l’utilizzatore può accedere a tutte le funzioni senza intervenire in nessun modo all’interno dell’impianto. Il costruttore declina ogni responsabilità da danni recati a cose o persone dovuti a interventi di personale non specializzato all’interno dell’impianto. L’utilizzatore nell’espletare le funzioni di monitoraggio e variazioni dei parametri di funzionamento deve agire esclusivamente sulla strumentazione esterna del quadro di comando rappresentato in FIG.5. D.1 DESCRIZIONE E FUNZIONAMENTO DEL QUADRO DI COMANDO Le funzioni del quadro di comando a bordo cella rappresentato in FIG. 5 sono: - Interruttore generale L’accensione viene segnalata dal pulsante luminoso verde. - Tasto SET Tenuto premuto per 5 secondi si accede alla programmazione dello strumento. - Tasto UP Tasto per l’incremento dei valori impostabili. - Tasto DOWN Tasto per il decremento dei valori impostabili. - Tasto LUCE CELLA L’accensione è segnalata dalla luce incorporata. - Tasto ESC (uscita) Tasto di uscita dal menù. Tenuto premuto per 2 secondi provoca uno sbrinamento supplementare. - Tasto ON / OFF Tasto per accendere o spengere lo strumento. In modalità OFF tutte le funzioni dell’impianto sono disabilitate tranne il tasto luce cella MISA S.R.L. – VIA MONACHELLE VECCHIA, 7 – 00040 POMEZIA ( ROMA ) ITALY – TEL. 06/91.18.91 FAX 06/91.20.788 -7- - Led di segnalazione: Sulla parte superiore del display sono presenti i seguenti led con i simboli e il significato sotto riportato: Compressore o Relé 1: ON per compressore acceso; lampeggiante per ritardo, protezione o attivazione bloccata. Sbrinamento: ON per sbrinamento in corso; lampeggiante per attivazione manuale. Allarme: ON per allarme attivo; lampeggiante per allarme tacitato. Ventole: ON per ventola in funzione. IMPORTANTE: Lo strumento elettronico di controllo viene programmato direttamente dal costruttore secondo i parametri ottimali di funzionamento; si consiglia pertanto di non modificare tali parametri senza aver preventivamente consultato i Nostri Uffici al fine di non provocare una diminuzione delle prestazioni dell’impianto e dei malfunzionamenti. Per accedere ai parametri di funzionamento dello strumento da parte di personale specializzato avvalersi delle istruzioni allegate al quadro elettrico. D.1.2 SEGNALAZIONE DI ALLARME Lo strumento prevede la possibilità di impostare e segnalare sul display alcune condizioni di allarme. D.1.2.1 SEGNALAZIONE DI ALLARME DERIVANTE DA SONDE GUASTE numero di aperture della porta e di non concentrarle nel tempo. 2 - Movimento merce giornaliero Non superiore a 30/35 kg per metro cubo di cella al giorno. 3 - Porta a strisce Sulle celle a bassa temperatura è sempre consigliabile l’installazione di una porta a strisce che eviti eccessiva immissione di aria esterna. E’ indispensabile nel caso di aperture di porta frequenti. 4 - Limiti di carico La merce stivata in cella non deve superare il limite inferiore del frigodiffusore. 5 - Condizioni ambientale: Verificare che l’impianto non sia esposto direttamente ai raggi solari. Verificare che la temperatura ambiente, in prossimità dell’unità condensante non superi 43°C e non sia inferiore a 3°C. 6 - Celle a bassa temperatura ATTENZIONE: è indispensabile montare una valvola di compensazione 7 - Quadro elettrico bordo cella (FIG.4): ATTENZIONE: Evitare getti d’acqua diretti sul quadro elettrico quando lo sportello non è perfettamente chiuso: solo a sportello chiuso è garantito il grado di protezione IP65. Vengono direttamente evidenziate sul display dello strumento: E1 – Sonda cella guasta E2 – Sonda sbrinamento guasta La sostituzione della sonda guasta dovrà essere effettuata da personale tecnico specializzato nel più breve tempo possibile. D.2 IMPOSTAZIONE PARAMETRI STRUMENTO Lo strumento è programmato con i valori indicati nella tabella che segue. Per interventi di personale specializzato volti a variare i parametri di funzionamento, si rimanda alla consultazione del foglio tecnico allegato al seguente libretto. D.3 COPY CARD La Copy Card è una scheda opzionale che si collega direttamente allo strumento tramite l’uscita seriale TTL. Accedendo tramite tastiera ai parametri della cartella FPr sarà possibile registrare nella Copy Card il settaggio dei parametri dello strumento ovvero scaricare dalla Copy Card le informazioni in un altro strumento. Nella cartella FPr infatti sono contenute due operazioni: 1. UPLOAD (UL): inserimento parametri di programmazione (da strumento a Copy Card) 2. DOWNLOAD (DL): inserimento parametri di programmazione (da Copy Card a strumento) Sul display comparirà “Y” se l’operazione è andata a buon fine oppure “n” in caso contrario. D.4 NORME PER LA BUONA CONDUZIONE DELL’IMPIANTO Gli impianti MS sono progettati per la conservazione di merci fresche (0/+8°C) o surgelati (-18/-25°C) pertanto occorre attenersi alle seguenti prescrizioni: 1 – Aperture porte Programmare i movimenti merce in modo da ridurre il MISA S.R.L. – VIA MONACHELLE VECCHIA, 7 – 00040 POMEZIA ( ROMA ) ITALY – TEL. 06/91.18.91 FAX 06/91.20.788 -8- STRUMENTO ELIWELL / VALORI IMPOSTATI Set diF HSE LSE OSP Cit CAt CP Ont OFt dOn dOF dbi OdO dtY dit dCt dEF dOH dEt dPO dSt FSt Fad Fdt dt dFd FAn FCO Fod FdC Fon FoF Att Afd HAL LAL PAO dAO AL OAO tdO tAO dAt EAL AOP dSd OFL Lit dOd dAd dEA Add FAA LOC PA1 diS ndt CA1 CA2 IWC 750 LX Descrizione/ description Set point di regolazione Differenziale di intervento Massimo valore impostabile set point Minimo valore impostabile set point Offset sul set point Tempo minimo attivazione uscita compressore Tempo massimo attivazione uscita compressore Tempo ON compressore in caso di sonda regolazione guasta Tempo OFF compressore in caso di sonda regolazione guasta Ritardo attivazione uscita compressore dalla chiamata Ritardo attivazione uscita compressore dallo spegnimento Ritardo tra due accensioni consecutive compressore Ritardo attivazione uscite all'accensione Tipo di sbrinamento Intervallo tra gli sbrinamenti Modo conteggio intervallo sbrinamento Ritardo attivazione ciclo di sbrinamento dalla chiamata Time out sbrinamento Sbrinamento all’accensione Temperatura di fine sbrinamento Temperatura blocco ventole evaporatore Differenziale di intervento ventole evaporatore Tempo ritardo ventole evaporatore dopo ciclo di sbrinamento Tempo di sgocciolamento Esclusione ventole evaporatore durante lo sbrinamento Stato ventole evaporatore attive in caso di fermo compressore Stato ventole evaporatore in caso di porta aperta Ritardo spegnimento ventole evap. dopo la disattivazione del compres Tempo di On ventole evaporatore in modalità regolatore ciclico Tempo di Off ventole evaporatore in modalità regolatore ciclico Modalità parametro HAL e LAL Differenziale di intervento allarme Soglia allarme di massima Soglia allarme di minima Esclusione allarmi all’accensione Tempo esclusione allarmi di temperatura dopo un ciclo di sbrinamento Tempo esclusione allarmi di alta e bassa temperatura dopo la chiusura Tempo esclusione allarme di porta aperta Tempo di ritardo segnalazione allarmi di temperatura Segnalazione allarme di defrost terminato per time out Allarme esterno blocca i regolatori Polarità uscita allarme Abilitazione relè luce da micro porta Abilitazione spegnimento luce cella da tasto durante il ritardo impostato Abilitazione spegnimento utenze su attivazione del micro Ritardo attivazione ingressi digitali Indirizzo dispositivo Indirizzo famiglia Abilitazione blocco tastiera Valore Password Visualizzazione con punto decimale Calibrazione sonda cella Calibrazione sonda evaporatore ‐ MEP 0 3 10 ‐2 0 0 0 0 0 0 0 2 0 0 6 1 0 30 n 12 25 2 4 2 Y n n 0 0 0 0 2 50 ‐50 4 180 1 10 30 n n 1 Y Y Y 0 0 0 n 0 n 0 0 MEN ‐21 3 ‐10 ‐21 0 0 0 0 0 0 0 2 0 0 4 1 0 30 n 12 10 2 4 2 y n n 0 0 0 0 2 50 ‐50 4 180 1 10 30 n n 1 y y y 0 0 0 n 0 n 0 0 MISA S.R.L. – VIA MONACHELLE VECCHIA, 7 – 00040 POMEZIA ( ROMA ) ITALY – TEL. 06/91.18.91 FAX 06/91.20.788 -9- CnF ddL dro H06 H11 H21 H22 H23 H24 H25 H26 H31 H32 H33 H34 H42 Blocco risorse alla fine dello sbrinamento Selezione °C / °F Tasto o ingresso digitale ausiliario/ luce attivi a strumento in Off Configurabilità e polarità ingresso digitale Configurabilità uscita digitale 1 (A) Configurabilità uscita digitale 2 (B) Configurabilità uscita digitale 3 (C) Configurabilità uscita digitale 4 (D) Configurabilità uscita digitale 5 (E) Configurabilità uscita digitale 6 (Buzzer) Configurabilità tasto UP Configurabilità tasto DOWN Configurabilità tasto ESC Configurabilità tasto Free Presenza sonda evaporatore E) MANUTENZIONE E.1 MANUTENZIONE ORDINARIA ATTENZIONE: L’utente non deve per nessun motivo aprire l’impianto MISAERM. Il costruttore declina ogni responsabilità per danni a cose o persone e per malfunzionamenti causati da interventi effettuati da personale non specializzato. Si raccomanda per il buon funzionamento dell’impianto di pulire ogni 2 o 3 mesi le alette del condensatore; ad impianto fermo questa operazione può effettuarsi con un getto di aria compressa o con una spazzola a setole lunghe senza aprire in alcun modo l’impianto MISAERM. Assicurarsi, nel caso in cui l’impianto MISAERM sia installato in un ambiente chiuso, che sia sempre garantito un opportuno ricambio d’aria. In caso di guasto della lampada, sostituirla con una di pari potenza togliendo prima tensione all’impianto. E.2 MANUTENZIONE STRAORDINARIA ATTENZIONE: Tutte le operazioni di manutenzione straordinaria devono essere effettuate da personale qualificato secondo le modalità descritte in questo libretto di istruzioni. IMPORTANTE: Prima di qualsiasi operazione di manutenzione o pulizia, togliere tensione alla macchina. In caso di danneggiamento del cavo di alimentazione sugli apparecchi monofasi, sostituire con un cavo con terminali faston 6.3 mm più coprifaston e terminale a occhiello sul cavo conduttore di terra. F) ANOMALIE DI FUNZIONAMENTO 1 - Blocco del compressore Si denota con un innalzamento anormale della temperatura della cella. Il compressore è dotato di un dispositivo di sicurezza che ne arresta la marcia quando si verificano condizioni di pericolo come le seguenti: - Cattivo funzionamento del ventilatore del condensatore - Condensatore sporco (vedi punto E.1) - Sbalzi di tensione elevati nella rete di alimentazione - Temperatura ambiente eccessiva (insufficiente ricambio di aria) Si ricorda che dopo l’arresto il compressore riparte automaticamente ma è opportuno rimuovere la causa che ne 0 0 Y 3 1 2 3 4 5 4 1 0 1 2 Y 0 0 y 3 1 2 3 4 5 4 1 0 1 2 y ha provocato l’arresto. Far intervenire un tecnico se l’inconveniente persiste. 2 – Formazione di ghiaccio sull’evaporatore Possibili cause possono essere: - Errata impostazione del termostato (per MS positivi) - Troppo frequenti aperture della porta della cella (vedi punto D.4) - Introduzione di derrate a temperatura superiore a quella prevista (non superiore a 20°C per celle positive, non superiore a –14°C per celle a bassa temperatura). ATTENZIONE: Durante la fase di sbrinamento si verifica un rialzo della temperatura. Ciò è previsto per permettere all’evaporatore di liberarsi da formazioni di brina o ghiaccio. Lo sbrinamento è segnalato dall’accensione del Led dello strumento elettronico. G) SMALTIMENTO RIFIUTI E DISMISSIONE Alla fine del ciclo di vita dell’impianto, evitare che il gas refrigerante R404A e l’olio POE vengano dispersi nell’ambiente. ATTENZIONE: Le operazioni di smontaggio devono comunque essere eseguite da personale qualificato. Smontare l’impianto raggruppando i componenti secondo la loro natura chimica. E’ ammesso uno stoccaggio provvisorio dei rifiuti speciali in attesa di uno smaltimento mediante trattamento e/o stoccaggio definitivo. Vanno comunque osservate le leggi vigenti nel paese dell’utilizzatore in materia di tutela dell’ambiente. Nei vari paesi sono in vigore legislazioni differenti, pertanto si devono osservare le prescrizioni imposte dalle leggi e dagli enti preposti dai Paesi dove avviene la demolizione. MISA S.R.L. – VIA MONACHELLE VECCHIA, 7 – 00040 POMEZIA ( ROMA ) ITALY – TEL. 06/91.18.91 FAX 06/91.20.788 - 10 - CONTENTS: LIST OF FIGURES: Fig. 1-2 ASSEMBLY OF EVAPORATOR, DIMENSIONS OF EVAPORATING UNIT ………………........................................12 Fig. 3 - ASSEMBLY OF CONDENSING UNIT ON CELL ………………………………………………..………..................13 Fig. 4 - ASSEMBLY OF CONDENSING UNIT ON WALL ..……………….………………………............……..................13 Fig. 5 - SWITCHBOARD INSTRUMENTS .......…………….....……………………………………………………13 Fig. 6 - ASSEMBLY OF CONDENSING UNIT ON FRAMEWORK ………………………..…………………..………...…….14 Fig. 7 - DIMENSIONS OF CONDENSING UNIT …………………….……………………………………….……….……………39 Fig. 8 - DIMENSION OF SWITCHBOARD ……………………………....……………………………………..……………40 Fig. 9 - POSITIONS OF SPARE PARTS MEP 7-13-16 MEN 6-13 ...............……………………………..……………46 Fig 10 – POSITION OF SPARE PARTS MEP 18-26-50-70 MEN 20-28 ……………………………………………………49 LIST OF WIRING DIAGRAMS: WIRING DIAGRAMS FOR SINGLE-PHASE MISAERM ………………………………………………………………………....43 WIRING DIAGRAMS FOR THREE-PHASE MISAERM …………………………………………………………………...…..44 LIST OF COMMENT TEXTS: INSTRUCTIONS FOR USE AND MAINTENANCE A) GENERAL INFORMATION ......…….....................................................................................................................15 A.1 INTRODUCTION .……….................................................................................................................................15 A.2 SCOPE AND RESTRICTIONS ...............................................................................................15 B) INSTALLATION .....…...........................................................................................................................................15 B.1 PRODUCT UNPACKING AND HANDLING ....………………………...........................................15 B.1.1 STORAGE AND TRANSPORT ……….………………......................................................15 B.1.2 PACKAGE INTEGRITY ……………………..……….................…....................................….....15 B.1.3 PACKAGE REMOVAL AND HANDLING .......…...................................................…..15 B.1.4 PACKAGE DISPOSAL ……………..…………………...……...............……………...........15 B.2 ASSEMBLY OF THE SPLIT UNIT ……………………………………………………..………...……………15 B.2.1 ASSEMBLY OF EVAPORATOR ……………………………………..…….……………………15 B.2.2 ASSEMBLY OF CONDENSING UNIT ON CELL ………………………………………15 B.2.3 ASSEMBLY OF CONDENSING UNIT ON WALL ………………..……………………………15 B.2.4 ASSEMBLY OF CONDENSING UNIT FRAMEWORK .................….…………………15 B.2.5 INSTALLATION OF PRE-CHARGED PIPES FOR SINGLE-PHASE SYSTEM .……..…………………..16 B.2.6 INSTALLATION OF PRE-CHARGED PIPES FOR THREE-PHASE SYSTEM ………………………… 16 B.3 ASSEMBLY OF SWITCHBOARD ………………………………………………….……...……………16 B.4 ELECTRIC CONNECTION ………………………………………..……………….……...……………16 C) SYSTEM STARTUP ……..………………………………………………………………………………16 D) SYSTEM USE ………..………………...…………………….………………………………………………..16 D.1 DESCRIPTION AND OPERATION OF CONTROL BOARD ……………………………………..16 D.1.2 ALARM SIGNALS ………..…………………………………………………….17 D.1.2.1 ALARM SIGNALS ORIGINATED FROM FAULTY PROBES ……………………………17 D.2 SETTING OF INSTRUMENT PARAMETERS ……..………….…………………….……………………………17 D.3 COPY CARD ………………………………………………………...………………………………………………...17 D.4 RULES FOR PROPER SYSTEM OPERATION …………………………………………………...17 E) MAINTENANCE …………………………………………………………………………………………………………19 E.1 ROUTINE MAINTENANCE ………………….……….……………………………………………19 E.2 EXTRAORDINARY MAINTENANCE ……………………………………………………………………………19 F) FUNCTIONING FAULTS ………………………………………………………………………………………19 G) DISMANTLING AND DISPOSAL ………………………………………………………………………....…19 TECHNICAL DATA ............................................................................................................................................…..............38 WIRING DIAGRAMS ………………………………………………………………………………………………………………….41 SPARE PARTS ...............................................................................................................................….................…...45 CONFORMITY STATEMENT .....................................................................................................................…..52 MISA S.R.L. – VIA MONACHELLE VECCHIA, 7 – 00040 POMEZIA ( ROMA ) ITALY – TEL. 06/91.18.91 FAX 06/91.20.788 - 11 - EVAPORATOR DIMENSION B [mm] 18 674 22 674 26 974 Fig. 1 PLANT MEP18 MEP26-50-70 MEN20 MEN28 A [mm] 678 B [mm] 412 C [mm] 298 1.048 782 298 865 597 375 Fig. 2 MISA S.R.L. – VIA MONACHELLE VECCHIA, 7 – 00040 POMEZIA ( ROMA ) ITALY – TEL. 06/91.18.91 FAX 06/91.20.788 - 12 - Fig. 3 Fig. 4 Fig. 5 MISA S.R.L. – VIA MONACHELLE VECCHIA, 7 – 00040 POMEZIA ( ROMA ) ITALY – TEL. 06/91.18.91 FAX 06/91.20.788 - 13 - Fig. 6 MISA S.R.L. – VIA MONACHELLE VECCHIA, 7 – 00040 POMEZIA ( ROMA ) ITALY – TEL. 06/91.18.91 FAX 06/91.20.788 - 14 - A) GENERAL INFORMATION A.1 INTRODUCTION This manual has the objective of supplying all necessary information to correctly effectuate the installation, use and maintenance of the unit. It constitutes an integral and essential part of the product and must be handed to the user. Before starting any operation, carefully read the contained instructions herewith. The manufacturer declines any responsibility for any operation effectuated on the unit disregarding the instructions contained herewith. A.2 DESTINATION OF USE AND RESTRICTIONS The MS unit has been designed and constructed to be installed in refrigeration cells destined for the refrigeration and conservation of food products. Any other use is to be considered improper and therefore dangerous. It is recommended to protect the unit from improper use that could constitute a danger. The manufacturer declines any responsibility for damage caused to persons or things deriving from installation errors, use and the lack of observance of the instructions supplied by the manufacturer. The packing of the MS is predisposed to be moved by a fork lift truck. With the scope of not scratching the sheet metal it is recommended to move the unit on its own pallet until the unit is in proximity to the installation zone. Unscrew the lower part and lift up in order to remove the packing. ATTENTION: On the upper wall of the unit in proximity to the fan is a buttonhole for lifting and positioning the unit in the compartment predisposed on the refrigeration cell. B.1.4 DISPOSAL OF THE PACKING The disposal of the packing materials must be done in conformity with the norms in force in the country of utilisation of the product. The components in plastic material subject to eventual disposal by recycling are marked in the following way: Polyethylene: polybag PE Expanded polysterol: protections PS A.3 TESTING Our products have been designed and optimised by laboratory tests with the objective of obtaining high performance and an end-of-line test, the report of which is attached. B) INSTALLATION To ensure the correct functioning of the product and the maintaining of safety conditions during use, scrupulously follow the instructions described in the following paragraph. The installation of the unit must be realised in conformity with the norms in force regarding the design, installation and maintenance of refrigeration installations and must be carried out by professionally qualified personnel according to the instructions of the manufacturer. The electrical feed installation of the units must be realised according to the CEI norms and in respect of the laws nr: 186/68 and nr. 46/90. An incorrect installation can cause damage to persons or things for which the manufacturer cannot be held responsible. ATTENTION: Do not switch on the unit until it has been earthed. B.1 UNPACKING AND MOVEMENT OF THE PRODUCT B.1.1 STORAGE AND TRANSPORTATION Pressed cardboard: protections PC B.2 ASSEMBLY OF SPLIT UNIT B.2.1 ASSEMBLY OF EVAPORATOR Single-phase systems: Remove the plastic protection guard. Drill 4 anchoring holes Ǿ 3.5 on the ceiling and anchor the evaporator with the screws Ǿ 4.2 x 13, as shown in FIG. 1. Three-phase systems: Remove the side protection guards of the evaporator. Drill 4 holes Ǿ 12 on the cold store ceiling according to the dimensions shown to allow the replacement of defrosting resistances in case of faults. Install the evaporator through the threaded bars, plates, nuts, and washers provided. B.2.2 ASSEMBLY UNIT ON CELL CONDENSING Install the angle bracket with 9 rivets Ø 4 x 9.5, as shown in FIG. 2. Place a self-stick gasket 3 x 10 between the condensing unit and the cell, and connect the condensing unit. B.2.3 ASSEMBLY UNIT ON WALL Store the unit in its original packing in a dry place and undercover from the weather. The storage temperature must be between -20°C and 60°C. During transportation, utilise the original packing and avoid shocks and knocks. OF OF CONDENSING Install the bracket on the wall through 4 M6x50 anchors, as shown in FIG. 3. Place a self-stick 3x10 gasket between the condensing unit and the wall, and connect the condensing unit. B.1.2 INTEGRITY OF THE PACKING B.2.4 ASSEMBLY CONDENSING UNIT B.1.3 REMOVAL MOVEMENT Perform the following operations, as shown in FIG. 5: 1.) Assemble the foot-upright unit with the 6 M8 screws and nuts provided with the unit; 2.) Position the first condensing unit and lock it with the M8 screws provided with the unit; 3.) Position the 2 wooden spacers on the corners of the unit already installed and rest the second unit. The 6 anchoring holes should now perfectly coincide and it is Before proceeding with the unpacking of the product, check the integrity of the cartons and any protection. Any damage must be quickly advised to the transporters’. In no case can any damaged equipment be returned to the manufacturer without prior warning and without having obtained prior written authorisation. OF THE PACKING AND OF MOUNTED MISA S.R.L. – VIA MONACHELLE VECCHIA, 7 – 00040 POMEZIA ( ROMA ) ITALY – TEL. 06/91.18.91 FAX 06/91.20.788 - 15 - possible to lock the unit with the M8 screws. Remove the two spacers and repeat the operation in the case a third unit is mounted. 4.) At this point, fix the assembly just created on the ground with the 4 holes on the feet, after a perfectly leveled support area has been prepared. 5.) In the case of promiscuous mounting of three-phase and single-phase condensing units: for single-phase units, use the aluminum spacers and longer screws specifically supplied with the unit (set supplied as an option by Misa). B.2.5 INSTALLATION OF PRE-CHARGED PIPES FOR SINGLE-PHASE SYSTEMS NOTICE: THE FEMALE QUICK CONNECTOR AND CORRESPONDING MALE CONNECTOR MUST BE PERFECTLY ALIGNED BEFORE STARTING TIGHTENING, IN ORDER TO AVOID DAMAGING THE THREAD. TIGHTENING OF THE FEMALE QUICK CONNECTOR IN THE MALE CONNECTOR MUST BE DONE QUICKLY AND COMPLETELY, SO THAT GASKETS CREATE THE RIGHT SEALING. PARTIAL TIGHTENING OF THE CONNECTOR CAN CAUSE GAS LEAKAGE FROM THE SYSTEM Drill one hole diameter 50 mm on the cold store in the most appropriate position for pipes (gas and liquid) and electric cables to come out of the evaporator. Screw the pipes on the corresponding quick connectors on evaporator side and condensing unit side, and make sure that the fluid pipe and hot gas pipe are not inverted. Shape the pipes along their route and make sure they are bent with an appropriate radius, and avoid chokes, which may affect proper system operation. B.2.6 INSTALLATION OF PRE-CHARGED PIPES FOR THREE-PHASE SYSTEMS Drill one hole diameter 50 mm on the cold store in the most appropriate position for pipes (gas and liquid) and electric cables to come out of the evaporator. Install the fittings provided on the taps of the condensing unit; perform the 4 welds; create the vacuum on the pipe side and evaporator through the needle valves ¼” of taps. B.3 INSTALLATION OF THE ELECTRIC PANEL Install the electric panel on the cold store wall through the four screws provided. After the screws have been tightened, apply the 4 plugs in the specific screw housing to ensure the IP65 protection degree. Perform the electric connections by connecting the cable of probes and the seven-core cable of the evaporator, the cable coming from the condensing unit, and supply cable. B.4 ELECTRIC CONNECTION Power supply shall be operated with a 3 x 2.5 section cable through a magnetothermic switch with minimum 3 mm opening of contacts, or polarized plug; in both cases, the sectioning device must be in a visible location. NOTICE: Electric safety of the system is only ensured when the system is properly connected with an effective grounding system installed in accordance with current safety standards. Check that the line voltage corresponds to the voltage indicated on the nameplate. The maximum allowance is +/10% of rated value. Installation operations shall only be performed by qualified staff in accordance with current laws and standards. C) SYSTEM STARTUP Energize the system by acting on the compressor switch shown in FIG. 4. Set the operating temperature of the refrigeration cell as desired. To visualise the set point, press and release the “set” key. The label “set” appears; press the “set” key again to visualise the value set. To change the value of the set point, act on the up and down arrow keys within 15 seconds. ATTENTION: In the case of low-temperature refrigeration installations, it is recommended to bring the refrigeration cell to the operating temperature gradually so as not to create excessive pressures that could damage the cell. D) USE OF THE UNIT ATTENTION: All FREEBLOCK units are designed so that the user can gain access to all functions without intervening in any way inside the unit. The manufacturer declines any responsibility for damage caused to persons or things due to interventions carried out by non-specialised personnel inside the unit. The user in carrying out the functions of monitoring and changing functioning parameters must act exclusively on the external instrumentation of the control panel represented in Fig. 4. D.1 DESCRIPTION AND FUNCTION OF THE CONTROL PANEL The functions of the control panel on board the cell shown in FIG. 4 are: - Main switch Switching on is indicated by the green light button. - SET Button Keeping pressed for 5 seconds, it is possible to access the instrument programming. - UP Button Button to increase settable values. - DOWN Button Button to decrease settable values. - CELL LIGHT Button Switching on is indicated by the inbuilt light. - ESC Button Button to exit the menu. Keeping pressed for 2 seconds, it provokes an additional defrosting. - ON / OFF Button Button to switch the instrument on or off. In OFF mode, all system functions are disabled, except the cell light button. - Indication LED: The following LEDs with the symbols and meaning indicated below are on the upper part of the display: Compressor or Relay 1: ON for compressor switched on; flashing for delay, protection, or startup locked. Defrosting: ON for defrosting in progress; flashing for manual startup. Alarm: ON for active alarm; flashing for stopped alarm. Fans: ON for fan operating. IMPORTANT: The electronic control instrument is set directly by the manufacturer according to optimal operation parameters. Therefore, it is recommended to avoid changing these parameters without previously consulting Our Offices, MISA S.R.L. – VIA MONACHELLE VECCHIA, 7 – 00040 POMEZIA ( ROMA ) ITALY – TEL. 06/91.18.91 FAX 06/91.20.788 - 16 - in order to avoid provoking a decrease in system performances and malfunctioning. To enter instrument operation parameters, specialized staff should refer to the instructions attached to the switchboard. D.1.2 ALARM SIGNALS. The instrument included the possibility of setting and signaling some alarm conditions on the display. WARNING: Avoid direct jets of water on the electric panel when the door is not perfectly closed: the IP65 protection degree can only be ensured when the door is closed. D.1.2.1 ALARM SIGNALS ORIGINATED FROM FAULTY PROBES They are directly shown on the instrument display: E1 – Faulty cell probe E2 – Faulty defrosting probe. Any faulty probe shall be replaced by specialized technical staff as soon as possible. D.2 SETTING OF INSTRUMENT PARAMETERS The instrument is set with the values indicated in the following table. For any changes of operation parameters performed by specialized staff, read the technical instructions attached to this manual. D.3 COPY CARD The Copy Card is an optional card connected directly with the instrument through a serial TTL outlet. By entering the parameters of the FPr folder through the keyboard, it will be possible to register the setting of instrument parameters in the Copy Card, or download information from the Copy Card to another instrument. In fact, two operations are contained in the FPr folder: 1. UPLOAD (UL): setting parameters are entered (from instrument to Copy Card) 2. DOWNLOAD (DL): setting parameters are entered (from Copy Card to instrument). “Y” will appear on the display, if the operation was successful, or “n” if it failed. D.4 RULES FOR PROPER SYSTEM OPERATION MS systems are designed and engineered for preservation of fresh (0/+8°C) or frozen (-18/-25°C) products. Therefore, the following instructions must be observed: 1 – Door opening Set goods handling in a way as to reduce the number of times doors are opened and avoid concentrating goods through time. 2 – Daily handling of goods Not more than 30/35 kg per cubic meter of cell per day. 3 – PVC strip curtain door On low temperature cells, it is always recommended to install a strip curtain door, which avoids excessive air entering from outside. This system is indispensable in the case of frequent door opening. 4 – Load limits Goods stored in the cell must not exceed the lower limit of fridge-diffuser. 5 - Environmental conditions: Check that the system is not directly exposed to sunlight. Check that the room temperature around the condensing unit is not above 43°C or below -3°C. 6 - Low temperature cells 7 - Electric panel on the cold store (FIG.4): MISA S.R.L. – VIA MONACHELLE VECCHIA, 7 – 00040 POMEZIA ( ROMA ) ITALY – TEL. 06/91.18.91 FAX 06/91.20.788 - 17 - ELIWELL / SET VALUES Set diF HSE LSE OSP Cit CAt CP Ont OFt dOn dOF dbi OdO dtY dit dCt dEF dOH dEt dPO dSt FSt Fad Fdt dt dFd FAn FCO Fod FdC Fon FoF Att Afd HAL LAL PAO dAO AL OAO tdO tAO dAt EAL AOP dSd OFL Lit dOd dAd dEA Add FAA LOC PA1 ndt diS CA1 CA2 ddL IWC 750 LX Description Adjustment Set point Activation differential Maximum possible set point value Minimum possible set point value Offset on set point Minimum compressor activation time before disabling Maximum compressor activation time before disabling Compressor activation time in the event of a faulty probe Compressor off time in the event of a faulty probe Starting delay for compressor request time elapsing Activation delay after compressor switching off Delay between two consecutive compressor switch‐ons Delay time in activating the outputs after switch‐on Type of defrost Interval between the start of two subsequent defrosting operations Selection of count mode for the defrosting interval Defrost start delay time from start up of instrument Defrost time‐out Defrosting at start‐up Defrosting end temperature Evaporator fan lock temperature Fan activation intervention differential Delay time at fan activation after a defrosting cycle Dripping time Exclusion of the evaporator fans during defrosting Evaporator fans status when the compressor is OFF Evaporator fans status when the door is open Evaporator fan switch off delay time after compressor stop Time evaporator fans are ON per duty cycle Time evaporator fans are OFF per duty cycle Parameter “HAL” and “LAL” modes Alarm start differential Maximum temperature alarm Minimum temperature alarm Alarm exclusion after instrument is switched on Temperature alarm exclusion time after defrost High and low temperature alarm exclusion time after disabling Alarm exclusion time of door open Temperature alarm signal delay time Alarm signal for defrosting end due to time‐out External alarm to lock controls Polarity of alarm output Enabling light relay by door switch Enabling light switching off of cell from button during set delay Enabling light switching off of loads upon switch activation Digital input activation delay Device Address Family Address Keyboard locking Password Value View with decimal point Calibration of cell probe Calibration of evaporator probe ‐ Locks resources at the end of defrost MEP 0 3 10 ‐2 0 0 0 0 0 0 0 2 0 0 6 1 0 20 n 12 25 2 4 2 y n n 0 0 0 0 2 50 ‐50 4 180 1 10 30 n n 1 y y y 0 0 0 n 0 n 0 0 0 MEN ‐21 3 ‐10 ‐21 0 0 0 0 0 0 0 2 0 0 4 1 0 20 n 12 10 2 4 2 y n n 0 0 0 0 2 50 ‐50 4 180 1 10 30 n n 1 y y y 0 0 0 n 0 n 0 0 0 MISA S.R.L. – VIA MONACHELLE VECCHIA, 7 – 00040 POMEZIA ( ROMA ) ITALY – TEL. 06/91.18.91 FAX 06/91.20.788 - 18 - dro H06 H11 H21 H22 H23 H24 H25 H26 H31 H32 H33 H34 H42 Selection °C / °F 0 0 Key or aux digital input/light door switch active when the instrument is Off y y Configuring digital inputs/polarity 3 3 1 (A) Digital output configurability 1 1 2 (B) Digital output configurability 2 2 3 (C) Digital output configurability 3 3 4 (D) Digital output configurability 4 4 CnF 5 (E) Digital output configurability 5 5 6 (Buzzer) Digital output configurability 4 4 UP key Configurability 1 1 DOWN key Configurability 0 0 ESC key Configurability 1 1 Free key Configurability 2 2 Evaporator probe presence y y Too many openings of the cell door (see point D.4) E) MAINTENANCE Introduction of goods at a temperature more than E.1 ORDINARY MAINTENANCE foreseen (not more than 20°C for positive cells and ATTENTION: The user must never open the MS unit. The not more than -14°C for low-temperature cells). manufacturer declines any responsibility for damage to ATTENTION: There is a rise in temperature during the persons or things and for malfunctioning caused by defrosting phase. This allows the evaporator to free itself of interventions effectuated by unauthorised personnel. formations of ice or frost. Defrosting is signalled by the For good functioning of the unit, it is recommended to clean switching on of the LED of the electronic instrument. the fins of the condenser positioned on the opposite side to the fans every two or three months. This must be effectuated using a jet of compressed air or with a long-haired brush and G) DISMANTLING AND DISPOSAL without opening the MS unit. Ensure that there is always a At the end of the life cycle of the unit, avoid dispersing the sufficient exchange of air if MS unit is installed in a closed refrigerant gas R404A and the POE oil in the environment. environment. ATTENTION: Dismantling operations must be carried out by If a fluorescent tube should burn out, substitute it with one of qualified personnel. the same wattage and switching off the mains current to the Dismantle the unit, grouping the components according to unit beforehand. their chemical nature. E.2 EXTRAORDINARY MAINTENANCE Temporary storage of special waste materials is permitted ATTENTION: All extraordinary maintenance operations must whilst waiting for disposal by definite treatment and/or be effectuated by qualified personnel according to the storage. methods described in this instruction manual. The laws in force in the country must be observed by the IMPORTANT: Before any maintenance operation or cleaning, user with regards to environmental protection. switch off the mains current to the machine. In the various countries, different legislations are in force, In the case of damage to the feed cable on single-phase therefore the regulations imposed by the laws and authorities equipment, substitute it with a cable with 6.3 mm faston of the countries where the demolition occurs must be terminals plus the faston covers and a ring terminal on the observed. earth cable. F) FUNCTIONING FAULTS 1 - The compressor blocks This denotes an abnormal rise in temperature of the refrigeration cell. The compressor is equipped with a safety device that stops the compressor when a dangerous situation is verified, such as the following: - Poor functioning of the condenser fan - Condenser dirty (see point E.1) - Voltage overload in the electrical mains system - Excessive environmental temperature (insufficient exchange of air) It must be remembered that after stopping the compressor starts automatically but it is better to remove the problem that caused the stoppage. Call a technician if the problem persists. 2 – Formation of ice on the evaporator Possible causes could be: - Incorrect setting of the thermostat (for MEP) MISA S.R.L. – VIA MONACHELLE VECCHIA, 7 – 00040 POMEZIA ( ROMA ) ITALY – TEL. 06/91.18.91 FAX 06/91.20.788 - 19 - INHALT: LISTE DER ABBILDUNGEN: Abb. 1-2 MONTAGE VERDAMPFER, ABMESSUNGEN VERDAMPFEREINHEIT …………………............................21 Abb. 3 - MONTAGE KONDENSATOREINHEIT AN DER ZELLE ……………………………………..………..................22 Abb. 4 - MONTAGE HÄNGE-KONDENSATOREINHEIT ..……………………………………............……..................22 Abb. 5- ARMATUR DER SCHALTTAFEL ……………………....…………………………………………………….22 Abb. 6 - MONTAGE KONDENSATOREINHEIT MIT GESTELL ………………………..…………………..………..…...23 Abb. 7 - ABMESSUNGEN KONDENSATOREINHEIT …………………….……………………………….……….……………39 Abb. 8 - ABMESSUNGEN SCHALTTAFEL ……………………………....………………………………………40 Abb. 9 - LAGE DER ERSATZTEILE MEP 7-13-16 MEN 6-13 ...…………………………………..……………46 Abb. 10 – LAGE DER ERSATZTEILE MEP 18-26-50-70 MEN 20-28 …………………………………………………49 LISTE DER SCHALTPLÄNE: SCHALTPLAN FÜR MISAERM MONOPHASE .…………………………………………………………………………....43 SCHALTPLAN FÜR MISAERM DREIPHASE ………………………………………………………………………...…..44 LISTE DER KOMMENTARTESTE: GEBRAUCHS- UND WARTUNGSANLEITUNGEN A) ALLGEMEINE INFORMATIONEN ......……........................................................................................................24 A.1 VORAUSSETZUNG ….................................................................................................................................24 A.2 GEBRAUCHSBESTIMMUNG BESCHRÄNKUNGEN .................................................................................24 B) INSTALLATION .....….........................................................................................................................................24 B.1 AUSPACKEN UND HANDLING DES PRODUKTS ....……………………….........................................24 B.1.1 LAGERUNG UND TRANSPORT ……….………………....................................................24 B.1.2 UNVERSEHRTHEIT DER VERPACKUNG ……………..……….................…..................…...24 B.1.3 ENTFERNEN DER VERPACKUNG UND HANDLING .......…...................................................…24 B.1.4 ENTSORGEN DER VERPACKUNG ……...……...............……………...........24 B.2 MONTAGE DER SPLIT-EINHEIT …………………………………………………………..………...…24 B.2.1 MONTAGE VERDAMPFER ……………………………………..…….………………24 B.2.2 MONTAGE DER KONDENSATOREINHEIT AN DER ZELLE ………………………………24 B.2.3 MONTAGE DER HÄNGE-KONDENSATOREINHEIT ………………..…………………………24 B.2.4 MONTAGE KONDENSATOREINHEIT MIT GESTELL ……….……………..……25 B.2.5 MONTAGE DER VORBELADENEN SCHLÄUCHE FÜR EINPHASIGE ANLAGEN …………25 B.2.6 MONTAGE DER VORBELADENEN SCHLÄUCHE FÜR DREIPHASIGE ANLAGEN ………..25 B.3 MONTAGE DEL SCHALTTAFEL ………………………………………………….……...…………25 B.4 ELEKTROANSCHLUSS ………………………………………..……………….……...……………25 C) INBETRIEBNAHME DER ANLAGE ……..………………………………………………………………………25 D) GEBRAUCH DER ANLAGE ………..………………...………………………………………………………………25 D.1 BESCHREIBUNG UND FUNKTION DER STEUERTAFEL ………………………………………25 D.1.2 WARNMELDUNGEN ………..…………………………………………………….26 D.1.2.1 WARNMELDUNGEN DURCH DEFEKTE SONDEN …………………………26 D.2 EINSTELLUNG DER INSTRUMENTEN-RICHTWERTE ….…………………….……………………………26 D.3 COPY CARD ………………………………………………………...……………………………………………….26 D.4 NORMEN FÜR DEN KORREKTEN EINSATZ DER ANLAGE ………………………………………………26 E) WARTUNG …………………………………………………………………………………………………………28 E.1 ORDENTLICHE WARTUNG ………………….……….……………………………………………….28 E.2 AUSSERORDENTLICHE WARTUNG ……………………………………………………………………………28 F) FUNKTIONSANOMALIEN ……………………………………………………………………………………28 G) ABFALLENTSORGUNG UND AUSSERBETRIEBSETZEN ……………………………………………....…28 TECHNISCHE DATEN .......................................................................................................................................................38 SCHALTPLÄNE ………………………………………………………………………………………………………………….41 ERSATZTEILE ...............................................................................................................................….................…...45 KONFORMITÄTSERKLÄRUNG .....................................................................................................................…..52 MISA S.R.L. – VIA MONACHELLE VECCHIA, 7 – 00040 POMEZIA ( ROMA ) ITALY – TEL. 06/91.18.91 FAX 06/91.20.788 - 20 - VERDAMPFER AUSMA B [mm] 18 674 22 674 26 974 Abb. 1 ANLAGEN MEP18 MEP26-50-70 MEN20 MEN28 A [mm] 678 B [mm] 412 C [mm] 298 1.048 782 298 865 597 375 Abb. 2 MISA S.R.L. – VIA MONACHELLE VECCHIA, 7 – 00040 POMEZIA ( ROMA ) ITALY – TEL. 06/91.18.91 FAX 06/91.20.788 - 21 - Abb. 3 Abb. 4 Abb. 5 MISA S.R.L. – VIA MONACHELLE VECCHIA, 7 – 00040 POMEZIA ( ROMA ) ITALY – TEL. 06/91.18.91 FAX 06/91.20.788 - 22 - Abb. 6 MISA S.R.L. – VIA MONACHELLE VECCHIA, 7 – 00040 POMEZIA ( ROMA ) ITALY – TEL. 06/91.18.91 FAX 06/91.20.788 - 23 - A) ALLGEMEINE INFORMATIONEN A.1 VORBEMERKUNG Das vorliegende Handbuch hat zum Zweck, alle notwendigen Informationen zur richtigen Installation, zum Gebrauch und zur Wartung der Anlage zu liefern. Dies stellt einen vollwertigen und wesentlichen Teil des Produkts dar und muss dem Verbraucher ausgehändigt werden. Vor jedem Vorgang aufmerksam die hier enthaltenen Anleitungen lesen. Der Hersteller lehnt jede Verantwortung für Vorgänge ab, die unter Vernachlässigung der hier enthaltenen Anleitungen ausgeführt wurden. A.2 GEBRAUCHSBESTIMMUNG EINSCHRÄNKUNGEN UND Die Anlage MS wurde zum Einbau in Räume mit Plus- und Minustemperaturen, die für die Kühlung und Konservierung von Lebensmitteln bestimmt sind, entworfen und gebaut. Jede andere Verwendung wird für ungeeignet und somit für gefährlich gehalten. Es wird empfohlen, das Gerät vor einem ungeeigneten Gebrauch zu schützen, der eine Gefahr darstellen könnte. Der Hersteller lehnt jede Verantwortung für Schäden an Personen oder Dingen ab, die durch Installations- oder Gebrauchsfehler oder durch Nichtbeachtung der vom Hersteller gelieferten Anleitungen verursacht wurden. werden. Auf gar keinen Fall kann ein beschädigtes Gerät dem Hersteller ohne Vorankündigung zurückgegeben werden und ohne vorher die schriftliche Genehmigung erhalten zu haben,. B.1.3 BESEITIGUNG DER VERPACKUNG UND BEWEGUNG Die Verpackung von MS ist dafür vorgesehen, mit einem Gabelstapler bewegt zu werden. Um das Blech nicht zu zerkratzen wird empfohlen, die Anlage mittels seiner Palette bis in die Nähe der Installationsstelle zu bewegen. Die untere Schrauben losschrauben um die Verpackung zu entfernen. ACHTUNG: Auf der oberen Wand der Maschine nahe dem Ventilator befindet sich ein Langloch für das Anheben und die Positionierung der Maschine in den vorgesehenen Hohlraum der Zelle. B.1.4 ENTSORGUNG DER VERPACKUNG Die Entsorgung der Verpackungen muss entsprechend den gültigen Gesetzen des Landes erfolgen, in dem das Produkt verwendet wird. Die Bestandteile aus Plastik, die für eine eventuelle Entsorgung mit Recycling bestimmt sind, sind wie folgt gekennzeichnet: A.3 PRÜFUNG Unsere Geräte wurden in Labortests entwickelt und optimiert mit dem Ziel, gehobene Leistungen und Ergebnisse zu erzielen. Die erzielten Testergebnisse der Qualitätsprüfung werden im Anhang beigefügt. Polyäthylen: Anleitungstütchen PE Aufgeschäumtes Styropor: Schutzvorrichtungen PS Presskarton: Schutzvorrichtungen B) INSTALLATION Um den richtigen Betrieb des Erzeugnisses und die Erhaltung der Sicherheitsbedingungen während des Gebrauchs zu gewährleisten, müssen die im Folgenden unter diesem Paragraph aufgeführten Anleitungen sehr genau befolgt werden. Die Installation der Anlage muss entsprechend den gültigen Normen erfolgen, die Planung, die Installation und die Wartung der Kühlanlagen beinhalten. Sie muss überdies durch professionell qualifiziertes Personal gemäß den Anleitungen des Herstellers ausgeführt werden. Die elektrische Versorgungsanlage der Maschine muss nach den Normen CEI und unter Beachtung der Gesetze Nr. 186/68 und Nr. 46/90 erfolgen. Eine fehlerhafte Installation kann Schäden an Personen und Dingen anrichten, für die Hersteller nicht in die Verantwortung genommen werden kann. ACHTUNG: Die Anlage nicht in Betrieb setzen, bevor die Anlage der Erdleitung nicht angeschlossen ist. B.1 AUSPACKEN UND BEWEGEN DES PRODUKTS B.1.1 LAGERUNG UND TRANSPORT Die Maschine trocken und vor Wetterunbilden geschützt in der Originalverpackung lagern. Die Lagertemperatur muss zwischen –20 °C und 60°C liegen. Während des Transports die Originalverpackung verwenden und Stöße und Rucke vermeiden. B.1.2 UVERSEHRTHEIT DER VERPACKUNG Vor dem Auspacken des Produkts überprüfen, ob es samt eventueller Schutzvorrichtungen vollständig ist. Mögliche Schäden müssen umgehend dem Frachtführer mitgeteilt PC 2 MONTAGE DER SPLIT-EINHEIT B.2.1 MONTAGE DES VERDAMPFERS Einphasige Anlagen: Plastikabdeckung abmontieren. An der Decke 4 Löcher mit Ǿ3,5 für die Befestigung bohren und den Verdampfer mit den Schrauben Ǿ4,2 x 13 befestigen, wie in Abb. 1 angegeben Dreiphasige Anlagen: Die seitlichen Abdeckungen des Verdampfers abmontieren. An der Decke der Zelle 4 Löcher mit Ǿ12 bohren, dabei die angegebenen Höhen beachen, damit das Auswechseln der Abtauwiderstände bei Defekten möglich bleibt. Den Verdampfer mit Hilfe der zur Ausstattung gehörenden Gewindestangen, Platten, Muttern und Unterlegscheiben anbauen. B.2.2 MONTAGE KONDENSATOREINHEIT ZELLE DER DER AN Den Winkelbügel wie in Abb. 2 gezeigt mit 9 Nieten ø 4 x 9,5 befestigen Die Kondensatoreinheit einhängen, dabei die Klebedichtung 3 x 10 zwischen Enheit und Zelle anbringen. B.2.3 MONTAGE DER KONDENSATOREINHEIT HÄNGE- Den Wandbügel wie in Abb. 3 angegeben mit 4 Dübeln M6 x 50 befestigen. Die Kondensatoreinheit einhängen, dabei die Klebedichtung 3 x 10 zwischen Enheit und Mauer anbringen. MISA S.R.L. – VIA MONACHELLE VECCHIA, 7 – 00040 POMEZIA ( ROMA ) ITALY – TEL. 06/91.18.91 FAX 06/91.20.788 - 24 - B.2.4 MONTAGE DER KONDENSATOREINHEIT MIT GESTELL Die folgenden Arbeitsschritte wie auch in Abb. 5 angegeben durchführen: 1.) Fuß und Ständer mit den beiliegenden 6 Schrauben und Muttern M8 zusammen bauen. 2.) Die erste Kondensatoreinheit aufstellen und mit den beiligenden M8 Schrauben blockieren. 3.) Die hölzernen 2 Abstandhalter auf die Ecken der bereits montierten Einheit legen und die zweite Einheit darauf stellen. Die 6 Befestigungslöcher stimmen jetzt perfekt überein und die Einheit kann mit den M8 Schrauben befestigt werden. Die zwei Abstandhalter entfernen und die Operation im Fall der Aufstellung einer dritten Einheit wiederholen. 4.) Jetzt die gesamte Gruppe mit Hilfe der 4 Löcher an den Füßen am Boden blockieren, nachdem die Aufstellfläche vollständig nivelliert wurde. 5.) Wenn gemischt dreiphasige und monophasige Kondensatoreinheiten aufgestellt werden, bei den monophasigen die für diesen Zweck mitgelieferten AluAbstandhalter und längere Schrauben verwenden (das Kit kann optionsmäßig von der Misa geliefert werden). B.2. 5 MONTAGE DER VORBELADENEN SCHLÄUCHE FÜR EINPHASIGE ANLAGEN ACHTUNG: DAS HOHLTEIL DER SCHNELLBEFESTIGUNG UND DER ENTSPRECHENDE ZAPFEN MÜSSEN PERFEKT AUSGERICHTET WERDEN, BEVOR DIE VERBINDUNG DURCHGEFÜHRT WIRD, UM BESCHÄDIGUNGEN DES GEWINDES ZU VERMEIDEN. DAS SPANNEN VON HOHLTEIL UND ZAPFEN DER SCHNELLBEFESTIGUNG MUSS RASCH UND VOLLSTÄNDIG DURCHGEFÜHRT WERDEN, DAMIT DIE DICHTUNGEN RICHTIG HALTEN. WIRD DIE BEFESTIGUNG NICHT RICHTIG DURCHGEFÜHRT, KANN GAS AUS DER ANLAGE AUSTRETEN. An der am besten geeigneten Stelle der Zelle ein Loch von 50 mm Durchmesser für den Ausgang der Schläuche (Gas und Flüssigkeit) und die Elektrokabel des Verdampfers bohren. Die Schläuche mit den entsprechenden Schnellverbindungen auf der Seite von Verdampfer und Kondensatoreinheit verbinden, dabei darauf achten, dass die Schläuche für Flüssigkeit und Gas nicht verwechselt werden. Die Schläuche über den gesamten Verlauf hin anpassen, dabei darauf achten, dass sie in einem passenden Winkel gebeugt werden und nicht knicken, denn Verengungen können die Funktion der Anlage beeinträchtigen. B.2.6 MONTAGE DER VORBELADENEN SCHLÄUCHE FÜR DREIPHASIGE ANLAGEN An der am besten geeigneten Stelle der Zelle ein Loch von 50 mm Durchmesser für den Ausgang der Schläuche (Gas und Flüssigkeit) und die Elektrokabel des Verdampfers bohren. Die zur Ausrüstung gehörenden Verbindungen an die Hähne der Kondensationseinheit montieren, 4 mal schweißen, durch die Zapfventile ¼” der Hähne das Vakuum auf der Seite der Schläuche und des Verdampfers herstellen. B.3 MONTAGE DER SCHALTTAFEL Die Schalttafel mit den beiliegenden vier Schrauben an der Zellenwand befestigen. Wenn die Schrauben angezogen sind, die 4 Stopfen auf den dafür vorgesehenen Sitz auf Schraube aufsetzen, damit der Schutzgrad IP65 gewährleistet ist.der Schraube aufsetzen, damit der Schutzgrad IP65 gewährleistet ist. Die elektrischen Verbindungen vornehmen, indem das Kabel der Sonden und das 7-polige des Verdampfers, das Kabel der Kondensatoreinheit und das der Speisung verbunden werden. B.4 ELEKTOANSCHLUSS Der Anschluss darf für die monophasigen Anlagen nur mit einem Kabel mit 3 x 2,5 Querschnitt und für die triphasigen mit einem Kabel mit 5 x 1,5 Querschnitt erfolgen, mit Thermomagnetschalter mit Mindestöffnung der Kontakte 3 mm oder einem polarisiertem Stecker; in beiden Fällen muss die Trennvorrichtung an einer sichtbaren Stelle liegen. ACHTUNG: Die elektrische Sicherheit des Geräts ist nut dann gewährleistet, wenn es korrekt mit einer effizientem Erdungsanlage verbunden ist, die entsprechend der gültigen Sicherheitsnormen aufgebaut sein muss. Überprüfen, ob die Leitungsspannung der auf der Teilenummerplakette angegebenen entspricht. Die zugelassene Toleranz beträgt +/- 10% des Nennwerts. Die Installationsarbeiten dürfen nur von Fachpersonal entsprechend der gültigen Normativen durchgeführt werden C) INBETRIEBNAHME DER ANLAGE Mit dem Kompressorschalter von Abb. 4 Spannung geben. Die Betriebstemperatur der Zelle einstellen, falls eine Veränderung der Voreinstellung gewünscht wird. Um die Solltemperatur anzuzeigen, auf die Taste “set” drücken und loslassen. Es erscheint der Kennsatz “set”; noch einmal die Taste drücken, um den eingestellten Wert sichtbar zu machen. Um den Wert des Sollwerts zu verändern, in 15 Sekunden auf die Tasten und drücken. ACHTUNG: Im Fall von Kühlanlagen mit Niedrigtemperatur wird empfohlen, die Zelle schrittweise auf die Betriebstemperatur zu bringen, um nicht übermäßigen Druck auszulösen, der die Zelle beschädigen könnte. D) BENUTZUNG DER ANLAGE ACHTUNG: Alle Anlagen FREEBLOCK wurden so geplant, dass der Benutzer alle Funktionen ausführen kann, ohne auf irgendeine Weise in das Innere der Anlage einzugreifen. Der Hersteller lehnt jede Verantwortung für Schäden an Dingen oder Personen ab, die durch Eingriffe nicht spezialisierten Personals im Innern der Anlage entstehen. Der Benutzer muss bei der Überwachung und der Veränderung der Funktionsparameter ausschließlich auf die äußere Geräteausstattung des in ABB. 4 dargestellten Schaltpults einwirken. D.1 BESCHREIBUNG UND FUNKTION DER STEUERTAFEL - Allgemeiner Schalter Die Zündung wird angedeutet durch grüner Schaltknopf - Set Taste Der Taste während 5 Sekunden drücken um weiter zu gehen mit der Programmierung des Instrumentes - UP Taste Für die Erhöhung von den programmierten Werten - DOWN Taste Für die Verminderung von den programmierten Werten - BELEUCHTUNG Taste MISA S.R.L. – VIA MONACHELLE VECCHIA, 7 – 00040 POMEZIA ( ROMA ) ITALY – TEL. 06/91.18.91 FAX 06/91.20.788 - 25 - Die Zündung wird durch das Licht innerhalb des Tastes angedeutet - ESC Taste (Ausgang) Ausgangstaste vom Menu. Wenn man den Taste während 2 Sek. drückt bekommt man eine extra Abtauung - ON/OFF Taste Taste für die An- und Ausschaltung. Bei OFF sind alle Funktionen des Instrumentes ausgeschaltet außen des Tastes Beleuchtung Die LED Zeichengebung : auf dem obenen Teil des Displays sind folgenden Led mit Zeichen und Erklaerung angegeben. Kompressor oder Relais 1: ON für angestelltem Kompressor; blinkt bei Verzögerung, Schutz oder gesperrter Inbetriebnahme. Abtauen: ON für laufendes Abtauen; blinkt bei manueller Inbetriebnahme. Alarm: ON für aktiven Alarm; blinkt für abgestellten Alarm. Belüftung: ON für laufenden Ventilator. WICHTIG: Das elektronische Kontrollinstrument wird direkt vom Hersteller programmiert, mit den optimalen Funktionsrichtwerten; es empfiehlt sich deshalb diese Richtwerte nicht zu ändern ohne uns vorher kontaktiert zu haben, um eine Leistungsminderung der Anlage und Funktionsstörungen zu vermeiden. Für den Zugang zu den Funktionsrichtwerten des Instruments durch Fachpersonal bitte die der Schalttafel beiliegenden Anweisungen befolgen. D.1.2 WARNMELDUNGEN Das Instrument sieht vor, dass einige Alarmbedingungen eingestellt und auf dem Display angezeigt werden können. D.1.2.1 WARNMELDUNGEN DURCH DEFEKTE SONDEN D.4 NORMEN FÜR DEN KORREKTEN EINSATZ DER ANLAGE Die MS-Anlagen wurden für die Aufbewahrung von Frischware (0/+8°C) oder Tiefkühlware (-18/-25°C) entwickelt, deshalb müssen folgende Vorschriften eingehalten werden: 1 – Öffnen der Türen Die Warenbewegung so programmieren, dass das Öffnen der Tür reduziert und nicht auf einen Zeitraum konzentriert wird. 2 - Tägliche Warenbewegung Nicht mehr als 30/35 kg pro Kubikmeter Zelle am Tag. 3 - Streifentür Bei Niedrigtemperaturzellen ist der Einbau einer Streifentür immer empfehlenswert, da sie verhindert, dass zu viel Außenluft eintritt. Bei häufigem Türenöffnen ist sie unabdinglich. 4 - Lastgrenzen Die in der Zelle aufbewahrte Ware darf nicht die Untergrenze des Kühlverdampfers überschreiten. 5 - Umfeldbedingungen: Darauf achten, dass die Anlage nicht direkter Sonnenbestrahlung ausgesetzt ist. Darauf achten, dass die Temperatur dort, wo die Einheit aufgestellt wird nicht höher als 43°C und nicht niedriger als -3°C ist. 6 - Niedrigtemperaturzellen ACHTUNG: es muss unbedingt ein Ausgleichventil eingebaut werden. 7 - Schalttafel Zellenrand (Abb. 4): ACHTUNG: Bei nicht vollständig geschlossener Klappe muss das direkte Bespritzen der Schalttafel mit Wasser vermieden werden: nur bei geschlossener Klappe ist der Schutzgrad IP65 gewährleistet. Werden direkt auf dem Display des Instruments angezeigt: E1 – Sonde der Zelle defekt E2 – Abtau-Sonde defekt Die defekte Sonde muss innerhalb möglichst kurzer Zeit von Fachpersonal ausgewechselt werden. D.2 EINSTELLUNG DER INSTRUMENTEN-RICHTWERTE Das Instrument ist auf die in der folgenden Tabelle angegebenen Richtwerte programmiert. Sich bei Eingriffen durch Fachpersonal, mit denen die Funktionsrichtwerte geändert werden sollen an die Angaben des dem Heft beiliegenden technischen Blatts halten. D.3 COPY CARD Bei der Copy Card handelt es sich um eine optional erwerbbare Karte, die über den Serialausgang TTL direkt mit dem Instrument verbunden wird. Über die Tastatur hat man Zugriff auf die Richtwerte der Datei FPr und kann in der Copy Card die Einstellung der Richtwerte des Instruments speichern bzw. von der Copy Card die Informationen auf ein anderes Instrument übertragen. In der Datei FPr befinden sich die folgenden zwei Operationen: 3. UPLOAD (UL): Eingabe der Programmierungsrichtwerte (von Instrument auf Copy Card) 4. DOWNLOAD (DL): Eingabe der Programmierungsrichtwerte (von Copy Card auf Instrument) Auf dem Display erscheint “Y” wenn die Operation einen guten Ausgang hatte, bzw. “n” wenn nicht. MISA S.R.L. – VIA MONACHELLE VECCHIA, 7 – 00040 POMEZIA ( ROMA ) ITALY – TEL. 06/91.18.91 FAX 06/91.20.788 - 26 - GERÄT ELIWELL / EINGESTELLTE WERTE CP dEF FAn AL Set diF HSE LSE OSP Cit CAt Ont OFt dOn dOF dbi OdO dtY dit dCt dOH dEt dPO dSt FSt Fad Fdt dt dFd FCO Fod FdC Fon FoF Att Afd HAL LAL PAO dAO OAO tdO tAO dAt EAL AOP dSd OFL Lit dOd dAd dEA Add FAA LOC PA1 diS ndt CA1 CA2 IWC 750 LX Descrizione/ description / Beschreibung Einstellungs‐Setpoint Eingriffsdifferenzial Einstellbarer Höchstwert für Setpoint Einstellbarer Mindestwert für Setpoint Offset am Setpoint Mindestzeit Aktivierung Verdichter‐Ausgang Maximalzeit Aktivierung Verdichter‐Ausgang ON‐Zeit Verdichter wenn Regulierfühler defekt OFF‐Zeit Verdichter wenn Regulierfühler defekt Verzögerung Aktivierung Verdichter‐Ausgang nach Aufruf Verzögerung Aktivierung Verdichter‐Ausgang nach Abschalten Verzögerung bei zweimal aufeinander folgendem Anschalten des Verdichters Verzögerung Aktivierung Ausgänge nach Anschalten Abtautyp Intervall zwischen den Abtauvorgängen Zählmodus Abtauintervall Verzögerung Aktivierung Abtauzyklus nach Aufruf Time out Abtauen Abtauen bei Anlassen Temperatur bei Abtau‐Ende Temperatur Sperren Gebläse Verdampfer Eingriffsdifferenzial Gebläse Verdampfer Tempo Verzögerung Gebläse Verdampfer nach Abtauzyklus Abtropfzeit Ausschluss Gebläse Verdampfer während des Abtauens Zustand Gebläse Verdampfer bei Verdichter‐Ausgang Zustand Gebläse Verdampfer bei offener Tür Verzögerung Ausschalten Flügelr. Verd. nach Deaktivierung des Kompr. On‐Zeit Gebläse Verdampfer in Modus Zyklusregulierer Off‐Zeit Gebläse Verdampfer in Modus Zyklusregulierer Modalität Parameter HAL und LAL Eingriffsdifferenzial Alarm Alarmschwelle bei Höchstwert Alarmschwelle bei Mindestwert Alarm‐Ausschluss beim Anschalten Zeit Ausschluss Temperaturalarme nach einem Abtauzyklus Zeit Ausschluss Höchst‐ und Mindesttemperaturalarm nach dem Schließen Zeit Ausschluss Alarm offene Tür Verzögerungszeit Signalisierung Temperaturalarme Signalisierung Alarm Defrost wenn Time Out beendet Externer Alarm für Reglersperrung Polarität Ausgang Alarm Freigabe Lichtrelais durch Tür‐Mikro Freigabe mit Taste Zellenbeleuchtung löschen, während eingestellter Verzögerung Freigabe Ausschalten Abnehmer durch Aktivierung des Mikro Verzögerung Aktivierung Digitaleingänge Vorrichtungsadresse Gruppenadresse Freigabe Tastatursperre Passwort Wert Angabe mit Dezimalpunkt Kalibrierung Zellenfühler Kalibrierung Verdampferfühler ‐ MEP 0 3 10 ‐2 0 0 0 0 0 0 0 2 0 0 6 1 0 30 n 12 25 2 4 2 y n n 0 0 0 0 2 50 ‐50 4 180 1 10 30 n n 1 y y y 0 0 0 n 0 n 0 0 MEN ‐21 3 ‐10 ‐21 0 0 0 0 0 0 0 2 0 0 4 1 0 30 n 12 10 2 4 2 y n n 0 0 0 0 2 50 ‐50 4 180 1 10 30 n n 1 y y y 0 0 0 n 0 n 0 0 MISA S.R.L. – VIA MONACHELLE VECCHIA, 7 – 00040 POMEZIA ( ROMA ) ITALY – TEL. 06/91.18.91 FAX 06/91.20.788 - 27 - ddL dro H06 H11 H21 H22 H23 H24 H25 H26 H31 H32 H33 H34 H42 Sperrung der Umgebung am Ende des Abtauvorgangs 0 0 Auswahl °C / °F 0 0 Taste oder digitaler Hilfseingang / Licht aktiv bei Instrument in Off y y Konfigurierbarkeit und Polarität Digitaleingang 3 3 Konfigurierbarkeit digitaler Eingang 1 (A) 1 1 Konfigurierbarkeit Digitaleingang 2 (B) 2 2 Konfigurierbarkeit digitaler Eingang 3 (C) 3 3 Konfigurierbarkeit Digitaleingang 4 (D) 4 4 CnF Konfigurierbarkeit Digitaleingang 5 (E) 5 5 Konfigurierbarkeit Digitaleingang 6 (Buzzer) 4 4 Konfigurierbarkeit UP‐Taste 1 1 Konfigurierbarkeit DOWN‐Taste 0 0 Konfigurierbarkeit ESC‐Taste 1 1 Konfigurierbarkeit Free‐Taste 2 2 Verdampfer‐Fühler vorhanden y y - Zu hohe Raumtemperatur (unzureichend für Luftaustausch) E) WARTUNG Beachten, dass der Kompressor nach dem Stillstand E.1 ORDENTLIHCHE WARTUNG automatisch wieder startet, aber es empfiehlt sich den Grund VORSICHT: Der Benutzer darf unter keinen Umständen den für den Stillstand auszuschalten. Schalten Sie einen MS öffnen. Der Hersteller lehnt jede Verantwortung für Fachmann ein, falls die Unannehmlichkeit anhält. Schäden an Dingen oder Personen ab und für 2 – Bildung von Eis auf dem Verdunster Fehlfunktionen, die durch Eingriffe von nicht spezialisiertem Mögliche Ursachen können sein: Personal ausgeführt werden. - Fehlerhafte Einstellung des Thermostats (für Für einen guten Betrieb der Anlage wird empfohlen, 2 oder 3 positive MS) mal im Monat die Klappen des Kondensators zu reinigen, der - Zu häufige Öffnung der Zellentür (siehe Punkt D.4) sich auf der Entgegengesetzten Seite der Ventilatoren - Lagerung von Lebensmitteln mit einer höheren befindet; dies muss durch einen komprimierten Luftstrahl Temperatur als die vorgesehene (nicht höher als oder mit einer Bürste mit langen Borsten erfolgen und ohne 20° C für Positivzellen, nicht höher als –14°C für in irgendeiner Weise den MS zu öffnen. Zellen mit Niedrigtemperaturen). Falls der MS in einem geschlossenen Raum installiert wurde, - VORSICHT: Während der Abtauphase tritt eine muss sichergestellt werden, dass stets ein angemessener Temperaturerhöhung ein. Das ist vorgesehen, um Luftaustausch gewährleistet ist. dem Verdunster zu gestatten, sich von Frost- oder Im Fall eines Schadens an der Lampe, sie durch eine mit Eisbildung zu befreien. Die Entfrostung wird beim derselben Stärke ersetzen und vorher die Spannung aus der Anschalten des LED des elektronischen Geräts Anlage entfernen. angezeigt. E.2 AUSSERORDENTLICHE WARTUNG VORSICHT: Alle außerordentlichen Wartungsvorgänge müssen von Fachpersonal gemäß den in diesem Bedienungshandbuch beschriebenen Modalitäten ausgeführt werden. WICHTIG: Vor jedem Wartungs- oder Reinigungsvorgang die Spannung aus dem Gerät entfernen. Im Fall der Beschädigung des Versorgungskabels der einphasigen Geräte durch ein Kabel mit Steckhülsenenden (Faston) von 6.3 mm und Steckhülsendeckeln (DeckelFaston) ersetzen und das Erdungsleitkabel versehen mit Ösenklemme. F) UNREGELMÄSSIGKEITEN FUNKTIONSWEISE DER 1 - Blockierung des Kompressors Sie äußert sich durch einen anormalen Temperaturanstieg der Zelle. Der Kompressor ist mit einer Sicherheitsvorkehrung ausgestattet, die den Betrieb anhält, wenn gefährliche Bedingungen wie dei folgenden auftreten: - Schlechte Funktion des Ventilators des Kondensators - Verschmutzter Kondensator (siehe Punkt E.1) - Erhöhte Spannungsunregelmäßigkeiten im Versorgungsnetz G) ENTSORGUNG DER ABFÄLLE UND ABWICKLUNG Am Ende des Lebenszyklus der Anlage vermeiden, dass das Kühlgas und das Öl POE frei in die Umwelt gelangen. VORSICHT: Die Abbauvorgänge müssen auf jeden Fall von qualifiziertem Personal ausgeführt werden. Beim Abbau der Anlage die Komponenten nach ihrer chemischen Natur zusammenfassen. Eine provisorische Lagerung des Sondermülls ist während der Wartezeit auf eine Entsorgung mittels einer Behandlung und/oder einer endgültigen Lagerung gestattet. Auf jeden Fall müssen die im Land des Verbrauchers gültigen Gesetze bezüglich des Umweltschutzes beachtet werden. Die Gesetzgebungen sind in den verschiedenen Ländern unterschiedlich, daher müssen die Vorschriften beachtet werden, welche die Gesetze und die Unternehmen der Länder auferlegen, in denen die Verschrottung erfolgt. MISA S.R.L. – VIA MONACHELLE VECCHIA, 7 – 00040 POMEZIA ( ROMA ) ITALY – TEL. 06/91.18.91 FAX 06/91.20.788 - 28 - TABLE DES MATIERES : LISTE DES ILLUSTRATIONS : Fig.1-2 - MONTAGE DE L’EVAPORATEUR, DIMENSIONS DE L’UNITE EVAPORATEUR ………….............................30 Fig.3 - MONTAGE DE L’UNITÉ DE CONDENSATION SUR LA CHAMBRE ………………………..………...................31 Fig.4 - MONTAGE DE L’UNITÉ DE CONDENSATION AU MUR ..……….………………………............……....................31 Fig.5 - INSTRUMENTATION TABLEAU ELECTRIQUE ....…………….....……………………………………………………31 Fig.6 - MONTAGE DE L’UNITÉ DE CONDENSATION SUPERPOSEE …………………..…………………..………...…….32 Fig.7 - DIMENSIONS DE L’UNITÉ DE CONDENSATION .……………..……………………….……….……………39 Fig.8 - DIMENSIONS DU TABLEAU ELECTRIQUE ……………………………....…………………………………40 Fig.9 - POSITIONS PIECES DETACHEES MEP 7-13-16 MEN 6-13 ...……………… ……………..……………46 Fig.10 - POSITIONS PIECES DETACHEES MEP 18-26-50-70 MEN 20-28 ……………………………………………..49 LISTE DES SCHEMAS ELECTRIQUES : SCHEMA ELECTRIQUE POUR MISAERM MONOPHASE ……………………………………………………………………....43 SCHEMA ELECTRIQUE POUR MISAERM TRIPHASE …………………………………………………………………...…..44 LISTE DES TEXTES DE COMMENTAIRE : INSTRUCTIONS D’UTILISATION ET D’ENTRETIEN A) INFORMATIONS GENERALES ......……..............................................................................................................33 A.1 AVANT-PROPOS ……....................................................................................................................................33 A.2 USAGE PREVU ET RESTRICTIONS ...............................................................................................33 B) INSTALLATION .....…..........................................................................................................................................33 B.1 RETRAIT DE L’EMBALLAGE ET MANUTENTION DU PRODUIT ……………...........................................33 B.1.1 STOCKAGE ET TRANSPORT ……….………………...................................................33 B.1.2 INTEGRITE DE L’EMBALLAGE ………………..……….................…....................................…...33 B.1.3 RETRAIT DE L’EMBALLAGE ET MANUTENTION .......…...................................................…33 B.1.4 ELIMINATION DE L’EMBALLAGE ………..…………………...……...............……………...........33 B.2 MONTAGE DE L’UNITE SPLIT …………………………………………………..………...……………33 B.2.1 MONTAGE DE L’EVAPORATEUR ……………………………………..…….……………………33 B.2.2 MONTAGE DE L’UNITÉ DE CONDENSATION SUR LA CHAMBRE ……………………………33 B.2.3 MONTAGE DE L’UNITÉ DE CONDENSATION AU MUR ………………..………………………33 B.2.4 MONTAGE DE L’UNITÉ DE CONDENSATION SUPERPOSEE ……….……………………33 B.2.5 MONTAGE DES TUYAUX PRECHARGES POUR DES INSTALLATIONS MONOPHASÉES ..34 B.2.6 MONTAGE DES TUYAUX PRÉCHARGÉS POUR DES INSTALLATIONS TRIPHASÉES ..34 B.3 MONTAGE DU TABLEAU ELECTRIQUE ………………………………………………….……...…………34 B.4 BRANCHEMENT ELECTRIQUE ………………………………………..……………….……...……………34 C) MISE EN SERVICE DE L’INSTALLATION ……………………………………………………………………………34 D) UTILISATION DE L’INSTALLATION …………...………………………………………………………………………34 D.1 DESCRIPTION ET FONCTIONNEMENT DU TABLEAU DE COMMANDE ………………………………..34 D.1.2 MESSAGE D’ALARME ………..…………………………………………………….35 D.1.2.1 MESSAGE D’ALARME LIE A DES SONDES EN PANNE …………………………35 D.2 REGLAGE DES PARAMETRES DE L’INSTRUMENT …….…………………….…………………………35 D.3 COPY CARD ………………………………………………………...……………………………………………….35 D.4 NORMES POUR UNE BONNE UTILISATION DE L’INSTALLATION ……………………………...35 E) ENTRETIEN …………………………………………………………………………………………………………37 E.1 ENTRETIEN ORDINAIRE ………………….…………….………………………………………….37 E.2 ENTRETIEN EXTRAORDINAIRE ……………………………………………………………………………37 F) ANOMALIES DE FONCTIONNEMENT ……………………………………………………………………………37 G) ELIMINATION DES DECHETS ET MISE A LA DECHARGE …………………………………………………....…37 DONNEES TECHNIQUES ............................................................................................................................…............38 SCHEMAS ELECTRIQUES ………………………………………………………………………………….41 PIECES DETACHEES ......................................................................................................................….................…...45 DECLARATION DE CONFORMITE .....................................................................................................................…..52 MISA S.R.L. – VIA MONACHELLE VECCHIA, 7 – 00040 POMEZIA ( ROMA ) ITALY – TEL. 06/91.18.91 FAX 06/91.20.788 - 29 - EVAPORATEUR DIMENSIONS B [mm] 18 674 22 674 26 974 Fig. 1 INSTALLATION MEP18 MEP26-50-70 MEN20 MEN28 A [mm] 678 B [mm] 412 C [mm] 298 1.048 782 298 865 597 375 Fig. 2 MISA S.R.L. – VIA MONACHELLE VECCHIA, 7 – 00040 POMEZIA ( ROMA ) ITALY – TEL. 06/91.18.91 FAX 06/91.20.788 - 30 - Fig. 2 Fig. 3 Fig. 4 MISA S.R.L. – VIA MONACHELLE VECCHIA, 7 – 00040 POMEZIA ( ROMA ) ITALY – TEL. 06/91.18.91 FAX 06/91.20.788 - 31 - Fig. 6 MISA S.R.L. – VIA MONACHELLE VECCHIA, 7 – 00040 POMEZIA ( ROMA ) ITALY – TEL. 06/91.18.91 FAX 06/91.20.788 - 32 - B.1.3 ENLEVEMENT DE L’EMBALLAGE ET MANIPULATION A) INFORMATIONS GENERALES A.1 PREAMBULE Ce manuel a pour but de fournir toutes les informations nécessaires pour effectuer correctement l’installation, l’utilisation et l’entretien du système. Il fait partie intégrante et essentielle du produit et devra être livré à l’utilisateur. Avant chaque opération, lire attentivement les instructions suivantes. Le constructeur décline toute responsabilité pour toute opération effectuée sur le système en négligeant les indications suivantes. A.2 DESTINATION RESTRICTIONS D’USAGE ET Le système MS a été conçu et construit pour être installé sur des cellules destinées à la réfrigération et à la conservation de produits alimentaires. Toute autre utilisation est considérée comme impropre et donc dangereuse. Il est recommandé de protéger l’appareil d’un usage impropre qui pourrait constituer un danger. Le constructeur décline toute responsabilité pour des dommages causés sur des personnes ou objets dus à des erreurs d’installation, d’utilisation et toutefois de non observation des instructions fournies par le constructeur. L’emballage du MS est prédéfini pour être manipulé par un chariot à fourches. Pour ne pas griffer les tôles, il est conseillé de déplacer le système en utilisant sa palette jusqu’à proximité de la zone d’installation. Pour ôter l’emballage, dévisser les vis posées dans la partie inférieure et soulever l’emballage. ATTENTION : sur la paroi supérieure de la machine, à proximité du ventilateur, un œillet est prévu pour soulever et positionner la machine dans l’espace prédéfini sur la cellule. B.1.4 DEMANTELEMENT L‘EMBALLAGE Le démantèlement des emballages doit être fait en conformité avec les normes en vigueur dans le pays où le produit est utilisé. Les composants en matériau plastique sujets à un éventuel démantèlement avec recyclage sont contresignés de la façon suivante : polyéthylène : sachet instructions polystyrène mousse : protections A.3 CONTROLE Nos appareils sont étudiés et optimisés grâce à des tests de laboratoire, pour obtenir des prestations et des rendements élevés et grâce à un contrôle en fin de ligne dont le compterendu d‘essais est annexé à ce document. B) INSTALLATION Pour assurer un fonctionnement correct du produit et le maintien des conditions de sécurité durant l’utilisation, suivre scrupuleusement les instructions reportées dans le paragraphe suivant. L’installation du système doit être réalisée en conformité avec les normes en vigueur concernant la conception, l’installation et l’entretien des installations frigorifiques et doit être effectuée par du personnel professionnellement qualifié selon les instructions du constructeur. L’installation électrique d’alimentation des unités devra être réalisée selon les normes CEI et dans le respect des Lois n° 186/68 et n° 46/90. Une mauvaise installation peut entraîner des dommages sur des personnes ou des objets, à l'égard desquels le constructeur ne peut être considéré comme responsable. ATTENTION : Ne pas lancer le système tant que l’installation de mise à terre n’est pas reliée. B.1 DEBALLAGE ET MANIPULATION DU PRODUIT B.1.1 EMMAGASINAGE ET TRANSPORT Stocker la machine dans un endroit sec et à l'abri des intempéries dans son emballage d'origine. La température d’emmagasinage doit être comprise entre -20°C et 60°C. Au cours du transport, utiliser l’emballage d’origine et éviter les secousses et les chocs. B.1.2 INTEGRITE DE L’EMBALLAGE Avant de procéder au déballage du produit, vérifier son intégrité et les protections éventuelles. Les dommages éventuels doivent être immédiatement signalés au transporteur. Toutefois, dans tous les cas, aucun appareil endommagé ne pourra être rendu au constructeur sans préavis et autorisation préalable écrite. DE PS carton comprimé : protections PC B.2 MONTAGE DE L’UNITE SPLIT B.2.1 MONTAGE DE L’EVAPORATEUR Installations monophasées : Démonter le carter en plastique. Réaliser 4 trous d’ancrage de Ǿ 3,5 sur le plafond et bloquer l’évaporateur par les vis Ǿ 4,2 x 13 comme indiqué dans la FIG. 1. Installations triphasées : Démonter les carters latéraux de l’évaporateur. Réaliser 4 trous Ǿ12 sur le plafond de la chambre froide selon les dimensions indiquées pour permettre le remplacement des résistances de dégivrage dans le cas de pannes. Monter l’évaporateur par des barres filetées, plaques, écrous et rondelles fournis. B.2.2 MONTAGE DE L’UNITE DE CONDENSATION SUR LA CHAMBRE Monter la fixation d’angle avec 9 rivets ø 4 x 9,5 comme indiqué sur la FIG.2. Accrocher l’unité de condensation en interposant la garniture adhésive 3 x 10 entre l’unité et la chambre. B.2.3 MONTAGE DE L’UNITE CONDENSATION AU MUR DE Monter la fixation murale avec 4 chevilles M6 x 50, comme indiqué sur la FIG.3 Accrocher l’unité de condensation en interposant la garniture adhésive 3 x 10 entre l’unité et le mur. B.2.4 MONTAGE DE L’UNITE CONDENSATION SUPERPOSEE DE Effectuer les opérations suivantes, comme indiqué sur la FIG.5: 1.) Visser le pied au montant avec le N°6 vis et écrous M8 fournis 2.) Placer la première unité de condensation et la bloquer avec les vis M8 fournies MISA S.R.L. – VIA MONACHELLE VECCHIA, 7 – 00040 POMEZIA ( ROMA ) ITALY – TEL. 06/91.18.91 FAX 06/91.20.788 - 33 - 3.) Placer les 2 entretoises en bois aux angles de l’unité déjà montée et poser la seconde unité. Les 6 trous de fixation coïncideront parfaitement et il sera possible de bloquer l’unité avec les vis M8. Retirer les deux entretoises et répéter l’opération dans le cas d’une superposition d’une troisième unité 4.) A ce moment-là, bloquer au sol l’ensemble avec les 4 trous présents sur les pieds après avoir préparé une zone d’appui parfaitement à niveau. 5.) En cas de superpositions mixtes d’unités de condensation triphasées et monophasées, utiliser pour les monophasées les entretoises en aluminium et les vis plus longues fournies (kit fourni en option par Misa). B.2.5 MONTAGE DES TUYAUX PRÉ CHARGÉS POUR DES INSTALLATIONS MONOPHASÉES ATTENTION : LE RACCORD RAPIDE FEMELLE ET LE MALE CORRESPONDANT DOIVENT ETRE PARFAITEMENT ALIGNES AVANT DE COMMENCER LE SERRAGE, DE MANIERE A EVITER D’ABIMER LE FILETAGE. LE SERRAGE DU RACCORD RAPIDE FEMELLE DANS LE MALE DOIT SE PRODUIRE DE MANIERE RAPIDE ET COMPLETE AFIN QUE LES GARNITURES CREENT LA BONNE ETANCHEITE. UN SERRAGE PARTIEL DU RACCORD PEUT PROVOQUER LA PERTE DU GAZ DE L’INSTALLATION Réaliser sur la chambre froide un trou diamètre 50 mm dans la position la plus approprié pour la sortie des tuyaux (gaz et liquide) et des câbles électriques de l’évaporateur. Visser les tubes sur les raccords rapides relatifs côté évaporateur et côté unité de condensation, en prenant soin de ne pas inverser le tube du liquide et le tube du gaz chaud. Modeler les tubes sur tout leur parcours en prenant soin de les plier avec un rayon adapté et éviter les étranglements qui compromettraient le bon fonctionnement de l’installation B.2.6 MONTAGE DES TUYAUX PRÉ CHARGÉS POUR DES INSTALLATIONS TRIPHASÉES Réaliser sur la chambre froide un trou diamètre 50 mm dans la position la plus approprié pour la sortie des tuyaux (gaz et liquide) et des câbles électriques de l’évaporateur. Monter les raccords fournis sur les robinets de l’unité de condensation ; réaliser les 4 soudures ; réaliser le vide côté tuyaux et évaporateur par les soupapes à pointeau ¼” des robinets. B.3 MONTAGE ÉLECTRIQUE DU TABLEAU Monter le tableau électrique sur la paroi de la chambre froide par les quatre vis fournies. Après avoir serré les vis, appliquer les 4 bouchons dans le logement prévu de la vis, afin de garantir le degré de protection IP65 .Effectuer les branchements électriques en branchant le câble des sondes et le câble à 7 pôles de l’évaporateur, le câble provenant de l’unité de condensation et le câble d’alimentation. B.4 BRANCHEMENT ELECTRIQUE L’alimentation doit être effectuée avec un câble de section 3 x 2,5 à l’aide d’un interrupteur magnétothermique avec une ouverture des contacts de minimum 3 mm, ou avec une prise polarisée ; dans les deux cas, la disposition de sectionnement doit être visible. ATTENTION : La sécurité électrique de l’appareil n’est garantie que si ce dernier est correctement relié à un équipement de mise à la terre efficace, comme prévu par les normes de sécurité en vigueur. Vérifier que la tension de ligne correspond à la tension indiquée sur la plaquette. La tolérance autorisée est de +/10% de la valeur nominale. Les opérations d’installation doivent être exclusivement effectuées par du personnel qualifié, conformément aux normes en vigueur. C) MISE EN SERVICE DE L’INSTALLATION Appuyer sur l’interrupteur compresseur de la FIG.4. Paramétrer la température d’exercice de la cellule pour changer la température déjà paramétrée. Pour afficher le point de réglage, appuyer et relâcher la touche « set ». L’étiquette « set » apparaîtra ; appuyer de nouveau sur la touche set pour afficher la valeur paramétrée. Pour changer la valeur du point de réglage, appuyer avant 15 secondes, sur les touches et . ATTENTION : dans le cas d’installations de réfrigération à basse température, il est recommandé de mettre la cellule à la température de fonctionnement de façon graduelle pour ne pas créer de pressions excessives qui pourraient endommager la cellule. D) UTILISATION DU SYSTEME ATTENTION : tous les systèmes MS sont conçus de façon à ce que l’utilisateur puisse accéder à toutes les fonctions sans intervenir à l’intérieur du système. Le constructeur décline toute responsabilité en cas de dommages sur des personnes ou objets dus à des interventions de personnel non spécialisé à l’intérieur du système. L’utilisateur en remplissant les fonctions de monitorage et les variations des paramètres de fonctionnement doit agir exclusivement sur l’instrumentation externe du cadre de commande représenté sur la FIG.4. D.1 DESCRIPTION ET FONCTIONNEMENT DU CADRE DE COMMANDE Les fonctions du tableau de commande de la chambre froide, représenté dans la FIG. 4 sont : - Interrupteur général L’allumage est signalée par le bouton lumineux vert - Touche SET Tenir pressé pendant 5 secondes et on accède à la programmation de l’instrument. - Touche UP Touche pour augmenter les valeurs programmées. - Touche DOWN Touche pour diminuer les valeurs programmées. - Touche ECLAIRAGE CHAMBRE L’allumage est signalé par la lumière incorporée. - Touche ESC (sortie) Touche sortie du menu. Si pressé pendant 2 secondes un dégivrage supplémentaire sera provoqué. - Touche ON / OFF Touche pour allumer ou éteindre l’instrument. MISA S.R.L. – VIA MONACHELLE VECCHIA, 7 – 00040 POMEZIA ( ROMA ) ITALY – TEL. 06/91.18.91 FAX 06/91.20.788 - 34 - Dans la modalité OFF toutes les fonctions de l’équipement sont déshabilitées sauf la touche éclairage chambre froide. - Témoins lumineux de signalement : la partie supérieure de l’afficheur reporte les témoins lumineux ci-dessous avec les symboles et leur signification : Compresseur ou relais 1: ON pour compresseur allumé ; clignotant pour retard, protection ou activation bloquée. Dégivrage : ON pour dégivrage en cours ; clignotant pour activation manuelle. Alarme: ON pour alarme active ; clignotant pour alarme arrêtée. Ventilateurs : ON pour ventilateur en marche. IMPORTANT : L’instrument électronique de contrôle est directement programmé par le fabricant selon les paramètres optimaux de fonctionnement ; il est donc conseillé de ne pas modifier ces paramètres sans avoir préalablement consulté nos bureaux afin de ne pas provoquer de réduction des prestations de l’installation et des dysfonctionnements. Le personnel spécialisé souhaitant accéder aux paramètres de fonctionnement de l’instrument doit suivre les instructions fournies avec le tableau électrique. D.1.2 MESSAGE D’ALARME L’instrument prévoit la possibilité de régler et de signaler sur l’afficheur certaines conditions d’alarmes. Inférieur ou égal à 30/35 kg par mètre cube de chambre par jour. 3 - Porte à bandes Il est toujours conseillé d’installer sur les chambres à basse température une porte à bandes pour éviter l’introduction excessive d’air provenant de l’extérieur. Elle est indispensable en cas d’ouvertures fréquentes de la porte. 4 - Limites de charge La marchandise stockée dans la chambre ne doit pas dépasser la limite inférieure du diffuseur d’air froid. 5 - Conditions environnementales : Vérifier que l’installation n’est pas directement exposée aux rayons du soleil. Vérifier que la température ambiante, à proximité de l’unité de condensation ne dépasse pas 43°C et n’est pas inférieure à -3°C. 6 - Chambres à basse température ATTENTION : Il est indispensable de monter une vanne de compensation. 7 - Tableau électrique sur la chambre froide (FIG.4): ATTENTION : Éviter les jets d’eau directs sur le tableau électrique quand la porte n’est pas parfaitement fermée : le degré de protection IP65 n’est garanti que si la porte est fermée. D.1.2.1 MESSAGE D’ALARME LIE A DES SONDES EN PANNE L’afficheur de l’instrument indiquera : E1 – La sonde chambre en panne E2 – La sonde dégivrage en panne Le remplacement de la sonde en panne devra être effectué au plus vite par du personnel technique spécialisé. D.2 REGLAGE DES PARAMETRES DE L’INSTRUMENT L’instrument est programmé avec les valeurs indiquées dans le tableau qui suit. Pour les interventions du personnel spécialisé destinées à modifier les paramètres de fonctionnement, consulter le volet technique joint à ce manuel. D.3 COPY CARD La Copy Card est une fiche en option qui se branche directement à la sortie série TTL de l’instrument. En accédant à l’aide du clavier aux paramètres du dossier FPr, il sera possible d’enregistrer dans la Copy Card les informations dans un autre instrument. En effet, le dossier FPr contient deux opérations : 1. UPLOAD (UL): insertion de paramètres de programmation (de l’instrument vers la Copy Card) 2. DOWNLOAD (DL): insertion des paramètres de programmation (de la Copy Card vers l’instrument) Un « Y » apparaitra sur l’afficheur si l’opération s’est bien déroulée ou un « n » dans le cas contraire. D.4 NORMES POUR LA BONNE UTILISATION DE L’INSTALLATION Les installations MS sont conçues pour la conservation de marchandises fraiches (0/+8°C) ou surgelées (-18/-25°C). Par conséquent, il faut respecter les prescriptions suivantes : 1 – Ouverture des portes Programmer les mouvements de marchandise de manière à réduire le nombre d’ouvertures de la porte et à ne pas les concentrer dans le temps. 2 - Mouvement quotidien de la marchandise MISA S.R.L. – VIA MONACHELLE VECCHIA, 7 – 00040 POMEZIA ( ROMA ) ITALY – TEL. 06/91.18.91 FAX 06/91.20.788 - 35 - INSTRUMENT ELIWELL / VALEURS PARAMETREES CP dEF FAn AL IWC 750 LX Set diF HSE LSE OSP Cit CAt Ont OFt dOn dOF dbi OdO dtY dit dCt dOH dEt dPO dSt FSt Fad Fdt dt dFd FCO Fod FdC Description Point de consigne de réglage Différentiel d’intervention Valeur maximale attribuable au point de consigne Valeur minimale attribuable au point de consigne Offset point de consigne Temps minimum d’activation sortie compresseur Temps maximum d’activation sortie compresseur Temps d’allumage du compresseur en cas de sonde en panne Temps de désactivation du compresseur en cas de sonde en panne Retard activation sortie compresseur à partir de l’allumage Retard activation sortie compresseur à partir de l’arrêt Temps de retard entre deux allumages consécutifs du compresseur Temps de retard de l’activation des sorties à l’allumage Type de dégivrage Intervalle entre les dégivrages Mode de comptage de l’intervalle de dégivrage Temps de retard d’activation du cycle de dégivrage à partir de l’allumage Time out dégivrage Dégivrage au moment de l’allumage Température de fin de dégivrage Température de blocage des ventilateurs de l’évaporateur Différentiel d’intervention des ventilateurs de l’évaporateur Temps de retard des ventilateurs de l’évaporateur après un cycle de dégivrage Temps d’égouttement Exclusion des ventilateurs de l’évaporateur pendant le dégivrage Etat des ventilateurs de l’évaporateur en cas de sortie compresseur Etat des ventilateurs de l’évaporateur en cas de porte ouverte Temps de retard de l’arrêt des ventilateurs de l’évaporateur après l’extinction du compresseur MEP 0 3 10 ‐2 0 0 0 0 0 0 0 2 0 0 6 1 0 30 n 12 25 2 4 2 y n n 0 MEN ‐21 3 ‐10 ‐21 0 0 0 0 0 0 0 2 0 0 4 1 0 30 n 12 10 2 4 2 y n n 0 Fon FoF Att Afd HAL LAL PAO dAO OAO tdO tAO dAt EAL AOP dSd OFL Temps d’activation des ventilateurs de l’évaporateur en mode régulateur cyclique Temps de désactivation des ventilateurs de l’évaporateur en mode régulateur cyclique 0 0 0 2 50 ‐50 4 180 1 10 30 n n 1 y y 0 0 0 2 50 ‐50 4 180 1 10 30 n n 1 y y y 0 0 0 n 0 n y 0 0 0 n 0 n Lit dOd dAd dEA Add FAA LOC diS PA1 ndt Modalités paramètre HAL et LAL Différentiel d’intervention des alarmes Seuil alarme température maximale Seuil alarme température minimale Exclusion des alarmes à l’allumage Temps d’exclusion des alarmes de température après un cycle de dégivrage. Temps d’exclusion des alarmes haute et basse température après la fermeture Temps d’exclusion de l’alarme de porte ouverte Temps de retard signalement des alarmes de température Signalement de l’alarme après dégivrage terminé pour time‐out Alarme extérieure de blocage des régulateurs Polarité de la sortie de l’alarme Activation du relais lumière par interrupteur porte Activation/désactivation de la lumière de la chambre au moyen de la touche pendant le retard réglé Activation/désactivation des services sur activation de l’interrupteur Retard de l’activation des entrées numériques Adresse dispositif Adresse famille Activation blocage clavier Valeur mot de passe Affichage avec point décimal MISA S.R.L. – VIA MONACHELLE VECCHIA, 7 – 00040 POMEZIA ( ROMA ) ITALY – TEL. 06/91.18.91 FAX 06/91.20.788 - 36 - CA1 CA2 ddL dro H06 H11 H21 H22 H23 H24 H25 H26 H31 H32 H33 H34 H42 Calibrage sonde chambre Calibrage sonde évaporateur Blocage des ressources à la fin du dégivrage Sélection °C / °F 0 0 0 0 0 0 0 0 Touche ou entrée numérique auxiliaire / lumière actifs lorsque l’instrument est éteint y y Configuration et polarité de l’entrée numérique 3 3 Configuration sortie numérique 1 (A) 1 1 Configuration sortie numérique 2 (B) 2 2 Configuration sortie numérique 3 (C) 3 3 Configuration sortie numérique 4 (D) 4 4 CnF Configuration sortie numérique 5 (E) 5 5 Configuration sortie numérique 6 (Buzzer) 4 4 Configuration touche UP 1 1 Configuration touche DOWN 0 0 Configuration touche ESC 1 1 Configuration touche Free 2 2 Présence sonde évaporateur y y - Température ambiante excessive (changement E) ENTRETIEN d’air insuffisant) E.1 ENTRETIEN ORDINAIRE On rappel qu’après l’arrêt, le compresseur repart ATTENTION : l’utilisateur ne doit en aucun cas ouvrir le MS. automatiquement mais il est nécessaire de trouver la cause Le constructeur décline toute responsabilité en cas de qui a provoqué l’arrêt. Faites intervenir un technicien si dommages sur des personnes ou objets et pour des mauvais l’inconvénient persiste. fonctionnements dus à des interventions effectuées par du 2 – Formation de glace sur l’évaporateur personnel non spécialisé. Les causes possibles peuvent être : Il est recommandé pour le bon fonctionnement de - paramétrage erroné du thermostat (pour MS l’installation de nettoyer tous les 2 ou 3 mois les ailettes du positifs) condensateur positionné sur le côté opposé à celui des - Ouvertures de la porte de la cellule trop fréquentes ventilateurs ; cela doit être effectué avec un jet d'air (voir point D.4) comprimé ou avec une brosse à poils longs et sans ouvrir le - Introduction de denrées à température supérieure MS. à celle prévue (non supérieur à 20°C pour des S’assurer, dans le cas où le MS est installé dans un cellules positives, non supérieur à -14°C pour des environnement fermé, qu’un changement d'air est toujours cellules à basse température) garanti. ATTENTION : durant la phase de dégivrage, une hausse de En cas de panne de la lampe, la remplacer avec une lampe la température a lieu. Cela est prévu pour permettre à de puissance égale en coupant d’abord le courant du l’évaporateur de se libérer des formations de givre ou de système. glace. Le dégivrage est signalé par l’allumage de la Del E.2 ENTRETIEN EXTRAORDINAIRE de l’instrument électronique. ATTENTION : toutes les opérations d’entretien extraordinaire doivent être effectuées par du personnel qualifié selon les G) ECOULEMENT DES DECHETS ET modalités décrites dans ce livret d’instruction. IMPORTANT : avant toute opération d’entretien ou de MISE HORS SERVICE nettoyage, couper le courant de la machine. A la fin du cycle de vie du système, éviter que le gaz En cas d’endommagement du câble d’alimentation sur les réfrigérant R404A et l’huile POE soient dispersés dans appareils monophasés, remplacer par un câble avec des l'environnement. terminaux faston 6.3 mm plus des couvres-faston et un ATTENTION : les opérations de démontage doivent être terminal à œillet sur le câble conducteur de terre. toutefois effectuées par du personnel qualifié. Démonter l’installation en regroupant les composants selon F) ANOMALIES DE leur nature chimique. FONCTIONNEMENT Un stockage provisoire des déchets spéciaux est autorisé 1 – Blocage du compresseur dans l’attente du démantèlement par traitement et/ou Une élévation anormale de la température de la cellule a lieu. stockage définitif. Le compresseur est équipé d’un dispositif de sécurité qui en Les lois en vigueur dans le pays de l’utilisateur en matière de arrête la marche quand des conditions de danger ont lieu protection de l’environnement doivent être observées. Dans comme les suivantes : les différents pays, des législations différentes sont en - Mauvais fonctionnement du ventilateur du vigueur, il faut donc observer les prescriptions imposées par condensateur la loi et par les organismes préposés des Pays dans lesquels - Condensateur sale (voir point E.1) la démolition a lieu. - Sauts de tension élevés dans le réseau d’alimentation MISA S.R.L. – VIA MONACHELLE VECCHIA, 7 – 00040 POMEZIA ( ROMA ) ITALY – TEL. 06/91.18.91 FAX 06/91.20.788 - 37 - DATEC 100 07-2011/C 06-2006/B DATI TECNICI TECHNICAL DATA TECHNISCHE DATEN DONNEES TECNIQUES IMPIANTO UNIT ANLAGE SYSTEME MISAERM MEP 7 MEP 13 MEP 16 MEP 18 MEP 26 MEP 50 MEP 70 MEN 6 MEN 13 MEN 20 MEN 28 MISA S.R.L. – VIA MONACHELLE VECCHIA, 7 – 00040 POMEZIA ( ROMA ) ITALY – TEL. 06/91.18.91 FAX 06/91.20.788 - 38 - DATI TECNICI – TECHNICAL DATA MODELLO/ MODEL POTENZA NOMINALE/ VOLT NOMINAL (50 Hz) POWER HP WATT ASSORBITI GAS / WATT INPUT IMBALLO/ PACKING FRIGODIFFUSORI/ EVAPORATOR DIMENSIONI / DEFROS DIMENSIONS T mm FAN AIR LxPxH W N°xǾ m3/h GEP 05 230/1 0,5 680 80x43x17 585 2x230 850 MEP 13 GEP 75 230/1 0,75 830 80x43x17 585 2x230 850 MEP 16 GEP 11 230/1 1,1 950 113x43x17 825 3x230 1250 MEP 18 GEP 17 380/3N 1,7 1120 68x33x42 1220 1x275 950 MEP 26 GEP 21 380/3N 2,1 1340 105x33x42 2160 2x275 1800 MEP 50 GEP 23 380/3N 2,3 1980 105x33x42 2160 2x275 1800 MEP 70 GEP 27 380/3N 2,7 2200 105x33x42 2160 2x275 1800 MEN 6 GEN 12 230/1 1,2 740 80x43x17 585 2x230 850 MEN 13 GEN 17 230/1 1,7 960 113x43x17 825 3x230 1250 MEN 20 GEN 20 380/3N 2,0 1430 105x33x42 2160 2x275 2000 MEN 28 GEN 30 380/3N 3,0 1760 87x46x49 2075 1x350 2700 R404A MEP 7 DIM. IMB./ CRATE DIM. UNITA' COND. MONO / UNITA' COND. TRIFASE 57x85x72 MODELLO / MODEL UNITA' CONDENSANTI/ CONDENSING UNIT IMP. MONO 66x120x81 / IMP. TRIFASE 85x111x93 IMP./ PLANT PESO/ WEIGHT KG 48/27 53/32 61/36 122/87 124/87 132/95 135/96 59/38 59/38 132/98 135/98 Fig. 6 MISA S.R.L. – VIA MONACHELLE VECCHIA, 7 – 00040 POMEZIA ( ROMA ) ITALY – TEL. 06/91.18.91 FAX 06/91.20.788 - 39 - Fig. 7 MODELLO / MODEL MEP 7 MEP 13 MEP 16 MEP 18 MEP 26 MEP 50 MEP 70 MEN 6 MEN 13 MEN 20 MEN 28 MODELLO / MODEL DIAMETRO TUBAZIONI / TUBE DIAMETER DISTANZA FINO A / DISTANCES UO TO 10 METRI LIQUIDO / LIQUID GAS 6 14 14 6 14 6 14 10 10 16 10 16 10 18 6 14 6 14 10 16 10 18 QUANTITA’ DI GAS UNITA CONDENSANTE + EVAPORATORE / QUANTITY OF GAS FOR CONDENSING UNIT AND EVAPORATOR MEP 7 1.000 g MEP 13 1.000 g MEP 16 1.000 g MEP 18 2.000 g MEP 26 2.000 g MEP 50 2.000 g MEP 70 2.000 g MEN 6 1.500 g MEN 13 1.700 g MEN 20 2.000 g MEN 28 2.000 g MISA S.R.L. – VIA MONACHELLE VECCHIA, 7 – 00040 POMEZIA ( ROMA ) ITALY – TEL. 06/91.18.91 FAX 06/91.20.788 - 40 - SCHEL 100 07-2011/C 06-2006/B SCHEMI ELETTRICI ELECTRICAL WIRING DIAGRAMS SCHEMAS ELECTRIQUES ELEKTRISCHE SCHEMATA IMPIANTO UNIT ANLAGE SYSTEME MISAERM MEP 7 MEP 13 MEP 16 MEP 18 MEP 26 MEP 50 MEP 70 MEN 6 MEN 13 MEN 20 MEN 28 MISA S.R.L. – VIA MONACHELLE VECCHIA, 7 – 00040 POMEZIA ( ROMA ) ITALY – TEL. 06/91.18.91 FAX 06/91.20.788 - 41 - LEGENDA SCHEMI ELETTRICI WIRING DIAGRAMS LEGENDE SCHEMAS ELECTRIQUES LEGENDE DER SCHALTPLÄNE / WIRING DIAGRAMS IWC 750 LX TASTIERA KEYBOARD IC INTERUTTORE COMPRESSORE COMPRESSOR SWITCH UC UNITA‘ CONDENSANTE CONDENSING UNIT LC LUCE CELLA COLDROOM LIGHT EV AEROEVAPORATORE EVAPORATOR VE VENTILATORI EVAPORATORE EVAPORATOR FAN VS VALVOLA SOLENOIDE SOLENOID VALVE L FUSIBILE F20 20A FUSE F20 20A HPV PRESSOSTATO VENTILATORE FAN PRESSURE SWITCH HLP PRESSOVAQUOSTATO HP/LP PRESSURE SWITCH HPV PRESSOSTATO VENTILATORE CONDENSATORE FAN PRESSURE SWITCH HPC (OPZIONE/OPTION) PRESSOSTATO COMPRESSORE SWITCH COMPRESSOR VSG VALVOLA SOLENOIDE GAS CALDO HOT GAS SOLENOID VALVE MSP (OPZIONE/OPTION) MICROSWITCH PORTA DOOR MICROSWITCH RC (OPZIONE/OPTION) RESISTENZA CARTER COMPRESSORE CARTER HEATING ELEMENT REA RESISTENZA EVAPORAZIONE ACQUA EVAPORATOR WATER HEATER K1 CONTATTORE COMPRESSORE CONTACTOR COMPRESSOR K2 RELE’ SBRINAMENTO DEFROST RELAY K3 RELE’ RESISTENZA CARTER CARTER HEATING RELAY MISA S.R.L. – VIA MONACHELLE VECCHIA, 7 – 00040 POMEZIA ( ROMA ) ITALY – TEL. 06/91.18.91 FAX 06/91.20.788 - 42 - SCHEMA ELETTRICO MONOFASE / SINGLE-PHASE ELECTRICAL DIAGRAM (SE113028) MISA S.R.L. – VIA MONACHELLE VECCHIA, 7 – 00040 POMEZIA ( ROMA ) ITALY – TEL. 06/91.18.91 FAX 06/91.20.788 - 43 - SCHEMA ELETTRICO TRIFASE / THREE-PHASE ELECTRICAL DIAGRAM (SE113029) MISA S.R.L. – VIA MONACHELLE VECCHIA, 7 – 00040 POMEZIA ( ROMA ) ITALY – TEL. 06/91.18.91 FAX 06/91.20.788 - 44 - PARTI DI RICAMBIO SPARE PARTS ERSATZEILE PIECES DE RECHANGE IMPIANTO UNIT ANLAGE SYSTEME MISAERM PARIC 100 MEP 7 MEP 13 MEP 16 MEP 18 MEP 26 MEP 50 MEP 70 07-2011/C 06-2006/B MEN 6 MEN 13 MEN 20 MEN 28 MISA S.R.L. – VIA MONACHELLE VECCHIA, 7 – 00040 POMEZIA ( ROMA ) ITALY – TEL. 06/91.18.91 FAX 06/91.20.788 - 45 - MISAERM MEP7 – MEP13 – MEP16 – MEN6 – MEN13 Fig. 9 ABB. 9 MISA S.R.L. – VIA MONACHELLE VECCHIA, 7 – 00040 POMEZIA ( ROMA ) ITALY – TEL. 06/91.18.91 FAX 06/91.20.788 - 46 - POS. N. CODE 1 017754 1 017852 1 017652 1 017596 1 017597 2 016920 2 016913 2 016914 2 016923 2 016924 3 017109 3 017110 3 017102 4 017100 4 017113 4 017103 5 017707 6 018304 7 017840 8 018617 9 017342 9 017348 10 018418 11 016736 11 016719 12 011953 12 011951 13 024116 13 024117 14 016816 14 016812 15 032627 16 032629 17 032628 18 032630 19 033025 19 033026 19 032989 DESCRIZIONE - DESCRIPTION COMPRESSORE ASPERA NEK6213GK COMPRESSOR ASPERA NEK6213GK COMPRESSORE ASPERA NT6222GK COMPRESSOR ASPERA NT6222GK COMPRESSORE ASPERA NJ9226GK COMPRESSOR ASPERA NJ9226GK COMPRESSORE ASPERA NJ2192GK COMPRESSOR ASPERA NJ2192GK COMPRESSORE ASPERA NJ2212GK COMPRESSOR ASPERA NJ2212GK RELE AVVIAMENTO STARTING RELAY RELE AVVIAMENTO STARTING RELAY RELE AVVIAMENTO STARTING RELAY RELE’ AVVIAMENTO STARTING RELAY RELE’ AVVIAMENTO STARTING RELAY COND.AVVIAM. 53/64 uF 330V STARTING CONDENSER 53/64 uf 330 V COND.AVVIAM. 88/108 uF 330V STARTING CONDENSER 88/108 uf 330 V COND.AVVIAM. 21/25 uF 330V STARTING CONDENSER 21/25 uf 330 V COND.MARCIA 15 uF 450V OPERATING CONDENSER 15uF 450 V COND. MARCIA 20 uF 450V RUN COND. 20 uF 450V COND.MARCIA 25 uF 450V OPERATING CONDENSER 25uF 450 V KLIXON PER NEK9213GK KLIXON FOR NE9213GK PRESSOSTATO DANFOSS KP5 PRESSURE SWITCH DANFOSS KP5 FILTRO DML 082 6mm FILTER DML 082 6mm RICEVITORE LT 2.4 RECEIVER LT 2.4 CONDENSATORE 2R10T600 CONDENSER STARCO 2R10T600 CONDENSATORE 3R10T600 CONDENSER STARCO 3R10T600 VALVOLA SOLENOIDE DANFOSS EVR3 SOLENOID VALVE DANFOSS EVR3 MOTORE MAVIB F18Y00000VB01 MOTOR MAVIB F18Y00000VB01 MOTORE MAVIB EFCR25Y0.A5 MOTOR MAVIB EFCR25Y0.A5 RETE MAVIB 036.0201.0000 GRID MAVIB 036.0201.0000 RETE MAVIB 036.0412.0000 GRID MAVIB 036.0412.0000 RETE MAVIB Ø 250 VERNICIATA GRID MAVIB Ø 250 PAINTED RETE MAVIB Ø 300 VERNICIATA GRID MAVIB Ø 300 PAINTED VENTOLA MAVIB EL.5.254.27AP FAN MAVIB EL5.254.27AP VENTOLA MAVIB EL.5.300.27AP FAN MAVIB EL5.300.27AP ATTACCO RAPIDO PREPARATO 1/2” CON VALV. QUICK JOINT 1/2” WITH VALVE ATTACCO RAPIDO PREPARATO 1/4” CON VALV. QUICK JOINT 1/4” WITH VALVE ATTACCO RAPIDO PREPARATO 1/2” QUICK JOINT 1/2” ATTACCO RAPIDO PREPARATO 1/4” QUICK JOINT 1/4” QUADRO ELETTRICO COMPLETO SB. EL. POS. COMPLETE ELECTRICAL PANEL SB. EL. POS. QUADRO ELETTRICO COMPLETO SB. EL. NEG. COMPLETE ELECTRICAL PANEL SB. EL. NEG. KIT SCATOLA ELETTRICA ELECTRIC BOX MEP7 MEP13 MEP16 MEN6 MEN13 X X X X X X X X X X X X X X X X X X X X X X X X X X X X X X X X X X X X X X X X X X X X X X X X X X X X X X X X X X X X X X X X X X X X X X X X X X X X X X X X X X X X X X X X X X X X X X X X MISA S.R.L. – VIA MONACHELLE VECCHIA, 7 – 00040 POMEZIA ( ROMA ) ITALY – TEL. 06/91.18.91 FAX 06/91.20.788 - 47 - 19 032988 20 017860 20 017861 21 015829 24 018997 24 018998 24 018968 25 016738 26 018459 26 018470 27 018461 27 018462 27 018471 28 016447 28 016448 29 017647 30 016433 31 018853 31 018859 KIT SPORTELLO KIT WINDOW STRUMENTO ELIWELL IWC 750LX SB. EL. POS. INSTRUMENT ELIWELL IWC 750LX SB. EL. POS. STRUMENTO ELIWELL IWC 750LX SB. EL. NEG. INSTRUMENT ELIWELL IWC 750LX SB. EL. NEG. INTERRUTTORE COMPRESSORE COMPRESSOR SWITCH EVAPORATORE SHS18 EVAPORATOR SHS18 EVAPORATORE SHS22 EVAPORATOR SHS22 EVAPORATORE SHS32 EVAPORATOR SHS32 VENTILATORE 220V 35W DIAM 230 FAN 220V 35W DIAM 230 VALVOLA TERMOSTATICA DANFOSS TS2 “N” THERMOSTATIC VALVE DANFOSS TS2 “N” VALVOLA TERMOSTATICA DANFOSS TS2 “NL” THERMOSTATIC VALVE DANFOSS TS2 “NL” ORIFICIO DANFOSS N°00 NOZZLE DANFOSS N°00 ORIFICIO DANFOSS N°01 NOZZLE DANFOSS N°01 ORIFICIO DANFOSS N°02 NOZZLE DANFOSS N°02 RESISTENZA SBRINAMENTO RCE023 DEFROSTING RESISTENCE RCE023 RESISTENZA SBRINAMENTO RCE024 DEFROSTING RESISTENCE RCE024 SONDA NTC PROBE NTC RESISTENZA SCARICO 100W UNLOADING RESISTENCE 100W CARTER EVAPORATORE SHS 18-22 EVAPORATOR CARTER SHS 18-22 CARTER EVAPORATORE SHS 32 EVAPORATOR CARTER SHS 32 X X X X X X X X X X X X X X X X X X X X X X X X X X X X X X X X X X X X X X X X X X X X X X X X X X X MISA S.R.L. – VIA MONACHELLE VECCHIA, 7 – 00040 POMEZIA ( ROMA ) ITALY – TEL. 06/91.18.91 FAX 06/91.20.788 X - 48 - MISAERM MEP18 –MEP26 –MEP50 –MEP70 –MEN20–MEN28 Fig. 10 ABB.10 MISA S.R.L. – VIA MONACHELLE VECCHIA, 7 – 00040 POMEZIA ( ROMA ) ITALY – TEL. 06/91.18.91 FAX 06/91.20.788 - 49 - POS. N. CODE 1 017653 1 017654 1 017655 1 017656 1 017599 1 017598 2 017339 2 017340 2 017338 3 018618 4 018419 5 018304 6 018303 7 017839 8 016719 9 011951 10 024117 11 016812 12 018557 13 018558 14 018562 15 015802 16 033025 16 033026 16 032989 16 032988 17 017860 17 017861 19 015829 21 018906 21 018908 21 018909 21 018914 21 018916 22 011873 22 011874 23 016749 23 016717 DESCRIZIONE - DESCRIPTION COMPRESSORE ASPERA NJ9232GS COMPRESSOR ASPERA NJ9232GS COMPRESSORE ASPERA NJ9238GS COMPRESSOR ASPERA NJ9238GS COMPRESSORE U.H. TFH4524Z COMPRESSOR U.H. TFH4524Z COMPRESSORE U.H. TFH4531Z COMPRESSOR U.H. TFH4531Z COMPRESSORE U.H. TFH2480Z COMPRESSOR U.H. TFH2480Z COMPRESSORE U.H. TFH2511Z COMPRESSOR U.H. TFH2511Z CONDENSATORE 3R14T620 CONDENSER 3R14T620 CONDENSATORE 4R14T620 CONDENSER 4R14T620 CONDENSATORE 4R14T620 TUB RIG CONDENSER 4R14T620 TUB. RIG. RICEVITORE LT 2.4 120x250B RECEIVER LT 2.4 120x250B VALVOLA SOLENOIDE DANFOSS EVR6 SOLENOID VALVE DANFOSS EVR6 PRESSOSTATO DANFOSS KP5 PRESSURE SWITCH DANFOSS KP5 PRESSOSTATO DOPPIO DANFOSS KP15 DOUBLE PRESSURE SWITCH DANFOSS KP15 FILTRO DANFOSS DML 083 10MM. FILTER DANFOSS DML 083 10MM. MOTORE MAVIB EFCR25Y0.A5 MOTOR MAVIB EFCR25Y0.A5 RETE MAVIB 036.0412.0000 GRID MAVIB 036.0412.0000 RETE MAVIB Ø 300 VERNICIATA GRID MAVIB Ø 300 PAINTED VENTOLA MAVIB EL.5.300.27AP FAN MAVIB EL5.300.27AP RUBINETTO CASTEL 6175/33 3/8” COCK CASTEL 6175/33 3/8” RUBINETTO CASTEL 6175/44 1/2” COCK CASTEL 6175/44 1/2” RUBINETTO CASTEL 6175/55 5/8” COCK CASTEL 6175/55 5/8” CONTATTORE A9-30-10 230V CONTACTOR A9-30-10-230V QUADRO ELETTRICO COMPLETO SB. EL. POS. COMPLETE ELECTRICAL PANEL SB. EL. POS. QUADRO ELETTRICO COMPLETO SB. EL. NEG. COMPLETE ELECTRICAL PANEL SB. EL. NEG. KIT SCATOLA ELETTRICA ELECTRIC BOX KIT SPORTELLO KIT WINDOW STRUMENTO ELIWELL IWC 750LX SB. EL. POS. INSTRUMENT ELIWELL IWC 750LX SB. EL. POS. STRUMENTO ELIWELL IWC 750LX SB. EL. NEG. INSTRUMENT ELIWELL IWC 750LX SB. EL. NEG. INTERRUTTORE COMPRESSORE COMPRESSOR SWITCH EVAPORATORE F27HC36E4 EVAPORATOR F27HC36E4 EVAPORATORE F27HC49E4 EVAPORATOR F27HC49E4 EVAPORATORE F27HC71E4 EVAPORATOR F27HC71E4 EVAPORATORE F27HC31E7 EVAPORATOR F27HC31E7 EVAPORATORE F35HC47E7 EVAPORATOR F35HC47E7 GRIGLIA VENTILATORE F27HC FAN GRID F27HC GRIGLIA VENTILATORE F35HC FAN GRID F35HC MOTORE VENTILATORE F27HC VENT. MOTOR F27HC MOTORE VENTILATORE F35HC VENT. MOTOR F35HC MEP18 MEP26 MEP50 MEP70 MEN20 MEN28 X X X X X X X X X X X X X X X X X X X X X X X X X X X X X X X X X X X X X X X X X X X X X X X X X X X X X X X X X X X X X X X X X X X X X X X X X X X X X X X X X X X X X X X X X X X X X X X X X X X X X X X X X X X X X X X X X X X X X X X X X X X X X X X X X MISA S.R.L. – VIA MONACHELLE VECCHIA, 7 – 00040 POMEZIA ( ROMA ) ITALY – TEL. 06/91.18.91 FAX 06/91.20.788 X X - 50 - 25 016818 26 018855 26 018856 26 018857 27 016461 27 016469 27 016470 27 016605 27 016606 27 016477 28 017647 29 018472 29 018467 30 018471 30 018468 30 018467 31 016433 VENTOLA MOTORE F27HC FAN MOTOR F27HC KIT BACINELLA F27HC 1 MOT. WATER BASIN KIT BACINELLA F27HC 2 MOT. WATER BASIN KIT BACINELLA F35HC 1 MOT. WATER BASIN RESISTENZA BATTERIA SHC01 BATTERY RESISTENCE SHC01 RESISTENZA BATTERIA SHC02 BATTERY RESISTENCE SHC02 RESISTENZA BATTERIA SHC30 BATTERY RESISTENCE SHC30 RESISTENZA BACINELLA SHB01 DRAYNG TRAY SHB01 RESISTENZA BACINELLA SHB02 DRAYNG TRAY SHB02 RESISTENZA BACINELLA SHB05 DRAYNG TRAY SHB02 SONDA NTC PROBE NTC VALVOLA TERMOSTATICA DANFOSS TES2 “N” THERMOSTATIC VALVE DANFOSS TES2 “N” VALVOLA TERMOSTATICA DANFOSS TES2 “NL” THERMOSTATIC VALVE DANFOSS TES2 “NL” ORIFICIO DANFOSS N°02 NOZZLE DANFOSS N°02 ORIFICIO DANFOSS N°03 NOZZLE DANFOSS N°03 ORIFICIO DANFOSS N°04 NOZZLE DANFOSS N°04 RESISTENZA SCARICO 100W UNLOADING RESISTENCE 100W X X X X X X X X X X X X X X X X X X X X X X X X X X X X X X X X X X X X X X X X MISA S.R.L. – VIA MONACHELLE VECCHIA, 7 – 00040 POMEZIA ( ROMA ) ITALY – TEL. 06/91.18.91 FAX 06/91.20.788 X X X - 51 - MISA S.R.L. -VIA MONACHELLE VECCHIA,7 00040 POMEZIA (ROMA) ITALY – TEL. 06/91 18 91 FAX 06/91 20 788 DICHIARAZIONE CE DI CONFORMITA’ – CE CONFORMITY DECLARATION CE KONFORMITATSERKLARUNG – DECLARATION CONFORMITE CE LA SOCIETA’ / COMPANY / FIRMA / SOCIETE : MISA S.R.L. – via Monachelle Vecchia,7 – 00040 POMEZIA (Roma) – Italy Dichiara sotto la propria responsabilità che il prodotto: / Declares under its own responsibility that the product:/ Erklart unter seiner verantwortung da das produkt / Dèclare sous sa responsasabilitè que le produit: MISAERM MEP 7 – 13 – 16 – 18 – 26 – 50 - 70 MEN 6 – 13 – 20 - 28 Risponde ai requisiti essenziali delle direttive: / Complies with the requirements of the following directives: / Es entsprichi den vorshriften: / Correspond aux qualitès requises des directives: 2006/95/CE 93/68/CE 89/336/CE MISA S.R.L. – VIA MONACHELLE VECCHIA, 7 – 00040 POMEZIA ( ROMA ) ITALY – TEL. 06/91.18.91 FAX 06/91.20.788 - 52 -