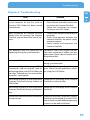
1
USER'S GUIDE
DATA TANK
EXTERNAL DUAL DISK HARD DRIVE / 3.5"
USB 2.0 / FIREWIRE 400 / 800
Win & Mac
Rev. 640
Freecom DataTank
Dear user,
GB
Thank you for choosing the Freecom DataTank as your external hard drive. To ensure
you get the best performance and ease of operation, please read this manual carefully
before using the Freecom DataTank.
Freecom Technologies GmbH • Germany
www.freecom.com
Package Contents
Please check the contents of the box to ensure it contains the following items:
•
Freecom DataTank (external hard drives)
•
Power pack
•
Data cables (USB 2.0, Firewire 400 and Firewire 800)
•
CD with user's guide, application software and safety guide
•
Quick Install Guide
Attention!
All rights reserved. The product names contained in this user's guide only are only used
for identification purposes and may be trademarks or registered trademarks of those
companies. This device is designed for office and home use.
Caution! This is a EN 55022 Class B device.
Freecom shall assume no liability for damages of any kind, for loss of data or any consequential claims resulting therefrom (including, and without restriction, claims relating to
the business losses, business interruptions, loss of business data or other financial claims)
that result from the use of this Freecom product or improper operation of this Freecom
product. This shall also apply in cases where Freecom has been notified that such claims
may exist.
Subject to change as technical advances dictate.
Table of Contents
User's Guide
GB
General Information............................................................................................................ Page 4
Safety Precautions................................................................................................................ Page 5
Freecom DataTank................................................................................................................ Page 6
Chapter 1:
Installing the Freecom Software (PC)............................................................................ Page 7
Chapter 2:
Hardware Installation.......................................................................................................... Page 11
Chapter 3:
Driver Installation................................................................................................................. Page 13
Chapter 4:
Freecom DataTank Configuration Software (PC)...................................................... Page 13
Installing the Freecom Software (Mac)......................................................................... Page 21
Sync Button and the Freecom Personal Media Suite User Interface (PC)........ Page 22
Using the Freecom Backup Software (PC)................................................................... Page 36
Chapter 5:
Partitioning the Freecom DataTank (PC)...................................................................... Page 48
Partitioning the Freecom DataTank (Mac)................................................................... Page 56
Chapter 6:
Troubleshooting.................................................................................................................... Page 57
© 2006 Freecom Technologies
Freecom DataTank
General Information
GB
Your system needs to meet the following hardware and software requirements for the
device to function properly.
System requirements
To use the Freecom DataTank, you will require the following components:
PC:
•
Intel/AMD CPU 700 MHz or faster
•
256 MB RAM or faster
•
CD ROM drive for installing the software
•
Free USB 2.0 or USB 1.1. port* or
•
Free Firewire 400 / Firewire 800 port
•
Internet connection for registering warranty online and downloading software
updates.
•
Operating system: Windows 2000, Windows XP, Windows Server 2003
Mac:
• Mac G3/G4/G5 or Power Book G3/G4 or faster
•
256 MB RAM or faster
•
CD ROM drive for installing the software
•
Free USB 2.0 or USB 1.1. port* or
•
Free Firewire 400 / Firewire 800 port
•
Internet connection for registering warranty online and downloading software
updates.
•
Operating system: Mac OS X v10.1 and later
* USB 2.0 is backward compatible with USB 1.1.
General Information
Precautionary measures
GB
To ensure that your Freecom DataTank functions properly, please take note of the following precautions. If these are not followed, you may void your warranty and damage
the Freecom DataTank.
•
Safely remove the Freecom DataTank via your operating system (the "unplug or eject
hardware" option in the Windows taskbar) before disconnecting the USB cable or
power cable and before switching off the device. Failing to do so may result in data
loss.
•
Do not drop the Freecom DataTank or expose it to other kinds of sudden mechanical
shocks as this may result in data loss and damage to the DataTank.
•
Do not use the Freecom DataTank when the ambient temperature is below 10°C or
above 35°C.
•
If the Freecom DataTank is moved from a cool environment to a warmer environment,
please allow the drive to acclimatize to the ambient temperature before operating
the device. Failing to do so may lead to condensation within the drive enclosure,
which in turn may cause the drive to malfunction.
•
Do not place liquids or drinks on the Freecom DataTank. When liquids are spilled and
get in contact with the electronics within the drive enclosure, it will damage the drive
and will cause the drive to malfunction.
•
Do not use the Freecom DataTank in a dusty environment. Dust inside the enclosure
may damage the internal electronics and result in drive malfunction.
•
Only use the power adapter that was supplied with the Freecom DataTank.
•
Opening the Freecom DataTank will void the warranty.
•
Since USB 2.0 is backwards compatible with USB 1.1, the Freecom DataTank can be
connected to all USB ports. When connected to a USB 1.1 port, however, the performance (data transfer rate) of the Freecom DataTank will be much lower than when the
drive is connected to a USB 2.0 port.
•
When using the Freecom Personal Media Suite software, please be aware that all files
in the SYNC folder on the Freecom DataTank are linked to the original files on your
PC or network. If you delete a file in the SYNC folder, its original will be deleted during the next synchronization, too! To avoid this, you have to ‘Split From Original’ the
file prior to deleting it. Please refer to chapter 4 for further information on Freecom
SYNC and Microsoft Briefcase.
Freecom DataTank
Freecom DataTank
GB
High speed data transfer via the USB 2.0 or Firewire port is perfect for saving your data,
backing up files, archiving, audio playbacks and any other applications that requires
rapid access to files.
For you convenience, the Freecom DataTank is partitioned (one partition) and preformatted before shipment (NTFS file system). If you want to format the Freecom DataTank
using a different file system, you should first consider the potential problems you may
encounter when using the Freecom DataTank with a computer other than the one used
to format the device.
Recommended installation sequence
1. Install the Freecom software.
2. Attach the port cable to the device and plug the power supply into the socket. Then
connect the other end of the cable to the port on the computer.
For a more detailed description of hardware and software installation, please refer to
Chapter 1-4.
Installing the Freecom software
Chapter 1: Installing the Freecom Software (PC)
GB
Before you can use the Sync button on your Freecom DataTank, you first need to install
the Freecom Personal Media Suite. To use the encryption function, you will need to install
the Freecom DataTank Configuration Software.
1
Note: To use the functions of the Freecom Personal Media Suite described in
this handbook, your Freecom DataTank has to be connected to your PC.
1.1 Installation
1. Insert the Freecom DataTank Software & Manual CD into your CD drive. The Freecom
start menu opens:
In case the software does not open automatically, please double click "Start.exe" in
the root directory of the CD.
2. Now click "Software Installation, followed by "Freecom Software". The installation of
the Freecom Software now begin.
Freecom DataTank
3. Follow the instructions on the screen, confirm with "Next" in order to continue with
the installation.
GB
1
4. Please read the licensing agreement carefully. To accept the licensing agreement,
confirm with "Yes". Note: Clicking on "No" ends the installation. Select the folder
where the Freecom programs will appear in the start menu.
5. Default target folder is C:\Program Files\Freecom. You can select a different target
folder for the program files by selecting another folder on your hard disk.
To install all accessory programs, choose "Full Installation" in the dialog window.
Installing the Freecom software
The software package on the CD supplied with the DataTank includes three tools:
the Freecom Media Suite, the Freecom DataTank Configuration Software and the
Freecom Backup Software.
The Freecom Personal Media Suite enables you to compress and encrypt your files,
synchronize files stored on your computer locally with those on the DataTank and
configure your system to run certain applications and files each time the DataTank
is connected to your computer.
The DataTank Configuration Software allows you to configure the RAID level and
encryption. There are many advantages to having two hard drives on your DataTank.
The "Fast" option let's you increase the speed of your DataTank, while the "Safe" option likewise raises the level of security.
For a detailed description of RAID* levels and their respective advantages and disadvantages, please refer to chapter 4.
The Freecom Backup Software helps you save certain file types to your DataTank.
The software provides a wizard, which leads you step by step through the backup
process, plus a user interface that allows you to backup your files in a mere three
clicks of the mouse.
GB
1
6. Click on "Next" to start the installation. All necessary program files are now installed
on your computer's hard disk.
* RAID = Redundant Array of Independent Disks. A RAID system arranges two or more physical drives on a
computer into one logical drive. This permits more storage space and/or greater data throughput than a
physical drive.
Freecom DataTank
GB
1
7. Please click "Finish". Once the installation is complete, the program icons will appear
on your desktop.
1. Uninstalling the Freecom software
In order to remove the Freecom Software from your computer, please proceed as follows:
1. Click "Start" - "Settings" - "Control Panel" - "Software" - "Freecom DataTank" - "Remove
Freecom DataTank".
2. Once the software has been uninstalled, the following confirm window appears on
the screen:
10
Hardware Installation
Chapter : Hardware Installation
GB
WARNING! Only connect the DataTank via the USB or Firewire port. Never
use both ports at the same time!
1. Plug the cable (USB or Firewire) into the Freecom DataTank.
2. Insert the power cord into the Freecom DataTank and plug
the power supply into the socket.
3. Plug the cable into the port (USB or Firewire) on your
computer.
Because USB 2.0 is backward compatible with USB 1.1, you can connect the Freecom
DataTank to any USB port. Please note however that USB 2.0 ports support significantly
higher data transfer speeds than USB 1.1.
11
Freecom DataTank
.1 Sync and encryption buttons, LEDs
GB
The front panel of the DataTank contains the Sync and encryption buttons along with
the corresponding LEDs (see figure).
Drive space / access indicator
Error LED
Encryption button / Encryption LED (chapter 4.2)
Sync button / Sync LED (chapter 4.4)
CAUTION! If the error LED lights red or an error message box appears,
the DataTank is not functioning properly. If possible, save your data on
another drive or disk.
. Power switch
Please turn the Freecom DataTank off when it is not in use. This conserves electricity and
extends the life of the built-in hard drive. The power switch is located on the back side
of the Freecom DataTank. Press the button for 3 seconds.
WARNING! Before turning off the Freecom DataTank manually, please
make sure to first "unplug or eject hardware". This option is found in the
Windows taskbar. Failure to do so may result in the loss of data.
1
Driver Installation
Chapter 3: Driver Installation
GB
Your computer will not require a special Freecom driver if you are using Windows 2000 / XP
or MacOS X. The required driver is automatically installed by the operating system when
the cable is plugged into your computer.
3
Chapter 4: Freecom DataTank Configuration Software (PC)
4.1 RAID* modes with the DataTank
The DataTank configuration wizard enables you to adjust the RAID settings for the
DataTank.
Double click on the program icon on your desktop (DataTank Configuration Wizard) or
go to "Start" - "Programs" - "DataTank Configuration Wizard".
Warning! All data on the DataTank's hard drives is deleted every time the
RAID mode is changed.
4.1.1 Double Driveletter (JBOD)
The Double Driveletter option configures the hard disks on your DataTank as separate
drives. You will have multiple drive letters, e.g., D: and E:.
* RAID = Redundant Array of Independent Disks. A RAID system arranges two or more physical drives on a
computer into one logical drive. This permits more storage space and/or greater data throughput than a
physical drive.
13
Freecom DataTank
GB
4
In the next window, you are prompted whether to create an encrypted drive. When the
"Create encrypted drive" option is selected, you can move the slider to the desired position (in %) and then enter your password twice in the two designated fields: "Type the
password" and "Type the password again". The password must be at least six character
in length.
Your configuration settings are displayed to give you one final chance to check whether
they are correct.
14
Freecom DataTank Configuration Software
GB
4
Check "Please confirm that all current data on the DataTank will be deleted". Click "Next"
to continue. You are prompted one last time to confirm that you want to apply the new
configuration. To save the configuration, click "Yes".
In the final step, a window is displayed with the results of the operation.
15
Freecom DataTank
4.1.2 Fast (striping)
GB
In the Fast mode, the hard drives on your DataTank are merged and the files are transferred to the two drives by turns, i.e., one file to drive 1 and the next one to drive 2. This
has the distinct advantage of significantly speeding up reading and writing versus using
several separate hard drives. The drawback of Fast mode (striping) lies in the fact that if
one of the two drives crashes, you will lose all data on the DataTank.
4
In the next window, you are prompted whether to create an encrypted drive. If the "Create
encrypted drive" option is selected, you can move the slider to the desired position (in %)
and then enter your password twice in the two designated fields: "Type the password"
and "Type the password again". The password must be at least six characters in length.
Your configuration settings are displayed to give you one final chance to check whether
they are correct.
16
Freecom DataTank Configuration Software
GB
4
Check "Please confirm that all current data on the DataTank will be deleted". Click "Next"
to continue. You are prompted one last time to confirm that you want to apply the new
configuration. To save the configuration, click "Yes".
In the final step, a window is displayed with the results of the operation.
17
Freecom DataTank
4.1.3 Safe (mirroring)
GB
In the Safe mode, all data on the first drive is also mirrored on the second drive. As a result,
only half of the entire storage space on your DataTank is available for use. This offers the
benefit of high level data security as a backup copy of your data is always made. If one
of the two drives crashes, your data is still available on the second drive.
4
In the next window, you are prompted whether to create an encrypted drive. If the "Create
encrypted drive" option is selected, you can move the slider to the desired position (in %)
and then enter your password twice in the two designated fields: "Type the password"
and "Type the password again". The password must be at least six characters in length.
Your configuration settings are shown to give you one last chance to check whether
they are correct.
18
Freecom DataTank Configuration Software
GB
4
Check "Please confirm that all current data on the DataTank will be deleted". Click "Next"
to continue. You are prompted one last time to confirm that you want to apply the new
configuration. To save the configuration, click "Yes".
In the final step, a window is displayed with the results of the operation.
19
Freecom DataTank
4.2 Encryption
GB
You will need to install the Freecom DataTank Configuration Software before you can
use the Encryption button on the front of your DataTank.
4
You must have create an encrpyted drive in the datatank config software in order to use
the encryption button. if you don‘t have setup an encrpyted drive, the shown dialof will
appear and start the dt config software.
Warning! All data on the DataTank's hard drives is deleted every time
the mode is changed.
Encryption button
A window opens when the Encryption button is pressed.
1. If the drive is already enabled, press OK to hide it.
2. If the drive is encrypted, you will need to enter the password and click OK to acess
the drive.
20
Installing the Freecom Software
4.3 Installing the Freecom software (Mac)
GB
1. Insert the Freecom DataTank Software & Manual CD into your CD drive.
4
2. Click the "Download Freecom Software" button. (http://www.freecomdemo.com/
mac/datatank.htm).
21
Freecom DataTank
GB
4.4 Sync Button and the User Interface of the Freecom Personal Media
Suite (PC)
4
The SYNC button only works if the Freecom Personal Media Suite Software is installed on
your computer. The synchronization process occurs simply by the push of a button.
2
1
4
3
5
6
7
8
1 Tabs for configuration of the Freecom Personal Media Suite components
- Secure & Compress
- Freecom SYNC
- Autorun
2 Minimizes Freecom Personal Media Suite in the taskbar
3 Input field (also shows the selected folder)
4 User menu
5 Connected Freecom DataTank (drive letter + available memory capacity)
6 Link to www.freecom.com. Click on this to access the Freecom homepage. Here you
can find further information about your Freecom DataTank.
7 Quick Help for Freecom Personal Media Suite
8 Minimizes Freecom Personal Media Suite in the system tray.
4.4.1 Configuration
To open the configuration menu, please right-click on the Freecom Personal Media Suite
icon in the system tray and select "Configuration":
1. "Show splash screen": Deactivate this function to prevent the display of the start
screen when starting the program.
2. "Start program on Windows start": Starts the Freecom Personal Media Suite in the
background with every Windows start. You will know this by the icon of the Freecom
Personal Media Suite in the system tray.
22
Sync Button and the User Interface of the Freecom Personal Media Suite
Important: We recommend to leave the function "Start program on Windows start" activated under all circumstances in order to be able to use
all the functions of the Freecom Personal Media Suite (e.g. "Autorun",
"SYNC on Freecom device plug-in")!
GB
4
4.5 Autorun
The "Autorun" function enables you to open or start documents, files or programs automatically when your Freecom DataTank is connected to your PC.
Automatically start, for example, the last document you were working on, MP3 play
lists, your favourite film and much more. These files do not have to be on your Freecom
DataTank for this.
4.5.1 Adding files / folders
1. Open the Freecom Personal Media Suite and select the "Autorun" tab.
2. Add files, folders and programs to the Autorun list by either clicking on "Add file"
and selecting the corresponding file or by pulling the files into the Autorun list field
using drag&drop.
3. For folders, please select "Add folders" or pull a folder into the Autorun list field using
drag&drop.
4. Alternatively, you can create a new folder on your Freecom DataTank using the "Add
folder" function by clicking on "Create new folder", naming the folder and selecting it.
23
Freecom DataTank
4.5.2 Removing files / folders from the Autorun list
GB
1. Open the Freecom Personal Media Suite and select the "Autorun" tab.
2. Select the file or the folder to be removed in the Autorun list field.
4
3. Click on "Remove". The corresponding entry is removed from the list.
4.6 Secure&Compress
The Secure&Compress function serves to compress and encrypt your documents. Unauthorized access to your personal data is therefore impossible.
4.6.1 Add / Select Folders
1. Open the Freecom Personal Media Suite and select the tab "Secure&Compress".
2. Click on "Change folder" and select the folder on your Freecom DataTank whose
content is to be compressed and encrypted.
3. Alternatively, you can create a new folder to be encrypted on your Freecom DataTank
using the "Change folder" function by clicking on "Create new folder", naming the
folder (e.g. "Secure") and selecting it.
In the selected folder, all files - even in sub-directories - are compressed and then encrypted.
The active Secure&Compress folder is easily recognised on your Freecom DataTank by
the "Padlock".
24
Sync Button and the User Interface of the Freecom Personal Media Suite
4.6.2 Opening the Secure&Compress folder
GB
1. Open the Freecom Personal Media Suite and select the tab "Secure&Compress".
2. Click on "Open folder" in order to open the Secure&Compress folder.
4
3. If the Freecom Personal Media Suite is already open and has started minimised in
the taskbar, you can also open the Secure&Compress folder with a right-click on the
taskbar symbol of the Freecom Personal Media Suite:
4. Of course you can also open the Secure&Compress folder over the Windows Explorer.
4.6.3 Encrypting files and folders
1. Open the Secure&Compress folder.
2. Pull the files or folders to be encrypted in the Secure&Compress folder using the
drag&drop function. Each file is now compressed and then encrypted.
3. The first time you will be requested to enter and confirm a password. Select "Save
password on this computer" if you do not want to be requested to enter a password
again.
4. Alternatively, you can also right-click on the files or folders and select the
Secure&Compress folder in the context menu under "Send to ...".
4.6.4 Decrypting files and folders
In order to decrypt files and folders which are in the Secure&Compress folder, please
proceed as follows:
1. Open the Secure&Compress folder.
2. Select the file(s) or folder(s) to be decrypted and pull them into the target folder (e.g.
with the Windows Explorer) using drag&drop.
3. Your files are now decrypted and decompressed. The encrypted original remains on
the Freecom DataTank.
25
Freecom DataTank
4.6.5 Deleting the Secure&Compress folder
GB
Click on "Delete folder" in order to delete the selected Secure&Compress folder.
4
ATTENTION: All files in the folder are irrevocably deleted!
Before the deletion, a security request is carried out whether you really want to delete
the folder:
4.6.6 Changing the password
1. Open the Freecom Personal Media Suite and select the tab "Secure&Compress".
2. Click on "Change password". The following window opens:
3. Please enter your current password in the top input field. Enter your new password
in the middle input field and confirm it in the bottom input field.
26
Sync Button and the User Interface of the Freecom Personal Media Suite
Please note: Your changed password applies to all files and folders encrypted from the
time of the change. For files and folders which were encrypted before, the password
which was used for encryption remains.
GB
4
Changes of the password do not apply to files and folders already
encrypted!
4.7 Freecom SYNC
4.7.1 What is Freecom SYNC?
The Freecom SYNC integrated in the Freecom Personal Media Suite is a program for
synchronizing files. The computer serves as origin of the data. This data can be processed
on any number of other computers.
Example:
You create a document at work and want to work on it at home (Freecom Personal Media
Suite is installed on your PC at work):
•
Copy the document from the PC at work to your Freecom SYNC folder on your Freecom DataTank.
•
Open the document at home directly out of the Freecom SYNC folder. Work on it and
save it in the Freecom SYNC folder.
•
Connect the Freecom DataTank to your PC at work and click "Sync now" in the
Freecom Personal Suite. The document will now be synchronized between your PC
at work and the Freecom DataTank. While synchronizing, only modified files will be
replaced by newer files.
27
Freecom DataTank
4.7.2 Creating a new SYNC folder
GB
1. Open the Freecom Personal Media Suite and select the tab "Freecom SYNC". Click on
"Select folder" and select a folder on your Freecom DataTank.
4
2. Alternatively, you can create a new SYNC folder on your Freecom DataTank using the
"Select folder" function by clicking on "Create new folder", naming the folder (e.g.
"SYNC") and selecting it.
3. Click on "Complete" so that the new folder is created. Then opens the Freecom SYNC
folder.
Important: The selected folder may not contain any files or folders!
4.7.3 Opening the SYNC folder
1. Open the Freecom Personal Media Suite and select the tab "Freecom SYNC".
2. Click on "Open folder" in order to open the SYNC folder.
3. If the Freecom Personal Media Suite is already open and has been started minimised
in the taskbar, you can also open the SYNC folder through a right-click on the taskbar
symbol of the Freecom Personal Media Suite.
4.7.4 Adding files into the SYNC folder
1. Open the SYNC folder.
2. Pull the respective files or folders in the SYNC folder using the drag&drop function.
3. Alternatively, you can also right-click on the file(s) or folder(s) and select the SYNC
folder in the context menu under "Send to ...". Your files/folders are now copied into
the SYNC folder.
4.7.5 Changing the SYNC folder
1. Open the Freecom Personal Media Suite and click on the tab "Freecom SYNC".
2. Click on "Change folder" to select a new folder for data synchronization.
Important: The selected folder may not contain any files or folders!
4.7.6 Deleting the SYNC folder
1. Open the Freecom Personal Media Suite and click on the tab "Freecom SYNC".
2. Click on "Delete folder" in order to delete the active SYNC folder.
ATTENTION: All files in the folder are irrevocably deleted!
28
Sync Button and the User Interface of the Freecom Personal Media Suite
Before the deletion, a security request is carried out whether you really want to delete
the folder:
GB
4
4.7.7 Synchronisation of files and folders
There are three possibilities for the synchronization of your files:
1. Press the SYNC button of your Freecom Freecom DataTank. Your data is now synchronised.
2. Synchronisation of the data when your Freecom DataTank is connected to your
computer.
For this, please proceed as follows:
a) Open the Freecom Personal Media Suite and click on the tab "Freecom SYNC".
b) Select a SYNC folder if you have not yet done so.
c) Activate the function "Sync on Freecom device plug-in" in the tab "Freecom
SYNC":
Your files are now synchronized each time when you connect your Freecom DataTank to
your computer (Freecom Personal Media Suite has to be started).
This function is activated by default when a SYNC folder is created!
29
Freecom DataTank
3. Starting the synchronization manually
GB
a) Open the Freecom Personal Media Suite and click on the tab "Freecom SYNC".
b) Select a SYNC folder if you have not yet done so.
4
c) Click on "Sync now!" to start the data synchronization.
d) Alternatively, right-click on the system tray icon of the Freecom Personal Media
Suite and select "Start synchronization" there.
4.7.8 Usage of the SYNC folder with other computers
Please follow these instructions if you want to use the SYNC folder with another (second)
computer.
All files you want to work with on another computer have to be opened directly out of
the Freecom SYNC folder! You should not copy them to another hard disk, as this might
cause a later synchronization to perform incorrectly.
4.7.9 Synchronization of new or changed files
This example shows how you can synchronize files which were changed or created on
the Freecom DataTank, with the original files on the primary computer.
1. Connect the Freecom DataTank with the primary computer.
2. Open the context menu on the SYNC icon in the taskbar and click on "Start synchronization".
30
Sync Button and the User Interface of the Freecom Personal Media Suite
3. A status window appears. Please select "Update" if you wish to synchronize the file
or otherwise select "Cancel". If you choose not to synchronize the file (Cancel) you
will be able to synchronize this file during the next synchronization.
GB
4
4.7.10 Skip files during synchronization
If you want to skip just one file out of many, please click on this file with the right mouse
button and select "Skip". The green arrow next to the selected file changes to a blue one,
indicating that this file will not be synchronized. You will be able to synchronize this file
during the next synchronization.
31
Freecom DataTank
4.7.11 Handling deleted files
GB
Deleting files on either the primary computer or the SYNC folder on the Freecom DataTank
results in a red X next to the file during the next synchronization.
4
This indicates that the file has been deleted and that its counterpart will be deleted, too.
Please select "Update" to proceed.
If you wish to keep the file, please click with the right mouse button on the file and select "Don’t Delete". The file will not be deleted and will be disregarded during the next
synchronization.
If you want to delete a file on either the primary computer or in the SYNC folder and do
not want to affect its counterpart, it is necessary to "Split From Original" the files. Please
follow the instructions:
1. Select the file or folder you want to delete.
2. Choose "Properties" in the context menu.
32
Sync Button and the User Interface of the Freecom Personal Media Suite
3. Select "Update" and "Split From Original".
GB
4
4. Select "Yes".
33
Freecom DataTank
4.7.12 Office use
GB
The Freecom Freecom DataTank is ideal for making a local backup, which stores your data
independently from your network or local computer. Simply ‘send to’ your important
files and directories to the SYNC folder on the Freecom Freecom DataTank and update
your backup from time to time click "Sync now". This is extremely easy and very fast,
because the SYNC tool only backups changed files via the fast USB 2.0/Firewire port
connections.
4
The best thing is, even when your network or local computer is not working, you can
take your Freecom Freecom DataTank to any other computer (equipped with an USB/
Firewire port) and continue. Even at your home-office, where you can be close to the
people you love and still having all your business data available.
Simply click "Sync now" before you leave the office and you are always up to date and
can work with the data on the Freecom Freecom DataTank.
Copying files into the SYNC folder
Mark the files and folders you want to copy to the SYNC folder. Click with the right mouse
button on the files and folders and select 'Send to SYNC folder...' Done.
Now all your valuable data has been copied to the Freecom Freecom DataTank. Every time
you click "Sync now", all changed or added / deleted files and folders from the selected
folders will be synchronized with the data on the Freecom Freecom DataTank.
34
Sync Button and the User Interface of the Freecom Personal Media Suite
4.7.13 Home use
GB
At the office, there is always a backup of your important business data. But how about
your data at home? All the memories stored in digital photo’s made during your last
holiday? Or the first pictures and movies of your children! You do not want to loose
those! The Freecom DataTank is ideal for making a safety backup, which stores your data
independently from your computer. Simply 'send to' your important files and directories
to the SYNC folder on the Freecom DataTank and update your backup from time to time
click "Sync now".
4
Copying files into the SYNC folder
Follow the instruction in the manual to install the Freecom DataTank and the SYNC folder.
Mark the files and folders you want to copy to the SYNC folder. Click with the right mouse
button on the files and folders and select 'Send to SYNC folder...'Done.
Now all your valuable data has been copied to the Freecom DataTank. Every time click
"Sync now", all changed or added / deleted files and folders from the selected folders
will be synchronized with the data on the Freecom DataTank.
35
Freecom DataTank
4.8 Using the Freecom Backup Software (PC)
GB
The "Freecom Backup Software" serves to back up personal and business data from
internal file media (e.g. hard disk) onto external Freecom drives. It makes it possible to
back up all data from individual hard disks, as well as data or data types individually
specified by the user. This can be carried out as a full backup or in incremental backups
(to save time). There are two user interfaces available:
4
1. The Wizard Mode for quick and easy backup of the data.
2. The Advanced Mode with advanced configuration possibilities.
4.8.1 Wizard Mode
In this window you can specify whether the software should always start in Wizard
Mode or in Advanced Mode.
36
Using the Freecom Backup Software
4.8.2 Selection of the files to back up
GB
4
For selecting the files to be backed up, there are three different options available:
1. My documents and settings contains the "My Documents" folder, Internet Favourites,
as well as the desktop of the logged-in user.
2. All documents and settings on this computer backs up the files of all users on
your computer.
3. Let me choose what to back up gives you the possibility to carry out a user-specified backup. You can select specifically which types of files and directories you want
to back up and which files should be excluded from the backup.
37
Freecom DataTank
4.8.3 Predefined backup
GB
Select either My documents and Settings or All documents and settings on this
computer and then click on "Next". A list of available Freecom drives is displayed then:
4
Select the drive to which you want to back up your data. You can open the advanced
backup options by clicking on the Options button.
4.8.4 Backup options
38
Using the Freecom Backup Software
The modes Full backup (complete data backup) and Incremental backup (appending
data backup) are available.
GB
1. Full backup means that at every backup a new directory is created with all data to
be backed up.
4
2. Incremental backup means that an already existing backup set is opened and only
that data is backed up that has been created or modified since the last backup. An
incremental backup is significantly faster than a full backup, because not all data
needs to be backed up.
Click on "Next" to continue.
4.8.5 Select a directory
The target folder for your backup can be either the suggested folder name (e.g. "My
Backup") or you can select your own target folder. Click on "Browse" for this and select
a backup folder. Then click on "Next".
39
Freecom DataTank
4.8.6 Summary of the settings made
GB
A summary of the settings you made is displayed then. Click on "Back" to make changes
or click on "Complete" to accept the settings and to start the backup.
4
4.8.7 Backup
While the backup is in progress a window is displayed showing the status of the backup.
A bar indicates the progress of the backup. Furthermore the number of backed up files
and the total size of the backup is listed after the completion of the backup.
After the end of the backup click on "Close" and you are returned to the main window.
40
Using the Freecom Backup Software
4.8.8 User-defined backup
GB
Select “Let me choose what to backup” if you would rather determine yourself which
files should be backed up.
4
4.8.9 Select drives
This window lists the drives from which a backup can be made. By clicking on "Add" you
can select further folders. With "Remove" you can take folders/drives from the list.
All the drives or folders that have a check mark are included in the backup. Remove the
check mark from drives or folders that you do not want to back up.
Then click on "Next".
41
Freecom DataTank
GB
4
4.8.10 File types to back up
In the following window you can select which types of files should be backed up. This
prevents unwanted files (such as temporary files) from being backed up.
A list of the most common files types is presented. Click the "Add" button to add a further
file types.
Click on "Next" to continue.
42
Using the Freecom Backup Software
4.8.11 Add extensions
GB
When you click on "Add" a list of all known file types is displayed. Select the file types
you need. In case the file name extension you are looking for is not on the list, then you
can define it yourself. For this go to the end of the list and select "Click here to add your
own extension".
4
4.8.12 Folders that should not be backed up
In the following window you can exclude folders from being backed up. By default
various folders of the system drive are selected. Click the "Add" button to add a further
directories. To remove directories from the list, select the directory to be omitted and
then click on "Remove".
Then click on "Next".
43
Freecom DataTank
4.8.13 Summary of the settings made
GB
The settings you have made are now listed for review. Click on "Back" if you want to make
changes or click on "Complete" to start the backup.
4
4.8.14 Backup
While the backup is in progress a window is displayed showing the status of the backup.
A bar indicates the progress of the backup. Furthermore the number of backed up files
and the total size of the backup is listed after the completion of the backup.
After the end of the backup click on "Close" and you are returned to the "Advanced
Mode" window.
44
Using the Freecom Backup Software
4.9 Advanced Mode
GB
4.9.1 Select source
4
In Source the source drives or folders can be specified from which a backup should be
made.
4.9.2 File types to back up (extensions)
File types can be selected in the Files window that should be included in the backup.
45
Freecom DataTank
4.9.3 Selecting the target drive
GB
In this window you can select the target drive for the backup.
4
4.9.4 Select backup mode
In the Destination window under Options the modes Full backup (complete data backup)
and Incremental backup (appending data backup) are available.
1. Full backup means that at every backup a new directory is created with all data to
be backed up.
2. Incremental backup means that an already existing backup set is opened and only
that data is backed up that has been created or modified since the last backup. An
incremental backup is significantly faster than a full backup, because not all data
needs to be backed up.
46
Using the Freecom Backup Software
4.9.5 Options
GB
Under Options in the main window the splash screen can be activated or deactivated
that appears when the software is started.
4
Furthermore folders can be selected that should not be included in the backup.
Click on "Backup Now" to start the backup.
4.9.6 Backup
While the backup is in progress a window is displayed showing the status of the backup.
A bar indicates the progress of the backup. Furthermore the number of backed up files
and the total size of the backup is listed after the completion of the backup.
Once the backup is completed press the "Close" button and you are returned to the
main menu.
47
Freecom DataTank
Chapter 5: Partitioning your Freecom DataTank GB
5.1 General information
5
Your Freecom DataTank was partitioned and formatted to provide you with the maximum
available capacity and compatibility.
For some users another file system might fit better for their needs. This manual describes
current limitations of most common file systems and Instructions to enable you to adapt
the Freecom DataTank to your needs.
5.2 File System features
Please refer to the tables below for an overview:
File systems supported by different operating systems
File system
FAT
FAT32
NTFS
HFS+
Windows 2000
yes
yes
yes
no
Windows XP
yes
yes
yes
no
MacOS X
yes
yes
yes (only read)
yes
FAT
FAT32
NTFS
HFS+
Windows 2000
4 GB*
32 GB
16 TB
-
Windows XP
4 GB*
32 GB
16 TB
-
Mac OS X 10.1.x
-
128 GB
-
2 TB
Mac OS X 10.2.x
-
128 GB
-
8 TB
Mac OS X 10.3.x
-
( -> 128 GB)
-
16 TB
Mac OS X 10.4.x
-
( -> 128 GB)
-
16 TB
Operating system
Maximum size of a partition
File system
Operating system
48
* FAT partitions larger than 2 GB can only be administrated by Windows 2000/XP.
Partitioning your Freecom DataTank
Example for different partitions with different file systems on one Freecom
DataTank
Total
size of
Freecom DataTank
GB
File system
500 GB
NTFS
FAT32
300 GB
200 GB
5
Note: On NTFS formatted hard disks can only be written under Windows
2000/XP. Under MacOSX data can only be read.
The example above is a good solution for Windows 2000/XP users who sometimes
exchange data with Windows 98SE/ME PCs.
For storing the data under Windows 2000/XP both partitions can be used. As the NTFS
file system is not recognized by Windows 98SE/ME data to be used on these operating
systems must be stored on the FAT32 partition.
Please follow the steps below to adapt the Freecom DataTank for your needs.
5.3Partitioning your Freecom DataTank under Windows XP / 2000
5.3.1 Deleting a partition on the Freecom DataTank
under Windows XP / 2000
1. Click with the right mouse button on the "My Computer" icon on your desktop.
2. Select the option "Manage".
3. Select the option "Storage" -> "Disk Management".
4. Choose your external hard drive and right-click on the partition.
5. Select "Delete Partition" and confirm by clicking on "Yes". The partition will be deleted now.
5.3.2 Creating a partition on the Freecom DataTank
under Windows XP / 2000
The following steps will guide you through the process of creating partitions on your
Freecom DataTank. After this procedure your Freecom DataTank will be ready for use and
it will be allocated a drive letter.
1. Click with the right mouse button on the "My Computer" icon on your desktop.
2. Select the option "Manage".
3. Select the option "Storage" -> "Disk Management".
4. Choose the hard disk, which is "unallocated". Ensure that the entire drive is "unallocated".
49
Freecom DataTank
GB
5
5. Click with the right mouse button on the "unallocated" area and select the option
"New Partition" (Windows 2000: "Create Partition Wizard"). The "New Partition Wizard"
opens. Click on "Next".
50
Partitioning your Freecom DataTank
6. Select "Primary partition" and click on "Next".
GB
5
7. Now you can adjust the size of your partition. Click on "Next" if only one partition
is to be created. See next chapter (Creating two or more partitions on the Freecom
DataTank under Windows XP/2000) how to create more than one partition.
8. Assign a drive letter to your hard disk. Normally you can use the default options. Click
on "Next".
51
Freecom DataTank
9. Select the formatting option. Choose either "FAT32" or "NTFS", the "Allocation Unit
Size" should remain on "Default". Finally select "Perform Quick Format" and click on
"Next".
GB
5
10. Click on "Finish" to complete the partitioning of your Freecom DataTank. Your Freecom
DataTank will be formatted now and is ready-to-use afterwards.
52
Partitioning your Freecom DataTank
5.3.3 Creating two or more partitions on the Freecom DataTank under
Windows XP / 2000
GB
1. Repeat the steps from the previous chapter (Creating a partition on the Freecom
DataTank under Windows XP/2000) for creating the first partition.
5
2. Click with the right mouse button on the "My Computer" icon on your desktop.
3. Select the option "Manage".
4. Select the option "Storage" -> "Disk Management".
5. Right-click on the unallocated space of your Freecom DataTank and select the option "New partition" (Windows 2000: "Create partition"). The "New Partition Wizard"
(Windows 2000: "Create Partition Wizard") opens. Click on "Next".
6. Select "Extended partition" and click on "Next".
7. Now you can adjust the size of your partition. Enter the size and click on "Next".
53
Freecom DataTank
8. Click on "Finish" to create the "Extended partition". The unallocated space now
changed to "Free space".
GB
5
54
Partitioning your Freecom DataTank
9. Right-click on "Free Space" and select "New Logical Drive" (Windows 2000: "Create
Logical Drive"). The "New Partition Wizard" (Windows 2000: "Create Partition Wizard")
opens. Click on "Next".
GB
5
10. "Logical drive" is already selected. Click on "Next".
11. Specify the partition size and click on "Next".
12. Assign a drive letter and click on "Next".
13. Select the formatting option. Choose either "FAT32" or "NTFS", the "Allocation Unit
Size" should remain on "Default". Finally select "Perform Quick Format" and click on
"Next".
14. Click on "Finish" to complete partitioning. Your partition will be formatted now and
is ready-to-use.
Note: If you select NTFS as file system, the data of your DataTank can be
read only under Mac OS X. There is no possibility to write data.
55
Freecom DataTank
5.4 Partitioning your Freecom DataTank under Mac OS X
GB
1. Open the “Disk Utility”. This can be found in “Applications” —> “Utilities”.
2. Click on the tab “Partition”.
5
Here you can setup the partition settings and partition the drive according to your settings. Detailed information how to use the Disk Utility can be found in the help:
56
Troubleshooting
Chapter 6: Troubleshooting
GB
Issue
Solution
After I connected the Freecom DataTank •
to my computer for the first time no
Freecom SYNC folder has been created
automatically.
•
Install the Freecom Personal Media
Suite software and safely remove and
reconnect the Freecom DataTank
Follow the instructions on chapter
Creating a new SYNC folder.
After installation of Freecom Personal •
Media Suite, the message "No Freecom
DataTank external hard drive found." ap- •
pears.
Connect the Freecom DataTank to your
computer.
Check all connections between the
Freecom DataTank, the power supply
and the computer.
Safely remove and reconnect the
Freecom DataTank.
•
6
Files deleted in the SYNC folder are still You have to "Split From Original" the files
appearing during the synchronization.
from their counterparts before you may
delete them. Please refer to chapter Handling deleted files.
An empty folder is not synchronized. Empty folders are not taken into account
during synchronization.
If you are working with the program "Total The SYNC folder is opened by another proCommander" and are using the "send to" gram. Please close all applications which
dialog to add items to the SYNC folder, the are using the SYNC folder.
message "The briefcase is in use on another
computer" could appear.
Not enough memory on the target drive Delete files on the target drive (Freecom
(Freecom DataTank) during creation of DataTank) or select less files.
SYNC folder.
Not enough memory on the target drive Delete files on the target drive (Freecom
(Freecom DataTank) during synchroniza- DataTank).
tion.
Data on the Freecom DataTank can be read, Check with which file system the Freecom
but not written.
DataTank was formatted. Only with FAT 32
data on the drive under different operating
systems can be read and written.
57
WARRANTY
(valid in Europe/Turkey only)
We thank you for purchasing this Freecom product and hope you will enjoy using it.
In order to avoid unnecessary inconvenience on your part, we suggest reading the quick
install guide, instruction manual and any additional electronic and or printed manuals.
When problems occur we have a database with Frequently Asked Questions (FAQ) on
our Freecom website (www.freecom.com), please check this site before you contact the
helpdesk.
Your Guarantee
All Freecom products come with unlimited technical phone and web support. By this
Guarantee, Freecom warrants their products to be free from defects in material and workmanship for a period listed below from the date of its original purchase. If during this period
of guarantee the product proves defective due to improper materials or workmanship,
Freecom will, without charge for labour or parts, at its sole discretion, repair or replace the
product or its defective parts upon the terms and conditions set out below.
Conditions
This guarantee will be granted only when the original invoice or sales receipt (indicating
the date of purchase, product and serial number) is presented together with the defective
product and a Freecom RMA number received from the Freecom Website or given by a
Freecom Service Center. Freecom reserves the right to refuse the free-of-charge guarantee services when the date of purchase of the product cannot be proven. This guarantee
will not apply if the RMA number is missing, the serial number on the product has been
altered, removed or made illegible.
This guarantee covers only the hardware components packaged with the product. This
guarantee covers none of the following: (a) any consumable supplied with the product,
such as media or batteries; (b) damage to or loss of any software programs, data or removable storage media; (c) any damage resulting from adaptations, changes or adjustments,
which may have been made to the product, without the prior written consent of Freecom;
(d) attempted repair by any party other than authorized by Freecom and (e) accidents,
lightning, water, fire or any other such cause beyond the reasonable control of Freecom.
With respect to all services provided, Freecom is not responsible for any damage to or loss
of any programs, data or other information stored on any media or any part of any product
serviced. Freecom is not liable for the consequence of business loss in case of system
failure. Be sure to exclude all parts not covered by this guarantee prior to returning the
product to Freecom. Freecom is not liable for any loss or damage to these items. If during
the repair of the product the contents of the hard drive are altered, deleted or in any way
modified, Freecom is not liable whatsoever.
Repair parts and replacement products will be provided on an exchange basis and will be
either new, equivalent to new or reconditioned. All replaced parts and products become
the property of Freecom The period of guarantee for any product or part repaired or replaced in warranty shall be the balance of the original guarantee. Repairs or replacements
on product or parts out of warranty carry 6 (six) months guarantee.