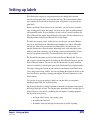
1
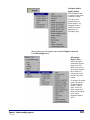
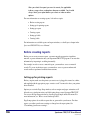
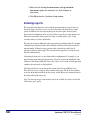
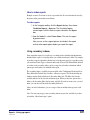
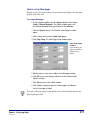
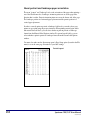
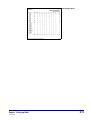
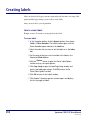
Reports
6
Understanding reports ........................................................... 384
Setting up reports................................................................... 387
Creating reports...................................................................... 395
Setting up labels ..................................................................... 405
Creating labels ........................................................................ 414
383
SCC5um1200kn
Understanding reports
Spectrum CIRC/CAT reports help you document and manage your catalog and
circulation processes. You can print reports from the following categories: Material
Reports, Circulation Reports, Circulation Statistics, Circulation Notices, Labels,
Inventory Reports, and System Reports.
Most Spectrum CIRC/CAT reports are generated in your Internet browser window, where
you can preview and print them. The browser offers you many options for customizing
how the report displays and prints. It also creates one or more .htm files that you can use
in many ways, such as publishing them on an Intranet, e-mailing to other library staff or
administration, and so on. Circulation notices and labels are generated in a Spectrum
preview window rather than in your browser like the rest of the program reports.
Generating to a program window lets you easily position your notices and labels on the
page.
Note: An Internet browser is a program installed on your computer. You do not need
access to the Internet to use it. If a browser is not installed on your computer, you can
install it from the Spectrum CIRC/CAT Client CD. See "Additional programs/files
available on the CDs " in the Overview chapter of the Spectrum CIRC/CAT Installations
Guide for more information.
To access reports
In the Navigator toolbar, click the Reports button. The reports
menu lists the seven report categories. From the reports menu,
choose the report category, then choose the report you want to
create. The report window that opens depends on which report
category you choose.
384
Spectrum CIRC/CAT User Manual
SCC5um1200kn
Navigator toolbar
Reports button
Click the Reports button
to open the reports menu
and choose a report.
The reports menu
displayed from the
Reports button in the
Navigator window is
identical to the one
displayed in the
Winnebago menu.
You can also access the reports menu from the Reports command
in the Winnebago menu.
Winnebago >
Reports menu
Choose the Reports
command to open the
reports menu. The
reports menu lists the
seven report categories.
All the reports in a
category are created
from the same report
window.
For example, all material
reports are created in
the Material Reports
window. To print a
report, choose the
report category and
report from the Reports
menu and the
appropriate window
opens.
Reports: Understanding reports
SCC5um1200kn
385
After you select the report you want to create, the applicable
indexes, range values, and options become available. You should
always select your report before you select an index or other
options.
For more information on creating reports, look at these topics:
• Before creating reports
• Setting up for printing reports
• Setting up reports
• Creating reports
• Setting up labels
• Creating labels
For information on available reports and report windows, see the Reports chapter in the
Spectrum CIRC/CAT Reference Manual.
Before creating reports
Before you can create accurate reports, you must enter the appropriate circulation,
material, or patron information into your Spectrum CIRC/CAT program. You enter this
information by importing it or adding it manually.
For example, in order to create a material report, you must have access to material
records. To create circulation reports, you must have access to patron and material
records and have performed circulation transactions.
Setting up for printing reports
Before you print, make sure the printer you want to use is plugged in, turned on, online,
and supplied with the appropriate paper or notice stock. You must also have your printer
driver installed.
Options you set in the Page Setup window, such as margins and paper orientation, will
affect the way circulation notices and labels print when you use Spectrum CIRC/CAT.
You access the Page Setup window by choosing Page Setup from the File menu. For
more information, see "How to create landscape labels".
Page Setup options do not affect reports that are generated in your browser. For these
reports, you adjust your browser settings to change how the report prints. See
"Customizing your browser settings".
386
Spectrum CIRC/CAT User Manual
SCC5um1200kn
Setting up reports
For each Spectrum CIRC/CAT report, you can select different options to affect how the
report displays and what information is included in the report. After you select the report
you want to create, the applicable indexes, range values, and options become available.
You should always select your report before you select an index or other options.
For more information on setting up reports, look at these topics:
• Activating Setup options for circulation reports
• Indexing reports
• Using secondary indexes
• Setting a range for a report
• Selecting a custom index range
• Setting up report options
Activating Setup options for circulation reports
To ensure that records exist for all of the reports, you must be sure that certain options are
set in your Spectrum program. For example, if the option to log fine transactions is not
activated, there are no records to create a Fine Activity Log report. You must first
activate the following options in Circulation Setup: "Save in-library usage for materials";
"Log fine transactions"; and "Log circulation transactions".
How to activate Setup options for circulation reports
Before you can print circulation reports, you should make sure that Spectrum CIRC/CAT
is set up to store the information you want to report on.
To activate Setup options for circulation reports
1 From the Winnebago menu, select Setup > Circulation. The
Circulation Setup window opens.
2 Click the General tab, if necessary.
3 Make sure that Save in-library usage for materials is selected.
If not, click the box to select it.
4 Click the Logs tab.
Reports: Setting up reports
SCC5um1200kn
387
5 Make sure that the Log fine transactions and Log circulation
transactions options are selected. If not, click the boxes to
select them.
6 Click OK to close the Circulation Setup window.
Indexing reports
The report index determines the order in which report information is sorted. After you
choose the report you want to create, you choose the index from the Index box. Index
options are different for each report. Some reports may not require an index option
because they list information in one way only. When a report doesn’t need an index, the
Index box is unavailable. Some reports also allow secondary indexes. (See "Using
secondary indexes" for more information.)
The same report appears differently when generated using a different index. For example,
a Materials report generated with a material number index lists all materials in order by
material number. A Materials report generated with a material type index lists all
materials in order by material type. The same information appears in each report, but is
listed in a different order.
All indexing by name, title, or user-defined fields is alphanumeric. For example, if you
print a Patrons report indexed by patron name, all patrons are listed in alphabetical order
(Anderson, John; Brown, Michelle; Garcia, Ray; and so on). If a name or title begins with
a number, those materials are displayed first.
Choosing an index for a report changes the content of the Start at and End at boxes.
These boxes let you set a range of data to include in the report. The Start at box defaults
to the data in the indexed field for the first record, and the End at box contains the data in
the indexed field of the last record.
Note: For some report types, some indexes may not be available if you have selected the
“Short form report” option.
388
Spectrum CIRC/CAT User Manual
SCC5um1200kn
How to index reports
Example scenario: You want to create a report that lists all reserved materials sorted by
the names of the patrons that reserved them.
To index reports
1 In the Navigator toolbar, click the Reports button, then choose
Circulation Reports > Reserves. The Circulation Reports
window opens with the Reserves report selected in the Report
box.
2 From the Index list, select Patron Name. This sorts the report
by patron names.
Now you can set the range of patrons to include in the report
and set other report options before you create the report.
Using secondary indexes
Some circulation reports let you choose a secondary index to further limit information
included in the report. A secondary index acts as both an index and a filter. For example,
to produce a report of materials checked out to certain patron types for a specific teacher,
you would use Patron Types as the main index and a Patron User-Defined field (defined
as teacher) as the secondary index, and set a range for each index to determine which
patron types and teachers are included in the report.
The secondary index is available for patron fields of the Combination Circulation Lists,
Fines, Materials Checked Out, Overdues, or Reserves reports. The Circulation Reports
window contains both an Index and a Secondary Index box. The Index box lists the
available indexes for the selected circulation report. When you have the option of two
indexes, the Secondary Index box becomes available. If you don’t want to use a second
index, you can choose None in the Secondary Index box.
After you select both indexes, you set a range of data to include in the report for each
index.
Note: For some report types, some secondary indexes may not be available if you have
selected the “Short form report” option.
Reports: Setting up reports
SCC5um1200kn
389
How to use a secondary index
Example scenario: You want to create an alphabetical list of all sophomores and
freshmen (which you have defined as patron types "10 – Class 2005" and "9 – Class
2004") with overdue materials.
To use a secondary index
1 In the Navigator toolbar, click the Reports button, then choose
Circulation Reports > Overdues. The Circulation Reports
window opens with the Overdues report selected in the Report
box.
2 From the Index list, select Patron Type.
3 In the Start at box under Index, enter 9. In the End at box
under Index, enter 10.
4 From the Secondary Index list, select Patron Name.
Because you want to include all students in this range, you can
keep the default names in the Start at and End at boxes under
the Secondary Index.
5 Click Create. The report lists all freshman and sophomore
students who have overdue materials grouped by their class.
If you want to create a report of all students in alphabetical order that is not grouped by
their classes, you can switch the primary and secondary indexes in this example.
Setting a range for a report
Most reports require you to specify a range for the report. The range refers to the data
records that you want to include in a report. Below the Index box, you find two boxes:
Start at and End at. The content of these boxes varies according to which report and index
you choose. Some circulation reports—Combination Circulation Lists, Fines, Materials
Checked Out, Overdues, and Reserves—have two indexes. For these reports, you specify
a range for the primary index, then you specify the range for a secondary index based on
the primary index you chose.
390
Spectrum CIRC/CAT User Manual
SCC5um1200kn
The default data in the Start at box is the number or name of the first data record of the
currently specified index, and the default data of the End at box is the number or name of
the last data record of the currently specified index. If you want to print only a portion of
the data records, you can edit these fields so the range includes those records you want to
print.
Because the default range changes according to which report you generate and what
index you use, you should choose your report, index, and in some cases your secondary
index before you specify the range. For example, if you want to generate a report listing
all of your materials by subject, you would choose the Subject report and use the default
range. You wouldn’t need to change the range in the Material Reports window.
Range values are not case-sensitive. Capital letters are not distinguished from lowercase
letters in the Range box.
How to set a range to report on
Example scenario: You want to create a report that shows how many students are in each
grade. In your system, each grade is set up as a different patron type from 10–22
(teachers and other staff are patron types 1–9).
To set a range to report on
1 In the Navigator toolbar, click the Reports button, then choose
Circulation Statistics > Number of Patrons by Type. The
Circulation Reports window opens with the Number of Patrons
by Type report selected in the Report box. This report can only
be indexed by patron types.
2 In the Start at box, enter 10.
3 In the End at box, enter 22.
4 Click Create. The report lists the number of students in each
grade.
Reports: Setting up reports
SCC5um1200kn
391
Selecting a custom index range
Some material and patron reports can be indexed using the custom indexes you create in
the Patron Custom Index and Material Custom Indexes windows. Because you can have
up to three data fields in one custom index, you set a range for custom indexes using the
Custom Index Range Selection window instead of using the Start at and End at boxes in
the report window. The Custom Index Range Selection window is only available after
you select a custom index from the Index box. For more information on creating a custom
index, see the "Creating material custom indexes" section of the Materials chapter or the
"Creating patron custom indexes" section of the Patrons chapter.
For more information about this window, see "About the Custom Index Range Selection
window" in the Reports chapter of the Spectrum CIRC/CAT Reference Manual.
How to select a custom index range for reports
Example scenario: You have created a material custom index called PUB PRICE
ADDDATE, which sorts your materials by the publisher, price, and the date the holding
record was added. Now you want to use this custom index to print a materials report. This
lets you print a very specific group of materials; for example, the materials published by
Doubleday that you purchased in the last year costing between $10 and $30.
To select a custom index range for reports
1 In the Navigator toolbar, click the Reports button, then choose
Material Reports > Materials. The Material Reports window
opens with the Materials report selected in the Report box.
2 From the Index list, choose your material custom index, PUB
PRICE ADDDATE.
3 Click the Change Custom Index Range button. The Custom
Index Range Selection window opens.
Note: The name of the index ranges depends on the index fields
defined in your custom index.
4 In the Publisher range group, enter Double in the Start at box
and E in the End at box. This should include all records for
Doubleday.
5 In the Price range group, enter 10 in the Start at box and 30
in the End at box. This includes all materials that cost between
$10 and $30.
392
Spectrum CIRC/CAT User Manual
SCC5um1200kn
6 In the Holding date added range group, enter 8/15/2000 in
the Start at box and 8/15/2001 in the End at box.
7 Click OK to save your settings and close the Custom Index
Range Selection window.
8 Click Create. This should generate a report listing all of your
Doubleday holdings that cost between $10 and $30 in
ascending order of price and date added.
Setting up report options
For many Spectrum CIRC/CAT reports, you can select different options to affect how the
report displays and what information is included in the report. After you select the report
you want to create, the applicable indexes, range values, and options become available.
You should always select your report before you select an index or other options.
Your option settings are saved even after you close the program, so you don’t need to
reset them every time you run the report.
Many reports have their own set of options you can adjust. For more information on the
report options windows, see the Reports chapter of the Spectrum CIRC/CAT Reference
Manual.
How to set up report options
Example scenario: You want to create a list of materials that have fines over $10 and the
patron that owes each fine. You just want to print high-level information about the
material rather than detailed information. You can set options in the Fines report to
include the information you specify.
To set up report options
1 In the Navigator toolbar, click the Reports button, then choose
Circulation Reports > Fines. The Circulation Reports window
opens with the Fines report selected. For this example, you will
use the default indexes and data ranges in the Report box.
2 Click the Options button. The Circulation Reports Options
window opens.
Reports: Setting up reports
SCC5um1200kn
393
Circulation Reports
Options window
The options window is
different depending on
which report is
selected. Not all reports
have options.
3 Select the Limit to fines between the following range option,
and in the boxes below it type 10 to 9999999.
4 Select the Short form report option. This creates a high-level
report with each patron’s information on one line.
5 Click OK to save your option settings and return to the
Circulation Reports window.
6 Click Create. A browser window opens and displays the report.
The Displaying Records message in the navigation bar displays
as "1 to x of y" (where x is the number of records in this data
set and y is the total number of records).
Note: The available options depend on which report is selected.
394
Spectrum CIRC/CAT User Manual
SCC5um1200kn
Creating reports
After you select the report you want to print and specify the index(es), data range(s), and
any other report options, you are ready to create the report. Click the Create button to
generate the report in your Internet browser.
If the report is large enough to be contained in more than one .htm file, you can click the
Next Set button to open the next report file. The Displaying Records message in the
navigation bar displays as "1 to x of y" (where x is the number of records in this data set
and y is the total number of records).
For more information on creating reports, look at these topics:
How to create reports
Example scenario: You want to create the Materials report.
To create reports
1 In the Navigator toolbar, click the Reports button, then choose
Material Reports > Materials. The Material Reports window
opens with the Materials report selected in the Report box.
2 Select the index that you want to sort the report on in the
Index box.
3 Set the range of data you want to include in the report in the
Start at and End at boxes.
4 Click the Options button to open the Material Reports Options
window and set your report options. Click OK to return to the
Material Reports window.
5 Click Create. A browser window opens and displays the report.
The Displaying Records message in the navigation bar displays
as "1 to x of y" (where x is the number of records in this data
set and y is the total number of records).
Reports: Creating reports
SCC5um1200kn
395
Next Set button
6 If the report is large enough to be contained in more than one
.htm file, you can click the Next Set button to open the next
report file.
7 When you are done viewing or printing the report, click the
close button in the upper right (Windows) or upper left
(Macintosh) corner of the browser window to close it.
Previous Set button
Customizing your browser settings
Spectrum CIRC/CAT uses your Internet browser to print reports. If you find that your
reports aren’t printing quite right, such as a line getting cut off by the footer, you have
several options to adjust how the reports are displayed and printed.
• You can adjust your browser’s font and font size to optimize the
report’s appearance.
• You can print to a different printer or select a different paper
orientation.
• You can copy and paste the report contents from the browser into a
word processor and customize the reports before distributing them to
others.
We have tested Spectrum CIRC/CAT with the browsers listed in the minimum program
requirements (see "Program requirements" in the Spectrum CIRC/CAT Installations
Guide) using the default browser settings. You may find that your preferences or the
requirements of your library differ from the browser defaults. Your browser should allow
you to modify certain defaults. For example, changing the font or font size may make the
report more appealing to you. With the wide assortment of browsers, fonts, printers, and
particularly personal preferences, we cannot test every combination, but we are confident
you will find a combination that suits your library. We provide instructions for adjusting
396
Spectrum CIRC/CAT User Manual
SCC5um1200kn
some browser settings; see your browser documentation for additional options available
to you.
For more information about browser reports, see "About HTML reports" in the Reports
chapter of the Spectrum CIRC/CAT Reference Manual.
How to adjust your browser font and font size
Let’s say you want to fit more lines on your reports. You can adjust various settings to
decrease the font and font size on your computer.
Note: The following instructions may vary slightly depending on the version of your
operating system or browser.
To adjust font size in Internet Explorer (Windows and Macintosh)
From the View menu, choose Text Size > Smallest. Experiment
with different font sizes to find the optimal size for displaying and
printing reports.
To adjust font size in Netscape Navigator (Windows and Macintosh)
From the View menu, choose Decrease Font.
To adjust fonts in Internet Explorer (Macintosh)
1 From the Edit menu, choose Preferences. The Internet Explorer
Preferences window opens.
2 Click the triangle (
Language/Fonts.
) next to Web Browser, then select
3 In the Proportional Font box, select a different font and font
size. Experiment with different fonts to find the optimal font for
displaying and printing reports.
4 Click OK.
Reports: Creating reports
SCC5um1200kn
397
How to adjust your browser page setup options
You can customize your browser settings to adjust how your reports print. Here are some
settings you can set in your browser’s Page Setup window. Note: The settings available
may vary depending on your operating system and browser version.
To adjust your browser page setup options in Internet Explorer
(Windows)
1 From the File menu, choose Page Setup.
2 In the Margins boxes, type the margin measurements in
inches.
3 In the Orientation group, select Portrait or Landscape to
specify whether you want to print the report vertically or
horizontally.
4 In the Header and Footer boxes, specify the information to be
printed by using the variables listed in the table below.
Variables can be combined with text (for example, Page &p of
&P).
To print this
Enter this
Window title
&w
Web address (URL)
&u
Date in short format (as specified by Regional Settings in Control Panel)
&d
Date in long format (as specified by Regional Settings in Control Panel)
&D
Time in the format specified by Regional Settings in Control Panel
&t
Time in 24-hour format
&T
Current page number
&p
Total number of pages
&P
Centered text (following &b)
&b
Right-aligned text (following &b&b)
A single ampersand (&)
&b&b
&&
5 Click OK to save your settings.
398
Spectrum CIRC/CAT User Manual
SCC5um1200kn
To adjust your browser page setup options in Netscape Navigator
(Windows)
1 From the File menu, choose Page Setup.
2 In the Margins boxes, type the margin measurements in
inches.
3 In the Header and Footer groups, select the information that
you want to display.
4 Click OK to save your settings.
To adjust your browser page setup options in Internet Explorer
(Macintosh)
1 From the File menu, choose Page Setup.
2 Specify whether you want to print the report in portrait or
landscape format by choosing the appropriate icon.
3 Click OK to save your settings.
To adjust your browser page setup options in Netscape Navigator
(Macintosh)
1 From the File menu, choose Page Setup.
2 Specify whether you want to print the report in portrait or
landscape format by choosing the appropriate icon.
3 Click the arrow next to Page Attributes and select Netscape
Communicator (this is only available if you have Netscape
Communicator installed).
4 For Header and Footer, select the information that you want to
display on the left, middle, and right of the header and footer.
5 Click OK to save your settings.
Reports: Creating reports
SCC5um1200kn
399
Other browser features
Your browser has many other features that help you view and print your Spectrum reports
effectively. The features available and the feature name may vary depending on your
operating system and browser version. See your browser documentation for instructions
on using these features.
• Find. Lets you search for a word or phrase in the report.
• Send to. Lets you e-mail the report.
• Copy/paste. Lets you copy a portion of the report’s content and paste
it into another document or application.
• Print selected text. Lets you print a portion of the report rather than
the entire report.
• Print multiple copies. Lets you specify the number of copies to print
at once.
Printing reports
After you generate a Spectrum CIRC/CAT report in your Internet browser, you can print
it. To print, you click the Print button in the navigation bar in your report browser
window. If multiple report files are generated for your report, the Print button prints one
data set at a time. To print the entire report, you click the Print button for each set of
records generated. For more information about HTML reports, see "About HTML
reports" in the Reports chapter of the Spectrum CIRC/CAT Reference Manual.
Note: The navigation bar Print button is not available on the Macintosh if you use
Internet Explorer as your browser. You must use the Print command in the File menu.
This command functions the same way as the Print button.
When you print reports, specific information about the report is printed at the top of the
first page of the report. Your library name is printed at the top left of the report. The title
and index(es) of the report are printed at the top right. If you select a custom index, each
of the fields included in the index is also displayed at the top right. The selected report
options are printed at the top left above the column headers. If the report data is arranged
in columns, the column headers are printed on the first page of the report only. If multiple
report files are generated for your report, the report information and column headers are
only printed on the first page of the first set of records you print.
You can also adjust your browser settings to include additional information in the header
and footer of every page of the report, such as page numbers and date.
400
Spectrum CIRC/CAT User Manual
SCC5um1200kn
The following graphic points out the various parts of a printed report.
Example of
a printed
report
Browser header
Library name
Report options
Report title
Column headers
Indexes
Report data
How to print a report
Example scenario: You have already created a Materials with Subjects report, and now
you want to print it. The first page of your report displays the message "Displaying
Records – 1 to 1388 of 3264". This lets you know that this report has been generated in
more than one report file, so you must print each data set individually. See "About
HTML reports" for information about reports created in a browser.
Note: These instructions are for reports created in a browser window. Labels and
circulation notices are created in a Spectrum preview window. See "Creating labels" for
more information.
Print
button
To print a report
1 In the first set of records, click the Print button in the
navigation bar. The Print window opens.
2 Click OK (Windows) or Print (Macintosh) to print the report.
Note: If you use Internet Explorer on a Macintosh, the Print
button is not available. Choose Print from the File menu and
click Print.
3 Click the Next Set button to open the next set of records.
Reports: Creating reports
SCC5um1200kn
401
4 Repeat steps 1 – 3 until you’ve printed every report file in the
set of reports. You will know when you reach the last report file
when a Next Set button is not displayed in the navigation bar
and the Displaying Records message shows that the last record
in the displayed set is equal to the total number of records.
5 When you are done viewing or printing the report, click the
close button in the upper right (Windows) or upper left
(Macintosh) corner of the browser window to close it.
How to print a report in landscape format
Some reports print better in landscape format. You can experiment with different reports
to see which page orientation you like better.
Example scenario: You have already created a report, and now you want to print it in
landscape format.
Note: These instructions are for reports created in a browser window. Labels and
circulation notices are created in a Spectrum preview window. See "How to create
landscape labels" for more information.
To print a report in landscape format
1 In the browser, choose Page Setup from the File menu.
2 Choose Landscape and click OK. (Note: This may vary
depending on your operating system and browser version.)
Print
button
3 In the first set of records, click the Print button in the
navigation bar. The Print window opens.
Note: If you use Internet Explorer on a Macintosh, the Print
button is not available. Choose Print from the File menu and
click Print.
4 Click OK (Windows) or Print (Macintosh) to print the report.
5 Click the Next Set button to open the next set of records.
6 Repeat steps 3 – 5 until you’ve printed every report file in the
set of reports. You will know when you reach the last report file
when a Next Set button is not displayed in the navigation bar
and the Displaying Records message shows that the last record
in the displayed set is equal to the total number of records.
402
Spectrum CIRC/CAT User Manual
SCC5um1200kn
7 When you are done viewing or printing the report, click the
close button in the upper right (Windows) or upper left
(Macintosh) corner of the browser window to close it.
How to print a circulation notice
Because circulation notices are generated in a Spectrum preview window rather than in
your browser, printing them is slightly different than printing other reports.
Example scenario: You want to send overdue notices to all patrons that have overdue
materials.
To print a circulation notice
1 In the Navigator toolbar, click the Reports button, then choose
Circulation Notices > Overdues. The Circulation Notices
window opens with the Overdues report selected in the Notice
box.
2 Select the index that you want to sort the notices on in the
Index box.
3 Set the range of data you want to include in the report in the
Start at and End at boxes.
4 Click the Options button to open the Circulation Notices
Options window and set your report options. Click OK to return
to the Circulation Notices window.
5 Click Create. A Spectrum preview window opens and displays
the first five pages of notices.
You can click directly on the report to zoom in and out. Click
the Next Page button to view the next four pages of the
report. Click the Prev Page button to return to the previous
page.
6 Click the Print button. The Print window opens, where you can
specify the number of reports to print.
Note: To return to the Circulation Notices window without
printing, click the Close button in the report preview window.
7 Click OK (Windows) or Print (Macintosh) to print the report.
The Spectrum preview window closes and you are returned to
the Circulation Notices window.
Reports: Creating reports
SCC5um1200kn
403
Before you create a circulation notice, you can choose to add the barcode numbers from
the notices you print to the Selected Barcodes file for printing mailing labels. You do this
by selecting the "Add to the Selected Barcodes file for printing mailing labels" option in
the General tab of the Circulation Notices Options window. If you choose this option,
you need to decide if you want to delete the existing Selected Barcodes file or add these
barcodes to the existing file. With this option selected, the Labels window opens when
you finish printing notices.
404
Spectrum CIRC/CAT User Manual
SCC5um1200kn
Setting up labels
The Labels report category lets you print patron barcode, mailing labels, material
barcodes, material spine labels, and circulation barcodes. These labels print on addresstype computer label stock and are designed to print on Sagebrush’s laser barcode and
spine labels.
Before you click the Create button to create your labels, you need to select your index,
range, starting print location, and options. You also have the option of printing multiple,
non-sequential barcodes. If you would like to do this, you have to enter barcodes in the
Selected Barcodes file and use Selected Barcodes as the index. For more information, see
"Entering numbers in the Selected Barcodes file" in this chapter.
The index lets you print a range of labels that are sorted to meet your needs. Material
barcodes or spine labels can be indexed by material number, title, author, call number,
material type, either of the two material user-defined fields, selected barcodes, and
material custom indexes. Patron barcodes and mailing labels can be indexed by patron
number, patron name, patron type, any of the three patron user-defined fields, selected
barcodes, and patron custom index. Circulation Barcodes don’t require an index.
The Selected Barcodes index uses the barcodes in the Selected Barcodes file. You can
add or remove barcodes from this file by clicking the Select Barcodes button to open the
Selected Barcodes window. You can also add all of the barcodes you print circulation
notices for to this file by selecting that option in the Circulation Notices Options window.
Choosing a starting print location on your label stock can eliminate wasted labels when
you’re using a partial sheet of labels. You can start printing the next batch of labels on the
same label sheet by specifying a starting point using the Row and Column boxes in the
Labels window.
You can also set up page properties to adjust how you print labels on your printer,
including margins, label size, and label spacing.
For the most trouble-free scanning, Sagebrush recommends a laser printer with output of
600 dots per inch (dpi) or better. You can print spine and mailing labels on many types of
printers. However, your success at producing barcodes legible to scanning equipment
may depend on several factors:
• the length of the barcodes you’re trying to print,
• the width of the label, and
• the number of dots per inch (dpi) that the printer is capable of printing.
Reports: Setting up labels
SCC5um1200kn
405
When printed on the same size labels, barcodes that contain more characters may consist
of thinner lines than barcodes with fewer characters. As barcode density increases, the
number of dpi needed to print the label also increases. In general, longer barcodes require
a printer with high resolution (600 dpi or more), while shorter barcodes can be generated
using a printer with lower resolutions (300 dpi or less). In addition, the quality of the
ribbon or toner cartridge can also influence the quality of the printed barcodes.
How to set up labels
Example scenario: You want to create patron barcodes for your patrons with last names
from N to Z. You’ve already printed and used labels from one sheet of label stock, so you
want to begin printing the labels halfway down the page.
To set up labels
1 In the Navigator toolbar, click the Reports button, then choose
Labels > Patron Barcodes. The Labels window opens with the
Patron Barcodes label type selected in the Label box.
2 Select the index that you want to sort the labels on in the Index
box.
3 Set the range of data you want to include in the labels in the
Start at and End at boxes. For this example, enter N in the
Start at box. Leave the value in the End at box to its default
value.
4 Select the Select starting print location option. In the Row
box, enter 3. In the Column box, enter 2.
406
Spectrum CIRC/CAT User Manual
SCC5um1200kn
5 Click the Options button to open the Patron Label Options
window and set your label options. Click OK to return to the
Labels window. For information about setting up options, see
"Setting up label options
6 Click Create. A Spectrum preview window opens and displays
the first five pages of labels.
Entering numbers in the Selected Barcodes file
You print multiple, non-sequential labels by entering the material or patron barcode
number for the label you want to print into the Selected Barcodes file. You enter barcode
numbers into the file at any time by clicking the Select Barcodes button in the Labels
window. You can also enter barcode numbers in this file when you print circulation
notices (see "How to print a circulation notice"). If you do this, as soon as you finish
printing notices, the Labels window automatically opens.
You can enter both material and patron barcodes into the Selected Barcodes file. For this
reason, it is important that you select the correct Material or Patron option in the Selected
Barcode window. This tells the program what type of number it is and determines
whether it is included in the selected label type. For example, a patron number is not
included in a Material Barcodes report.
For more information about this window, see "Selected Barcodes window" in the Reports
chapter of the Spectrum CIRC/CAT Reference Manual.
How to enter numbers in the Selected Barcodes file
Example scenario: You want to print barcodes for three books that have damaged labels.
To enter barcode numbers in the selected barcodes file
1 In the Navigator toolbar, click the Reports button, then choose
Labels > Material Barcodes. The Labels window opens with
the Material Barcodes label type selected in the Label box.
2 In the Labels window, click the Select Barcodes button. The
Selected Barcodes window opens.
Reports: Setting up labels
SCC5um1200kn
407
3 Make sure the Material option is selected so the program
knows that you are entering material numbers.
4 Enter the first barcode number, 10125, in the Barcode box.
5 Click Add New to add the barcode to the list.
6 Repeat steps 4 and 5 for each barcode you want to include.
7 Click OK to return to the Labels window.
8 From the Index list, select Selected Barcodes.
9 Set your label options and label page and click Create. A
Spectrum preview window opens and displays the first five
pages of labels.
To remove a barcode from the Selected Barcodes file, select it in the list of barcodes in
the Selected Barcodes window and click Remove. To clear all of the barcodes out of the
Selected Barcodes file, click Remove All in the Selected Barcodes window.
Setting up label options
Clicking the Options button in the Labels window opens an options window listing
available options for the selected label type. You should select the label type that you
want to print from the Label box before you check your options because the available
options vary according to the type of labels you’re printing.
Both patron and material barcode labels can be printed as they exist in your data records,
or they can be printed as 14-digit barcodes that include a four-digit location code (stored
in Location Setup).
408
Spectrum CIRC/CAT User Manual
SCC5um1200kn
Every label type also gives you the option of printing more than one copy of each label,
limiting the labels you print to those added to the database or edited in the database after
a specified date, and changing the font size for each line of text.
How to set up label options
Example scenario: You want to create patron barcodes for all of your patrons added
during the last year. You need to specify the label stock you’re printing on. You also need
to specify what will be printed on the barcodes.
To set up label options
1 In the Navigator toolbar, click the Reports button, then choose
Labels > Patron Barcodes. The Labels window opens with the
Patron Barcodes label type selected in the Label box.
2 Select the index that you want to sort the labels on in the Index
box.
3 Set the range of data you want to include in the labels in the
Start at and End at boxes. For this example, you can leave
these at the default values.
4 Click the Options button. The Patron Label Options window
opens.
Patron Label
Options window
Reports: Setting up labels
SCC5um1200kn
409
5 Select the label stock you are printing the labels on, Portrait
33.
6 Select Barcode as is.
7 Select User-defined fields on label and Expiration date on
label.
8 Select the Include patrons added on or after starting date
option, and in the Starting date box, enter a date one year
earlier than the current date.
9 Set your label options., if necessary.
10 Click OK to return to the Labels window.
11 Click Create. A Spectrum preview window opens and displays
the first five pages of labels.
Setting up label pages
You can set up page properties to adjust how you print material and patron labels on your
printer. This lets you position the labels on the page correctly. You can set up and save a
different page setup for each label stock for material barcodes (Portrait 30, Portrait 33,
and Landscape 27), material spine labels (Portrait and Landscape), and patron barcodes
(Portrait 30, Portrait 33, and Landscape 27). For more information about page orientation,
see "About portrait and landscape paper orientation".
Each page setting is displayed in inches. The boxes accept numbers from 0.000 to 9.999.
Each page setting also has a default number, which you can restore by clicking the
Defaults button.
Note: If you used a previous version of Spectrum CIRC/CAT on a Mac OS system, you
may be accustomed to editing the preference file settings to adjust your label page
settings. This is no longer necessary because you can now use the Label Page Setup
window to adjust these settings.
To save label stock, you can first print a sample page of labels on regular paper. Then,
with the sample page behind the label stock, hold them both up to a light to make sure the
labels line up correctly. If not, adjust the page label settings until they print properly.
For more information about this window, see "Label Page Setup window" in the Reports
chapter of the Spectrum CIRC/CAT Reference Manual.
410
Spectrum CIRC/CAT User Manual
SCC5um1200kn
How to set up label pages
Example scenario: You need to adjust your material barcodes slightly so that they print
properly on the label stock.
To set up label pages
1 In the Navigator toolbar, click the Reports button, then choose
Labels > Material Barcodes. The Labels window opens with
the Material Barcodes label type selected in the Label box.
2 Click the Options button. The Material Label Options window
opens.
3 Select a label stock from the Label Stock group.
4 Click Page Setup. The Label Page Setup window opens.
Label Page Setup
window
In this window, you
adjust how labels are
printed on your
printer.
5 Edit the boxes as necessary to adjust your label page settings.
6 Click OK to save your settings and return to the Material Label
Options window.
7 Click OK to return to the Labels window.
8 Click Create. A Spectrum preview window opens and displays
the first five pages of labels.
To reset the label page settings to their default values, click the Defaults button in the
Label Page Setup window.
Reports: Setting up labels
SCC5um1200kn
411
About portrait and landscape paper orientation
The terms "portrait" and "landscape" refer to the orientation of the paper when printing—
not of the labels themselves. Landscape orientation prints text across the page in the
direction that is widest. Portrait orientation prints text across the shorter side of the page.
The landscape position is a horizontal paper placement and the portrait position is a
vertical paper placement.
In order to correctly print on portrait or landscape label stock, you need to have your
printer set up to print using the proper orientation. When printing material spine labels
and material barcode labels, you can select whether to print in portrait or landscape
format from the Material Label Options window. For patron barcode labels, you can
select whether to print in portrait or landscape format from the Patron Label Options
window.
You must also make sure the Spectrum program’s Page Setup option (located in the File
menu) is set to the same page orientation as your label settings.
Portrait report
412
Spectrum CIRC/CAT User Manual
SCC5um1200kn
Landscape report
Reports: Setting up labels
SCC5um1200kn
413
Creating labels
After you select the label type you want to print and specify the index, data range, label
options and label page settings, you are ready to create labels.
After you create labels, you can print them.
How to create labels
Example scenario: You want to create patron barcode labels.
To create labels
1 In the Navigator toolbar, click the Reports button, then choose
Labels > Patron Barcodes. The Labels window opens with the
Patron Barcodes report selected in the Label box.
2 Select the index that you want to sort the labels on in the Index
box.
3 Set the range of data you want to include in the labels in the
Start at and End at boxes.
4 Click the Options button to open the Patron Label Options
window and set your report options.
5 Click Page Setup to open the Label Page Setup window and
specify your label page settings. Click OK to return to the
Patron Label Options window.
6 Click OK to return to the Labels window.
7 Click Create. A Spectrum preview window opens and displays
the first five pages of labels.
414
Spectrum CIRC/CAT User Manual
SCC5um1200kn
Report preview
window
In this window, you
preview the first five
pages of circulation
notices and labels.
You can click directly on the labels to zoom in and out. Click
the Next Page button to view the next four pages of labels.
Click the Prev Page button to return to the previous page.
8 From this window you can print the labels or click the Close
button to close the window without printing.
How to create landscape labels
Example scenario: You want to create material barcode labels on landscape label stock.
This means you must set the page orientation in two parts of the program: the Page Setup
window (accessible from the File menu in Spectrum) and the Patron Label Options or
Material Label Options window (accessible by clicking the Options button in the Labels
window).
To create landscape labels
1 From the File menu, choose Page Setup. The Page Setup
window opens.
2 In the Orientation group, choose Landscape. Click OK to save
your settings.
Reports: Creating labels
SCC5um1200kn
415
3 In the Navigator toolbar, click the Reports button, then choose
Labels > Material Barcodes. The Labels window opens with
the Material Barcodes report selected in the Label box.
4 Select the index that you want to sort the labels on in the Index
box.
5 Set the range of data you want to include in the labels in the
Start at and End at boxes.
6 Click the Options button to open the Material Label Options
window and set your report options.
7 In the Label Stock group, select Landscape 27.
8 Click Page Setup to open the Label Page Setup window and
specify your label page settings. Click OK to return to the
Material Label Options window.
9 Click OK to return to the Labels window.
10 Click Create. A Spectrum preview window opens and displays
the first five pages of labels.
You can click directly on the labels to zoom in and out. Click
the Next Page button to view the next four pages of labels.
Click the Prev Page button to return to the previous page.
11 From the Spectrum preview window you can print the labels or
click the Close button to close the window without printing.
Printing labels and circulation notices
After you generate labels and circulation notices in the Spectrum preview window, you
can print them. To print, you click the Print button.
To save label stock, you can first print a sample page of labels on regular paper. Then,
with the sample page behind the label stock, hold them both up to a light to make sure the
labels line up correctly. If not, adjust the page label settings until they print properly.
416
Spectrum CIRC/CAT User Manual
SCC5um1200kn
How to print labels and circulation notices
Example scenario: You have already created material barcodes, and now you want to
print them. First, you want to print just the first page to make sure the barcodes will print
correctly on your label stock.
Note: These instructions are for labels or circulation notices created in the Spectrum
preview window. All other program reports are created in your Internet browser.
To print labels and circulation notices
1 In the Spectrum preview window, click the Print button. The
Print window opens.
Print button
2 Select Pages. In the From and To boxes, enter 1.
3 Click OK (Windows) or Print (Macintosh) to print the first page
of the labels. The Spectrum preview window closes and you are
returned to the Labels window.
4 Make sure the barcodes print in the correct position on the
label stock. If not adjust your label page settings as necessary.
5 Click Create. A Spectrum preview window opens and displays
the first five pages of labels.
6 Repeat steps 1 – 4 until the labels print properly.
7 When the sample page of labels prints to your satisfaction, print
all of the labels. In the Print window, make sure All is selected
and click OK (Windows) or Print (Macintosh).
To save label stock, you can first print a sample page of labels on regular paper. Then,
with the sample page behind the label stock, hold them both up to a light to make sure the
labels line up correctly. If not, adjust the page label settings until they print properly.
Reports: Creating labels
SCC5um1200kn
417
418
Spectrum CIRC/CAT User Manual
SCC5um1200kn