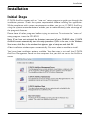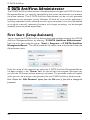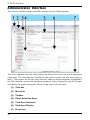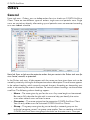
1
G DATA
AntiVirus
Operating
instructions
G DATA AntiVirus
2521__G_DATA_AntiVirus_Business__english_2007_06_10
G DATA AntiVirus
Table of Contents
General.................................................................................................................. 7
Introduction
7
Features
7
Product Architecture
8
Using G DATA AntiVirus
10
Tips for Better Antivirus Protection
11
Support and Licensing
12
G DATA PremiumHotline
13
Online Registration
14
Terms of Agreement
16
Installation Overview...........................................................................................18
General
18
System Requirements
19
Basic Virus Analysis
19
Installation...........................................................................................................21
Initial Steps
21
Installing the G DATA AntiVirus ManagementServer
23
Installing the G DATA AntiVirus Administrator
24
Installing the G DATA AntiVirus Client
24
G DATA AntiVirus
G DATA AntiVirus ManagementServer................................................................... 25
G DATA AntiVirus Administrator........................................................................... 26
First Start (Setup Assistant)
26
Subsequent Program Starts (Password Access)
28
Defining the client monitoring structure
29
Administrator Interface
30
G DATA AntiVirus Administrator program structure..............................................31
Title bar
31
Menu bar
31
File menu
Clients menu
View menu
Settings
Help
31
33
36
37
40
Toolbar
40
Client Selection Area
41
Task Area Selection
42
Task Area Display
42
Status bar
42
Task areas G DATA AntiVirus Administrator.......................................................... 43
Status
43
G DATA AntiVirus
Orders
General
Create New Scan
Modify Job Parameters at a Later Date
Settings
44
44
46
49
50
G DATA AntiVirus Client
50
Updates
51
Client Functions
51
Exception Directories for Scan Jobs
52
Monitor
52
Settings
53
Exceptions
56
Interaction with the user
56
Status
56
Email
57
Incoming mails
58
Outgoing mails
58
Scan options
59
Alerts
59
Email protection
59
Reports
60
Toolbar Commands
61
Quarantine
62
Clients
Toolbar Commands
Statistics
63
64
65
G DATA AntiVirus
G DATA AntiVirus Client....................................................................................... 66
Virus Checking
66
Set Priority for Virus Checking
66
Canceling Virus Scanning
67
Disable the Virus guard
67
Options
67
Quarantine
67
Internet Update
68
Info
68
Frequently Asked Questions (FAQs)...................................................................... 69
Index................................................................................................................... 74
General
General
Introduction
You have chosen G DATA AntiVirus to protect yourself from computer viruses. This
tool has been developed by a team that has over 15 years of experience in the field of
virus development. It is the most up-to-date software technology currently available on
the market for combating viruses. Easy to use for everyone, yet respecting the highest
security requirements – these have been the primary goals that have gone into the
development of G DATA AntiVirus.
Features
G DATA AntiVirus provides centrally controlled virus protection to your business. The
ManagementServer manages all clients on desktops, laptops and file servers. All client
processes are cloaked – users are unable to modify the security levels.
Award-winning technology
• DoubleScan: award-winning virus detection using two virus scanner modules.
• OutbreakShield - instant protection against new viruses. Blocks infected emails
within minutes of a virus outbreak.
• OutbreakShield and DoubleScan complement each other perfectly, providing
three protective shields
• Integrated rootkit blocker
• Special module uncloaks any rootkits already installed on the system
• Scans all compressed file and archive formats
• Secure protection against viruses, worms, rootkits, spyware, diallers, Trojans
and many more
• Improved protection against diallers, spyware, adware and other riskware
• Heuristic detection for unknown viruses
G DATA AntiVirus ManagementServer
• Installation, virus scans, updates, configuration and reports managed remotely
on the network (LAN/WAN) via TCP/IP
• Improved user interface: now even easier to use
• Automatic download and distribution of updates
• User-definable client grouping and setup
• Virus alert via popup window, email or VirusCall
• Central quarantine function
• Collect jobs for clients in offline mode
G DATA AntiVirus
G DATA AntiVirus Client
• Client processes run in the background and are “invisible” to users
• Email virus blocker for Outlook, Outlook Express, Mozilla and other popular
email clients (POP3/IMAP)
• OutbreakShield: instant client-side protection against new virus outbreaks
(POP3/IMAP)
• Full functionality, even in offline mode
• All local scan jobs possible
• Options for independent updates and temporary virus monitor deactivation
G DATA PremiumSupport
• Automatic hourly virus signature updates
• Free software updates
• Local rate PremiumHotline available 24 hours/365 days/weekends and public
holidays
• InternetAmbulance
Product Architecture
G DATA AntiVirus for Windows has a unique architecture developed with integrated
AVP technology. It includes two AntiVirus engines, Client software, Administrator software, Server software, and regular Internet Updates. According to numerous technical
appraisers, who for many years have ranked similar software programs, G DATA AntiVirus is one of the world’s best virus scanners for its efficiency and reliability in recognizing,
detecting, and dealing with viruses. The new architecture of G DATA AntiVirus makes
your network more efficient and more secure: The G DATA AntiVirus Management
Server checks and controls all client workstations, notebooks, or even file servers and
supplies them with virus signature updates. All client processes run transparently in the
background. Thus, one system administrator can maintain your entire virus protection
system from one centrally located workstation. There are specific commands that enable
the remote control of individual clients and perform automated procedures so that
any user can be set up and optimized quickly and easily. The organization’s network
will protect and update itself from then on; once the software has been set up and
optimized, there remains very little to be dealt with afterwards.
G DATA AntiVirus clients
All clients, regardless of whether they are on workstations, laptops or file servers, are
protected by G DATA AntiVirus ManagementServer in a way that is completely transparent to the user. The G DATA AntiVirus Client software for Windows Vista, 2000,
XP and 2003 Server runs all jobs from the G DATA AntiVirus ManagementServer in the
General
background without a user interface, so the user does not need to interact with the virus
protection technology at all. The clients have their own virus signatures and their own
scheduled tasks, so that virus scans can also run offline (e.g. on laptops). The reports
generated are gathered together and are then synchronised the next time a network
connection is available.
Online connection to the UpdateServer
The demands of the Internet age mean that regular updates have become a critical survival
tool for effective virus protection. This is why the G DATA AntiVirus ManagementServer
can request updates from the G DATA UpdateServer independently on an hourly basis,
thereby automatically updating the entire company network. The Emergency AntiVirus
Service is the second important online link between your company and G DATA. The
system administrator can encrypt and send suspect quarantined files to the Emergency
AntiVirus Service for analysis with a single click. If necessary, a solution will generally be
provided within 48 hours.
The G DATA AntiVirus Management Server
The most important feature of the G DATA AntiVirus Management Server is its architecture. The Management Server manages all client installations, requests the most
recent software updates and virus signature updates automatically from the G DATA AntiVirus Update Server, and administrates all virus protection activity on an organization’s
network (LAN/WAN). The G DATA AntiVirus Management Server utilizes TCP/IP for
communicating with clients. For offline clients, processing jobs are collected automatically and synchronized during each client’s next online session. The G DATA AntiVirus
Management Server operates with a central quarantine folder (optional), which enables
the system administrator to save any suspicious files in an encoded format and then
transmit them to the Emergency AntiVirus Service using the G DATA AntiVirus Internet
Ambulance if he/she chooses. The built-in virus alert system can warn authorized users
by means of a pop-up message, an email, or protocol, depending on the system configuration.
G DATA AntiVirus Administrator
The G DATA AntiVirus Administrator is the system software that manages the G DATA
AntiVirus ManagementServer; it is centrally controlled from the server by the system
administrator and protects the entire network. The G DATA AntiVirus Administrator
software can also be run with password protection on any client computer running Windows Vista, 2000, XP and 2003 Server. The G DATA AntiVirus Administrator software
allows you to define and manage countless network security zones, and also to manage
individual computers. All kinds of virus scanner operations, including automated installs,
software and virus signature updates, virus scans (immediate or at regular intervals),
monitoring functions and changes to settings, can be managed remotely across the
whole organisation.
G DATA AntiVirus
Using G DATA AntiVirus
At a time when the World Wide Web is growing in popularity, there are enormous security
risks that result. Virus protection and information security should be important not only
to IT managers and experts, but to all members of an organization. Everyone should be
consciously examining the issue of virus protection more closely from within a framework
of “comprehensive, risk management.” Future organizational success depends largely upon
the security of its informational database. Any network or PC that crashes because of a virus
infection affects an organization at its most sensitive point. IT systems, and the information
they manage, are the lifeblood of an organization. With every crash, there are consequences:
“life support” systems come to a halt, data upon which future success depends is lost, and
vital channels of communication are suddenly inaccessible. Computer viruses can potentially
damage an organization to such an extent that it might never be able to recover! However,
with G DATA AntiVirus, high quality, dependable virus protection for your entire network is
assured. The security offered by G DATA AntiVirus is among the most dependable on the
market. Our software has continually been judged as one of the best by various technical
appraisers who specialize in AntiVirus software. The primary features of G DATA AntiVirus
are its high-level security and the central administrator that enables system administrators to
easily manage all of the remotely distributed clients through an organizational network. All G
DATA AntiVirus clients, whether they are workstations, notebooks, or file servers, are centrally controlled through one administrative interface. All client processes run transparently
in the background ¯ without any risk that users might (or could) change the security level, or
worse, deactivate their workstation security system. The automatic Internet updates, which
are administrated through the central administrator, ensures that, should a critical situation
arise, each client system is regularly updated with the necessary virus signatures so that any
new virus can be quickly identified, and any subsequent response time is as short as possible.
The centralized control with the G DATA AntiVirus Management Server ensures that the
installation routine, the settings, the updates, the remote control, and automatic virus check
procedures can be centrally managed for an organization’s entire network ¯ all from one location. This makes it easier on the system administrator and saves both time and money. Since
you have decided to use G DATA AntiVirus, you are aware of the problems that computer
viruses can cause and you know that you need professional help to safeguard your network.
Because G DATA AntiVirus is one of the best AntiVirus programs in the world, you will be
receiving superior antivirus performance and a greater ease of use than what is offered by
other virus protection programs. Just as a reminder:
• New viruses are emerging all the time. It is no exaggeration to talk of several
hundred newly identified viruses every month. Unless you regularly update the
software and the virus signatures, which were provided when you purchased
your software, your virus protection system will become obsolete within days
and you will have no reliable means of protecting yourself.
• G DATA creates new updates as often as every hour. To ensure adequate
protection for your data, you should therefore make sure that you receive new
updates as soon as they are released.
10
General
Tips for Better Antivirus Protection
G DATA AntiVirus can detect not only known viruses on the basis of confirmed virus
signatures, but it can also detect suspected viruses by using a heuristic analysis, which
identifies suspicious code based on specific viral characteristics. This provides a measure
of assurance. However, there are additional steps you can take to not only safeguard
your individual workstation, but to safeguard your entire network system as well. These
steps do not take much effort; however, they can improve the security of your system
and the integrity of your data quite considerably.
Use original software
Use only original software and, before using it, be sure that all floppy disks are write-protected. To ensure that your media is write-protected, the small sliding panels must cover
the two holes at the top of the disk. No virus can circumvent this hardware protection.
When downloading software from the Internet, be critical and only use software that
you really require and only use software whose origin appears trustworthy. Never open
files that have been sent to you by unknown sources or that surprisingly appear from
friends, colleagues, or acquaintances. As a precaution, ask the source first if the program
can be started without danger or not.
Change the BIOS start sequence
Many of the problems caused by a virus infection can be evaded by ensuring that the
boot sequence lists “C:, A:”. With this setting you can use the BIOS setup menu (by
pressing DEL when booting) to make an alteration. In this way the computer will not be
booted from a CD-ROM that has been inserted by mistake: instead the computer will be
booted from your hard disk, and this method will at least make it more difficult for any
infection with boot sector viruses to enter your system.
Use the correct procedures
Always ensure that any virus infection is dealt with only by persons competent to do so. By
using this approach, you will prevent the destruction of many infected files, since viral experts
can frequently repair them. By teaching your staff to rely upon a specially trained colleague
whenever there is an apparent infection, you will avoid many difficulties and you will be dealing
with viruses far more efficiently. We advise you to deactivate the preview option for all email
programs. Email previewing makes it possible for your system to become infected by specific
HTML viruses, such as “Badtrans,” which become active as soon as the HTML code is read.
Regarding Internet usage, your staff should be trained never to download any programs over
the Internet; this is critical. In addition, your staff should never open any email attachments
without exercising careful consideration: Who are they from? Are they trustworthy? If any
user suspects that a virus has infected his or her system (for example, a newly installed software program does not perform as expected or an error message appears unexpectedly),
the user should NOT turn off the computer before requesting the system administrator
to complete a virus check. The explanation for this is simple: Trojan delete commands are
executed when the computer is restarted and, for this reason, it is easier to identify and treat
this kind of virus infection if your trained staff are able to assess the situation before a system
11
G DATA AntiVirus
reboot takes place. Also, it is very important to instruct your staff that special care needs to
be taken whenever they execute macro commands. Macro commands are frequently used to
launch a virus. To respond to this threat, you must always ensure that macro virus protection
is activated in all your Microsoft Office products. This feature activates an information dialog
before any unknown macro is executed; this gives the user time to review that macro and
verify that is it OK. In general, you should avoid maintaining files that contain macros and you
should always know what the macro has been designed to do.
Support and Licensing
G DATA AntiVirus is the software package that provides complete PC network security. It includes:
• G DATA AntiVirus ManagementServer: management software for servers
running Windows Vista, 2000 and Windows XP Professional (preferably server
versions), Windows 2003 Server
• G DATA AntiVirus Administrator: management software for G DATA AntiVirus
ManagementServer for Windows Vista, 2000, XP or Windows 2003 Server
• G DATA AntiVirus Client: client software providing virus protection for workstation PCs and servers running Windows Vista, 2000, XP or Windows 2003
Server
• Detailed documentation for installation and use
• Use of the Emergency AntiVirus Service to analyse suspicious files
• Use of the PremiumHotline via telephone, fax or email
There is no time restriction on the software licence. The licence price covers the total
number of client computers protected by G DATA AntiVirus, regardless of whether
they are being used as servers or workstation computers.
Emergency AntiVirus Service
If you come across a new virus or something unfamiliar, it is vital that you send us this
file via the G DATA AntiVirus quarantine function. We will analyse the virus and will then
provide you with an antidote as quickly as possible. We will of course treat any files you
send us as highly confidential and with complete discretion.
PremiumSupport renewals
Registering online entitles you to PremiumSupport. This provides complete virus protection with hourly virus updates via the Internet for one year. You can also choose to
receive information by email (e.g. about upgrades to G DATA AntiVirus ManagementServer software and current virus alerts). PremiumSupport can of course be renewed
from one year to the next. Simply contact us on:
Fax:
+ 49 234 / 9762-299
Email:
[email protected]
12
General
G DATA PremiumHotline
The PremiumHotline for G DATA AntiVirus multi-user and network licences is available
to all registered customers from Monday to Friday between 7 a.m. and 4 p.m. This will
help you to solve all problems connected with use of this product, either by phone, fax
or via the Internet. During Hotline hours one of our specialists will always be available
to speak to multi-user and network licence holders. Outside these hours you will be able
to reach our G DATA ServiceCentre on the following numbers:
Tel.:
+ 49 180 11 55 190 (contact your telephone service provider for call rates)
Fax:
+ 49 234 9762 162
Email:
[email protected]
You will find the Registration Number on the back of the User Manual. If you
purchased the software online, the registration number will have been sent in a separate
email.
By entering the registration number on the online registration form, you will instantly
receive a password which will allow you to download your personal online updates.
Many questions have already been answered in the G DATA AntiVirus Frequently Asked
Questions online database (FAQ): www.gdata.de
Please have your computer/network specifications to hand before you call the hotline.
The information you will need is:
• the version number of your G DATA AntiVirus Administrator and of the G
DATA AntiVirus ManagementServer (you will find these in the ? menu of the G
DATA AntiVirus Administrator under "Info”)
• the G DATA AntiVirus registration number or your user name for online
updates. You will find the registration number on the back of the manual. Your
user name is sent to you when you register.
• the exact version of Windows you are running (Client/Server)
• any additional hardware or software components installed on your computer
(Client/Server)
This information will ensure that your conversation with the Hotline operators is shorter,
more effective and more productive. If possible, please have the telephone near to your
ManagementServer (which should be switched on) when you call.
13
G DATA AntiVirus
Online Registration
You will have to register on the G DATA UpdateServer to receive your access data
before you can run an online update. You can register by selecting “Online Update”
under “Start > Programs > G DATA AntiVirus ManagementServer”.
Click “Online Registration”; you will then be prompted to enter your client details
and registration number.
Note: You will find your registration number on the back of the manual. If you bought the
software online, you will have been sent the registration number in a separate email.
Note: Please be aware that you will of course need to be connected to the Internet, either via
a permanent or dial-up connection.
Enter each part of your registration number consecutively into the corresponding five
fields, without hyphens. Please complete all other fields accurately too. Online registration can only be processed if all details have been provided.
14
General
Your user name and password will be displayed in a window as soon as you have registered.
Please write down your user name and password and keep them in a safe
place, so that you will still have a note of them if your computer needs to be
completely reformatted. You will only be able to continue with the process
once you have ticked the box next to the appropriate requester.
G DATA AntiVirus will now transfer these details to the online update form automatically.
You will now be able to perform online updates.
Note: Online updates can be run directly from the G DATA AntiVirus Administrator user
interface, and can even be automated using a freely definable time scheduler.
15
G DATA AntiVirus
Terms of Agreement
1. Subject of the Agreement
The subject of this Agreement is the G DATA AntiVirus and the program description
stored on the CD-ROM which are referred to in the following as the “Software”. G
DATA herewith informs users that it is not technologically possible to guarantee that
computer software will function without error in all applications and in conjunction with
other programs.
2. Scope of use
G DATA herewith grants you the simple, non-exclusive and personal right (also referred
to in the following as the “License”) to use AntiVirusKit on a single computer (i.e., a
computer with only one central processing unit (CPU)) at a single location. If this single
computer is a multiuser system, the License shall apply to all the users of this one system.
As the Licensee you are entitled to physically move the Software (i.e., when it is stored
on a data medium) from one computer to another computer provided that the Software
is used only on a single computer at any given time. Any other use is prohibited.
3. Special limitations
The Licensee is prohibited from
a) transferring AntiVirusKit from one computer to another computer via a network or
any other type of data transmission channel;
b) modifying AntiVirusKit without the prior written consent of G DATA.
4. Ownership
Your purchase of the product entitles you only to ownership of the physical data medium on which the G DATA AntiVirus is stored. Acquisition of the software itself is not
included therewith. In particular, G DATA reserves all rights of publication, reproduction,
revision, and enjoyment.
5. Reproduction
The Software and its written documentation are protected by copyright. The creation
of backup copies of the Software is permitted, but no copies may be passed to third
parties.
6. Duration of the Agreement
The Agreement shall remain in effect indefinitely. Any infringement of the conditions of
this Agreement on the part of the Licensee shall automatically terminate the Licensee’s
rights without notice. Upon termination of the License, the Licensee shall be obliged to
destroy the original CD-ROM including any UPDATES/UPGRADES as well as all related
written material.
16
General
7. Compensation for breach of Agreement
The Licensee shall be liable for any and all damages to G DATA that result from breach
of the copyright provisions and the other provisions of this Agreement.
8. Modifications and updates
Our service conditions shall always be valid in their latest form. Service conditions may
change without notice and/or reason.
9. Warranty and liability on the part of G DATA
a) G DATA guarantees to the original Licensee that the data medium (CD-ROM) on
which the Software is stored is free from defects as used under normal operating conditions and with normal care.
b) If the data medium (the CD-ROM) is defective, the purchaser is entitled to a replacement during the warranty period of 6 months following delivery. To receive a
replacement data medium the purchaser must send the defective CD-ROM and a copy
of the receipt or invoice to G DATA.
c) For the reasons indicated in para. 1, G DATA provides no guarantee that the Software
is free of errors. In particular, G DATA does not guarantee that the Software will satisfy
the purchaser’s specific requirements and purposes, or that the Software will function in
combination with other programs selected by the purchaser. The purchaser is exclusively
responsible for the correct selection and for the consequences of using the Software as
well as for any intended or actual achieved results from its use. The same applies for the
written material supplied with the Software. If the Software is unusable in the sense of
1. the purchaser is entitled to cancel this Agreement. G DATA is also entitled to cancel
this Agreement if the manufacture of usable software in the sense of 1 is not possible
with reasonable effort and expense.
d) G DATA shall not be liable for damages unless such damages are intentional or the
results of gross negligence on the part of G DATA. No liability shall be assumed for
gross negligence with regard to dealings with businessmen. The maximum compensation
in any case is the purchase price of the G DATA AntiVirus.
10. Jurisdiction
Sole jurisdiction for any disputes resulting directly or indirectly from the contractual
relationship of this Agreement shall be, at our discretion, the location of our company
headquarters or the domicile of the purchaser.
11. Final provisions
If any provision in this Agreement is or becomes invalid, all other provisions shall remain
in force. Such provisions shall be replaced by others in order to satisfy the intended
purpose of the original provision. In condition that approximates the invalid condition in
terms of commercial purpose is herewith considered to be accepted.
17
G DATA AntiVirus
Installation Overview
General
The following provides an overview of the basic installation procedures. Only the Server
and the Client programs must be installed; the AntiVirus Administrator program is automatically installed once the Server is installed. If you want, the AntiVirus Administrator
program can be subsequently installed on other computers as well. To be effective, all
PCs that are to receive antivirus protection should have a preliminary cold-boot analysis
to ensure that no boot-sector viruses are present and that all system files are virus-free.
Installation Overview
1. Before installing G DATA AntiVirus, it is of paramount importance to carry out a basic
virus analysis.
2. Next, install the G DATA AntiVirus Management Server on your server. Please ensure
that the G DATA AntiVirus Management Server is installed on a Windows Vista, 2000,
Windows NT, or a Windows XP Professional Edition (server version only) system.
When installing the G DATA AntiVirus Management Server, the AntiVirus Administrator
is automatically installed on the server PC as well. Use this program to control the G
DATA AntiVirus Management Server.
3. Next, complete the online registration procedure. Unless you do this, you will not be
able to update virus databases via the Internet.
4. Now, launch the G DATA AntiVirus Administrator. The first time the G DATA AntiVirus Administrator opens a Setup Assistant appears. Use this assistant to install the G
DATA AntiVirus Client software on all client PCs.
If you experience any problems trying to complete the remote installation procedure
with clients, you can carry out the procedure manually or semi-automatically instead.
You will also want to protect your server from viruses, so you should install the G DATA
AntiVirus Client software on it as well.
5. With each client installation, AntiVirus Administrator automatically configures each client to maintain optimal virus protection. Using the AntiVirus Administrator, you can then
execute additional antivirus prevention procedures and once any viruses are discovered,
decide how best to handle the viral infection. From time to time, you should also plan to
download any software updates via the Internet and implement them centrally from the
AntiVirus Administrator.
6. If the need arises, you can install the AntiVirus Administrator software on any client.
This lets you remotely connect to the G DATA AntiVirus Management Server from any
network PC.
18
Installation Overview
System Requirements
The G DATA AntiVirus system uses the TCP/IP protocol for all communication between
client and server computers, and also for its online connection to the G DATA UpdateServer. Clients/servers must meet the following minimum requirements:
• G DATA AntiVirus Clients: PC with Windows Vista, 2000, XP or Server 2003
(also x64 Edition), 128 MB RAM
• G DATA AntiVirus ManagementServer: PC with Windows Vista, 2000, XP or
Server 2003 (preferably the Server versions, but also x64 Edition), 128 MB
RAM, Internet access
Note: The VirusCall function requires a CAPI 2.0 compatible ISDN device or a modem with a
wave/out function that supports the TAPI “Automated Voice” mode.
Basic Virus Analysis
It is very important to run an initial virus scan using the boot CD before installing
the G DATA AntiVirus software for the first time! This checks whether your system
has already been infected by viruses. If you do not run the initial virus scan, harmful
programs such as stealth viruses could evade the virus protection and only be detected
at a later date if, indeed, they are detected at all.
A correct installation of the G DATA AntiVirus software, including an initial virus scan,
could run as follows:
1. Insert the G DATA AntiVirus software CD into your computer’s CDROM drive.
2. Now turn your computer off for at least 5 seconds: This is vital, as some
stealth viruses are able to protect themselves against a warm start (i.e. Restart).
3. Now turn your computer on again: Your computer will now start with a special
G DATA AntiVirus software desktop, rather than the standard Windows interface. This
will help you to remove any viruses that may already be present on your computer. If
your computer does not automatically boot from the CD-ROM drive, you will first need
to configure your computer to do this.
What is a boot CD?
A boot CD is a “bootable” CD-ROM; in other words, it uses its own operating system
to start a computer directly. The computer will therefore not use the standard
operating system present on the hard drive (e.g. Windows XP) when you switch
it on, but it will use the operating system present on the CD-ROM (e.g. LINUX).
The CD-ROM containing G DATA’s AntiVirus software not only holds the G DATA
AntiVirus software for installing under Windows, but also doubles as a boot CD.
19
G DATA AntiVirus
How can my computer be made to boot from the CD-ROM drive?
In order for the computer to boot from the CD-ROM drive, the BIOS (the initial
software responsible, for instance, for launching Windows when the computer is
turned on) must be configured accordingly. If this is not the case, you will first need
to change the boot sequence to “CD-ROM:, C:” in the BIOS. This sets the CD-ROM
drive as the “1st Boot Device” and the hard disk partition containing your Windows
operating system as the “2nd Boot Device”. From now on, whenever the boot CD is
in the CD-ROM drive, this will launch a special Linux-based version of the G DATA
AntiVirus software.
Note: If the boot CD is not in the CD-ROM drive, your normal Windows system will
start automatically after a few seconds.
Note: You can normally access the BIOS setup by pressing the DEL button while your
computer is booting up. Please consult your computer documentation to find out how
to alter the settings in your BIOS setup.
Note: After running the initial virus scan and installing the G DATA AntiVirus
software, you should restore the settings in the BIOS to “C:” as soon as possible, as
this setting provides effective protection against boot sector viruses (e.g. if a data
carrier is left in the drive by mistake).
4. Use the G DATA AntiVirus software program on the boot CD to scan
your computer for viruses and to remove any that are found: You will find
help on using the initial virus scan in the online help, which is available when you start the
boot CD.
5. Remove the G DATA AntiVirus software CD from your computer’s CDROM drive.
6. Turn your computer off and back on again: Your computer will now restart
with the standard Windows operating system, and you will be able to install the standard
G DATA AntiVirus software on a guaranteed virus-free system.
7. Insert the G DATA AntiVirus software CD back into your CD-ROM
drive.
8. Now you can start the actual G DATA AntiVirus software installation:
The G DATA AntiVirus software installation process is explained in detail in the “Installation” chapter.
20
Installation
Installation
Initial Steps
G DATA AntiVirus comes with an “auto-run” setup program to guide you through the
installation process. Check the system requirements before installing the application.
While compliance with system requirements enables you to run G DATA AntiVirus,
using the system recommendations enables you to more efficiently take advantage of
the program’s features.
Please close all other programs before trying to continue. To activate the “auto-run”
setup program, insert the CD-ROM.
Note: If you have not activated the Autostart command of your CD-ROM drive, G DATA
AntiVirus cannot automatically start the setup procedure. If this is the case, in the Windows
Start menu, click Run; in the window that appears, type e:\setup.exe and click OK.
A first installation window opens automatically. You must select a module to install.
You have three installation options available. Your first step is to install the G DATA
AntiVirus Management Server on the computer that you wish to use as the AntiVirus
server.
21
G DATA AntiVirus
Each installation option will be covered below. Your options are:
Option 1: The G DATA AntiVirus Management Server
The G DATA AntiVirus Management Server is the heart of the G DATA AntiVirus architecture: it manages the G DATA AntiVirus Clients, requests the latest software and virus
signature updates automatically from the G DATA AntiVirus Update Server, and controls
the G DATA AntiVirus technology on your network. Once you have installed the G
DATA AntiVirus Management Server, the G DATA AntiVirus Administrator software will
automatically be on the server so that you can then control the actions of the G DATA
AntiVirus Management Server.
Option 2: The G DATA AntiVirus Administrator
The G DATA AntiVirus Administrator is the control software for the G DATA AntiVirus
Management Server, which — controlled centrally by the system administrator — secures the entire network. The G DATA AntiVirus Administrator can be started from
each computer under Windows (from Windows 95) via a password.
Option 3: The G DATA AntiVirus Client
The G DATA AntiVirus Client software supplies virus protection for clients and executes
antivirus routines in the background using the G DATA AntiVirus Management Server
without any user interface. As a rule, installation of the G DATA AntiVirus Client software
is usually carried out centrally for all clients using the G DATA AntiVirus Administrator.
Option 4: Create a Boot CD
You can use the Boot CD wizard to create a bootable CD for basic virus analysis. The
latest virus signatures are used to do this.
22
Installation
Installing the G DATA AntiVirus ManagementServer
The minimum requirement for installing G DATA AntiVirus ManagementServer is a
version of either Windows NT 4.0 with Service Pack 4, Windows Vista, XP, Windows
2000 (preferably the server version) or Windows 2003 Server. Place the G DATA AntiVirus CD-ROM into the drive and click “Install”. Then select “G DATA AntiVirus
ManagementServer” by clicking on the button next to it. The welcome screen that
appears will inform you that you are about to install the G DATA AntiVirus ManagementServer onto your system. Please ensure all other applications that you may have open
on your Windows system are closed down at this point, as these could cause installation
problems. Click on “Next” to proceed with the installation. Now read through the
licence specifying the conditions of use for this software and select “I accept the terms
of this licensing agreement” and then “Next” if you agree with the contents of the
agreement. The next screen allows you to select where the G DATA AntiVirus ManagementServer files should be saved. By default the G DATA AntiVirus ManagementServer
will save in: “C:\Program Files\G DATA\G DATA AntiVirus ManagementServer”. If you wish to select a different target directory, click “Browse”, which will allow
you to select a different folder or to create a new one.
Now you will be asked to choose the program group. Click on “Next” to make the
software available in the default group under “G DATA AntiVirus ManagementServer” in the “Programs” section of the Windows Start menu. If you prefer the
software to be displayed under a different name in the Programs menu, you can enter
your preferred name in the “Program folder” field.
Now select a database server to install. You have a choice of using “Microsoft SQL
Express”, which is particularly recommended for larger networks, or an “Integrated
database”.
Note: When you install Microsoft SQL Express, any other databases that are present will be
converted automatically.
Now check the name of the computer on which you wish to install the management
server. This computer must be accessible to the network’s clients via the name that is
displayed here. If the correct name is not being displayed, change it under “Name”.
The G DATA AntiVirus ManagementServer installation will now commence. Once
installed, you will be able to register the product directly online. The computer must be
connected to the Internet to do this.
Note: You can of course postpone registration until a later date. You can then register by going
to the Start menu > Programs and selecting “G DATA AntiVirus ManagementServer”,
choosing “Online Update” and enabling “Online Registration”.
The installation will finish with a completion window. Click “Finish”. The G DATA AntiVirus ManagementServer and G DATA AntiVirus Administrator (the ManagementServer
interface) will now be available for use.
23
G DATA AntiVirus
Once installation is complete, the G DATA AntiVirus ManagementServer will start automatically each time the computer is restarted. To make adjustments to the ManagementServer, select “G DATA AntiVirus Administrator” via “Start > Programs > G
DATA AntiVirus ManagementServer”, which will start the ManagementServer’s
administration tool.
Installing the G DATA AntiVirus Administrator
When installing the G DATA AntiVirus Management Server, the G DATA AntiVirus
Administrator is also automatically installed on the same computer. Therefore, you do
not have to carry out the G DATA AntiVirus Administrator installation. However, an
installation of the G DATA AntiVirus Administrator can also be carried out on each
client computer (except when running Windows 95) — this installation is independent
of the server installation. In this way, the G DATA AntiVirus Management Server control
can be decentralized. To install the G DATA AntiVirus Administrator on a client computer, please insert the G DATA AntiVirus CD-ROM and select the G DATA AntiVirus
Administrator component by clicking the appropriate button. The Install Shield warning
appears followed by the installation greeting screen. This screen tells you that you are
about to install the G DATA AntiVirus Administrator onto your system. Please close all
applications that are open on your Windows system to avoid problems with installation.
Click Next and follow the installation steps that the installation assistant provides.
Installing the G DATA AntiVirus Client
The G DATA AntiVirus software supplies the virus protection and carries out antivirus
routines from the G DATA AntiVirus Management Server (without displaying a user
interface). As a rule, installation of the G DATA AntiVirus Client software is usually
carried out centrally for all clients using the G DATA AntiVirus Administrator. For this,
use the administrator tool called Setup assistant, which is available from the G DATA
AntiVirus Administrator interface. If the installation of the G DATA AntiVirus Client is
not successful via the network, the G DATA AntiVirus Client software can also be installed directly onto client computers using the CD-ROM. To install the G DATA AntiVirus
Client software on a client computer, please insert the G DATA AntiVirus Client/Server
CD-ROM and select the G DATA AntiVirus Client component by clicking the appropriate
button. The Install Shield warning appears followed by the installation greeting screen.
This screen tells you that you are about to install the G DATA AntiVirus Client onto
your system. Please close all applications that are open on your Windows system to
avoid problems with installation. Click Next and follow the installation steps that the
installation assistant provides. During installation, please enter the name or IP address of
the server onto which the G DATA AntiVirus Management Server is to be installed. This
data is necessary so that the client can contact the server over the network.
24
Installation
G DATA AntiVirus ManagementServer
After installation, the G DATA AntiVirus Management Server is available to you. The
Management Server is the heart of the G DATA AntiVirus architecture: it manages the
G DATA AntiVirus Clients, requests the latest software and virus signature updates automatically from the G DATA AntiVirus Update Server, and controls the virus technology
in the network. For communication with G DATA AntiVirus Clients, the Management
Server sets up all communications using TCP/IP.
For G DATA AntiVirus Clients who are offline, pending jobs are automatically collected
and synchronized during the next online session.
The Management Server has at its disposal a centralized quarantine folder, which can
be used to secure suspicious files in coded form and subsequently forward them for
Emergency AntiVirus Service using the G DATA AntiVirus Internet Ambulance.
Note: If you quit the G DATA AntiVirus Administrator software, this does not close the G
DATA AntiVirus Management Server. This remains active in the background and controls the
processes that have been set by you for the G DATA AntiVirus Clients.
25
G DATA AntiVirus
G DATA AntiVirus Administrator
The G DATA AntiVirus Administrator is the software that manages the G DATA AntiVirus
ManagementServer; it is centrally controlled by the system administrator and protects
the entire network. The G DATA AntiVirus Administrator can be run with password
protection on any computer running Windows. All kinds of virus scanner applications,
including automated installs, software and virus signature updates, virus scans (immediate
or at regular intervals), monitoring functions and changes to settings, can be managed
remotely across the whole organisation.
First Start (Setup Assistant)
You can access the G DATA AntiVirus Administrator tool used for managing the G DATA
AntiVirus ManagementServer by selecting “G DATA AntiVirus Administrator”
from the start menu program group: “Start > Programs > G DATA AntiVirus
ManagementServer”. You will be asked for the server name and password when the
Administrator starts.
Enter the name of the computer on which the G DATA AntiVirus ManagementServer
has been installed, in the “Server” field. As you will not have assigned a password yet,
just click the OK button without entering a password. The password screen will appear
which you can use to assign a new password for the G DATA AntiVirus Administrator.
Hint: Choose the “Edit Password” option from the File menu if you wish to change the
password.
26
G DATA AntiVirus Administrator
The Setup Wizard will automatically open the first time you start G DATA’s AntiVirus
Administrator. This will help to set up the G DATA AntiVirus Clients and will guide you
through all the main setup processes. The wizard can also be launched at any time by
selecting ‘Setup Wizard‘ from the File menu.
Firstly, all clients that are to be monitored by G DATA AntiVirus need to be activated.
Select the computers from the list and then click on “Activate”. Some computers
may not be listed (e.g. if they have not been switched on for a long time or have not
had file or print sharing enabled). To activate one of these clients, enter its name into
the “Computer” field and click the “Activate” button next to it. This computer will
then appear in the listing. Press “Next” when you have activated all G DATA AntiVirus
clients.
The following requester has the button “Install client software on activated computers automatically” ticked by default. If you prefer to install the software directly
on the client computers, please just uncheck this box.
You can adjust the default settings for the monitor, virus protection and client settings in
the following dialog box.
Note: You can of course do this at a later date, via the relevant Administrator areas.
The G DATA AntiVirus ManagementServer can download new virus signatures and
program files from the Internet. To allow this process to work automatically, you will
have to automate login and, if necessary, dial-up. You can find details about this in the
chapter “Online Update Menu”.
27
G DATA AntiVirus
The G DATA AntiVirus ManagementServer can alert you via email if a virus has been
found on one of the G DATA AntiVirus clients, and it can also send potentially infected
files to the Emergency AntiVirus Service for analysis. To do this you will need to specify
the mail server’s name, the port number (SMTP) and the sender’s address. By setting a
limit on the volume of messages, you can prevent your email inbox being “flooded” with
messages in the event of a virus attack.
Click on “Finish” to close the wizard. If you have indicated that the G DATA AntiVirus
Client software should be installed automatically, you will be prompted to specify a user
account on the server, which has access rights to the clients.
After you have clicked OK in this dialog, the G DATA AntiVirus ManagementServer will
try to install the G DATA AntiVirus Client software on all activated computers.
Note: If you should encounter problems remotely installing the G DATA AntiVirus Client via the
G DATA AntiVirus Administrator, you can also install the G DATA AntiVirus Client software on
the client computers manually or semi-automatically.
Subsequent Program Starts (Password Access)
To launch the AntiVirus Administrator select START > Programs > G DATA AntiVirus
Management Server > G DATA AntiVirus Administrator. Once the AntiVirus Administrator is running, you will be prompted for the server and access password.
Enter the name of the computer on which the G DATA AntiVirus Management Server
has been installed and your password.
The program interface of the G DATA AntiVirus Administrator is now opened. The G
DATA AntiVirus Administrator commands are explained in the following chapters.
28
G DATA AntiVirus Administrator
Defining the client monitoring structure
The client selection panel will list all activated computers (which are therefore being
monitored) once the Administrator has been launched. Please note that some computers may be activated even if the G DATA AntiVirus Client software has not (yet) been
installed on them. These computers will of course not yet be protected against viruses
and cannot yet be managed by the Administrator. Activating a computer simply places it
“under observation”.
Select the command „Display deactivated clients” from the Clients menu
to display computers that have not yet been activated as well. You can recognise the
deactivated computers by their greyed out icons. Computers without file or print sharing
enabled will normally not be displayed.
To activate a computer, highlight it on the list and then select the „Activate
client” option from the Clients menu. To update the list of existing clients after network changes, please click the „Update” button.
You can remove a computer from the list (i.e. deactivate it) by highlighting it
and then selecting „Delete” from the Clients menu. Please note that deactivating a
computer will not result in the client software being deinstalled.
The activated computers can be grouped together. This allows easily recognisable
security zones to be defined, as all settings can be applied both to individual computers
and to complete groups. To create a new group, simply highlight the next highest group
and then select „New group” from the Clients menu. You can then simply use your
mouse to drag and drop the relevant clients into the newly created group.
The computers can be easily moved from one group to another via drag and drop.
Individual computers can appear in multiple groups (hold down the Ctrl button whilst
dragging and dropping to duplicate a computer in another group).
Alternatively you can select the group and then choose “Edit group” from the Clients
menu. This will open a dialog box in which you can either add new computers to, or
remove existing ones from, a group.
29
G DATA AntiVirus
Administrator Interface
The AntiVirus Administrator interface is divided into the following areas:
The client selection area (far left) displays the hierarchical structure of the computers
supervised. The area selection (middle) can be used to switch the task area (right column). The content of the task areas normally refers to those computers highlighted in
the client selection area or the highlighted groups of clients. Above this column is a menu
and toolbar for global commands, which can be used in all task areas.
(1) Title bar
(2) Menu bar
(3) Toolbar
(4) Client Selection Area
(5) Task Area Selection
(6) Task Area Display
(7) Status bar
30
G DATA AntiVirus Administrator
G DATA AntiVirus Administrator .
program structure
Title bar
You can use the title bar displaying the program symbol and program name to specify the
basic Windows commands for managing and using the program windows. You can find
information in the Microsoft Windows online help.
Menu bar
The menu bar contains global functions which can be used in every task area. They have
been divided into the following areas: • File
• Clients
• View
• Settings and
• ? (Help) If necessary, functions can also be added to the menu bar, based on the relevant task
areas. The functions for the menus • Tasks
• Reports and
• Client settings are described in the chapters covering the relevant task areas.
File menu
Setup assistant
You can use the Setup Assistant from your server in a process that will support the user
when selecting and activating the clients that you want to manage with the support of G
DATA AntiVirus. For more information about the Setup Assistant, see “First Start (Setup
Assistant)” in Chapter “First Start”.
31
G DATA AntiVirus
Load protocol file...
Use this command to obtain an overview of the last actions carried out by G DATA
AntiVirus. A separate dialog box appears. Each of the listed protocol files contain relevant information about your system’s antivirus activities. Using the Number of entries
field, you can determine how many entries will appear. The most recent entries are
always listed first. The Update button updates the procedure list once the protocol file
is opened. The Print button opens a print protocol dialog box. With this dialog, you can
specify which protocols record you want to print. Use the Close button to close the
protocol file window. By default, your protocol list appears in chronological order. You
can subsequently sort the list based on specific criteria by clicking on a column heading:
a small arrow highlights the column heading which currently controls the sort. Ascending
or descending sort order is indicated by the arrow’s direction.
The following criteria are available:
• Date/time – Date and time of the antivirus action.
• Computer – The name of the respective client that the action will impact.
Numerous clients are listed in the protocol file. There is no subdivision into
groups here.
• Procedure – A short heading that indicates the antivirus action.
• Content – Here you obtain detailed information regarding the antivirus action.
You are informed, for example, if installations are to take place, which viruses
have been detected, or which updates or modifications are to be carried out on
the settings.
Edit password...
When starting the AntiVirus Administrator you are generally prompted for the server
and access password.
Select the Edit password command to change the password. A field appears in which you
firstly enter the old password, then the new password needs to be confirmed twice to
eradicate incorrect spelling or typing errors. By clicking OK, your password is changed.
32
G DATA AntiVirus Administrator
Page setup
Here, you can adapt the page format (borders and text size) for the G DATA AntiVirus
Administrator print commands on your printer, if the printout is not carried out to the
optimal initially.
Print preview
In this menu, you can determine which details and areas you wish to have printed. In the
selection window that appears, you can highlight the required elements to be printed
and then using OK, you are presented with the page preview, which displays the screen
preview of the printout. The Print button can be used to start the printout. The element
selection varies depending on which work area you are currently working in.
Print
This starts the print procedure for the client settings or reports. In the selection window
that appears, you can determine which details and areas of the client settings you wish
to print. The Print command is only available in selected task areas.
Exit
This command is used to quit the G DATA AntiVirus Administrator. Of course, your
network continues to be supervised according to the antivirus defaults, which you have
specified for use with the G DATA AntiVirus Management Server, even though the
G DATA AntiVirus Administrator is no longer running.
Clients menu
New group
This command can be used to create a new group. This is principally a folder on the
network level in which you can combine and edit G DATA AntiVirus Clients at the same
time. By activating this command, under the folder in which you are currently situated
within the client selection area, a new folder symbol appears. You may now specify a new
name for this group.
Edit group
This opens a dialog box in which you can group G DATA AntiVirus Clients together using
the Add and Remove buttons. If no group is selected in the client selection area, this
command cannot be used.
33
G DATA AntiVirus
Clear
You can deactivate a computer from the client list by highlighting it and then selecting
the Clear command. Please note: Deactivating a computer does not cause the G DATA
AntiVirus Client software being deinstalled. If you select a client group icon that is empty
and execute the Clear command, the client group icon will be deleted from the client list.
If any clients within the group are still active, you cannot perform this action. Therefore,
to delete a client group icon, all the clients within a group must be deactivated or moved
to other groups. Deactivated G DATA AntiVirus Clients can be made visible again using
the Display deactivated clients command.
Default settings
For the protection of the network or selected groups, you can create default settings
and quickly assign these defaults to the network’s or client group’s antivirus activities.
For example, by moving a client to a client group; the antivirus defaults for that client
are changed; they are replaced with default settings, which have been specified for the
higher-level client group.
Note: The Default settings command is only available if you highlight a Client group icon or
the Entire network icon. New clients that are moved into a group take over the group’s default
settings; these settings can then be individually modified later, as necessary.
Delete default settings
Use the Delete default settings command to delete the default settings for a selected
group and replace them with the default settings for the entire network.
Note: The Delete default settings command is only available if you highlight a client group
icon.
34
G DATA AntiVirus Administrator
Update view
To keep track of network modifications, which take place while using the G DATA
AntiVirus Administrator, use the Update view command to refresh your client list.
Display deactivated clients
G DATA AntiVirus Clients that have not been deactivated (or removed) from the client
list (by using the Clear command) can be made visible again by selecting this command.
The deactivated clients appear with translucent client icons.
Activate client
If you select a deactivated client icon (which appears with a translucent icon) and select
Activate client, the selected client icon becomes active. This means that the activated
client is now available for observation. No virus control routine is necessarily linked to
this action. To ensure that antivirus routines are activated, you should apply the antivirus defaults which appear in the Monitor or Orders task areas or move the G DATA
AntiVirus Client to a group for which such defaults have already been established. Once
you have installed the G DATA AntiVirus Client on the “observed” client computer, virus
protection is then available.
Activate client (dialog)
Use this command to activate G DATA AntiVirus Clients without highlighting them from
the client selection list. A dialog field appears. You may now enter the name of the G
DATA AntiVirus Client to be activated.
Search computer
Use this command to search computers within a defined area of Network IP addresses.
Enter the start IP address and the end IP. Click Start Search. G DATA AntiVirus automatically searches your host IDs for connected computers. Your search result is listed in the
dialog box display area. You now have the opportunity to activate any computers found.
Computers can be activated either by computer name (using the Activate button) or by
IP address (using the Activate (IP address) button). Activated clients appear in the client
selection list according to whichever selection is made.
35
G DATA AntiVirus
Install G DATA AntiVirus Client
You can also install clients from the G DATA AntiVirus ManagementServer using the G
DATA AntiVirus Client software, as long as the clients meet certain basic requirements.
When you enable this function, a menu will open in which you can enter access details for
the server via which the G DATA AntiVirus clients are to be installed. After entering the
relevant details (which will be saved by the software and thus do not need to be entered
each time), please confirm by pressing OK. This will then open a dialog box showing all
the available clients. Select one or more deactivated clients and then click “Install”. G
DATA AntiVirus will automatically install the G DATA AntiVirus Client software on the
relevant computers. If it is not possible to install the G DATA AntiVirus clients via the
remote installation described here, you can also install G DATA AntiVirus Client on the
clients manually or semi-automatically.
Hint: To access deactivated clients, these of course need to appear in the directory listings.
When you use the “Install G DATA AntiVirus Client” option, the program will draw your
attention to this if necessary and will allow you to display the deactivated clients.
Create a G DATA AntiVirus Client Installation Package
This function enables you to have the system create an installation package for the G
DATA AntiVirus Client. The package is a single executable file (“AvkClientSetupPck.exe”)
that can be used to install a new client on any computer you want to protect without any
further user interaction. The installation package can, for example, be used to distribute
the client to all the computers in a domain using a login script.
Note: The package will always contain the latest client version on the server.
View menu
This menu enables you to show, hide or select the different areas in G DATA AntiVirus.
Displayed areas are marked with a tick. You can update the G DATA AntiVirus display at any
time by pressing “Update” or the F5 key, for instance, in order to take new changes into
account. You will find information about the areas in the relevant chapters on Task areas.
•
•
•
•
•
•
•
•
•
•
36
Toolbar
Status bar
Status
Tasks
Settings
Monitor
Email scan
Reports
Clients
Statistics
G DATA AntiVirus Administrator
Settings
Internet update
Use this area to complete the Internet virus database and program files updates for the
G DATA AntiVirus Client. First, enter the access data that you received during your
online registration.
During an Internet update, G DATA AntiVirus downloads the latest files from the G
DATA AntiVirus Update Server and saves them on the G DATA AntiVirus Management
Server. Use the Clients task area to control the distribution of the new files to the clients.
Frequent Internet updates provide you with the assurance of knowing that you have the
most up-to-date virus database files and application program files. To know which files
are the most current, it is important to make a clear distinction between data files stored
on individual client PCs and data files stored on the G DATA AntiVirus Management
Server. You will always want to update your client data files using the updated data files
stored on the G DATA AntiVirus Management Server.
Update Virus Database
All the clients have a copy of the virus database so that there is protection from viruses
when they are offline (that way, there is no required link to the G DATA AntiVirus Management Server). This is feature is very important, for example, with notebooks. These
remote access devices are not always resident on your network and are frequently taken
offline. Client files are updated in two stages, both of which can be completed automatically. The first stage involves copying the latest files from the G DATA AntiVirus Update
37
G DATA AntiVirus
Server into a folder on the G DATA AntiVirus Management Server (please refer to the
Internet update task area). In the second stage involves the distribution of the new files
to the clients (please refer to the Clients task area).
Update program files (G DATA AntiVirus Client)
When G DATA Software is to update client software, you can run the procedure automatically using the G DATA AntiVirus Management Server. The files are updated on the
clients in two stages, both of which can be completed automatically. The first stage is for
copying the latest files from the G DATA AntiVirus Update Server into a folder on the G
DATA AntiVirus Management Server (please refer to the section on the Internet update
task area). In the second stage, the new files are distributed to the clients (please refer
to the section on the Clients task area).
Update G DATA AntiVirus Management Server
Use the following method to update the G DATA AntiVirus Management Server program files: click the option Internet update in the program group G DATA AntiVirus
Management Server from the START menu.
Note: Unlike the G DATA AntiVirus Client-software, the G DATA AntiVirus Management
Server software cannot be updated by using the G DATA AntiVirus Administrator. You must
use option Internet update from the Management Server Program folder.
Click the option “Update program files” to execute the updating of the G DATA AntiVirus Management Server files. The G DATA AntiVirus Administrator will normally control
the updating of the virus database and the program files for the clients: you can update
G DATA AntiVirus management program files only from this separate update program.
Access data and settings
As part of your online registration, G DATA Software will send you online the access
data required for completing an Internet Update. Enter the supplied information into
User name and Password. The Version check option is for use with the next virus
database update to check whether you are using the most recent program files. As a
rule, you should always keep this option activated, since it will ensure that you receive
the most recent program version as soon as it becomes available. The button Internet
settings opens a dialog box that lets you enter the access values required for establishing
an Internet connection. If you experience any problems while working with your virus
databases, you should deactivate the Version check option until you can identify the
problem.
Note: Use Internet Setting dialog box only if you experience problems with your G DATA
AntiVirus settings (for example, when using a proxy server.)
The following information is required for your Internet User Account: User name, Password and Domain. When you are registering via a proxy server you must also specify the
port (normally: 80) and – if you log on using proxy server – you must specify the proxy
38
G DATA AntiVirus Administrator
server user name and password (if different). User account this is the user account for
the computer on which the G DATA AntiVirus Management Server is running.
Note: The G DATA AntiVirus can use Internet Explorer connection data (from Version 4). First,
you must configure the Internet Explorer and check whether the update server test page is
accessible: http://ieupdate.gdata.de/test.htm. When done, deactivate the option Use proxy
server. For the User account, enter the user account which was configured to Internet Explorer
(This is the account you used when registering your computer).
Alarm messages
When a virus is newly diagnosed the G DATA AntiVirus Management Server can be used
to send warning messages automatically as email. The settings you need to allow for this
are set in this area.
Email settings
Enter the name of the email server in your network and the SMTP port (normally 25).
You will also need a valid Sent by address so that the email can be sent. The Emergency
AntiVirus Service will send its replies to this address.
Email notification
Activate the email message in the lower part and enter the email address of the recipient
of the messages. You must also specify some limit as to the quantity so that the mailbox
does not get to full if the virus infection is acute.
39
G DATA AntiVirus
Help
The Help menu has three options:
• Content and index – Displays the G DATA AntiVirus online Help files.
• Online virus dictionary – Opens the G DATA AntiVirus virus dictionary Web
page over the Internet. This Web page displays information about viruses and
malicious programs. You can also obtain this Web page by clicking on the Virus
dictionary button, which appears in G DATA AntiVirus toolbar. If your Internet
connection is currently unavailable, then the virus dictionary will not display.
• Info concerning G DATA AntiVirus Administrator – Displays information about
the program.
Toolbar
The toolbar contains icons for the most important menu bar commands.
Selected computers can be grouped together. This allows easily differentiated
security zones to be defined, as all settings can be applied to either individual G DATA
AntiVirus clients as well as to entire groups. To create a new group, just highlight the top
group and then select „New Group” from the Clients menu.
You can remove a computer from the list (i.e. deactivate it) by highlighting it
and then selecting „Delete” from the Clients menu. Please note that deactivating a
computer will not result in the client software being deinstalled.
„Update” or the F5 key allows you to update the G DATA AntiVirus display at
any time, for instance, in order to take recent changes into account.
Select „Display deactivated clients” from the Clients menu to display all computers that have not yet been activated. You will recognise the deactivated computers
by their greyed out icons. Computers without file or print sharing enabled will normally
not be displayed.
To activate a computer, highlight it on the list and then select „Activate Client”
from the Clients menu. You can also activate computers that are not shown on the list.
To do this, select “ Activate Client (Dialog)...” from the Clients menu and then enter
the name of the computer.
The log file gives you a quick general overview of the latest G DATA AntiVirus
activities. This is where all relevant information is displayed. The option „Number of
Entries” allows you to set how many entries you wish to have on display. The most
recent entries will always be included. The “Update” option serves to include all processes on the list which occur whilst the log file view is open.
40
G DATA AntiVirus Administrator
The „Online Update” area allows you to update G DATA AntiVirus Client’s
virus database and software files online.
The G DATA AntiVirus ManagementServer can be set to send a warning message
automatically via email when new viruses are found. You will find the options for this
under „Warning Messages” in the “Settings” menu.
The „Online Virus Encyclopedia” option calls up the G DATA AntiVirus virus
encyclopedia, which offers an interesting insight into the diverse world of viruses and
malware. As the virus encyclopedia is being constantly updated, it is published on the
Internet.
Use this button to access the G DATA AntiVirus online help.
Client Selection Area
The client selection area lists the clients, servers, and individual client groups that are
currently recognized by G DATA AntiVirus. This area is subdivided hierarchically. Like
groups that appear in Windows Explorer, client groups, which are hierarchically organized,
display a small Plus (+) sign. Clicking on the Plus (+) sign opens a client subdirectory and
enables you to view clients that are part of a group. By clicking on the Minus (-) symbol,
the client subdirectory is closed again.
The following symbols are visible in the client selection area:
Network symbol
Group (activated)
Server (activated)
Server (deactivated)
Client (activated)
Client (deactivated)
41
G DATA AntiVirus
Task Area Selection
This category allows you to change the task area via a simple click on the relevant tab.
The task areas form the G DATA AntiVirus desktop.
Task Area Display
Depending on the selection made, the task area contains various lists and windows which
allow you to optimise the prevention and removal of viruses on your network. The settings selected for this will always apply to the clients or groups that you have highlighted
or selected in the client selection area. The different topics are explained in detail in the
chapter “G DATA AntiVirus Administrator task areas”.
•
•
•
•
•
•
•
•
Status
Tasks
Settings
Monitor
Email
Reports
Clients
Statistics
Status bar
The Status bar is used to obtain high-level information regarding the current task area
display or current menu commands. For example, if the Reports task area has been selected, the total amount of entries as well as the number of entries you have highlighted
will appear on the status bar. If you have a virus alarm, a red task area button appears,
which you can use to obtain information about the virus alarm.
42
G DATA AntiVirus Administrator
Task areas G DATA AntiVirus Administrator
Status
The Status area in G DATA AntiVirus provides you with basic information about your
system’s current status. This information, comprising text, figures or dates, is displayed
to the right of each item.
Provided that your system is configured for optimal protection against computer
viruses, a green light icon will be displayed to the left of the items listed.
If a component is not set up for optimal system protection (e.g. disabled monitor
or out-of-date virus signatures), you are notified by a warning icon.
Note: When the G DATA AntiVirus program interface first opens, most of the icons will be
displayed in warning mode for a short duration. This does not mean that G DATA AntiVirus is
not protecting your computer during this time; quite the opposite: an internal virus protection
status check is underway, which means that a check is automatically being carried out to see
that the functions are operating correctly. If you double-click on the relevant item, you can perform any actions directly or switch to
the relevant task area. Once you have optimised the settings for a component displaying
a “warning” icon, the icon in the Status area reverts to the green light icon.
43
G DATA AntiVirus
Orders
General
From task area - Orders, you can define orders for virus checks on G DATA AntiVirus
Client. There are two different types of orders: single scans and periodic scans. Single
scans are carried out directly after setting up, and periodic scans are executed according
to a user-defined schedule.
Note: Job Scans or Jobs are the respective orders that you create in the Orders task area for
virus control, removal, or protection.
In the Orders task area, all jobs appear with the name you have given them and can be
sorted by criteria by clicking on the respective column description. A small arrow appears
in the column heading, which currently controls the sort. Ascending or descending sort
order is indicated by the arrow’s direction. To view all column headings, use the window
scroll bar. The following column headings appear:
• Name – The name given by you for the scan. Any name length can be entered.
Be sure to fully describe the job with its name to help you identify the active
scans when several scans are listed at once.
• Computer – The name assigned to the respective G DATA AntiVirus Client.
You can only define scans for activated G DATA AntiVirus Clients.
• Group – The group name given by you to identify a network group or the
individual computer name if no group name applies. You can combine individual G DATA AntiVirusClients into groups that then use the same scans. Once you
44
G DATA AntiVirus Administrator
•
•
•
•
specify a scan to a group, the group name will appear in the job list.
Status – This displays the status or result of a scan using clear, concise text.
Status text identifies current processing status, such as: job being carried out,
job complete, viruses detected, or no viruses found.
Last execution – This displays the date of the last execution.
Time interval – Respective of the job parameters that you determine for
each scan, this shows the time that the job will be repeated.
Analysis extent – This identifies the data medium (for example, local hard
drive) that the virus scan analysis will include.
Toolbar Commands
The toolbar belonging to the respective task area contains the most important commands for this task area.
Update – Updates the view. This command loads the current job list from the G
DATA AntiVirus Management Server..
New scan (single) – Creates a new job to be checked once. The dialog box
opens in which you can determine the job and scan parameters. You can enter the
required presettings. Change between the job parameters and scan parameters by
selecting the appropriate index card. New scan (periodic) – Creates a new job to be checked periodically. The
dialog box opens in which you can determine the job and scan parameters. You can enter
the required presettings. Change between the job parameters and scan parameters by
selecting the appropriate index card.
Delete scans – Deletes all selected jobs.
Execute again (immediately) – Select this command to re-execute individual
scans that have already been carried out or cancelled. With periodic scans, this command
causes them to execute independent of their schedule.
Protocols – Loads the protocol to the orders of the respective clients.
Display all jobs
Only display single scans
Only display periodic scans
Only display open scans
Only display completed scans
Display group jobs in detail – displays all entries that belong to group jobs.
The option is only available if a group is selected in the computer list.
45
G DATA AntiVirus
Create New Scan
To create a new scan in the client selection area, highlight the group or client for which
you wish to define this job and then click on one of the following buttons:
New scan (single) – To create a scan to be executed once.
New scan (periodic) – To define a scan to be executed periodically.
A settings menu opens with different index tabs with which you can carry out all necessary entries for the scan. The settings menu for periodic checks contains an additional
index tab, Schedule.
Job
This index tab is used to determine the name of the scan. Use clear and concise names,
such as Archive check or Monthly check. This makes it considerably easier to differentiate between various scans and find then again from a table list view.
Furthermore, you can determine whether the user can cancel the job using the G DATA
AntiVirus Client context menu. If you are permanently guarding your network with the
monitor, it is justifiable to allow a user to cancel the scan, since it can easily interfere with
a user’s work tempo. However, if you do not use the monitor, the periodic scan procedures are indispensable and should not be able to be switched off. Using the Determine
scan progress regularly to the server option, the status of a running scan procedure for
a client can appear in the administrator using a progress percentage bar.
46
G DATA AntiVirus Administrator
Schedule
This index tab is used to determine when and how an automatic update is to take place.
Under Execute, you may enter a presetting that can then be specified with the entries
under Schedule and Weekday. If you select With system start, the presettings for the
schedule are not used, since G DATA AntiVirus always carries out the update each time
your computer is restarted.
Note: Under Daily, with the help of the entries under Weekday, for example, you can set your
computer to carry out updates on workdays, on every second day, or during the weekends.
Scanner
This index tab is used to determine how the virus check is to be carried out by G DATA
AntiVirus. Since a virus check is mostly carried out because of a schedule or the start of
a manual analysis at times when the computer is not entirely loaded down with other
tasks, as a rule, more system resources for the virus analysis can be used, as for the
G DATA AntiVirus virus monitor.
As a schedule-based or manual virus scan is mainly started at times when the computer
is not working to full capacity on other tasks, it is generally possible to use more system
resources for this virus scan than for the G DATA AntiVirus virus monitor.
• Use engines: G DATA AntiVirus works with two AntiVirus engines, two
independently operating virus detection units; the use of both engines
guarantees optimal results. The use of one single engine, however, can provide
performance advantages. For example, if you only use one engine, your virus
check will take longer but additional resources can be made available for other
tasks. If you are confident that your system is safe and you want additional
resources for a short period, change from Both engines – performance
optimized (recommended) to Only classic engine. By running only one engine,
you will reduce the amount of resources needed, which may be important if
you have low RAM resources or if you have a weaker system processor. Both
engines – generally double check is a more aggressive virus scan and should only
be used for short periods of time when you know that you have imported a
significant number of files. Only additional engine is the lowest resource setting
that you can use and, although better than disabling the virus monitor altogether,
it will not yield the level of virus protection offered by any of the other settings.
• In the case of an infection: Use this feature to specify the treatment of
infected files. Depending on which purpose you use the computer for, various
settings are suitable. The option Disinfect (if not possible: move into quarantine) is the recommended option, since it will suppress the spread of a virus but
will also prevent a file from being deleted.
• Infected archive: Use this feature to specify the treatment of infected files.
Depending on which purpose you use the computer for, various settings are
47
G DATA AntiVirus
suitable. The option Disinfect (if not possible: move into quarantine) is the
recommended option, since it will suppress the spread of a virus but will also
prevent a file from being deleted.
• File types: Use this feature to specify which file types are to be scanned. As a
rule, it is recommended to check only those files that contain executable program
code; checking all files stored on a computer can take a considerable amount of
time. For simplicity, we recommend Automatic type recognition option, which
automatically checks only those files that theoretically could contain viruses. If
you wish to define your own file types, use the command User defined. By clicking
the (...) button, a dialog box is opened. Here, you can enter the required file type
in the top text box and then use the Add button to add the user-defined file type
to the list. You can also work with wildcards, therefore characters or character
strings can be replaced by the following symbols:
? The question mark replaces an individual character.
* The asterisk replaces an entire character string.
For example: To check numerous files for the file extension “.exe” (such as,
code.exe, program.exe) enter *.exe. in the respective field. To check files with
various table calculation formats (such as, *.xlr, *.xls), enter *.xl?. To check for
files of different types but whose name begins with the same character string
(such as, textbox.xlr, textline.doc), enter text*.*.
• Priority scanner: Use this feature to specify priority setting for a Virus Check.
Your priority options include High, Medium, and Low. Depending upon the
option you select, your system resources will be allocated to either expedite
the virus check or slow it down. For example, if you select Low, the virus check
will take longer; however the system itself will have more resources available
for other tasks. Depending on which applications you use, and at what time you
carry out the virus analysis, various settings are suitable here.
• Settings: Use this feature to specify additional virus check procedures. The
options selected here are suitable depending their application–the time saved
by leaving out some of these additional procedures could be offset by a lower
degree of security. The following settings are available:
Heuristic – With a heuristic analysis, viruses are not only determined using the
continually updated virus database, but also using typical characteristics associated with specific viruses. This additional procedure provides some additional
security; however, it is very time intensive and, in some cases, can generate an
incorrect identification.
Packed files – Checking packed data in a file archive is very time consuming.
When unpacking an archive, it is possible to identify viruses that have previously
been hidden. It is recommended that all packed archive files be checked on a
regular basis.
48
G DATA AntiVirus Administrator
System areas – As a rule, the system areas of your computer (such as, boot
sectors, master boot records, etc.), which enable your operating system to run,
should not be ignored and should be part of your regular virus checks.
Redundant check – This setting should only be used in exceptional cases since
the scan takes so long to perform. With this setting, files are scanned in their
entirety for viruses, not only in places where viruses typically “dock.”
• Scan for diallers / spyware / adware / riskware: G DATA AntiVirus
also allows you to scan your system for diallers and other malware. These are
programs that could, for example, establish expensive Internet connections
without your knowledge, and can therefore be equally financially damaging
as viruses. They may also secretly save your surfing habits or even keystrokes
(and therefore also passwords), which are then passed on to strangers via the
Internet at the earliest opportunity.
Analysis Extent
This index tab is used to limit the virus check to specific directories for the client. In this
way, you cannot include folders with archives that are seldom required or integrate into
a special scan routine. The directory selection refers to the currently selected computer
and not the selected client.
Modify Job Parameters at a Later Date
To modify job parameters later, double-click on a job entry from the job orders list. The
Edit Job Scan dialog box appears. You may now change the job parameters as necessary.
Alternatively, you can also alter the parameters of an existing job using the context
menu. Right-click on a selected job entry and select Properties… Now, the scan settings
can be altered as necessary.
49
G DATA AntiVirus
Settings
In this area you can set options for all clients, for individual clients or for groups of clients
(e.g. you can set whether updates should be performed automatically, whether independent Internet updates via the clients are permitted, whether exception directories can be
individually defined there, etc.). To do this, select the client or group of clients you want
to configure in the client selection area and make the desired entries.
G DATA AntiVirus Client
The following options are available:
• Comment: Use this to enter a distinctive name for the relevant client.
• Start bar icon: For terminal servers and Windows XP with fast user switching.
Choose which sessions should display a client icon in the task bar: “never”,
“only in the first session “ or “always”. If required, “normal” clients can use
this option to prevent the client icon from being shown. Note: The icon must be
displayed in order to allow the user access to advanced client functions. This allows
the relevant context menus to be accessed via the mouse.
• User Account: The G DATA AntiVirus Client software usually runs in the
system context (Vista/2000/XP/2003). You can enter a different account here,
to enable network directories to be checked, although the account must have
administrator rights on the client to do this.
50
G DATA AntiVirus Administrator
Updates
The following options are available:
• Update virus signatures automatically: Turns on the virus database’s
automatic update function. The clients regularly check if a new version is
available on the G DATA AntiVirus ManagementServer and, if so, will run an
update automatically.
• Update program files automatically: Updates the software program files
on the client with files from the G DATA AntiVirus ManagementServer. The
client may need to be rebooted after the program files have been updated.
Depending on the setting used for “Restart after updates”, the client’s user
may have the option of postponing the software update until later.
• Restart after updates: This is where you determine whether the client is
automatically restarted after the program files have been updated (“Restart
without asking”), whether the user will have the option of rebooting immediately or leaving it until later (“Message window on client”) or whether the
program files will only be updated when the client is next rebooted (“Create
report”).
Client Functions
The following options are available:
• User permitted to download signature updates: If this option is
activated, this particular client will be able to download virus signatures directly
from the Internet, even without a connection to the company server. This
drastically increases the security of any laptops used offsite.
• User permitted to change monitor options: Experienced users can
be granted considerable rights as far as the virus monitor is concerned. This
enables the user to specify the exact performance level for the monitor running
in the background and the level of security to use, and even to switch the
monitor off if necessary.
• User permitted to change email and monitor options: Activating this
option allows the client’s user not only to determine the monitoring options,
but also to influence email security options.
• Display local quarantine: If you allow the local quarantine to be displayed,
the user can disinfect, delete or restore data that the monitor has placed in this
quarantine folder because it is suspicious or actually infected with a virus. Note
that the virus is not removed if the data is restored, so this option should only
be made available to experienced client users.
51
G DATA AntiVirus
• Password protection for option changes: If the client’s user is permitted
to change monitoring options, there is always a risk that other people using
the computer may abuse this by disabling the monitoring functions. You can
password protect the monitor option settings on the client to prevent this,
by setting up an individual password for the relevant client or group and then
sharing it with authorised users of the client computers.
Exception Directories for Scan Jobs
Here, you can define exception directories on the clients. These directories are not
scanned by the virus checker.
Note: You can define exception directories for entire groups. If the clients in a particular group
have defined different exception directories, new directories can be added or existing ones
deleted. This does not affect the directories defined for a particular client. The same process
is used to define virus guard exceptions.
Monitor
Here, the monitor settings can be determined for those clients selected in the computer
list. In the computer list, select a group to alter the monitor settings for all clients in that
group. With the G DATA AntiVirus Monitor, you have acquired an extremely important
instrument in the G DATA AntiVirus product package for permanent protection against
computer viruses. The G DATA AntiVirus Monitor is always active in the background, and
all files that are to be accessed are checked for viruses. The virus control is carried out so
quickly that you will not be aware of this security check while you are carrying out your
daily work. It is irrelevant if you have received an infected file via a disk or CD-ROM, as
email attachment or from a file download over the Internet. You should no longer worry
about the possible ways that a virus might be imported into your computer. The G DATA
AntiVirus Monitor is always active in the background and checks all accessed files for
potential virus infection, independent of any specific scan (please refer to the Orders
task area). From the Monitor task area, you can determine individual settings for each
client or each group. Modifications to the default Monitor settings are saved and sent to
the Management Server only after you press the Accept button. Press the Reject button
to restore the current default settings from the G DATA AntiVirus Management Server
without accepting the modifications.
52
G DATA AntiVirus Administrator
Note: If you edit the monitor settings of a group, some parameters can take on an undefined
status. Undefined parameters are not saved when accepting.
The G DATA AntiVirus virus monitor should never be turned off on any client computer
as it performs a vitally important task. As soon as you have activated the monitor on a
client, it remains active in the background indefinitely.
Note: When using specific programs there can be a significant loss of speed (for example, TOnline, or Microsoft Office clients that make use of specific HP printers). To prevent this, you
can define custom INI files for G DATA AntiVirus to isolate these programs as exceptions. This
will shorten the client computer’s check procedure considerably; however, it does also pose a
security risk. It is best to weigh the possible risks and benefits before making a decision.
Settings
Monitor status
This is where you can enable or disable the monitor, or set it to protect your system
from Office 2000 macro viruses only. We recommend the “Full protection” setting,
53
G DATA AntiVirus
as the monitor alone can provide your system with up-to-date, direct protection from
virus attacks.
Engine use
G DATA AntiVirus works with two independently operating virus scanner units. Using
both engines is the only guarantee of optimal virus protection, although using a single
engine does offer performance benefits. Unlike regular virus scans, which should use
both engines, we recommend setting the monitor to “Standard engine only”, as this
enables the monitor to run very quickly, barely affecting the system’s performance.
In the event of an infection
This allows you to specify what should happen if an infected file is found. There are
different settings available, depending on the way a particular client is used.
• Block file access: An infected file has both read and write access blocked.
• Disinfect (if not possible: block access): An attempt will be made to
remove the virus; if this proves impossible, file access is blocked.
• Disinfect (if not possible: quarantine): An attempt will be made to
remove the virus; if this proves impossible, the file is placed in quarantine.
• Place file in quarantine: The infected file is moved into the quarantine folder.
• Delete infected file: This categorical measure very effectively prevents
viruses spreading. Depending on the virus, however, it can cause considerable
data loss.
Infected archives
Specify here whether viruses found in archives should be treated differently. Bear in
mind that a virus in an archive will only cause damage if the files are extracted from the
archive.
File types
This allows you to specify which file formats G DATA AntiVirus should scan for viruses.
It is generally not necessary to check files that do not contain any executable program
code, particularly as it can take a long time to scan every file in a computer. We recommend the “Automatic type recognition” option here; this automatically ensures
that only files which could theoretically contain a virus are scanned. If you wish to define
particular file formats that you wish the virus scan to include, select the “Customise”
option. Clicking “...” opens a dialog box where you can enter the required file formats
into the upper input box and then add them to the list of user-defined file formats by
clicking “Add”. You can also use wildcards here, replacing characters or character strings
with the following symbols:
? The question mark represents individual characters
* The asterisk represents a character string.
54
G DATA AntiVirus Administrator
For example, to specifically scan all files with the file extension “.exe”, type *.exe. To scan
files in a range of spreadsheet formats (e.g. *.xlr, *.xls), enter *.xl?. To scan different file
types with filenames beginning in the same way, you could, for instance, type text*.*.
Scan on write access
A virus-free system does not normally create infected files when it creates files. However,
to eliminate all eventualities, especially on computers which have not had an initial virus
scan run on them, you can opt for a scan to take place while files are being written. The
immense advantage of this is that, if viruses are copied from another client (that may be
unprotected) into a shared directory of the client protected by the monitor, they will be
caught. Also, any infected files downloaded from the Internet will be identified while they
are downloading, rather than when the file is executed. Scan network connections
This allows you to determine the way the Monitor handles network connections. If G DATA AntiVirus is generally monitoring your entire network, there is no need to scan
network connections.
Only scan network connections after user login
Specify here whether network connections should be scanned only after a user has
logged in or beforehand as well. Scanning network connections before user login can
result in the login process taking longer if profiles are saved on the server.
Heuristics
Heuristic analysis detects viruses not only from the constantly updated virus database,
but also based on particular characteristics typical of viruses. This method provides
additional security, although it can occasionally lead to false alarms.
Scan archives
Scanning compressed data in archives is very time-consuming and is generally unnecessary if the G DATA AntiVirus virus monitor is active on the system. If the archive’s files
are extracted, the monitor will detect any viruses concealed in it and will automatically
stop them spreading. To prevent performance being compromised by unnecessary scans
of large archived files that are rarely used, you can limit the size of archived files to be
scanned to a particular number of kilobytes.
Scan email archives
This option should generally be switched off, as email archive scanning generally takes
a very long time and if an infected email is found, access to all emails will be blocked.
As the monitor will not allow any infected email attachments to be executed, switching
this option off does not adversely affect security. If you use Outlook, all incoming and
outgoing emails are also scanned by an integrated plugin.
Scan system sectors at system startup
Your computer’s system sectors (e.g. boot sectors) should not normally be excluded
from virus checks. This is where you specify whether these should be scanned during
55
G DATA AntiVirus
system startup or when changing media (e.g. inserting a new CD-ROM). You should
generally have at least one of these options activated.
Scan system sectors on media change
Your computer’s system sectors (e.g. boot sectors) should not normally be excluded
from virus checks. This is where you specify whether these should be scanned during
system startup or when changing media (e.g. inserting a new CD-ROM). You should
generally have at least one of these options activated.
Scan for diallers / spyware / adware / riskware
G DATA AntiVirus also allows you to scan your system for diallers and other malware.
These are programs that could, for example, establish expensive Internet connections
without your knowledge, and can therefore be equally financially damaging as viruses.
They may also secretly save your surfing habits or even keystrokes (and therefore also
passwords), which are then passed on to strangers via the Internet at the earliest opportunity.
Exceptions
Here, you can limit the virus check to specific client directories. In this way, you can exclude folders with archives that are seldom required or integrate them into one special scan
that is performed only periodically. To specify your exceptions, use the Edit button.
Interaction with the user
Here, you can determine whether the user on the client computer is to be notified about
detected viruses.
Status
This displays whether the alterations you have carried out on the monitor have already
been accepted for the client or group or whether the Accept button has not yet been
pressed.
56
G DATA AntiVirus Administrator
Email
Each G DATA AntiVirus Client can be set up with its own individual email virus protection,
which scans POP3, IMAP and SMTP protocols at TCP/IP level. Additionally, Microsoft
Outlook is provided with a specific plugin application, which automatically checks all
incoming emails for viruses and prevents infected emails being sent out.
The “Apply” option accepts any changes made, and “Cancel” quits the dialog without
the changes being applied.
The G DATA AntiVirus Administrator allows you to set individual mail-handling configurations for each client or for user groups. You can choose from the following options:
57
G DATA AntiVirus
Incoming mails
The following options are available:
• In case of an infection: This allows you to specify what should happen if an
infected file is found. There are different settings available, depending on the
way a particular client is used.
• Scan incoming emails for viruses: When you activate this option, all emails
received while the client is online will be checked for viruses.
• Scan unread mails at program startup: This option allows all emails
received on the client when it is not connected to the Internet to be scanned
for virus infections. As soon as Outlook is opened, it will ensure that all unread
emails in the Inbox and its subdirectories are scanned.
• Attach report to infected incoming mail: As soon as a client receives an
email containing a virus, a message will be inserted in the body of the mail, below the actual message: “WARNING! This mail contains the following
virus:” followed by the virus name. The warning “[ VIRUS ]” is also inserted
before the mail’s subject header. If you have the “Delete attachment/text”
option enabled, you will additionally be informed that the infected part of the
email has been deleted.
Outgoing mails
The following options are available:
• Scan outgoing mails before sending: G DATA AntiVirus allows you to
scan your emails for virus infection before you send them to ensure that viruses
are not inadvertently sent from your network. If an outgoing mail does contain
a virus, a message will be displayed, saying “The mail re. [subject header]
contains the following virus: [virus name]. This mail cannot be
sent”, and the affected email will not be despatched.
• Certify outgoing mails: A certification report is displayed in the body of
each outgoing email below the actual email text. This will say “Virus checked
by G DATA AntiVirus”, provided the option “Scan outgoing mails
before sending “ is enabled. You can also specify whether the report should
contain the G DATA AntiVirus version date (“Version information”) and a
link to the G DATA Virus Encyclopedia (“Virus News”). A full report would
therefore look something like this:
Virus checked by G DATA AntiVirus
Version: AVK 10.0.541 from 06.02.2007
Virus News: www.antiviruslab.com
58
G DATA AntiVirus Administrator
Scan options
The following options are available:
• Use Engines: G DATA AntiVirus works with two independently operating
virus scanner units. Using both engines is the only guarantee of optimal virus
protection, although using a single engine does offer performance benefits, as
the scan can be completed more quickly with just one engine.
• OutbreakShield: The OutbreakShield detects and neutralises malware in
mass emails before the relevant updated virus signatures become available. The
OutbreakShield uses the Internet to monitor increased volumes of suspicious
emails, and thus bridges the gap between a mass mail outbreak and the
application of designated virus signatures to combat it, practically in real time.
Select “Modify” to specify whether the OutbreakShield should use additional
signatures to increase its detection rate. Note: Loading signatures can result in an
Internet connection being established automatically.
Alerts
The following options are available:
• Inform user if virus is discovered: The recipient of an infected message
can be notified automatically by a warning displayed on their desktop.
Email protection
The following options are available:
• Protect Microsoft Outlook via integrated plugin: When this is enabled,
a new “Scan folder for viruses” option is added to the client’s Outlook
“Tools” menu. This allows an individual client’s user to check the current mail
folder for viruses, regardless of the administrator settings. The user can also
scan file attachments when an email is open, by using the “Scan email for
viruses” option from the email program’s “Tools” menu. After it has finished,
it will display a summary of the virus scan results in a window. This will tell you
if the virus scan was completed, how many emails and file attachments were
examined and about any read errors that occurred, and will provide information
on any viruses found and the solutions applied. Both windows can be shut down
by clicking on “Close”.
59
G DATA AntiVirus
Reports
All detected viruses appear in this task area. In the first list column, the status of the
report appears (for example, Virus detected or Move file into quarantine). You can
respond to detected viruses by selecting the entries in the list and then activating a command in the context menu, or clicking on a toolbar icon. In this way, infected files can, for
example, be deleted or moved into the quarantine folder. When you are in the Reports
task area, all reports appear using the name that you have assigned to them. To sort
your reports, click on a column heading. A small arrow appears in the column heading
which currently controls the sort. Ascending or descending sort order is indicated by the
arrow’s direction. The following column headings appear. To view all column headings,
use the window scroll bar.
You can choose from the following criteria:
• Status – You can display short and precise information on the report. Clearly
understandable symbols denote the importance and type of message.
• Computer – The computer from which the respective report is to come from,
appears here. For user groups, all computers are listed here individually.
• Date/time – This is the date on which the report was set up, either as a result
of the current discovery of a extremely harmful virus by the G DATA AntiVirus
monitor or on the basis of a scan.
• Notifier – This entry can be used to learn whether the report from the "virus
scanner" is to take place on the basis of a scan, notified of automatically using
the Monitor or using the G DATA AntiVirus email plug-in.
• Virus – As long as it is known, the name of the detected virus appears here.
60
G DATA AntiVirus Administrator
• File / email – The files are listed in which a virus has been detected or there is
suspicion of a virus within them. For email, the email address of the sender is
also listed here.
• Folder – The directory details relating to each file will be important if a file has
to be transferred to quarantine and then recovered later.
Toolbar Commands
You can choose from the following Report toolbar commands. The Reports task area window
contains the most important menu bar commands presented as button icons that you can select:
Update: Updates the view. Loads the current reports from the G DATA AntiVirus ManagementServer.
Delete reports: Deletes the selected reports. If you wish to delete reports
relating to a quarantined file, you will need to reconfirm the delete command. In this case
the files currently in quarantine will also be deleted.
Print: This starts the report printing process. The selection window allows you
to choose which details and areas you wish to print out.
Print preview: This displays a preview of the pages to be printed on your
monitor before printing commences.
Delete virus: This attempts to remove the virus from the original file.
Place in quarantine: Moves the file into the quarantine folder.
Delete file: Deletes the original file from the client.
Restore file from quarantine: Moves the file from the quarantine folder back
to the client. Beware: the file will be restored in its original state and will therefore still be
infected.
Disinfect file and restore from quarantine: The virus will be removed from
the quarantine folder and the repaired file will be returned to the client. If the virus
cannot be removed, the file will not be restored.
Hide dependent reports: If a virus message or report is shown more than
once, because of differing or duplicated tasks, this option enables duplicates to be hidden. Only the latest entry is displayed for editing.
Hide archived files
Show all reports
Show all reports with viruses that have not been removed
Show all quarantine reports
Show contents of quarantine folder
61
G DATA AntiVirus
Quarantine
You can transfer infected files to the quarantine folder. The files will be saved in the
quarantine file on the G DATA AntiVirus Management Server. The original files will be
deleted. The enciphering will ensures that the virus cannot do any damage.
Note: Each quarantined file has its own report. When you delete the report, the file in
the quarantine folder is also be deleted. To send a file from the quarantine folder to the
Emergency AntiVirus Service for examination, use the “Send to G DATA AntiVirus Internet
Ambulance” option which appears when you double-clicking on a quarantine report.
62
G DATA AntiVirus Administrator
Clients
Choose a group from the list of computers so that you can display an overview of all
the clients in that group. With each client, you will see the information on the versions
of the components that have been installed and when the client had last logged on at the
G DATA AntiVirus Management Server. You will be able to check whether the clients are
running as they should and whether Internet updates are being downloaded.
In the Clients task area, the following information is available to you. When you are
in the Clients task area, all listed clients appear using the name that you have assigned
to them. To sort your clients, click on a column heading. A small arrow appears in the
column heading which currently controls the sort. Ascending or descending sort order
is indicated by the arrow’s direction. The following column headings appear. To view all
column headings, use the window scroll bar. You can choose from the following criteria:
• Computer – The name of the respective client appears here.
• A engine / B engine – The version number of the virus database and the
date of your last update via Internet update appear here.
• Version G DATA AntiVirus Client – This contains the versions number
and date of creation for the G DATA AntiVirus Client software used.
• Last access – This entry can be used to discover at what point in time the G
DATA AntiVirus Client was last active.
• Update virus database – You will be able to see whether the updating of the
most recent virus database has been “complete”, whether a task was specified
to do so or whether there have been any irregularities or errors.
63
G DATA AntiVirus
• Time – The date on which the status of the virus database was updated on the
client. This date is not identical to the update date of the virus database.
• Update program files – If new updates of the client software take place, the
respective status information appears here.
• Time – The date on which the status of the program files were updates on the
client.
• Exception directories – If you have set up exceptions directories for each
client so that they are excluded from the virus check, you will also be able to see
the exceptions listed here.
Toolbar Commands
The following options are available:
Update: Updates the view. Loads the current client settings from the G DATA
AntiVirus ManagementServer.
Delete: This removes a client from a group.
Print: This starts the client setting printing process. The selection window allows
you to choose which client settings details and areas you wish to print.
Print preview: This displays a preview of the pages to be printed on your
monitor before printing commences.
Install G DATA AntiVirus Client: Installs the G DATA AntiVirus Client
software. The installation can only be carried out if the client meets certain criteria.
Deinstall G DATA AntiVirus Client: Gives G DATA AntiVirus Client the
command to deinstall itself. The client has to be restarted in order to complete the
removal process. The user will be requested to do this via a message window.
Update virus database: Updates the client’s virus database with files from the
G DATA AntiVirus ManagementServer.
Update virus database automatically: Turns on the virus database’s automatic update function. The clients regularly check if a new version is available on the G
DATA AntiVirus ManagementServer and, if so, will run an update automatically.
Update program files: Updates the software on the client with program files
from the G DATA AntiVirus ManagementServer. The client may need to be rebooted
after the program files have been updated.
Update program files automatically: Turns on automatic software updates.
The clients regularly check if a new version is available on the G DATA AntiVirus ManagementServer and, if so, will run an update automatically.
Edit exception directories: This allows you to define the client’s exception
directories, which will not be checked during the course of a scan.
64
G DATA AntiVirus Administrator
Statistics
In this entry field, you can display statistical data on virus incidence and on the level
of client infection. To do this, simply select in “Statistics:” whether you would like a
general overview of clients and their interaction with the ManagementServer (“Client
Overview”), an overview of the viruses combated (“Virus Hit List”) or a list of infected
clients (“Hit List of Infected Clients”).
65
G DATA AntiVirus
G DATA AntiVirus Client
All clients have their own virus signature files and an individualized job scheduler that
programs the completion of automatically scheduled virus checks. Both of these
features enable computers that are running offline to maintain a regular schedule of
antivirus activity.
The client symbol in the task bar: After the client software has been installed,
the user of the client can use a symbol in the start bar for scanning the system on it for
viruses without having to enter any kind of administrative details.
Users can right-click on this symbol to open a context menu that enables them to perform the following functions:
Virus Checking
This function enables users to use the G DATA AntiVirus client to check their computers
for viruses outside the times specified by the administrator for virus checking. Users can
also use this function to check disks, CD-ROMs, hard drives and the auto-start area
as well as individual files or directories (folders). Laptop users who only connect their
computers to the company network occasionally can also use this function to provide
targeted virus protection. They can also place infected files into a quarantine folder, thus
rendering them harmless and making them available to the network administrator for
further evaluation at the next opportunity.
Note: Users can also use the explorer to check files or directories. This is done by highlighting
the files or directories needed and then right-clicking on “Check for Viruses (Anti-Virus Kit)”
in the context menu.
Set Priority for Virus Checking
This function enables users to define the priority for virus checking. If the priority is set
to “high”, virus checks are performed quickly, but the performance of other applications
on this computer will be noticeably reduced. If, on the other hand, the priority is set to
“low”, the virus checks will take longer, but the performance of other applications on the
client computer will be affected to a lesser extent.
66
G DATA AntiVirus Client
Canceling Virus Scanning
If the administrator has enabled the “User Can Change Virus Guard Options” option,
users will be able to cancel the virus checks on their computers, even if they have been
started manually on that client.
Disable the Virus guard
Users can use this command to turn off the G DATA AntiVirus virus guard for a specified
period of time (from “5 Minutes” to “Until the Next Restart”). This is, of course, only
possible if users have been given the appropriate authorization by the administrator.
Temporarily deactivating the virus guard can be useful when copying large numbers of
files, for example, as this will speed up the copying process. You should, however, bear in
mind that this also deactivates virus scanning for the period of time specified.
Options
If the administrator has enabled the “User Can Change Virus Guard Options” option,
users will be able to change both the virus scanning options on their computers and the
options for running the virus guard in the background to suit their individual needs.
Warning: This means, of course, that all virus checking mechanisms can be
“deactivated” on the G DATA AntiVirus Client. As an administrator you should,
therefore, only make this option available to experienced users.
Note: The individual settings options available to the user in the “Options” area are explained
in detail in the “Virus Guard Task Area” section.
Note: The settings under “Options” that affect security can also be password-protected for the
client computer. To do this, the administrator assigns an individual password to each client,
which users can use to modify the virus checking functions on the client. This password is
assigned in the “Settings” area of the G DATA AntiVirus Administrator.
Quarantine
Even for computers that are not currently connected to the network being monitored
by G DATA AntiVirus, there is a local G DATA AntiVirus quarantine folder available.
This enables users who are not in the building (users on business trips, for example), to
place suspicious files into quarantine on their laptop for examination on the company
network at the next available opportunity. The quarantine folder also allows you to
disinfect infected files, to delete them if this does not work, or to move them back to
their original location if required.
67
G DATA AntiVirus
Warning: Moving the files back to their original location does not remove the
virus. You should only use this option if the program will not function without
the infected file and you need it to recover your data.
Internet Update
Internet updates of the virus signatures can also be performed independently via the
G DATA AntiVirus Client. This is useful, for example, for laptops which may not always
have access to the company network. The administrator can also make this function
available specifically for individual clients.
Note: You can use the “Settings and Schedule” button to update the virus signatures on the
client at specified times.
Info
You can view the virus database version and the date it was last updated using “Info”.
68
Frequently Asked Questions (FAQ)
Frequently Asked Questions (FAQs)
After you have installed G DATA AntiVirus for the client, some applications run
more slowly than before
In the background, the client monitor inspects files and checks any opened and/or
closed files for possible virus infection. This procedure normally results in an almost
imperceptible delay. If an application opens a great number of files frequently, then
the delay might be quite considerable. You can avoid this problem by deactivating the
monitor temporarily to diagnose the problem. When a computer accesses files, which
are stored on a server, you may also have to deactivate the monitor on the server as
well. If the client monitor is, in fact, the cause of the problem, most often you can solve
the problem by defining an exception (that is, files which you do not want to be checked).
You must first find the files that are being accessed too frequently. To do this, use the
MonActivity program (in the Tools directory on your CD) to display all the files checked
by the monitor. Type the name of the computer that you want reviewed in the Computer
field; next click the Connect button. (You can leave the file empty if you want to connect
to the monitor on the computer from which the program was started). Then, once the
monitor is activated, execute the operations where delays have been experienced. This
will generate a list of all the checked files, which should help you determine which files
are causing the delay. Finally, define an exception (task area Monitor, Exclude button) to
exclude from monitor operation those files, which have been identified as causing the
problem.
Known delays Use of some HP printers with MS-Office
Mailsoftware Eudora
Exceptions
HP*.INI
EUDORA.INI
DEUDORA.INI
I want to complete the installation procedure on the clients centrally using the G
DATA AntiVirus Administrator
You will find it most convenient to use the G DATA AntiVirus Administrator to install.
But before you do so you must insure that the clients comply with specific requirements.
Remote installation is possible in two different ways. If the client complies with the
program requirements, the files will be copied directly and the appropriate entries will
be made in the registry. With Windows Vista, NT, XP professional and Windows 2000
the G DATA AntiVirus Client will be started immediately. If the server can access the
hard disk but not the registry, or if the system requirements are not complied with, the
entire setup program will be copied to the client and then, when the computer is next
booted up, the program will start automatically. You install the G DATA AntiVirus by
entering the G DATA AntiVirus Administrator menu bar and selecting Clients > Install
G DATA AntiVirus Client. You will then see the dialog. Type in the user name, password
69
G DATA AntiVirus
and domain for the G DATA AntiVirus Management Server. After you have typed in
these details, another window will appear showing you all the available network computers. The active clients will be denoted by a special symbol. Deactivated clients will be
denoted by a shaded symbol. Select one if the network computers for the installation
procedure and then click the Install button. It is as simple as this for you to install the G
DATA AntiVirus Client on this computer. If any problems should arise with the remote
installation of the G DATA AntiVirus Clients using the G DATA AntiVirus Administrator,
there is also the opportunity of installing the G DATA AntiVirus Client software manually
or semi-automatically onto the client computers.
The G DATA AntiVirus Client software cannot be installed remotely with an automatic procedure using the G DATA AntiVirus Administrator Tool
You will need to ensure that your network meets some advanced system requirements
before you can install the G DATA AntiVirus Client software remotely from the server
to the clients.
Requirements for remote installation on Windows XP or Windows 2000:
• Administrator rights on client
I want to improve my clients by adding the G DATA AntiVirus software using a
vacant network server
During installation, the setup program for clients will be copied into the following
directory AvkClientSetup that is beneath the program directory “C:\Programs\AVK
Client/Server\AVK Management Server”. After you have made this directory available
in the network, you can use this directory to start the software from any client by clicking
the following file: Setup.exe.
I want to use the G DATA AntiVirus CD ROM to install the G DATA AntiVirus Client
software on my clients
You will not find it difficult to install the client software directly on any of your clients
with the help of your CD. Just insert the CD in the CD drive on the client computer, then
select the component “G DATA AntiVirus Client” by clicking the adjacent button. With
the installation, you are then prompted for the name of the computer on which the G
DATA AntiVirus Management Server is to be installed. Enter the respective name (for
example, “avk_server”). Then click Continue to complete the installation. Sometimes
you will see a message in the final setup screen prompting you to re-boot: you must do
this because the G DATA AntiVirus Client will not operate until you have.
70
Frequently Asked Questions (FAQ)
I want to install the G DATA AntiVirus Administrator on a client computer
There is no problem if you want to start the G DATA AntiVirus Administrator from any
other computer in the network. The Administrator program runs best from the G DATA
AntiVirus Server even if you decide not to install the G DATA AntiVirus Administrator on
any client. However, we suggest that you only install the G DATA AntiVirus Administrator
on a client computer when confronted with an “on site” emergency. We suggest that you
open the directory “Admin” and then call up “Admin.exe” from the other computer. You
can also copy this file to other computers and start the administrator from one of them.
The advantage here is that you will always start the most recent version, because you can
update the file via the Internet. In the case of older versions of Windows 9x you may
experience a problem: you will be unable to start the G DATA AntiVirus Administrator
(because COMCTL32.dll is too old). If this is the case, you can install the G DATA
AntiVirus Administrator from your CD. The installation program will update the system.
For this reason you can use another method: insert the G DATA AntiVirus CD ROM in
the CD drive on the client computer, then click the Install button and select the option
G DATA AntiVirus Administrator by clicking the button alongside. In the greeting screen
that appears, you are informed that you are about to install the G DATA AntiVirus Administrator onto your system. Now, close all applications that are open in your Windows
system, and click Continue to proceed with the installation. The next screen allows you
to select the location for the Administrator data to be saved. Usually the G DATA AntiVirus Administrator is saved under “C:\Programs\G DATA AntiVirus Client/Server\G
DATA AntiVirus Administrator”. If you wish to select a different storage location, it is
possible to use the Browse button to open the directory structure, in which you can
select another directory or set up a new one. Continue moves you on to the next installation step. You now have the opportunity to select a program group. Once you have
clicked on Continue, the program is normally in the G DATA AntiVirus Administrator
program group in the program selection of the Windows start menu. Installation is
complete with a finishing screen. Click Quit. The G DATA AntiVirus Administrator is
now available to you. To carry out modifications to the Management Server, you can
select the G DATA AntiVirus Administrator entry under START > Programs > G DATA
AntiVirus Management Server and start the administration tool for the Management
Server in this way.
Internet updates work well with the “Internet update” program on the Management Server (START > Programs > G DATA AntiVirus Management Server > Internet
update), but do not work when I use the G DATA AntiVirus Administrator
The problem can be dealt with easily: specify a user account on the server. You open the
entry box by clicking the button Internet settings in the Update Internet task area.
71
G DATA AntiVirus
How do I check whether the clients have a connection to the Management Server?
The column Last access in the Clients task area shows the time at which the client had
last registered with the Management Server. Normally clients register every few minutes
with the Management Server (if no scan jobs are in progress). One of the following
reasons could explain why the link has been unsuccessful:
• The client has been turned off or separated from the network.
• It is impossible to establish a TCP/IP link between the client and the Management Server. Please check the network settings.
• The client has been unable to determine the IP address of the server, that is,
the name resolution has failed to function. You can check the link using the ping
command. Start by typing "ping <server name>" when prompted for an entry,
replacing "<server name>" with the name of the computer in the network
where the Management Server has been installed.
Clients should not be addressed by names rather they should be addressed by
their respective IP address
Installing the Management Server: When you are installing the Management
Server, you will be prompted for the server name. You must replace the name with
the IP address. You can also replace the server name with the IP address later, after
you have already installed the Management Server. You must remember to modify the
registry entry accordingly “HKEY_LOCAL_MACHINE\Software\G DATA AntiVirus
Client/Server\G DATA AntiVirus Management Server\ComputerName” and the file
“\Programs\G DATA AntiVirus Client/Server\G DATA AntiVirus Management Server\
AvkClientSetup\RegServer.txt”.
Activating the clients in the G DATA AntiVirus Administrator: You must
be able to establish the link from server to clients via the IP address as well and so you
must activate the clients in the G DATA AntiVirus Administrator using their IP address.
This can be done manually (activate client/client (dialog)) or by searching an IP address
sector (search client/computer).
G DATA AntiVirus Client setup from the CD: When the clients are installed
directly from the CD, the installation program will prompt you for the name of the
server and the computer name. In each case type the IP address.
How can I execute the Internet updates if there is no link between the Management Server and the Internet?
The command described here can be added on afterwards. First execute an Internet
update for the server program files and the clients. You can complete the Internet update from a client instead. Do this by going into Update Internet and then selecting the
72
Frequently Asked Questions (FAQ)
client from the list Update executed. The update can only be executed, if at the time
of the update, the client and the Management Server are switched on. You can register
online only if the Management Server is linked to the Internet. If there is no link, you are
requested to send your registration number and customer data (person to be contacted,
address) to our hotline. We will complete the registration for you and then send you the
access data.
A message on a number of clients reads:“The virus database is damaged”. What
can I do?
To insure that the protection from viruses is at its best, the virus database is checked at
regular intervals to make certain that it has not been damaged. If an error is found, the
message The virus database is damaged will appear. Delete this information and then
load the most recent update of the virus database from our server. Then update the
virus database on the clients that have been affected. Do not delay in contacting our
hotline by telephone, if the error message re-appears.
A message on a number of clients reads:“Program files have been changed or are
damaged”. What can I do?
To insure that the protection from viruses is at its best, the virus database is checked at
regular intervals to make certain that it has not been damaged. If an error is found, the
report Program files have been changed or are damaged is added. Delete this report and
then load the most recent update of the program files (G DATA AntiVirus Client) from
our server. Then update the program files on the clients that have been affected. Do not
delay in contacting our hotline by telephone, if the error message re-appears.
My mailbox has been moved into the quarantine folder
This may happen when your mailbox contains infected mail.
Recovering a file: Close the email program on the client that is to be dealt with and
then delete any newly created archive file. Then use the G DATA AntiVirus Administrator to open the associated report and click Return file. Please telephone our hotline if
you find that the file is not being recovered.
73
G DATA AntiVirus
Index
A
Access data and settings 38
Activate 26
Activate client 29, 35, 40
Activate client (dialog) 35, 40
Administrator 24, 26
Administrator Interface 30
adware 47, 53
Alarm messages 39
Alerts 59
Analysis extent 44, 49
archives 53
Attach report to infected incoming mail 58
Automatic type recognition 53
B
Basic Virus Analysis 19
before installing 19
BIOS 11, 19
Block file access 53
boot CD 19, 21
boot from the CD-ROM drive 19
C
Canceling Virus Scanning 67
Certify outgoing mails 58
Change the BIOS start sequence 11
Clear 34
Client 24, 36, 66
Client (activated) 41
Client (deactivated) 41
Client Functions 51
Client Installation Package 36
Clients 31, 36, 63
Client Selection Area 41
Client settings 31
client symbol 66
Comment 50
74
Index
Computer 44, 63
Create a Boot CD 21
Create an G DATA AntiVirus Client Installation Package 36
Create New Scan 46
D
Default settings 34
Defining the client monitoring structure 29
Delete 29, 40, 64
Delete default settings 34
Delete file 61
Delete infected file 53
Delete reports 61
Delete scans 44
Delete virus 61
diallers 47, 53
Disable the Virus guard 67
Disinfect 53
Disinfect file and restore from quarantine 61
Display all jobs 44
Display deactivated clients 29, 35, 40
Display group jobs in detail 44
Display local quarantine 51
E
Edit exception directories 64
Edit group 29, 33
Edit password... 32
Email 57
email archives 53
Email notification 39
Email protection 59
Email scan 36
Email settings 39
Emergency AntiVirus Service 12
Encyclopedia 40
Engine use 53
Exception Directories for Scan Jobs 52, 63
Exceptions 56
Execute again (immediately) 44
Exit 33
75
G DATA AntiVirus
F
Features 7
File 31
File types 47, 53
First Start (Setup Assistant) 26
G
G DATA AntiVirus Administrator 26
G DATA AntiVirus Client 50, 66
G DATA AntiVirus ManagementServer 23, 25
G DATA PremiumHotline 13
group 33, 44
Group (activated) 41
H
Help 40
Heuristics 53
Hide archived files 61
Hide dependent reports 61
Hotline 13
I
In case of an infection 58
Incoming mails 58
Infected archive 47, 53
Info 68
Inform user if virus is discovered 59
Initial Steps 21
initial virus scan 19
installation 21
Installation Overview 18
Install client software on activated computers automatically 26
Installing the G DATA AntiVirus Administrator 24
Installing the G DATA AntiVirus Client 24, 36, 64
Installing the G DATA AntiVirus ManagementServer 23
Interaction with the user 56
Internet Update 68
Internet update 37
In the case of an infection 47, 53
Introduction 7
76
Index
J
Job 46
L
Last access 63
Last execution 44
Licensing 12
Load protocol file... 32
M
ManagementServer 23, 25
Menu bar 31
Microsoft Outlook 59
Modify Job Parameters at a Later Date 49
Monitor 36, 52
Monitor status 53
My mailbox has been moved into the quarantine folder 73
N
Name 44
Network symbol 41
New group 29, 33, 40
New scan (periodic) 44, 46
New scan (single) 44, 46
Number of Entries 40
O
Online Registration 14
Online Update Menu 26, 40
Online Virus Encyclopedia 40
Only display completed scans 44
Only display open scans 44
Only display periodic scans 44
Only display single scans 44
Only scan network connections after user login 53
Options 67
OutbreakShield 59
Outgoing mails 58
Outlook 59
77
G DATA AntiVirus
P
Page setup 33
Password 26
Password Access 28
Password protection for option changes 51
Place file in quarantine 53
Place in quarantine 61
PremiumHotline 13
PremiumSupport renewals 12
Print 33, 61, 64
Print preview 33, 61, 64
Priority scanner 47
Product Architecture 8
Program Starts 28
Protect Microsoft Outlook via integrated plugin 59
Protocols 44
Q
quarantine 53, 61, 62, 67
R
Registration 14
Registration Number 13
Reports 31, 36, 60
Restart after updates 51
Restore file from quarantine 61
riskware 47, 53
S
Scan archives 53
Scan email archives 53
Scan for diallers / spyware / adware / riskware 47, 53
Scan incoming emails for viruses 58
Scanner 47
Scan network connections 53
Scan on write access 53
Scan options 59
Scan outgoing mails before sending 58
Scan system sectors at system startup 53
Scan system sectors on media change 53
78
Index
Scan unread mails at program startup 58
Schedule 47
Search computer 35
Server 26
Server (activated) 41
Server (deactivated) 41
Set Priority for Virus Checking 66
Settings 31, 36, 40, 47, 50, 53
Setup Assistant 26, 31
Show all quarantine reports 61
Show all reports 61
Show all reports with viruses that have not been removed 61
Show contents of quarantine folder 61
spyware 47, 53
Start bar icon 50
Statistics 36, 65
Status 36, 43, 44, 56
Status bar 36, 42
Subsequent Program Starts (Password Access) 28
Support and Licensing 12
symbol 66
System Requirements 19
system sectors 53
T
Task Area Display 42
Task Area Selection 42
Tasks 31, 36
Terms of Agreement 16
Time 63
Time interval 44
Tips for Better Antivirus Protection 11
Title bar 31
Toolbar 36, 40
Toolbar Commands 61, 64
U
Uninstall G DATA AntiVirus Client 64
Update 29, 40, 44, 61, 64
Update G DATA AntiVirus Management Server 38
Update program files 63, 64
79
G DATA AntiVirus
Update program files (G DATA AntiVirus Client) 38
Update program files automatically 51, 64
Updates 51
Update view 35
Update virus database 37, 63, 64
Update virus database automatically 64
Update virus signatures automatically 51
Use engines 47, 59
Use original software 11
User Account 50
User permitted to change email and monitor options 51
User permitted to change monitor options 51
User permitted to download signature updates 51
Use the correct procedures 11
Using G DATA AntiVirus 10
V
Version G DATA AntiVirus Client 63
View 31
View menu 36
Virus Analysis 19
Virus Checking 66
Virus Encyclopedia 40
W
Warning Messages 40
80