1
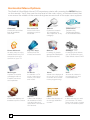
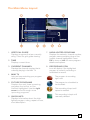
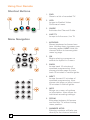
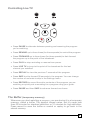
Ultra Whole Home DVR
User Guide
Contents
Welcome
On Demand
Horizontal Menu Options������������������� 2
Intro to Eastlink OnDemand��������������24
The Main Menu Layout���������������������� 3
OnDemand Library�������������������������� 25
Using Your Remote����������������������������4
OnDemand Options������������������������ 25
Shortcut Buttons���������������������������4
PIN Entry����������������������������������������� 25
Menu Navigation���������������������������4
Controlling Live TV����������������������� 5
Home Network
Setup���������������������������������������������� 28
TV Channels
Eastlink Premium Support��������������� 28
TV Channels - Layout������������������������ 8
Playing Media���������������������������������� 29
Grid Guide����������������������������������������� 9
Supported Files������������������������������� 29
Preview Panel���������������������������������� 10
Preview Panel - Layout���������������11
Settings
Recording Options��������������������� 12
Parental Controls����������������������������� 32
TV Setup������������������������������������������34
Recorded TV
Sounf Effects �����������������������������������34
Intro to Recorded TV������������������������14
Front Panel ��������������������������������������34
Recorded TV - Layout��������������������� 15
Aspect Ration���������������������������������� 35
Manage Recordings������������������������ 16
Recording Default���������������������������� 36
Expand DVR Storage���������������������� 16
External Hard Drive������������������������� 36
Audio Output����������������������������������� 36
Search
Working with your PIN����������������������37
Intro to Search��������������������������������� 18
Pay Per View PIN�����������������������������37
Find By Title������������������������������������ 19
Find By Keyword����������������������������� 20
Messages
Find By Category�����������������������������21
Receiving Messages������������������������ 40
Search Options������������������������������� 22
New Message��������������������������������� 40
Welcome
Congratulations on choosing Eastlink Ultra Whole Home DVR.
Let’s get started with all your system can do.
1
Horizontal Menu Options
The Eastlink Ultra Whole Home DVR experience starts with pressing the MENU button
on the remote. You’ll then see the top level of the main menu, a horizontal band that
runs across the middle of the screen and gives access to all of the main menu options.
Channels
A vertical menu that
lists all available
channels.
Recorded TV
A list of all of the
programs you’ve
recorded.
Search
Options to search
for programs by
title, keyword, or by
category.
OnDemand
Contains the
OnDemand library
of all available titles.
Home Network
An easy way to enjoy
media stored on your
computer from the
comfort of your TV.
Pay-Per-View
Quickly find PPV
movies and events.
Games
A variety of classic
games like Blackjack
and Slotmachine.
Settings
A category that allows
you to customize your
Ultra Whole Home DVR
Messages
A place to receive
messages about
Eastlink services
and updates.
TV Music
A collection of TV
music channels to
match your taste
and mood.
News
A filter that displays all
of the 24 hour news
channels and current
news programming.
Kids
Access all children’s
programming in one
consolidated list.
Sports
A filter that displays all
available sports content.
Movies
A filter that displays
all available movies,
including live and
recorded TV as well as
OnDemand.
HDTV
A filter that displays all
of the high-definition
content.
Favorites
A filter that lets you add
your favorite TV, video,
photo and music content
to one convenient place.
2
The Main Menu Layout
1. VERTICAL GUIDE
Displays programs that are currently
airing. Press for grid guide viewing.
2. TIME
Displays current time.
3. CURRENT CHANNEL
Displays the channel number that is
currently playing in the Mini TV.
4. M
INI TV
Lets you keep watching your program
while you browse.
5. F
UTURE PROGRAMS
Displays the next three upcoming
programs that will air on the
channel highlighted. Use the right
arrow to scroll through more
upcoming programs.
6. QUICK INFO
Displays information about the highlighted program; rating, repeat or new,
short description.
7. HIGHLIGHTED PROGRAM
Displays the network, channel number,
program name and airing time of the
current channel highlighted. Press
OK to view, or info for more program
details and options.
8. RECORDING ICON
Icon will display if the highlighted
program is currently recording or
scheduled to record.
The program is recording
right now.
The program is scheduled to
be recorded.
This recording is kept until
space is needed.
This recording is kept until
manually deleted.
3
Using Your Remote
Shortcut Buttons
1
A
2
3
B
C
4
1. D
VR
Goes to a list of recorded TV.
2. V
OD
Jumps to Eastlink Video
OnDemand menu.
3. G
UIDE
Activates the Channel Guide .
D
4. LIVE TV
Jumps to full-screen, live TV.
Menu Navigation
5
6
1
info
zoom
1. ARROWS
Moves backward or foward one
item. Holding down increases your
browsing speed. HINT: Hold the
channel
button
to browse guide
abc
def
2
1
menu
by 3page.
mno
2. OKjkl5
6
Begins playing a program or
7
selects
an
pqrs
tuv
wxyz option in a menu.
ghi
2
OK
4
7
back
next
3
4
abc
def
zoom
ghi
jkl
mno
pqrs
tuv
wxyz
clear
0
enter
4
2
7
next
4
2
5
8
3
6
9
9
4. N
EXT
Jumps forward 15 minutes of
recorded programming. Also
shows next page or jump forward
30 minutes in vertical guide.
6
1
8
3. B
ACK
clear Jumps
enter 15 minutes of
0
back
recorded programming. Also
shows previous page or jump
back 30 minutes in vertical guide.
7
5. INFO
Brings up a menu of options
or information. Also allows for
individual recording settings.
6. ZOOM
Alternates between full screen
and the Mini TV without losing
menu position.
7. NUMBER KEYS
Entering numbers will take you
directly to the channel entered.
4
Controlling Live TV
back
next
replay
skip
play
pause
rew
rec
fwd
stop
• Press PAUSE to alternate between pausing and resuming the program
you’re watching.
• Press REWIND up to three times (for three speeds) to rewind the program.
• Press FORWARD up to three times (for three speeds) to fast-forward
the program up to the point of live broadcast.
• Press PLAY to stop rewinding or resume from pause.
• Press LIVE TV to jump to the point of live broadcast for the last
channel you watched.
• Press REPLAY to view the previous 7 seconds of the program.
• Press SKIP to skip forward 30 seconds in the program. You can change
the number of seconds to skip in the Settings menu.
• Press RECORD to record the entire contents of the program you are
watching or quickly set a recording for a program using your guide.
• Press PAUSE and then SKIP to advance forward one frame.
The Buffer (temporary memory)
Whenever you start watching a program, you are storing it in a temporary
memory, called a buffer. The amount stored varies, but it’s never less
than 30 minutes for standard definition or 10 minutes for high definition.
Press record to save the buffer or rewind or replay to go back in the
stored memory.
5
6
TV Channels
With all of the channels available these days, it’s tough to know
what all of your options are. The TV Channels category makes
it easy to find what you want to watch.
TV Channels - Layout
1. TIME
With the current time, you’ll know
when your program begins.
5. A
VAILABLE TV PROGRAMS
Displays all of the programs
that are currently airing.
2. CURRENT CHANNEL
Displays the channel that is playing in Mini TV. If the program is
recorded, an icon will display the
current status - i.e., play or pause.
6. RECORDING ICON
Displays an icon if the program is
recording or scheduled to record.
3. MINI TV
Even when channel surfing, Mini
TV always keeps you in the action.
4. FOCUS PROGRAM
Pressing INFO on this item brings
up an action menu.
8
7. INFORMATION PANEL
Displays program information
about the show in focus.
8. PROGRAM INFORMATION
Displays the next three upcoming
programs that will air on the
channel in focus.
Grid Guide
A
The Eastlink Ultra Whole Home DVR offers an optional Grid Guide view for people
who prefer to find programming in that layout. You can access the Grid Guyide using
the
C remote short cut key.
B
D
The Grid Guide works similarly to the rest of the main menu:
• ARROW buttons navigate the guide
• INFO brings up a list of options
• SKIP will cycle forward 24 hours; REPLAY will cycle back 24 hours
• BACK and NEXT will move through the guide in 30 minute increments
• ZOOM will alternate between the guide and full screen TV
• If you are looking at the present time in the guide, MENU will return you to the
main menu
• Black shows indicate currently-airing programs; gray shows will air in the future
• OK tunes to the program if it’s currently airing, brings up an action menu if it’s on
in the future.
9
Preview Panel
TV Channels, like all horizontal categories that contain TV programming, has
a preview panel that displays upcoming programs for the channel in focus new
program.
Press the RIGHT ARROW button to select the panel, and then use the up and
down arrows to browse through up to two weeks of programming for that channel.
For a shortcut back to the present time, press the MENU button.
If you see a program you would like to record, press the RECORD or the
INFO button.
10
Preview Panel - Layout
1. C
HANNEL LOGO
The current channel.
2. P
ROGRAM LENGTH
The time the program begins
and ends.
3. TIMESLOT
Indicates the day and time that
the preview panel is currently
displaying.
5. TIME
Displays the time corresponding
to each program.
6. S
ELECTED PROGRAM
The currently-selected show.
Pressing info on the selected
program brings up an action menu
with options.
4. P
ROGRAM INFORMATION
Detailed program information, such
as title, rating, whether it’s a repeat,
cast and crew.
11
Recording Options
If you have record once or record series selected, you’ll see an arrow to the right
that allows you to access recording options. You can also access recording options
from the action menu of a program that’s currently recording or scheduled to record.
Scheduled to Record
Recording options for a single episode scheduled to record:
• keep - lets you decide when the program will be deleted.
• get series - sets the entire series to record.
• stop - allows you to set the recording to stop early or late.
• start - allows you to set the recording to start early or late.
Recording options for a series scheduled to record:
• keep - lets you decide when the program will be deleted.
• series options - allows you to set recording preferences for the entire series.
• stop - allows you to set the recording to stop early or late.
• start - allows you to set the recording to start early or late.
12
Recorded TV
Your Eastlink Ultra Whole Home DVR makes it easy to watch
and manage your recordings from one place in the main menu:
Recorded TV.
13
Intro to Recorded TV
In the horizontal menu, you’ll find the Recorded TV category.
• All of the recorded and currently-recording programs are listed
in the vertical band in alphabetical order.
• Episodes of a series are grouped into folders; you’ll see the
individual episodes in the preview panel to the right.
• To watch a program, select it, and press OK. And if you’ve already
watched half of the program, you can choose whether to resume where
you left off or start over from the beginning.
14
Recorded TV - Layout
1
2
3
4
1. CHANNEL LOGO
Displays the channel of the
recorded program.
2. R
ECORDED PROGRAMS ICONS
Let you know if the show is in
danger of deletion or protected
against deletion.
3. F
OCUS
Displays the channel number,
logo and an indication of whether a
program is part of a series. Folders
that contain multiple episodes in
a series also display the number
of episodes.
4. SERIES FOLDER
Episodes of a series are held
within a folder listing the number
of recorded episodes.
5
6
7
5. E
PISODES OR DURATION
If the item in focus is a folder
containing episodes in a series,
focus lists the number of episodes.
If it’s an individual program, it lists
the programs’s duration.
6. I NFORMATION
With a folder containing episodes
in a series in focus, this area
program the current recording
options for the series. With a single
recorded program in focus, this
area shows a summary of the
program information.
7. SERIES
Individual episodes in a series are
shown in the preview panel. Press
the right arrow button and select
an episode to see that episode’s
action menu.
15
ManageRecordings
When you press INFO with a recorded program in focus, you’ll get the following
list of options in the action menu:
• Play/Start Over - Launches the program full screen from the beginning.
• Resume - This option only appears if you’ve watched a portion of the program.
Launches the program full screen from the point you left off.
• See all times - Displays all of the times that particular program airs.
• Delete - Removes the program from Recorded TV.
• Recording options - Lets you access the recording options menu.
• Keep Until - Your Eastlink Ultra Whole Home will automatically delete the oldest
program in your Recorded TV folder as you need the room for new recordings.
Keep Until lets you set the program to be deleted at the point of your choosing.
• Lock - Prevents someone from watching the recorded program without a PIN.
• Record Series - you’ll get this option if you only have a single episode recorded.
Expand your DVR storage
Deciding which recordings to keep and what to erase is always a difficult decision…
if only you had more space!
Eastlink DVR Expander allows you to install an External Hard Drive to the reverse
side of your DVR – no more managing your content! Best of all, this technology is
available to you at no monthly charge. In order to function properly the External Hard
Drive must have the following specifications:
• Must be an “E-sata” Hard Drive – it can not be firewire or USB 2.0
• Minium 16 MB buffer and 7200 RPM
• Includes and “esata” cord, not firewirte or USB 2.0
16
Search
Sometimes you know the title. Sometimes you just know what
night it’s on. Sometimes you’re in the mood for a certain type
of show. The Eastlink Ultra Whole Home DVR has you covered
to help you find what you’re looking for.
17
Intro to Search
The Search category in the main menu contains three different ways to search
for programming: By Title, By Keyword, and By Category.
When you search using any of these three options, all of the following categories
will be searched for related programming:
• Currently airing
• Airing 12 days in the future
• Anything listed in the Eastlink OnDemand menu’s
• Recordings you have stored in your Recorded TV Library
• A Pay Per View option
You’ll be able to tell what type of program you’re looking at by the color of the card:
• Current programs are black
• Future programs gray
• Eastlink OnDemand, Recorded TV, and Pay Per View programs are yellow
18
Find By Title
1
2
4
5
3
6
7
8
When you select Find By Title, a screen will open that allows you to enter your title
and browse through results.
• Use the ARROW BUTTONS to navigate the onscreen keyboard
• To enter a letter, press OK with that letter highlighted
• To browse the list, press the LEFT ARROW until that panel is in focus.
1. SEARCH TYPE
This bar describes the type of
search you’re doing.
2. S
EARCH RESULTS
As you enter characters on the
right, the list on the left will filter
down to only display programs that
match your entry.
3. S
EARCH BOX
As you select characters, the
characters are entered in the
search box.
4. F
OCUS
The details for the channel and
programs are displayed in the
focus card.
5. V
ERTICAL LIST
The vertical list fills with programs
that match your criteria. Pressing the up or down arrows brings
these programs into focus.
6. S
PACE
Use a space to separate words
in your search entry.
7. SELECTOR
To enter a letter, move the selector
to it, and press OK; each character
is entered into the search box. You
can use texting-style letter entry as
a shortcut.
8. B
ACKSPACE
Removes a character from
the search box.
19
Find By Keyword
A Keyword search lets you search for any word contained in the programming
information. For example, if you know the actor in a program, but can’t remember
the title, you can search on the actor’s name, and all programs featuring that actor
will appear in the list.
To search by keyword, enter each letter by selecting it and pressing OK. You’ll see
results on the left filter down with each letter you enter. Press the left arrow and use
the up and down arrows to scroll through them.
SEARCHING TIP
Did you know that you can use your remote control keypad like a mobile phone
keypad?
For example, by pressing 222 on your remote control you will enter the letter C.
By pressing 33, you will enter the letter E.
• CLEAR - Clears the entire entry
• 0 - Enters a space
• 1 - Enters a backspace
20
Find By Category
4
5
3
1
2
If you’re in the mood for a certain type of program, Find by Category gives you a
way to browse what you’re looking for. When you press OK with Find by Category
selected, you’ll see a list of categories along the vertical band, and a list will display
the programs in each category. An Option card in each category will take you one
level deeper in the menu and allow you to browse subcategories.
1. CATEGORY
Category describes the type
of search you’re currently doing.
2. SHOW CATEGORY
The different types of programs
run along the horizontal band.
3. SHOW LIST
Each program airing over the next
24 hours that falls into the selected
category.
4. S
UB CATEGORY OPTION CARD
Each category will contain a card
labeled “Press OK to see more...”
Selecting this card will take you to
another screen with subcategories
along the horizontal band.
5. B
ACK CARD
Select this card and press OK to
go back up one level in the menu.
21
Search Options
The Search Options card allows you to choose which type of content is displayed in
both Search results and in the TV Filters.
To customize the type of content that appears in both areas, select Options and
press OK to clear the check box for the type of content you would like to remove.
You can remove:
• TV Recordings - programs you’ve recorded with your DVR
• TV Shows - live TV shows from the Eastlink lineup
• VOD - programs from Eastlink’s OnDemand library
22
OnDemand
Eastlink’s OnDemand selection gives you a vast library of great
programming to choose from and an easy way to search
through it all.
23
Intro to Eastlink OnDemand
When you bring the Eastlink OnDamnd card into focus, you’ll see a list of folders in
the vertical band. When you bring each folder into focus, the available programming
in each will appear in the preview panel.
Pressing OK with any of these folders in focus will show you the list of programming
in that OnDemand library. Choose from thousands of FREE programs that you can watch instantly! Includes
Prime Time TV, Sports, Music, Local Events & Kid shows. You also have access to
instant Pay Per View and subscription based content!
24
OnDemand Library
When you enter the OnDemand library, you’ll see a list of programming categories.
Each category will hold lists of the OnDemand programming you can choose from.
OnDemand Options
When you see a program you like, press OK to begin watching. If your choice is
a Pay Per View Preview option, the following options will appear:
• preview - plays the trailer for the selected movie or event if available.
• lock - uses Parental Controls to block access to that channel.
• buy - purchases the Pay Per View so that you can watch it immediately.
PIN Entry
The first time you try to purchase a Pay Per View OnDemand program or set Parental
Controls, you’ll be prompted to create a PIN that you will then enter before you make
additional purchases.
You can turn the PIN prompt off from the Parental Controls section of the Settings
category. See Page 37 in the “Settings” section for details.
25
26
Home Network
With your Eastlink Ultra Whole Home DVR, you can access
your computer’s music, video, and photos from the
comfort of your living room.
Setup
Home Network allows you to stream media from any server in your home, such as
your computer, to your Eastlink Ultra Whole Home DVR. Because Home Network is
DLNA ®-based, it is completely plug and play; if your computer is connected to your
home network and has a DLNA server, you should automatically see that computer
listed in the Home Network category of the main menu.
To make sure that Home Network will function properly, make sure that:
• Your computer is set up to share content according to your server’s instructions
• Your server software is not blocked by a Firewall
Eastlink Premium Support
Eastlink Premium Support is the perfect complement to Eastlink Ultra Whole Home
DVR, and it is included with your subscription.
Our technical experts can provide support for all of the devices that interact
with your Ultra Whole Home DVR, plus all of the other technology in your home.
Let us help with things like navigating game console set up, Virus removal, computer
performance, downloading pictures from your camera, tips for using Social Media,
and much more!
Our experts are available 24/7. Connect with us by phone, or online chat to get help
with navigating or set up of your Ultra Whole Home DVR, or assistance using any
of the technology in your home.
1-888-525-4253
https://premiumsupport.eastlink.ca
28
Playing Media
• To access your content, choose the device that interests you, and press OK.
• To open a folder of content, press OK.
• If you have an individual file selected that you would like to play, press OK.
• If you have a folder selected, and you would like to view a list of options for the
content of that folder, press INFO.
Supported Files
• Photo: JPEG, GIF*, BMP* and PNG* files
• Music: MP3, WMA, and AAC (unprotected files), and LPCM files
• Video: MPEG-1, MPEG-2, MPEG-4, H.264, and WMV files
*These file types are available through DLNA® servers that support transcoding
Content that is protected by Digital Rights Management (DRM) will not be accessible.
29
Settings
Settings allows you to customize your Eastlink Ultra Whole Home
DVR to your preferences.
31
Parental Controls
Settings provides robust Parental Controls, including the ability to lock programs by:
• TV Rating
• Movie Rating
• Channel
In addition, you can lock out individual programs, including recordings, from
action menus for each program in the main menu. The system records scheduled
programs that are blocked by parental controls, but you must enter the PIN before
you can watch them..
Parental Controls also allows you to turn on the option to have a PIN prompt before
any Pay Per View purchase.
32
Parental Controls
1
3
2
4
1. R
ATING
You can lock individual ratings
by pressing OK on the focus.
Locking a rating locks all higher
ratings above it.
2. M
INI TV
Your current program, if unlocked,
will continue to play in the Mini TV.
5
3. L
OCK ICON
The Lock icon displays if the
item is locked.
4. C
ATEGORY TITLES
Category titles display the parental
control category.
5. H
ELP
Help explains details about
the currently-selected rating.
33
TV Setup
If you have connected the Ultra Whole Home DVR to your TV with an HDMI™ cable,
your TV Setup should automatically select the correct resolution.
If you are using alternate cables, including an HDMI to DVI cable, you should select
the highest video resolution supported by your TV. The system automatically adjusts
the video output to match the broadcast format and the selections set in the TV
Setup card. The video resolution options are 480i (non-HDTV), 480p, 720p (default),
1080i, and 1080p.
If your TV is standard-definition (SD), make sure 480i is the only box checked. All
other video resolutions will be output at 480i. You can still watch HD channels and
they may look considerably better than their SD counterparts.
Sound Effects
Allows you to set the volume level of the Ultra Whole Home DVR sound effects,
including turning them off completely.
Front Panel
Allows you to set the brightness level of the Ultra Whole Home DVR front
panel display.
34
Aspect Ratio
Use the Aspect Ratio card in Settings to control how programming content appears
on your TV. For standard-definition (SD) TVs, choose Standard (4:3) only. You’ll then
be asked to choose how you want HD content to display on your TV, either by
letterboxing (putting black pillars on the top and bottom of the content) or cropping
the content to fit.
For Widescreen TVs, determine how standard content displays on your TV by first
choosing Widescreen (16:9) and then selecting maintain (displays standard content
as-is), or stretch (stretches the standard content to fill the TV screen).
35
Recording Defaults
Recording Defaults provides access to the same settings that are available in
Recorded TV. See the “Recorded TV” section, page 16 for details.
External Hard Drive
When you plug in an external hard drive, this setting will help you initialize setup,
as well as provide options for disconnection.
Eastlink DVR Expander allows you to install an External Hard Drive to the reverse
side of your DVR – no more managing your content! Best of all, this technology is
available to you at no monthly charge. In order to function properly the External
Hard Drive must have the following specifications:
• Must be an “esata” Hard Drive – it can not be firewire or USB 2.0
• Minium 16 MB buffer and 7200 RPM
• Includes and “E-sata” cord, not firewire or USB 2.0
Audio Output
Use the Audio Output card in Settings to identify the type of connection to audio
equipment. Choose from the options that the Ultra Whole Home DVR system can
output: Dolby Digital®, stereo, or mono. Depending on the broadcast content and
your audio receiver’s capabilities, sound effects may not be heard when selecting
Dolby Digital as the audio output mode.”
36
Working with your PIN
Creating a PIN
1. The first time you use Parental Controls or purchase a Pay Per View program,
the system asks you to create a PIN.
2. In the Settings category, scroll to the Parental Controls card, and press OK.
3. Press the numbers on the remote to enter a four digit PIN and then enter the PIN
again to confirm it.
4. Choose close.
Changing a PIN
1. In the Settings category, scroll to the Parental Controls card, and press OK.
2. Choose settings, use the left arrow to scroll left to the Change PIN card, and then
press OK.
3. Enter the old PIN, enter the new PIN, and then enter the new PIN again to confirm it.
If You Forget Your PIN
Contact Eastlink Support for assistance 1-888-345-1111
Pay Per View PIN
You can choose to turn off the PIN prompt before a Pay Per View purchase from
the Parental Control section. Select the Pay Per View card and press OK to turn the
PIN prompt on or off.
37
Messages
You’ll receive a new message whenever there is information
from Eastlink, like the availability of a new feature.
39
Receiving Messages
The Messages category is located in the main menu. Bring the Messages category
into focus, and your messages will appear in the vertical band. Press OK to view
each message.
Use the NEXT and BACK buttons to page through the message.
nce you have read the message, you can choose to close the message, mark
O
it as unread, or delete it.
New Message
When you receive a new message, a mail icon appears at the bottom left of your
main menu.
As soon as you have read all your messages, the icon will disappear.
40
1-888-345-1111