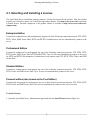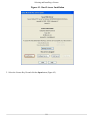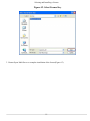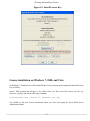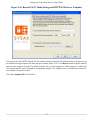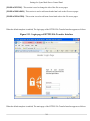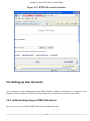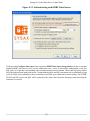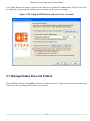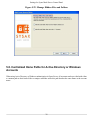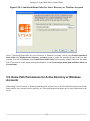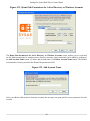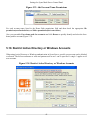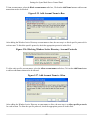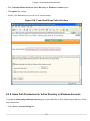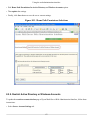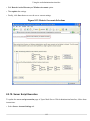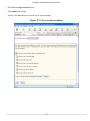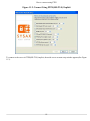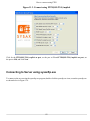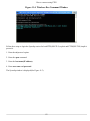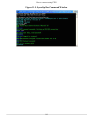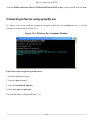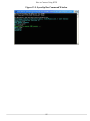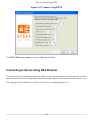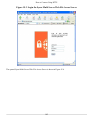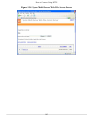
1
Sysax Multi Server User manual
Table of Contents
1. Introduction to Sysax Multi Server .............................................................................................. 1
1.1. Introduction to Sysax Multi Server .................................................................................... 2
2. Minimum System Requirements .................................................................................................. 4
2.1. System Requirements ...................................................................................................... 5
3. How to Install/Uninstall ............................................................................................................. 6
3.1. Install/Uninstall Sysax Multi Server ................................................................................... 7
4. Selecting and Installing a License ................................................................................................ 8
4.1. Selecting and Installing a License ...................................................................................... 9
5. Settings for Sysax Multi Server Control Panel .............................................................................. 14
5.1. Setting-up Connection protocols ...................................................................................... 15
5.2. Selecting Server Listen Address ...................................................................................... 17
5.3. Installing SSL Certificate ............................................................................................... 18
5.4. Restricting IP addresses ................................................................................................. 20
5.5. Restricting PASV Mode Settings and HTTP/S File Server Template ....................................... 21
5.6. Setting-up User Accounts ............................................................................................... 25
5.7. Manage Hidden Files and Folders .................................................................................... 37
5.8. Centralized Home Paths for Active Directory or Windows Accounts ...................................... 38
5.9. Home Path Permissions for Active Directory or Windows Accounts ....................................... 39
5.10. Restrict Active Directory or Windows Accounts ............................................................... 41
5.11. Running FTP Scripts Based on Server Events .................................................................. 43
6. FTP Configuration ................................................................................................................... 44
6.1. Setting-up Web-Based Administration .............................................................................. 45
6.2. Configuring Server Startup ............................................................................................. 45
6.3. Configuring Server Logging ........................................................................................... 47
7. How to start and stop Sysax Multi Server .................................................................................... 49
8. Using the web administration interface ........................................................................................ 52
8.1. Checking On Server Status in Real Time .......................................................................... 53
8.2. Updating Server Settings using Web Interface .................................................................... 55
9. Using the Web File Access Interface .......................................................................................... 66
9.1. Links for Sysax Multi Server Web File Access Server Interface ............................................. 67
10. How to connect using FTP ...................................................................................................... 75
11. How to connect using FTPS .................................................................................................... 79
12. How to Connect Using Telnet .................................................................................................. 85
13. How to Connect Using SFTP .................................................................................................. 91
14. How to Connect Using SSH2 Secure Shell ................................................................................. 96
15. How to Connect Using HTTP .................................................................................................. 99
16. How to Connect Using HTTPS .............................................................................................. 104
17. Troubleshooting Tips ............................................................................................................ 107
18. How to Get Technical Support ............................................................................................... 109
18.1. Get technical support ................................................................................................. 110
19. Frequently Asked Questions (FAQ) About Sysax Multi Server ..................................................... 111
ii
1
Introduction to Sysax Multi
Server
1.1. Introduction to Sysax Multi Server ............................................................................................ 2
1
Introduction to Sysax Multi Server
1.1. Introduction to Sysax Multi Server
Sysax Multi Server is a Secure FTP server, SSH2 secure shell server, Telnet server, and HTTPS file server
combined into a single Windows program. It's robust, secure, and high-speed software architecture makes it
suitable for business and personal file transfer needs.
Supports multiple internet protocols
All file transfer protocols including FTP, FTPS, and SFTP are supported in addition to HTTP and HTTPS based
file transfers. Telnet and Secure shell access are also supported.
Supports Multiple Authentication Methods
The server can authenticate connections using existing windows user accounts, LDAP Active Directory servers,
external databases accessible using ODBC, or Sysax server specific user accounts. Additionally, access to specific
connection protocols may be restricted for individual user accounts.
Supports remote web-based administration
The server can be remotely administered using any web browser. Server settings can be modified on the fly.
Activities of connected users can be modified in real time.
Runs FTP scripts based on server events
The server can run FTP scripts that are trigged by events such as user login, file transfer completion, file rename,
and delete operations. The server event type, user name, user IP address, and corresponding file names are made
available inside the script. The FTP scripts are identical to that supported by Sysax FTP Automation and can be
used to send email, initiate file transfers, process local files, or run other programs.
Runs as a Windows service
The program runs as a Windows service and can be configured to automatically start on system boot up even
when no user is logged on.
Free personal edition
A free personal edition that supports one connection at a time and unlimited account creation is available for noncommercial use.
2
Introduction to Sysax Multi Server
Simple to set up and use
Sysax Multi Server is simple to set up and use on any Windows-based computer.
Supports both anonymous and account-based access
Sysax Multi Server enables you to set up both anonymous and password protected user accounts on the same
computer.
High speed software architecture
The software architecture for Sysax Multi Server has been fine-tuned to support very high data transfer rates, and
large volumes of user connections.
Protection against security breaches
Sysax Multi Server has been designed to safeguard against many types of malicious hacking attacks against the
server.
Unlimited free customer support
Licensed users of Sysax Multi Server are eligible for unlimited free customer service.
3
2
Minimum System Requirements
2.1. System Requirements .............................................................................................................. 5
4
Minimum System Requirements
2.1. System Requirements
Sysax Multi Server is compatible with Windows 7, Windows 2008, certified for Windows Vista and runs on all
versions of the Microsoft Windows operating system including:
• Windows 95
• Windows 98
• Windows 2000
• Windows ME
• Windows XP
• Windows 2003
• Windows Vista
• Windows 2008
• Windows 7
The minimum hardware required to run Sysax Multi Server are:
• Pentium Class or higher processor
• At least 16MB of free system RAM
• At least 10MB of hard disk space
• Connection to the internet or local network
Note
Sysax Multi Server supports a multi-threaded architecture that scales well on multi-core and multiprocessor systems.
5
3
How to Install/Uninstall
3.1. Install/Uninstall Sysax Multi Server ........................................................................................... 7
6
How to Install/Uninstall
3.1. Install/Uninstall Sysax Multi Server
To install Sysax Multi Server:
1. Verify that the downloaded msi installation package is digitally signed by Codeorigin, LLC
2. Double click on the msi installation package to run the installation wizard
3. Follow on-screen instructions to install Sysax Multi Server
To uninstall Sysax Multi Server:
1. Click the Start button on your computer
2. Select the All Programs Menu
3. Select Sysax Multi Server
4. Click on Uninstall Sysax Multi Server
5. Follow on-screen instructions to uninstall Sysax Multi Server
or
1. Click the Start button
2. Select Settings
3. Select Control Panel
4. Select Add/Remove Programs
5. Choose Sysax Multi Server from the list
6. Click Add/Remove button
7. Follow on-screen instructions to uninstall Sysax Multi Server
7
4
Selecting and Installing a License
4.1. Selecting and Installing a License ............................................................................................. 9
8
Selecting and Installing a License
4.1. Selecting and Installing a License
The Sysax Multi Server installation package contains a 30-day trial license for the product. After the trial has
expired, you will need to choose one of the following product editions. Visit http://www.sysax.com/ to purchase
a product license. Detailed comparison of all product editions is available at http://www.sysax.com/server/
compare.htm
Enterprise Edition
Licensed for commercial use and simultaneously supports all of the following connection protocols: FTP, SFTP,
FTPS, Telnet, SSH2 Secure Shell, HTTP and HTTPS. Unlimited users can also simultaneously connect to the
server.
Professional Edition
Licensed for commercial use and supports any one of the following connection protocols: FTP, FTPS, SFTP,
FTPS, Telnet, SSH2 Secure Shell, HTTTP and HTTPS. Up to 10 users can simultaneously connect to the server
for HTTP and HTTPS file tranansfers. Unlimited users can connect using FTP, SFTP, FTPS, Telnet, and SSH2
Secure Shell.
Standard Edition
Licensed for commercial use and supports any one of the following connection protocols: FTP, FTPS, SFTP,
FTPS, Telnet, and SSH2 Secure Shell. Up to 10 users can simultaneously connect to the server.
Personal edition (also known as the Free Edition)
Licensed only for personal use and supports any one of the following connection protocols: FTP, FTPS, SFTP,
FTPS, Telnet, and SSH2 Secure Shell. One user can simultaneously connect to the server at a time.
To install a license:
1. Open the Sysax Multi Server Administration panel and click the Install License button (Figure 4.1).
9
Selecting and Installing a License
Figure 4.1. Start License Installation
2. Select the License Key file and click the Open button (Figure 4.2).
10
Selecting and Installing a License
Figure 4.2. Select License Key
3. Restart Sysax Multi Server to complete installation of the license(Figure 4.3).
11
Selecting and Installing a License
Figure 4.3. Install License Key
License installation on Windows 7, 2008, and Vista
On Windows 7, Windows server 2008, and Windows Vista, you may need to manually install the license
key as follows:
Open a DOS prompt and navigate to the folder where you have saved the license key file (eg.
sysaxserv_ent.key) and run the following command:
sysaxservdmgr.exe /installlic sysaxserv_ent.key
You should see the new license information when you close and reopen the Sysax Multi Server
Administrator panel.
12
Selecting and Installing a License
The sysaxservdmgr.exe program is located in the installation folder for Sysax Multi Server. If your system
cannot automatically find it, you may need to type in the full path to the executable or copy the license file
to the installation folder, navigate to this folder from the DOS command prompt, and run the command.
13
5
Settings for Sysax Multi Server
Control Panel
5.1. Setting-up Connection protocols ..............................................................................................
5.2. Selecting Server Listen Address ..............................................................................................
5.3. Installing SSL Certificate .......................................................................................................
5.4. Restricting IP addresses .........................................................................................................
5.5. Restricting PASV Mode Settings and HTTP/S File Server Template ..............................................
5.6. Setting-up User Accounts .......................................................................................................
5.7. Manage Hidden Files and Folders ............................................................................................
5.8. Centralized Home Paths for Active Directory or Windows Accounts ..............................................
5.9. Home Path Permissions for Active Directory or Windows Accounts ...............................................
5.10. Restrict Active Directory or Windows Accounts .......................................................................
5.11. Running FTP Scripts Based on Server Events ..........................................................................
14
15
17
18
20
21
25
37
38
39
41
43
Settings for Sysax Multi Server Control Panel
5.1. Setting-up Connection protocols
Sysax Multi Server supports secure file transfer protocols such as FTPS, SFTP, and HTTPS in addition to SSH2
Secure Shell. FTP, HTTP, and Telnet are also supported. The Enterprise Edition allows multiple protocols to be
simultaneously selected. The Professional and Personal Editions allows the selection of a single protocol at a
time. If multiple protocols are simultaneously enabled, each protocol must have a different port number associated
with it.
Figure 5.1. Multi Server Account Setup
• SSH2 based Secure Shell and SFTP
This option enables Secure shell so that users can remotely login and have access to a command prompt. It
also enables file transfer using SFTP. In both cases, data transfer is protected with SSH2 based encryption. The
default connection port number is 22.
• SSH2 based SFTP only
This option only enables file transfer using SFTP. Secure Shell access is disabled and users will not have
access to a command prompt. In this case, data transfer is protected with SSH2 based encryption. The default
connection port number is 22.
• SSH2 based Secure Shell only
15
Settings for Sysax Multi Server Control Panel
This option only enables remote login access without the ability to transfer files. Connected users have access to
a command prompt to run commands on the system. The connection is protected with SSH2 based encryption.
The default connection port number is 22.
• Telnet
This option enables unsecured remote login access without the ability to transfer files. Connected users have
access to a command prompt to run commands on the system. The connection is not encrypted and can be
used within internal networks to eliminate the additional overhead associated with encryption. The default
connection port number is 23.
• FTP and FTPS(SSL/TLS)
This option enables unsecured file transfer using FTP or secured file transfer using SFTP. FTP connections
are not encrypted and can be used within internal networks to eliminate additional overhead associated with
encryption. FTPS connections are protected with SSH/TLS based encryption. The default connection port
number in both cases is 21.
• FTPS(SSL/TLS) Explicit
This option only enables file transfer using explicit FTPS. In explicit FTPS, the connection is first established
without encryption. An encryption mechanism based on SSL/TLS is then negotiated and subsequent data
transfers are encrypted. The default connection port is 21.
• FTPS(SSL/TLS) Implicit
This option only enables file transfer using implicit FTPS. In implicit FTPS, the connection is always encrypted
with SSL/TLS. The default connection port is 990.
• HTTP File Server
This option enables files to be transferred using a regular web browser such as Internet Explorer. The connection
is not encrypted and can be used within internal networks, eliminating the additional overhead associated with
encryption. The default connection port is 80.
• HTTPS File Server
This option enables files to be securely transferred using a regular web browser such as Internet Explorer. The
connection is protected with SSL/TLS based encryption.
16
Settings for Sysax Multi Server Control Panel
5.2. Selecting Server Listen Address
After setting up the connection protocols, the next step is to select the IP address that the server will monitor for
incoming connections. There are two options are available in this section. By default, the server will listen for
connections on all addresses associated with this computer. This default radio button is pre-selected.
Figure 5.2. Select Server Listen Address
To make the server listen only for connections on a specific IP address, select the Listen on only the following
IP address radio button. Click on the Select button to select an IP address from the list of available IP addresses
associated with the computer or type in a new IP address.
Figure 5.3. Select IP Address to Listen
17
Settings for Sysax Multi Server Control Panel
5.3. Installing SSL Certificate
A self signed SSL certificate is automatically created on product installation. A different SSL certificate may be
selected by clicking on the Browse button. SSL Certificates are required if FTPS or HTTPS protocols are used
for file transfer. (Note: Enabling FIPS Mode will restrict the cryptographic algorithms used to those approved by
the FIPS 140-2 validation process.)
Figure 5.4. Select SSL Certificate
A new self signed certificate can also be created by clicking on the Create Certificate button. The certificate
generation dialog box is displayed. The SSL certificate parameters to be filled out are:
Server Name
This field specifies the domain name of the server.
Group Name
This field specifies the group or division name of the company or organization that the server belongs to.
18
Settings for Sysax Multi Server Control Panel
Company Name
This field specifies the name of the company or organization that the server belongs to.
City Name
This field specifies the name of the city that the company or organization is located in.
State Name
This field specifies the name of the state that the company or organization is located in.
Country Name
This field specifies the two letter country code that the company or organization is located in.
The new SSL certificate is then generated by clicking the Create SSL Certificate button.
Figure 5.5. Generate SSL Certificate
Click OK on the SSL Certificate created screen.
19
Settings for Sysax Multi Server Control Panel
Figure 5.6. SSL Certificate Created
The generated server-side self-signed SSL certificate is valid for one year from the date of creation.
5.4. Restricting IP addresses
Connections to Sysax Multi Server can be controlled by banning specific IP addresses or by allowing only specific
IP addresses. The complete IP address of the connection or a combination of IP addresses and wildcards such as
192.168.* can be specified.
Figure 5.7. Specify IP Restrictions
20
Settings for Sysax Multi Server Control Panel
To ban IP addresses, click the radio button Enable IP Address Restriction and select the Block Connections
option. Choose whether to automatically block IP address if login failed or whether to block only if attempts
happened within a certain number of seconds. Click on the Add Address button to add IP addresses that need
to be blocked.
Figure 5.8. Add IP Address to Ban
To allow only specific IP addresses, select the Allow connections radio box (Figure 5.7). Click on the Add
Address button to add IP addresses that need to be allowed.
Figure 5.9. Add IP Address to Allow
5.5. Restricting PASV Mode Settings and HTTP/S File Server
Template
When a connection requests the server to transfer files in PASV mode, an external IP address can be specified
for security purposes. If the Server is running inside a firewall or other secured environment, an IP address that
is externally accessible is required. The range of data connection ports can also be restricted to specific minimum
and maximum values.
21
Settings for Sysax Multi Server Control Panel
Figure 5.10. Restrict PASV Mode Settings and HTTP/S File Server Template
The page layout of the HTTP/S based web file transfer interface that allows file transfer using a web browser can
be customized using a template file in the enterprise edition (Figure 5.10). Click Browse button to quickly identify
and select the template file path. The default template file is web-ft-template.txt. If the template is enabled, the
file transfer interface can be changed by changing the template. The template can be customized as needed or a
new template file can be created.
The default template file looks like this:
22
Settings for Sysax Multi Server Control Panel
Exhibit 5.1. Default Template File
[LOGINPAGETITLE]
Title: Sysax Multi Server Web File Access Server
[LOGINPAGEHEADER]
<hr>
<h3>Header: Login Page</h3>
<hr>
[LOGINPAGEIMAGETAG]
<img src="loginacc.gif" width="148" height="295" border=1>
[LOGINPAGEINFOTEXT]
InfoText: Sysax Multi Server Web File Access Server
[LOGINPAGEFOOTER]
<hr>
<center><small>Footer: Login Page</small></center>
[FILEPAGETITLE]
Title: Sysax Multi Server Web File Access Server
[FILEPAGEHEADER]
<hr>
<h3>Header: File Page</h3>
<hr>
[FILEPAGEFOOTER]
<hr>
<center><small>Footer: File Page</small></center>
[LOGINPAGETITLE] : This section is used to change the title of the login page.
[LOGINPAGEHEADER] : This section is used to add some header html code to the login page.
[LOGINPAGEIMAGETAG] : This section is used to control the display of the image on the login screen. The
image file name should be the same because files that can be sent before logging in is restricted to protect against
hackers.
[LOGINPAGEINFOTEXT] : This section is used to control the display of the informational text shown at the
right of the image and above the login button.
[LOGINPAGEFOOTER] : This section is used to add some footer html code to the login page.
23
Settings for Sysax Multi Server Control Panel
[FILEPAGETITLE] : This section is used to change the title of the file access pages.
[FILEPAGEHEADER] : This section is used to add some header html code to the file access pages.
[FILEPAGEFOOTER] : This section is used to add some footer html code to the file access pages.
When the default template is enabled, The login page of the HTTP/S File Transfer Interface appears as follows:
Figure 5.11. Login page of HTTPS File Transfer Interface
When the default template is enabled, The main page of the HTTP/S File Transfer Interface appears as follows:
24
Settings for Sysax Multi Server Control Panel
Figure 5.12. HTTPS file transfer interface
5.6. Setting-up User Accounts
User connections can be authenticated using ODBC databases (database authentication is supported in the
enterprise edition), Windows NTLM, LDAP Active Directory, or Sysax Server specific local accounts
5.6.1. Authenticating using an ODBC Data Source
Sysax server can use an external ODBC Data Source to authenticate users
25
Settings for Sysax Multi Server Control Panel
Figure 5.13. Authenticating with ODBC Data Source
Clicking on the Configure data source button opens the ODBC Data Source Setup window. In this, an external
database(ODBC data source) can be used to authenticate users. A user is successfully authenticated by the first
SQL query if a valid entry corresponding to the username and password is returned. The second SQL query obtains
the home path and home path permissions. Custom database tables and SQL statements can be substituted as long
as the first SQL query authenticates the user and the second SQL query obtains the account settings. The $USER,
$PASS, and $IP values in the SQL will be replaced by the actual values from the incoming connection when the
statement is executed.
26
Settings for Sysax Multi Server Control Panel
Figure 5.14. Configure ODBC Data Source
The MS SQL Server Driver or MS Access Driver database option can be selected to connect directly to these
Microsoft databases.
An example of the ODBC tables is shown below. The SQL statement that is executed to create the tables is similar
to:
CREATE TABLE multiserver_users (uid INTEGER PRIMARY KEY NOT NULL, username
VARCHAR (255) UNIQUE NOT NULL, password VARCHAR (255) NULL, homepath
VARCHAR (255) NULL, homeperm VARCHAR (255) NULL, accdisabled INTEGER
NULL);
In this:
• The username field is the username for the account and must be unique.
• The password field is the password for the account.
• The homepath field is the home path for the account.
27
Settings for Sysax Multi Server Control Panel
• The homeperm field shows the permissions for the home path and all sub folders.
For the permissions field, the following letters mean:
R = file read
W = file write
D = file delete
L = folder list
C = folder creates
X = folder delete
The accdisabled field shows if the account is disabled. An account is disabled if this field is set to 1.
Figure 5.15. ODBC Table
5.6.2. Authenticating with LDAP Active Directory
Connections can be authenticated using Sysax LDAP Active Directory (Figure 5.16) by specifying the domain
controller to use.
28
Settings for Sysax Multi Server Control Panel
Figure 5.16. Authenticating with LDAP Active Directory
5.6.3. Authenticating with Windows Accounts
Sysax server can use Windows accounts that have already been created on the computer system, or user accounts
on a domain controller associated with the system. This enables system administrators to manage user accounts
directly through the Windows computer management tools.
29
Settings for Sysax Multi Server Control Panel
Figure 5.17. Authenticating with Windows Accounts
5.6.4. Creating Sysax User Accounts
Sysax server specific user accounts can be created to enable account management directly through the Sysax
server administration panel or through the web based administration interface.
30
Settings for Sysax Multi Server Control Panel
Figure 5.18. User Account Selection with Sysax User Account Option
Clicking on the Configure accounts button opens the Sysax account manager window where user accounts can
be created, deleted, or modified.
31
Settings for Sysax Multi Server Control Panel
Figure 5.19. System User Account Manager
Adding User Accounts
The Add User account dialog box enables the creation of user accounts. A user account can be created by
specifying the username, password and home path. In the Add user account dialog, the Login field is used to enter
the user's login name. The Password field is used to enter the user's password. The Home path field is used to
enter the home path for the user account. The Browse button can be clicked to quickly identify and select the
home path. Finally click on the OK button to create the new user account.
32
Settings for Sysax Multi Server Control Panel
Figure 5.20. Add User Account
Deleting User Accounts
When you choose to delete a user account, you are prompted by the Account delete confirmation screen.
Figure 5.21. Account Delete Confirmation
This prevents you from inadvertently deleting an account. To verify the deletion, click Yes.
Granting User Permissions After you create the user accounts, the next step is to grant specific access permission
for each account.
Figure 5.22. Setting Permissions
For each account listed in the field under Permissions for accessible paths, check the appropriate file
permissions(read/write/delete) and folder permissions(list/create/delete).
33
Settings for Sysax Multi Server Control Panel
You can also use the Add path and Delete path buttons to add or delete the highlighted paths.
Disabling Specific Protocols
After granting the account permissions, the next step is to disable specific protocols for each account. To disable
the specific protocols, check the appropriate protocols in this field.
Figure 5.23. Selecting User Protocols
Set Maximum Connections The figure below represents the screen that enables you to set the maximum number
of connections allowed to connect to the FTP server. It also allows you to set a timeout period.
Figure 5.24. Maximum Connections and Timeout
To set maximum connection and timeout period, enter the number in the field to the right of Max connections.
You can also use the up and down arrows to select a number.
Set Timeout Period
If the Sysax Multi Server does not respond or does not finish a response in a timely manner after the client sends
a command, the server times out and disconnects.
To reset the timeout specification, enter the appropriate seconds in the field to the right of Timeout(secs. You can
also use the up and down arrows to select a number.
34
Settings for Sysax Multi Server Control Panel
Figure 5.25. Maximum Connections and Timeout
5.6.5. Importing a CSV file containing Sysax User Accounts
Clicking on the Import CSV button opens the Import CSV account file window where a CSV file containing
comma separated account information can be directly imported into the server.
Figure 5.26. Import CSV Account File
Each line in the CSV file corresponds to one account. The orders of the comma separated fields are: 1.)username,
2.)password, 3.)homepath, 4.)homeperm and 5.)accdisabled. A sample CSV file is shown in below. The first row
may optionally contain the field headings exactly as shown in the CSV file
35
Settings for Sysax Multi Server Control Panel
Figure 5.27. Sample CSV File
In this,
• The username column contains the username for the account
• The password column contains the password for the account.
• The homepath column contains the home path for the account.
• The homeperm column contains the permissions for the home path and all sub folders.
For the permissions column, the following letters denote the following permissions:
R = file read
W = file write
D = file delete
L = folder list
C = folders create
X = folder delete
The accdisabled column shows if the account is disabled. An account is disabled if this field is set to 1.
5.6.6. Using both Windows and Sysax User Accounts
It is also possible to authenticate users using a combination of either windows accounts or Sysax user accounts. If
this option is selected and a username exists in both windows and Sysax user accounts, the server can be configured
36
Settings for Sysax Multi Server Control Panel
to use either Windows accounts or Sysax user accounts first to perform the authentication. The server may also
be configured to login using the windows account and then use the sysax user settings.
Figure 5.28. Using both Windows and Sysax User Accounts
5.7. Manage Hidden Files and Folders
Files and Folders that have the 'hidden' attribute set or that start with a '.' character can be prevented from being
listed even if the containing folder is otherwise accessible.
37
Settings for Sysax Multi Server Control Panel
Figure 5.29. Manage Hidden Files and Folders
5.8. Centralized Home Paths for Active Directory or Windows
Accounts
When using Active Directory or Windows authentication in Sysax Server, all accounts can be provided with either
a common path as their home folder or unique subfolder under this path that has the same name as the account
name.
38
Settings for Sysax Multi Server Control Panel
Figure 5.30. Centralized Home Paths for Active Directory or Windows Accounts
In the "Centralized Home Paths for Active Directory or Windows Accounts" screen, select Enable centralized
home folder for Windows/active directory accounts option to enable the centralized home folder for that
account. You can click Browse from Central home folder Path field to quickly identify and select the home
path. If you want to create unique home path subfolders, select Create unique home path subfolders based on
account name.
5.9. Home Path Permissions for Active Directory or Windows
Accounts
When using Active Directory or Windows authentication in Sysax Server, the file and folder permissions for the
home path for user accounts can be explicitly set. These path permissions apply only to user connections to the
server.
39
Settings for Sysax Multi Server Control Panel
Figure 5.31. Home Path Permissions for Active Directory or Windows Accounts
The Home Path Permissions for Active Directory or Windows Accounts screen, enables you to create and
set file/folder permissions for windows/active directory accounts. An account name can be added by clicking on
the Add Account Name button. To delete and account name, click Delete Account Name button. The Default
account name is always present in the Home Path permissions field.
Figure 5.32. Add Account Name
After you add the windows/active directory accounts, the next step is to grant specific access permission for each
account.
40
Settings for Sysax Multi Server Control Panel
Figure 5.33. Add Account Name Permissions
For each account name listed in the Home Path permissions field and then check the appropriate file
permissions(read/write/delete) and folder permissions(list/create/delete).
Also you can enable Force home path for account to and click Browse to quickly identify and select the force
home path for account (Figure 5.31).
5.10. Restrict Active Directory or Windows Accounts
When using Active Directory or Windows authentication in Sysax Server, specific user accounts can be blocked
or allowed. The full account name or wild card patterns such as acc* can be specified. A single * applies to all
user accounts.
Figure 5.34. Restrict Active Directory or Windows Accounts
41
Settings for Sysax Multi Server Control Panel
To ban account names, select the Block account names radio box, Click on the Add Name button to add account
names that need to be blocked.
Figure 5.35. Add Account Name to Ban
After adding the Window/Active Directory account name to ban, the next step is to block specific protocols for
each account. To block the specific protocols, check the appropriate protocols in this filed.
Figure 5.36. Blocking Window/Active Directory Account Protocols
To allow only specific account names, select the Allow account names radio box, Click on the Add Name button
to add account names that need to be allowed.
Figure 5.37. Add Account Name to Allow
After adding the Window/Active Directory account name to allow, the next step is to allow specific protocols
for each account. To allow the specific protocols, check the appropriate protocols in this filed.
42
Settings for Sysax Multi Server Control Panel
Figure 5.38. Allowing Window/Active Directory Account Protocols
5.11. Running FTP Scripts Based on Server Events
Sysax Server enables the execution of custom scripts on specific server events. The event type, user account,
connection IP address, and any filenames are made available inside the script. Identical to the scripting language
used by the Sysax FTP Automation product, the script can be used to send email, perform file transfer, local
processing, or run other programs.
Figure 5.39. Running FTP Scripts
43
6
FTP Configuration
6.1. Setting-up Web-Based Administration ...................................................................................... 45
6.2. Configuring Server Startup ..................................................................................................... 45
6.3. Configuring Server Logging ................................................................................................... 47
44
FTP Configuration
6.1. Setting-up Web-Based Administration
Sysax server can be administered locally (using HTTP)or remotely (using HTTPS) using a web browser. A
username and password must be specified to validate access to the browser based administration interface.
Figure 6.1. Web Administration Interface
6.2. Configuring Server Startup
To configure the server startup, open the Sysax Multi Server administrator program. The Sysax Multi server
control panel is displayed(Figure 6.2).
45
FTP Configuration
Figure 6.2. Sysax Multi Server Control Panel
On the automatic startup screen, you are presented with two options: to automatically start the server on Windows
boot-up, or to start the server manually from the administrator panel.
Select the appropriate startup method and click Save. The following dialog box is displayed(Figure 6.3).
46
FTP Configuration
Figure 6.3. Configure Server Startup
6.3. Configuring Server Logging
You can choose to optionally record server activity to a server log file. After you make your selections on
the automatic startup screen and click Save, then select the Server log tab. The following dialog box is
displayed(Figure 6.4).
47
FTP Configuration
Figure 6.4. Server Log
To enable recording of server activity to a logfile, make sure that the Enable record to log file is checked. Then
enter the path in the Path field(or use the Browse button) to identify the log path.
In addition, on the Server log tab, you can indicate a maximum size of file that triggers a rollover to prevent the
file from becoming too large.
To specify the maximum size of the log file, verify that Roll over this log file after is checked(Figure 6.4), then
enter the size in bytes(or use the up and down arrows). Finally click Save to preserve your settings.
48
7
How to start and stop Sysax Multi
Server
49
How to start and stop Sysax Multi Server
After you establish a connection, you can start the server(Figure 7.1).
Figure 7.1. Start Server
To start the server, follow these instructions:
1. Click Start button on task bar.
2. Select Programs -> Sysax Multi Server.
3. Click the sub-menu Sysax Multi Server Administrator.
4. Select Start Server.
After the server is used, you can stop its operation(Figure 7.2).
50
How to start and stop Sysax Multi Server
Figure 7.2. Stop Server
To stop the server, follow these instructions:
1. Click Start button on task bar.
2. Select Programs -> Sysax Multi Server.
3. Click the sub-menu Sysax Multi Server Administrator.
4. Select Stop Server.
51
8
Using the web administration
interface
8.1. Checking On Server Status in Real Time .................................................................................. 53
8.2. Updating Server Settings using Web Interface ............................................................................ 55
52
Using the web administration interface
On the web administration screen, you are presented with two check box options: to Enable web based
administration and to Enable server remote administration.
Select the appropriate web administration option and click Save.See Figure 8.1 below.
Figure 8.1. Web Administration Interface
To enable web administration in Sysax Server, verify that enable web based administration is checked in web
administration screen then enter login name, password, local address and port.
To enable server remote administration in Sysax Server, verify that enable server remote administration is
checked in web administration screen. Enter remote address, port and the path address of SSL certificate, or
click Browse to find the paths of remote and certificate.
8.1. Checking On Server Status in Real Time
When browsing or opening the Sysax Multi Server Web Administration Interface, the server status page is
displayed(Figure 8.2).
53
Using the web administration interface
Figure 8.2. Server Status Page
The Server Status page shows the current status of server. It shows the month, date, year and time. It also shows
the current running time of server and how many no of clients are connected to the server.
The opening page of Sysax Multi Server Web Administration Interface contains some different buttons.
• Refresh Page
The refresh page button is used to refreshes the server status.
• (Re)start Server
The (re)start server button is used to restart the server for new settings to take effect will disconnect all connected
users.
• Stop Server
The stop server button is used to stop the server.
• Logout
The logout button is used to logout the currently used working account.
54
Using the web administration interface
8.2. Updating Server Settings using Web Interface
To update server settings, select Server account settings tab of Sysax Multi Server Web Administration
Interface window. The server account settings page is displayed in figure 8.3.
Figure 8.3. Updating Server Settings using Web Interface
You can update the server settings by using web browser. Select the appropriate server settings option of server
account settings page in Sysax Multi Server web administration interface.
55
Using the web administration interface
8.2.1. Selecting Internet Protocols and Security
To update the selecting server protocol page of Sysax Multi Server Web Administration Interface, follow these
instructions:
• Select Server Account Settings tab.
• Pick Select server protocols and security option.
• Then update the settings.
• Finally, click Save button to save the server current settings.
Figure 8.4. Selecting Internet Protocols and Security
56
Using the web administration interface
8.2.2. Selecting Server Listen Address
To update the server listen address page of Sysax Multi Server Web Administration Interface, follow these
instructions:
• Click on Select Server Listen address tab.
• Select any one of the option.
Figure 8.5. Selecting Server Listen Address
8.2.3. Selecting SSL Certificate
To update the selecting ssl certificate page of Sysax Multi Server Web Administration Interface, follow these
instructions:
• Select Server Account Settings tab.
• Pick Select SSL Certificate option.
• Then update the settings.
• Finally, click Save button to save the server current settings.
57
Using the web administration interface
Figure 8.6. Selecting SSL Certificate
8.2.4. Specifying IP Restrictions
To update the specifying IP restrictions page of Sysax Multi Server Web Administration Interface, follow these
instructions:
• Select Server Account Settings tab.
• Pick Specify IP restrictions option.
• Then update the settings.
58
Using the web administration interface
• Finally, click Save button to save the server current settings.
Figure 8.7. Specifying IP Restrictions
8.2.5. PASV Mode Settings
To update the PASV mode settings page of Sysax Multi Server Web Administration Interface, follow these
instructions:
• Select Server Account Settings tab.
• Pick PASV mode settings option.
• Then update the settings.
59
Using the web administration interface
• Finally, click Save button to save the server current settings.
Figure 8.8. Setting PASV Mode
8.2.6. User Account Selections
To update the user account selection page of Sysax Multi Server Web Administration Interface, follow these
instructions:
• Select Server Account Settings tab.
• Pick User Account Selection option.
60
Using the web administration interface
• Then update the settings.
• Finally, click Save button to save the server current settings.
Figure 8.9. User Account Selections
8.2.7. Centralized Home Paths for Active Directory or Windows Accounts
To update the centralized home paths selection page of Sysax Multi Server Web Administration Interface, follow
these instructions:
• Select Server Account Settings tab.
61
Using the web administration interface
• Pick Centralized Home Paths for Active Directory or Windows Accounts option.
• Then update the settings.
• Finally, click Save button to save the server current settings.
Figure 8.10. Centralized Home Paths Selections
8.2.8. Home Path Permissions for Active Directory or Windows Accounts
To update the home path permissions selection page of Sysax Multi Server Web Administration Interface, follow
these instructions:
• Select Server Account Settings tab.
62
Using the web administration interface
• Pick Home Path Permissions for Active Directory or Windows Accounts option.
• Then update the settings.
• Finally, click Save button to save the server current settings.
Figure 8.11. Home Path Permissions Selections
8.2.9. Restrict Active Directory or Windows Accounts
To update the restrict accounts selection page of Sysax Multi Server Web Administration Interface, follow these
instructions:
• Select Server Account Settings tab.
63
Using the web administration interface
• Pick Restrict Active Directory or Windows Accounts option.
• Then update the settings.
• Finally, click Save button to save the server current settings.
Figure 8.12. Restrict Accounts Selections
8.2.10. Server Script Execution
To update the server script execution page of Sysax Multi Server Web Administration Interface, follow these
instructions:
• Select Server Account Settings tab.
64
Using the web administration interface
• Pick Server script execution option.
• Then update the settings.
• Finally, click Save button to save the server current settings.
Figure 8.13. Server script execution
65
9
Using the Web File Access
Interface
9.1. Links for Sysax Multi Server Web File Access Server Interface .................................................... 67
66
Using the Web File Access Interface
9.1. Links for Sysax Multi Server Web File Access Server
Interface
The Web File Access server interface contains seven different links.
Go to parent folder link:
This link is used to go to the last working page visited from the current working page. Clicking this option shows
the figure displayed below.
Figure 9.1. Go to Parent Folder Link
Delete selected items link:
The delete selected items link is used to delete the selected file or folder.
67
Using the Web File Access Interface
Figure 9.2. Delete Selected Items Link
Rename selected items link:
The rename selected items link is used to rename the selected file or folder.
68
Using the Web File Access Interface
Figure 9.3. Rename Selected Items Link
After clicking the rename selected items link, the following figure is displayed.
69
Using the Web File Access Interface
Figure 9.4. Renaming Selected Items
Create folder link:
The create folder link is used to create a folder into the selected path.
70
Using the Web File Access Interface
Figure 9.5. Create Folder Link
After clicking the create folder link, the following figure is displayed.
71
Using the Web File Access Interface
Figure 9.6. Creating a Folder
Upload link:
The upload link is used to upload files. To upload a file, select the path from upload the following file field.
Click the upload option (Figure 9.7).
72
Using the Web File Access Interface
Figure 9.7. Example of Upload Link
Download link:
If you want to download files, just double click the downloaded file from Web File Access Server Interface
window. The File Download dialog box appears with the message: "Do you want to open or save this file?". Click
the save button to download the file.
73
Using the Web File Access Interface
Figure 9.8. Example of Download Link
Logout
The logout button is used to logout the current working account.
74
10
How to connect using FTP
75
How to connect using FTP
Sysax Multi Server allows you to connect to the server in FTP, and to connect using the sysaxftp.exe file.
Connecting to Server
To connect to the server in FTP, go to the Sysax Multi Server control panel and click Start Server(See Figure
10.1).
Figure 10.1. Start Server
The multi-server account setup window appears(See Figure 10.2).
76
How to connect using FTP
Figure 10.2. Connect Using FTP
Click FTP and FTPS(SSL/TLS) on port, set the port to 21, and click Next.
Connecting to Server using sysaxftp.exe
To connect to the server using the sysaxftp.exe program, double-click the sysaxftp.exe icon, or run the
sysaxftp.exe as shown below in Figure 10.3.
77
How to connect using FTP
Figure 10.3. Windows Dos Command Window
Follow these steps to login the Sysaxftp session (Figure 10.4).
1. Enter the open command.
2. Enter the host name(IP address).
3. Enter user name and password.
Figure 10.4. Sysaxftp Dos Command Window
78
11
How to connect using FTPS
79
How to connect using FTPS
Sysax Multi Server allows you to connect to the server in FTPS, and to connect using the sysaxftp.exe file.
Connecting to Server
To connect to the server in FTPS(SSL/TLS) explicit, go to the Sysax Multi Server control panel and click Start
Server(See Figure 11.1).
Figure 11.1. Start Server
The multi-server account setup window appears(See Figure 11.2).
80
How to connect using FTPS
Figure 11.2. Connect Using FTPS(SSL/TLS) Explicit
To connect to the server in FTPS(SSL/TLS) implicit, the multi-server account setup window appears(See Figure
11.3).
81
How to connect using FTPS
Figure 11.3. Connect using FTPS(SSL/TLS) implicit
Click for the FTPS(SSL/TLS) explicit on port, set the port to 21 and FTPS(SSL/TLS) implicit on port, set
the port to 990, and click Next.
Connecting to Server using sysaxftp.exe
To connect to the server using the sysaxftp.exe program, double-click the sysaxftp.exe icon, or run the sysaxftp.exe
as shown below in Figure 11.4.
82
How to connect using FTPS
Figure 11.4. Windows Dos Command Window
Follow these steps to login the Sysaxftp session for both FTPS(SSL/TLS) explicit and FTPS(SSL/TLS) implicit
protocols.
1. Enter the ssl protocol option.
2. Enter the open command.
3. Enter the host name(IP address).
4. Enter user name and password.
The Sysaxftp window is displayed(See Figure 11.5).
83
How to connect using FTPS
Figure 11.5. Sysaxftp Dos Command Window
84
12
How to Connect Using Telnet
85
How to Connect Using Telnet
Sysax Multi Server enables you to connect to the server using a Telnet-only shell interface.
Connecting to Server
To connect to the server using a Telnet-only shell interface, go to the Sysax Multi Server control panel and click
Start Server(Figure 12.1)
Figure 12.1. Start Server
The multi-server account setup window is displayed(Figure 12.2).
86
How to Connect Using Telnet
Figure 12.2. Connect Using Telnet
Click Telnet on port, set the port to 23, and click Next.
Connecting to Server Using PuTTY.exe
To connect to the server using the putty.exe program, double-click the putty.exe icon, or run the putty.exe
command as shown below in Figure 12.3.
87
How to Connect Using Telnet
Figure 12.3. Windows Dos Command Window
Configuring PuTTy.exe
The PuTTY Configuration screen is displayed(Figure 12.4).
88
How to Connect Using Telnet
Figure 12.4. PuTTY Configuration
Connecting in Telnet-only Interface
Follow these steps to configure the PuTTY session.
1. Enter the host name(IP address).
2. Select Telnet protocol.
3. Enter 23 in the Port field.
4. Click Open.
The PuTTY window is displayed(See Figure 12.5)
89
How to Connect Using Telnet
Figure 12.5. PuTTY Command Line
At the log-in command line, enter the login name and password to open the protected FTP account or Windows
user account(Figure 13.6).
Figure 12.6. PuTTY system Command Line
90
13
How to Connect Using SFTP
91
How to Connect Using SFTP
Sysax Multi Server allows you to connect to the server in SFTP, and to connect using the sysaxftp.exe file.
Connecting to Server
To connect to the server in SSH2 based Secure Shell and SFTP, go to the Sysax Multi Server control panel and
click Start Server(Figure 13.1).
Figure 13.1. Start Server
The multi-server account setup window appears(Figure 13.2).
92
How to Connect Using SFTP
Figure 13.2. Connect Using SSH2 based Secure Shell and SFTP
To connect to the server in SSH2 based SFTP, the multi-server account setup window appears(Figure 13.3).
Figure 13.3. Connect using SSH2 Based SFTP
93
How to Connect Using SFTP
Click both SSH2 based Secure Shell and SFTP and SSH2 based SFTP on port, set the port to 22, and click Next.
Connecting to Server using sysaxftp.exe
To connect to the server using the sysaxftp.exe program, double-click the sysaxftp.exe icon, or run the
sysaxftp.exe as shown below in Figure 13.4.
Figure 13.4. Windows Dos Command Window
Follow these steps to login the Sysaxftp session.
1. Enter the ssh protocol option.
2. Enter the open command.
3. Enter the host name(IP address).
4. Enter user name and password.
The Sysaxftp window is displayed(Figure 13.5).
94
How to Connect Using SFTP
Figure 13.5. Sysaxftp Dos Command Window
95
14
How to Connect Using SSH2
Secure Shell
96
How to Connect Using SSH2 Secure Shell
Sysax Multi Server allows you to connect to the server in an SSH-only shell interface, and to connect using the
PuTTy.exe file (See Chapter 12).
Connecting to Server
To connect to the server in an SSH-only shell interface, go to the Sysax Multi Server control Panel and click Start
Server(See Figure 14.1).
Figure 14.1. Start Server
The multi-server account setup window appears(Figure 14.2).
97
How to Connect Using SSH2 Secure Shell
Figure 14.2. Connect Using SSH2 Based Secure Shell Only
Click SSH2 based Secure Shell only on port, set the port to 22, and click Next.
98
15
How to Connect Using HTTP
99
How to Connect Using HTTP
Sysax Multi Server allows you to connect to the server in HTTP interface, and to connect using the web browser.
Connecting to Server
To connect to the server in HTTP, go to the Sysax Multi Server control Panel and click Start Server (Figure 15.1).
Figure 15.1. Start Server
The multi-server account setup window appears(See Figure 15.2).
100
How to Connect Using HTTP
Figure 15.2. Connect Using HTTP
Click HTTP File Server on port, set the port to 80, and click Next.
Connecting to Server Using Web Browser
To connect to the server using the web browser, double-click the internet explorer icon, then enter the local host
address and select the Click to Login button. Enter the user name and password to login the web file access server.
The login page of Sysax Multi Server Web File Access Server is displayed(Figure 15.3).
101
How to Connect Using HTTP
Figure 15.3. Login the Sysax Multi Server Web File Access Server
The opened Sysax Multi Server Web File Access Server is shown in Figure 15.4.
102
How to Connect Using HTTP
Figure 15.4. Sysax Multi Server Web File Access Server
103
16
How to Connect Using HTTPS
104
How to Connect Using HTTPS
Sysax Multi Server allows you to connect to the server in HTTPS interface, and to connect using the web browser.
Connecting to Server
To connect to the server in HTTPS, go to the Sysax Multi Server control Panel and click Start Server(Figure 16.1).
Figure 16.1. Start Server
The multi-server account setup window appears(Figure 16.2).
105
How to Connect Using HTTPS
Figure 16.2. Connect Using HTTPS
Click HTTPS File Server on port, set the port to 443, and click Next.
Connecting to Server Using Web Browser
To connect to the server using the web browser, and double-click the internet explorer icon. Then enter the
local host address and select the Click to Login button. After entering the user name and password, login to the
SysaxMultiServer Web File Access Server interface.
The login page of Sysax Multi Server Web File Access Server Interface is displayed(See Figure 16.3).
Figure 16.3. Login the Sysax Multi Server Web File Access Server Interface
The opened Sysax Multi Server Web Administration Interface is shown in Figure 16.4.
Figure 16.4. Sysax Multi Server Web Administration Interface
106
17
Troubleshooting Tips
107
Troubleshooting Tips
This section discusses common errors and troubleshooting.
Server Cannot be Started
The selected FTP port is already being used by another program. Select another port or quit the other application.
108
18
How to Get Technical Support
18.1. Get technical support ......................................................................................................... 110
109
How to Get Technical Support
18.1. Get technical support
Technical support for Sysax Multi Server is provided by an online support system. Please visit http://
www.sysax.com/support to submit a support ticket or to check the status of an existing support ticket.
110
19
Frequently Asked Questions
(FAQ) About Sysax Multi Server
111
Frequently Asked Questions (FAQ) About Sysax Multi Server
Installation and Licensing
Does Sysax Multi Server run on Windows Vista? How about Windows 95?
Yes, Sysax Multi Server runs on all Windows operating systems from Windows 95 to Windows Vista and
Windows Server 2008.
How I upgrade to a newer version of Sysax Multi Server?
You need to first uninstall the older version of the product and then install the latest version that is available on
the Sysax.com website. Your server settings should not be affected by the uninstallation and reinstallation.
How do I install or update a license key?
Open the Sysax Multi Server Control panel and click the "install license" button. Select your license key file and
click the "Open" button. The new license should now be installed.
How I uninstall Sysax Multi Server?
From the Windows "Start" menu, select the "Sysax Multi Server" program group and click on "Uninstall Sysax
Multi Server". The uninstallation wizard will be started to complete the uninstallation of the product.
I installed the free personal edition license before my 30 day trial was up. How do I go back to the trial
edition?
You can return to the trial edition within 30 days of installation by uninstalling and reinstalling the program.
What is the difference between the personal and commercial edition licenses?
The free personal edition is available for use by individuals for non commercial use. It is restricted in the number
of protocols that can be simultaneously supported and the number of users that can be simultaneously logged into
the server. Click here to compare all three editions side by side.
Features and Benefits
Can I run multiple protocols like FTP and SSH simultaneously?
Yes, the enterprise edition of the product can be configured to run several protocols like FTP, FTPS, SFTP,
Secure Shell, Telnet, HTTP, and HTTPS simultaneously. This enables clients to connect to a user account through
different mechanisms for ease of access.
112
Frequently Asked Questions (FAQ) About Sysax Multi Server
Does Sysax Multi Server support secure file transfers?
Yes, the FTPS and HTTPS protocols are encrypted using SSL while the SFTP and Secure Shell protocols are
encrypted with SSH based encryption.
What is HTTP and HTTPS based file transfer? Can I securely upload files using my web browser?
If the server is configured for HTTP access, clients can login to the server using any web browser and upload and
download files. HTTPS provides additional security by using SSL to encrypt communication between the server
and the client's web browser.
What are server event triggers and what is a server script?
An FTP script can be executed based on a connected client activity. The script can be executed when a client login
is successful, client login is unsuccessful, file has been downloaded, file has been uploaded, file has been renamed,
or a file has been deleted. The trigger type, user account name, client IP address, and transferred file names are
automatically passed to the script. The FTP script is identical to that used by Sysax FTP Automation and supports
file transfer, local file processing, email notification, external program execution, and many other actions.
Can users be authenticated using windows user accounts?
Sysax Multi Server can be configured to authenticate using windows accounts or through a custom database. It is
also possible to authenticate using both mechanisms or authenticate using windows but use custom user settings.
Can I administer the program remotely using my web browser?
Yes, Sysax Multi Server can be securely administered remotely using any web browser. Using a HTTPS
connection ensures that the communication is securely encrypted using SSL.
Can I make Sysax Multi Server start automatically on windows boot up?
Yes, the server can be configured to automatically start on server boot up.
Troubleshooting and Support
Why I am not able to start the server?
The most common issue is that another program is already using one or more of the ports that you selected for the
server. If this is the case, the server log will contain an entry regarding this error.
How do I get technical support? How do I report a bug or request a new feature?
Please click here to use our customer support system to submit a request for technical support, report a bug or
request a feature.
113