1
888 534-5994
Attendance Rx
Version 2.1
USER MANUAL
Table of Contents
Glossary
Getting Started
4
10
Preparing and Setting Up Before Use ........................................................... 10
Attendance Rx Setup Wizard ........................................................................ 11
Administrator
13
Employees ................................................................................................... 133
Adding an Employee ............................................................................... 13
Editing an Employee ............................................................................... 14
Deleting an Employee............................................................................. 15
Employee Options................................................................................... 15
Messaging ................................................................................................... 177
Setup ........................................................................................................... 188
Pay Period............................................................................................... 20
Pay Interval Round.................................................................................. 20
Overtime Thresholds............................................................................... 21
th
7 Day Overtime ..................................................................................... 22
Max Time on Clock ................................................................................. 23
Time Card Approvals .............................................................................. 23
Day Change Offset.................................................................................. 23
Salaried Employee Settings.................................................................... 24
Shifts.............................................................................................................. 25
Shift Rules............................................................................................... 26
Lunch Rules ............................................................................................ 26
Punch Editing ................................................................................................ 27
Inserting an Employee Punch ................................................................. 28
Deleting an Employee Punch.................................................................. 29
Viewing Punch Calculation Details ......................................................... 29
Editing the Total Time Accumulations..................................................... 30
Printing a Time Card ............................................................................... 31
Submitting Employee Time Slip .............................................................. 31
Reports .......................................................................................................... 32
Future Transactions Report .................................................................... 33
Payroll Exports .............................................................................................. 34
Exporting Data ........................................................................................ 35
Unapproved Timecards........................................................................... 35
Wells Fargo ExpressPay, Premier, QwikPay and Intuit PC Access ....... 36
PayChex Paylink Export ......................................................................... 37
PayChex Preview Export ........................................................................ 38
PrimePay PrimeLink Export .................................................................... 39
QuickBooks Payroll Integration............................................................... 39
Peachtree Complete Accounting Export................................................. 39
Supervisors.................................................................................................... 42
Adding a Supervisor................................................................................ 43
Deleting a Supervisor.............................................................................. 43
Resetting a Supervisor's Password ........................................................ 43
Supervisor Preferences .......................................................................... 44
2
Employee Clients
45
Add Employee Transaction ........................................................................... 45
Auto Clock In/Out .......................................................................................... 45
Submit Employee Time Slip .......................................................................... 46
Employee In/Out Board ................................................................................. 48
Client Connection Settings ............................................................................ 48
Attendance Rx® Administrator
49
Holiday Setup ................................................................................................ 49
About Future Transactions ............................................................................ 50
Setting up QuickBooks® to communicate with Attendance Rx ..................... 51
Setting up Attendance Rx to communicate with QuickBooks® ..................... 52
Exporting Attendance Rx employee timecard data to QuickBooks® ............ 52
Generic ASCII file Export............................................................................... 53
ADP Export .................................................................................................... 54
Importing Attendance Rx data into Peachtree Complete Accounting ........... 55
Setting up Peachtree Complete Accounting Version 7.0 .............................. 55
System Utilities
56
Data Tools ..................................................................................................... 56
Biometrics ...................................................................................................... 57
Employee FIU Verification ............................................................................. 59
Employee FIU Enroll...................................................................................... 59
Employee HandPunch Enroll......................................................................... 60
3
Glossary
The Attendance Rx system is a Windows-based PC application designed to offer simple yet
effective employee time and attendance management.
Enter Current Pay Period Start Date
The first item required is the start date of your company's current Pay Period.
Pay Period Type
The Attendance Rx supports WEEKLY, BI-WEEKLY, SEMI-MONTHLY, and MONTHLY Pay
Periods.
Next Pay Period Start Date
(Required For Semi-Monthly Pay Periods only)
When using Semi-Monthly Pay Periods, each month contains two Pay Periods. After selecting a
current pay period start date and semi-monthly pay period type, the user must also specify the start
date of the NEXT pay period in order to establish the two days of each month that mark the
beginning of each Semi-monthly pay period.
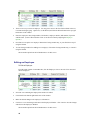
Overtime Thresholds
Overtime thresholds specify how employee hours will be divided among Regular, Overtime1 and
Overtime2 during the course of each day and of each week.
For more information on overtime calculations in general, see Overtime Thresholds.
Pay Interval Rounding
The Attendance Rx Pay Period Setup Wizard allows the user to specify how time intervals will be
rounded.
Attendance Rx supports rounding to the nearest one(1), five(5), six(6), ten(10) or fifteen(15)
minute interval.
(For More information, Please see Pay Interval Rounding)
Max Time On Clock
Max Time on Clock specifies how long an employee can be punched in before assuming that the
employee forgot to punch out.
(For more information, please see Max Time on Clock)
4
Day Change Offset
By setting a Day Change Offset, the user can adjust the time of day that one day changes to the
next to a time other than midnight.
(For more information, please see Day Change Offset)
Employee Name
The employee name is associated with a particular badge number. The employee name will show
up in reports. Reports can be sorted alphabetically. Enter last names first if reports need to be
sorted by last name.
Employee Badge Number
This number must be unique among employees and between 1 and 9999. This must be the same
number as the employees badge used at the Prox terminal.
Employee PIN
This number must be unique among employees and between 1 and 9999. This number is used to
clock in and out at the PC.
Employee Number
This is the number to be associated with an employee. This is typically a Social Security or
payroll number.
Employee Shift Assignment
The shift number defines which set of shift and lunch rules are to be associated with a particular
employee.
Export ID
The Employee Alternate Export ID is a 48-character alphanumeric field that is
used to identify employees when exporting to QuickBooks and Peachtree.
This Export ID must be unique among all of the employees.
QuickBooks and Peachtree will not export any employees whose Export ID is blank.
For QuickBooks, the Export ID must match exactly the QuickBooks Employee Full Name field.
For Peachtree, the Export ID must match exactly the Peachtree Employee.
5
Daily Overtime Threshold
The Daily Overtime Thresholds specify the amount of time worked in a day, after which, overtime
will begin to accumulate. Any time worked after the overtime-level 2 threshold will be
accumulated in overtime 2. Any time worked after the overtime level 1 threshold but not over the
level 2 threshold will be accumulated in overtime 1. NOTE: Leave the threshold at 24 hours if
you pay overtime based on a 40-hour week only.
The default value for Daily overtime threshold is 24 Hours.
Weekly Overtime Threshold
The Weekly Overtime Thresholds specify the amount of time worked in a week, after which,
overtime will begin to accumulate. If an employee's Regular hours for the week reach the Weekly
Overtime Level 1 Threshold, all subsequent hours worked for the week will begin to accrue to
Overtime Level 1. Once an employee's combined Regular hours have exceeded Weekly Overtime
1 Threshold, AND the employee's combined Regular and Overtime 1 hours for the week have
reached the Weekly Overtime Level 2 Threshold, all subsequent hours worked for the week will
accrue to Overtime Level 2. To disable either Weekly Overtime 1 or Weekly Overtime 2, set the
Overtime Level 1 or Overtime Level 2 threshold to zero (0), or set either Overtime Threshold to a
large value that can never be reached.
The default value for Weekly Overtime Threshold Level 1 is 40 hours. The default value for
Weekly Overtime Threshold Level 2 is 168 hours (disabled, logically unreachable).
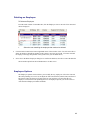
California Overtime
California Overtime Rule settings as of the release of this product are as follows:
Daily
•
Overtime Level 1 Threshold: 8hrs
•
Overtime Level 2 Threshold: 12hrs
Weekly
•
Overtime Level 1 Threshold: 40hrs
•
Overtime Level 2 Threshold: 168hrs (disabled)
7th Day Overtime: ENABLED
Shift Start Time
The time of day employees in this shift are scheduled to begin work.
6
Shift Stop Time
The time of day employees on the shift are scheduled to stop working.
Shift Round
The number of minutes before the Shift Start Time or after the Shift Stop Time in which employee
punches will be treated as if they had occurred exactly on the Shift Start and Stop Times.
Shift Grace
The number of minutes after the Shift Start Time or before the Shift Stop Time in which employee
punches will be treated as if they had occurred exactly on the Shift Start and Stop Times.
Shift Dock
The maximum number of minutes an employee will lose from time worked totals for punching IN
late or punching OUT early.
Lunch Start
The earliest time of day at which an employee can punch out for lunch. The system may adjust an
employee's out to lunch punch to make sure that a full Lunch Duration is taken.
Lunch End
This is the latest time of day at which an employee should punch back in from lunch. The system
may adjust an employee's IN from lunch punch to make sure that a full Lunch Duration is taken.
Lunch Duration
The number of minutes for lunch that will be subtracted from time worked totals. Lunch Duration
is ignored if the employee's lunch rules are disabled.
Auto Lunch After
Auto Lunch After is the minimum amount of time that must elapse from the employee's last IN
punch before the Lunch Duration is subtracted from the employee's work time.
Edit Time Totals
7
The Edit Time Totals feature allows an employee's total time accumulations to be adjusted without
altering the punch information. Adjustments can be made, for both current and the previous pay
periods, to regular, overtime 1, and overtime 2-hour accumulations.
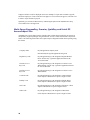
Hours Summary Report
The Hours Summary Report lists hours worked by regular and overtime hours. This report can be
generated be for an individual employee, a specific shift, or all employees -- for the current or
previous pay period. If the employee has missed a punch, the Hours Summary Total will be noted
with an asterisk (*).
Time Card Report
The Time Card Report lists an employee's transactions and accumulations of time worked. This
may be for the current pay period, previous pay period, or any archived pay period. The report
may be for one employee, employees on a specific shift, or for all employees.
Who's In and Who's Out Report
The Who's In and Who's Out Report lists all employees or a specific shift of names by who is
punched IN or punched OUT.
Employee Profile Report
The Employee Profile Report lists all of the employees who have been entered into the Attendance
Rx system with their employee number, badge number and shift number.
Rules Setup Report
The Rules Setup Report lists all of the Setup Rules plus Admin Users and when the last
Administrator made a change to any of the Attendance Rx rules.
Shifts Report
The Shifts Report displays the Shift rules and Lunch rules for each shift, including holiday
settings.
Holiday Report
The Holiday Report lists all holidays that have been entered into the Attendance Rx system.
Raw Transactions Report
8
This report allows you to see how and when transactions were entered into the system by listing
each transaction performed by pay period.
Time Card Approval Report
The Time Card Approval Report shows you a two-column list of employee names showing who
has had their time card approved and who has not.
Approaching OT
Daily Totals by Day
This report shows the time totals for all employees broken out daily for the selected pay period.
Daily Totals by Employee
The Daily Totals by Employee report shows the hours worked for each day of the selected pay
period printed one employee per page.
9
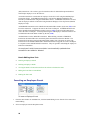
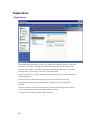
Getting Started
Getting Started
Attendance Rx was designed to allow for easy installation and setup, as well as no-hassle
administration. Follow these three steps to help you in preparing to use Attendance Rx.
•
Preparing and Setting Up Before
•
AttendanceRx® Setup Wizard
•
Contacting Acroprint Customer Support
Preparing and Setting Up before Use
Before you use your Attendance Rx system for the first time, you should run through a setup
procedure. The application comes with default settings so that if you choose, you can simply click
through the initial Pay period setup, add employees and start clocking IN and OUT. However,
you might want to include or configure many of the other features to meet your particular needs.
Here is a suggested setup sequence you may wish to follow.
Notes:
Most settings can be changed at any time and will affect only the total time accumulations in the
Previous and Current Pay Period.
Changes to the next pay period start date will lengthen or shorten the duration of the current pay
period, but not affect the Previous pay period.
Steps:
1.
Print a Rules Setup Report
2.
Adjust the following items located in the Setup section as desired:
•
Pay Period Length
•
Next Pay Period Start Date
•
Max Time on the Clock
•
Overtime Thresholds
•
7th Day Overtime
•
Pay Interval Round
10
3.
•
Date Format
•
Time Totals Format
•
Time of Day Format
•
Day Change Offset
For each shift used, adjust the following items located in the Shifts and Lunches section as
desired:
o
Set up shift rules
o
Set up lunch rules
4.
Add Employees to the Attendance Rx System.
5.
Generate a Rules Setup and Employee Profile Report
After checking these reports for accuracy and making any desired changes, you may begin
entering transactions for all of your employees.
Attendance Rx Setup Wizard
The first time Attendance Rx is executed, the user will be presented with the Attendance Rx Pay
Period Setup Wizard. The Attendance Rx Pay Period Setup Wizard establishes the initial Pay
Period settings for your Attendance Rx system. The user must enter all of the following
information before Attendance Rx will be allowed to operate.
•
Current Pay Period Start Date
11
•
Pay Period Type
•
Next Pay Period Start Date (Only required for Semi-Monthly Pay Periods)
•
Overtime Thresholds
•
Pay Interval Rounding
•
Max Time on Clock
•
Day Change Offset
•
Shifts and Lunches
At any time during the Pay Period Setup Wizard, the user may use the BACK button to review or
change previous settings. When all information is entered, the user must click on the FINISH
button to complete the process and to start the Attendance Rx services. Each of these settings can
be changed at any time during normal operation using the Setup form of the Attendance Rx
Administrator. If the wizard is cancelled, the Attendance Rx will automatically run it again the
next time it is started.
12
Administrator
Employees
Employees
The Employees section allows you to view all of your employees and their information. You can
add a new employee, delete or modify an existing employee.
Employee How-To’s:
Adding a New Employee
Editing an Employee
Deleting an Employee
Biometrics - Enrolling an Employee Fingerprint
Please note that biometrics must be installed and enabled to use this functionality.
Adding a new Employee
From the main window of Attendance Rx, click the Employees icon or enter the View menu and
select Employees.
13
•
There are two ways to enter an employee. You may place cursor in the first field available in the row,
Last name and begin typing. Option two, use the Wizard, and click the Wizard button in the top righthand corner of the window.
•
Enter the employee's name, badge number, Pin Number, employee number, shift number, Export ID
and Hire Date. (Some of these numbers can be set to auto-increment by adjusting the Employee
Options.)
•
Press Enter to accept the new employee information if using manual entry, or press Finish to accept if
using the Wizard.
•
To erase changes made before adding a new employee, click Delete if using manual entry, or Cancel is
using the Wizard.
Select another option from the left hand menu to exit this screen.
Editing an Employee
To Edit an Employee:
From the main window of Attendance Rx, click the Employees icon or enter the View menu and
choose Employees.
•
Select the row containing the employee that needs to be edited.
•
Click Detail in the bottom right hand corner of the window.
•
Make the desired changes to the employee’s information
•
Click Save to save the changes and return to the Employees Window. Click Cancel to lose the changes
and return to the Employees Window.
Select another option from the left hand menu to exit this screen.
14
Deleting an Employee
To Delete an Employee:
From the main window of Attendance Rx, click the Employees icon or enter the View menu and
choose Employees.
•
Select the row containing the employee that needs to be deleted.
•
Click the Delete button in the bottom right hand corner of the window. (Note: You will not be able to
delete an employee that still has punches in the current or previous pay periods. You must wait until
the employee no longer has punches in the system before you can delete them.)
•
Select Yes in the Delete Employee dialog box to confirm the deletion, select No to cancel the deletion.
Select another option from the left hand menu to exit this screen.
Employee Options
The Employee Options selection allows you to modify the way employees will see the time and
date when punching in or out. You can adjust the Time Totals Format, Date Format, and Time of
Day Format. These preferences will only apply for your login; they will not affect the way
employees see their time when punching in or out. In Employee Options you can also select to
Auto Increment Employee Numbers and PINs.
15
To Change Employee Options:
•
Select File from the main window then Employee Options.
•
Set your preference for Time Totals Format.
•
Select your preference for Date Format from the drop down list.
•
Set your preference for Time of Day Format.
•
To save your preferences, click Ok. To exit without saving your changes, click Cancel.
Employee Biometrics
Attendance Rx supports various biometric devices which you can easily integrate into your
Attendance Rx solution. Biometrics refers to and employee’s fingerprint or a template of their
hand which is used to verify their identity before allowing that individual to clock IN or OUT.
Attendance Rx currently provides two solutions for Biometrics:
•
STMicro® Fingerprint Identification Unit
•
Recognition Systems® HandPunch 1000
Please Note:
16
You must have the correct drivers installed as well as biometrics functionality enabled to use these
features.
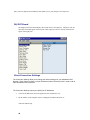
Messaging
Messages
Messages alloy you to display a company wide or employee specific message to employees when
they clock in or out.
From the main window of Attendance Rx, click the Messages icon or enter the View menu and
choose Messages.
To edit the company message:
•
Enter your company-wide message in the Enter a Company Message field. This message will appear
on-screen after every employee punches in or out.
•
Click Save to save the message or click the X to delete the Company Message.
To edit employee messages:
17
Enter employee specific messages in the Message field next to the employee’s name. This
message will appear only on this employee’s screen after he or she punches in or out.
Select another option from the left hand navigation menu to exit this screen.
Setup
Setup
18
The Setup selection on the Attendance Rx system allows the user to adjust variables related to the
clock, time calculations, pay periods, and holidays. Most items can be changed at any time and
the change will be reflected in the total time accumulations.
To Change the Setup Options:
From the main window of Attendance Rx, click on the Setup icon or select Setup from the View
menu.
Adjust the following items as desired on the General Tab:
•
Pay Period
•
Overtime Thresholds
•
7th Day Overtime (California Overtime)
•
Pay Interval Round
•
Max Time On Clock
•
Day Change Offset
•
Time Card Approvals
•
Salaried Employee Settings
Adjust the following items as desired on the Holiday Tab
•
Holiday Dates
•
Employee Qualification for Holidays
19
Select Save to save your changes. To quit without saving changes, select another option from the
left hand navigation and select No in the Save Changes dialog box. To restore your original
settings, click Refresh in the top right hand corner and select No in the Save Changes dialog box.
Pay Period
The Pay Period Length specifies how often employees will get paid.
To Change the Pay Period Length:
From the main window of Attendance Rx, click the Setup icon or enter the View menu and choose
Setup.
Change the Pay Period Length to the desired setting.
The available choices are:
•
Weekly
•
Bi-weekly
- Employees are paid every two weeks
•
Semi-Monthly
- Employees are paid twice per month
•
Monthly
- Employees are paid once per week
- Employees are paid once per month
Select Save to save your changes. To quit without saving changes, select another option from the
left hand navigation and select No in the Save Changes dialog box. To restore your original
settings, click Refresh in the top right hand corner and select No in the Save Changes dialog box.
Setting the Next Pay Period Start Date
The Next Pay Period Start Date is the date on which the next pay period will start. Set the Pay
Period Length prior to setting the Next Pay Period Start Date. The next pay period start date must
be greater than the current time and date and less than the current time and date plus the length of
the pay period.
Changing the Next Pay Period Start Date Setting:
•
From the main window of Attendance Rx, click the Setup icon or enter the View menu and choose
Setup
•
Change the Next Pay Period Start Date value to the desired future date.
•
Select Save to save your changes. To quit without saving changes, select another option from the
left hand navigation and select No in the Save Changes dialog box. To restore your original
settings, click Refresh in the top right hand corner and select No in the Save Changes dialog box.
Pay Interval Round
The Pay Interval Round allows the time worked totals to be rounded and calculated to the nearest
one, five, ten, or fifteen-minute interval.
Example 1:
20
Pay Interval Round time set to 10 minutes.
•
•
Punch at 10:14 will round to 10:10.
Punch at 10:15 will round to 10:20.
Example 2:
•
Pay Interval Round time set to 15 minutes.
•
Punch at 10:07 will round to 10:00.
•
Punch at 10:08 will round to 10:15.
*The default value for Pay Interval Round is one minute.
Editing the Pay Interval Round Setting:
1.
From the main window of Attendance Rx, click the Setup icon or enter the View menu and choose
Setup.
2.
Choose the desired Pay Interval Round value from its drop-down list. Choices include 1, 5, 6, 10
or 15 minute(s).
3.
Select Save to save your changes. To quit without saving changes, select another option from the
left hand navigation and select No in the Save Changes dialog box. To restore your original
settings, click Refresh in the top right hand corner and select No in the Save Changes dialog box.
Overtime Thresholds
Overtime Thresholds specify the amount of time an employee must work before overtime will
begin to accumulate. The threshold amounts may be set on both a daily basis and weekly basis.
Both the daily and weekly overtime thresholds may be set at two different levels to reflect
company policy.
If your employees are paid overtime only for working more than 40 hours in one week then set
Daily level 1 and 2 to 24 hours.
Set Weekly Level 1 to 40 hours and Weekly Level 2 to 168 hours.
Example:
The employer decides to pay employees at 1.5 times their pay rate (time and
a half) if a given employee works over 40 hours in a week and 2 times the
normal pay rate (double time) if the employee works over 48 hours in a
week. To implement these rules, set the first level weekly overtime threshold
to 40 hours and the second level to 48 hours. If an employee then works 60
hours in a particular week, the totals generated will be:
•
Regular:
40:00
21
•
Overtime 1:
08:00
•
Overtime 2:
12:00
Editing the Daily Overtime Threshold Values:
1.
From the main window of Attendance Rx, click the Setup icon, or enter the View menu and
choose Setup.
2.
Move your cursor to the Daily Overtime value. Change this value to the desired setting for each
of the two available levels.
3.
Select Save to save your changes. To quit without saving changes, select another option from the
left hand navigation and select No in the Save Changes dialog box. To restore your original
settings, click Refresh in the top right hand corner and select No in the Save Changes dialog box.
Editing the Weekly Overtime Threshold Values:
1.
From the main window of Attendance Rx, click the Setup icon, or enter the View menu and choose
Setup.
2.
Move your cursor to the Weekly Overtime value. Change this value to the
desired setting for each of the two available levels.
3.
Select Save to save your changes. To quit without saving changes, select another option from the left
hand navigation and select No in the Save Changes dialog box. To restore your original settings, click
Refresh in the top right hand corner and select No in the Save Changes dialog box.
Disable Overtime
You can disable overtime by setting the values to zero hours.
7th Day Overtime
When enabled, 7th Day Overtime will promote all hours worked on the seventh consecutive
worked day to the next higher pay level (Overtime 1 or Overtime 2), provided that the 7
consecutive days start at the beginning of the a given week of the pay period. This rule affects
only the Daily Overtime calculations and will not overwrite any Weekly Overtime rule settings.
Note: This feature was added to accommodate a law commonly referred to as California
Overtime.
To enable 7th Day Overtime:
•
From the main window of Attendance Rx, click the Setup icon, or enter the View menu and
choose Setup.
•
Click on the 7th Day Overtime checkbox.
•
Select Save to save your changes. To quit without saving changes, select another option from the
left hand navigation and select No in the Save Changes dialog box. To restore your original
settings, click Refresh in the top right hand corner and select No in the Save Changes dialog box.
22
Max Time on Clock
The Max Time on the Clock feature allows the clock to gain some control over missed punches.
The system assumes that an employee has missed an out punch after the maximum time on the
clock has been exceeded. The system will change the employee's status to out with zero
accumulated time for that punch. It will note the missed punch on the time card and hours
summary report.
The default value for Max Time On Clock is twelve hours (12:00).
Note: To Disable Max Time On Clock consideration during calculations, set Max Time on Clock
to zero hours (00:00).
Editing the Max Time on Clock setting:
1.
From the main window of Attendance Rx, click the Setup icon or enter the View menu and choose
Setup.
2.
3.
Change the Max Time On Clock value to the desired setting.
Select Save to save your changes. To quit without saving changes, select another option from the
left hand navigation and select No in the Save Changes dialog box. To restore your original
settings, click Refresh in the top right hand corner and select No in the Save Changes dialog box.
Time Card Approvals
The Attendance Rx system allows you to prevent exporting time cards to payroll software that has
not yet been approved.
Setting your Time Card Approval Preferences:
•
From the main window of Attendance Rx, click the Setup icon or enter the View menu and choose
Setup
•
If you want to prevent exporting unapproved time cards for hourly employees, check the box
labeled "Do not export unapproved Time Cards for Hourly Employees."
•
If you want to prevent exporting unapproved time cards for salaried employees, check the box
labeled "Do not export unapproved Time Cards for Salaried Employees."
•
Select Save to save your changes. To quit without saving changes, select another option from the
left hand navigation and select No in the Save Changes dialog box. To restore your original
settings, click Refresh in the top right hand corner and select No in the Save Changes dialog box.
Day Change Offset
A normal day, by default begins at exactly 12:00AM (midnight). Some companies, however, may
have employees that work overnight shifts...their actual workday starting late in the day or evening
and ending sometime on the next day. Day change offset can be used to 'move' the employee's
workday change time backward or forward from midnight.
If you do not have employees that work thru midnight, leave this setting at the default.
23
If your third shift employees begin working on Day 1 and end working on Day 2 and all hours are
accredited to Day 1, leave this setting at the default.
If your third shift employees begin working on Day 1 and end working on Day 2 and all hours are
accredited to Day 2, set the Day Change Offset to your shift start time minus your shift start
round. Example: If your Shift starts at 11:00 and you have a 30-minute round, you would set your
Day Change Offset to 10:30pm.
Editing Day Change Offset:
1.
From the main window of Attendance Rx, click the Setup icon or enter the View menu and choose
Setup.
2.
Move your cursor to the Day Change Offset. Change this value to the desired setting.
3.
Select Save to save your changes. To quit without saving changes, select another option from the
left hand navigation and select No in the Save Changes dialog box. To restore your original
settings, click Refresh in the top right hand corner and select No in the Save Changes dialog box.
Salaried Employee Settings
The Salaried Employee Settings section allows you to set the parameters for which your salaried
employees will be paid.
To Change Salaried Employee Settings:
•
From the main window of Attendance Rx, click the Setup icon or enter the View menu and choose
Setup.
•
If your salaried employees receive paid holidays, place a check in the "Pay Holidays" checkbox.
Also place the number of hours each salaried employee should be compensated for each holiday.
•
Enter the number of hours that your salaried employees are paid each pay period. This value will
be exported every week to payroll.
•
Select Save to save your changes. To quit without saving changes, select another option from the
left hand navigation and select No in the Save Changes dialog box. To restore your original
settings, click Refresh in the top right hand corner and select No in the Save Changes dialog box.
24
Shifts
Shifts
A shift can be defined as a set of rules enforcing Company policy pertaining to Employee’s hours
worked and lunch breaks. When an employee is assigned to a shift, the software then refers to set
of rules defined for that shift and applies them to the employee's transactions in order to derive the
total time accumulations.
There are twelve shifts and lunches available in the Attendance Rx software package. Each shift
may be defined differently with its own set of rules. These can be broken down into two groups,
as described below.
Editing Shift and Lunch Rules:
•
From the main window of Attendance Rx, click the Shifts icon or from the View menu select
Shifts.
•
Select one of the 12 shifts to edit from the pull-down menu.
•
You may change the name of the Shift by selecting the existing shift and and modifying the text.
•
If the selected shift rule is to be enabled, select Shift Rules Enabled so that a check mark appears
in the box. Edit the Shift Start, Stop, Round, Grace, and Dock times to fit your company policies.
Note: You can select 12-hour or 24-hour clock (see Setup). Pay close attention to AM and PM
(12:00 AM is midnight).
25
•
If lunch rules are to be used, select Lunch Rules Enabled so that a check mark appears in the box.
Edit the Lunch Start and End, Duration, and Auto Lunch After times to fit your company policies.
Note: You can select 12-hour or 24-hour clock (see Setup). Pay close attention to AM and PM.
(12:00 AM is midnight).
•
Click the Save button to save your changes or Cancel to abort the changes made and restore the
original settings.
Note - In the upper right-hand corner of the screen located below the help button, is
another button, which invokes the setup wizard. This wizard will walk you through
prompting you for information to complete your shift rules.
Shift Rules
Shift Name:
The name as you would like it to appear on reports and screen
displays.
Shift Start
Time:
The time of day employees are schedule to start work
Shift Stop
Time:
The time of day employees are schedule to stop work
Shift Round:
The number of minutes before the Shift Start Time or after the Shift
Stop Time in which employees transactions will be treated as if they
occurred exactly at the Start or Stop times
Shift Grace:
The number of minutes after the Start time that an employee’s
"late" punch is still considered on time. The number of minutes
before the Stop time that an employee’s "early" punch out is
considered on time.
Shift Dock:
The number of minutes an employee will lose from their daily total
for punching in late or punching out early.
Lunch Rules
26
Lunch Start:
The earliest time of day at which an employee can punch out for
lunch. The system may adjust an employee’s OUT to lunch punch
to ensure the full Lunch Duration is taken within the window
allowed for lunch. You may view this in the Punch Editor screen
by selecting Details.)
Lunch End:
Employee lunch period should be completed on or before this time.
The system may adjust an employee’s IN from lunch punch to
ensure the full Lunch Duration is taken within the window allowed
for lunch. You may view this in the Punch Editor screen by
selecting Details.)
Lunch
Duration:
The number of minutes subtracted from time worked totals for
lunch period. Lunch Duration is ignored if the employee's lunch
rules are disabled.
Auto Lunch
After:
An employee must work consecutive number of hours entered in
this field before the lunch duration will be subtracted from the daily
total.
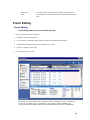
Punch Editing
Punch Editing
Punch editing allows supervisors to do the following:
•
Review and edit employee transactions
•
Adjust the total time accumulations
•
View the details of transaction totals and how the software calculated the transactions
•
Add miscellaneous transactions (Vacation, Holiday, Sick, Other)
•
Approve an employee’s time card
•
Print an employee's time card
Transactions are easily inserted when an employee forgets to punch IN or OUT. Attendance Rx
can store several different types of transactions, some examples include: NORMAL (PC)
transactions, REGULAR (REG) transactions, INSERTED (INS) transactions, and TIMESLIP
27
(SLP) transactions. The various types of transactions allow for Salaried Exempt and Salaried
Non-Exempt employees to use the software.
A normal transaction is created when an employee clocks IN or OUT using the Add Employee
Transaction feature. An INSERTED transaction is a PUNCH or MISCELLANEOUS entry
inserted by an Administrator using the Punch Editor feature. A TIMESLIP transaction is created
when an employee submits a transaction using the Submit Employee Time slip feature (Salaried
Employees Only).
An INSERTED transaction can be identified in the Punch Editor window by the text (INS) to the
left of the transaction. It appears the same on the Time Card Report. A TIMESLIP transaction
can be identified in the Punch Editor window by the text (SLP) to the left of the transaction as
well as the Time Card Report. A normal punch using the Add Employee Transaction feature can
be identified in the Punch Editor window by the text (CLK).
An administrator can also DELETE transactions. When deleting a normal or TIMESLIP
transaction, the Punch Editor does not actually delete the transaction from the database. The
transaction will no longer appear in the Punch Editor window, but will appear on reports. The
transaction will be marked as DELETED. DELETED transactions appear on a Time Card Report
in a separate section entitled Deleted Transactions. They are ignored in calculating the employee's
total time accumulation.
An employee's total time accumulation is automatically updated when
transactions are added or deleted.
Punch Editing How-To’s:
•
Inserting an Employee Punch
•
Deleting an Employee Punch
•
Viewing the details of transactions and how the software calculates the totals
•
Editing the Total Time Accumulations
•
Printing the Time Card
Inserting an Employee Punch
To Insert an Employee Punch:
1.
From the main window of Attendance Rx, click the Punch Editing icon or from the View menu select
Punch Editing.
2.
Select an employee from the drop-down menu.
28
3.
Select the Previous Pay Period, Current Pay Period or the Future Pay Period. Be certain to confirm
transaction being inserted occurs within the date range of the pay period. You will not be allowed to
insert a punch that belongs in the current pay period into the previous pay period or vice versa.
4.
Enter the correct Date. You may use the calendar for adjusting the Date. To display the calendar, click
on the drop down menu (arrow). Other options include highlighting the correct place in the date field
or place your cursor in the date field and using your keyboard type the correct information.
5.
Enter the correct Time. You may select the appropriate arrows Up or Down to
adjust Time of desired transaction or miscellaneous entry or simply highlight the portion
of the time displayed and type using your keyboard the correct information.
6.
Select the type of transaction to insert from the drop-down menu (select either Punch, Holiday,
Vacation, Sick, Reg, FMLA or Other).
7.
Select Insert or press, at the same time, <ALT> and I.
The punch will immediately appear in the window (it will look like the image shown above).
Deleting an Employee Punch
To Delete an Employee Punch:
•
From the main window of Attendance Rx, click the Punch Editing icon or from the View menu
select Punch Editing.
•
Select an employee from the drop-down list box.
•
Select desired Pay Period.
•
Select the transaction to be deleted by pointing and left clicking one time with your mouse.
•
Select Delete or press, at the same time, <ALT> and D.
Deleted Punches
A DELETED punch does NOT appear in the Punch Editing window and is ignored in
calculating the employee's total time accumulation.
Viewing Deleted Punches:
To view a DELETED punch, select the View Deleted button and a window will display a list of
the DELETED punches.
Viewing the details of transactions and how the software
calculates totals.
29
To view details:
•
From the main window of Attendance Rx, click the Punch Editing icon or from the View menu
select Punch Editing.
•
Select an employee from the drop-down list box.
•
Select the desired pay period.
•
Select a transaction. Click on the Details button or press, at the same time, <ALT> and T. The
Punch Details dialog screen appears. It lists the rules applied to both the IN and OUT punch as
well as adjustments made to the total time.
•
Select OK to exit the Punch Details dialog screen.
Editing the Total Time Accumulations
To Edit Total Time Accumulations:
•
From the main window of Attendance Rx, click the Punch Editing icon or from the View menu
select Punch Editing.
•
Select an employee from the drop-down list box.
•
Select Edit Totals or press, at the same time, <ALT> and E. The Edit Time Totals dialog screen
appears.
•
Time can be added to or subtracted from an employee's total time for either the current or previous
pay period. Hours may be allocated as Regular, Overtime 1 or Overtime 2 categories. A value of
0:00 means that no time will be added to or subtracted from the employee's total time
accumulations.
•
Select Save to accept changes or Cancel to exit Edit Totals windows. Edited changes are reflected
on the screen under the +/- Edits and Totals columns.
30
NOTE:
Note that the edited hours are added to or deleted from the overall pay period totals.
They are not allocated to a particular day.
Printing a Time Card
To print a Time Card:
•
From the main window of Attendance Rx, click the Punch Editing icon or from the
View menu select Punch Editing.
•
Select an employee from the drop-down list box.
•
Select Print to print a detailed time card.
•
Select Close to return to the main window of Attendance Rx.
Submitting Employee TimeSlip
This feature is for use by Employees entered as Salaried Employees in the Attendance Rx
Employee Profiles feature. Users may enter a batch of transactions as a single Time Slip. This
can be useful for employees who wish to submit vacation or holiday hours in advance, or
employees who track their own hours and submit their time at the end of each pay period.
Employees and users may submit time slips by using "Submit Employee Time slip" menu item
from the Attendance Rx Services System Tray Icon popup menu. Time Slips can be created and
submitted for one pay period at a time. Multiple Time Slips may be submitted to allow
transactions to be submitted for multiple pay periods.
31
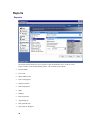
Reports
Reports
The reports selection allows the user to generate a report and either Preview it on the PC screen,
Export, or print it to the default Windows printer. The available reports include:
•
Hours Summary
•
Time Cards
•
Who's In/Who's Out?
•
Time Card Approval
•
Employee Profiles
•
Rules Setup Report
•
Shifts
•
Holidays
•
Raw Transactions
•
Approaching OT
•
Daily Totals By Day
•
Daily Totals by Employee
32
Additional Options
Options are available on some of these reports to have them sorted by various fields and to report
on either all of the employees, the employees assigned to a particular shift or individual
employees.
To Generate a Report
1.
From the main window of Attendance Rx, click the Reports icon, or click on the View menu and
choose Reports.
2.
Select the type of report you wish to print.
3.
Select the filter criteria when applicable. This includes All Employees, Individual Employee(s), or
Individual Shift or Salaried Employee.
4.
If Individual Employee(s) is selected, select the employee(s)'s name. If Individual Shift is selected,
select the shift number.
5.
If you are generating either Hours Summary or Time Card reports, select either the current, previous or
one of the available Archived Pay Periods.
6.
Select the output (where you want the report to go). Choices include Print, Preview, or Export.
7.
Select the method by which you want the report sorted if appropriate. Methods available include First
name, Last name, badge number, employee number or shift.
8.
Select the Print button if you wish to print a hard copy of the report.
9.
Select the Preview button to view the report on the PC screen.
10. Select the Export button to create a ASCII report file or send the data to a Payroll program. The default
extension for the created file will be "RPT". The created file can be viewed later by clicking on the
View File button and then selecting a previously saved "RPT" file.
11. Select Close to return to the main window of Attendance Rx.
Future Transactions Report
The Transaction Report shows all transactions that have been entered via Time slip submission,
Manual Punch or User Edit that occur after the end of the current pay period. These transactions
will automatically be properly inserted into the appropriate pay period as it becomes current.
•
From the main window of Attendance Rx, click the Reports icon, or click on the
View menu and choose Reports.
•
Select Time Card for your Report Type and select Future for your Pay Period.
•
Select Preview or Print to view the information.
•
Select an option from the left hand menu to exit this screen.
33
Payroll Exports
Exports
The Attendance Rx system is designed to work with most common payroll programs. The Export
feature allows employee time and attendance data to be exported to a file in order that it can later
be imported into a database, spreadsheet or other programs.
Advanced Payroll Integration:
QuickBooks Payroll Integration
File Payroll Export:
Generic ASCII file (delimited)
Peachtree Complete Accounting Version 7.0 (.csv)
ADP import file (EPIP or CSV)
PayChex Paylink import file
PayChex Preview import file
PrimePay PrimeLink import file
Wells Fargo ExpressPay/Express Pay Plus import file
34
Premier/Premier Plus import file
QwikPay/QwikPay Plus import file
Intuit PC Access/PC Access Jr import file
Exporting Data
1.
From the main window of Attendance Rx, click the Export icon or enter the View menu and choose
Export.
2.
Select the Pay Period. Data may be exported for either the current, previous or archived pay period.
3.
Select the Group Selection. Choices include all employees, an individual shift, or individual
employee(s).
4.
Select the output format from the drop-down list.
5.
Select Export.
6.
Edit the output options for the selected output format.
7.
Select OK to export the data. A Save As dialog will appear. Enter the file name for the data to be
exported. Select OK to save the file, or select Cancel to return to the Data Export window without
saving the file.
Unapproved Timecards
35
Unapproved Time Cards are displayed when a user attempts to export time card data to payroll,
and not all employees’ Time Cards have been approved. You will need to approve each time card
in order to export the data to payroll.
Optionally you can turn off this feature by unchecking the option in the Administrator Setup
screen under Time Card Approvals.
Wells Fargo ExpressPay, Premier, QwikPay and Intuit PC
Access Import File
Attendance Rx exports employee hours summary data to Wells Fargo ExpressPay ®, Premier ®
and QwikPay ® payroll packages using the Intuit PC Access ® Time Clock Interface import file
format. The following list describes the required export configuration fields when exporting using
this format.
Company Name
Payroll application company name
Determined by the payroll application being used.
Regular Pay Code
Payroll application pay code assigned to Regular Worked
Hours 'PLUS' only...ignored in applications that use PC
Access JR format
Overtime Level 1
Pay Code
Payroll application pay code assigned to Overtime Level 1
Worked Hours 'PLUS' only...ignored in applications that use
PC Access JR format
Overtime Level 2
Pay Code
Payroll application pay code assigned to Overtime Level 2
Worked Hours
Vacation Code
Payroll application pay code assigned to Vacation Hours.
Check 'Export as Deduction' to export as negative hours
Holiday Code
Payroll application pay code assigned to Holiday Hours.
Check 'Export as Deduction' to export as negative hours
Sick Code
Payroll application pay code assigned to Sick Hours. Check
'Export as Deduction' to export as negative hours
Other Code
Payroll application pay code assigned to Other Hours.
Check 'Export as Deduction' to export as negative hours
36
PayChex Paylink Export
Attendance Rx exports employee profile and time card data to a PayCheck PayLink import file
based on values entered for the following fields
Office Number
The PayChex Paylink office number
Client ID
Your PayChex Paylink Client ID
Site Number
The PayChex Paylink Site number for the employees entered in
the Time and Attendance Software
Sequence Number
The PayChex Paylink Import Sequence Number
Vacation Pay
Code
A valid PayChex Paylink pay code for Vacation Pay
Holiday Pay Code
A valid PayChex Paylink pay code for Holiday Pay
Sick Pay Code
A valid PayChex Paylink pay code for Sick Pay
Other Pay Code
A valid PayChex Paylink pay code for Other Pay
37
PayChex Preview Export
Attendance Rx exports employee profile and time card data to a PayChex Preview import file
based on values entered for the following fields
Client Number
Your PayChex Preview Client ID
Regular Pay Code
PayChex Preview Pay Code for Regular Hourly Wages
Overtime Level 1 Pay
Code
PayChex Preview Pay Code for Overtime Level 1 Hourly
Wages
Overtime Level 2 Pay
Code
PayChex Preview Pay Code for Overtime Level 2 Hourly
Wages
Vacation Pay Code
PayChex Preview Pay Code for Vacation Hourly Wages
Holiday Pay Code
PayChex Preview Pay Code for Holiday Hourly Wages
Sick Pay Code
PayChex Preview Pay Code for Sick Hourly Wages
Other Pay Code
PayChex Preview Pay Code forIOther Hourly Wages
Vacation Export as
Deduction
If checked, export Vacation as a deduction (otherwise as
earning)
Holiday Export as
Deduction
If checked, export Holiday as a deduction (otherwise as
earning)
Sick Export as Deduction
If checked, export Sick as a deduction (otherwise as
earning)
Other Export as Deduction
If checked, export Other as a deduction (otherwise as
earning)
Sequence
The PayChex Preview Import Sequence Number
38
PrimePay PrimeLink Export
Attendance Rx exports employee profile and time card data to a PrimePay PrimeLink import file
based on values entered for the following fields
Batch Sequence Number
The numeric PrimePay PrimeLink Import Batch Number
Overtime Level 1 Pay Code
The value to use in the PrimePay PrimeLink import
Coded Hours field for Overtime Level 1 Hours
Overtime Level 2 Pay Code
The value to use in the PrimePay PrimeLink import
Coded Hours field for Overtime Level 2 Hours
Vacation Pay Code
The value to use in the PrimePay PrimeLink import
Coded Hours field for Vacation Hours
Holiday Pay Code
The value to use in the PrimePay PrimeLink import
Coded Hours field for Holiday Hours
Sick Pay Code
The value to use in the PrimePay PrimeLink import
Coded Hours field for Sick Hours
Other Pay Code
The value to use in the PrimePay PrimeLink import
Coded Hours field for Other Hours
QuickBooks Payroll Integration
The Attendance Rx Software easily exports employee Time Card data to QuickBooks including
Regular Hours and Adjustments, Overtime Level 1Hours and Adjustments, and Overtime Level 2
Hours and Adjustments, Vacation Hours, Holiday Hours, Sick hours and Other hours.
The following topics will guide you throughout the export process:
•
Setting up QuickBooks® to communicate with Attendance Rx® (Page 51)
•
Setting up Attendance Rx® to communicate with QuickBooks® (Page 52)
•
Exporting Attendance Rx® employee Timecard data to QuickBooks® (Page 52)
Peachtree Complete Accounting Export
1.
In the Attendance Rx system, click Export and select "Peachtree Complete Accounting..." as the
target export format.
39
2.
In the Export Options dialog that appears on the next dialog, enter the appropriate values in the
fields as listed below:
The Attendance Rx software exports employee time card data to a Peachtree Complete
Accounting import file format based on values entered for the following fields:
Regular Pay Level
The Peachtree Pay Level (1-20) associated with Regular Pay
Regular Pay Item Code
The Peachtree Pay Item Code associated with Regular Pay
Overtime 1 Pay Level
The Peachtree Pay Level (1-20) associated with Overtime
Level 1 Pay
Overtime 1 Pay Item Code
The Peachtree Pay Item Code associated with Overtime Level
1 Pay
Overtime 2 Pay Level
The Peachtree Pay Level (1-20) associated with Overtime
Level 2 Pay
Overtime 2 Pay Item Code
The Peachtree Pay Item Code associated with Overtime Level
2 Pay
Vacation Pay Level
The Peachtree Pay Level (1-20) associated with Vacation Pay
Vacation Pay Item Code
The Peachtree Pay Item Code associated with Vacation Pay
Holiday Pay Level
The Peachtree Pay Level (1-20) associated with Holiday Pay
Holiday Pay Item Code
The Peachtree Pay Item Code associated with Holiday Pay
Sick Pay Level
The Peachtree Pay Level (1-20) associated with Sick Pay
Sick Pay Item Code
The Peachtree Pay Item Code associated with Sick Pay
Other Pay Level
The Peachtree Pay Level (1-20) associated with Other Pay
40
Other Pay Item Code
The Peachtree Pay Item Code associated with Other Pay
Output Field Titles
This value should match the Peachtree Import option chosen
when executing the actual import to Peachtree. The default is
NO.
Batch Sequence Number
The first ticket number that will be used in the resultant
output file. This number should be modified only if a
previous installation of Attendance Rx has already been used
to export employee time cards to Peachtree. Any arbitrary
changes to this field can cause imports to Peachtree to fail.
3.
After all fields have been entered correctly, click on the OK button. The software will
then prompt you for the name of the Peachtree Complete export file (*.csv). Specify a file name
and click on "Save". Save the location and the file name that you selected for use when importing
to Peachtree Complete Accounting. If the pay period you have selected is complete, the software
will create the file specified and the export process is complete.
41
Supervisors
Supervisors
The Attendance Rx Administrator is protected by Admin User Login/Password entry. Those who
access the system using the Attendance Rx Administrator should keep the following in mind:
In order to make changes to Attendance Rx using the Attendance Rx Administrator, a user must
first log in to the program using a correct User Login and Password.
The user who gains access using an Admin User Login/Password entry may add new Admin Users
to the Attendance Rx.
New user logins are automatically assigned a password, which is identical to the login.
Upon the first successful login, the Attendance Rx will prompt new users to change their
password.
A user may change his or her password at any time by clicking on the Change Password Icon or
by selecting Change Password from the main Attendance Rx menu.
Any Admin User may delete any other Admin User Login.
42
Adding a supervisor
To Add a New Supervisor:
•
From the main window of Attendance Rx, click the Supervisors icon or enter the View menu and
choose Supervisors.
•
Enter the login name of a new supervisor. Press enter to save the entry.
•
Select an option from the left hand menu to move from this screen.
•
The default password for the login will be the login name. The system will force you to change
this after logging in for the first time.
Deleting a Supervisor
To Delete a Supervisor:
•
From the main window of Attendance Rx, click the Supervisors icon or enter the View menu and
choose Supervisors.
•
Select the login of a supervisor you would like to delete and select Delete.
•
Select an option from the left hand menu to move from this screen.
Resetting a Supervisor's password
To Reset a Supervisor’s Password:
•
From the main window of Attendance Rx, click the Supervisors icon or enter the View menu and
choose Supervisors.
•
Select the login of a supervisor you would like to reset and select Reset Password.
•
Select Yes in the Reset Password dialog box to reset the password, otherwise click No.
The default password for the login will be the login name. The system will force you to change
this after logging in for the first time.
Select an option from the left hand menu to move from this screen.
43
Supervisor Preferences
The User Preferences selection allows you to modify your individual preferences for Time Totals
Format, Date Format, and Time of Day Format. These preferences will only apply for your login;
they will not affect the way employees see their time when punching in or out.
To Change User Preferences:
•
Select File from the main window then Preferences.
•
Set your preference for Time Totals Format.
•
Select your preference for Date Format from the drop down list.
•
Set your preference for Time of Day Format.
•
To save your preferences, click Save. To cancel without saving your changes, click cancel.
44
Employee Clients
Add Employee Transaction
Access to this feature requires a PIN number assigned by the supervisor.
To Add an Employee Transaction:
•
Right Click on the Attendance Rx tray icon in the system tray next to the system time.
•
Click Add Employee Transaction.
•
Enter your Employee PIN number into the text box.
•
You now have one of three options:
o
Click the blue arrow next to the PIN to retrieve your IN/OUT Status.
o
Click Punch to Clock IN/OUT.
o
Click Punch and Close to Clock IN/OUT, closing the window when completed.
Biometrics - Employee FIU Verification
If you have Biometrics Functionality enabled your employees will be required to verify their
fingerprint before Attendance Rx will allow them to clock IN or OUT.
Read more about Employee FIU verification.
Read more about Employee FIU Enroll
Auto-Clock IN/OUT
Auto-Clock IN/OUT allow you to automatically Clock-IN when you login to your computer, and
Clock-OUT when you logoff. Access to this feature requires a PIN number assigned by the
supervisor.
45
To enable this feature:
•
Right Click on the Attendance Rx tray icon in the system tray next to the system time.
•
Click Auto-Clock IN/OUT Setup.
•
Check the enable Auto-Clock IN/OUT and enter your Employee PIN number.
•
Click OK to save your settings.
NOTE:
The next time you log off your computer you will automatically be clocked OUT.
Submit Employee Time Slip
The Time Slip allows an employee to submit a batch of transactions and hour totals. Access to
this feature requires a PIN number assigned by the supervisor.
46
To Access Your Time Slip:
•
Right Click on the Attendance Rx tray icon in the system tray next to the system time.
•
Click Submit Employee Time Slip
•
Enter your Employee PIN number into the text box
•
Click the blue arrow next to the PIN to retrieve a new Time Slip or a saved Time Slip if one exists.
•
Choose the Pay Period for the Time Slip you would like to submit
To Edit Your Time Slip:
Once your Time Slip has been accessed, you can edit the totals for any day listed on the left side of the
screen.
•
Select the row cooresponding to the date you want to edit
•
Select the column under the category you want to edit.
•
Simply type over the existing value with your new total.
•
Your New totals will be displayed to the right of the values you are editing under Pay Period Totals.
To Submit Your Time Slip:
47
Once your Time Slip has been modified, click Submit to save your changes to the Supervisor.
IN/OUT Board
The Employee IN/OUT Board displays the current status of all employees. Employees who are
currrently clocked IN appear in the left pane while employees who are currently clocked OUT
appear in the right pane.
Client Connection Settings
The Connection Settings allow you to change the network settings for your Attendance Rx®
Network. Each client must have a unique IP Address (Internet Protocol) which is used to talk to
other Attendance Rx® computers.
The Connection Settings require you specify two IP Addresses:
Your local IP address that the client application will communicate over.
The IP Address of the computer which is running the Attendance Rx® Server.
*Network Edition Only
48
Attendance Rx® Administrator
Employees
Manage your employees and shift assignments.
Messages
View and Edit your Company and Employee Messages.
Setup
Setup Company Pay Rules.
Shifts
Define shift hours and pay rules.
Punch Editing
View and Edit Employee Time cards & Time Slips.
Reports
Print or Preview Reports.
Exports
Export Time cards to payroll.
Supervisors
Manage your Administrative Supervisors.
Holiday Setup
Holiday Dates
•
Enter the dates of paid holidays. These dates should be entered in advance.
•
From the main window of Attendance Rx, click the Setup icon or enter the View menu and choose
Setup.
•
Click on the Holiday Tab to adjust Holiday Settings.
•
Enter the date of the Holiday in the Date field.
•
Enter the description of the Holiday in the Holiday field.
•
Select Save to save your changes. To quit without saving changes, select another option from the
left hand navigation and select No in the Save Changes dialog box. To restore your original
settings, click Refresh in the top right hand corner and select No in the Save Changes dialog box.
Employee Qualification for Holidays
49
•
If your company requires that an employee work a certain number of days before becoming
eligible for paid holidays it can be entered on this screen.
•
From the main window of Attendance Rx, click the Setup icon or enter the View menu and choose
Setup.
•
Click on the Holiday Tab to adjust Holiday Settings.
•
Enter the number of days an employee must be employed before paid holidays are allowed in the
"Number of calendar days (after Hire Date) when an employee becomes eligible for Holiday Pay.
•
Select Save to save your changes. To quit without saving changes, select another option from the
left hand navigation and select No in the Save Changes dialog box. To restore your original
settings, click Refresh in the top right hand corner and select No in the Save Changes dialog box.
About Future Transactions
Transactions and Punches added to the Future Pay Period will only appear in the Future
Transactions Report until such time as the Pay Period the transaction occurs becomes the Current
Pay Period. Only Holiday, Vacation, Sick, and Other transactions can be submitted to the Future
Pay Period. "Punches" can only be submitted to the Current and Previous Pay Periods.
To add a transaction to the selected Pay Period:
•
Employees and users may submit Time Slips by using "Submit Employee Timeslip" menu item
from the Attendance Rx Services System Tray Icon popup menu. You may access this feature by
right clicking on the Attendance Rx Services System Tray Icon and selecting Submit Employee
TimeSlip. The icon is located in the bottom right-hand corner of your computer desktop by the
Windows System Clock. The icon is an employee seated behind and office desk.
•
The Employee must first enter his or her PIN number, assigned by the Administrator, into the PIN
field and press Enter. It is not necessary to include the zeroes.
•
Select the desired pay period to which transactions will be added. During the timeslip editing
process, you may switch between any of the three available Pay Periods and make additional
changes before submitting. Available Pay Periods are limited to the Previous Pay Period, the
Current Pay Period, and Future Pay Periods.
•
Select the desired date of the transaction. Note: The allowable dates will be limited to the Pay
Period selected in Step 3
•
Enter an elapsed time in Hours and Minutes.
•
Continue adding transactions of different types and dates until you are finished.
•
Click "Submit" to end transaction entry and send to the Administrator.
•
You may continue to select pay periods, add more transactions, or delete transactions until you are
satisfied with the contents of each of the pay period's Time Slips. You may cancel at anytime
during this process to ensure the entries will NOT be submitted to the Administrator.
50
Setting up QuickBooks® to communicate with Attendance Rx
Before you begin:
Make sure QuickBooks® Pro/Premier is installed on your local computer and that you have access
to the company file (*.QBW).
1.
Enable your QuickBooks company file to use time tracking.
You will need to enable your company file to use time data to create paychecks. This must be
enabled to allow Attendance Rx to interface with your company file.
To turn on time tracking:
A.
From the Edit menu, choose Preferences.
B.
In the Preferences window, select Time Tracking from the scroll box on the left.
C.
Click the Company Preferences tab, and click Yes in response to "Do You Track Time?"
NOTE: QuickBooks may close all windows after this setting has been changed.
D.
In the Preferences window, select Payroll and Employees from the scroll box on the left.
E.
Click the Company Preferences tab, and click Employee Defaults button.
F.
Make sure "use time data to create paychecks is checked, and if not check this option.
G.
Click OK to close the Employee Defaults window, then click OK again to close the Preferences
window.
2.
Create QuickBooks ® Hourly Wage Pay Items for Regular, Overtime Level 1, and Overtime
Level 2
The Attendance Rx Software exports employee time card data as Regular, Overtime 1, Overtime
2, Vacation, Holiday, Sick, and Other hours. QuickBooks must be setup with a unique Hourly
Wage Pay Item for each of these employee hours values.
Please refer to your QuickBooks ® documentation for information on how to create and modify
Hourly Wage Pay Items.
Once you have created Hourly Wage Pay Items associated with Regular, Overtime1, Overtime 2,
Vacation, Holiday, Sick, and Other you must write down or remember the exact names for each.
The Attendance Rx software will require the user to supply these names prior to exporting
employee time card data. The Attendance Rx software default values for these items are "Regular
Pay," "Overtime Pay," "Premium Overtime Pay," "Vacation Pay," "Holiday Pay," "Sick Pay," and
"Other Pay."
3.
Add Employees
If you attempt to export an employee’s timecard to QuickBooks®, and the employee does not
exist in the application you will be prompted to add the employee(s) at the time of the export.
51
Setting up Attendance Rx to communicate with QuickBooks®
Add existing QuickBooks ® employee names to your new Attendance Rx Software
For QuickBooks Integration, each employee name must be a unique combination of
characters. Attendance Rx does not restrict the user by enforcing uniqueness among all employee
names. In order to accommodate QuickBooks’s unique employee name requirement, the
Attendance Rx exports information to QuickBooks using the Export ID assigned to each
employee.
When adding employees to Attendance Rx who already exist in your QuickBooks
software, enter the full employee names, exactly as they appears in the QuickBooks software, to
the Export ID field in the Attendance Rx New Employee form.
When adding Attendance Rx employees who already exist in your QuickBooks software, you
must make sure that the employee names entered in QuickBooks match exactly the entries for
each employee Export ID in the Attendance Rx software.
Exporting Attendance Rx employee timecard data to
QuickBooks®
Step 1: Select the output format QuickBooks Integration v1.0
Step 2: Click Export
If you have never mapped your pay codes or chosen a QuickBooks® company file (*.QBW), you
will need to do so before you can run the integration.
Data Export Setup Screen
Setup Step 1.
Select Company File
Click Select to select the QuickBooks® company file (*.QBW) you created for your company.
Setup Step 2.
Setup Pay Codes
Map the Attendance Rx Pay Code to the corresponding Wage Pay Item in QuickBooks®.
If this is the first time you are running the integration, please have QuickBooks® running and your
company file opened. You will not be required to have QuickBooks® running in the future.
Step 3: Click OK to run the integration.
If this is the first time you are running the integration, QuickBooks® will prompt you that an
application without a certificate is attempting to access your company file.
Click Yes, Always to allow Attendance Rx to integrate with QuickBooks®
52
Add Missing Employees to QuickBooks
If you are attempting to export timecard data for an employee who is not found in QuickBooks®
you will be asked by Attendance Rx if you would like to add the missing employees to
QuickBooks.
Missing Payroll Items
If you are attempting to export Attendance Rx Pay Codes that do not match exactly with one of
the QuickBooks® Payroll Items, you will be prompted by Attendance Rx and the integration will
be abandoned.
NOTE: The spelling of the Pay Codes and corresponding Payroll Items must be identical.
Generic ASCII file Export
The Attendance Rx software exports employee profile and time card data to a Generic ASCII
delimited file based on values entered for the following fields:
Insert Quotes Around Non-Numeric
Name Fields
Output Field Titles
Remove Blanks
Include Employee Information
Split Names into Last, First
Line Terminator
Generic Field Separators
Puts double quotes (") around Field
Titles and Employee
Outputs the Titles for each field as the
first line in the file
53
Removes Trailing, Leading and
Internal Blanks from Non-Quoted
Fields
Outputs all Employee Profile Fields
along with Time Card Data
Outputs employee names entered as
First Last as Last, First
Selects the End of Line characters
appended to the end of each line in
the file
Specifies the character that will
separate each field in the file
ADP Export
Attendance Rx exports employee profile and time card data to two ADP import file formats based
on values entered for the following fields:
Company Code
The 3-character alpha-numeric ADP Company Code
Batch Sequence Number
The numeric ADP Import Batch Number
Pay Number
The numeric ADP Pay Number
Overtime Level 2 Pay Code
The value to use in the ADP import Coded Hours field
for Overtime Level 2 Hours
Overtime Level 2 Pay Code Name
The name of the value to use in the ADP import Coded
Hours field for Overtime Level 2 Hours
Vacation Pay Code
The value to use in the ADP import Coded Hours field
for Vacation Hours
Vacation Pay Code Name
The name of the value to use in the ADP import Coded
Hours field for Vacation Hours
Holiday Pay Code
The value to use in the ADP import Coded Hours field
for Holiday Hours
Holiday Pay Code Name
The name of the value to use in the ADP import Coded
Hours field for Holiday Hours
Sick Pay Code
The value to use in the ADP import Coded Hours field
for Sick Hours
Sick Pay Code Name
The name of the value to use in the ADP import Coded
Hours field for Sick Hours
54
Other Pay Code
The value to use in the ADP import Coded Hours field
for Other Hours
Other Pay Code Name
The name of the value to use in the ADP import Coded
Hours field for Other Hours
Output to ADP CSV format
Chooses ADP Comma Delimited format for ADP Data
Import (WINDOWS)
Output to ADP EPIP format
Chooses ADP EPIP format for ADP Data Import
(DOS)
Importing Attendance Rx data into Peachtree Complete
Accounting
To import your Attendance Rx employee time card data to Peachtree Complete Accounting, you
must first follow the instructions found in Setting up Peachtree Complete Accounting to Import
Time and Attendance Data and Exporting Time and Attendance data to a Peachtree Complete
Accounting import file to create a Peachtree Complete Accounting compatible file. After creating
a Peachtree Compatible file from Attendance Rx data, go to the Import/Export form in your
Peachtree Complete Accounting software and create a new export format including all fields and
with "Field Headers in first Record" selected. Then selected the file and execute the import.
Setting up Peachtree Complete Accounting Version 7.0
Inventory Items
You must set up inventory item(s) that are associated with REG, OT1, OT2, VAC,HOL, SIC and
OTH hourly wages. Normally, this is one item but may be defined individually for each level.
Please see Peachtree Accounting help for instructions on setting up Employee Time slip Items.
Employees
Before you can import Time Card data to Peachtree Complete Accounting, you must make sure
that the employee IDs assigned to the employees in Peachtree matches the Export IDs for each of
the employees defined in the Attendance Rx software.
Mismatched employee ID's will generate an error when attempting to import to Peachtree
Complete Accounting and may cause unexpected results.
55
Also, for each employee, you must enter Pay Rates for the 3 levels of the inventory item
associated with hourly wages along with vacation, holiday, sick and other wages. By default, the
first pay level will receive imported REGULAR hours, the second will receive imported
OVERTIME1 hours and the third will receive imported OVERTIME2 hours. The vacation,
holiday, sick and other wages levels must be set according to the desired outcome.
System Utilities
System Utilities
The System Utilities provides data and software maintenance functions for Attendance Rx®.
Only users with a Login and Password are allowed to access these functions.
The System Utilities window provides two tabs:
1. Data Tools:
Provides interface to manage your company’s database, including import/export data
initialization and maximum employee count upgrade.
More Information on Data Tools
NOTE: Most functions on this screen will greatly affect the database and operation of
Attendance Rx®.
2. Biometrics:
The Biometrics Tab of the System Utilities provides interface to enable and setup
biometrics devices for use with Attendance Rx.
Enabling Attendance Rx Biometrics Functionality and Installing a new device.
56
Data Tools
The System Utilities Data Tools provides interface to manage your company’s database,
including import/export data initialization and maximum employee count upgrade.
• Initialize Database – Clear all information from the database and invoke the setup wizard. Please
note this will delete all previous information.
• Initialize Users – Reinitialize the users to the initial "installed" settings.
• Import from Acroprint HRx® - Import Employees From Acroprint’s HRx software.
•
Import from Acroprint TimeStationPC® - Import employees, setup rules and shifts
from an existing TimeStationPC or TimeStationPC Network database.
•
Setup Punch Export – Configure settings to export punch transactions to a text
file after each successful clock IN or OUT from an employee.
• Upgrade Maximum Number of Employees – Upgrade ability to add additional employees to
Attendance Rx. Requires a purchased upgrade from Acroprint.
•
View Event Log – Lists critical events such as pay period roll, changing of setup
rules and PC clock changes.
Biometrics
The Biometrics Tab of the System Utilities provides interface to enable and setup biometrics
devices for use with Attendance Rx.
57
Biometrics Functionality
Before you can begin using your FIU device you will need to enable Attendance Rx biometrics
functionality. This tells the software to check verify fingerprints before allowing employees to
clock IN or OUT.
To enable Biometrics Functionality:
1. Click the Biometrics tab on the Systems Utilities screen.
2. Check "Enable Attendance Rx Biometrics Functionality"
To disable Biometrics Functionality:
1. Click the Biometrics tab on the Systems Utilities screen.
2. Uncheck "Enable Attendance Rx Biometrics Functionality"
Installed Biometrics Device
Once Biometrics Functionality is enabled, you will need to install an FIU device on each
workstation where your employees clock IN or OUT.
To install a new Biometrics Device:
1.
Attach the FIU device to an available USB port. On most workstations the operating system will
find and automatically install the new device.
2.
Click the Biometrics tab on the Systems Utilities screen.
3.
Choose the appropriate device from the drop down field under "Installed Biometrics Device".
4.
A dialog box will be displayed indicating the status of the device and availability of the drivers.
Follow the directions on the screen if Attendance Rx cannot locate the device.
58
To uninstall (remove) a Biometrics Device:
1.
Click "Remove Device" below the drop down.
Employee FIU Verification
If you have Biometrics Functionality enabled your employees will be required to verify their
fingerprint before Attendance Rx will allow them to clock IN or OUT.
Once an employee enters their PIN and click "PUNCH" or "PUNCH AND CLOSE" a dialog box
will be displayed requesting their FIU verification.
Please follow the instructions on the screen which will tell you where to place your finger and
whether the verification was successful.
Employee Biosense Setting
If an employee’s Biosense setting is set to zero, they will not be required to verify their
fingerprint. The system will proceed as though Biometrics were not enabled.
More about Employee FIU Enroll and Biosense
Employee FIU Enroll
When Biometrics Functionality is enabled you will need to enroll each employee’s fingerprint on
those workstations where that employee will clock IN or OUT.
NOTE: The "Enroll FIU" button will only be visible when Biometrics Functionality is enabled.
To enroll and employee’s FIU:
1.
Go to the Employee screen in the Administrator by clicking "Employees" on the left side the of
the Administrator.
2.
Select the row for the given employee and click Enroll FIU. The dialog displayed below will
show.
59
3.
Click "Enroll Employee" and follow the instructions as they are displayed on the screen.
4.
Change the Employee Sensitivity to a value greater than zero.
Employee Sensitivity Settings
The employee sensitivity settings determine how strict the match must be between the employee
fingerprint and the template registered during enroll.
Disable FIU Verification for an Employee
To disable FIU verification for an individual employee, set their Employee Sensitivity Setting to
zero(0).
Employee HandPunch Enroll
When Biometrics Functionality is enabled you will need to enroll each employee’s hand template
on those workstations where that employee will clock IN or OUT.
NOTE: The "Enroll Hand" button will only be visible when Biometrics Functionality is enabled.
To enroll and employee’s FIU:
1.
Go to the Employee screen in the Administrator by clicking "Employees" on the left side the of
the Administrator.
2.
Select the row for the given employee and click Enroll Hand. The dialog displayed below will
show.
3.
Click "Enroll Employee" and follow the instructions as they are displayed on the screen.
60