1
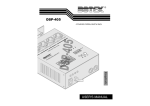
Medical CO2 laser system
User’s Manual
Model LS30-1A
CE Approved
FDA Approved
CEIEC,Sichuan Hualong Co.,Ltd.
No.48, Sec.2, Yihuan Road, East, Chengdu, China
post code: 610051
Tel: 86-28-84330882, mobile phone: 86-13708089801
Fax: 86-28-85074968
E-mail add: [email protected] (recommended)
Alternative E-mail add: [email protected]
http://www.madeinchina.com/152880/aboutus.shtml
Every effort has been made by the manufacturer to ensure that the data given in this
document is accurate. This product will be improved continuously, the information
contained herein are subject to change without notice.
The manufacturer has no responsibility for the result that is caused by user’s fault or wrong
operation on the instrument, and no responsibility for any errors or omissions in this
document or the information contained in this document!
1
User’s Manual
(Version LS30-1A)
1.
2.
3.
4.
5.
6.
7.
8.
9.
10.
11.
12.
Introduction
Warning: Precautions of safety
Main Specification
Structure
Preparation before turning on the apparatus
Installation and Adjustment
Instruction Manual
Attention
Mark Instructions
Packing List
Normal Use Distance for Eyes
Check & Maintenance of Laser Tube
2
1.
Introduction
Model LS30-1A Medical Carbon Dioxide (CO2) Laser
System (see Fig.2) is widely used in all open operation
including vaporization, cutting and coagulation. The
satisfactory results may be given using the instrument in
the treatments of following diseases such as pointed
condyloma, hemorrhoids, cervical erosion, nasal polyp,
nevus, benign tumor, tattoo and so on. It is an
indispensable medical appliance for common surgery,
gynecology, urology, anus, otorhinolaryngology,
plastics, dermatology and stomatology.
3
2. Precautions of safety
Note:
Before operate the instrument, read the user's manual first please!
Never allow untrained personnel to operate the laser. The operator must be trained with
basic laser physics, laser safety, tissue interaction, laser operating procedures and
hands-on experience.
The operator must get the qualification certificate of laser therapy according to the law of
state government.
As this apparatus has high-pressure voltage and laser radiation, operators should use it
with great attention. Safety measures are stated in the Instruction Manual. Improper
operation, adjustment, or maintenance may cause danger of laser radiation and
high-pressure shock.
On laser radiation safety
1) The CO2 laser is classified as class 4 laser product and the red LD aiming beam laser is
classified as class 3A laser product, which are according to the standard of IEC
(International Electrotechnical Commission) 60825-1:1993 Safety of laser products–Part 1:
Equipment classification, requirements and user's guide.
2) The nominal ocular hazard distance (NOHD) after focusing (f=100mm) handpiece is
4.4m and after 50mm focus lens is 2.2m , which are calculated according to IEC
60825-1:1993. If the handpiece without focus lens, the NOHD can be more than 40m!
3) Never stare into laser aperture and look directly into the laser beam or its reflection,
permanent damage to the eye can occur. Be careful, the safety distance for eye is 40m away
when the handpiece without focus lens.
4) The laser radiation safety shall be paid special attention in the operation of the instrument.
All personnel in the therapeutic room have to wear the special protective eyewear so as to
prevent the eye from injuring.
Warning:
Protective eyewear can only prevent the damage to eyes that caused by diffuse reflection.
It cannot prevent the damage to eyes that are caused by full power laser direct or reflective
radiation, so, never look directly into the laser beam or its reflection even if protective
eyewear is used.
5) Note: when the handpiece with focus lens is used , the laser output power will be 15%
more compared with using the handpiece without focus lens.
6) Do not shoot laser onto a wall or any other things to avoid unexpected reflection or
causing a fire. Windows and glass door panels require to be fitted with blinds or film that are
made by fireproofing material, which will prevent inadvertent exposure to radiation of
persons outside the laser area.
7) Do not use inflammable anesthetics or oxidizing gases such as nitrous oxide (N20) and
oxygen (02) in course of the instrument operation. Some material as cotton goods would be
ignited in rich oxygen and higher temperature caused by the operation of the laser
instrument. The inflammable solutions used in clean and sterilization shall be volatilized
before starting the laser instrument.
8) Please note that the handpiece of the guiding beam arm must be kept downward while the
instrument is unattended. Do not place the arm anywhere to avoid unexpected hurt.
4
9) In operating room, prohibit mirror reflection. The substance with reflection function must
be paid special attention, unexpected reflection can cause injury. Remove all shiny reflective
objects such as ring, watchband, large accouterment, glass and metallic utensils away from
the patient and the operating physician to avoid the damage of reflection.
10) Never depress the footswitch without first verifying the safe orientation of the articulated
arm and the attached headpieces.
11) The operator shall pay full attention that the instrument must be in stand-by state when it
is not in use temporarily.
12) Keep the switch-on key with the authorized person only to prevent unauthorized use of
the laser system.
13) The Medical Smoke Evacuator shall be installed in the treatment area and the warning
note ---Warning: the evacuated smoke may contain biological particulate-- shall be marked
in the proper position.
5
3. Main Specifications
Laser Type:
CO2 Laser Device
Wavelength:
10.6µm
Mode:
Low mode
Output Power:
5-25W(or 30W) Step Adjustable per 1 Watt
Light Beam Divergent Angle:
≤6mrad
Starting Voltage:
≤25KV
Operating Voltage:
≤10KV
Operating Current:
3-25mA
Focal Flare Diameter:
≤0.4mm
Focal Length of Lens:
f=100mm
Power Unstability Degree:
<±10%
Indication Beam:
2mW 670nm Semiconductor Laser
Transmission System :
6-Articulation Joint Spring-Balanced Light Guiding Arm
Operating Mode;
Continuous, Single, Repeated and Modulated pulse
Display:
Power and Pulse Output Time; Pulse Interrupted Time
Power Adjustment:
5-25W(or 30W), Step Adjustable per 1W
Pulse Output:
0.01-2.95 seconds, step adjustable per 0.01s
Pulse Intermission:
0.01-2.95 seconds, step adjustable per 0.01s
Cooling System:
Built-in circulating water cooling
Input Voltage:
AC110V±10%; 60Hz
Environmental temperature:
5-40℃
Relative Humidity:
≤80%
Dimension:
400mm*370mm*1080mm
Weight:
21Kg
6
4. Structure
1
2
3
4
5
6
7
8
9
1—laser guiding arm
4—main body
7—wheel
2—emergency stop switch
3—operation panel
5—Interlocking Remote Control Device
6—power socket
8—fuse
9—foot switch
7
Structure Sketch
1—handle
2—emergency stop switch
3—power control board
4—door safety switch
*when back door is opened, the laser machine will stop working automatically.
5—HV power supply
6—water tank
7—water inlet
8—fuse
9—machine grounding port
10—socket for foot switch
11—socket for power in
12—Interlocking Remote Control Device (It is set usually on the door of the treatment room.
When the door is opened during the treatment, laser output will be cut off immediately till
the door is closed for the purpose of safety.
13—water outlet
16—hydraulic switch
14—wheel
17—CO2 laser tube
15—window to observe the water level
18—base for laser guiding beam arm
8
5. Preparation for Using
1) When opening up the packing case, first you should examine the cabinet of the unit and be
sure there is no obvious collision damage. You should also make sure that there is no
drop-out between structural parts and connecting lines and all the packing list parts are
installed properly. (See the packing list parts.)
2) Opening up the back side door of the cabinet, you should find the injection point of the tank,
and then fill clean water into the tank (distilled water is better if possible.) until the water
reaches the red line.
Warning:
Starting the Power Switch without water in the tank is forbidden, or the circulating water
pump will be burnt down.
9
Inject of distilled water into the rubber tube
Red line of water lever
3)
Make sure whether the power voltage coincides with the voltage needed by the
i.
unit.
4)
Screw into earth plug
5)
Insert the plug of the foot switch connecting line into the socket on the back of the unit. Push
the notch till the connection is reliable.
6)
Insert fuses
i.
screw
unscrew
7) Insert radio lock
10
8) Insert the two ends of the power line into the power input socket and power
i.
socket separately. (The power socket must have a good earth); connect
the earth nail on the under bed of the outer-shell with ground firmly.
9) Insert the key into the switch hole of the control board, and turn the key 90
i.
degree in the direction of right-hand, and in the meantime, the
power is on and the circulating water pump and the cooling fan inside
the unit are turned on.
10) Turn off the power after several minutes’ test run.
11
6. Installation and Adjustment
6.1 Laser Guiding System:
CO2 laser guiding system is composed of debugging tube, laser guiding arm, focusing probe,
focus-out probe, expanding beam unit, nose clip and connecting base. The conn6.1ecting base is
fixed on the laser output end of the unit. Generally speaking, this system can be used when the
laser-guiding arm is connected and locked tightly to the connecting base.
Choose low power output after turning on the machine. Use a piece of paper to check the
laser beam.
If the laser beam is not in the centre, or, if the path of the red semiconductor guiding beam
does not well coincident with the CO2 laser path, or,
If there are double points and double lines,
you may need
6.2 CO2 Laser Output Beam core Adjustment:
Firstly, take off the laser-guiding arm and equip the debugging tube on the connecting base. Then
adjust CO2 Laser device to make CO2 laser beam aim at the core of the debugging tube and make
sure that the beam goes through the debugging tube coaxially. Thirdly, switch on and select the
lowest power, and inspect the position of the flare of the debugging tube end by a piece of
pergamyn.
Fourthly, adjust laser device repeatedly until the CO2 Laser beam go into from the
center of beginning core of the debugging tube, and go out from the ending core. At last, take off
the debugging device, put on the laser guiding arm and lock it tightly.
The process of indication adjustment of isotopic light route is the same as above. Adjusting
till the focusing flare of the red semiconductor laser coincides with that of CO2 Laser.
Select lower power after switching on. Inspect the output condition of the laser by a piece of
pergamyn at the flat surface of the output end of the laser guiding arm.
Use focusing probe to do cutting operation in general. When conducting burning cure in large
area, take off the focusing probe and put on the focus-out probe in order to control the size of the
flare
12
7. Operation Instruction
Ⅰ. Operating the machine:
1. Turn the key of POWER SUPPLY in the direction of clockwise; the POWER
SUPPLY pilot lamp will be lighted. If it works regularly, the WATER
COOLING pilot lamp will be lighted.
2. If you select guide light, press GUIDING SWITCH button until GUIDING
pilot lamp is lighted
3. Put off the laser output probe and put on the laser output defocus.
4. Press “on” of high voltage switch, the high voltage switch lamp will be
lighted, control the laser output by foot switch, turn right the “Voltage
Adjust” and adjust the current to 3-4mA, you can feel the heat at the laser
output defocus.
II. Operating Medical Cure:
1. Select proper laser output probe.
2. Operate the machine: Same as the 1 and 2 in I.
3. Power adjust: choose the “Continuous” operation condition, press high voltage
switch on, put the asbestos board under the laser output and press the foot switch.
Adjust the Current Adjust, the current will increase and the laser output powers
also increase.
4. Function Selection: Continuous and Pulse. Pulse has four steps(0.05, 0.1, 0.2 and
0.5), each step means the pulse output time and the pulse break time.
5. Operating Medical Cure: choose the proper working method
pulse), control the laser output by foot switch.
III. Closing the machine
Turn left the Current Adjust” to zero, then close the key power switch.
(continuous and
8. Attention
*Don’t face the laser output beam to eyes or other healthy skins directly in any case.
*Avoid aiming the laser beam at smooth reflective surface, such as stainless steel, mirror
surface etc. in order not to hurt eyes or skins by the reflection of laser beam.
*If the unit is cleaned by alcohol, the laser irradiation only can be used after the alcohol
becomes dry. The laser beam should avoid irradiating inflammable and explosive
cargo.
*In order to make the viewing fields of the operated part clear and avoid focusing lens to
be polluted, smoke-extracting facility should be equipped when operating.
*Suggest that the operators wear laser-eye shield with corresponding wavelength when
operating.
*High-voltage power exists inside the apparatus, only specialized technician is allowed to
open up the cabinet in order to avoid the danger of electric shock.
*If extraordinary noise and smell is found when the apparatus is working, the apparatus
must be stopped immediately for inspection. Power should be cut off before
inspection.
*The apparatus assembles glass laser tube inside. So pay attentions not to fall down when
transport it.
14
9. Mark Instructions
MARK INSTRUCTION
LASER DANGER MARK
LASER WARNING MARK
LASER OUTPUT HOLE
MARK
ELECTRICAL EQUIP MENT CLASSIFIED MARK
15
10. Packing List
Sequence
Title
Number
Quantity
Unit
Remarks
6 arms
1
Laser Guiding Arm
One
Set
2
Power Cable
One
Piece
3
Foot Switch
One
Piece
4
Power Switch Key
Two
Piece
5
Cabinet Key
Two
Piece
6
Fuse ( 4A )
Two
Piece
7
Interlocking
Control Device
One
Piece
8
Water Filling Pipe
One
Piece
Remote
11. Normal Use Distance for Eyes
NOHD =
4 P 0 π E MPE − a
Φ
Explanation
P0—Output power of laser tube;
EMPE—Max. irradiation level permitted;
Φ—Diverging angle of laser beam;
a—Diameter of laser beam
16
JZ-1A uses CO2 laser tube, length 880mm, suppose the atmosphere reducing
could be ignored, then:
4 × 30 10 3 π − 0 .004
NOHD =
3 × 10 −3
120
− 0 .004
3140
=
3 × 10 − 3
= 63 .8( m )
P0=30W
,
EMPE=103W•m-2,
Φ=3mrad,a=4mm
That means, in the condition of normal using and ignored the atmosphere
reducing, the NOHD is 63.8m.
12. Check & Maintenance of Laser Tube
Time Interval of checking: one year from the laser tube begin to be used. You can replace the
tube according to the requirement of manual. Attention: Please make tube’s anode and
cathode matches the ones of power, or it will damage the tube.
17