1
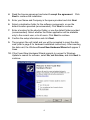
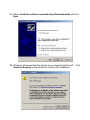
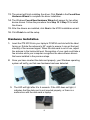
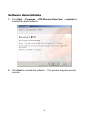
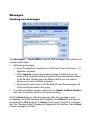
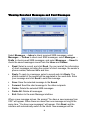
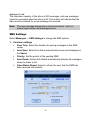
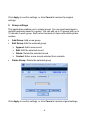
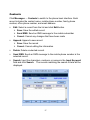
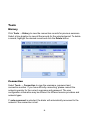
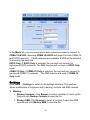
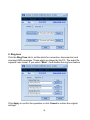
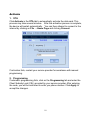
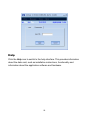
ZTE CORPORATION ZTE MY39 CDMA 1X-EVDO Wireless Data Card User Manual Preface Important notice Due to the nature of wireless communications, transmission and reception of data can never be guaranteed. Data may be delayed, corrupted or be totally lost. ZTE accepts no responsibility for damages of any kind resulting from delays or errors in data transmitted or received using the MY39, or for failure of the MY39 to transmit or receive such data. Limitation of Liability ZTE Corporation reserves the right to make modifications on print errors or update specifications in this manual without notice. No part of this publication may be excerpted, reproduced, translated or utilized in any form or by any means, electronic or mechanical, including photocopying and microfilm, without the prior written authorization of ZTE Corporation. Software Drivers License Proprietary Rights Provisions: The software drivers provided with this product are copyrighted by ZTE Corporation. And although copyrighted, the software drivers are unpublished and embody valuable trade secrets proprietary to ZTE Corporation. The disassembly, Reverse Engineering of the software drivers for any purpose is strictly prohibited by law. The copying of the software drivers, except for a reasonable number of back-up copies, is strictly prohibited by international law. It is forbidden by international law to provide access to the software drivers to any person for any purpose other than processing the internal data for the intended use of the software drivers. Copyright © 2006 by ZTE Corporation All rights reserved. Edition: 1st edition, Mar., 2006 10 9 8 7 6 5 4 3 2 1 Safety Regulations Before using the ZTE MY39, you must review the Safety Information outlined in this document. General instructions Do not operate the wireless data card in an area where prohibited by the law. Follow any special rules and regulations and obey all signs and notices. Always turn off the host device and remove the wireless Data card from the card slot when instructed to do so, or when you suspect that it may cause interference or danger. Please use original accessories or accessories that are authorized by ZTE. Using any unauthorized accessories may affect your wireless data card’s performance, and violate related national regulations about telecom terminals. Do not operate your wireless data card in any area where a potentially explosive atmosphere may exist. Sparks in such areas could cause an explosion or fire resulting in bodily injury or even death. Be aware and comply with all signs and instructions. Users are advised not to operate the wireless data card while at a refueling point or service station. Users are reminded to observe restrictions on the use of radio equipment in fuel depots (fuel storage and distribution areas), chemical plants or where blasting operations are in progress. Areas with a potentially explosive atmosphere are often but not always clearly marked. Potential locations can include gas stations, below deck on boats, chemical transfer or storage facilities, vehicles using liquefied petroleum gas (such as propane or butane), areas where the air contains chemicals or particles, such as grain, dust or metal powders, and any other area where you would normally be advised to turn off your vehicle engine. Hospital safety Do not operate your wireless data card in any area where medical equipment, life support equipment, or near any equipment that may be susceptible to any form of radio interference. In such areas, the host 1 communications device must be turned off. The wireless data card may transmit signals that could interfere with this equipment. Aircraft safety On an aircraft, either on the ground or airborne, in addition to FAA requirements, many airline regulations state that you must suspend wireless operations before boarding an airplane. Please ensure that the host device is turned off and your wireless data card is removed from the card slot prior to boarding aircraft in order to comply with these regulations. The wireless data card can transmit signals that could interfere with various onboard systems and controls. Road safety The driver or operator of any vehicle should not operate a wireless data device while in control of a vehicle. Doing so will detract from the driver or operator's control and operation of that vehicle. In some countries, operating such communications devices while in control of a vehicle is an offence. 2 Welcome Introduction Congratulations and thank you for purchasing the ZTE MY39 Wireless Data Card! The ZTE MY39 is a hybrid mode wireless data card, which is suitable for use with CDMA1X-EVDO networks. It fits into the PCMCIA card slot of most windows based laptop computers. It allows you to connect to the internet, send and receive SMS (Short Messages Service) messages, and has a personal address book. This manual will provide the information needed to get started using your new ZTE MY39 PC card. Caring for your ZTE MY39 When not in use, fold the antenna down and store in a compartment where the card can be protected from being crushed or broken. Do not apply adhesive labels to the wireless data card. This may cause the card to jam inside the PC Card slot of your notebook PC. The wireless data card should easily fit into the PC Card slot. Forcing the wireless data card into the PC Card slot may cause considerable damage. Your wireless data card should be stored in a dry and clean place. Protect your card from liquids, dust and excessive heat. CDMA Coverage and Roaming The ZTE MY39 operates on CDMA 1X-EVDO networks and can only be used where CDMA coverage is available. The companies that offer service on these networks are called wireless service providers. Every wireless service provider has a different coverage area and most wireless service providers post coverage maps on their web sites. Most CDMA service providers have roaming agreements that allow you to use your MY39 on other wireless service provider’s networks. When you use your data card on a network other than the one operated by your wireless 3 service provider, you are “roaming” and you may be billed at a higher rate. Please refer to your wireless service provider for coverage details. A CDMA Service Provider Account Companies that operate CDMA networks and provide access to these networks are called services providers. To use the ZTE MY39, you must have an account with a CDMA service provider. Each service provider has its own pricing options. There may be flat rate accounts, which provide you a maximum number of minutes of network usage for a fixed monthly fee. There may be accounts for which you are charged for network usage by the minute or by amount of data transmitted. Each data card has been provisioned at the factory for use with a particular service provider. This sets the data card to use particular radio channels and enables services specific to that provider. The process of setting up your account is called activation. Activation involves action by the service provider and configuration of the data card. The procedure to configure (activate) your data card is covered on page 10. Package Contents Your Data card package contains the following components: ZTE MY39 wireless data card Installation CD Quick Start Guide Warranty Card Specifications Networks Dimension Weight Data Rate Working Voltage Current CDMA 800MHz / CDMA 1900MHz 125×54×5mm Less than 60g Up to 2.4Mbps 3.3V(Using the notebook power supply) Sleep: 110mA Max: 800mA 4 Installation This chapter guides you through the steps necessary to install the ZTE MY39 data card on a notebook PC. The basic steps are: Insert the MY39 installation CD into your CD-ROM drive and install Dialer software. Insert the MY39 data card into the PC card slot to install the drivers. If the MY39 has not been activated, activate it as described on page 9. Before you begin the installation process, ensure your PC is running a supported operating system and meets the hardware requirements described below. System requirements Operating System: Windows 2000 / XP Card Slots: Type II PC card slot (CardBus) Disk Drive: CD-ROM, DVD-ROM Memory: 64MB or above Disk Space: 15MB free disc space for installation Processor: Pentium 200MHz or above Note: The card performance may be influenced if the system does not meet the minimum requirements. Software Installation procedures WARNING: Do not insert the ZTE MY39 into the laptop’s PCMCIA card slot before installing the software. 1. Close any Windows applications that are currently running on your system. Insert the CD included with the ZTE MY39 data card. The installation program should start automatically. If the program does not launch, select Start → Run and enter D:\MY39.exe (where D is the letter of the CD-ROM drive). Click OK to begin installing the Dialer software. 2. Select a language and click Next to continue. 3. Click Next to continue installing the ZTE MY39 Dialer software on your computer. 5 4. Read the license agreement and select I accept the agreement. Click Next to continue the installation. 5. Enter your Name and Company in the space provided and click Next. 6. Select a destination folder for the software components, or use the default location provided (recommended). Click Next to continue. 7. Enter a location for the shortcut folder, or use the default folder provided (recommended). Select whether the Dialer application will be available only to the current user, or to all users. Click Next to continue. 8. Confirm the setup information and click Next. 9. The program files will install and you will be prompted to insert the data card (refer to page 9 for hardware installation instructions). After inserting the data card, the Windows Found New Hardware Wizard will appear 3 times. 10. If the Found New Hardware Wizard prompts to connect to Windows Update to search for software, select No, not this time, and click Next to continue. 6 11. Select Install the software automatically (Recommended) and click Next. 12. Windows will prompt that the drivers are not signed by Microsoft. Click Continue Anyway in this window to continue the installation. 7 13. The wizard will finish installing the driver. Click Finish in the Found New Hardware Wizard to complete the driver installation. 14. The Windows Found New Hardware Wizard will appear for two other device drivers. Follow the procedure from Step 10 to Step 13 to install the drivers. 15. After the drivers are installed, click Next in the MY39 installation wizard. 16. Click Finish to exit the setup. Hardware Installation 1. Insert the ZTE MY39 into your laptop’s PCMCIA card slot with the label facing up. Rotate the antenna to 90° angle to ensure it can get the best intensity of the received signal. When the data card is not in use, adjust the antenna to the horizontal level. Recognition of your card could take a few minutes while your computer recognizes the new software drivers that were installed in the previous steps. 2. Once you have inserted the data card properly, your Windows operating system will notify you that new hardware has been detected. 3. The LED will light after 5 to 6 seconds. If the LED does not light, it indicates that the data card is not inserted properly, or there is a malfunction with the data card or laptop. 8 Getting started 1. Double-click the MY39 icon on the desktop, or select Start → Programs → ZTE Wireless Data Card → MY39 to open the Dialer application. 2. If your data card is already activated, skip ahead to Step 5. 3. To activate your card, select Tools → Activate from the menu bar in the ZTE Dialer software. Under the OTA tab, click the Activate button. 4. The software will prompt with the status of the activation process. Once complete, the card will automatically reset. Note: If activation fails, contact your service provider’s customer support number for assistance with manual programming. 5. After activation is complete, click File → Home Page on the menu bar of the Dialer software. 6. Click Connect to access the internet. Safe removal of Hardware WARNING: Do not eject the data card from the laptop without following the proper removal procedure. Removing the card improperly can cause a fatal error on your laptop. 1. Close the MY39 Dialer software. 2. Left click on the Safely Remove Hardware system tray. icon in the Windows 3. Click either entry of NEC PCI to USB Open Host Controller. 4. After Windows prompts that the device has been safely removed, use the ejector button on your laptop to remove the data card from the PCMCIA slot. Do not pull the data card out by the antenna. 9 Software Uninstallation 1. Click Start → Programs → ZTE Wireless Data Card → uninstall, to uninstall the dialer software. 2. Click Next to uninstall the software. This process may take several minutes. 10 Functions & Operation Interface introduction Tray Icon Descriptions The card is not connected. The wireless data card is initializing. The wireless data card is connected. The use of Tray Icons Right click the tray icon and the following menu will appear: Close Radio: Turn the radio off to comply with FAA regulations, where radio devices must be off during flight. Help: Enter the interface of Help. About: View the information about the data card. Exit: Shut down the application interface. Connecting to Internet You can browse web pages after you have accessed to Internet with the wireless data card. You can also receive SMS messages while surfing the Internet. 1. Connecting to the Internet Select File → Home Page and click Connect. 11 When connected, Status: connected successfully will appear together with data amount, rate and time connected. An icon in the Windows system tray will appear to indicate the connection status. Once the internet connects, the following connection information is displayed. ¾ Status of the connection and transmission. • Connected Successfully: Connected or transmitting data • Dormant: If data is not sent or received for a period of time, the dialer will display Dormant. ¾ Duration of the data connection. ¾ Current network used for connection (CDMA 1X-EVDO) ¾ Traffic counters show the amount of traffic sent, received, and the current data rate. There are three main reasons why you might experience inadequate signal strength. ¾ You may be outside of the CDMA 1X network coverage area. Contact your wireless service provider for coverage maps. ¾ Your antenna is not completely extended or is pointed in the wrong direction. You may be able to improve the signal strength by reorienting the antenna. ¾ You may be inside a building or near a structure that is blocking the signal. If this is the case, you may be able to improve the signal strength by changing the position or location of your PC. 2. Disconnecting from the Internet Click Disconnect to disconnect from the Internet. After disconnected, a will appear in the Windows system tray. standby icon 12 Messages Creating new messages Click Messages → Create SMS to send an SMS message to an individual or multiple subscribers. Addressing messages: ¾ Enter the recipients’ number(s) in the To field. Use a semicolon (;) to separate recipients. ¾ Click Contacts to open the contacts window. Double click on the name of the recipient and that individual will be automatically added to the To field. Holding down the Ctrl key while you click names allows you to select multiple recipients. ¾ Entering the group name in the To field will send the message to all of the recipients saved in the group. To include a callback number, select the box Enable Callback Number and enter the phone number in the space provided. Click the Send button to send the message. After the message is sent successfully, the SMS message will be saved in the Outbox (if auto-save is not selected in SMS Settings) or Saved (if auto-save is selected). If sending fails, the “Sending Failed” message will appear on the interface. Select Save to save messages to Drafts. 13 Viewing Received Messages and Sent Messages Select Messages → Inbox to check received SMS messages; select Messages → Outbox to check sent SMS messages; select Messages → Drafts to check saved SMS messages; and select Messages → Saved to check the saved messages moved from the Inbox and Outbox. Read: Select a record, and click Read. You can read all the information of short messages including the content of short message, the sender’s phone number, delivered date and time. Reply: To reply to a message, select a record and click Reply. The phone number of the sender will be populated in the send area. Enter your message and click Send to send the message. Save: Save the selected message to the Saved. Forward: Send the short message to the other recipients. Delete: Delete the selected SMS messages. Delete All: Delete all messages. Exit: Return to the main Message interface. When a new message arrives, the prompt “You have a new message from XXX” will appear. When there are more than one message arriving at the same time, “You have new messages” will appear. Click Read, and the interface will automatically switch to the Inbox. New messages will be 14 displayed in red. The maximum capacity of the inbox is 500 messages, and new messages cannot be accepted when the inbox is full. The system will indicate that the inbox must be cleared for a new message to be saved. Note: The new message dialogue box can be minimized. It will not prompt again when new messages arrive. SMS Settings Select Messages → SMS Settings to change the SMS options. 1. Common settings Save Time: Select the duration for saving messages in the SMS center. Auto Save: Select Auto Save automatically saves sent messages in the Saved. Priority: Set the priority of the sending SMS. Auto Delete: Select Auto Delete automatically deletes old messages when the Inbox is full. Open Status Report: Select to inform the user that the SMS has been received successfully. 15 Click Apply to confirm settings, or click Cancel to restore the original settings. 2. Group settings This application enables you to create groups. You can send messages to multiple recipients saved in a group. You can edit up to 10 groups with up to 10 records in each group. Each record consists of name and mobile phone number. Add Group: Add a new group Edit Group: Edit the selected group. ¾ Append: Add a new record ¾ Edit: Edit the selected record ¾ Delete: Delete the selected record ¾ Contact: Enter a new record selected from contacts Delete Group: Delete the selected group Click Apply to confirm settings, or click Cancel to restore original settings. 16 Contacts Click Messages → Contacts to switch to the phone book interface. Each record includes the contact name, mobile phone number, family phone number, office phone number, and email address. Edit: Select a record from the list and click Edit button ¾ Save: Save the edited record ¾ Send SMS: Send an SMS message to the mobile subscriber ¾ Cancel: Cancel any changes that have been made Append: Append a new record ¾ Save: Save the record ¾ Cancel: Cancel editing the information Delete: Delete a selected record. Send SMS: Send an SMS message to the mobile phone number in the selected record. Search: Input the characters, numbers, or names in the Input Keyword field and click Search. The records matching the search criteria will be displayed. 17 Tools History Click Tools → History to view the connection records for previous sessions. Select a time duration to view all the records for the selected period. To delete a record, highlight the desired record and click the Delete button. Connection Select Tools → Connection to view the username, password and connection number. If you have difficulty connecting, please consult the network operator for the correct username and password. The user configuration information may be different for different service providers and network types. If auto-reconnect is selected, the dialer will automatically reconnect to the network if the connection is lost. 18 In the Mode tab, you can select which data network you want to connect to. CDMA 1X+EVDO: Selecting CDMA 1X+EVDO will search for both CDMA 1X and EVDO networks. If both networks are available, EVDO will be selected to maximize the data rate. EVDO Only: If EVDO Only is selected, the card will only connect to high-speed EVDO networks. The SMS function will not work in EVDO Only mode. CDMA 1X Only: If CDMA 1X Only is selected, the card will only connect to low-speed CDMA 1X networks. The SMS function will work in CDMA 1X Only mode. Settings Click Tools → Settings to switch to the settings interface. The interface allows modification of ringtones and to backup contacts and SMS records. 1. Backup ¾ Backup Contacts: Click Browse to select a location to back up the files and click Backup Contacts to save the file. ¾ Backup SMS: Click Browse to select a location to save the SMS records and click Backup SMS to save the file. 19 2. Ring tone Click the Ring Tone tab to set the alerts for connection, disconnection and incoming SMS messages. These alerts are played by the PC. The audio file supports .wav format. If you select "Mute", it will disable the ring tone feature. Click Apply to confirm the operation or click Cancel to restore the original settings. 20 Activate 1. OTA Click Activate in the OTA tab to automatically activate the data card. This process may take several minutes. After the activation process is complete, the device will restart automatically. You can then attempt to connect to the internet by clicking on File → Home Page and clicking Connect. If activation fails, contact your service provider for assistance with manual programming. 2. Programming If automatic programming fails, click on the Programming tab and enter the Client Subsidy Lock (CSL) provided by your service provider. After entering the code, you will be instructed to enter you phone number. Click Apply to accept the changes. 21 Help Click the Help icon to switch to the help interface. This provides information about the data card, such as installation instructions, functionality and information about the application software and hardware. 22 FAQ & Answers If you experience problems when using your ZTE MY39 data card, please refer to the following questions and answers to resolve the problem. If the problem still exists, please contact your service provider or visit the ZTE Canada webpage at www.ztecanada.com/support. Problem Description After the dialer software is opened, the datacard initializes for a long time, and then prompts “data card has an error”. The data card cannot connect to the internet and/or cannot send or receive SMS messages. Possible Causes Problem with the PCMCIA card slot Problem with the software installation The data card is not activated. The radio is closed The signal strength is low 23 Resolution Check that the data card light is illuminated. If the light is off, reinsert the data card. If the light is illuminated, right click My Computer and select Properties → Hardware → Device Manager. If there is an exclamation point beside the ZTE modem or the ZTE ports, reinstall the software. If the problem persists, please contact you service provider. Follow the activation procedure on page 10 Right click the ZTE icon on the system tray and click Open Radio Adjust the position of the antenna or your laptop. The dialer software gives the error message “Data connection failed” The username and password are incorrect “Invalid Input Number” is prompted when sending an SMS message No alert tone is played when receiving SMS messages or when connecting or disconnect from the network. You have written invalid characters in the To: box. Websites cannot be opened after connecting to the internet The internet settings are incorrect There may be a virus on the laptop The ringtones are muted. The PC sound card is not installed or is disabled. Select Tools → Connection and enter the correct username and password. Ensure the To: box contains numbers only. Select Tools → Settings → Ring Tone and ensure the Mute button is not selected. Enable or reinstall the sound card drivers. Restore the default internet settings Use antivirus software to remove the virus Support If you have any difficulties installing or using your new ZTE MY39 EVDO card, please contact TELUS’ toll-free customer support line at 1-800-558-2273. The call centre is open from 8 a.m. to 10 p.m. (EST) Monday to Friday and from 9 a.m. to 8 p.m. (EST) Saturdays and Sundays. Online Help The ZTE MY39 has extensive online help, which includes documentation, answers to frequently asked questions (FAQ) and the latest software. Visit the ZTE Canada webpage at www.ztecanada.com/support for more information. 24


![- [ [ [ ANSEL ] ] ]](http://vs1.manualzilla.com/store/data/005876018_1-a636cab6934c7a831e92a71c6eb2f063-150x150.png)