1
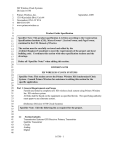
GPS Wireless Computer Time Sync
User Manual
Synchronised Solutions for every type of facility
SCHOOLS
HEALTHCARE
GOVERNMENT
INDUSTRIAL
CORPORATE
TABLE OF CONTENTS
COMPUTER TIME SYNC
Section 1.1 COMPUTER TIME SYNC SETUP INSTRUCTIONS
Page 4
Section 1.2 COMPUTER TIME SYNC OPERATION
Page 7
Section 1.3 CONFIGURE A SINGLE WORKSTATION TO SYNCHRONISE WITH THE COMPUTER TIME SYNC
Page 8
Section 1.4 CONFIGURING A NETWORK SERVER TO SYNCHRONISE WITH THE COMPUTER TIME SYNC
Page 11
Section 1.5 SCHEDULING NETWORK SERVERS TO SYNC TIME WITH THE SERVER RUNNING THE TIME SYNC
SOFTWARE
Page 11
Section 1.6 HOW TO INSTALL TIME SYNC AS A WINDOWS SERVICE
Page 16
Section 1.7 INSTRUCTIONS FOR HARDWARE HOOKUP
Page 19
Section 1.8 TROUBLESHOOTING
Page 20
WARNING: No Serviceable parts in the equipment.
WARNING: In order to turn the transmitter off, unplug the power supply unit from the wall. The transmitter must be placed
within the vicinity of a wall outlet.
The GPS Wireless Computer Time Sync User Manual
The Computer Time Sync software is easily loaded on a Windows-based network server or personal computer. The Wireless Computer
Time Sync is plugged into an available serial port on the computer via the 9-pin serial connector that is included. Synchronised time signals from the GPS Master Satellite Time System are received by the Wireless Computer Time Sync and sent to the server or workstation.
When installed on a network server, the Windows settings of the workstation and server can be configured to synchronise to the Primex
Wireless System. Computer Time Sync is designed to operate on all of the current Microsoft Windows including 95, 98, ME,
NT 4.0, 2000 and XP.
1.1 COMPUTER TIME SYNC SETUP INSTRUCTIONS
Installing Computer Time Sync Software:
Operating systems may vary from directions below. If you require assistance contact Primex Wireless Technical
Support at 0800-3896996.
1.
2.
3.
4.
Insert Computer Time Sync CD Rom into the CD Rom drive of your computer
Select Start in the taskbar
Double click on ‘My Computer’ (if this icon is not in the taskbar it may be located on the desktop)
Double Click the computer’s CD Rom drive (usually D). If enough time has elapsed, the drive will read the CD and
put a Time Sync icon by the drive it is in (icon may vary depend on the computer) See figure 1 below.
FIGURE 1
5. Double click on the ‘setup’ icon. See figure 2 below.
FIGURE 2
-4-
The GPS Wireless Computer Time Sync User Manual
6. At this time the programme will begin to install. InstallShield Wizard will install TimeSync on your computer, click
Next. Follow prompts. See figure 3 below.
FIGURE 3
7. Next a Readme Information screen will appear with the operating system compatibility. Review and click Next.
8. Next will appear a Customer Information screen with the option to enter a User Name and Organization. Here you
can specify whom the programme is installed for. See figure 4 below.
FIGURE 4
9. Next will appear a Destination Folder screen: click Next to install to this folder, or click Change to install to a
different folder. Primex Wireless recommends choosing the suggested folder. See figure 5 below.
FIGURE 5
-5-
The GPS Wireless Computer Time Sync User Manual
10. Next a Ready to Install the Programme screen will appear and the Wizard is ready to begin installation. At this
point if you like to review or change any of your installation settings, click Back. Click Cancel to exit the wizard. To
proceed with installation click Install. See figure 6 below.
FIGURE 6
11. At this time the programme is being installed and may take several minutes. After the programme has been installed
an InstallShield Wizard Complete screen will appear. Click Finish.
12. At this time you will be back at the setup screen. You may exit out of this screen by clicking on the “X” in the
upper right corner. See figure 7 below.
FIGURE 7
-6-
The GPS Wireless Computer Time Sync User Manual
1.2 COMPUTER TIME SYNC OPERATION
1. To start the programme select Start,
2. Select Programme
3. Select Primex Wireless
4. Select TimeSync. See figure 8 below.
FIGURE 8
At this time a clock icon will appear in the user’s taskbar. See figure 9 below.
FIGURE 9
5. Double click on the new clock icon and select Configure. See figure 10 below.
FIGURE 10
6. Select the correct serial port corresponding to where the Network Serial Cable will be plugged in and click ‘OK’.
See figure 11 below.
FIGURE 11
-7-
The GPS Wireless Computer Time Sync User Manual
7. The programme is now ready to operate. At any time you wish to quit the programme, double click on the clock icon
in the taskbar again and select Exit. See figure 12 below.
FIGURE 12
8. Double click on the computer’s clock located in the lower corner of the taskbar. See figure 13.
FIGURE 13
9. Confirm in the Date and Time Properties window that the Time Zone is correct for the user’s location.
10. Under time zone make sure that the box is not checked concerning the automatic clock adjustment for Daylight
Saving Time changes. Click Apply, then click OK See figure 14 below.
11. Some computers give the option of Internet Time. If your computer has this option make sure that the box
concerning the automatic synchronisation with an internet time server is not selected. See figure 15 below.
FIGURE 14
FIGURE 15
Please note: If any changes are made in the Date and Time Properties Window click on Apply before returning to the
desktop. If apply is not selected, the changes will not take effect.
1.3 CONFIGURE A SINGLE WORKSTATION TO SYNCHRONISE WITH THE
COMPUTER TIME SYNC
IMPORTANT NOTE:
When installing on Windows, NT, 2000 or XP, Time Sync needs to be installed using a minimum of PowerUser
rights. When it is run it needs the ability to change the system time. Windows Time under services most likely will
need to be set from automatic to manual. Windows Time maintains date and time synchronisation on all clients and
servers in the network and needs to be disabled. See steps 1-9 below. Administrative rights may be required for
installation. See your network administrator for details.
1. Select Start in the taskbar. See figure 16.
FIGURE 16
-8-
The GPS Wireless Computer Time Sync User Manual
2. Double click on Control Panel. See figure 17 below.
FIGURE 17
3. Double Click on Administrative Tools (icon location may vary depend on the computer). See figure 18 below.
FIGURE 18
4. Double Click on Services. See figure 19 below.
FIGURE 19
-9-
The GPS Wireless Computer Time Sync User Manual
5. Scroll down to Windows Time and double click. See figure 20 below.
FIGURE 20
6. Under Startup Type drop down menu change from Automatic to Manual. See figure 21 below.
FIGURE 21
7. Click on Stop. The below Service Control screen will then appear. See figure 22 below.
FIGURE 22
8. Once Service Control screen has stopped, Click on Apply
9. Click on OK
-10-
The GPS Wireless Computer Time Sync User Manual
1.4 CONFIGURING A NETWORK SERVER TO SYNCHRONISE WITH THE
COMPUTER TIME SYNC
NOTE: If installed on a network, the Computer Time Sync must be installed by an IT professional who has knowledge of
networking and network time.
WARNING: Modifying the registry can cause serious problems that may require the reinstallation of a computer’s operating
system. It cannot be guaranteed that problems resulting from using the Registry Editor incorrectly can be solved. Use the
Registry Editor at your own risk. Before modifying the registry, be sure to backup the registry and fully understand how to
restore the registry if a problem occurs.
As was previously stated, the Computer Time Sync could be installed on a single workstation computer or on a network
server. The programme installation instructions described in 1.1 apply to both applications. There is a difference, however,
in how you configure the server and workstations after the installation. For instructions on how to configure a workstation,
see section 1.3. The instructions below describe how to configure a network server.
In most instances, the Computer Time Sync is connected to the domain server. It then synchronises the server's clock
locally. Next, Windows Time Service must be configured to stop synchronising-- with external time sources. This is
performed in the following manner:
• Stop Windows Time Service
• Locate the Win32 registry key for Windows 2000 is located at HKEY LOCAL
MACHINE/System/CurrentControlSet/Services/ W32Time/Parameters.
• Set the Type key to NoSync
• Restart Windows Time Service
More detailed information on this matter can be found at www.microsoft.com/windows2000/docs/wintimeserv.doc ,
specifically pages 18-20.
Upon completing the above steps, the server will be synchronised to the Primex Wireless Clock System and if the local
workstations are configured to synchronise with the server, they also will be synchronised to the Primex Wireless Clock
system.
1.5 SCHEDULING NETWORK SERVERS TO SYNC TIME WITH THE SERVER
RUNNING THE TIMESYNC SOFTWARE:
NOTE: If installed on a network, the Computer Time Sync must be installed by an IT professional who has knowledge of
networking and network time.
Create a timesync.bat file to run the net time command to sync time with TimeSync server. Use Notepad to create
this file. Save it as timesync.bat. See figure 23 below.
FIGURE 23
-11-
The GPS Wireless Computer Time Sync User Manual
Save timesync.bat file to each server that needs to sync with TimeSync server.
Schedule timesync.bat file to run each day. Go to Start, Programme, Accessories, System Tools, Scheduled Tasks. See
figure 24 below.
FIGURE 24
Click on Add Scheduled Task. Click Next.
Click browse to navigate to timesync.bat file location. See figure 25 below.
FIGURE 25
-12-
The GPS Wireless Computer Time Sync User Manual
Click on the timesync.bat file. Then click open. See figure 26 below.
FIGURE 26
Click Daily. See figure 27 below.
FIGURE 27
-13-
The GPS Wireless Computer Time Sync User Manual
Set time for timesync.bat file to run. See figure 28 below.
FIGURE 28
Enter user ID and password with permission to run schedule tasks. For Example: Administrator. See figure 29 below.
FIGURE 29
-14-
The GPS Wireless Computer Time Sync User Manual
Click Finish. See figure 30 below.
FIGURE 30
Timesync.bat will now be scheduled to run every morning and will sync the time with the TimeSync Server. See figure 31
below.
FIGURE 31
-15-
The GPS Wireless Computer Time Sync User Manual
1.6 HOW TO INSTALL TIME SYNC AS A WINDOWS SERVICE
This method works well on Windows NT 3.51, 4 and 2000.
All services under NT are controlled by the Service Control Manager (SCM). Microsoft developed a small utility which is distributed with the Windows NT Resource Kit. The utility is called SRVANY.EXE and acts as a host (or service "wrapper") for
your application. In other words, it becomes the service application which does all of the work and communicates with the
SCM for you. When it starts, it looks at the registry to find out where your application is located. If it finds it, it starts your
application.
There are two programmes Microsoft has developed. The first, as just mentioned, is SRVANY.EXE. SRVANY is a programme which you copy to and resides in the folder where your application is installed. When your service starts, it actually
starts SRVANY, which starts your application.
The second programme Microsoft developed is called INSTSRV.EXE. This programme installs SRVANY as a Windows
service. It is a command-line driven programme, and once used is no longer needed unless you wish to add another service
which uses SRVANY, or you wish to un-install a previously added service.
Here's a visual step-by-step guide to installing SRVANY with the Time Sync software :
Assumptions:
• You are logged in as an Administrator. You cannot install a service otherwise
• The Time Sync software has been installed with its default settings, and so resides here: C:\Program
Files\Quartex\TimeSync\
• You've copied both SRVANY.EXE and INSTSRV.EXE into this folder
Step 1: Install SRVANY.EXE as a service using INSTSRV.EXE (from the command prompt) Change to the directory path of
the installed Time Sync software (remember to copy both “instsrv.exe & srvany.exe” to this same directory. See
example below.
Type: instsrv TimeSync “c:\program files\quartex\timesync\timesync.exe”
Hit Enter. You will receive a message “The service was successfully added!”. See figure 32 below.
FIGURE 32
-16-
The GPS Wireless Computer Time Sync User Manual
Step 2: Verify that your service was added by bringing up your services applet (from the control panel). See figure 33 below.
FIGURE 33
Step 3: (Windows 2000 only):
The default settings for SRVANY on Windows 2000 are not the same as those used on NT4, so some additional checkpoints
are required: (from the registry editor)
1. Go to the HKEY_LOCAL_MACHINE\SYSTEM\CurrentControlSet\Services\TimeSync registry entry
2. Check the value of the "ImagePath" string entry
3. This value should be the full path to SRVANY including the extension. Correct it if it's not. If you put SRVANY.exe in
the TimeSync folder, as described above, this full path should be:
c:\Program Files\Quartex\TimeSync\srvany.exe. See figure 34 and 35 below.
FIGURE 34
FIGURE 35
You next have to tell SRVANY where the application resides, so it can start it when the SCM starts SRVANY. Follow these
steps to complete the installation of your new service:
-17-
The GPS Wireless Computer Time Sync User Manual
Step 4: Add a "Parameters" key:
1. Start your registry editor
2. Find your service under HKEY_LOCAL_MACHINE\SYSTEM\CurrentControlSet\Services\TimeSync
3. Create a New Key and name it Parameters
FIGURE 36
FIGURE 37
Step 5: Add an "Application" value:
1. Open the "Parameters" key
2. Create a new string value (REG_SZ) within the "Parameters" key & name it Application
3. Edit "Application" and specify the full path of the Time Sync executable (including the extension) (should be
C:\Program Files\Quartex\TimeSync\timesync.exe). See figure 38 below.
FIGURE 38
FIGURE 39
-18-
The GPS Wireless Computer Time Sync User Manual
FIGURE 40
FIGURE 41
The Time Sync application is now installed as a Windows service. Below is some more information you should know about
SRVANY and your new service application:
• The registry values are not case sensitive
• To UN-install the service, use INSTSRV.EXE, ex: INSTSRV TimeSync REMOVE
• There are three ways to start the service:
1. From the Services applet of the Control Panel
2. Using the SC.EXE utility, ex: SC start TimeSync
3. Using the NET.EXE utility, ex: NET START TimeSync
• There are three ways to stop the service:
1. From the Services applet of the Control Panel
2. Using the SC.EXE utility, ex: SC stop TimeSync
3. Using the NET.EXE utility, ex: NET STOP TimeSync
• You may install SRVANY.EXE several times with different registry parameters (i.e. running different target applications) just use a distinct service name for each instance (ex. App_01, App_02, etc.)
1.7 INSTRUCTIONS FOR HARDWARE HOOKUP
-19-
Antenna
BNC Connector
Q11842
1-800-537-0464
RF CHANNEL #
MODEL #
VERSION#
RX
RX Light
COM
PORT
NOTES
9VDC
1. Connect the supplied rubber antenna to the BNC connector on
the side of the Computer Time Sync case.
2. Connect the DB9 female connector that is attached to the
Computer Time Sync case into the serial communications port of
the users PC (or USB if desired, an adapter will be needed. If this
is the case, see troubleshooting section for more information).
3. Take the supplied 9VDC power supply and connect it to the
Computer Time Sync Case. Plug it into standard electrical outlet.
4. The RX light will blink green with successful reception of data
packets from the transmitter. Please note: This may not be an
instantaneous blink.
5. Once the Computer Time Sync finds a signal it will update the PC
at the next minute change on the transmitter. It will then update
every five minutes from that initial synchronisation.
9VDC Power Supply
DB9 Data Cable
The GPS Wireless Computer Time Sync User Manual
1.8 TROUBLESHOOTING
Error Messages
1. Connection Error Message:
If communication is lost between the com port of your computer and the Computer Time Sync after it has
been installed and running properly, a message will be displayed across your screen. See figure 42 below. Confirm
Computer Time Sync DB9 data cable is connected into the serial port of your computer.
If you are still experiencing problems please call Primex Wireless Technical Support at 0800-3896996.
FIGURE 42
2. Valid Time Signal Error Massage:
If the Computer Time Sync Receiver has not received a signal from the transmitter in 24 hours after receiving a valid
signal a message will be displayed across your screen. See figure 43 below.
Confirm Computer Time Sync installation checking:
• connections to computer
• confirm 9VDC power supply is plugged in to both the case and the wall outlet
• confirm rubber antenna is attached to case
• confirm green LED is flashing
If you are still experiencing problems please call Primex Wireless Technical Support at 0800-3896996.
FIGURE 43
USB Serial Port on Computer
If your computer has a USB port, a USB to serial converter adapter will need to be purchased. It is crucial that he USB
adapter is compatible with the system you are using.
-20-
Phone:0800-3896996 Fax: 01422-349462
www.primexwireless.co.uk
[email protected]
Primex Wireless, Inc. ©2005, Patents Pending. Printed in the USA.
41012M 10/05/05