1
5.
6.
Support the front axle with a hydraulic jack. Disconnect the shocks from the
axle. Save the lower shock hardware.
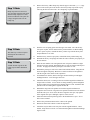
Remove the upper mounting nut from the sway bar links Figure 3. For XJ/ZJ
models remove and save the upper nut and stem hardware. For TJs, disconnect
the links from the sway bar with a pickle fork to release the tapered seat. Save
nut.
Step 5 Note
If replacing the shocks, remove
the shocks from the upper mount
as well and remove from vehicle.
The upper mounting hardware will
not be reused.
Figure 3
7.
Remove the cotter pin and castellated nut from the drag link end at the pitman
arm Figure 4. Thread the nut back on a couple of turns. Strike the pitman arm
near the drag link end to release the tapered seat. Take care not to damage the
end. Remove the nut and the drag link from the pitman arm. Save hardware.
Figure 4
8.
Remove the driver’s side coil spring retainer clip located on the back side of the
axle coil seat. Save clip and bolt.
9.
Loosen the driver’s and passenger’s side lower control arm bolts at the axle.
Completely remove the passenger’s side bolt and leave the driver’s side in
place. This should allow the axle to lower enough to remove and install the coil
springs.
10.
Lower the axle with the hydraulic jack and remove the coil springs. Take care
not to over extend the brake lines.
Step 8 Note
Some models may have a passenger's side retaining clip as well. If
that is the case remove it also.
J2200 Installation - pg. 3