1
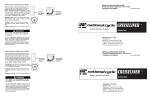
INSTALLATION AND OWNER’S MANUAL
P4105 Highway Bar
for Kawasaki® VN2000
Please read these instructions carefully and thoroughly before beginning work.
Before installing accessory, carefully consider whether one possesses the necessary technical skills and workshop tools
to complete the installation properly. Otherwise, any Motorcycle Retailer will be glad to install this accessory.
Dealers, if installing the Highway Bar for a customer please supply them this manual. It contains the instructional and
reference material needed to properly maintain and use this product.
At time of purchase report any missing parts directly to National Cycle, Inc. The following information is necessary:
BAG NUMBER on outside of plastic fastener bag and DATE STAMP located on the end panel of the outer box.
Thank you.
The following symbols are used in these instructions:
Special notes and cautionary measures.
PARTS LIST
Index
Part No.
1
90-970205-000
2
90-970206-000
3
51-513052-000
4
42-431010-000
5
51-515965-000
6
51-515951-000
7
49-495531-000
Bag#795
Tips for facilitation of operation, control
and adjustment, as well as maintenance
work.
4mm Allan Wrench
8mm Hex
Ratchet
10mm Socket
14mm Socket
1/2” Socket
Torque Wrench
Motorcycle Service Manual for
Torque Specifications.
Description
Highway Bar, Left
Highway Bar, Right
“U” Bolt
Whizlock Nut, Chrome
CS M10 1.25 x 65
CS M10 1.25 x 50
Spacer
Replacement Parts Items 3-7
Qty.
1
1
2
4
2
2
4
Bag 795
6
3
4
5
7
Right and Left side of Motorcycle is determined
while sitting on the bike.
1
2
PREPARATION
1. Insure that the motorcycle is on flat level ground.
2. It is recommended that the motorcycle sit for at least one
hour prior to installation to allow the engine to cool.
3. To facilitate installing the U-clamps to the down tube,
loosen the radiator frame cover. (4mm Allan Wrench)
Figure 1.
During installation tighten all fasteners to hold. Wait
until you check all clearances and operation of the
brake and shift lever to firmly tighten and torque all fasteners.
Figure 1
Page1 of 2
10-114858-000 09/06
INSTALLATION
Right Side Highway Bar
1. Remove the bottom engine mount bolt. Store bolts they will
not be re-used. (14mm Socket) Figure 2.
2. Select the right side Highway Bar. Using one supplied
spacer and one 50mm bolt, loosely install the Highway Bar at
the lower mount point. (8mm Hex) Figure 3.
3. Repeat procedure at upper engine mount bolt using the
supplied 50mm bolt and one spacer. Do not fully tighten
bolts. (14mm Socket, 8mm Hex) Figure 4.
Install Upper “U” Bolt
While installing the Whizlock Nuts (step #4 below),
tighten the nuts evenly, alternating left and right as you
tighten. When complete you want the same amount of
threads exposed on the ends of the “U” to insure the bolt
does not rotate. Do not fully tighten at this time.
4. Place “U” Bolt between the radiator and the down tube at
the location shown in Figure 5. Threaded ends of “U” will
face outward. Install Whizlock Nuts. (1/2” Socket) Do not
fully tighten.
Figure 2
Place spacer on bolt to
inside of Highway Bar
Figure 3
Figure 5
Figure 4
Page 2 of 4
10-114858-000 09/06
LEFT SIDE INSTALLATION
To expose the engine mount bolts you need to
loosen the wire connector cover. See step #6.
1. Remove the two bolts holding the wire connector cover.
Bolts will be reused. (10mm Socket) Figue 6.
2. Remove the lower engine mount bolt. (14mm Socket)
Figure 7.
3. Install Highway Bar at lower engine mount point using the
supplied 65mm bolt and one spacer. Place spacer to the
inside of Highway Bar. Do not fully tighten. (8mm Hex)
Figure 8 and 9.
4. Use remaining 65mm bolt, and spacer to install Engine
Guard to upper mount point. Spacer is located to the inside
of Highway Bar. Do not fuly tighten. (14mm Socket and
8mm Hex)
Figure 6
On the Left Side due to tight clearances between
the radiator and the down tube you must locate the
point where the radiator is “notched out” slightly. Figure 10.
5. Repeat Step #3 to install “U” Clamp. Do not fully tighten.
(1/2” Socket) Figure 10.
Place spacer on
bolt to inside of
Highway Bar
Figure 7
Figure 9
Figure 8
Figure 10
Page 3 of 4
10-114858-000 09/06
CHECK CLEARANCE AND TIGHTEN ALL FASTENERS
Check clearance and operation of foot brake
and shift lever. Check clearance of Highway Bar
at a full fork lock left and right. Adjust as
necessary.
12. Tighten all Screws (left and right side) at the lower
mount points to the specified torque in your service manual.
Tighten the 4 Whizlock Nuts firmly. (8mm Hex and 1/2”
Socket) Figure 11.
13. Reinstall the Wire Connector Cover. (Hex Key)
Figure 12.
Check hardware for tightness after you ride the motorcycle. Re-tighten fasteners if necessary.
MAINTENANCE / CAUTION
The high quality chrome finish of your National Cycle
Highway Bar can be maintained with any quality chrome
cleaner or polish applied with a soft cloth.
Check hardware for tightness regularly. Never
ride with loose mounting hardware. Check to
be sure your Highway Bar does not contact
any part of the motorcycle at a full turn left and right.
Correct any problem before using the motorcycle.
Figure 11
If the additional of an accessory(ies) adversely affects
your motorcycle’s stability immediately remove the
accessory(ies). Do Not ride a motorcycle that exhibits
unsafe handling traits. Have experienced service
personnel correct any problem before riding with the
accessory(ies) installed. For further questions concerning handling problems associated with an
accessory(ies), contact your dealer, motorcycle manufacturer, or accessory manufacturer.
Figure 12
©2005 National Cycle, Inc. PO Box 158, Maywood, IL 60153-0158 USA
708-343-0400 / Fax: 708-343-0625 / www.nationalcycle.com / e mail: [email protected]
Page 4 of 4
10-114858-000 09/06