1
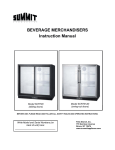
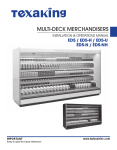
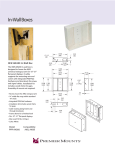
Installation & Service
Sheet
CORNER (WEDGE) CASES
INSIDE & OUTSIDE CORNER MERCHANDISERS
Refrigerated Corner Display Cases
This sheet has been designed to be used in conjunction
with the General Installation & Service Manuals.
Save All Instructions for Future Reference!!
This merchandiser conforms to the Commercial Refrigeration Manufacturers Association Health and Sanitation standard CRS-S1-97.
PRINTED IN Specifications subject to REPLACES
IN U.S.A.
change without notice. EDITION
ISSUE
DATE
4/97
Tyler Refrigeration Corporation * Niles, Michigan 49120
PART
NO.
9403980
REV.
CORNER (WEDGE) CASES
Installation & Service
Installation Information
WARNING
Corner cases are not intended as stand alone commercial refrigerated merchandisers.
They must be bolted to the adjoining case(s) or to the floor to provide stability. Failure to
do so could result in product damage and/or possible personal injury.
Pull-Up Locations
There are no parts which need to be removed
to access the corner casepull-up hardware.
On open well cases and service cases there
are two or three pull-up locations. On multishelf cases there are three, four or five pull-up
locations.
• See page step 8 on page G-9 in the
General Installation & Service Manual for
the specific pull-up locations (1) for the different types of cases.
Refrigerant Piping
All case-to-case piping should be routed
through the access openings (2) in the side
case supports. Refrigeration technicians can
make connections to corner case piping by
removing the bottom tray (3) from the case.
Field Wiring Connections
Corner cases provide one of three locations
to connect field power supply wiring.
1. On models with raceways, raceway cover
(4) or lower front cladding (5) can be
removed. The wires should be connected
to the terminal block in the raceway.
2. On service case models, remove a rear
lower panel (6) to expose an electrical
junction box where the wires should be
connected.
Page 2
3. On corner cases where space does not
allow for a raceway, wiring in flexible
metal conduit* (7) is routed through an
access opening (2) and connected to the
adjoining case wiring.
*
Field supply connections are 18AWG
wire leads. An equipment grounding
green conductor is routed in the flexible conduit. DO NOT rely on the conduit as equipment grounding means!
NOTE
Some electrical components and/or ballast
may be located on top of the case when
space does not permit them to be located
in the raceway and/or under the canopy.
Plumbing Waste Connections
The drain pan in each case is fitted with a
3/4” inside diameter tube. A length of PVC
hose is attached to the tube. A preformed
PVC “P-trap” is shipped loose, along with a
spring connector. This “P-trap” is to be
installed between the end of the PVC hose
and where it connects into the drain system
on the adjoining case. Waste outlets are not
intended for direct connection to the building
plumbing system Plumbing Codes require
drain lines to terminate as an approved air
gap. Consult your licensed plumber.
April, 1997
Installation & Service
CORNER (WEDGE) CASES
Curved Glass Replacement
Glass Removal
Glass Installation
1. Firmly lift up and out on front glass handle
until the glass air seal releases.
1. Insert bottom edge of front glass handle
into bottom glass edge trim.
2. Grasp both sides of the plexiglas and
slide the top glass trim out of the retainer
glass clip at the top of the case.
2. Line-up and position the top glass trim
into the retainer glass clip at the top of the
case.
3. Push firmly on the top of the plexiglas
until the top glass trim snaps into the
retainer glass clip.
4. Press in along the sides of the plexiglas to
assure a proper air seal for the front
curved glass.
March, 1998
Page 3