1
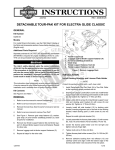
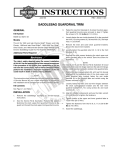
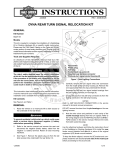
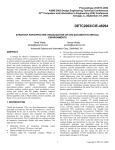
-J02622
REV. 2005-05-12
CHROME TOUR-PAK LID TRIM KIT
GENERAL
is01541
2
Kit Number
53936-03
1
Models
This kit fits 1993-2005 Touring models equipped with a King
or Chopped Tour-Pak (except 100th Anniversary Two-tone
versions.) This kit does not fit with Mini Tour-Pak Lid Rack (part
number 53100-96) or previously installed Tour-Pak Lid Organizer (part number 53249-01A).
NOTE
erman
G
.
e
.
y
n
Kit Contents
Rosto
ck
A Service Manual for your model motorcycle is available from
a Harley-Davidson Dealer.
2
1. Template
2. Measure these areas to be sure distances are
equal
o p. d e
See Figure 4 and Table 1.
INSTALLATION
2.
4.
See Figure 1. Carefully place template in recessed area
of Tour-Pak and align the template with the 3 surrounding
ridges (forming the recess). Center template by measuring
equal distances from side of template to left and right
ridges and at top corners. Tape the template to the TourPak in the centered location.
w
w
3.
Obtain template from this kit and carefully cut around the
outer line. Measure the 1 inch reference line to be sure of
correct scale.
Use a scribe or similar tool to carefully mark the exact
center of each of the five trim mounting holes on the template. Press hard enough that marking will penetrate paper
and will also mark the Tour-Pak surface.
w.
Figure 1. Center of Template
NOTE
Apply masking tape to the Tour-Pak cover at the five points
where you will be drilling the trim mounting holes. The tape will
serve as a marker for drilling as well as to keep the fiberglass
surface from chipping or splintering during the drilling process.
sh
1.
NOTE
Remove all belongings from within the Tour-Pak to avoid possible contact with the moving drill bit during the following drilling
procedures.
h d o nli
Place a piece of masking tape at each of the marked holes
and copy the scribe marks made in the last step to the
masking tape.
n
e
5.
Drill starter holes using a 1/16 inch drill bit. Using a 3/8
(.375) inch drill bit, drill the finished holes. Remove the
masking tape pieces.
6.
See Figure 4. Obtain the Tour-Pak lid trim piece (4) and
five of the rubber washers (3) from kit. At each of the
mounting studs on the trim piece, carefully fit a rubber
washer onto the stud end.
NOTE
The rubber washers are sized specifically to surround the stud
with a seal-tight fit. Make sure washers are placed correctly at
each of the mounting studs.
7.
-J02622
Open and lift up the lid of the Tour-Pak. Place the chrome
lid trim piece onto the lid carefully aligning each of the
mounting studs (with washers) with each of the drilled
holes.
1 of 2
SERVICE PARTS
is01542
See Figure 4 and Table 1.
is01543
4
1
3
1
Figure 2. Trim Piece Mounting Studs
erman
G
.
e
.
y
n
While holding the lid trim with one hand, hold screwdriver
as straight and as parallel to the mounting stud as possible
and tighten the self-tapping screw until the lid trim piece
begins to draw up tight, then stop. Repeat Steps 8 and 9
for the remaining screws and washers.
4
w
w
3
2
1.
2.
3.
4.
Self-tapping screw
#10 metal washer
Rubber washer
Rubber washer
1
Table 1. Service Parts
Item
Description (Quantity)
Part Number
1
Screw, panhead, Torx #10-24 (5) 4194
2
Washer, #10 (wide) (5)
6831
3
Washer, EPDM (10)
57964-97
4
Lid, Tour-Pak, chrome trim
Not Sold Separately
5
Template (not shown)
53937-03
sh
10. Return to all five screws and tighten evenly and securely,
but do NOT overtighten.
is01544
Figure 4. Service Parts: Chrome Tour-Pak Lid Trim Kit
o p. d e
9.
See Figure 3. Obtain a rubber washer (3), #10 metal
washer (2) and self-tapping mounting screw (1) from kit.
Install the metal washer followed by the rubber washer
onto the self-tapping screw.
Rosto
ck
8.
2
w.
h d o nli
n
e
Figure 3. Lid Trim Kit Drill and Hardware Locations
-J02622
2 of 2