1
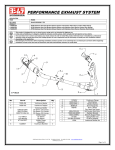
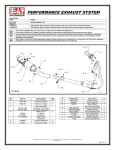
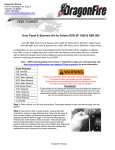
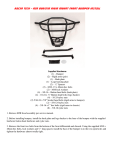
YOSHIMURA PIM II
(EMS Peripheral Interface Module)
APPLICATION
YEAR
2011
MODEL
Polaris RZR XP 900
PRODUCT
600XX399000
PIM2 Fuel Injection Controller Kit
This product is designed for use in closed course racing and is not
intended for highway use.
Read through all instructions before beginning installation.
Areas of vehicle may be extremely hot. Let vehicle cool down before
beginning installation. Always wear hand and eye protection and take
precautionary measures to avoid injury or damage.
NOTE:
In the state of California, it is illegal to modify the emission control system, which includes the fuel injection of any
vehicle for on- or off-highway vehicles.
5420 Daniels Street Chino, CA 91710 Tel (800) 634-9166 Fax (909) 591-2198 www.yoshimura-rd.com
600XX399000
Page 1 of 5
TOOLS REQUIRED
Metric Socket Set
Screwdriver
Power Drill
Drill Bit Set
-INSTALLATION-
1. Remove driver and passenger seat as per Factory Service or Owner’s
Manual.
2. Disconnect the battery.
3. Install PIM 2 bracket in compartment under driver side seat using
supplied hardware. Apply provided hook-and-loop adhesive to PIM 2 unit
and insert into bracket.
4. Remove engine access panel behind driver and passenger seat.
5. Connect PIM 2 harness to PIM 2 unit and route harness towards the rear
of the vehicle.
5420 Daniels Street Chino, CA 91710 Tel (800) 634-9166 Fax (909) 591-2198 www.yoshimura-rd.com
600XX399000
Page 2 of 5
6. Locate the stock Crank Position Sensor (CPS) behind passenger seat.
Disconnect stock CPS plug and connect the PIM 2 harness in-line with
the stock harness plug.
Stock
CPS
Stock
CPS
PIM 2
Harness
Stock Harness
7. Locate the stock Power plug next to oil reservoir. The power plug can
be accessed from the oil reservoir cover. Disconnect the stock Power
plug and connect the PIM 2 harness in-line with the stock harness plugs.
Stock
Harness
PIM 2
Harness
Stock
Harness
8. Locate the coil mount bolt behind driver seat. Remove and install PIM
Ground harness to coil mount bolt.
PIM Ground Harness
5420 Daniels Street Chino, CA 91710 Tel (800) 634-9166 Fax (909) 591-2198 www.yoshimura-rd.com
600XX399000
Page 3 of 5
9. Locate the (2) stock Fuel Injector plugs (White plug and Black plug).
Disconnect the stock Fuel Injector plugs and connect the PIM 2 harness
in-line with the stock harness plugs.
Stock
Harness
Stock
Harness
PIM
Harness
10. Locate the Throttle Position Sensor (TPS) behind the airbox. Remove
stock airbox as per Factory Service Manual to access the TPS. Using
the provided T-Tap plug, install T-Tap onto green TPS wire. Connect
PIM 2 harness to new T-Tap plug.
PIM 2
Harness
T-Tap
Stock
TPS
11. Re-install airbox as per Factory Service Manual.
12. Re-install engine access panel.
13. Re-connect battery and re-install driver and passenger seat as per
Factory Service or Owner’s Manual.
5420 Daniels Street Chino, CA 91710 Tel (800) 634-9166 Fax (909) 591-2198 www.yoshimura-rd.com
600XX399000
Page 4 of 5
Ground
TPS
CPS
Power
Connector
To Fuel
Injectors
To PIM 2
To Fuel
Injectors
**T-Tap**
D.A.T.A. Box
DESCRIPTION
PIM2 Unit
PIM2 Harness for Polaris RZR XP 900
PIM2 Bracket for Polaris RZR XP 900
Installation CD
USB Communication Cable
6mm x 16mm Button Head Cap Screw
6mm Flat Washer
6mm Lock Nut
Zip Ties
Hook-and-Loop Adhesive
“Comp Use Only” Sticker
Yoshimura Sticker Sheet
** T-Tap**
QTY
1
1
1
1
1
2
4
2
8
1
1
1
1
PART #
R-433B
600XX399000HB
R-433-2505-BRKT
R-433-CD
R-433-USB
M6X16BHS
6MMWASHER
6MMLN
ZT-300
5000-V
17012
17029
**
5420 Daniels Street Chino, CA 91710 Tel (800) 634-9166 Fax (909) 591-2198 www.yoshimura-rd.com
600XX399000
Page 5 of 5