1
3.0
Electrical System Installation
3.1
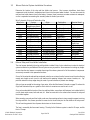
Nitrous Electrical Components Bill of Materials (BOM)
Item #
Quantity
Description
1
2
1 ea.
1 ea.
Activation microswitch
Activation microswitch bracket (not shown)
3
2 ea.
Activation microswitch mounting nut
4
5
2 ea.
1 ea.
Activation microswitch mounting screw
2 Stage 30 amp relay
6
1 ea.
Wire harness with integral relay/fuse holders
7
8
1 ea.
6 ea.
Red lighted toggle switch
18/22g female spade connector, Nylon insulated
9
2 ea.
14/16g female spade connector, Nylon insulated
10
11
2 ea.
3 ea.
14-16g male spade connector, Nylon insulated
16/18, splice connector
12
5 ea.
14/16g 3/8” ring terminal, Nylon insulated
13
14
1 ea.
1 ea.
Male blade fuse tap
14/16g male spade connector, Nylon insulated
15
1 ea.
Nitrous 2nd stage push button
16
17
1 ea.
2 ea.
20 amp ATO blade fuse
18/22g female spade connector, Nylon insulated
Nomenclature Descriptions:
ATO… the fuse configuration is ATO. When replacing this fuse, ask for an ATO fuse.
“a”… Amperage.
Important: The wiring hardware and instructions included with this kit are intended for 12-volt electrical systems only.
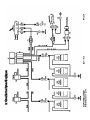
Before attempting to wire your Edelbrock Performer nitrous oxide system, examine and follow the wiring diagram on
the following page. Please call the Edelbrock Technical department with any questions concerning electrical wiring.
&
When working with electrical systems in your vehicle, it is a good idea to have a service manual that features your vehicle.
It is also good practice to have a book that specializes on the specialized techniques required when working with
vehicular electrical systems.
©2004 Edelbrock Corporation
Brochure No. 63-0190 - DC/mc
Page 16 of 28
Rev. 03/04
Catalog #70003 & #70004