1
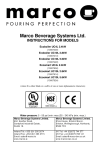
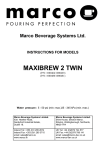
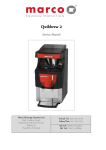
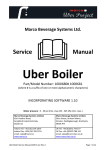
MARCO BEVERAGE SYSTEMS LTD. INSTRUCTIONS FOR MODELS QWIKBREW 2 (P/N: 1000379#, 1000384#, 1000385#, 1000386#) QWIKBREW 2 5.6KW (P/N: 1000382#) (where # is either blank or a suffix of one or more alphanumeric characters) Marco Beverage Systems Limited. Marco Beverage Systems Limited. 63d Heather Road, Sandyford Industrial Estate, Dublin 18. Shire House, Strixton Manor, Strixton, Wellingborough, Northants, NN29 7PA Ireland Tel: +353 (0)1 295 2674 Ireland Fax: +353 (0)1 295 3715 email: [email protected] www.marco.ie UK Tel: +44 (0)2072 744 577 UK Fax: +44 (0)2079 788 141 email: [email protected] www.marco-bev.co.uk WARNINGS Warning. Live electrical voltages are present behind the cover(s) marked with this symbol. Covers shall only be removed by authorised personnel only. The appliance must be fully disconnected from mains (the switch on the front panel is a standby switch and does not switch mains voltage) Installation should only be carried out by a competent service engineer. This appliance must be placed/installed on a horizontal flat stable surface. This appliance is not suitable for outdoor use. The ambient temperatures this unit should operate within are 5ºC - 35ºC. This appliance should not be installed in a tightly enclosed area (such as a cupboard). Air should be able to freely circulate around it. This appliance dispenses hot water at near boiling point and is a potential scald/burn hazard. Beware of accidentally operating the water draw off tap especially when cleaning the front of the brewer. Steam & hot water may discharge from the vent outlet at the bottom from of the machine. The vent outlet at the bottom of the machine is intended to drain condensate into the supplied driptray. This vent must not be plugged, plumbed or obstructed in any way. This appliance is not intended for use by persons (including children) with reduced physical, sensory or mental capabilities, or lack of experience and knowledge, unless they have been given supervision or instruction concerning use of the appliance by a person responsible for their safety. Children should be supervised to ensure that they do not play with the appliance. This appliance may be placed in self-service areas if attended to by trained personnel. The electrical power supply must be connected in accordance with the applicable regulations of the country of installation. The appliance must be fully disconnected from mains power before removing any panels or during general servicing; the button on the front is standby only and does not switch mains power on/off. (i.e. you must unplug fully at the power socket). If the supply cord is damaged, it must be replaced by the manufacturer, its service agent or similarly qualified persons in order to avoid a hazard. Check your National water supply authorities for any specific requirements. Check your National health/kitchen authorities for any specific requirements. The new water inlet hose-set (if) supplied with the appliance is to be used. Any old water inlet hose-set(s) should not be reused. Risk of flooding. A hose is not a permanent connection. It is, therefore, advisable to switch off brewer and close the stopcock valve when brewer is not in use, e.g. overnight, weekends etc. The utmost care has been taken in the manufacture and testing of this appliance. Failure to install, maintain and/or operate this brewer according to the manufacturer’s instructions may result in conditions that can cause injury or damage to property. If in any doubt about the s erviceability of the brewer always contact the manufacturer or your own supplier for advice. The default temperature set point of this machine is approx 94°C using this machine at high altitudes could result in boiling and excess steam, with little water being able to be dispensed. Contact the manufacturer in this case. Before any attempt is made to move or service the brewer ensure it is unplugged, and drained via the tap and allowed to full cool fully. 1900057 REV.3 2 INSTALLATION PLUMBING Water pressure: 5 - 50 psi (min.-max.)35 - 345 kPa (min.-max.) 1. Fit a stop valve on a cold water line and attach a ¾” BSP male fitting 2. Connect the straight tail-piece of the flexible hose to the stop valve fitting. Make sure that pre-attached sealing washer is secure. 3. Connect the right angled tail-piece of the hose to the inlet valve of the brewer (in the base of the machine); again making sure that the pre-attached sealing washer is secure. 4. Turn on water supply and check that the fittings have sealed. 5. A hose is not a permanent connection so it is advisable to close the stop valve when not in use for long periods (e.g. weekends/holidays) For model 1000384 Push Button Rear Delivery, there is an optional drain hose to allow urn to be emptied into a drain or container by turning the key on the side panel. However the bunged hose must be replaced with a suitable hose to facilitate this. For model 1000385, the Coffee and Hot Water output is controlled via Front Push Buttons. These operate in a “Push and Hold” mode. To drain the coffee urn a key switch is located at the front on the unit. When operated this key switch will open the Coffee output valve and allow the coffee urn to drain. A suitable container should be used. ELECTRICAL When installing the product, always observe the local regulations and standards. Products without an electrical plug are to be connected by an authorised professional installer. N.B. THESE APPLIANCES MUST BE EARTHED! 1900057 REV.3 3 FIRST TIME OPERATION 1. Check that all installation procedures have been carried out. 2. Switch on the power to the unit by pressing the Power Button (See below); all the LEDs on the control panel will flash momentarily. 3. The machine will automatically take in water. The ‘Power On’ LED will begin to flash until water has passed safely above the elements (~ 3 minutes). 4. Heating will begin, and the ‘Power On’ LED will stop flashing and glow. 5. When the water has reached the high level and is up to temperature, the green ‘Ready to Brew’ light illuminates. The appliance is now ready for brewing and water can be drawn off from the hot water tap. QUICK OPERATION INSTRUCTIONS 1900057 REV.3 4 BREWING HOT WATER OPERATION Approx. 5.7L of water is available as an immediate draw-off; after this no water is available until the machines heat fill cycle has recovered. This is to ensure that any water drawn off is at the correct temperature. BREWING OPERATION 1. A brew can be selected any time the green ‘Ready to brew’ light is illuminated. 2. Slide out the coffee filter bowl and place a single sheet of filter paper in the bowl. 3. Put the desired amount of ground coffee into the filter paper. Your coffee supply company may have pack sizes to suit the brews of your Qwikbrew 2. Depending on the coffee grind and roast, and on water quality, you may have to adjust these quantities to obtain the optimum flavour. 4. Level off the surface of coffee by gently shaking the filter bowl. 5. Slide the coffee filter bowl into the guide rails in the brew head and push fully home. 6. Select the correct brew on the control panel by pressing the required Brew Button. N.B. If you make a mistake press the Power Button to turn the machine off. Wait 3 seconds and turn back on again. Select the correct brew. 7. A 3L brew should take around 4-5min. A 6L brew should take around 8-10min. 8. As soon as possible after brewing – remove the filter paper with the spent grinds. Note: allow time for all the coffee to drain from the filter bowl before removing. SETTING BREW WATER VOLUMES When in volume calibration mode you are selecting the overall water flow time for each brew. The sprayhead outputs approx 700mL/minute which is 11.66mL/second. You can select 1, 2 or all 3 brew volumes in the one calibration session, they can be selected in any order, e.g. brew 2 could be the lowest or highest volume depending on when you press the brew 2 button. So if you want a volume of 3.5L in brew 2 you would press 2 after 5min(=300sec), (11.66mL/sx300s=3.5L), see table guide. To Calibrate Volume 1. 2. 3. 1900057 Turn the brewer on by pressing the power button. Press and hold any of the brew buttons for 5+ seconds, your timer should be started the moment you press the button down. (any brew button can be pressed to enter calibration mode, e.g. you could press & hold brew 1 if only calibrating brew 3) The power on red LED will blink to show you are in volume calibration mode, no water will flow at this time. REV.3 5 4. 5. When the desired time has passed press the corresponding brew button to select this volume for that brew. When all required brews are selected turn the brewer off using the power button to save your settings. (To disable a brew button select a water flow time of less than 10seconds.) Brew Water Volume * Calibration Time Estimate 1L 1min 25 sec (85sec) 1.5L 2min 8sec (128sec) 2.0L 2min 51sec (171sec) 2.5L 3min 15sec (214sec) 3.0L 4min 17sec (257sec) 3.5L 5min (300sec) 4.0L 5min 43sec (343sec) 4.5L 6min 26sec (386sec) 5.0L 5.5L 7min 8sec (428sec) 7min 51sec (471sec) 6.0L 8min 34sec (514sec) NOTE- * A certain volume of Brew water will be retained in the coffee grinds and so the Coffee volume will be less than the Brew Water volume. This will depend on the Coffee grind and weight. Trails will be required to determine this volume. On average 1gram of coffee absorbs 2ml of water. Verification of Volume Settings Select a brew and measure the actual water output, if it is too low or too high a volume you can recalibrate and extend or reduce your water flow time. e.g. if you set brew 1 to have a water flow time of 8min 34sec you would expect to get 6L (as the flow rate is approx 700mL/min), i f you got 6.1L then you will want to reduce it by 100mL. Assuming the flow rate of 11.66mL/s, to achieve a 100mL reduction, use the following equation to determine the time difference required: 100mL/11.66mL/s = 8.6s (round up to 9sec) So you would enter volume calibration mode and select a new flow time of: 8min 34sec – 9 sec = 8min 23sec If you need to recalibrate any brew button follow the calibration instruction for that button. Once you have recalibrated the required brew button press the power button to save this new setting. It is not necessary to recalibrate the other brew buttons. Pressing the power button in calibration mode will only save the settings which have been changed. All previously saved settings will remain. 1900057 REV.3 6 CLEANING Like any cooking utensils the coffee urn of your Qwikbrew 2 must be cleaned properly and regularly. Marco recommends cleaning after each days brewing using a suitable urn-cleansing compound. Marco’s own brand cleaner is available (Part Number 8000235), instructions are given on each tub. Your Qwikbrew 2 is supplied with one large urn cleaning brush and one small sight-glass cleaning brush – to assist thorough cleaning. The exterior of the machines may be cleaned with a damp cloth and a light detergent. Do not use abrasive cloths or creams, as this will spoil the finish of the machine. Do not use a water jet or spray. Beware of accidentally operating the draw off tap when cleaning the front of the machine. For machines with Push Button Delivery For model 1000384 Push Button Rear Delivery. This model comes with an optional drain hose to allow the user to empty the Urn into a drain or container by turning the key on the front panel. However some residue can be left in the tap and dispense valve and this residue should be also drained off prior to performing a new brew. The key should be removed after use and stored in a safe place to remove the possibility of accidental emptying of Urns. 1900057 REV.3 7 DESCALING The only regular maintenance required is occasional de-scaling. In common with all coffee brewer manufacturers, service calls resulting from limescale are not covered by warranty. Fitting a scale reducer is recommended, especially in hard water areas. Marco can advise on suitable water treatment by contacting [email protected] A service agent should descale the machine regularly. Marco suggests that the machine be descaled every 3 months if the unit is in a hard water area. In soft water environments every 6 months should suffice. TROUBLESHOOTING The Marco Qwikbrew 2 uses an electronic diagnostic system to help determine faults. If an error is detected a sequence of flashes is displayed through the POWER light. DIAGNOSTIC LIGHT GUIDE No of flashes Symptom Action required 2 Water level below elements. Normal when machine first fills. Check water pressure, if this is OK - call service agent. 3 Temperature sensor failure (o/c) Call service agent 4 Water not heating Call service agent 5 Temperature sensor failure (s/c) Call service agent Machine not filling Check water pressure. If this is OK and the machine has not returned to normal operation after 15 min – call service agent 6 1900057 REV.3 8