1
Kit Contents
QtyPart
4
2
2
2
QtyPart
2
3" Front Coil Spring
3" Add-A-Leaf
2
4U-bolts/nuts/washers
Leaf Spring Clamp
5/16" center pin/nut
Front Shock
Rear Shock
INSTALLATION INSTRUCTIONS
Important—measure
before starting!
Measure from the center of the
wheel up to the bottom edge of the
wheel opening
1.
Park the vehicle on an appropriate work surface. Ensure that the vehicle is in
park for automatic transmission or in first gear for manual transmissions and the
parking brake is applied. Block the wheels for added safety.
»»F
ront Installation
2.
Remove the bolt mounting the front track bar to the passenger’s side of the axle
(Figure 1). Save track bar bolt and nut tab. Allow the track bar to hang free.
LF__________ RF__________
LR__________ RR__________
Step 2 Note
The track bar bolt may require a
T‑50 Torx socket on early models.
Figure 1
J3310, J3311 Installation - pg. 2
3.
Raise the front of vehicle with a hydraulic jack and place jack stands under the
frame rails, just behind the lower control arm pockets.
4.
Remove the wheels.
6.
Support the front axle with a hydraulic jack. Remove the shocks. Save the
lower shock hardware.
7.
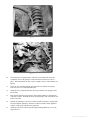
Remove the upper mounting nut from the sway bar links (Figure 2). Swing the
sway bar up off of the links. Save all hardware/bushings.
8.
Remove the cotter pin and castellated nut from the drag link end at the pitman
arm (Figure 3). Thread the nut back on a couple of turns. Strike the pitman arm
near the drag link end to release the tapered seat. Take care not to damage the
end. Remove the nut and the drag link from the pitman arm. Save hardware.
9.
Remove the driver’s and passenger's side coil spring retainer clip located on the
back side of the axle coil seat. Save clips and bolts.