1
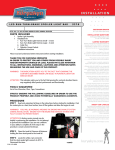
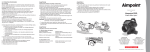
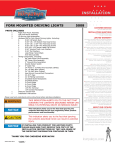
I N S TA L L AT I O N
l e d fa i r i n g l i g h t s f o r g l 18 0 0 4 6 2 7
Fit s : ‘ 01 -u p GL18 0 0
Parts Included
4
1
1
1
7-Color Lizard Lights
7-Color Controller/Switch
Hardware Kit including:
4 Replacement Adhesive Pads
4 18” Extensions
1 Double Male Lizard Light Connector
2 Double Female Lizard Light Connector
2 Double Sided Replacement Tape for Intake Grills
6 4” Cable Ties
1 Dielectric Grease Packet
4 Alcohol Cleaning-Pads
Installation Instructions
Please read and understand entire instructions before starting installation.
Thank you for choosing Küryakyn!
In order to protect you and others from possible injury and/
or property damage or loss, please pay close attention to all
instructions, warnings, cautions and attention notes regarding
the use and care of this product.
WARNING! THIS INDICATION ALERTS YOU TO THE FACT THAT IGNORING THE
CONTENTS DESCRIBED HEREIN CAN RESULT IN POTENTIAL DEATH OR
SERIOUS INJURY.
CAUTION! This indication alerts you to the fact that ignoring the contents described herein
can result in potential injury or material damage.
ATTENTION!This indication alerts you to the fact that ignoring the contents described herein
may negatively affect product performance and functionality.
Tools Suggested
Set of hex wrenches, electrical tape, utility knife, mineral spirits, and duct tape.
Strictly observe the following guidelines in order to use the
product properly and avoid potentially dangerous accidents.
ATTENTION!Seven Color Lizard Lights are designed for display or parade use. Check local
regulations regarding the use and placement of colored lights when vehicle is
operated on public streets.
-cont.-
4627-11GL-0208
CUSTOMER SERVICE
877.370.3604 (toll free)
INSTALLATION QUESTIONS
[email protected]
or call 715.247.2983
LIMITED WARRANTY
Küryakyn warrants that any Küryakyn products sold
hereunder, shall be free of defects in materials and
workmanship for a period of one (1) year from the
date of purchase by the consumer excepting the following provisions:
• Küryakyn shall have no obligation in the event
the customer is unable to provide a receipt showing
the date the customer purchased the product(s).
• The product must be properly installed,
maintained and operated under normal conditions.
• Küryakyn makes no warranty, expressed or
implied, with respect to any gold plated products.
• Küryakyn shall not be liable for any consequential
and incidental damages, including labor and
paint, resulting from failure of a Küryakyn product,
failure to deliver, delay in delivery, delivery in nonconforming condition, or for any breech of contract or
duty between Küryakyn and a customer.
• Küryakyn products are often intended for use
in specific applications. Küryakyn makes no
warranty if a Küryakyn product is used in
applications other than intended.
• Küryakyn electrical products are warranted for one
(1) year from the date of purchase by the consumer.
Components of Küryakyn products containing L.E.D.s
will be warranted for defects in materials and
workmanship for 3 years from the date of purchase.
• Küryakyn makes no warranty of any kind in regard
to other manufacturer’s products distributed by
Küryakyn. Küryakyn will pass on all warranties made
by the manufacturer and where possible, will expedite
the claim on behalf of the customer,
but ultimately, responsibility for disposition of the
warranty claim lies with the manufacturer.
ABOUT OUR CATALOG
You’ll find all our innovations for H-D, GL and
Metric Cruisers in our annual catalogs. Order online
today–select the ”CATALOGS” icon. Each Küryakyn®
product comes with a Proof-of-Purchase good for a
complimentary catalog. Details in packaging.
Be sure to ask your local dealer about other
Küryakyn products, the motorcycle parts and accessories designed for riders by riders.
©2005 Küryakyn USA® All Rights reserved.
Procedure
STEP 1 Read and understand all steps in the instructions before starting the installation. Park the
motorcycle on a hard, level surface and turn off the ignition.
PIC.1
ATTENTION!A factory service manual may be helpful in performing this installation. Do not
attempt to perform this installation if you are not confident in your ability to
complete all of the steps in the procedure; consult a trained technician.
STEP 2 Remove the side cover on the clutch side as shown in PIC.1, by gently pulling on it
to release the bosses securing the cover.
PIC.2
STEP 3 Carefully remove the clutch side
Remove the
mold ing by
pull ing up
and back at
the bottom
first and
working
yo ur way up
fairing-molding piece shown in PIC.2 starting
at the bottom of the molding; pulling out to
disengage the tabs, working your way up the
piece.
STEP 4 Open the clutch side fairing
pocket lid, and remove the four trim clips
by pushing in on the center pins, and then
pulling the clips out. Set the trim clips aside,
they will be used to reinstall the fairing
pocket. (PIC.3)
STEP 5 Remove the fairing pocket by
pulling it straight up and out.
PIC.3
as
rubber
gro mmet
PIC.4
STEP 6 Remove the rubber grommet
from the bottom of the fairing pocket and
set aside for now. (See PIC.3.)
PIC.5
STEP 7 Remove the three bolts from
the front fairing as shown in PIC.4; set
them aside to reinstall later.
STEP 8 Remove/disconnect the inline
fuse on the power wire (red) and insert
through the hole in the bottom of the
fairing pocket, so that the controller switch
will be located in the fairing pocket.
STEP 9 Carefully insert the remaining
wires one at a time, from the control
switch through the hole in the bottom of
the fairing pocket.
STEP 10 Run the power wires (red power and black ground)
PIC.6
through the location for the clutch side fairing pocket and down
along the edge of the fairing as shown in PIC.5.
Note It may be helpful to tape the two power wires
together every 4-6” using electrical tape.
STEP 11 Gently pull the fairing out and tuck the power wires
behind the fairing as shown in PIC.6.
-cont.-
Page
2
l e d fa i r i n g l i g h t s
INSTALLATION
ATTENTION!Secure all wiring away from any moving parts, pinch points or extreme heat. Küryakyn
WILL NOT warranty any electrical component that fails due to pinched, crimped,
broken, abraded, melted or frayed wires.
STEP 12 Tuck the power wires up underneath
PIC.7
PIC.8
the fairing as far as possible as shown in PIC.7.
STEP 13 Run the two power wires along the
motorcycle frame as shown in PIC.8, towards the
battery.
STEP 14 Make sure that the there is enough
wire to connect the power wires to the battery
so that they will not be stretched or pinched. Do
not connect the power wires to the battery at this
time.
PIC.9
SUGGESTION Referring to PIC.9 lay out the extension wires,
double
mal e
connectors, and lizard lights on a work surface to mock up the
layout.
s w i t ch
18” ext e n s i on
STEP 15 For motorcycles that have intake vent inserts, carefully
remove them setting them aside to be reinstalled later using the
included double-sided tape from the hardware kit.
18” ext ensio n
STEP 16Pull the rubber boot back from the fairing at the base
of the mirrors.
18” ext ens i on
18” ext ensio n
double
femal e
STEP 17 Referring to PIC.10, remove the bolts, washers and
mounts that secure the windscreen garnish and set them aside to
be reinstalled later.
l ayo ut o f l iz ard l ight s and wiring
STEP 18 Carefully pull up on the windshield garnish at the
points where the bosses are located as shown in PIC.10 to remove from the motorcycle.
-cont.-
PIC.10
garnish
mo unt s
washers
bo lt s
bo sses
bosses
Page
3
l e d fa i r i n g l i g h t s
INSTALLATION
STEP 19 Remove the fairing garnish by removing the three screws shown in PIC.11, set the garnish
and screws aside for now.
STEP 20 Remove the two trim clips and the screw that secure the leading edge of each
of the inner fairings as shown in PIC.12, these clips and screws will be used again.
PIC.11
STEP 21 Lightly pull out on the clutch side inner fairing.
STEP 22Using an 18” extension wire, feed the extension through the inner fairing up to
the fairing pocket and control switch (make sure that the extension will connect properly
to the control switch, red to red and black to black.)
fai ri n g
ga r n i s h
STEP 23Insert the other end of the extension wire between the two pieces of plastic
and into the fairing pocket as shown in PIC.13.
STEP 24Clean the area inside the pocket shown in PIC.14 with an included alcohol-
PIC.12
cleaning pad and allow to thoroughly dry.
remove tr im
cl ips and
screws
ATTENTION!Ensure the area of installation is free of grease, oil, dirt or other debris to
ensure proper adhesion. Küryakyn WILL NOT warranty any parts lost due
to improper installation.
ATTENTION!Küryakyn recommends the use of dielectric grease on electrical
connections.
STEP 25Connect the wire to the lizard light, ensuring that the wires line up (red to red
and black to black.)
STEP 26Using the back of your fingernail, rub the backing of the adhesive pad to
activate the catalyst, and then remove the backing.
PIC.13
ATTENTION!The adhesive will not bond correctly if applied at temperatures less than
50°F. Do not attempt this installation in temperatures less than 50°F
STEP 27Place the Lizard light in the intake making sure that it is far enough back so
that there will be sufficient clearance for the vent insert. Press into place and hold for
one (1) minute. Full bonding strength will occur in 24 hours.
clutch
side
inner
fairing
STEP 28Take an 18” extension wire; make sure that the wire will properly connect
to the lead from the switch (red to red, black to black) and feed through the small hole
above the chrome headlight accent piece as shown in PIC.15. Reach through the fairing
pocket hole with your other hand towards the headlight to reach the extension wire and
pull the wire towards the fairing pocket.
STEP 29Feed enough wire through in order to connect to the lead from the switch, (red
to red, black to black.)
STEP 30Verify that both extensions are
securely and properly connected to the leads
from the control switch.
STEP 31 Cut a slit/notch in the rubber
to
fa ir in g
i n ta k e
p ock e t
Pic t ure depic t s i n s i d e
t he inner fair i n g
PIC.14
clean the
h ighl ighted
area to
install the
l iz ard l ight
PIC.15
Pl ace t he wire
along the to p of
the headl ight
grommet that was removed in STEP 6.
Page
-cont.Feed the extens i on
t hro ugh t he ho l e abov e
the headl ight tr im
4
l e d fa i r i n g l i g h t s
INSTALLATION
STEP 32Reinstall the grommet in the bottom of the fairing pocket, placing the wires in the slit/
notch in the grommet. (See PIC.16.)
STEP 33Re-install the fairing pocket, making sure that the wires are tucked underneath
PIC.16
the fairing pocket and are not being pinched. Secure with the four trim clips that were
removed in STEP 4.
STEP 34Route the extension from STEP 28 along the top of the headlight as shown in
PIC.15.
NOTE You may choose to secure the extensions with cable ties or duct tape.
STEP 35Clean the inside of the windscreen garnish above the intake with an included
alcohol cleaning pad as shown in PIC.17 and allow the area to thoroughly dry.
STEP 36Connect two Lizard lights together using a double male connector (red to
PIC.17
red, black to black.)
STEP 37Using the back of your fingernail, rub the backing of the adhesive pad to
activate the catalyst, and then remove the backing.
STEP 38Ensuring that the lights are placed so that the wire from the controller
switch will properly connect to the light (red-to-red, black to black); press the lizard
lights into place and hold for one (1) minute. Full bonding strength will occur in 24
hours.
STEP 39Connect two 18” extensions together using a double female connector (red
to red, black to black.)
PIC.18
STEP 40Verify that the extension will properly connect to the light on the
ro u t e t h e
ext e n s i on d ow n
between the
he a d li g ht s
windscreen garnish (red-to-red, black to black,) and route the extensions between
the headlights towards the inner fairing. Make sure that there is enough slack in
the wires to connect them to the lights on the windscreen garnish. (See PIC.18.)
STEP 41 Insert the extensions in the inner fairing and route towards the brake
side intake as shown in PIC.18.
STEP 42Insert the other end of the wire between the two pieces of plastic and
into the fairing pocket as shown in PIC.13.
F e e d t he
ext e n s i on i n t o
t he inn e r fa i r i n g
ATTENTION!Secure all wiring away from any moving parts, pinch points
or extreme heat. Küryakyn WILL NOT warranty any electrical
component that fails due to pinched, crimped, broken, abraded,
melted or frayed wires.
STEP 43Clean the area inside the pocket shown in PIC.14 with an included alcohol-cleaning pad
and allow to thoroughly dry.
STEP 44Connect the wire to the lizard light, ensuring that the wires line up (red to red and black to
black.)
STEP 45Using the back of your fingernail, rub the backing of the adhesive pad to activate the
catalyst, and then remove the backing.
STEP 46Place the light in the intake making sure that it is far enough back so that there will be
sufficient clearance for the vent insert. Press into place and hold for one (1) minute. Full bonding
strength will occur in 24 hours.
-cont.-
Page
5
l e d fa i r i n g l i g h t s
INSTALLATION
STEP 47Hook the power leads to the battery, red to positive and black to negative and secure any
remaining wires out of the way using an included cable tie.
STEP 48Reinstall the fairing garnish and screws that were removed in STEP 19.
PIC.19
STEP 49Connect the extensions to the Lizard lights that are mounted on the inside
of the windscreen garnish and place the windscreen in place.
STEP 50Test to make sure the lights are operating properly, (all lights on and the
same color at the same time) if not wires/lights may not be properly installed.
STEP 51 Gently push the windscreen garnish into place to seat the bosses.
STEP 52Reinstall the bolts, washers and mounts that were removed in STEP 17
(PIC.10) to secure the windshield garnish.
STEP 53Place the rubber mirror boots in place.
STEP 54Reinstall the inner fairings using the trim clips and screws that were
PIC.20
removed in STEP 20 making sure the wires will not be pinched.
Remov e t he o l d
adhes ive and a pply
the re pl acement
adhesiv e
STEP 55Secure the clutch side front fairing using the bolts that were removed in
STEP 6.
STEP 56Carefully install the fairing trim starting at the top, inserting the front tab
and working your way down the molding, being careful not to break the tabs.
STEP 57Reinstall the side cover.
STEP 58Choose a mounting location inside the fairing pocket to mount the control
switch. Clean the area with an alcohol cleaning pad and allow the area to thoroughly
dry. (see PIC.19)
PIC.21
STEP 59Using the back of your fingernail, rub the backing of the adhesive pad
to activate the catalyst, and then remove the backing.
STEP 60Press the switch into place and hold for one (1) minute. Full bonding
strength will occur in 24 hours.
Steps to Re-install the Intake Vent Inserts
STEP 61Remove as much of the adhesive by hand from the insert as possible.
STEP 62The use of mineral spirits will help remove any of the remaining
adhesive from the insert. Allow the area to thoroughly dry.
CAUTION! Some cleaning products and or solvents contain harsh chemicals
that can severely damage the intake insert and void warranty.
Clean the
h ighl ighted
area to
reinstall
the intake
insert.
STEP 63Using the back of your fingernail, rub the backing of the adhesive replacement pad to
activate the catalyst, and then remove the backing.
STEP 64Apply the replacement adhesive pad to the intake insert where the other adhesive pad
was. (PIC.20)
STEP 65Clean the area inside the fairing intake shown in PIC.21, with an alcohol-cleaning pad
and allow to thoroughly dry.
-cont.-
Page
6
l e d fa i r i n g l i g h t s
INSTALLATION
STEP 66Using the back of your fingernail, rub the backing of the adhesive pad to activate the
catalyst, and then remove the backing.
STEP 67Insert the vent insert into the fairing intake, press and hold in place for one (1) minute. Full
bonding strength will occur in 24 hours.
STEP 68Repeat STEP 61 through STEP 67 for the insert on the other side.
OPERATION
The controller has a rheostat, a toggle switch, and a push button.
• Use the toggle switch to select “STEADY ON” or “FLASH” modes or to turn the lights “OFF”.
• The push button allows the user to select the color they wish to illuminate. There are eight
possibilities. The first seven options select an individual color. The eighth option is called “PAINT
MODE” which continuously cycles the lights through all seven colors and is indicated by the
white-colored light to initiate the Paint Mode.
• The rheostat varies the flash rate when illuminating a specific color in “FLASH” mode or varies
the rate at which the lights cycle through all seven colors if “PAINT MODE” is selected.
Ride On!
Page
7
l e d fa i r i n g l i g h t s
INSTALLATION