1
EN
BINKS MODEL HAR-511 AIR REGULATOR
DESCRIPTION
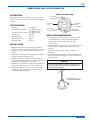
HAR-511 BOTTOM VIEW
3/8" NPT(f)
Regulated Port
This regulator has been designed to receive air at main
line pressure and to deliver it at a desired lower regulated
pressure.
3/8" NPT(f)
Inlet
SPECIFICATIONS
Air inlet
Air outlets (2 regulated)
Air outlets (2 unregulated)
Air Capacity
Maximum Temp.
Max. Inlet Pressure
Regulator range
3/8" NPT(f)
1/4" NPT(f) (1 Ea.)
3/8" NPT(f) (1 Ea.)
1/4" NPT(f) (2 Ea.)
60 CFM
150° F
150 psi
0-125 psi
1/4" NPT(f)
Outlet
Unregulated
1/4" NPT(f)
Unregulated Port
1/4" NPT(f)
Regulated Port
REGULATOR MAINTENANCE
INSTALLATION
1.Maximum inlet pressure and operating temperature
ratings are 150 psig and 150° F (intermittent to 180° F).
2.Install as close as possible to where regulated air is
needed.
3.Install the unit with the air flowing through the body in
the direction indicated by the arrow.
4.Install the same pipe size unit as the pipe line in use.
Avoid using fittings, couplings, etc., that restrict the air
flow, unless maximum flow is not needed.
5.Regulator may be installed so that adjusting handle is in
any position. Attach gauge to one 1/4" female port.
6.Turning the adjusting screw clockwise increases the
regulated pressure and turning it counterclockwise
reduces the regulated pressure.
1.Occasionally remove bottom plug (7) and clean valve
seat (10) and body (5). Clean parts with denatured
alcohol, wipe off seat and blow out body with
compressed air.
2.To disassemble regulator, remove screws, bonnet, spring
and spring button. Diaphragm assembly can now be
removed.
3.Check all o-rings for signs of damage. Replace if
necessary.
4.Reassembly parts. Insert stem of valve through hole in
regulator body. Install spring and o-rings. Screw bottom
plug into body.
NOTE
Erratic operation or loss of regulation is usually due to dirt in
the valve area and cleaning is necessary. If cleaning does not
correct the problem, replace the items included in Repair Kit
KK-4977. (See diagram below.)
If unit leaks air at “A”,
install Repair Kit KK-4977.
A
77-2781-R8.3 (8/2015)
3/4