1
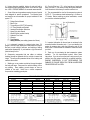
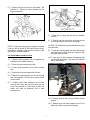
SHOCK ABSORBER INSTALLATION 4) Install front wheels and lower vehicle to ground. Tighten the lug nuts to 145 ft. lbs. 1) Fully extend new Rancho front shock absorber RS7044. Insert shock into coil spring from engine compartment. 5) Apply thread lock and tighten the upper link bolts to 120 ft. lbs. Install thread lock, and tighten the lower link bolts to 160 ft. lbs. 2) Attach shock to axle bracket with the original hardware. Tighten bolt to 100 ft. lbs. 6) Apply thread lock and attach track bar to frame bracket. If holes to not align, have assistant slowly turn wheel to left or right to align. Tighten the track bar bolt to 165 ft. lbs. 3) Install lower retainer and bushing on shock. Install shock bracket and the three original nuts. Refer back to illustrations 4 and 5. Tighten nuts to 55 ft. lbs. 4) Install upper bushing and retainer. absorber nut and tighten to 40 ft. lbs. FINAL CHECKS & ADJUSTMENTS Install shock 7) Turn the front wheels completely left then right. Verify adequate tire, wheel, and brake hose clearance. Inspect steering and suspension for tightness and proper operation. 5) Align reference marks and reattach the front drive shaft with the original hardware. Apply thread lock and tighten bolts to 21 ft. lbs. 8) Readjust headlamps. certified alignment facility. 6) Reattach the end links to the sway bar with the original retainers, bushings, and nut. Tighten to 20 ft. lbs. Have vehicle aligned at a Recommended Alignment Specifications 7) Reattach brake hose to the axle bracket with the original bolt. Caster (degrees) Camber (not adjustable) Sum Toe In (degrees) SWAY BAR DROP BRACKET INSTALLATION 1) Remove sway bar to frame mounting bolts. 2) Install Rancho sway bar drop brackets RS176692 using OE hardware with logo facing out. Preferred 4.0° -0.25 1 Range +.75° 0.05 Please retain this publication for future reference. Important Note P. 3) Attach sway bar to Rancho sway bar drop brackets RS176692 using supplied hardware from kit RS860699. See illustration 8. Illustration 8 6 See